Many construction crews take on the installation of the fence from corrugated board. The process is not troublesome and quick, but substantial earnings.
Eliminate this expense item from the general budget for the improvement of a summer house or a private house by deciding to make a fence from the corrugated board with your own hands.
The purpose of the fence on the site is to fence the territory. However, he has another function - representative.
Previously, the main material for the installation of fences was wood - a material that is accessible, but requiring maintenance and protection from damage, now other building materials compete with it: brick, concrete, polycarbonate, mesh, forging, and corrugated board.
According to the ratio of parameters “price-installation-durability- appearance»Leadership belongs to corrugated board, which led to its wide distribution among users.
The advantages of corrugated fences
- ease of material and installation;
- strength (rigidity);
- resistance to corrosion;
- uniform and very slow burnout (like paint on a car);
- aesthetic appeal;
- undemanding to leaving;
- long term of operation;
- relatively low price.
This list of advantages has little building materials. But, all these properties are fully disclosed only when proper installation. So, you need to know how to make a fence from corrugated board correctly. Within the article, we will talk about the nuances of the choice of material, the specifics of its calculation, the types of frame for the fence, describe how to attach corrugated board and much more.
Do-it-yourself fence from corrugated board -
step-by-step guide from A to Z
Mounting the fence from corrugated board, includes only screwing the sheet to the frame, this is a process consisting of several stages. Each of which will be described in detail in the form of step-by-step instructions.
Stage 1. Scheme of the fence from corrugated board - from sketch to drawing
An arbitrary schematic drawing (sketch) is needed in order to visualize design features the fence.
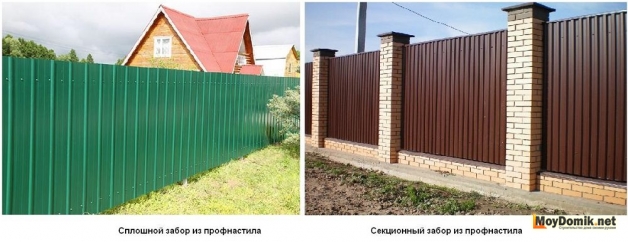
There are two types (types) of fence from corrugated board:
- solid;
- sectional.
 It is the type of fence that determines the consumption of material and how to install structural elements.
The drawing scheme is applied:
- the location of the fence on the site. Helps to take into account the features of the site: relief, plantings, buildings, access roads, gate installation site, etc .;
- if the site is uneven (elevation, lowland), apply a place where there will be elevations. Manufacturers producing high-quality material produce profiled sheets with a length of a multiple of 50 mm. this allows you to achieve visually the same height of the fence, despite differences in elevation on the ground.
- dimensions: height of the fence and the length of individual straight sections;
- the location of the columns (supports);
Note. At sectional fence the width of the section is determined by the width of the sheet. It should be a multiple of 1, 1,5 or 2 sheets.
A detailed diagram simplifies material calculation.
2 stage. Materials for the fence from corrugated board
Construction will take place quickly if the materials necessary for manufacturing are prepared in a timely manner.
What materials are needed for the fence from corrugated board:
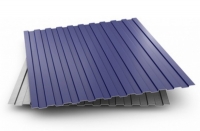
1. Decking
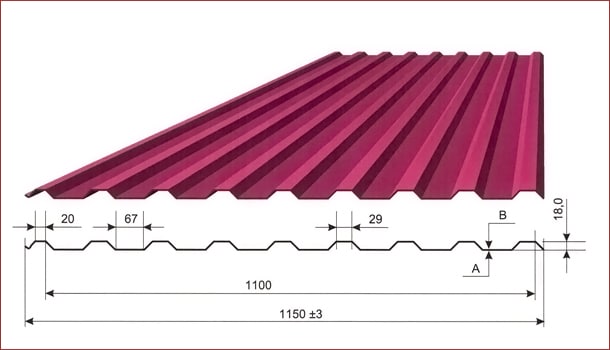
When choosing a professional sheet (goforolist), you need to pay attention to the thickness (0.45-0.5 mm +/- 0.06 mm), wave height, lack of capillary groove, parameters, coating, color and texture.
The profiled sheet has a high windage, this must be taken into account when planning the frame.
Note. The dimensions of the profiled sheet for the fence differ from different manufacturers, this must be considered when choosing a material. It is also worth knowing that the warranty period for galvanized corrugated board is 20-30 years, and with polyester coating - up to 50 years (depending on the thickness of the layer).
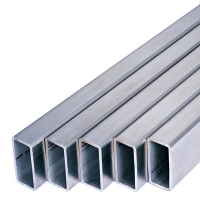
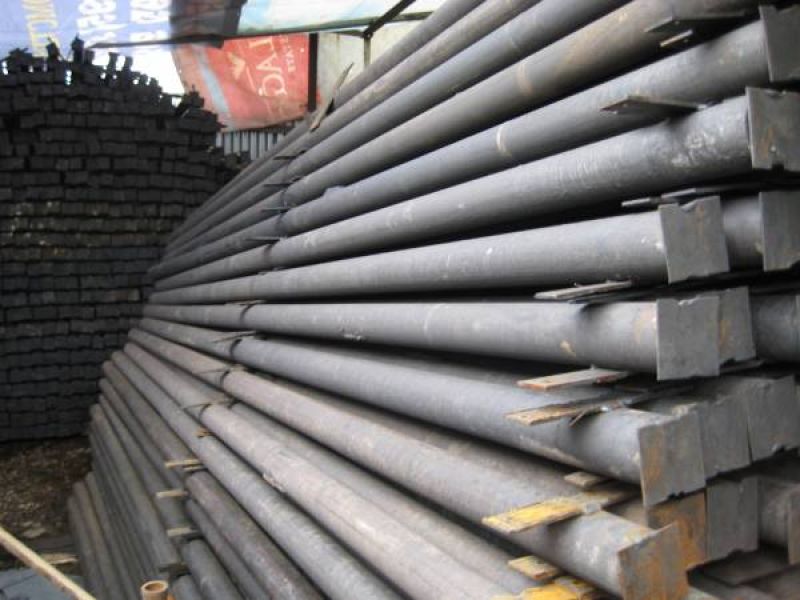
2. Supporting posts (poles)
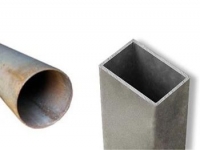 Theoretically, any material can be used: wood, stone, metal.
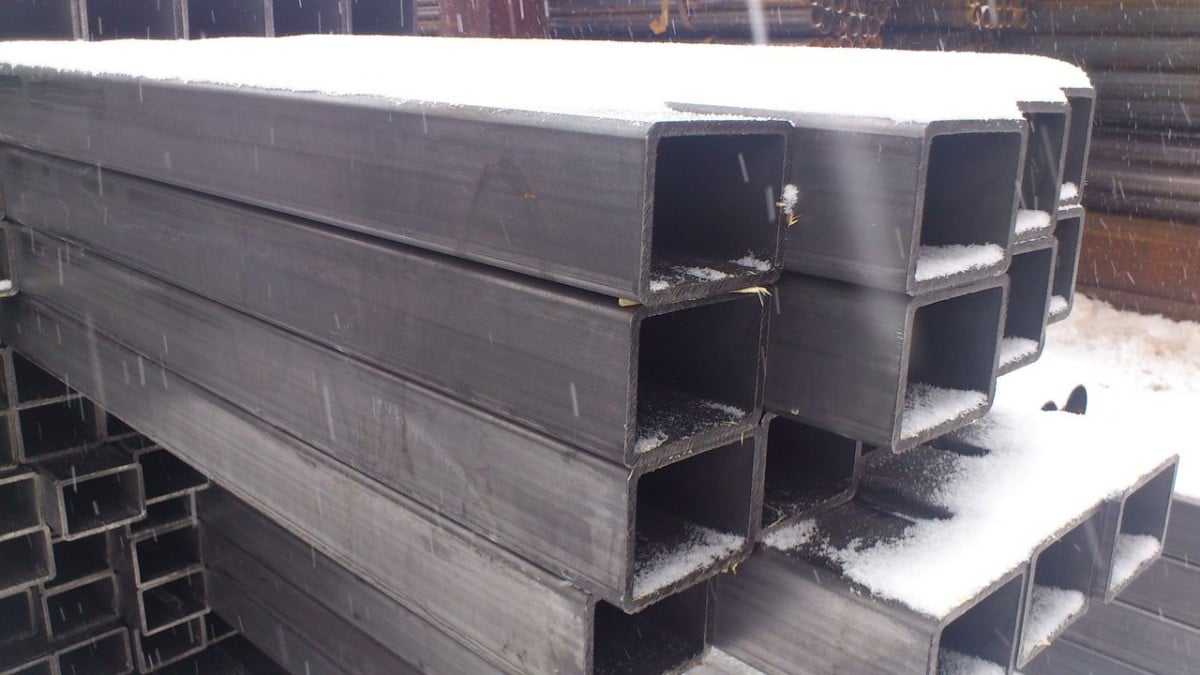
When deciding which pillars to use for the fence, keep in mind that the most simple and available option - metal pipes.
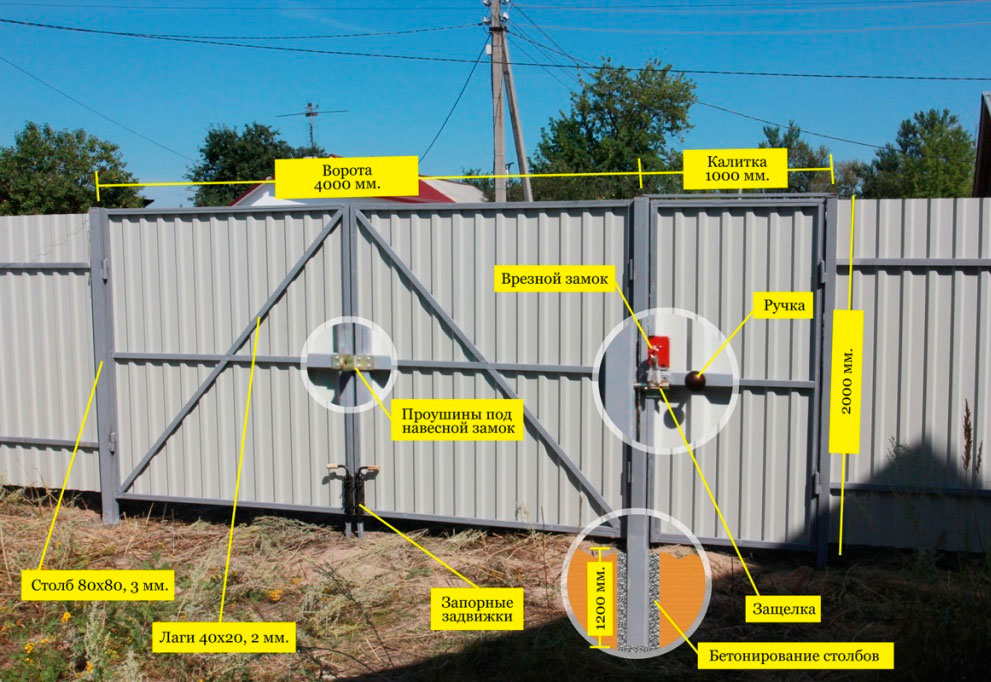
The parameters of the racks depend on the expected load. Typically used pipes are 60x40x2 mm or 40x40x2 mm. For round pipes, the diameter is 60-100 mm.
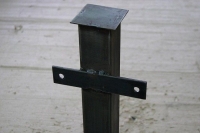 You can use purchased ready-made pipes for the fence (photo) (for any type of soil) or piles (normal soils and loams).
The advantage of ready-made support columns in the presence of a “heel” for installation on the pillow, holes for attaching corrugated board and the top plug, which eliminates the ingress of water into the pillar.
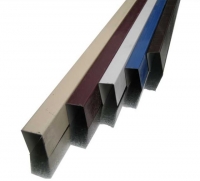
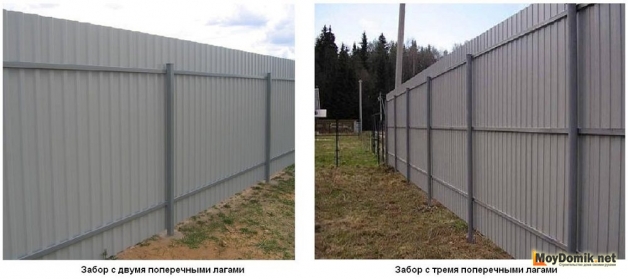
3. Cross logs
 For logs (crossbeams), it makes sense to use square pipes 40x40x2 mm. or 40x20x2 mm. General recommendation - the width of the log is equal to half the width of the support column.
Wooden logs are unacceptable to use, because the wood tends to rot in the place of fastening of the sheet. This will not only reduce the life of the fence, but will also prevent the use of the sheet a second time. Metal corner also not suitable for logs, with a thickness of 2 mm it will not provide adequate resistance to wind load, and manufacturers do not recommend using a thicker one.
Note. A special self-tapping screw for corrugated board with a drill is designed for drilling metal with a thickness of not more than 2.5 mm. So the use of a thick-walled profile is fraught with additional drilling efforts.
4. Plate holder (bracket) for corrugated board
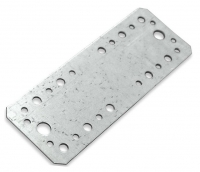 Special fasteners (brackets) are used when assembling the frame of the fence by the non-welding method, on hardware.
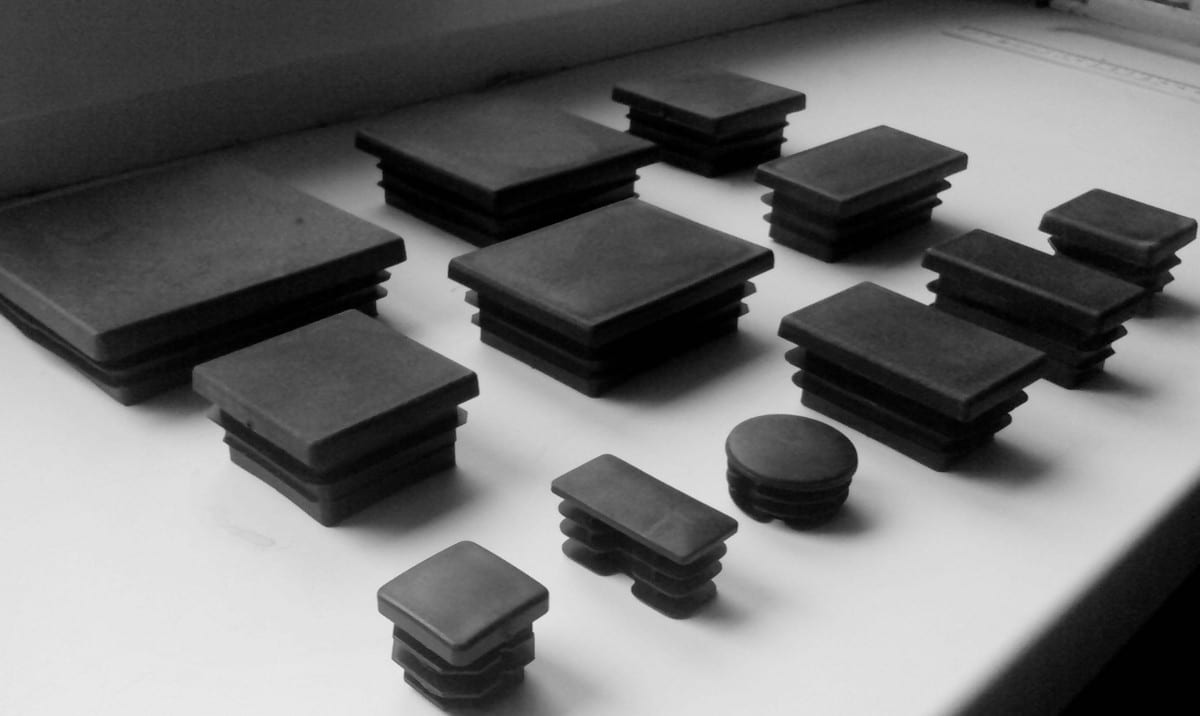
5. Plugs for poles (supports)
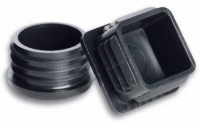 Plastic plugs have a protective function to prevent water from entering the pipe.
In practice, the pillar is closed with a special pad or a plastic bottle. Not very aesthetically pleasing, but certainly cheap and suitable as a temporary solution to a problem.
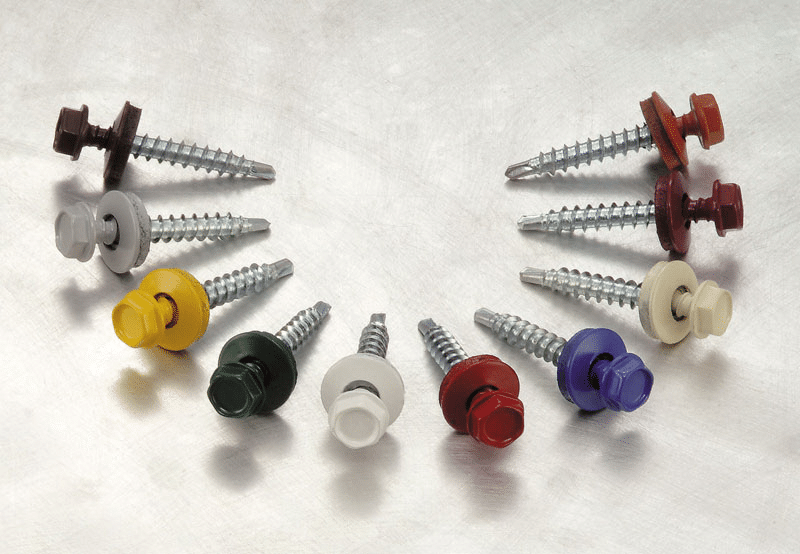
6. Hardware
 Needed for non-welded assembly of the frame of the fence. To do this, use a bolt or screw M6 (30 and 20 mm). As well as screws for attaching corrugated board or rivets.
 Professionals advise using a self-tapping screw, because It is equipped with an additional gasket (neoprene rubber), which allows you to firmly press the profiled sheet without damaging its surface. Its length is 15-35 mm.
Tip. When using rivets, the edges of the hole under them are recommended to be machined. special paint. This will prevent the rapid appearance of rust at the attachment point and the formation of rusty smudges on the corrugated board, which are very difficult to eliminate.
 The paint is used to tint scratches that may appear during the installation of the profiled sheet, as well as to paint over the cut on the sheet. The expense is small, one spray, as a rule, is enough.
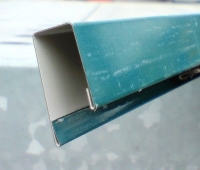
8. Decorative end plate for decorating the fence
 U-shaped strip (intake, cover), which is installed on the upper edge (edge) of the profiled sheet and protects users from possible cuts, and the sheet from the appearance of rust.
Material prepared for the website www.site
 Note. When buying, pay attention, the edges of the strap should be bent (rolled). Otherwise, they will not only scratch the metal during installation, but will lose their shape (the edges will move away from the sheet) during operation.
Additional materials and tools:
- cement, gravel, sand - for the installation of support pillars or arrangement of the foundation;
- level, plumb line, welding machine (and consumables), a screwdriver, mortar containers, formwork boards (if necessary), a shovel or drill, a primer and anti-corrosive solution for metal, a rivet (if necessary), a rope, goggles and gloves, a grinder (if necessary, cutting profiled sheets )
3 stage. Calculation of material on a fence from corrugated board
How to determine how much building material will be required for manufacturing.
1. The calculation of the number of sheets of corrugated board:
- with a solid fence - the total length of the fence is divided by the useful width of the sheet. Rounding goes to big side;
- with sectional. If the size of the section (span) is equal to the width of the sheet, the total width of the sheet is used. If there are plans to install one and a half to two sheets - useful.
Note. The sheet can be installed both vertically and horizontally. With horizontal mounting, the height of the fence will be 1, 2 or 3 working widths of the sheet. With vertical - determined by the customer.
Tip. When calculating, do not use such a concept as the total area of \u200b\u200bthe required corrugated board. Calculate in pieces at a given sheet height.
2. The calculation of the number of posts for the fence from corrugated board
The number of supports depends on the distance between the fence posts from the corrugated board
- with a solid fence, the total length of the fence is divided by the estimated distance between the posts (racks). Given the windage of the sheet, it is taken equal to 2,000 - 3,000 mm. Increasing the distance is impractical, since this will lead to an increase in the thickness of the racks or the number of longitudinal logs.
- with sectional. The quantity is determined by the estimated number of sections. When installing racks for mounting sections of the fence, it is necessary to calculate in advance the distance between the posts so that it matches the total (when installing one sheet in the section) or useful (1.5-2 sheets) area of \u200b\u200bthe corrugated board.
Note. The calculations take into account that the support posts (poles) must be installed at the corners of the fence, as well as at the installation site of the gate and / or gate. The number of intermediate supports is rounded down. And the difference is compensated by the deviation from the specified distance between the racks.
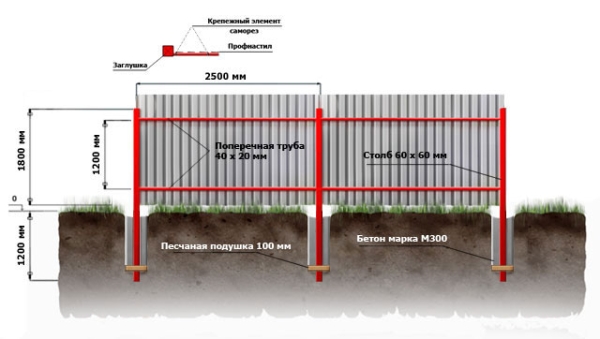
The size of the rack is determined by the height of the fence, taking into account the fact that the columns are deepened into the soil by 30% of their length. Thus, with a fence height of 2,000, the height of the support column for the fence from corrugated board should be 2 600-2 700. For intermediate racks, the installation depth of 25% of the total fence height is permissible. Then the length of the rack will be 2,500 mm.
3. The calculation of the number of transverse logs
The amount depends on how you install the fence.
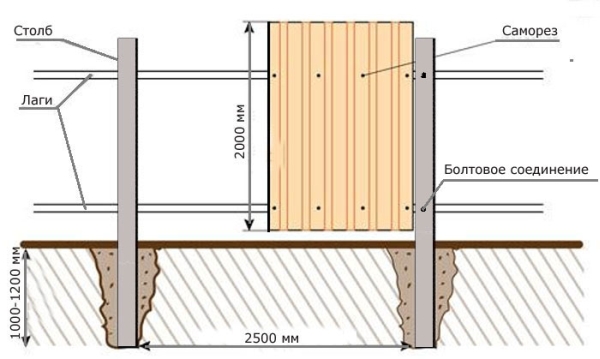
- Masters advise using 2 logs with a fence height of up to 2,000 mm. Moreover, their distance from the edges of the corrugated board is 300 mm.
- With a fence height of more than 2,000 mm - 3 logs.
 Thus, the total lagging is determined by multiplying the total length of the fence by the number of crossbars.
4. Plate holder
The number of plates is equal to the number of support legs multiplied by the number of rows of lags.
5. Pillar plug
The number of plugs is equal to the number of support posts. Plus 2-3 spare (useful during the operation of the fence).
6. Hardware
When calculating the self-tapping screws, it is taken into account that the fastening is performed in two extreme waves and through two in the middle of the profiled sheet into each of the transverse lags. Thus, with two transverse logs per sheet, 6 pcs are required, with three - 9 pcs. The number of hardware is rounded in multiples of the package (standard packaging - 250 pcs). Because, in the process of twisting the self-tapping screw, defects can occur.
When fastened with rivets, their consumption increases, since they are attached along the edges and through the wave.
Standard packing of paint 50, 100, 200, 500, 900 gr. The choice depends on the length of the fence. Usually 50 gr. jars are enough.
8. Decorative end plate
The quantity is equal to the length of the fence divided by the working length of the bar. The standard length of the bar is 2,000 mm, the working (taking into account the overlap) is 1850-1950 mm.
4th stage. Do-it-yourself fence installation from corrugated board
Installation technology step by step:
1. Site preparation
Cleaning the surface of the soil from everything that will interfere with the installation of sheets and posts.
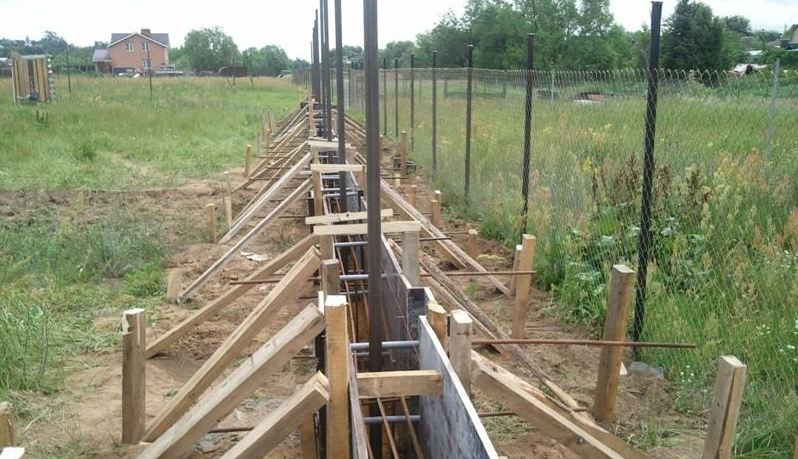
2. Foundation and / or installation of support columns
Note. The destruction of the corrugated sheet begins at the point of contact with the surface of the soil. Pebbles, dirt, mechanical damage lead to the appearance of defects just below the sheet. In addition, the uneven terrain of the site often creates difficulties when installing supports. That is why the foundation for the fence from corrugated board is an obligatory stage of the device of the fence.
What is the best foundation for a fence from corrugated board?
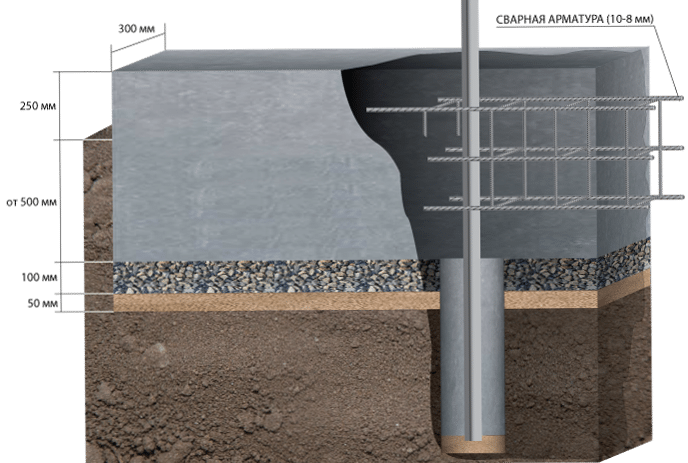
Soil analysis usually helps to decide on what foundation to put a fence from a profiled sheet in a particular area. But since the fence from corrugated board is a relatively light design, an ordinary one is suitable for it. Its optimal depth is 300-400 mm, and the minimum width of the foundation for the fence from corrugated board is determined by the width of the support column (columns).
We will not dwell on how to fill the foundation. But we note such a nuance, the depth of the pit at the place of installation of the basic support pillars (along the edges of the fence, corners, at the place of installation of the gate) should be 1/3 of their height + 100-150 mm for the device of the pillow under the sole of the rack. For intermediate posts - 1/4 of the height of the support + height of the pillow. This eliminates the effect of groundwater and freezing on the rack.
The preparation and installation of formwork is no different from the arrangement of a strip foundation for a house or a gazebo.
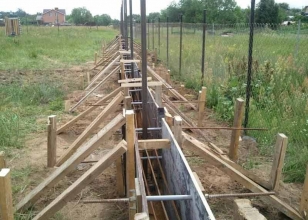
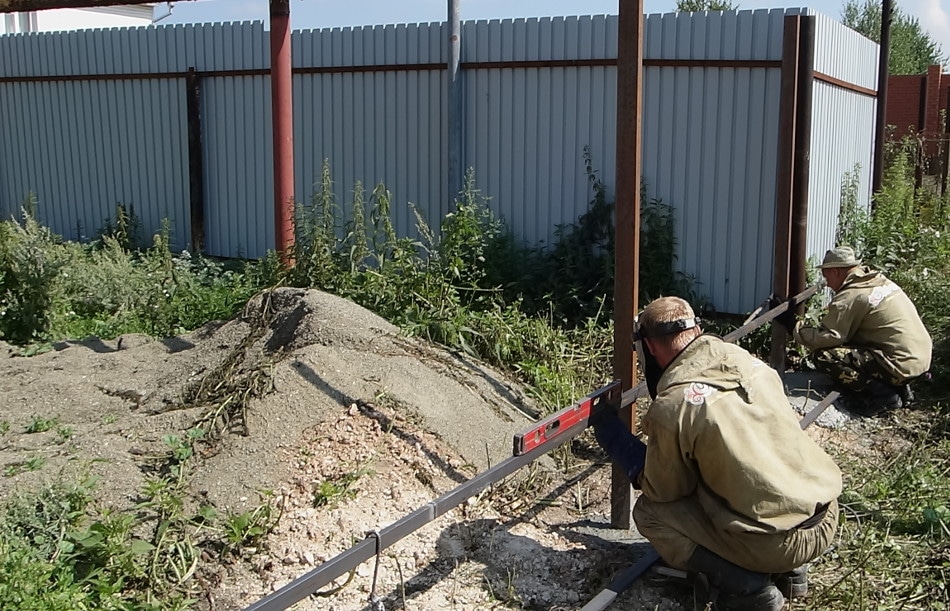
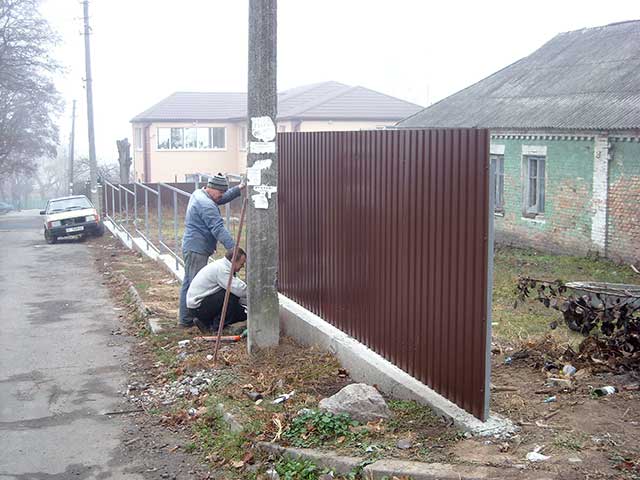
 First of all, basic support stands are installed (along the edges of even sections of the fence), a rope is pulled between them and intermediate posts are installed along it. In the place of installation of the support racks, the soil is removed with a drill, a gravel-sand cushion is poured on which the racks are installed. In this case, metal pipes should be treated with an anti-corrosion solution.
Users note that it is better to concrete racks on 100-150 mm. So they remain stable when reinforcing the formwork and filling it with concrete. If it is planned to ram the pillars, then the pillow needs to be made with a height of 200-250 mm and hammer the racks into it. This method is more time-consuming, but less costly and reliable.
Tip. The use of level and plumb when installing racks required.
More simple option installation of support racks without arrangement of the foundation will be. Installation requirements are similar. Depth is 1/3 or 1/4 of the length of the rack, depending on where it was installed, the thickness of the gravel and sand cushion is 100-150 mm, mandatory treatment with an anti-corrosion solution, level checking and reliable concreting.
Note. In practice, the posts for the fence from corrugated board are installed with deviations from the above technology. This is justified in stable soils.
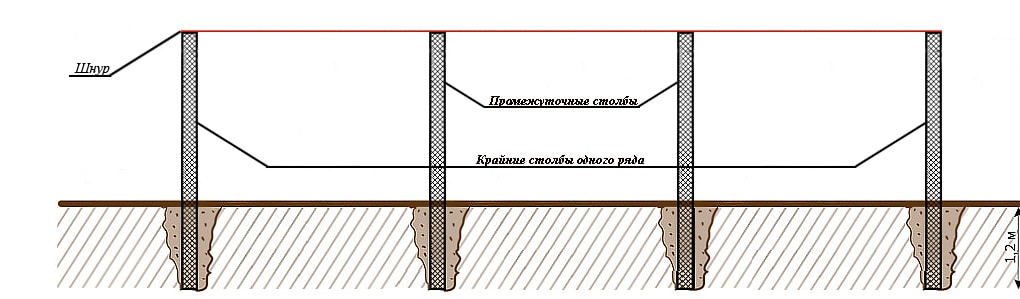
Alternative ways to install the racks are shown in the diagram.

3. Installation lag
The corrugated board is mounted on transverse logs. They are mounted on the support posts after they are reliably concreted. It is impossible to rush work in this case, because this may cause the stand to deviate from the vertical.
Cross logs can be welded or screwed to support racks. Masters recommend using a holder plate (bracket) for these purposes. Thus, the plate is screwed to the support stand, and the lag to the plate, this makes the project a little longer and more expensive, but the fastening is considered more reliable.
Three ways to fix the lag to the support posts (photo)
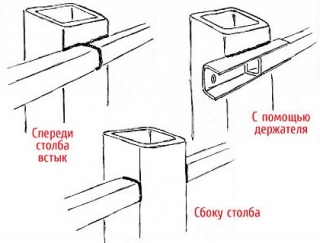 - butt front butt. The method is ideal when installing solid fences;
- behind the pillar with the use of a holder (kronshteyna). Suitable for sectional fences;
- side of the pillar. The advantage of the method is that you can attach corrugated board not only to the lag, but also to the support column, which makes the design more stable. But, the duration of the work and the consumption of screws increases. Suitable for sectional fences.
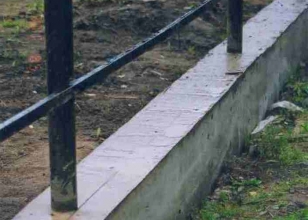
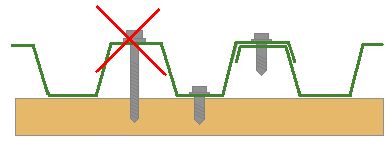
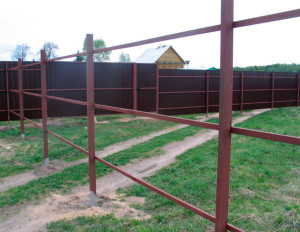
![]() Note. With a significant slope of the site, the transverse logs are mounted with an offset, as shown in the photo.
Note. With a significant slope of the site, the transverse logs are mounted with an offset, as shown in the photo.
Completely finished frame is covered with anti-corrosion primer and paint.
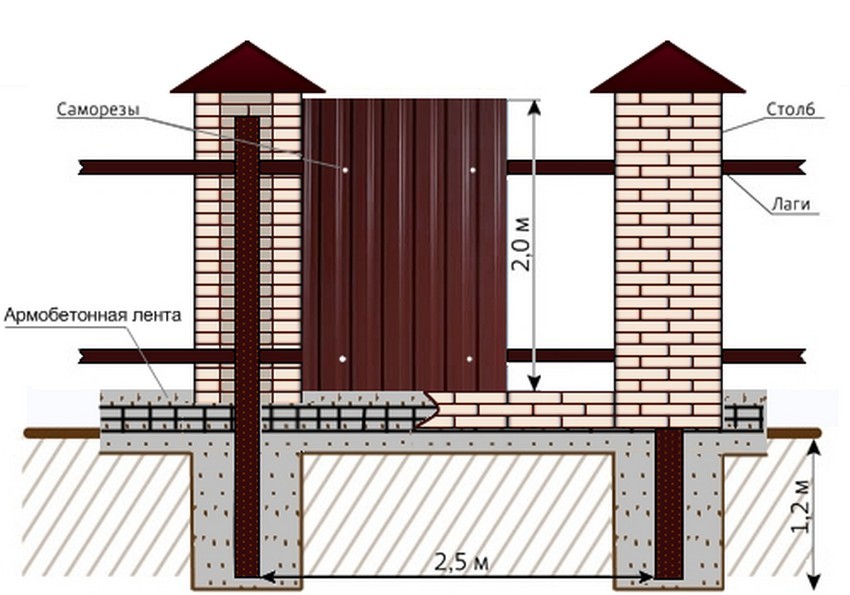
4. Decorative design of columns
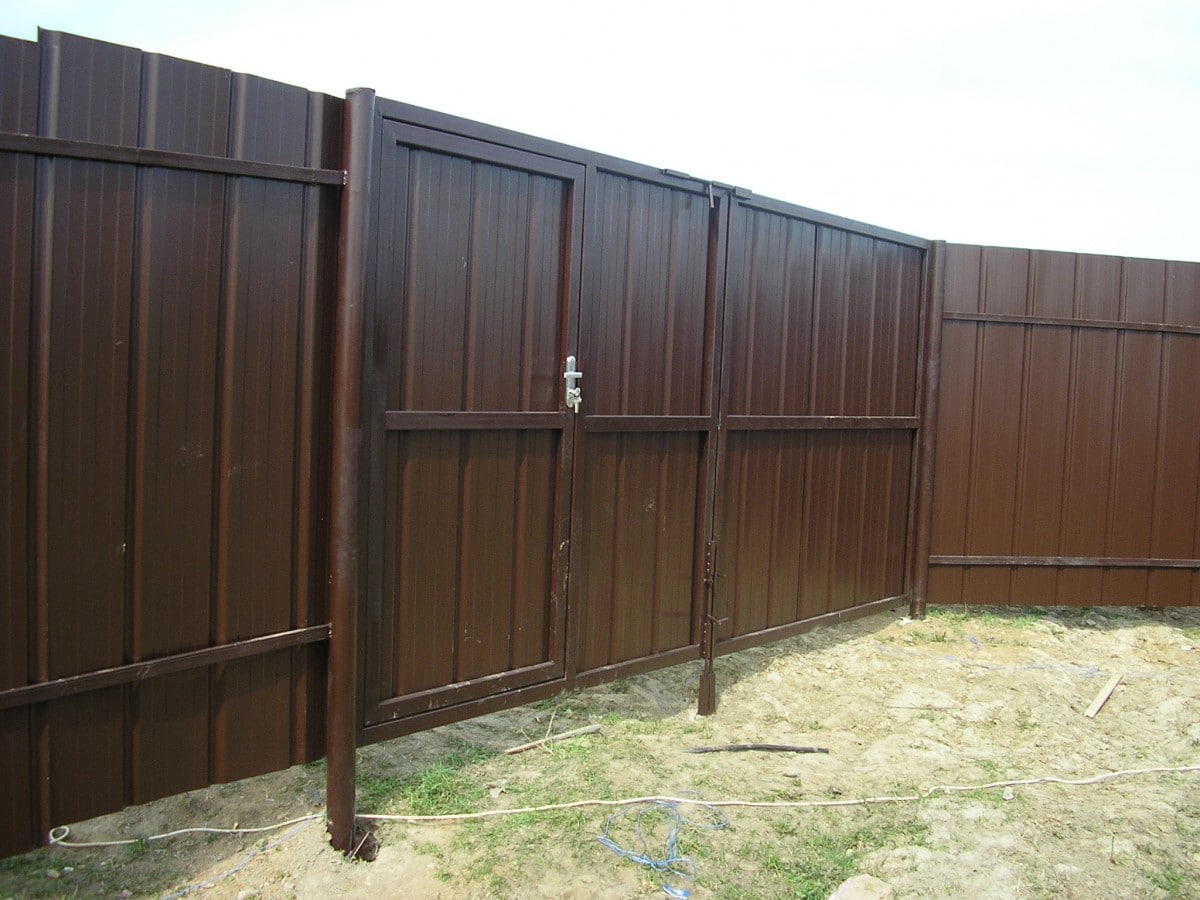
This stage is possible only if the sectional type of fence from corrugated board is selected. Here, the installed metal support posts can be bricked or lined with stone. According to many users, a fence from corrugated board with brick pillars, looks more beautiful and presentable than with metal racks or even solid.
Note. A similar decor of fence supports is thought out even at the planning stage. Because the presence of brickwork makes adjustments to the distance between the posts, and therefore the number of sheets mounted in the section.
Of course, you can make a decision about finishing the racks with bricks at any stage, but you should be prepared for the fact that the profiled sheet will have to be cut in length, and this will lead to waste not only of the sheet, but also of paint, and cutting tools, time and money.
Users agree that this work should be entrusted to the master masons, as it is the brickwork in this case that will determine the aesthetic properties of the fence. If you decide to do the work yourself, then you should know:
- appropriate to use decorative brick high Quality (chips and efflorescence are unacceptable);
- adhere to the same thickness of the masonry seam;
- connect every third row with a metal mesh (reinforce);
- completely fill the void between the masonry and the support pipe with concrete mortar;
- make a decorative element on the top of the pillar.
5. Installation of corrugated board on the fence
To avoid rust, you need to know how to fix corrugated board correctly.
To fasten the profiled sheet to each other and to the lag, rivets or special screws are used. Installation begins based on the configuration of the sheet. One of the extreme waves of the sheet is cover (left or right depends on the equipment of the manufacturer). The first sheet is mounted so that the cover wave of the next one closes the wave of the previous one, and not vice versa. In order not to encounter a situation when a scrap of sheet refuses near the gate, installation must begin with these elements.
Tip. To ensure ventilation, you need to make the distance of the sheet on the soil surface to 50-100 mm.
The profiled sheet must be fixed along the edges to each of the transverse lags. One mount is in the middle of the sheet. If a fence is being built in a windy region, it is advisable to fix the hardware through two waves.
How to fix a professional sheet?
To screw a self-tapping screw into a professional flooring, you also need to have certain skills. Namely, to know that the self-tapping screw:
- “Jumping off" of the self-tapping screw threatens to damage the front surface of the corrugated board.
6. Installation of additional elements
In fact, with the above steps, the installation of the fence from the corrugated board ends. However, manufacturers, craftsmen and experienced users recommend closing the top end of the profiled sheet with a special decorative U-shaped strip (end fence).
 The overlay will give the fence an aesthetic appearance and prevent damage to users on the sharp edges of the sheet.
The strap is simply worn on a sheet, so when ordering, pay attention to its width.
For corrugated board with a wave height of 8 mm, you need a bar 10 mm wide (including rolling) or 8 mm (without rolling).
We draw attention to the fact that the professional flooring of most manufacturers is painted in color on one side only. The unpainted gray side looks towards the house. If trees, shrubs or grapes are planted along the fence, this will hide an unpresentable view of the fence.
5 stage. Cleaning the area after the construction of the fence
Cleaning is the logical completion of the construction process. Cleaning is necessary in order to avoid injury from scraps of corrugated board, scattered with screws and to give the site a well-groomed appearance.
Do-it-yourself fence installation from corrugated board - video
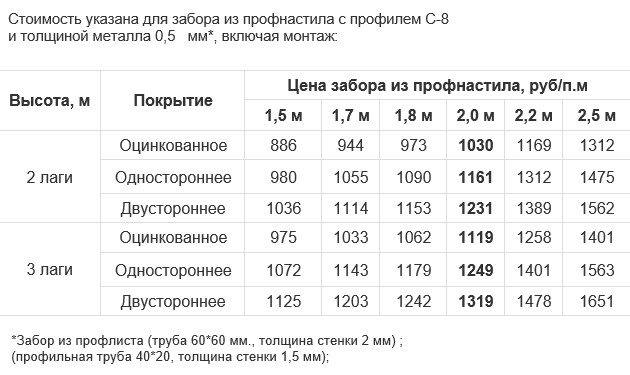
Installation of fences from corrugated board - price for work and material
| Material | The cost of the fence from corrugated board
dIY installation |
The cost of installing a fence from corrugated board
subject to the employment of employees |
|---|---|---|
| Decking | 140-680 rub / sq.m | |
| Pipe 60x60x2 | 110 rub / mp | |
| Pipe 40x40x2 | 70 rub / mp | |
| Pipe 40x20x2 | 60 rub / mp | |
| Plate holder | 80-150 rub / piece | |
| Post cap | US $ 0.75 / piece | |
| Hardware (self-tapping screw) | US $ 2.5-5.3 / piece | |
| 180 rub / pcs (cylinder) | ||
| End plate (2 000 mm) | 60-110 rub / piece | |
| Cement | 175 rub / 50 kg. | |
| Sand | 80 rubles / 50 kg. | |
| Gravel, fraction 20-40 mm. | 100 rubles / 40 kg. | |
| Nerzhamet-Grunt - alkyd primer for metal | 210 rub / kg. | |
| Foundation device | 0 | 5 000 rub. per sq.m. (the type of soil affects the cost) |
| Pit drilling or pile driving | 0 | From 200 rub / pcs. |
| Concreting support pillars | 0 | From 500 rub / pcs. |
| Lag mount | 0 | From 50 rub / mp |
| Fixing a sheet of corrugated board | 0 | From 200 rub / mp |
The total cost of building a fence from corrugated board is determined based on the need for a particular type of material.
The cost of installing the turnkey fence from the corrugated board (price per meter of work, materials with installation) is shown in the table.
Conclusion
The fence from corrugated board looks great, firmly tolerates any temperature changes and all types atmospheric phenomena. But there are two weaknesses - sailing and poor-quality installation. We hope that the information provided here will allow you to take into account and timely eliminate both of these shortcomings.
Any homeowner seeks to surround his home with a fence, which is not only a means of protecting property, it also helps protect the integrity of privacy those people who live behind him.
When choosing a material, each person proceeds from their own criteria, the most universal of which are durability, practicality, ease of installation and processing. It is these properties that corrugated board has, which, unlike a mesh-netting, the fence from which allows you to completely hide the house from someone else's view.
Consider how to take up the construction of the fence from the material so widespread and beloved by many.
Preparing to install the fence
In order for the installation of the fence to take place without interruptions and delays, it is necessary to carry out some preparatory measures.
The main of these activities are:
- Calculation of the required quantity and purchase of material. To this end, it is necessary to determine the perimeter of the enclosed area and take into account the height of the planned fence.
- Determining the installation location of the gate and gate for the entry of vehicles.
- Determining the step of installing the support posts. The step is determined based on specific conditions, but it should not exceed 3 meters.
- Preparation of the site for work. For this purpose, all objects and elements that are an obstacle should be removed from the zone of upcoming work, and the zone itself should be aligned.
The procedure for installing the fence from corrugated board
Markup
First of all, those places where the fence will be installed are determined and marked. For this purpose, a cord is stretched between the corners of the future fence, along which the installation of support posts is marked.
As support pillars, as a rule, metal pipes or square profiles are used. Of course, it is possible to use wooden poles or beams, but you must not forget about the short lifespan of them. In case of application metal elements much attention needs to be paid to. To this end, all elements must be painted before installation, and their upper sections are closed with any material that can prevent moisture from entering the internal cavities.
The supporting elements must have the following dimensions:
- diameter not less than 75 mm if pipes are used
- cross-section of the order of 60 × 60 mm, if square profiles are used.
Installation of support posts
The installation of the pillars begins with the preparation of the pits, which can be done with hand drill. The depth of the pits can be from 70 to 100 cm, which is determined by the height of the fence. As a rule, the depth is 30% of the height of the fence.
The very installation of support columns can be carried out using ramming or concreting. Moreover, the first method is cheap, and the second - reliability. In the case of concreting, a concrete solution is prepared from a mixture of cement, sand, gravel in a ratio of 1: 3: 4, diluted with water.
Pillars must be installed in the following sequence:
- Install the outer posts and pull the cord along their upper cut.
- The height of the intermediate posts should be aligned with the tensioned cord.
- Using a building level or plumb line, check that each post is correctly fixed.
- Install the next pillar only after the concrete has hardened under the previous one. This period can be from 2 to 3 days.
Lag mounting
Having installed the pillars, it is necessary to proceed with the installation of the inter-pillar logs on which the corrugated board will be mounted. This operation is usually performed by welding. However, it can also be carried out using bolts.
As a lag can be used:
- corner size 40 × 40 mm
- profile rectangular section 25 × 40 mm.
For every meter of fence height, there must be at least one log. Finished installation frame construction, it is necessary to cover it with a layer of paint in order to prevent possible corrosion.
Installation of corrugated board
Installation of corrugated board on the prepared frame is the final stage of all work.
The sheets are fastened using self-tapping screws for metal, twisted or with an electric drill with a bat in the buried part of the wave at a distance of 100-150 mm from one another. Using tensioned cords, you can control the installation height of the sheets of corrugated board and the level of screwing of self-tapping screws.
During the work it is necessary to observe safety measures, since all metal edges are sharp. These edges must be tinted using special polymer paints, and all work should be done in protective gloves.
To cut corrugated board, you should use a grinder, after wearing safety glasses. The edges resulting from sawing must be filed.
Fencing the land on which the house or cottage is located is a completely normal task for any owner. The construction industry knows many ways to fence a site: wooden fence, fence made of concrete panels, of iron bars, brick, rubble, mesh netting or hedge. All of them are good in their own way. But what to make cheap fence? All have their pros and cons. This article will consider the method of fencing from a profiled sheet.
What is a professional sheet?
A profiled sheet (corrugated board, profiled sheet) is a galvanized sheet of steel having a wave-like relief. Such a relief is created by profiling in order to give rigidity to the sheet, which is why it got its name - profiled sheet or briefly profiled sheet. Galvanization of the sheet is designed to give it anti-corrosion properties. In addition to the zinc layer, a layer of synthetic plastics and resins with color differences is applied over the sheet. This has an additional protective factor against corrosion. The assortment has a wide variety of profiled sheet colors.
The advantages of a fence from a profiled sheet
A fence built from corrugated board has the following positive factors that make it a popular building material:
Strength: due to the curved shape of the sheet.
Due to the continuous structure, the fence is not visible.
Such a fence is quick to mount.
Lower in price.
The profiled sheet fence has soundproofing properties.
Greater stability in strong winds, as its basis is metal pillars concreted into the ground.
Durable thanks to corrosion protection. Serves an average of 30-50 years. Does not need regular tinting, as is the case with wood.
Aesthetic thanks to its color range.
The minus of the profiled sheet is that the coating of the profiled sheet is afraid of scratches and damage. In the place of the scratch, it begins to rust very quickly.
What do you need for work?
To build from a profiled sheet, you need the following material:
poles, the role of which metal pipes can successfully play;
profile pipe 20 by 40 mm, they are called logs;
corrugated board, galvanized roofing screws with a rubberized washer.
Of the tools you need:
bulgarian;
welding machine;
shovel and bayonet;
level (spirit level);
the sledgehammer is medium in size.
The next stage of the discussion is how to make a fence from a professional sheet practically?
Step-by-step instruction for building a fence from a profiled sheet
1. First, a clear boundary of the future fence, the exact perimeter, is determined. It is necessary to mark the places for the installation of future posts. There should be a maximum of 250 cm between the stand supports. This is done on the basis of a maximum sheet width of 1200 mm, and two sheets can be mounted in one span between pipe posts. Separately, it is necessary to note the pillars for the gate and the gate. Most likely, the marking of all other pipes should come from the gate and the gate. Places for poles should be noted with stakes.
2. With a bayonet shovel a pit breaks out for each pipe. The depth of the pits is at least 1 m. In order for the pits to be dug in one line, you need to pull a thread or fishing line. If the site is defined, the first pillars, in addition to gates and gates, should be placed in the corners of the outlined territory.
3. Sand 10 cm thick is poured into the hole, then a pipe pole is placed and, in order to temporarily fix it, hammer a 20 cm into the ground with a sledgehammer. Therefore, do-it-yourself fence posts should have a length of 320 cm.
Important: Preliminarily, the part of the column that will be concreted in the ground must be painted with water-repellent paint to prevent corrosion processes.
Then concreting takes place. The first pillars need to be set clearly in terms of level in all directions. To make the poles stiffer, a couple of broken bricks can be thrown into the hole. They jam the pipe. After such a fixation, concrete is poured into the pit, not reaching a ground level of about 5 cm.
4. After installing the beacon tubes, a large kapron thread is stretched between them. Then with the other pipes we do the same. But now, thanks to the stretched thread, the evenness of the pillars must be controlled only in one plane. After concreting all the pillars, you need to give two to three days to set.
5. The next stage - marking for the installation of the lag, profile pipeas a guide plane for the profiled sheet.
First, markup is made of those places where the edges of the profile pipe will be welded to the post. All marks must be done in a strict horizontal level. This problem can be quickly solved using the laser level. And the markup itself is best done when it starts to dusk. Just in the afternoon the laser level beam is not visible. The main thing is to mark one belt. From it then you can measure the second with a tape measure.
6. After completing the marking, you can begin to weld the belts from the profile pipe to the posts. It is better to weld the lags from the inside, so that later, when the corrugated board is screwed on, it does not rest against the weld seam. Of course, you can’t do without a partner. The log should be welded from the ground at a distance of 30-40 cm and the same from the top of the corrugated sheet. If the fence is planned up to two meters, then two lags will be enough. If over two meters - then three lags.
Tip: By the way, it doesn’t hurt to brew tops of pipes with “dimes” so that water and other precipitation did not flow there and did not start the mechanism of metal oxidation and its further destruction.
7. Ready frame for corrugated board is ready. It remains, to protect against corrosion, paint the entire structure obtained with water-repellent paint as well as the underground part of the pillars.
8. The fence from the profiled sheet is completed with the hands of the installation of the profiled sheet itself. It is important to achieve an even vertical position and a distance of 10 cm from the ground from the first sheet. The first sheet is screwed with special screws, and the second one behind it. In each span between the posts two sheets are attached. To preserve the integrity of the sheet and prevent oxidation, the edges that do not fit do not need to be trimmed with a grinder, for example. They should be bent. In order not to injure your hands on the edges of the sheets, it is advisable to work with a professional sheet in gloves.
9. The final touch is the installation of the ebb (decorative fence) on the upper edge of the sheet. You can fasten it with screws with a press washer or fasten with rivets. This is done from the side of the courtyard so that the street is not visible and does not spoil the appearance.
This completes the fencing successfully. the land.

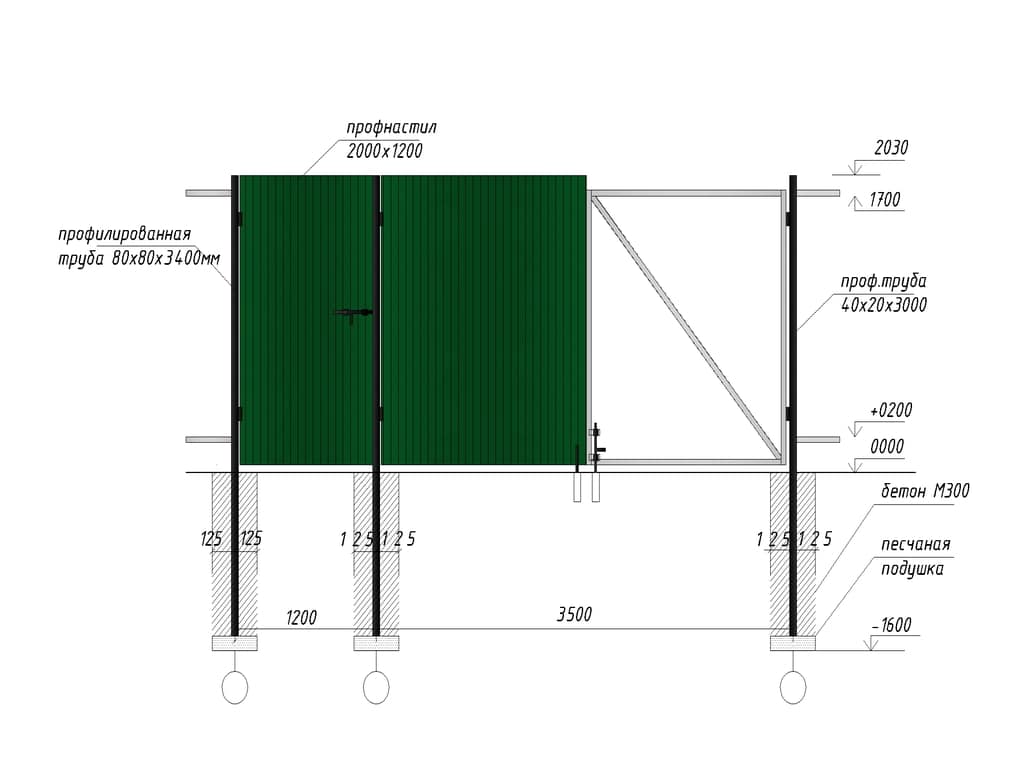
Installation of gates and gates
Starting marking under the columns of the gate and gate, you need to remember that the supports for them should be stronger. Therefore, it is better to use a profile pipe with a section of 60 to 60 mm or round pipe with thick walls. These pillars should be stronger, because they will have additional burden. These posts should be set 50 cm deeper inland.
The frame for the gate and gate is also welded from the profile pipe. The rigidity of the frame should be clear, because after the frame of the gate is hung on the hinges, the gate should not sag. Their wings should be in a strict horizon.
Summary
In fact, there is nothing complicated in making a fence from a profiled sheet. The article describes practical advice. They are taken from real experience. The main thing is to follow them exactly. And then to make a cheap fence with your own hands will not be difficult, but even interesting.
Video on the topic - what you should not save on when building an inexpensive fence from corrugated board:
IN recent times, the use of profiled sheets in the construction of fences and fences became very popular. The market for building materials is saturated with profiled sheets of various colors and strengths to create an attractive and reliable fence.
Profiled sheet has several advantages over stone, concrete and other structures. Firstly, the profiled sheet is galvanized and polymer coated, which allows you to protect the material from the effects of atmospheric phenomena and sunlight. This in turn increases the life of the profiled sheet. Secondly, the cost of mounting the structure and the material itself is much lower than other analogues. At the same time, any fragment of the fence from the profiled sheet can be easily replaced if the old one became unusable. Thirdly, the fence from the profiled sheet has high level sound insulation. Profiled sheets are very easy to use and do not require additional care.
Another advantage of this material is that the fence from the profiled sheet can be easily made with your own hands, significantly saving on the services of masters.
Preparatory stage
Starting to install a fence from a profiled sheet with your own hands, you need to measure the perimeter of the enclosed area. This is necessary for accurate calculation. supplies: support columns, lags, profiled sheet, concrete mixture. It is important to remember that the pillars must be selected according to the height of the fence plus 1.5 m for their further concreting. After that, we proceed to marking the territory, hammering pegs at the installation site of the supporting posts. Between the pegs, it is necessary to pull the string-row so that the subsequently installed fence is smooth and straightforward. After that, you can start digging holes with a depth of 1-1.5 m and a diameter of 0.2-0.3 m.
Installation phase
After finishing preparatory phase, proceed to install the support pillars. A variety of materials are used as supports: pipes, channels, concrete, stone pillars. It is recommended to choose rectangular posts, since it is easier to attach logs and profiled sheets to them.

The column is installed in a dug hole, 1-1.5 m in size, followed by concreting. It is recommended to concrete the supports deeper than 1.5 m to avoid further tipping or deformation of the fence. At the same time, in order to firmly establish the pillar, the concrete mixture should contain 3 times more gravel than cement, and 1.5 times more than sand. To install the support it is exactly necessary to use the level. The next support is recommended to be installed at a distance of 2 m. The drying time for concrete is 3-4 days, only after this period you can proceed with further actions. Important also on this stage close the top of the pillars to avoid the accumulation of water inside the structure.
After installing the poles, you can proceed with the installation of the lag. The number of lags depends on the height of the fence. At a height of 1.5-1.8 m, two lags are enough, but if the fence is higher, an additional rail is required. The lag is attached to the supporting posts by welding, parallel to the ground, with an offset of about 0.3-0.4 m from it. If, however, this unit is not available, it is possible to mount the lags with the help of bolts, however, such a fastening will be less reliable.
After mounting the frame, you can proceed directly to the installation of profiled sheets. Profiled sheets are attached to the logs using self-tapping screws or rivets, setting each sheet with an overlap of 1 wave. At the same time, the spacing between the fasteners should not exceed 0.2-0.25 m.
The final step in installing the fence from a profiled sheet with your own hands is the additional processing of the attachment points. In order to protect the welding spots from screwing in, screwing in self-tapping screws, rivets must be primed, followed by their painting in the color of the fence. If scratches appear on the corrugated sheets during the installation of the fence, they also need to be covered with a double layer of enamel.
Following the instructions and considering all the details, mounting a fence from a profiled sheet with your own hands will not be presented challenge. A well-established fence will fulfill its aesthetic and protective purpose for a long time to come.
Do-it-yourself video review of installing a fence from corrugated board
The problem of installing a new fence is faced by every summer resident or the owner of a private house. Everyone wants it to be beautiful, reliable, not require subsequent maintenance and suit for the price. The listed requirements are met by professional flooring (or professional sheet) - painted (less often galvanized) or coated polymeric materials corrugated thin-walled steel sheet. Almost every man can install a fence from a corrugated board with his own hands, without involving outside experts.
Which deck to choose for the fence
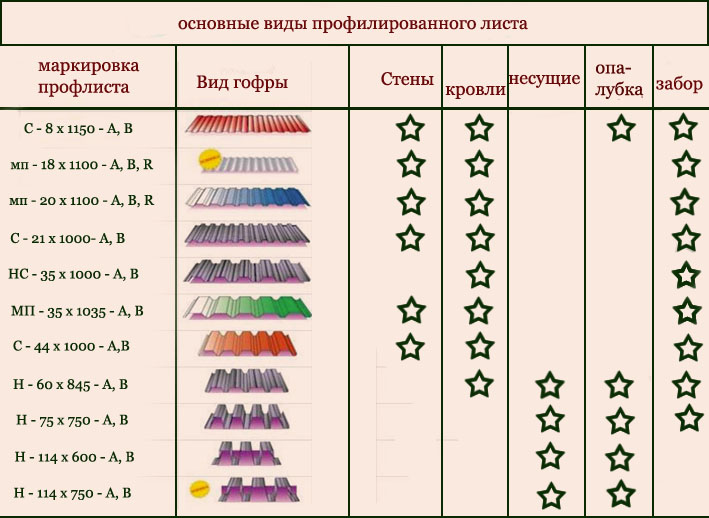
Modern market offers a diverse range of profiled sheets, which is divided into three conditional groups:
- C - with a wave height of 8-44 mm. These products are used in the installation of walls, facades and barriers, which include fences.
- Group H is for roofing. Such a profiled sheet has increased bending stiffness due to the high (over 44 mm) wave and a special capillary groove for water flow.
- NS - a universal professional flooring with a wave height from 35 to 44 mm for various purposes.
Simple fence from corrugated board
The width of the corrugated board is 980-850 mm, it depends on the size of the used steel coil and the wave profile. According to the standards, the thickness of the steel profiled sheet is 0.45-1 mm (subject to tolerance it can be 0.39 mm). The height of the finished sheet is 1.0 m and then after 0.5 m. Directly from the manufacturer, you can order a sheet of any size up to 6 m long.
Types of profiled sheet and their application
The coating of corrugated board is multi-layer (except for the cheapest option with a single zinc layer) and is conditionally divided into three groups:
- Zinc coating is the cheapest with a minimum life.
- Zinc-alumina coating of a mixture of zinc and aluminum with improved performance.
- The polymer coating is the most relevant, consisting of:
- polyester with a matte or glossy structure for use in medium temperature ranges;
- pural (a mixture of polyurethane and polyamide) with increased resistance to ultraviolet light;
- plastisol based on polyvinyl chloride (PVC) for use in difficult climatic conditions;
- a certain kind of composites.
The color scheme is presented very widely. At well-known manufacturers (e.g. Ruukki), the color of the coating can be ordered from the RAL and RR catalogs. It looks interesting professional sheet with prints that imitate wood, stone or brickwork.
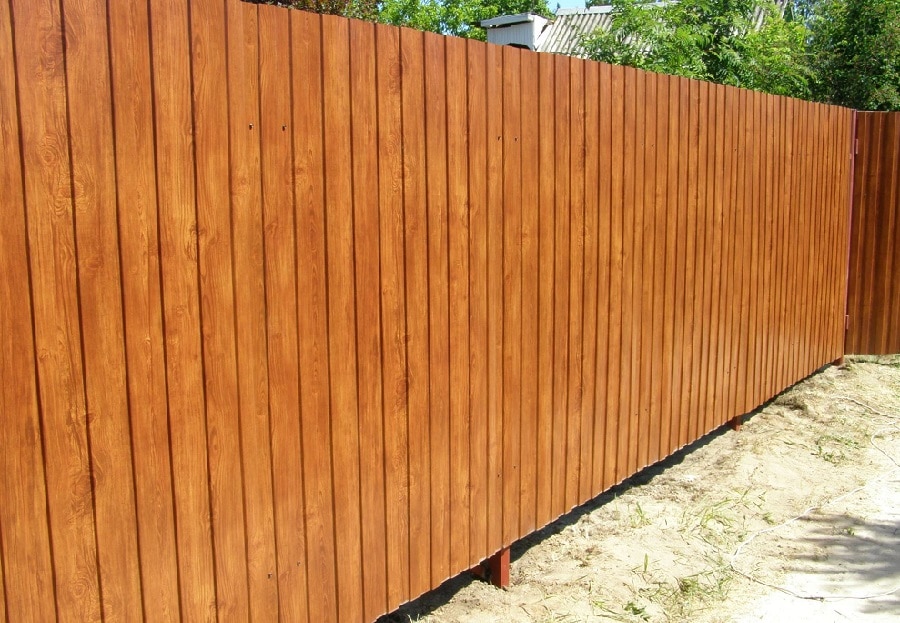
Fence from profiled sheet under a tree
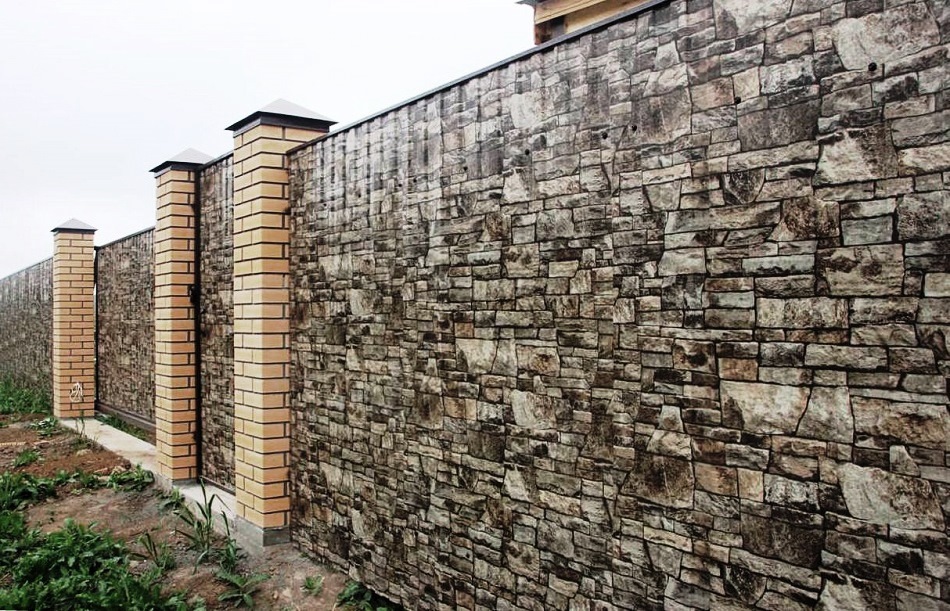
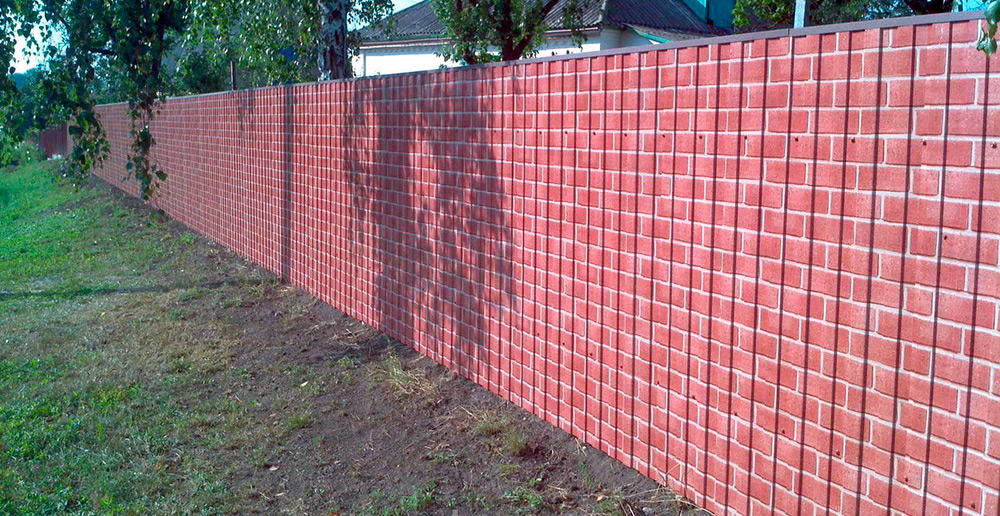
"Brick" metal fence
The parameters described above affect the appearance of the fence, its life (from 20 years and above) and differ significantly in price. To make a fence from a profiled sheet with your own hands, it is important to choose an acceptable combination of price and quality of the material. Experts consider the professional flooring with polymeric coatings of grades SP10 and SP20 optimal for fences.
Technology for installing fences from corrugated board
You can hire specialists, but it is quite possible to make a fence from a profiled sheet with your own hands with racks from a metal pipe. This task does not require supernatural skills and rare tools, and you can save from 20 to 50% of the cost of the material - this is how much the work costs.
Rack Fence Scheme
Calculation of professional sheets and racks for building a fence
To determine the amount of corrugated board, remember that each sheet overlaps next but useful sheet width 40-80 mm less than real. The height is selected depending on the wishes and the availability of the foundation.
As a lag (jumpers) for fixing the profiled sheet, a profile pipe 40 * 20 mm is used. It is believed that when using the SP20 profile, two logs are required with a fence height of up to 2 m and three at a higher height. Optimal distance from lags to the edge of the profiled sheet 300 mm.
Racks (support) for supporting structure may be from various materials. Better to use metal pipe square section with a side from 60 mm and above. The distance between the racks is 2-2.5 meters. To calculate the number of racks you need:
- Measure the length of the fence, then divide by 2.5.
- Round the resulting amount up (the total number of racks, taking into account the angles, is 2 more).
- The height of the supports should be calculated taking into account that 30-40% of the length should be in the ground. Therefore, for a fence 2 meters high, the length of the rack will be: 2 + 0.35 * 2 \u003d 2.7 m (approximately).
Racks from a profile pipe with a heel
Fasteners and trims for the ends
The number of fasteners (screws or rivets) is calculated taking into account the fact that two extreme waves of the sheet and middle ones through one are attached to the lags. That is, one sheet of SP20 is attached at six points. Rivets (the most popular 4 * 20 mm) and self-tapping screws (preferably 4 * 25 mm) are different colorsthat allows you to pick them up to match the fence. It is preferable to use self-tapping screws with rubber-coated washers, this prevents damage to the profiled sheet during installation and loosening of the fastener during operation.
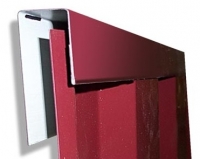
A decorative U-shaped strip is used to frame the end of the fence, gives a finished look and protects the corrugated sheet from rust. It is better to use a bar with rolled edges - it is stronger and does not damage the coating during installation. The length of the strips is 2 m, they are installed on top of each other with an overlap (30-50 mm) along the entire length of the fence.
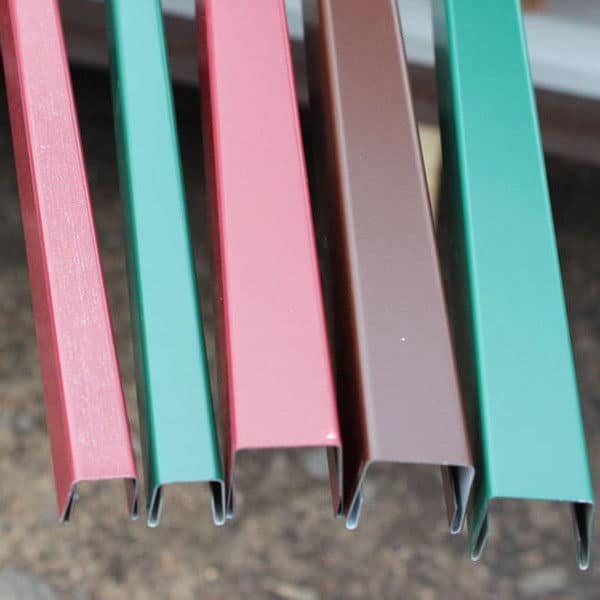
Decorative U-shaped level
It is useful to purchase an aerosol can with paint of the appropriate color to eliminate possible scratches and scuffs on the profiled sheet. To protect the supporting frame, soil and paint (better than neutral gray color in the background back side fence).
To prepare a concrete mortar, you will need to required quantities sand, crushed stone, cement (in the transition period of the year - plasticizer).
Tool kit for construction
To install a fence from a professional flooring with your own hands, you will need following tools:
- drill and shovel for digging pits under racks;
- concrete mixer;
- angle grinder ("grinder");
- a welding machine for fastening the lag to the racks (there are other mounting options, but you should not consider them because of the complexity and unreliability);
- drill or screwdriver;
- riveter (when using rivets);
- scissors for metal;
- paint tool (for painting the frame);
- measuring tool (tape measure, thread, bubble and hydraulic level).
In no case should you neglect the requirements of labor protection! When working with a power tool, goggles are required, comfortable work clothes. For welding operations use a protective shield. The professional sheet itself is very sharp and you need to work with it with gloves.
Work in protective clothing
Technology for installing frame racks
To understand how to properly install a fence from a corrugated board with your own hands, you should understand the principles of mounting a supporting structure. The initial stages of the construction of the frame is its marking, geo-referencing, determining the type of soil and choosing the method of installing the racks.
- Install the outer and corner posts first. They should be at the same height, which is controlled by a hydraulic level. If the level length is not enough, you need to use any intermediate pole or support.
- Racks can simply be driven into the ground, but it is better to concrete them. To facilitate alignment of the columns in height, the bottom of the prepared pits is covered with gravel or sand, and the rack itself is better equipped with a heel - a flat platform that facilitates installation.
- Mandatory control of the verticality of the racks using a bubble level during and after installation.
- It is better to give concrete on top of the soil in a conical shape to drain water and prevent its accumulation at the base of the rack.
- If the length between the extreme racks is divided by the number of intermediate, you get the exact distance between the centers.
- After concrete hardening and marking, pits are prepared for intermediate racks.
- Pull the thread along the top of the already installed racks (height control), the upper and lower parts of the racks (control of being on one straight line).
Similarly to the corner, intermediate racks are installed, while alignment in the same plane and height according to the tensioned threads is mandatory. The height of the supports is regulated by adding or removing a gravel (sand) pillow.
To prevent moisture from getting inside, the top of the racks must be brewed with metal plugs (it is easier to do this before installation), or use special plastic ones.
how a budget option - you can use the same parts plastic bottles with bottoms. After putting on the rack, the bottle is evenly heated with a construction hairdryer, decreasing in size and very tightly fitting the pipe. It looks interesting and stylish, it is almost impossible to recognize the original subject in such stubs!
Technique for securing lag to supports
After concrete hardens, logs are fastened to the supports with the help of electric welding. For a fence with a height of 2 m, the upper lag must be placed at a height of 0.3 m from the top of the racks, the lower one - 1.7 m. It is easier to merge the lags along the length in advance, controlling the parallelism of the parts to be welded, or in the center of the racks. Mandatory control of horizontal installation using a level.
After fastening the lag in the places of welding, remove the slag, if necessary, clean the surfaces with a “grinder”. To process the whole frame with soil and then paint, since after installing the profiled sheet it will be much more difficult to do.
With a significant slope of the surface of the land, racks and logs are placed with an offset in height. You can shift each span or through several sections, but be sure to one size and the same number of spans!

Mounting and fixing the profiled sheet
Directly attaching the sheet to the frame is the final operation in the construction of a fence from a professional flooring with your own hands. Considering that the logs are located strictly in level and at the same distance from each other, even before installation, it is necessary to calculate and mark on the profiled sheet the places for fasteners with a marker or a soft pencil.
The first sheet is aligned strictly in level and attached to the lags. Subsequent sheets are superimposed and attached with interception in one wave. Periodically, it is necessary to control the verticality of the material being fixed (the height is set by the first sheet).
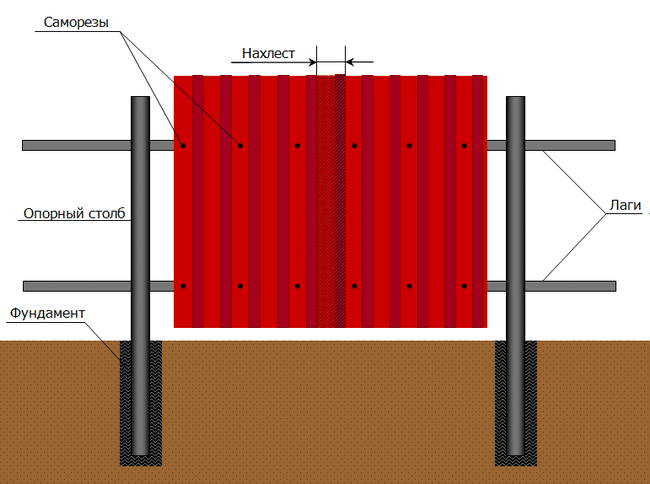
Installation diagram of a fence from a profiled sheet with columns
If there is a clear shift in level, you can slightly correct the situation on the next 2-3 sheets by fixing one side of the corrugated board and slightly stretching the desired loose angle. You can pull the sheet just a few millimeters, but often this is enough to not dismantle the fence and not start the operation again.
If it is necessary to trim the corrugated board, it is better to use scissors for metal. “Grinder” should be used only as a last resort, since there is a high risk of material damage, burrs will form, and the cut edge will quickly rust.
When installing the sheet directly on the foundation (if any) is not necessary! It is better to leave a gap within 10 mm to prevent wetting and corrosion of the profiled sheet.
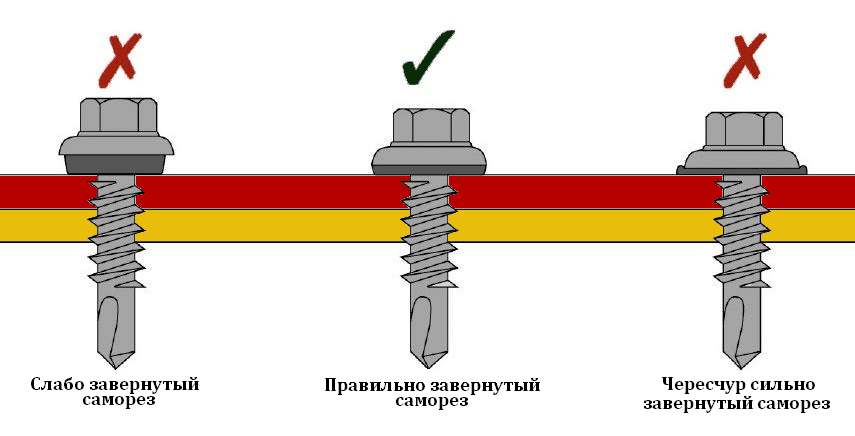
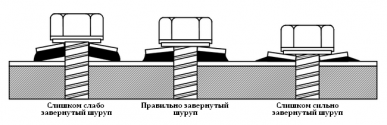
It is important to tighten the screw
Do not tighten the screws too much to avoid deformation of the rubber layer of the washer; it is better to use a screwdriver with a selected tightening force. After installation, be sure to remove protective film (if available), because after a few months it will partially stick to the surface, and in some places it will crumble, giving the fence an untidy spotty appearance. Final Stage - Installation decorative strips.
The "wrong side" of the fence
How to build a fence with a strip foundation
Installation of a fence with a foundation
To prevent damage to the bottom of the profiled sheet, the formation of rust when in contact with the ground and impart to the fence aesthetic look foundation used. Making a fence from a corrugated board with a foundation with your own hands is more difficult, but also quite feasible. In fact, this is an ordinary shallow strip foundation with optimal depth 300-400 mm and a socle from 100 mm high. The width of the foundation is not regulated, 200 mm will be enough
To make the foundation between the installed racks, you need to dig a pit necessary depth, then make and install the formwork. Since the base will be visible, it is better not to save on formwork material. OBS-board is well suited for these purposes, even better - laminated plywood, and you can use these materials repeatedly, filling the formwork in parts.
The technology itself is no different from pouring a strip foundation for a gazebo or other structure. Easier and faster work will advance using a concrete mixer. To give strength to the foundation, it is advisable to use reinforcement, at least a few threads welded to the racks.
Foundation formwork
Installation of sectional fence with columns
The most beautiful, but also the most expensive fence design sectional typewhere the sections are separated by columns (columns). To build a fence from corrugated board with columns with your own hands, you should first decide on the design and choose necessary material. It could be facing brick, natural stonespecial decorative blocks. There are many options for the design of the columns and the foundation, only a reasonable imagination and some mason skills are needed.
Column Fence Scheme
Pillars can be laid out as independent units or overlaid installed metal racks, thus modernizing the option of a fence with a foundation. But, in any case, the foundation for the columns should be much more powerful and massive, since the columns themselves have an impressive weight. Mandatory reinforcement of the foundation, preferably in two rows. When enclosing the support, concrete should be filled with voids between the support and the brick.
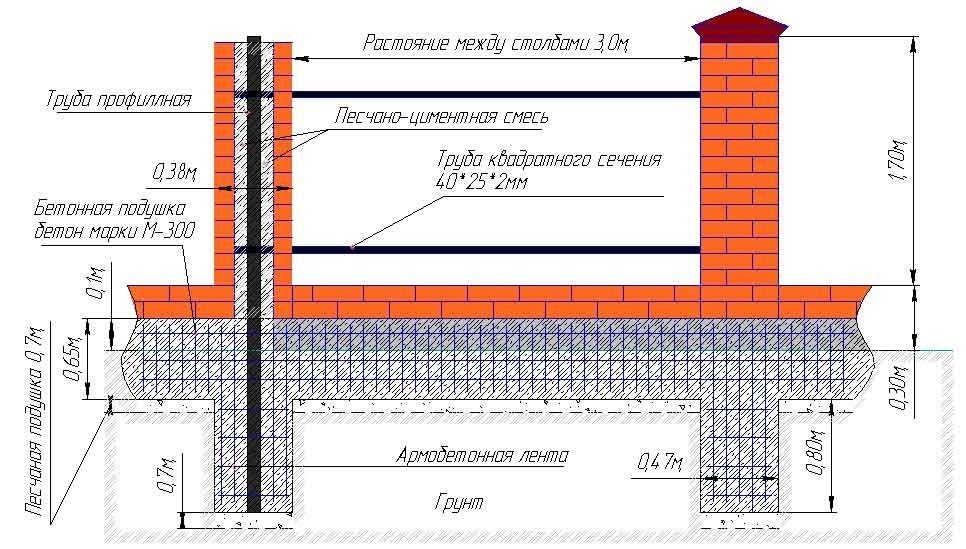
Fencing scheme with columns and foundation
If the columns are built without a ready-made intake frame, it is imperative to provide embedded metal parts for subsequent fastening of the lag, while strictly maintaining the horizontal level (both the columns themselves and embedded parts).
Columns should be placed only after the foundation has dried, per day it is recommended to lay out no more than 500 mm columns in height. Every third row of bricks for strength is reinforced with a metal mesh, the seams should be smooth and of the same size.
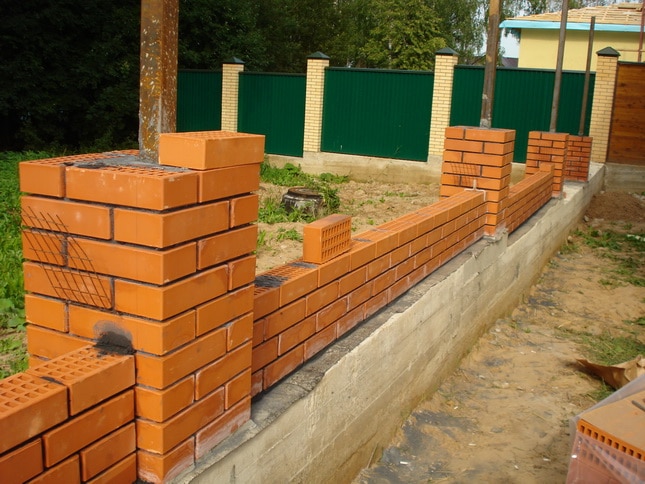
To reduce material consumption and facilitate installation, it is recommended to accurately calculate the distance between the columns so that a certain number of profiled sheets (usually 2 or 3) are placed in it without cropping. The top of the column must be covered with a finished decorative cap or conical to drain the water.
As you can see, the task of how to build a fence from a profiled sheet with your own hands is not too difficult. This is realistic to do for any person with skills in working with metal and concrete. Of course, you can always invite a specialist, but the work performed perfectly on your own will please you more long years!
Video: fence from corrugated board