Now in all schools, in labor lessons and extracurricular activities, such creativity as the creation of applications from colored paper is very popular. This is mainly done by children in elementary school, they make various crafts from paper and cardboard, make pictures and voluminous toys for the Christmas tree.
Application is a painstaking work that develops thinking, perseverance and instills a love of kids for all kinds of crafts. While working on the application, the child learns to handle scissors, glue paper and study geometric shapes.
A child of 3 years old can do the simplest crafts with their parents. For the smallest, the technique of broken appliqué is used. It can be created without the help of scissors. The child tears off small pieces of paper, spreads it with glue and sticks it on a thick sheet of cardboard, creating a certain picture.

The older the child becomes, the more spatial thinking is developed in him and you can teach him to perform voluminous crafts. To do this, the paper is folded like an accordion, fastened with glue, and then a specific object is formed and glued to a sheet of cardboard.
A more complex type of paper craft is quilling, which consists in twisting thin strips of paper. To create a picture, folded rolls are glued to cardboard or interconnected.
Easy and interesting toilet paper appliqué will appeal to your preschool kid. To create it, you need a template diagram, toilet paper or paper white napkins, glue and a bright sheet of cardboard.
Toilet paper elephant step by step:
- On cardboard, draw the body of an elephant with a pencil according to the finished template.
- Tear off a small piece of paper, roll it into a ball, spread it with glue and stick it on the elephant's body. So fill in the whole drawing.
- From white paper, cut out the trunk, head and legs. Glue them in place.
- Eyes can be drawn, can be made from pieces of black paper.
You will get an original three-dimensional picture, which can be supplemented at your discretion - with a tree or grass.
Simple cardboard applications for kids 3-5 years old
If you have nothing to do on a rainy day, try to instill in your child a love of needlework. Start with the simplest applications, such as a kitten. But be prepared that you will have to cut out all the details, and allow the baby to glue.

One of the simple cardboard applications is a cut-out postcard. You can make a greeting card for March 8 or for the New Year. Moms and dads will remember the labor lesson at school, and it will be interesting for kids to work together with their parents.
The technology for working on a postcard is very simple:
- You will need a piece of cardboard a set of colored paper.
- Fold the cardboard in half.
- Having decided on the pattern, cut out the necessary details. For example, for a snowman - circles of white or blue color, for a flower - oval petals.
- Parents show, and the child uses glue to attach the blanks to the postcard.
In addition to the usual applications, various funny figures can be made from cardboard.
How to entertain a child: paper applique for grade 1 with templates
When dealing with a child before school, parents should teach the baby how to handle paper. Children in kindergarten try to make the simplest crafts. Preschoolers work with applications more difficult - it is in their power to make a small picture.
In modern stores, you can find self-adhesive applications that can be stuck on a notebook or decorate a locker at school.
In grade 1, children in a labor lesson use the simplest geometric shapes to create applications - a square, a circle, an oval, a triangle. If the baby does not know how to work with a ruler, you can use stencils. Children cut out figures according to the template and stick them on cardboard.

First-graders can make light applications:
- Animals - dog, kitten, squirrel, zebra and mouse;
- Birds - owl, swallow, chicken;
- Fairy tale - bun, mermaid, hut;
- Nature - the sun, the cloud, the tree.
All these applications will consist of the simplest elements, the head is a circle, the ears are a triangle. Using ordinary PVA glue, they are attached to the base and a simple muzzle of an animal or bird is obtained.
How to make a black and yellow bee:
- From yellow and black paper, cut out 2 circles with a diameter of 4 cm.
- From red paper cut out two identical wings in the shape of a heart, from yellow paper - two wings a little smaller.
- Their black paper to make antennae-stripes.
- Lay black-yellow-black-yellow circles alternately on blue cardboard.
- Lay out the antennae of the bee from the last yellow one.
- Place larger wings on the sides, then stick smaller wings on them.
- Eyes can be drawn or cut out of green paper.
- Glue all the details to the cardboard - the bee is ready!
Developing thinking: paper applique for grade 2 with templates
Having learned how to make elementary crafts from paper and cardboard, having got acquainted with the technique of creating the simplest applications, children begin to study a new creativity - voluminous applications. Having mastered the skills, children will be able to make beautiful cards for mothers and grandmothers on March 8, for dad - crafts for February 23 or a birthday.

To create the application "Flowers in a vase" you will need:
- Cardboard sheet;
- Colored paper - white, yellow, green, blue;
- Glue stick;
- Pencil;
- Scissors.
Having prepared materials and tools, you can start needlework.
- Make blanks for the application - two squares of white paper 5x5 cm, a yellow circle with a diameter of 4 cm. For a bouquet of 5 daffodils, you need to cut 10 squares and 5 circles according to the template.
- With a simple pencil, draw stripes dividing the square in half - horizontally and vertically.
- On each side of the square, make cuts along the lines, not reaching the middle of about 0.5 cm. You should get a square divided into 4 quadrangles.
- Each square needs to be twisted - put a pencil on the diagonal of the square and wrap the corners on it.
- Similarly, make all 10 large squares.
- Make 5 yellow circles according to the template - the basis for the middle of the flower. Screw the circle folded in half onto the handle, remove and fasten with glue.
- To make a flower, you need to put together two blanks of petals and insert a yellow core. If everything is done correctly, you will get a beautiful daffodil of 8 petals.
- From green paper cut into thin strips - the future leaves of the flower. Bend a little along, give shape.
- According to a pre-prepared template, you need to cut a vase. It can be made blue. You can decorate a vase with an arbitrary ornament cut out of paper of a lighter color.
- On an A4 cardboard sheet, first stick a vase so that its bottom coincides with the bottom of the paper. The application is placed vertically.
- Then stick the leaves of daffodils in a chaotic manner, after which you can begin to form a bouquet. Glue the flowers so that they are in the center of the entire application.
Glue all parts well so that after drying they hold firmly. The finished picture can be decorated with a piping of small figures or beads.
Volumetric application for grade 3 with templates
Third grade students can do more complex and laborious work done using the quilling technique or interesting volumetric crafts. Teachers often wonder what kind of paper work to come up with for children so that they are interested.

In the 3rd grade, girls are still playing with dolls, so it will be interesting for them to make voluminous furniture for a dollhouse. The boys can make an airplane, a racing car. On the Country of Masters website, you can find a sample of voluminous paper crafts for every taste - origami templates, quilling patterns. Schemes and templates can be printed out and performed with the children in the classroom or given homework.
If you run out of ideas, you can always ask the guys what they would like to do in the lesson.
Children's quilling applications are very popular among schoolchildren. This is not only a unique gift, but also a beautiful decoration.
How to make paper applications for children (video)
Paper applications are a great reason to keep children busy for a certain amount of time. This type of creativity can be engaged in even the smallest children - from 3 years old and primary school students. Armed with imagination and a craft kit, kids can create incredible paintings and impress their loved ones with their accomplishments.
Today we will learn how to interesting and original paper crafts with or for children.
And first, let's see what we need for this:
To create crafts, we will use different types of paper and cardboard:
napkins for decoupage on boxes;
newspaper for creating papier-mâché balloons;
old magazines for crafts with beads;
crepe and wrapping paper;
colored double-sided paper;
corrugated and plain cardboard;
paper plates, cardboard tubes, various boxes and much more.
For creativity, the child will need such basic materials and tools as scissors, glue, paints and felt-tip pens.
Does it happen to you that you collect a lot of small necessary items, but there is nowhere to put them? Let's make a fun pocket in which everything will fit and which can be hung in a conspicuous place.
Paper crafts for kids: USEFUL POCKET
What will be required:
colored paper
pencil
lace scissors glue
Work sequence:
Draw the outline of the muzzle of an animal, such as a bear.
Cut out two such shapes along the contour. Make details for the ears and nose, as shown in the photo.

Apply glue along the edge, connect the parts to make a pocket inside. Punch two holes.

Glue on the ears and nose. Draw a ribbon for hanging.

This pocket is perfect for storing small items: hairpins, combs or stationery.

Paper Craft for Kids: RACE RACE
Did you know that you can make unusual racing cars with your own hands? Let's create them and have a real race. I wonder what car number will win?
What will be required:
cardboard tubes of paint, felt-tip pens
colored paper, cardboard
glue scissors
Work sequence:
Color the tubes in bright colors.

Cut out parts for cars from colored and white paper (for wheels, it’s better to take black cardboard - then your “car” will stand firmly). Use a felt-tip pen to draw what you need.

Make a hole in the straw as shown in the picture (you can ask an adult to help).

Now glue all the details. Wait until it dries - and go ahead, play!

Paper crafts for kids: PAPIER-MACHE BALLOONS
Who doesn't dream of flying in a hot air balloon? Someday you will definitely do it. Now let's try to make an unusual balloon from an ordinary newspaper.
What will be required:
glue bead
needle spoke
cream paint
Work sequence:
Inflate the balloon, lubricate it with any cream. Prepare a newspaper for crafts - for this you need to tear it into small pieces. Wetting them in water, glue the ball so that there is no gap.

Now apply a layer of glue on the ball and glue it again with pieces of newspaper soaked in water - so you need to do 2-3 layers. You may need the help of an adult.

When the ball is completely dry (for this you will need to wait 1-2 days), pierce it with a needle - we don’t need it now - and cut the ball, as shown in the photo.

Now color the ball with paints.

Now let's make a basket. To do this, the newspaper sheet was divided into 4 parts to make rectangular blanks. Then, starting from the bottom corner, roll the newspaper into a tube with a knitting needle, and glue the tip.

Take 5 tubes and put them side by side, and stretch the sixth tube across under the first, over the second, under the third, etc., alternating. The next tube must be weaved in reverse: what was below will be on top.

To secure our base, take one tube and weave it around, also passing it between the other tubes through one.

Now you can make the basket itself: to do this, bend all the ends up and start weaving them around in the same way as you did before. Weave 4 rows.

Unnecessary ends weave on top and glue, some you can just cut off. Color the basket with gouache.

Make holes at the bottom of the ball and secure the basket with a thread. The balloon is ready!

FUNNY ANIMALS
It turns out that you can quickly and easily make yourself a striped friend. And in order to be able to play with friends, let's find out how to make not only a tiger, but also other animals.
What will be required:
colored paper
glue scissors
Work sequence:
Take a sheet of colored paper and fold it as shown in the picture. Glue the ends to make a strip.

Bend the strip "accordion" in three places to get the letter "M".

Cut out blanks for the animal from colored paper.

Glue the blanks to the base. Ready! You have a tiger.

HOME THEATER
But what if you arrange a real theater in your home? It will be possible to invite adults to the performance and show them some kind of fairy tale, for example, "Gingerbread Man". I think they will definitely appreciate your skill!
What will be required:
colored paper compasses scissors glue
markers stick
Work sequence:
Draw a blank on a sheet of colored paper, as shown in the photo.

Cut out the blank and glue.

Cut out the base for the animal from colored paper
Glue the pieces to the base. Look who we got

Take your favorite animal fairy tale as a base and make all the characters out of paper. If sticks are glued to the blanks, it will be possible to show a performance from behind a screen, as in a puppet theater.
Paper crafts for kids: FUNNY CATERRORS AND SPIDERS
Have you ever seen a real spider? And the caterpillar? Let's make funny animals with furry legs out of a cardboard egg box. They will look like the real thing!
What will be required:
egg carton
glue scissors
colored paper
wire
Work sequence:
Cut out blanks from a cardboard box: three cells for caterpillars, one for bugs and spiders.

Color the blanks with gouache.

Prepare details for animals: cut out eyes from colored paper, make legs from fluffy wire.
Make holes in the blanks and stick the legs. Then glue on the eyes.

Try to make them exactly the same.

AMAZING MASQUERADE
You can celebrate your birthday in an unusual way by throwing a masquerade. Invite your friends and have everyone make an animal mask for themselves. It will be fun!
What will be required:
cardboard plates
colored cardboard and paper
scissors
Work sequence:
Color the plate blue.

Cut out the ears and color them too.

Prepare parts for a bunny from colored paper.
Cut out holes for the eyes and glue the pieces as shown.


PAPER BEADS
What girl doesn't love jewelry? Let's try to make beads from old magazines. You will get bright ones that you can wear with your favorite dress or give to your mother.
Work sequence:
Cut out the details from the magazine sheet: strips about 1 cm wide and elongated triangles.

Wind the blanks on the knitting needle - these will be paper beads. Glue the tip well.

Make as many beads as you need for the entire decoration. Take a needle and thread and carefully thread all the beads onto the thread.

This is how easy it is to make unusual ones: original multi-colored beads, bright bracelets. You can even give them to someone: what girl would refuse such beauty?!
Paper Crafts for Kids: PRINCESS DECORATIONS
All girls dream of becoming real princesses. What is a princess without a crown? Let's make it from a regular cardboard roll.
What will be required:
cardboard tubes of paint
colored paper
scissors
Work sequence:
Cut out the crown from the roll. You can do a few things.

Color the blanks in different colors.

Decorate crowns. To do this, you can use beads, ribbons and laces.
Make holes on the sides and thread the elastic so that the crown can be put on.

You can make a decoration for a real princess from an ordinary hoop: use colored paper to turn it into a beautiful diadem.
Paper craft for kids: TOY LOCKER
Probably, like all children, you have a lot. Sometimes there are so many of them that it becomes difficult to neatly fold. Let's make a beautiful storage cabinet for small toys.
What will be required:
boxes of different sizes
white gouache
patterned napkins
stationery knife
tassel pen
Work sequence:
Paint the boxes white so that the pictures and text on them do not show through.

Glue the box on all sides with a napkin. To do this, put it on the box, pressing along the edges, and with a brush, apply a thick layer of glue on top so that it sticks.

Cut out the doors with a clerical knife - here you will need the help of an adult. Glue the handles with superglue and fasten the boxes together to make a cabinet.
All! Our dresser is ready. Now you can put your toys there. Mom will be delighted when she sees what order you have!

CREATIVE BOX
Do you like to draw? Or maybe you like to carve or craft something? This is cool! Let's make a creative bag-box where you can put everything you need for creativity.
What will be required:
shoe box
wrapping
colored paper
adhesive lanyard
Work sequence:
Tape the box and lid on all sides. If it's hard for you, ask one of the adults about it.

Make blanks inside the box. At the bottom of a sheet of colored paper folded in half, make an incision to the middle, as shown in the photo. Cut two pieces of the same length as the width of the box from top to middle.

Insert the blanks into each other and place them in the box - these will be the compartments of our bag.
Make holes on the sides of the box: they should be at such a level that the box can be closed with a lid. Make the handles of the same length from the cord so that the box is comfortable to take in your hand.

HANDMADE PHOTO ALBUMS
Where did you last go on holiday? Maybe it was a trip with your parents to the sea or a vacation in the village with your grandmother? You must have some memorable photos. Let's make a suitcase-shaped photo album for them.
What will be required:
colored paper and cardboard
hole punch scissors lace
Work sequence:
For the cover of the photo album, take a sheet of colored cardboard and fold it in half.

For pages, take sheets of double-sided paper of different colors and also fold in half.

Now connect the cover and pages together: for this, fold everything together and make holes on the side with a hole punch. Tie the sheets with a rope or cord.

Cut out the details for the suitcase from colored cardboard and glue them to the photo album.


Paper Crafts for Kids: FUNNY BOOKMARKS
What is your favorite book? Or maybe several? It's great that you love to read. Let's make an interesting bookmark for the book.
What will be required:
colored paper
Work sequence:
Use a ruler to draw three squares on a sheet of colored paper, as shown in the photo. The triangles that are filled in are not needed.

Cut out the piece.

And it, as shown in the photo: first bend it to the inner corner, then another on top of it. Glue them together. Cut out the details from colored paper.

It turned out great, right? Now it will be easy to find the place in the book where you finished reading. You can also make a bookmark in the form of another animal, such as a dinosaur with sharp teeth.

CARDBOARD BAG
Do you know how you can make a bright bag out of an ordinary box? Very simple! Let's dream up and make a handbag that you can take with you outside in sunny weather.
What will be required:
cereal box
colored paper
glue scissors
Work sequence:
Color the box with gouache.

Cut out a bag with handles from the box. This may require the help of an adult.

Cut out a strip and a circle from colored paper - this will be the core of the flower. Fold the strip with an accordion and glue the ends. To keep the flower, stick it on a small square. Glue the core on top.
For butterflies, cut out blanks from 1 colored paper. To make the figure voluminous, you need to make 5-6 identical parts. Glue them together in the middle. Glue all the pieces to the box.

DIY Paper Crafts: Pencil Stand
Do you want to give a gift to a friend, but don't know what to choose? Don't be upset, I have an idea! Make an original stationery stand out of an ordinary cardboard box. Your friend will definitely love this gift!
What will be required:
boxes
the same width
white and colored paper, cardboard
adhesive tape
Work sequence:
Build a ship out of boxes: cut off the lids and cut them to height. Make the bow of the ship and pipes out of cardboard.

Tape each piece with colored paper inside and out.

Cut out and glue the windows, lifebuoy, steering wheel, anchor.

Glue the boxes together and glue them to the base, cut along the contour.

PUZZLE APPLICATION
Do you have unnecessary puzzles in which a lot of details are already lost? I have an idea how they can be applied. Let's make an amazingly colorful application with autumn leaves.
What will be required:
unnecessary puzzles crepe paper
paint glue
Work sequence:
Color the puzzles in the colors of bright autumn leaves: yellow, orange, red.

Cut out a brown rectangle from crepe paper - this will be a tree trunk - and make green grass.

Glue the brown blank in the form of a trunk: for this, somewhere you need to compress the paper in layers, and straighten it somewhere.
Make a crown of a tree from the prepared puzzle pieces. Also glue several layers of grass to make it voluminous.


Paper crafts for kids: 3D PICTURE
Do you want to make a large application? It's quite easy! You will get a real picture that you can give to your grandparents.
What will be required:
candy box
corrugated cardboard
double tape adhesive
Work sequence:
Cut out the necessary details for the picture from corrugated cardboard.

Glue the first layer of applique on the bottom of the box - what will be in the background.
Paste other details on top.

What a beauty! It turned out to be a real big picture. In this way, you can make a city where there are cottages and high-rise buildings, or an underwater world with shells, algae and fish.

BOUQUET IN A POSTCARD
Do you want to give your mom unusual flowers? Let's make a card-bouquet of colored paper. Trust me, she'll love it.
What will be required:
double-sided colored paper
scissors ribbon
Work sequence:
Draw a blank on a sheet of colored paper, as shown in the figure.
Cut out the blank and separately a triangle.
Glue a small triangle on the bottom, and fold the large part as shown in the picture.

Draw, and then cut out flowers of different sizes and colors. Make leaves for the bouquet.

Glue flowers inside our postcard in the form of a bouquet, tie a ribbon at the bottom.


3D POSTCARD
Surely you watched the cartoon in 3D and noticed how the characters come to life with a three-dimensional image. It turns out that making objects three-dimensional is quite simple. Let's try to make a postcard with a 3D effect.
What will be required:
colored cardboard, double-sided colored paper
scissors ribbon
Work sequence:
Take two sheets folded in half: one is cardboard, the other is colored paper.

On a sheet of colored paper, make cuts on the fold side, as shown in the photo. You should get 3 even squares of different sizes.

Now what you cut, push forward and inward. You should get a ladder, as if from boxes.
Glue the blank onto a sheet of colored cardboard. Decorate the boxes: glue colored paper and ribbons.

By this principle, you can make a card with balloons

CARD WITH PALM
Do you want to make another unusual postcard? You don’t need anything special for this: just a sheet of colored paper and cardboard, scissors, glue and your wonderful pens.
What will be required:
colored cardboard and paper
Work sequence:
Circle your palm on a piece of cardboard.

Cut out the piece with scissors. You will need two of these items.
Cut out a strip of colored paper and fold it like an accordion.

Glue one end of the accordion to one "hand" and the other to the other. Cut out from colored paper or write a congratulation with felt-tip pens.

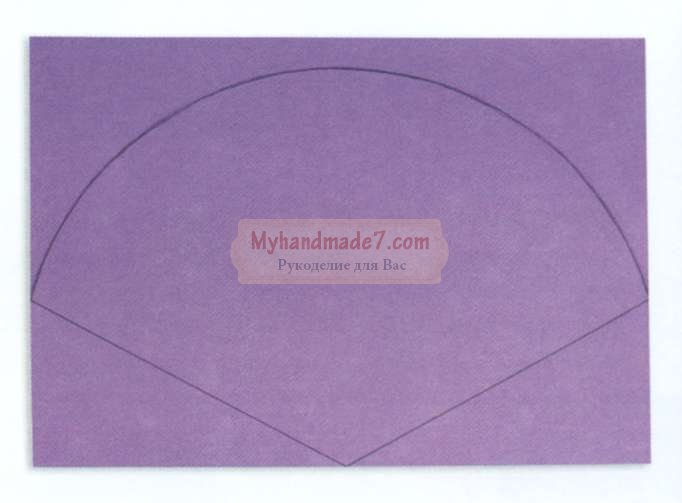
ENVELOPE
Do you know how to decorate a small gift? You don't have to be an adult to do this, and you don't need any special equipment. Repeat after me and you will definitely succeed!
What will be required:
colored paper glue
ribbon
Work sequence:
Draw 4 identical circles on a sheet of colored paper. This is easy to do if you take a mug, put it upside down and circle it.

Cut out the circles and fold them in half.

Glue the circles together as shown in the picture.
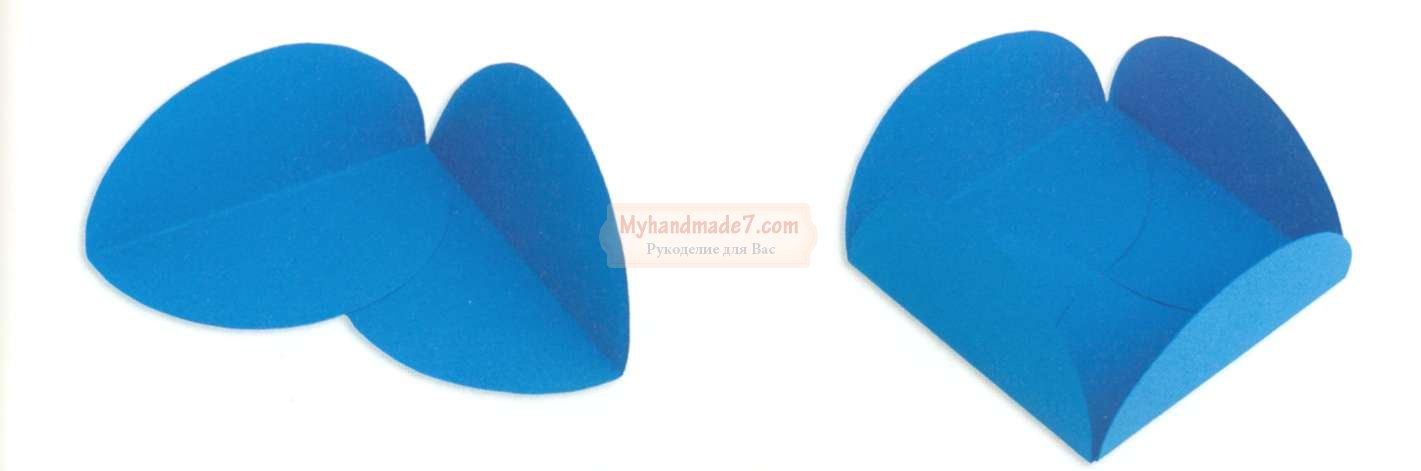
Bend the free halves of the circles so that one turns out on top of the other. Then pull the bottom from one side up.

SWEET GIFT
Have you ever seen a gift shaped like a candy? Maybe they gave you something similar? Let's make such a surprise, and you can "treat" someone to them.
What will be required:
cardboard tube
wrapping paper glue
scissors ribbon
Work sequence:
Cut out a square from the wrapping paper. In size, it should be larger than a cardboard tube.

Cover the tube with paper. Tie one end of the candy with a ribbon.

Put candy in a gift and tie the other end.
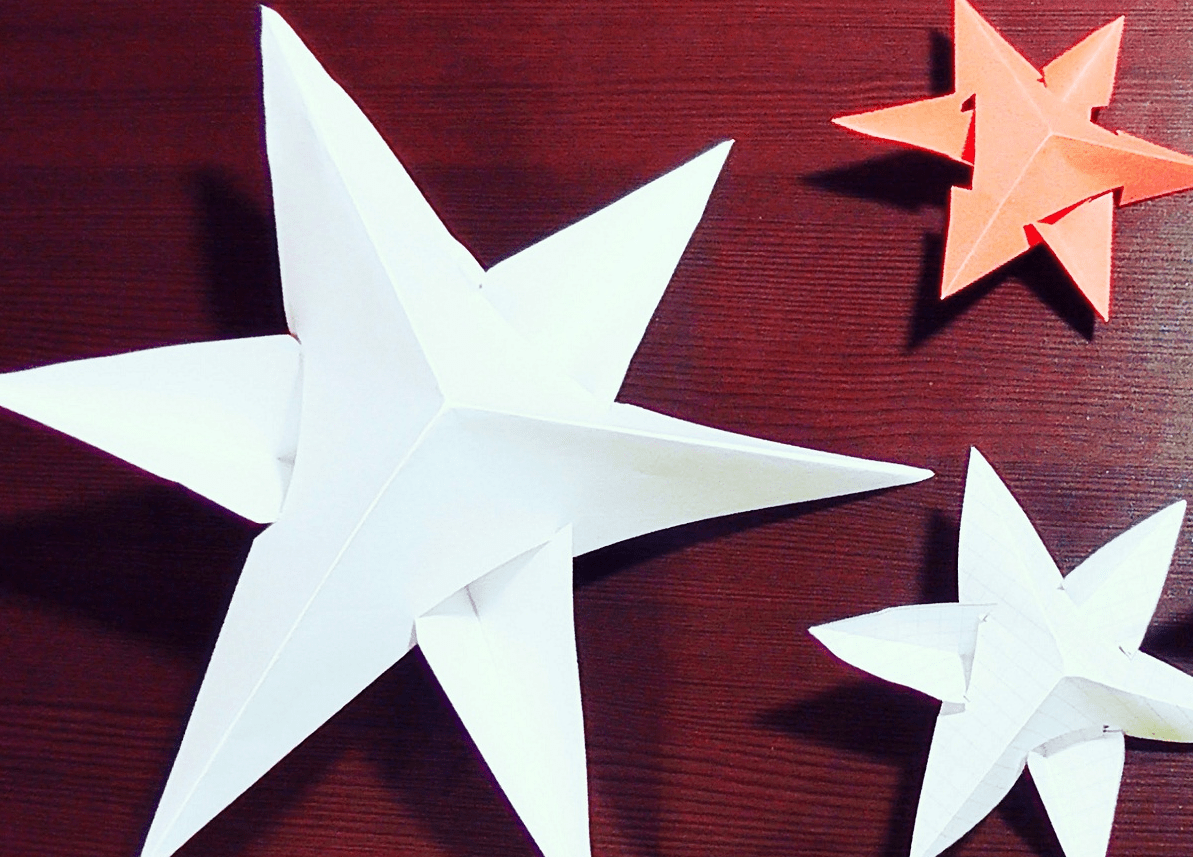
3D FIGURINES
Have you ever wanted to decorate your room in an unusual way? Let's make voluminous figurines-decorations from colored paper. They can be placed on a bedside table or hung on a string from a chandelier.
What will be required:
colored paper glue
scissors ribbon
Work sequence:
Draw a half of an apple on a piece of colored paper folded in half, as shown in the photo.

Cut out the blank and, using it as a template, make 5 such copies. Additionally, cut out the details for the apple.

Glue the blanks together, as shown in the photo.

Glue the rest of the details.

Fruits and vegetables can be anything!
Crafts from cardboard and paper: bright flowers
Do you want to grow bright flowers in your window? Let's make them out of cardboard tubes, but in such a way that no one guesses what material they are from.
What will be required:
cardboard tubes of paint
colored paper glue
scissors skewers
Work sequence:
Make cuts on both sides of the tube so that they do not reach the middle.

Color the tubes in different colors.

When the blanks are dry, straighten the petals, as shown in the photo.
Glue the centers cut out of colored paper.

Paste the skewer with colored paper, cut out the leaves.
Connect all the details. Poke a hole in the center of the flower with a skewer.
Such a flower can be put in a vase and presented to someone.

FRAME OF UNUSUAL FLOWERS
Do you have a boring monochrome frame at home? Let's make it a real masterpiece!
What will be required:
egg carton
glue scissors
Work sequence:
Cut out petal blanks from the cells of a cardboard box, as in the picture.

Color them the same color. You should have 15-18 such sets of different colors (depending on the size of the frame).

Glue the petals together in the middle, carefully press and let them dry.
Glue the flowers to the frame. You won’t be able to attach everything at once, so do it in stages and wait until everything dries.

The frame is ready. Now you can insert your favorite photo into it.
CUTE CACTUS
How do you like such a cute cactus? It is completely safe for children because the thorns are painted on it. Let's make such a cactus and put it on the windowsill.
What will be required:
markers
Work sequence:
Draw a cactus in a pot on cardboard.

Color the picture on both sides and make another one exactly the same.

Make cuts: on one cactus from the bottom to the middle, and on the second - from the top to the middle.

Insert the blanks into each other. The cactus is ready.
In the same way, you can make a rocket or a teddy bear.
COLORED LANTERNS
Your birthday is coming up and you want to decorate your room to make it festive and beautiful? Then let's make unusual colored lanterns.
What will be required:
toilet paper tubes
crepe paper
ribbons
glue scissors
Work sequence:
Cut out a square of crepe paper and glue one side of the tube.

Make blanks from crepe paper: cut out strips and make cuts on one side along the entire length.

Start taping the tube from the bottom. You should get a skirt, as in the photo.
Thus, glue the entire flashlight. Make holes on the top sides and thread a ribbon through them so that the craft can be hung.

Such lanterns can be not only decoration, but also a useful thing. For example, at a holiday you can arrange a game with prizes: hang lanterns on a rope and put something valuable in them by gluing the bottom. Each blindfolded guest must cut off a gift with scissors.

ROOM DECORATION
Would you like to have a bird? Of course, nothing compares to the real one, but still an unusual and beautiful bird can be made from ordinary colored paper. See how it's done.
What will be required:
double-sided colored paper
crepe paper scissors
ribbons
wire
Work sequence:
Draw bird silhouettes on a sheet of paper.

Cut them out. Make a few of these. They must be different colors.

Make wings out of crepe paper: to do this, cut out rectangles of different colors and fold them like an accordion.
Make cuts in the blanks of the birds and insert the wings there. Tie ribbons to the figures and hang them on a circle made of wire.
Colored paper is an excellent material for crafts. You can make applications, various figures and many other creative things from it. In this article we will consider: how to make crafts from colored paper for primary school children with their own hands.
You will need: thick colored paper, glue gun, ruler, scissors, adhesive tape, stationery gum, pencil, pen spring.
Master Class
- Take a sheet of paper and a pencil, twist the tube diagonally from the corner, then fix it with tape and pull out the pencil.

- Twist the second sheet of paper around the first tube, then pull them apart. The second paper tube should be slightly larger in diameter than the first so that it can be fired from in the future.
- Fix the second tube with tape, then cut off the edges.
- Twist 2 more paper tubes in the same way.
- Cut the tubes into segments of this length: trunk - 2 tubes 15 cm long; handle - 7 tubes 5 cm long; trigger - 1 tube 8 cm long.
- Glue 5 cm tubes diagonally to make a handle.

- Glue the 8cm tube on top of the handle so that the remaining 3cm protrude to the right. This is a trigger.
- Glue two 15cm tubes together and glue to the top of the gun as a barrel.
- Twist two thin tubes from yellow paper.
- Bend the thin tube into a "U" shape and insert one end into the trigger and the other end into the top tube of the handle. Cut off the excess. This will be the trigger.
- Make a trigger guard from the second thin tube. To do this, place one end of the tube in the handle (in the second tube from the top) and glue the rest of the tube to the bottom of the barrel.

- Twist the pink paper tube, flatten it and tape the handle as shown in the image. It is worth noting that the rear hole in the trigger must be open.
- Remove the trigger from the top tube of the handle and insert the spring. It is worth noting that the spring should rest against the tube covering the back of the handle. Reinsert the trigger.
- Twist a thin thick tube of yellow paper, secure with tape and cut off the edges so that they are even.

- Bend the edge, put on an elastic band and fix with glue.
- Insert the tube with the rubber band into the down tube of the gun barrel and pull the rubber band forward, hooking it between the two tubes.
- Roll up bullets out of paper, load the gun and shoot.
You will need: colored cardboard, scissors, glue stick, cotton wool, stapler.
Master Class

The rainbow in the clouds is ready!
Binoculars
You will need: yellow cellophane, scissors, adhesive tape, black paint, brush, green and black paper, glue, rubber band, wine cork, string or elastic band.
Master Class
- Cut out 2 circles of yellow cellophane and stick with tape on the circumference of the bushings as binocular lenses.

- Paint the circumference of the wine cork with black paint and cover it with green paper.
- Tape the sleeves with green paper and glue the black stripes as shown in the image.

- Glue the bushings together and fix by putting on a clerical gum. After a while, remove the gum.

- Glue the glued cork between the bushings.

- Prepare an elastic band or rope of the desired length, make a hole on the side of the bushings and fasten the elastic band.
Binoculars are ready!
Origami rose
You will need: double-sided colored paper, scissors, a simple pencil.
Master Class
- Fold a sheet of colored paper diagonally as shown in the photo and cut off the excess strip to make a square.
- Bend the square to form a second diagonal.

- Bend the square in half to form lines like a snowflake.
- Move the sides of the workpiece in this way: the top - from the right side to the left, and the bottom - from the left to the right, to make a triangle.
- Bend all 4 peaks to the middle and run your fingers along the folds.
- Expand the workpiece to a double triangle and fold the top corner back.

- Spread the bud and bend the folded corner inward.
- Gather the double corner back and run your fingers through the folds.
- Raise 4 side corners to the top.

- Flip over, then fold each side to the center to the middle. You should get a blank with a hole at the bottom.
- Blow strongly into the hole from below to straighten the bud.
- Twist the petals using a simple pencil.

- Take the strip of paper cut off at the beginning.
- Fold the stem and insert it into the bud.
The origami rose is ready!
Moving 3Dfish
You will need: colored paper, scissors, glue, pencil, black felt-tip pen.
Master Class
- Take a sheet of blue paper and make a square.
- Fold the sides to the fold line, then open the paper.

- Fold the paper in half in such a way that you get a triangle, as shown in the image.
- Make cuts along the fold line, then open the paper and glue the overlapped parts that are not cut.
- Flatten the fish's face by cutting off a corner.

- Cut out the fins and tail from the pink, then draw stripes with a felt-tip pen.
- Cut out the eyes from white paper and draw the pupils with a black felt-tip pen.

- Glue the fins, tail and eyes, also do not forget to draw eyelashes.

- Cut out an elongated semi-oval and glue it as the lower jaw.
You will need: a sheet of colored paper, a felt-tip pen and scissors.
Master Class
- Fold a sheet of colored paper in half.
- Place your palm on the piece of paper so that the thumb and forefinger touch the edge of the piece of paper, thereby forming a half heart.
- Circle your palm.
- Cut out the palm and unfold the craft.
The heart in the hands of colored paper is ready!
You will need: colored paper in white and yellow, a simple pencil, ruler, glue, coin or compass.
Master Class
- Cut 9 strips of paper to the same size.
- Make 2 circles on yellow paper.
- Cut them out.
- Glue the ends of the strips to form petals.
- Glue the petals to the yellow circle, then glue the second circle on top.
You will need: red colored paper, a simple pencil, scissors, a round object.
Master Class
- Trace a round object on colored paper.
- Draw a spiral in the circle.
- Cut out the circle.
- Cut the spiral in such a way that you get a "spring"
- Twist the rosette, in the same way make the desired number of roses.
Original colored paper roses are ready! I recommend watching the video tutorial!
You will need: double-sided colored paper, glue gun, stick or skewer as a stem, button.
Master Class

A creative flower made of colored paper is ready!
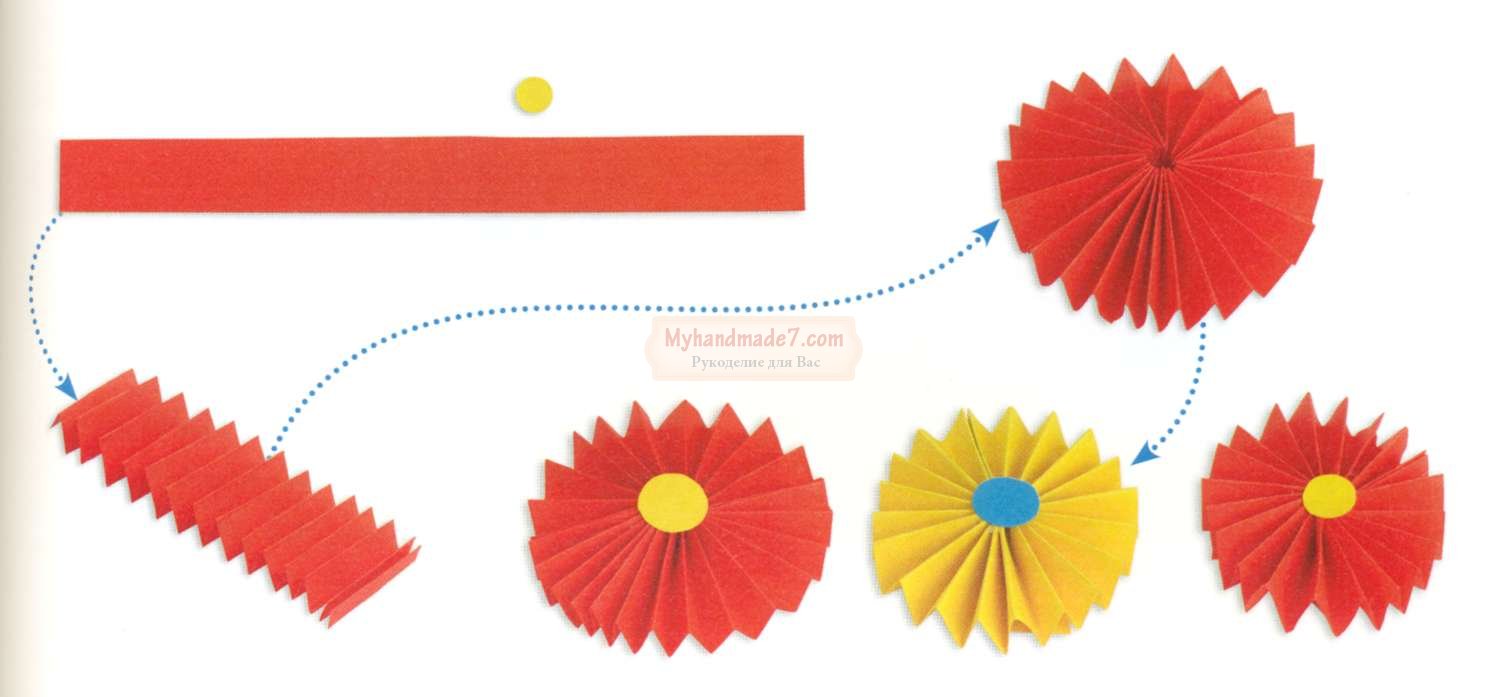
You will need: 4 sheets of colored paper, double-sided tape.
Master Class
- Fold each sheet into an accordion.
- Fold each harmonica in half to form a fan.
- Glue 4 sheets together in such a way that you get a circle.
A fan flower made of colored paper is ready!
You will need: colored paper, stapler, cut out butterfly (from a magazine, notebooks, pictures), felt-tip pen.
Master Class

A case for surprises made of colored paper is ready!
You will need: colored paper in black and yellow, a simple pencil, scissors, ruler, glue, compasses, sequins.
Master Class

Colored paper owl is ready!
You can also make a cute bunny out of colored paper, but see how in this video!
colored paper sisters
You will need: paper of two colors, 2 wooden sticks, buttons for the eyes, rubber bands or ropes for hands, pencil, glue.
Autumn is the best time to prepare natural material from which various crafts will be created in the future. In many schools today is celebrated - the day of autumn. And for this holiday, it is customary to make various crafts from natural materials. Indeed, crafts for grade 1 in schools in early autumn are made mainly from natural materials. Therefore, in our selection of crafts for grade 1, you can also find such wonderful crafts made from materials that nature has generously awarded us. In addition, here you will see other options for crafts that you will definitely want to make.
Crafts for grade 1 from natural materials
Look at what a wonderful composition can be made from materials that fall under our feet in the fall. And for this composition you will have to collect acorns. You will also need PVA glue and a sheet of cardboard, from which you must cut out the shape of a regular sheet.

Probably all 1st grade students are familiar with the popular cartoon - Smeshariki. So, from natural materials you can make these heroes in a creativity lesson at school. To create this craft, you should prepare only vegetables and plasticine. You may also need felt-tip pens with which you will decorate the characters. Everything looks very funny. Is not it?

Crafts from handy materials
In this article, you will be able to discover crafts for younger students. You can make all these crafts at school in the classroom or at home, for example, for a school exhibition. We all have a lot of unnecessary things in our house. And if you have old glass jars lying around at home, then we suggest making them a little brighter.
So, you should prepare:
- clean glass jar
- acrylic paints,
- flowers for decoration.
It is very easy to make this craft. To do this, you just need to paint the jar with acrylic paints. And as soon as the paint dries, you need to write on it with a marker. That's all the wonderful vase is ready. You just have to insert flowers into it.

If there are matches at home, then you can make such a picture out of them. Here you will need glue and a sheet of cardboard. Get creative and see what you can do.


Crafts from colored paper
You can make a lot of crafts out of colored paper. And therefore, such material is used quite often in the classroom with schoolchildren. You can make such bright and interesting little things out of paper. And the diagram will tell you how to do them.


Indian.
To make such an Indian it is worth preparing:
- colored paper: red, yellow and orange;
- toilet paper sleeve;
- scissors;
- glue;
- a couple of buttons;
- marker;
- a couple of big buttons.

Progress:
- First, a couple of buttons should be glued to the toilet paper roll. As a result, you get eyes.
- From orange paper, you need to cut a triangle, which is instead of a beak. And from red paper it is necessary to cut out a squiggle, which is glued under the beak.
- Now put your palm and circle it. After that it is worth cutting it out. This palm should be used as a template. And such palms should be cut out a few. Approximately, there should be 6 of them.
- Now we glue the palms on the back of the sleeve. Moreover, it is necessary to stick in 2 layers in order to get feathers.
- At the end, we glue 2 large buttons to the bottom of the sleeve, which will be the legs of the craft.
A hand toy is a cheerful octopus.
This craft is very easy to make. To work, you need to prepare:
- scissors and pencil;
- glue and colored paper.
Progress:
- First, put your palm on a piece of paper. Then it should be circled with a simple pencil. At what fingers are the legs of an octopus.
- Now with the help of colored paper it is worth making the face of an octopus.
- Then it is worth cutting out a skirt for an octopus girl from paper.

That's all the fun craft is ready.
Finally
Now you have learned about what crafts you can do to school in grade 1. It is worth saying that this is just part of the crafts. And you can supplement these ideas with your creative thinking and imagination.
In modern schools and preschool institutions, much attention is paid to working with paper. Both kids and schoolchildren love to create original paper crafts. Working with her, the child develops his imagination, learns to think creatively, and also develops fine motor skills of fingers.
Simple voluminous gift boxes or voluminous figures can be made by hand by drawing a diagram on a piece of paper. Many crafts are almost impossible to put together without diagrams. Thanks to the templates, you can create complex voluminous fakes from colored paper or cardboard. Beautiful knick-knacks, furniture models and much more - any art lover can do.

To do this, you need to find on the Internet, for example, on the website of the Country of Masters, any template you like. Animals, birds, toys - everything can be created using ready-made templates and schemes.
Each template comes with instructions on how to assemble the craft. The template needs to be downloaded, printed on a printer, cut out a figure along the contour. On each figure on the template, dotted lines will be drawn along which the model should be folded. Glue the finished model with glue.
Easy paper crafts for kids
Children show interest in paper from childhood. To instill a love of creativity, parents should captivate the child with the creation of a variety of paper crafts. You can make a beautiful bright bird craft that a child can play with or use it to decorate a bedroom.
A simple cardboard bird:
- According to the template, cut out the shape of a bird, draw a beak, feathers, a tail.
- Fold an accordion from a square sheet of colored paper.
- Make a hole and fasten the wings in it.

If you cut out a few birds, you can make a Chinese breeze according to Feng Shui. By hanging the birds on a wooden stick, you can steal the entrance to the children's room with such a craft.
All cutting work must be carried out by adults or under their close supervision!
After working with paper, the child should put the entire tool in a box. This is how precision is developed.
Stylish cardboard and paper crafts: three-dimensional paintings
Application is considered the simplest paper craft, it is often studied in elementary school. A beautiful three-dimensional picture of bright flowers will be an original gift from a child to a mother or grandmother. Flowers can be made from white toilet paper or napkins.
If you take toilet paper for crafts, it is better to use expensive white perforated paper, which can then be slightly painted over.
Working with napkins is very simple, but you need to be careful not to accidentally tear it. Therefore, you should be especially careful when creating such crafts.

Progress:
- Fold the napkin in four, fasten with a stapler in the middle. Cut out a circle from a napkin
- Raise each layer of the napkin in turn, forming a lush flower.
- From green paper, cut 6-7 leaves according to the pattern.
- Cut out a basket from brown paper, stick it on a thick red sheet of cardboard. Arrange flowers and leaves in the basket.
The basket can be made from corrugated paper of any color, but it is advisable to stick it in a couple of layers. Instead of paper, you can use foil for baking or from chocolate bars.
Interesting paper crafts: weaving
There are a lot of ways to weave paper crafts, this is a very interesting and original way to create crafts.
The simplest thing is to plait strips of paper between each other in a checkerboard pattern, creating an object. A more complicated way is weaving from paper twisted into tubes.
Depending on which paper you choose, your craft will have special properties.

There are several options:
- Newspaper;
- Glossy magazine;
- Tape for cash registers;
- Plain paper.
Note that it is easier to work with paper, which is durable - the craft, respectively, will come out more durable. An original drawing will come out of glossy magazines.
Do not intertwine different types of papers. Thick paper may not be intertwined with thin paper, and sometimes it can tear it.
Finished products can be decorated with ribbons, beads, quilling flowers, everything that your imagination is capable of.
How to make paper crafts: preparing paper tubes
Weaving from paper tubes is a very entertaining art. You can make tubes from magazine sheets - the material is quite dense and bright pictures will become an original pattern on the basket.
For manufacturing you will need:
- Paper;
- Scissors;
- Pencil;
- Ruler;
- Glue;
- Knitting needles.

First, let's prepare the tubes. Ribbons with a width of 90 mm of any length are simply wound on a knitting needle. We glue the edge, take out the knitting needle, leaving a couple of centimeters inside the tube, glue the second edge.
It is desirable to wind tightly, the accuracy of the product depends on this. Do not be distracted by extraneous matters, so the progress of work is lost.
By gradually pulling out the needle and building paper on it, you can lengthen your tube to the desired size. To weave a basket, the length of the tube should be such that it is convenient for you to bend it.
Beautiful basket: paper crafts in stages
So, we made blanks, in addition to this, you will need a piece of durable cardboard, scissors and glue. From the cardboard you need to cut the bottom of the future basket. To do this, according to any template, cut out two cardboard circles.
Now you can start weaving baskets:
- Glue paper tubes around the circle on the first cardboard circle. Glue the second circle onto the tubes.
- We lift the tubes up and fasten with an elastic band.
- Glue the end of one tube to the base, then grab the standing tube from the outside, lead it inward and grab the second tube from the inside.
- We alternate "outside-inside" until the tube ends.
- To lengthen the tube, you need to insert a new vine at the end of the previous one.
- In order for the basket to have a certain shape, when weaving it is better to insert a bottle or jar inside.
- Weave all rows to the required height.
- If there is a piece of vine left, do not cut it, it is better to fix it inside the finished basket. For fidelity, you can stick to one of the tubes.
- Frame tubes can be glued to the walls of the basket.
- We paint the finished product with acrylic paint, wait for complete drying and paint over again.
42.jpg)
The decorative basket is ready, you can put a small artificial flower there or adapt it for hairpins and rubber bands.
Simple paper crafts: an angel on a Christmas tree
For the New Year, I really want to decorate the house with beautiful decor. The easiest way is to make beautiful paper crafts yourself with a little effort. Even a child of 4-5 years old can make an angel craft under the supervision of their parents.
How to make a Christmas angel step by step:
- Cut out two squares of 10x10 cm from colored paper. Fold them like an accordion.
- Make a bend on the accordions, stepping back from the end of 3 cm. Bend one accordion to the right, the second to the left.
- Glue the bent fold to the bottom of the fan.
- To make the head, you need to cut 4-5 strips of paper as wide as the edge of the fan. We wind the strips on top of each other, forming a tight circle. Fix the size of the head with glue.
- Place the rest of the paper down.
- Glue the halves together. Angel is ready.
17.jpg)
If you want to decorate a Christmas tree with an angel, you can tie a serpentine to a halo and hang the craft on a branch.
You can also plant it on top of the tree. To keep it, just attach the craft to the branch with a regular clothespin.
White Paper Crafts: Volumetric Snowflake
Volumetric snowflakes look spectacular, besides, they can decorate an apartment before the holiday and decorate a Christmas tree. To create such a craft, you will need paper, scissors, glue.
How to make a three-dimensional snowflake step by step:
- Cut out 6 squares from sheets of paper.
- Fold the square in half to make a triangle. Make cuts from the bottom fold towards the top corner. The cuts should not meet, you need to leave a small gap between them. Thus, make 3 triangular cuts.
- Unfold the sheet and place it in front of you in the form of a diamond.
- Fold the first inner row of strips together, fix with glue.
- Turn the craft over, repeat step 4 with the following strips.
- Turn over and fasten all remaining strips.
- In a similar way, make 6 parts of a snowflake.
- Fasten together in 3 parts with a stapler.
- Glue the two halves together.

When working, it is better to use glue with a brush or a glue stick.
If, when gluing, a loop-ribbon is placed in the center, the finished craft can be hung anywhere.
White and colored paper is suitable for work. A snowflake made of paper will look very unusual, where one side is colored and the other is white.
The easiest children's paper crafts without scissors
Easy and beautiful craft for kids - "The Universe through the eyes of a child." The figure can depict the month, stars and other celestial bodies. This craft can be done without cutting.
To work, you will need very few materials - glue, confetti (or small pieces of torn paper) and a dark blue sheet of cardboard.
How to do:
- Collect confetti from crackers or cut out a bunch of small circles of multi-colored paper with a hole punch.
- Take a stencil and apply a drawing on a sheet - a crescent, stars and planets.
- Paint over the drawn figures with PVA and, until it is dry, sprinkle with ready-made confetti.
The finished picture can be decorated with a shiny frame, for it you need to finely chop the New Year's rain and stick it along the contour of the picture in the same way.
7.jpg)
Work with such crafts can be carried out even with preschool children - in kindergartens or early development circles.
Applications can also be decorated in this way. Decorating, for example, a Christmas tree cut out of a green leaf, you can make a beautiful New Year's craft.
Fascinating paper crafts for children: mobile toys
Such toys are very interesting for children. You pull the string, and the arms and legs of the animal or doll move. In fact, making such a figure is quite easy.
An entertaining puppet toy can also be made from plywood, but since cardboard is more malleable in manufacturing, we will analyze this option better.
To work, you will need cardboard, a couple of buttons, thin wire, scissors, strong thread and bards.

How to make a puppet dog:
- Moving parts (paws and tail) are drawn on cardboard separately and cut out.
- Subsequently, at these points, we make fastenings with wire or bards. Buttons can be used as a stopper.
- We glue the torso and head with adhesive tape or glue to a bamboo stick.
- We insert into the pre-made holes in the paws along the mount and combine with the body. We tie the paws together with a thread or elastic band. To do this, we make two additional holes in each foot so that they are located closest to each other, and the thread is not visible from the front side.
- In the same way we fasten the tail and connect it to the hind leg.
- After we tie another long thread to the one between the legs, it will set in motion all the moving limbs.
- The final stage of painting, at your discretion.
Having performed a cat, a fox, a hare using a similar technology, you can arrange a puppet theater for kids. Every child will like a play based on their favorite fairy tale with the participation of animals.
Paper crafts without glue: simple origami for kids
The origami technique is quite complicated, but you really want to make your child an interesting voluminous toy with your own hands.
This chicken is one of the most interesting and relatively simple crafts. The sheet of paper must be square.
Tip: if you go when tearing off to avoid severely torn edges, fold the sheet in both directions.
For cutting, you can use scissors or a ruler with a sharp clerical knife.
Origami chicken step by step:
- Fold the square sheet diagonally. Unfold, fold in half.
- Having unfolded, we bend the left and right corners of the square inward, combining them in the middle of the square. The result is a pentagon.
- We bend the top of the cone in the middle. Then we bend the same cone in the opposite direction, so that a small corner protrudes beyond the border of the sheet - the future beak.
- We combine the left and right sides of the whole craft, put it so that the beak is on the left.
- We bend the upper right corner into the middle of the product.
- The lower right corner, it consists of two sheets, we bend them outward of the product. We do this by combining the lower sides, while we bring a small corner beyond the extreme left border - these are the legs of the chicken.
- We turn out a small corner-tail.
- We lower the beak a little. You can paint over with a regular red pencil for more realism. Draw eyes.
Such a craft can surprise a child, intrigue him. Having aroused interest in the toy, you can enlist the baby to help create a similar origami next time.
Master class: do-it-yourself paper crafts (video)
In fact, you can make so many crafts out of paper and cardboard that you can’t list them - animals, birds, cars, dolls. They can be voluminous or simple, colored or white. The richer your imagination, the more interesting the craft is.