The balcony is the most vulnerable room in the apartment, which often suffers from severe frost and wind. And if earlier it often served as a kind of storage room, storing all the necessary (and often even unnecessary) things, nowadays many people turn the loggia into a full-fledged room.
The only difficulty that residents face is that it is almost impossible to be on the balcony in winter - frost and strong wind create a beautiful picture outside the window, but a cold atmosphere on the loggia. However, this problem can be prevented today. A huge amount of thermal insulation materials make it easy and quick to insulate the balcony with your own hands.
Today, there are a huge number of options than to insulate the balcony from the inside. The choice of one or another option may depend on many factors:
- The amount you are willing to spend on insulation.
- Climate.
- Building type.
- Your personal preference.
- Resistance of the material to frost, wind, moisture.
One way or another, before proceeding with the insulation of the loggia, it is important to study in detail all popular materials. This is the only way you can choose the option that suits you perfectly. We suggest you familiarize yourself with the most common heaters.
Expanded clay

It is made of clay, therefore it is considered an environmentally friendly and safe material. Expanded clay is a small and lightweight porous granules. A similar weight and structure of the material is achieved thanks to a special clay firing technology. The raw materials are first heated to about 1000 degrees, as a result of which voids are formed inside, providing heat and sound insulation. Expanded clay is used to insulate walls, floors, ceilings or even the foundation of a country house.
Advantages:
- affordable cost;
- long service life;
- resistance to mold and mildew;
- the ability to take the required form;
- light weight.
Disadvantages:
- increased degree of moisture permeability;
- rather complex material setting;
- Expanded clay is used mainly for floor insulation and is not suitable for other surfaces.
Mineral wool

The most common insulation for walls and floors. Outwardly, it resembles a thick canvas, which consists of many molecules chaotically intertwined with each other. The raw material for mineral wool is glass, rocks or slag. In order for the fibers to reliably connect with each other, they are impregnated with special mixtures based on oils and alcohol. The mineral wool itself is divided into several other types:
- glass wool (consists of glass, stove and limestone);
- stone wool (made from basalt rocks);
- slag wool (produced from blast-furnace slag).
Advantages:
- low level of thermal conductivity;
- compliance with all fire safety standards;
- does not lend itself to influence (deformation) during sudden temperature changes, heating and cooling;
- resistance to chemical and mechanical damage;
- vapor permeability;
- easy to install.
Disadvantages:
- moisture permeability (which can be reduced with the help of special water-repellent agents);
- great weight.
Styrofoam

Perhaps the lightest thermal insulation material. It is a foamed mass, which is more than 90% filled with air. It is thanks to this technology that it turns out to achieve a good result and efficiently. The popularity of foam as insulation is also due to the large selection of materials. It is divided into the following categories:
- sheet;
- foam in balls;
- extruded polystyrene foam (which we will talk about a little later);
- liquid foam;
- foam formwork.
Advantages:
- low cost compared to other heaters;
- low weight of the material;
- good thermal insulation properties, allowing the use of a thinner layer of insulation;
- versatility (suitable for floor, ceiling and wall insulation);
- long service life (up to 30 years);
- resistance to the appearance of harmful microorganisms;
- easy to install.
Disadvantages:
- release of toxic substances during combustion;
- poor vapor barrier;
- the release of harmful substances even at high temperatures (applies to cheaper options);
- absorbs moisture;
- not resistant to mechanical and chemical damage.
Extruded polystyrene foam

Today, many people prefer to insulate the balcony with expanded polystyrene. This material is a subspecies of polystyrene and is also characterized by low weight and good thermal insulation properties. Comparing polystyrene and expanded polystyrene, it can be noted that the materials have both common features and some differences. For example, the texture of the latter is not granular, but smoother.
Advantages:
- low vapor permeability;
- material strength;
- lack of water absorption, which allows the use of expanded polystyrene without preliminary waterproofing;
- low degree of thermal conductivity;
- compliance with all fire safety requirements (incombustibility);
- resistance to high and low temperatures;
- environmental friendliness;
- ease of installation;
- resistance to mechanical damage.
Disadvantages:
- poor vapor barrier;
- high material cost;
- instability to the action of sunlight (corrected by special processing of the material);
- additional costs for the arrangement of the frame or the purchase of glue.
Polyurethane foam

The basis for polyurethane foam is a subspecies of plastic, which has a foamed structure. Like some previous heaters, this material is 90% composed of a gaseous substance, which is filled with all its cells. The use of various technologies has helped to create several types of polyurethane:
- Elastic (in other words - foam rubber), which fills sofas and armchairs, and is also used to make washcloths, shoe linings, etc.
- Hard - is actively used for heat and sound insulation at home.
Advantages:
- mounted on any material (concrete, metal, glass, wood, brick, etc.);
- light weight that does not weigh down the surface;
- able to significantly strengthen the surface;
- resistance to sudden changes in temperature, extreme heat and frost;
- compliance with all fire safety requirements;
- thanks to the one-piece construction, no seams or joints appear on the surface.
Disadvantages:
- not resistant to sunlight;
- although the material does not burn, it begins to smolder in an open fire. Therefore, do not install polyurethane foam in rooms with a high risk of overheating or fire.
Penofol
It is one of the most innovative balcony heaters. This material consists of several layers:
- Self-extinguishing foamed polyethylene.
- Aluminum foil.
Unlike previous heaters, penofol is not able to absorb heat. Thanks to the foil, it works on a different principle, namely, it reflects thermal radiation. The material, in turn, is divided into several types:
- Type "A" - the foil is on one side of the insulation.
- Type "B" - with foil on both sides.
- Type "C" - with a special self-adhesive insert.
Advantages:
- versatility. The material is used to insulate the walls of the floor and ceiling of the balcony. In addition, it is great for both indoor and outdoor decoration;
- low level of vapor permeability;
- provides high-quality sound insulation;
- light weight and thin structure;
- ease of installation;
- environmental friendliness;
- compliance with all fire safety standards.
Disadvantages:
- due to its high softness, penofol is not used for wall insulation under plaster;
- some types of foam foam require special glue;
- will not be able to protect against severe frosts and is installed mainly as an additional insulation.
Preparation for the insulation of the balcony
In any repair or construction process, it all starts with the preparation of surfaces and territory. Therefore, before you insulate the balcony with your own hands, you will have to get rid of all the trash that is there. By the way, things that you still plan to leave afterwards also need to be transferred to another room.
After the balcony is completely cleared of unnecessary things, it is necessary to completely inspect the room. Firstly, it is important to understand which parts of the loggia require more thorough insulation. In addition, you need to pay attention to cracks and chips that allow cold air to pass through.
Important! Some balconies are quite small. And the thermal insulation material takes up the space of the room. In this case, it is better to immediately identify the so-called "cold" and "warm" zones of the loggia and insulate only those that are more susceptible to frost and wind.

The balcony parapet especially needs insulation
Right now, it is desirable to get rid of significant defects on the surfaces. Large gaps can be filled with putty or polyurethane foam.
At the same stage, you should decide on the type of insulation for the balcony and stock up on all the necessary tools. We will talk about thermal insulation materials a little later. Now let's look at what tools you need to insulate the balcony.
Balcony insulation tools:
Do-it-yourself balcony insulation is a fairly simple and straightforward process. The main thing is to understand the sequence of work and stock up on the necessary tools. These include the following basic materials:
- Insulation in the required amount (the calculation is carried out in accordance with the number of layers and the area of the balcony).
- Cladding material for exterior decoration.
- Polyurethane foam.
- Waterproofing materials.
- Adhesive mixtures.
- Wooden or metal beams (for the frame).
- Dowels, screws, nails of different sizes.
- Metallized adhesive tape for sealing joints.
In some specific cases, you may also need:
- drill;
- puncher;
- scissors;
- hammer;
- building level;
- rollers;
- spatulas, etc.
Everything here will depend on the finishing of the loggia.
Warming potlok
If you plan to insulate the balcony with your own hands, then it is best to start from the ceiling and move further from top to bottom. Of course, if the ceiling of your loggia is the floor of your neighbors, then the process of protecting the room from frost and wind is much easier. However, if the roof is independent, then a little effort should be made to insulate it.

For the best protection of the balcony from cold and wind, we recommend performing the work in the following sequence:
- Spraying or special soundproofing film.
- ... In this case, the most popular materials are polyvinyl chloride or polyester.
- Special membrane that protects from the wind. It freely allows steam released from the insulation to pass through, however, it helps to completely isolate the ceiling from wind and drops, which can enter the room with it.
- Anti-condensation material that protects the insulation from the formation of water droplets.
- Frame (metal or wood of your choice). Sheathing is optional. The insulation can be installed using special glue. The main thing is to make sure that the mixture does not contain toluene. For greater reliability, use dowels when fixing sheets.
- ... We recommend that you use polystyrene, expanded polystyrene or mineral wool. They provide good protection from the cold and are easy to install, which is especially important when insulating the balcony ceiling.
- Vapor barrier for insulation. Does not allow water vapor to pass inside, thereby significantly increasing the thermal insulation properties of the material.
Floor insulation
The initial stage of the balcony floor insulation is the installation of waterproofing on the surface. Polyethylene or penofol will perfectly cope with this role. Be sure to cover all the joints between the sheets with tape. Thus, you can be sure that the balcony is protected from moisture as much as possible.
Tip: In case you are using single-sided foam foam (type "A"), install it with the reflective layer down.
Another popular option for waterproofing the balcony floor is bituminous mastic. However, do not forget that such material dries for about 24 hours.
After waterproofing, you should install a frame or, in another way, logs. For this, wood or metal is used. The main thing is to choose the highest quality material that can last for many years.
Tip: If you are installing wooden beams, make sure that the moisture in them does not exceed 12%. Also for that. To prevent the appearance of fungus, we recommend that you treat the beams with an antiseptic or a special primer.
The bars are laid at a distance equal to the width of one sheet of insulation. As for the height of the beams, it, as a rule, is 10-15 cm. To prevent gaps that appear between the logs and the wall of the balcony, ordinary foam is used.
After installing the lags, you can proceed directly to the installation of the insulation. Make sure that there are not even the smallest gaps between the sheets (or slabs) and the frame. Otherwise, your work will not bring the desired result. In some cases, the insulation is stacked in several layers (for greater protection). Then it is important that the seams between the slabs are not in the same place. That is, you need to lay the material with a slight offset.

Wall insulation
In the process of insulating the floor on the balcony, it will not be superfluous to immediately take care of the walls. So, for example, making out a waterproofing layer, sheathe the entire room around the perimeter with it. This will greatly simplify your further work.
- Create a batten with wooden beams. The distance between them and the width of each beam should be related to the dimensions of the insulation.
- Install thermal insulation material. For walls, traditional options are most often chosen - mineral wool (or glass wool), polystyrene, polyurethane foam, penofol (or isolon). For greater reliability, we recommend combining several thermal insulation materials (for example, foam and mineral wool).
- In the presence of cracks and large seams, polyurethane foam is used. With its help, you can reliably protect the balcony from cold and wind.
- Do not forget to install a vapor barrier on the insulation.
Important! Most often, the wall that connects the balcony and the room (living room, kitchen, etc.) is insulated with one layer. At the same time, at least two layers of insulation should be installed on the outer walls, or a denser thermal insulator should be used.
Insulation of windows on the balcony
If you want to insulate the balcony from the inside as efficiently as possible, in no case should you forget about the windows. After all, even the highest quality thermal insulation materials for walls, ceilings and floors will not be of any use if the wind blows through the cracks in the window opening.
If all this time your balcony has not been glazed, you should pay special attention to the wall that protects it from the street. The parapet (and this is what this wall is called) must be strong enough to withstand the frames and the glass unit. In some cases, it is better to additionally strengthen this part of the loggia. There are two options for strengthening the parapet:
- Brick. The simplest method, which, however, is not particularly reliable and durable.
- Reinforcement with steel rods. Use thick iron beams and cement. This method is a little more complicated than the previous one, but several times more reliable.
Before glazing the balcony, it is necessary to choose the material from which the window frames will be made. Of course, the most popular today are PVC structures. However, some modern manufacturers make wooden or aluminum frames that are in no way inferior to plastic ones (unless they are more expensive).
Classic wooden frames are practically not airtight. Therefore, with their help, it will be impossible to insulate the balcony. Therefore, it is better to use them in areas with a warmer climate.
As for aluminum structures, they are able to retain heat much better than wood. In addition, they are also resistant to rust and corrosive processes. However, the most optimal option (if the criterion is to consider the price-quality ratio) are plastic windows. They are not afraid of high humidity and temperature extremes. In addition, such structures are distinguished by good thermal conductivity. Therefore, if you want to insulate the balcony, choose PVC windows. The most common types of structures today are:
- swing windows;
- windows with two-chamber sash;
- extended profiles.

Tip: If you do not have the time or financial opportunity to update the balcony glazing, you can try to insulate the opening using special materials (polyurethane foam, foam rubber, etc.).
Additional insulation methods
If you live in an area with a cold climate, insulation alone on the balcony may not be enough. Indeed, even the highest quality heat insulators are sometimes not able to protect against severe frosts. Therefore, on cold winter days, additional insulation of the balcony can be organized.
For example, install a conventional electric heater. For greater effect, it should be placed near the wall connecting the balcony and the apartment itself.
Important! Never place the heater near windows. Condensation, which will be released in the process, can greatly harm the glass unit.
If you do not want to install additional heating devices, and it is strictly forbidden to carry out central heating to the balcony, you can install a "warm floor" system on the loggia. It will last for more than a dozen years, creating a comfortable temperature even in the cold season. In addition, today many such systems are equipped with a special thermostat that helps to choose the most optimal mode.
Another option for additional insulation is air conditioning. In addition to the fact that it will heat the loggia in winter, it will also be able to cool the air on summer days. However, the use of an air conditioner has one rather important disadvantage - it will not be able to heat the balcony floor with high quality. Therefore, the warm floor still wins.
Tip: Installing a warm floor is another cost item. You should not rely only on your own strengths, since the installation of the system is a rather complicated process. It is better to entrust the work to professionals.
When protecting the room from cold air and strong winds, do not forget that it is also important to organize good ventilation on the balcony. With sealed gaps, this will be a little more difficult. Therefore, we recommend that you periodically ventilate the loggia for a more comfortable stay on it.
If you live in a cold climate, pay attention to the ventilation system of the "breather" type, which supplies cleaned air from the street, heating it beforehand to the temperature you need.

The process of the ventilation system breather
Common mistakes when insulating
When organizing the insulation of the balcony on your own, you can not take into account many important nuances. Typically, people make fairly predictable and common mistakes, including:

- preparation of the room (freeing up space, taking out the garbage, etc.);
- ceiling repair (if necessary);
- cleaning surfaces (walls and floors) from past coatings, dust and dirt;
- restoration of walls and floors (if necessary);
- applying an antiseptic that prevents mold;
- glazing of the balcony;
- balcony waterproofing;
- sealing all seams and cracks;
- conducting electrical wiring;
- installation of insulation (from top to bottom - from the ceiling to the walls and only then - to the floor);
- fine finishing of the loggia;
- installation of furniture and lighting.

The sequence of materials for the insulation of the balcony
Today's balcony in many apartments turns into a full-fledged room, a functional space. This is especially true for small apartments, whose residents appreciate every centimeter. If the balcony is insulated, it becomes an office, a storage room, a resting place, a mini greenhouse, a dining room or an extra bed. There are many options for using it. The main thing is to do the work on its insulation with high quality. Only in this case it will be warm and cozy on the balcony.

Features and Benefits
In the warm season, the whole family can rest on the balcony, but when autumn comes, this room becomes useless. If you insulate it, the situation will change. The plus is that all the planned work is easy to do on your own. Additionally, a warm room is a space in which it is easy to create a small work area or sitting area. In addition, the presence of a warm balcony will automatically make the apartment cozier and warmer. You can attach a living room or kitchen to it, depending on its location. This will create extra space.

Before you start with insulation or glazing, you need to get expert advice. He will definitely tell you what kind of load a warm balcony can withstand, whether it is worth strengthening it. If the base is a strong concrete slab, the question of reinforcement does not arise. But the metal parapet must be reinforced with foam blocks or lightweight bricks made of ceramic material. The same should be done in the case of a fragile fastening of a reinforced concrete base.
Double-glazed windows in wooden frames can be used for insulation. They are environmentally friendly, allow windows to "breathe", but are expensive. Aluminum windows insulated with polyamide inlays increase the thermal insulation of the room. The most optimal would be the equipment of PVC windows with double glazing, which reliably retain heat.
Such windows are cheaper than wooden ones, but at the same time their thermal insulation is not inferior to aluminum ones.

What materials are better to choose
For finishing balconies or loggias today there are many varieties of finishing materials, with the help of which they give even the smallest room an original and attractive look. The main thing is to make the right choice of material for finishing. For insulation, experts recommend using cork, plastic panels, lining with a wooden or plastic base, drywall, plaster, MDF panels, decorative stone, aluminum profile, penoplex, expanded polystyrene, penofol.
Mineral wool, styrofoam finishing is an excellent solution for self-warming a room.

In the case of a non-insulated balcony, it is better to give preference to artificial stone, plastic frost-resistant lining, cork panels or tiles. The following materials are most often used for finishing:
Drywall
- This material is distinguished by the fact that there are no toxic substances in its basis, it is easy to process and is combined with other finishing materials in design. Drywall can be plastered, painted, wallpapered, sheathed with panels and clapboard. With the help of such a versatile material, it is enough to simply turn a balcony into a full-fledged living room.

PVC panels
- A practical solution, but it is better not to use this material if the constant temperature on the balcony is below five degrees. This problem can be solved with the help of frost-resistant panels, developed using new technologies. This material is not afraid of moisture, but it is able to quickly lose color from direct sunlight. This point should be taken into account if the room is located on the south side. Advantages: low cost, quick and easy installation with glue.

Cork panels
- They create coziness that cannot be organized using other finishing materials. Cork panels are pressed bark of cork oak. Cork panels are easy to install and are suitable for any type of balcony, regardless of the room temperature. The cork panel does not absorb foreign odors, including the smell of tobacco. Lack of material - high price. For insulation, inexpensive penoplex is also used, mineral wool is also perfect.

How to properly insulate a balcony with your own hands: step by step instructions
A balcony in a city apartment is a special space. This piece of the house, brought out under the open sky, can become an office, a greenhouse or a resting corner, as long as it is glazed and insulated.
Do-it-yourself balcony insulation will save a lot of money. Sheathing in a panel house, in "Khrushchev" is done taking into account the characteristics of the apartment and the building.
- Step 1... To begin with, the old frames are dismantled, the surface is prepared and things are taken out. Insulation from the inside is an important stage in the entire process.

- Step 2... At the second stage, it is necessary to glaze the balcony. The best option would be PVC plastic windows. Many people prefer to keep the old wood frames. However, remember that even if wooden structures are in good condition, they will not be able to organize the same heat savings. There are cracks in the tree, so it makes no sense to engage in insulation in this situation.

- Step 3... After the plastic windows are installed, you can begin to warm the floor. Be prepared for the floor to get higher. Consider this if the ceiling in the room is low.

- Step 4... Wall cladding is carried out after the installation of windows and floor insulation. The walls on the balcony are side walls, except for the main one. At the final stage of insulation, finishing works are carried out. The choice of materials depends on the budget. In the process of finishing, window slopes are installed overlooking the balcony.

Required tools and materials
- In order to insulate a balcony or loggia, you will need the following tools: a hacksaw for metal or a clerical knife; roulette; level; pencil, marker or any other writing instrument; glue application tool - brush, spatula, and so on; other instruments. From the materials you need glue and the insulation itself. In addition, you will need a vapor barrier film and a windproof membrane.

A frame device is also required. In this case, you will need wooden beams, as well as nails to secure them. You may also need special fasteners - nails with very wide heads. They are used when polystyrene is not attached with glue.
Insulation inside
- High-quality thermal insulation combined with double glazing turns the balcony into a living space. It is necessary to insulate not only the walls, but also the floor with the ceiling. Insulation materials must be durable, lightweight, safe for humans. Due to precipitation and condensation, the walls of the balcony can become damp and moldy, which means that a hydro and vapor barrier is needed.

Polystyrene foam meets these requirements as much as possible: traditional foam and Penoplex thermal insulation boards. The first is very lightweight, compressive strength, and waterproof. Penoplex is insulation made of extruded polystyrene foam. Its margin of safety and durability surpasses conventional foam, and its shape makes it easy to install in the grip and provides perfect insulation. Balcony cladding with slabs can be performed both inside and outside.

Insulation of a closed balcony begins with surface preparation. It is necessary to carefully cover the gaps and joints between the floor, walls and parapet with polyurethane foam without toluene in the composition. Metal structures must be cleaned of rust, covered with oil paint and treated with a building antiseptic.
Before laying the insulation, they put windows and doors. Window sills and slopes are mounted at the last stage of work. The glazing of the balcony depends on the parapet. If this is just a metal crate, it needs to be built up with ceramic (lightweight) bricks or foam blocks. The thickness should not exceed ten centimeters. To protect the foam blocks, at the finishing stage, they are covered with corrugated board.

Floor
Window structures can be installed on a reinforced concrete parapet immediately, using various assembly and sealing compounds. Reinforced-plastic windows have excellent characteristics, with skillful installation, they reliably protect the balcony and look aesthetically pleasing. When choosing a model, it is worth stopping at swing frames with double glazing.
Floor
- In order to insulate the floor, you can resort to two different directions at once: to make it warm or to constantly warm it up. We are talking about installing a floor heating system, for example, an electric one. Installation of a water system on a balcony is very inconvenient and almost impossible, but installation of an electrical or film system is easy to carry out.

photos
It all starts with preparation. A waterproofing film is laid on the floor under the tiles, which protects the floor from moisture from the outside. Further, the crate is arranged. Instead of a lag, a bar is used, five centimeters thick. If you do not want to raise the floor too much in relation to the old coating, it is better to use a beam of low height. A square beam of 50 × 50 mm is perfect. The beams are laid every 40-60 cm.

To prevent moisture from entering the insulation from the inside, it is covered with a vapor barrier film. It is laid on top of the beams and attached to them with a construction stapler. For internal fastening, a fastening step of 50 cm is sufficient, so as not to create unnecessary holes in the film. Polystyrene must be protected from moisture on all sides. Therefore, it is better to lay the film with an overlap on the walls. All gaps between the beams and walls should be sealed with the same insulation material or polyurethane foam.
Walls
- Many do not insulate the walls, believing that the cold does not enter the balcony from the side of the house. In many ways it is, but the work needs to be done. The walls themselves are not sources of cold, but the joints between them and the side walls of the balcony can be. For this reason, the whole work can only consist in installing foam foam, which is vapor-tight and thin. It will protect the walls from icing and the penetration of condensate into the balcony.

- Ceiling. If we are talking about a private house, then it is best to make a special roof structure. It is recommended to make a pitched roof, the slope of which is directed away from the house. The roof is made of rafters and lathing. A waterproofing film is attached on top of it. Roofing material is attached to the film, and the waterproofing is on top of the double-sided vapor barrier film, with the absorbent side inward. From below, the rafters are hemmed with a vapor-permeable windproof membrane.

The floor slab, that is, the horizontal part, must have several layers at once: insulation; vapor barrier layer; load-bearing beams with interior decoration. The device begins with the installation of the frame, namely the rafter system. Next, a vapor barrier double-sided membrane is attached to it in the specified way. Then they arrange a crate and lay a waterproofing layer. You can use classic roofing felt or special PVC films.
- Insulation outside. In order to insulate the balcony from the outside on your own, skills are required. It is not easy to do quality work on your own, taking into account the characteristics of the building. Finishing outside means saving up to thirty percent on heating. Remember that outdoor work is fraught with some difficulties: if the balcony is higher than the second floor, then industrial climbers will have to be involved in the work.

Before starting the insulation, obtain the consent of the officials from the architecture department. The exterior of the balcony can spoil the overall picture, but if you finish in the same style as the entire building, then you can get permission. Outside insulation has a number of advantages:
- the reinforced concrete slab remains warm, humid air from the room freely passes through it and is released into the atmosphere;
- saving useful space;
- you can install a layer of thermal insulation of any thickness, this will not affect the inner space of the balcony in any way.

The materials can be used the same as for interior work. Preference is given to sprayed thermal insulation as the lightest and most effective. Experts recommend using polystyrene or expanded polystyrene. Mineral wool is sensitive to moisture penetration, so its installation requires special care and accuracy.

An independent procedure for insulating a balcony is difficult. All stages must be performed at a high level, otherwise the room will not be completely isolated. A glass, panoramic, stained-glass balcony is an excellent solution for a small space. Designers advise to connect it to the room for expansion. A glazed balcony connected to the kitchen on the top floor is a luxurious solution.

This material should be of interest to all apartment owners who have a separate balcony or loggia. In this article, I want to talk about how simple do-it-yourself balcony insulation will help make it a full-fledged part of your apartment. If you are tired of using your balcony solely for storing old unnecessary things, read the article and find out how to properly insulate it.
What is the difference between a balcony and a loggia
So that in the future no one has any confusion, first I want to explain how the loggia differs from the balcony:
- The balcony always protrudes forward, beyond the vertical walls of the building... The floor and ceiling of the balconies are interfloor concrete slabs that are cantilevered to the facade of the house. The vertical railing (parapet) is usually made in the form of a welded metal structure, which is installed in front and on the sides of the balcony;

- The loggia is always recessed deep into the facade... Structurally, it is a continuation of the living space, however, it is separated from it by a capital outer wall with a balcony door. Interfloor ceilings serve as the floor and ceiling for the loggia, and the side walls are made of monolithic concrete or brickwork. The parapet on the loggia is installed only along the front, and can be made of welded metal or light building materials (foam concrete blocks, hollow bricks, etc.).

Why do you need to insulate the loggia
In old multi-storey buildings, apartments with balconies and loggias were rented out to tenants without glazing at all. This means that snow and rain can freely enter there, and the air temperature throughout the year remains the same as outside.
Apartments in modern new buildings are most often rented with glazed balconies. Glazing helps protect it from rain and snow, but does not protect it from cold, wind and moisture. Therefore, the temperature and humidity of the air on the glazed, but not insulated balcony, does not differ much from the weather outside.
I can say from personal experience that the simultaneous glazing and insulation of balconies with your own hands allows you to solve several housing issues at once:
- The insulated and glazed loggia can be used not just as a storage room for unnecessary trash, but as a full-fledged room in your apartment. Moreover, when paying for utilities, you still pay for it as for living space;

- When supplying electricity and centralized heating, it can be equipped with a study, a small home workshop, a children's playroom, and even your own greenhouse or winter garden;
- If you want to increase the usable area of your living room or bedroom, and are ready to sacrifice a balcony for this, then I suggest doing the following:
- First of all, we insulate the balcony with high quality, and install a panoramic window with double-glazed windows;
- Next, we supply centralized or autonomous heating from the apartment;
- We dismantle the old window block and the balcony door;
- Now it remains to unite your room and balcony into a single living space.

- The following offer should be of interest to owners of one-room apartments.
If the layout of your house allows, then due to the balcony or loggia, it is easy to turn a one-room apartment into a two-room one:
- First of all, you need to carefully insulate the loggia, and install double-glazed windows;
- Then bring heating, sewerage and water supply pipes to the loggia;
- Install a sink, plumbing and a minimum set of kitchen appliances;
- In the former kitchen, equip a living room, a nursery or.

Even if you do not plan to convert the balcony into a living room, then insulating it will help significantly reduce heat losses in your apartment. Firstly, in winter, this will make the house much warmer, and secondly, it will reduce the monthly costs of heating and air conditioning.
Selection of thermal insulation materials
To insulate balconies, it is best to use rigid polymer-based insulation materials, or roll insulation based on mineral wool.
Both those and other materials for insulation have their advantages and disadvantages, therefore, below I will talk about their main qualities in more detail:
- Polyfoam is a rigid sheet insulation made of expanded polystyrene granules welded together.
It has the following characteristics:
- Construction foam sheets are usually 1000x1000 mm in size, and can have a thickness of 10 to 150 mm;
- They have sufficient rigidity, have a very low thermal conductivity, and absolutely do not allow air and water vapor to pass through;
- Polyfoam is considered the cheapest insulation, since its price is about 150-200 rubles per sheet 1000x1000x50 mm in size.

- Extruded polystyrene foam (EPS or Penoplex) has similar performance properties, but it has a much higher rigidity:
- Penoplex sheets are capable of withstanding a significant weight load, so I advise you to use it for floor insulation;
- EPS and foam are degraded by ultraviolet radiation. Therefore, they cannot be left in direct sunlight for a long time;
- For the same reason, it is advisable to carry out the final finishing no later than a week after the installation of the insulation.

- Foamed polyethylene foam (Penofol) is sold in rolls with a width of 1000 mm, and a thickness of 3 to 12 mm... Penofol is most often used as an auxiliary heat and waterproofing material. It is laid in the form of an interlayer between the main insulation and the inner decorative cladding.
Penofol in a thermal insulation coating performs three important functions at once:
- Foamed polyethylene itself has low thermal conductivity, therefore it serves as an additional insulation;
- A thin mirror film of aluminum foil reflects the infrared spectrum of thermal radiation, therefore returns the radiant heat from the heating batteries back to the loggia;
- Polyethylene film absolutely does not allow water vapor to pass through, therefore, warm humid air from the room cannot penetrate into the thickness of the main insulation. This protects it from condensation.

- Basalt or stone mineral wool is a soft fibrous insulation made from interwoven thin fibers of molten rocks.
Basalt wool is considered a universal type of insulation, since it has practically no restrictions on its use in construction:
- Mineral wool is sold in rolls or in the form of rigid plates with a thickness of 20 to 100 mm;
- It has a low heat transfer coefficient, does not burn at all, is not susceptible to mold formation, and has an unlimited service life;
- Stone wool allows air and water vapor to pass well, however, when it gets wet, its heat-insulating properties deteriorate significantly;
- In order to prevent the formation of condensation inside the insulation, the mineral wool must be installed in combination with a waterproofing layer.

In addition to stone wool, glass wool is also on sale, which is made from thin strands of molten glass. Its fibers are very fragile and break easily, therefore, after crushing, such cotton wool does not regain its shape. I do not recommend using it for insulating living quarters, because small glass fibers can penetrate human skin and cause severe irritation.
Instrument preparation
To insulate the balcony with your own hands, you can do with the usual set of household tools:
- To drill holes in concrete, you will need an electric rock drill and a set of drills with a diameter of 6 to 12 mm;
- Holes in brick walls can be drilled with a hammer drill. To do this, you need a set of drills with a victorious tip with a diameter of 6-12 mm;
- In the process of work, you will need to tighten a large number of self-tapping screws. Therefore, I recommend using the PH2 and PZ2 cordless screwdriver with interchangeable bits;
- It is more convenient to cut the bars for the installation of the lathing using an electric cutting machine, but if it is not there, then you can use an ordinary hand saw for wood;

- To cut the insulation and cut the cladding panels, you will need a sharp construction knife with a set of replaceable blades;
- From hand tools, you will also need two hammers weighing 200 g and 400 g;
- Two flat and one curly screwdriver;
- Small and large pliers or pliers;
- Building level, rope plumb line, metal ruler and tape measure at least 3 m long;
- Polyurethane foam in large metal cylinders;
- In addition to insulation, from the materials you need to purchase dry wooden blocks for the manufacture of a carrier, with a section of 60x60 mm;

- Insulation adhesive. It is sold as a dry mortar and is prepared directly at the work site;
- Wide aluminum metallized tape for ventilation systems;
- Plastic dowels with wide washers for attaching insulation. People often call them umbrellas or parachutes;
- Depending on your preferences, you can use moisture-resistant drywall, plastic siding panels or clapboard for interior decoration of the balcony. In my opinion, plastic siding is best suited for these purposes..

At night and daytime, significant changes in air temperature can be observed on the insulated balcony, which in turn can lead to the formation of condensation on the walls and ceiling. Therefore, for interior finishing, it is allowed to use exclusively moisture-resistant and frost-resistant materials.
Warming process
Stage 1: strengthening the balcony parapet
Insulation of the balcony from the inside should start with the installation of windows, however, in some cases, problems may arise with this. In the construction of multi-storey buildings, balcony parapets are usually made in the form of a light metal fence welded from a corner and a steel square. It is not safe to mount a heavy two-chamber balcony glazing on such a parapet, therefore, it must be strengthened before installing new windows.
I can suggest three ways to strengthen the parapet:
- To strengthen a strong and reliable balcony railing in new homes, you can use an easier method:
- Along the entire perimeter of the parapet, weld additional longitudinal beams from a profile pipe with a section of 40x20 mm, or from a steel corner with a section of 40x40 mm;
- To the longitudinal beams, on each side, weld brackets with mounting plates made of steel with a thickness of at least 4 mm. Each plate should have two holes with a diameter of 12 mm;
- The existing metal structure must be additionally secured at several points to the concrete floor slab, as well as to the facade of the building or to the side walls of the loggia. Expanding anchor bolts must be used for fastening;
- All metal rods of the handrail should be tied together with a truss structure made of a reinforcing bar with a diameter of 12 mm, or a profile pipe of 20x20 mm. Weld the extreme ends of the truss to the mounting brackets;
- After installing the glazing, the outside of the parapet can be sewn up with decorative plastic siding panels.

- In old houses built in the Soviet period, the parapet can be unreliable and very flimsy.
- From inside the balcony, build a new parapet made of foam concrete blocks or hollow fired bricks;
- In the places where the new parapet is adjacent to the facade of the house or to the side walls of the loggia, install anchor embedded structures, at least 3 pcs. in height;
- On top, fix the common railings from a wide board with a thickness of 35-40 mm. It must completely overlap both parapets, and protrude outside and inside the balcony, not less than 50 mm on each side;
- An old metal fence, sewn up with plastic siding panels for beauty.

- If the fence of your balcony is in disrepair, it is better to dismantle it immediately and install a new parapet in its place.
To do this, you can use the following method:
- Along the perimeter of the balcony slab, lay out a new parapet made of hollow bricks or foam concrete blocks;
- After each row of foam concrete blocks, or after every third row of bricks, along the entire perimeter of the parapet, a reinforcing strapping made of a metal mesh must be laid in the masonry;
- The free ends of the strapping must be welded to the anchor brackets on the facade of the house or on the side walls of the loggia;
- Fasten a wide railing board from above to the end of the parapet so that it protrudes outward and into the balcony by about 50 mm;
- Outside, the brick parapet must be plastered with reinforcing fiberglass mesh, and painted with acrylic facade paint in any suitable color.

The installation of metal-plastic double-glazed windows requires certain knowledge and practical skills, therefore, I recommend entrusting such work to qualified specialists in this matter. Firstly, it is more reliable and safe, and secondly, they give a guarantee for their work. In addition, when ordering windows with installation, you can get a discount on installation work.
Stage 2: installation of the floor covering
Balcony slabs usually have a small thickness, therefore, before installing the final floor covering, it must be properly insulated.
Floor insulation can be done with foam panels, extruded polystyrene sheets or mineral wool slabs.
The general principle of using these materials is approximately the same, so I will tell you how to do this using the example of foam sheets:
- The concrete floor slab must be cleaned of construction debris, dried well, and covered with two layers of heated rubber-bitumen mastic;

- If you use mineral wool as insulation, then for waterproofing you need to lay a vapor-permeable waterproof membrane or perforated plastic film on the slab;
- Along the balcony, fix wooden bars (logs) with a cross section of at least 60x60 mm to the floor... The extreme bars must be laid close to the parapet and to the wall in the apartment, and a distance of 300-400 mm must be maintained between the middle bars;

- In the intervals between the bars, lay the foam panels tightly without gaps... If small gaps remain between the foam sheets, then they must be filled with polyurethane foam;
- Cover the insulation and the longitudinal beams with waterproofing made of foamed polyethylene (Penofol);

- Penofol must be laid so that its foil side is facing up, and its edges should be bent onto the side walls, by 60-100 mm on each side;
- To provide a ventilation gap between the finished floor and Penofol, wooden counter strips with a thickness of 15-20 mm must be nailed to the longitudinal bars;
- A fine floor covering can be attached over the counter battens. To arrange a wooden floor on the balcony, you need to use a 40 mm thick tongue-and-groove floorboard.
- You need to lay floorboards across the balcony, and fasten to the logs using galvanized self-tapping screws.

If you want to lay linoleum or laminate flooring on the balcony, then first you need to equip the subfloor. For this, sheets of moisture-resistant plywood or OSB with a thickness of at least 20 mm must be fixed to the longitudinal bars. After that, the subfloor must be sanded and a final floor covering must be laid.
Stage 3: thermal insulation of the parapet and side walls
For normal thermal insulation of the balcony and loggia, it is very important to qualitatively insulate the parapet and side walls, because they are in direct contact with cold air from the street. The capital wall between the apartment and the loggia need not be insulated so that it freely passes heat from the heated room to the loggia.
Below is a step-by-step instruction in which I will talk about insulating walls and a balcony parapet using foam and mineral wool:
- Before starting work, all concrete and brick surfaces must be treated with an antiseptic penetrating primer... It fills open pores between material particles and protects the wall from mold formation under the insulation;

- Mount a supporting frame on the wall for attaching the finished interior cladding. It is made in the form of a lathing of vertical bars with a section of 60x60 or 75x75 mm.
- On the walls, the bars should be placed vertically, from the floor itself to the ceiling... The outer bars are installed at the corners of the balcony, and the intermediate ones are attached to the side walls, at a distance of 300-400 mm from each other.
- It is more convenient to make the supporting frame for the parapet from three or four horizontal bars. The lower bar must be fixed to the parapet at floor level, and the upper bar must be fixed under the railing board. An intermediate one or two beams should be mounted at an equal distance between the upper and lower beams;

- When making a supporting frame, I advise you to lay electrical wiring cables, heating pipes or other hidden communications along the walls in advance;
- If you plan to insulate the balcony with foam, then you need to cut it into separate plates. The width of each tile must be such that it fits snugly between two adjacent bars of the supporting frame;
- Next, you need to prepare an adhesive solution. Apply several large dots of glue to the foam sheet, and press it against the wall in the gap between the frame bars;
- Thus, you need to glue the foam on all walls and the balcony parapet. If there are large gaps and slots in some places, they must be blown out with polyurethane foam.;

- Thermal insulation of walls with mineral wool has some differences:
- Before installing the supporting frame, waterproofing must be fixed to the wall from a vapor-permeable membrane;
- For fixing mineral wool, instead of glue, you need to use plastic dowels, better known as "umbrellas".
- After installing foam or mineral wool, Penofol must be fixed to the wooden blocks with the foil side inside the balcony. For this, it is convenient to use a furniture or construction stapler;
- On top of Penofol, wooden counter strips with a thickness of 20 mm must be fixed. They will be used to fasten the inner cladding;

- If you plan to use drywall for finishing walls and ceilings, then the counter battens must be fastened vertically, parallel to the lathing bars;
- For mounting lining boards or plastic siding, the counter strips must be horizontal., in four or five rows. The distance between them should be no more than 500 mm;
- At the end of everything, you will need to complete the finishing of the walls and parapet, and at the junction of each wall and floor, install a wooden or plastic skirting board.

In the manufacture of a supporting frame for finishing cladding, some craftsmen use a metal profile for drywall. At first glance, this option may seem simpler, but I do not recommend doing this. The fact is that metal has a higher thermal conductivity than wood, therefore cold bridges are formed in the wall at the place of installation of metal profiles. They worsen the thermal insulation of the balcony, and can cause condensation to form in the insulation layer.
Stage 4: insulation of the ceiling
If you plan to install a separate heating system on the balcony, then you must not forget that warm air from radiators always rushes up. In order not to heat the neighbor's balcony from the upper floor, I advise you to pay special attention to the thermal insulation of the ceiling.
The gap between the visor and the floor slab must be blown out with foam.
- The concrete slab should be treated twice with a water-based penetrating antiseptic primer;
- Before installing the heat-insulating material, a vapor-permeable waterproof membrane must be fixed to the ceiling. It is needed so that moisture from the ceiling does not penetrate into the insulation;
- On top of the waterproofing, fix longitudinal wooden bars with a cross section of 60x60 mm. The two extreme bars should be located in the very corners of the ceiling, and intermediate bars are installed between them with a step of 300-400 mm;

- The insulation cut to the width must be laid between the bars. It cannot be glued to the waterproof membrane, therefore, for fastening, you need to use plastic dowels "umbrellas";
- To fill the gaps between the foam plates, you must also use polyurethane foam;
- If warm, humid air from the room enters the insulation, condensation will form there. To prevent this from happening, a vapor barrier made of foamed polyethylene foam must be nailed to the bars on top of the insulation;
- Penofol must be fixed to the ceiling in such a way that its edges fall on each wall by at least 80-100 mm;

- To ensure the tightness of the vapor barrier, all joints of the panels and mounting brackets from the stapler must be glued with metallized aluminum tape;
- Further finishing of the ceiling is carried out in the same way as described in the previous section (paragraphs 11-14):
- Nail longitudinal or transverse counter strips to the ceiling beams;
- From below, fix the finishing decorative cladding (drywall, lining or siding panels);
- Carefully trim the hanging remnants of Penofol;
- Install a decorative cornice or plinth along the perimeter of the ceiling.

Even with full compliance with the insulation technology, condensation may form inside the heat-insulating sheathing. To protect wood from rotting and mildew, it is important to follow two simple rules. Firstly, all wooden parts must be treated with antiseptic impregnation before installation. Secondly, always leave a ventilation gap of 15-20 mm between the finishing sheathing and the insulation.
Conclusion
After reading this article, you can easily insulate any balcony or loggia in a city apartment on your own. A visual guide to insulating balconies can be viewed in the video in this article. All your questions and wishes, I propose to discuss below in the form for comments.
By insulating the balcony, we create a buffer zone on the path of cold air to the living quarters, add a few square meters to create a storage room, or even a small room - but this is if you connect a heater. In our step-by-step instructions, we will tell you how to properly insulate a balcony with your own hands and what materials are used for this.
Balcony insulation begins with checking the supporting structures. To do this, it is advisable to look at the balcony slab from the balcony of the neighbors below: if the beginning destruction is visible with the naked eye, then you can strengthen the concrete and reinforcing layer as shown in the figure. If you doubt the strength of the slab and the ability to carry an increased load of glazing, insulation, floors, it is better to seek expertise. Although, as practice shows, balconies can easily withstand increased load and collapse - this, fortunately, is an extremely rare exception to the rule.
 a - concrete is knocked down in damaged places. b - the surface is cleaned and repair compounds are applied: 1 - contact layer; 2 - anti-corrosion protection; 3 - repair mortar; 4 - leveling putty
Before starting work, you need to remove the old finish and frames (if any), clean all surfaces from decaying elements, if necessary, make a small concrete screed or fill up the slabs with concrete mortar.
Insulation works can be divided into:
- outer skin;
- glazing;
- internal insulation;
- finishing.
Outside parapet siding
The easiest way to make the outer balcony cladding is vinyl siding.
Outside the parapet, a vertical crate is assembled in such a way that it forms a single flat area (check with a stretched thread). Bars or metal profile of the battens are fixed at a distance of about 40 cm from each other. Further, along the lower and upper perimeter, guides for siding (closing profile) are mounted, and the corners are made out with a special vinyl profile - "outer corner".

The siding starter bar is attached with the long side to the lower rail using self-tapping screws. Better to start from the side wall - and the panel is shorter and less visible from the street - you can practice. Between the siding and the balcony grating, you can immediately lay soft mineral wool slabs. At the top of the parapet, you need to mount a drainage system.

A very short video about the main stages of cladding:
Glazing is an obligatory stage in the insulation of the balcony. In this case, you can independently make frames from wood, aluminum or steel profiles (corner, profile pipe) and glaze, or you can purchase ready-made double-glazed windows. The first option will be cheaper, but it is more time consuming and, most importantly, it will only slightly increase the temperature on the balcony in winter. You are unlikely to succeed in sealed windows without the use of double-glazed windows technologies; they will have to be insulated for the winter or not, and leave the balcony, in principle, cold, which will only reduce the wind load. So it is better to order ready-made double-glazed windows for glazing.
If the balcony was not glazed, and you are not insulating the loggia, then the parapet for installing the frames is most likely missing or insufficient. You can create a retaining wall in the form of a reinforcing cage with concreting or brick. To lighten the structure, expanded clay can be poured into concrete, reducing the overall load. The top of the parapet must also be reinforced with a metal profile.

If the protective grill of the balcony is strong enough, and the double-glazed windows are single-chamber, aluminum are very light, then wooden boards under the windowsill, which are attached to the upper part of the grill, can act as a support.
If the balcony has a small area, then you can weld a frame on brackets that protrudes beyond the concrete slab. At the same time, the window sill will not "eat" the valuable volume of the balcony. This arrangement of a balcony is called a take-out.

After that, the window sills and the frame of the future glazing are installed - without frames and sashes, which will be mounted later. For this, the metal structure is welded to the metal profile of the parapet and supports fixed to the neighbor's balcony slab from above. If you live on the top floor, the structure will be more complex, since you will have to make a canopy, for example, from corrugated board, polycarbonate, etc. In this case, the racks must be more durable.

After the frame is fixed, the upper drainage systems (visor) are mounted and the double-glazed windows are installed according to the instructions.

For the glazing features of small balconies without increasing the area, see the video:
Insulation of the balcony from the inside
From the inside, the balcony is insulated from the walls, floor and ceiling. For this, you can use various thermal insulation materials.
Balcony insulation materials
The thermal conductivity of building heat-insulating materials differs within wide limits, therefore, it is impossible to name the recommended thickness unambiguously. For information, see how the optimum thicknesses differ to achieve the same thermal resistance when using popular materials.

The basic requirements for materials also include:
- long-term strength;
- non-hygroscopicity;
- fire safety.
Most often used:
- mineral or stone wool - fiber insulation;
- lightweight polystyrene and "Penoplex" (different types of expanded polystyrene) - plate materials;
- polyurethane foam or "Penoflex" - polyurethane foam.

Sometimes a composition of these materials is used.
Fiber insulation is convenient to install when it is made in the form of soft slabs or blankets with a foil surface.

Polyurethane foam is applied using special, preferably professional equipment.

To compare the consumer properties of materials, we have summarized their main characteristics in a table.
Stages of insulating a balcony from the inside
Now that we know the main properties of heat-insulating building materials, we will consider the procedure for performing the work.
Advice! If lighting or connecting heating devices is supposed to be on the balcony, make the wiring to the lamp, switch and outlet in advance by placing the cables in plastic boxes. This will hide the wiring, which is much more attractive than open wiring.
Before work, make sure that dust, small particles of insulation or mortar do not pollute the apartment - cover the openings with foil.
Floor insulation
Insulation should start from the floor. First, a layer of waterproofing should be laid on the balcony slab. It can be ordinary polyethylene or foil insulation. At this stage, the waterproofing material can also be fixed to the walls.


To protect against condensation, a vapor barrier is laid on top. If you purchase an embossed film, then you need to lay it with the embossed side up.
The sub-floor is completed with 10 mm plywood in two layers. It is attached to self-tapping screws to the lags. Instead of plywood, you can use sheets of fiberboard or chipboard.
Ceiling insulation
Apply a layer of antiseptic to the cleaned ceiling. For thermal insulation, you can take foil-clad mineral wool or foam. A good solution would be to use penofol - a foam material covered with aluminum foil, which is glued to PVA, and nailed on top with a crate for attaching the finishing layer of finishing - a type-setting ceiling, drywall or siding.

Styrofoam can be fixed to the ceiling using polyurethane foam.

Minvata is laid on a plasterboard false ceiling, which is fixed on a frame made of an aluminum profile or a wooden bar 40x40 mm.

If required, fix the fixtures.
Wall insulation
The waterproofing was already performed at the first stage, therefore, a vertical or horizontal lathing made of timber is immediately mounted on top of it. The distance between the bars is equal to the width of the insulating material. For walls, it is better to use expanded polystyrene or mineral wool plates.

PPP can be glued to special glue or foam, be sure to blow it out all the joints and cracks.
A vapor barrier film is fixed on top of the insulation.
Finishing work
There are many materials that can be used to decorate a balcony. This is drywall, which can be plastered or covered with wallpaper, and tiles, and vinyl siding, and lining.

Most balconies are equipped with stationary or mobile clothes dryers that can rise to the ceiling.

If the space allows, compact furniture or transforming furniture can be installed on the balcony: folding tables and seats, and some happy owners of wide balconies even equip a sleeping place. The window sill can be made wider and turned into a table top - for morning coffee or doing chores.
If desired, you can install a fan heater on the balcony, which will allow you to use additional space in spring and autumn, or install an electric convector, which will make the balcony all-season for equipping an office or a winter garden there.

In conclusion, we suggest that you look at photos of the design finishes of the balcony space - for inspiration and a source of ideas.


Operation of the balcony all year round will increase the useful area of the apartment. Creating a comfortable microclimate is possible if you take into account the rules and recommendations of experts on how to insulate a balcony with your own hands. In our article, we will consider repairs using the example of a loggia of the following dimensions: 7.5 m in length, 1.16 in width and 2.9 in height. Step-by-step instructions and photos in the process. The repair took 2 weeks, the budget was 40 thousand rubles, the year of construction was 2013.
- On the example of Moscow
- ... Most useful from youtube
Required tool
- Screwdriver and electric drill;
- Construction stapler, level;
- Scissors, knife;
- Marker, laser tape measure;
- Hammer;
- Putty knife;
- Gas-burner;
- A special gun for glue or polyurethane foam;
- Containers for mixing components;
- Scotch tape (painting and reinforced);
- Rags, sponges, etc.;
- Drill attachments with which you can stir building mixtures.
Materials (what to buy)
- Structures for glazing the premises;
- Material for organizing a waterproofing layer (foamed polyethylene);
- Insulation (mineral wool 70 mm thick);
- Logs made of wood for leveling the floor and creating a reliable base (50x50);
- Plywood sheets (10 mm);
- Glue, metal tape;
- Tiles for wall cladding in two shades;
- Laminate (thickness 12 mm).
Warming instructions using a live example
Consider a simple repair option that most apartment owners resort to:
1. Preparation of the balcony before renovation
On the eve of glazing, you need to carefully check the space and eliminate chips, cracks and gaps.
Depending on the size of the flaw, polyurethane mastic, polyurethane foam, and sealants are used. To organize a convenient seal, a special gun is used, designed for applying polyurethane foam.
The space is insulated with a PVC profile double-glazed window.
The glazing of the loggia, or the replacement of old windows with new double-glazed windows is an obligatory stage in the work to protect the space from heat loss.
Other glazing materials are also used: wood, aluminum and metal-plastic. Elements of window frames should be treated with paint and antiseptic agents. The wooden structure of the windows is leaky, has a low level of thermal insulation and an inconvenient opening mechanism. Aluminum windows are a durable option, they are comfortable and reliable, but the level of heat loss is quite high.
It is better to give preference to PVC window frames, which also contain aluminum, but the internal formwork does not consist of metal.
PVC windows are resistant to moisture and sudden changes in temperature. Such frames are convenient to use, sealed and have a low level of thermal conductivity.
Masking cables in the wall for connecting the air conditioner.

2. Raising the floor level and thermal insulation
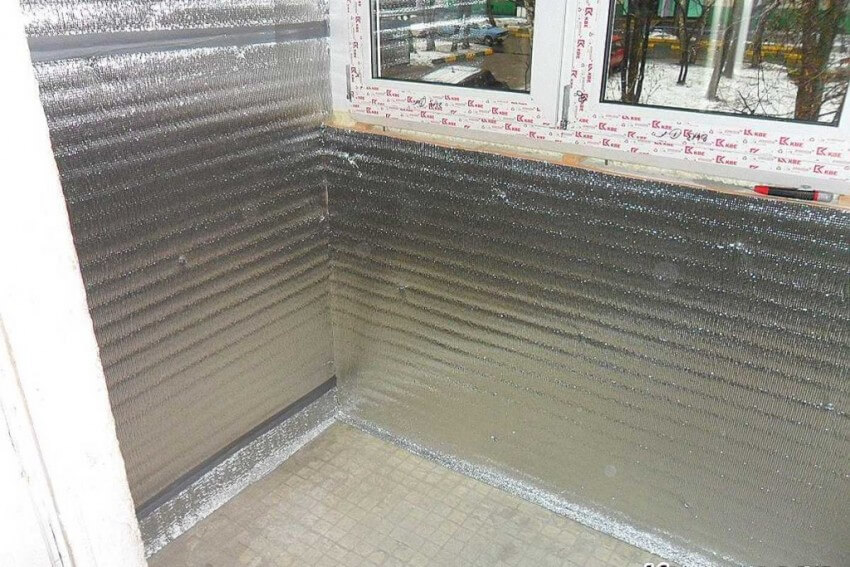
Waterproofing the floor with penofol.

Most often, the materials at the base of the floor and walls are concrete and brick, which strongly absorb moisture and vapors. In order for the heat insulator to retain its properties, a waterproofing layer should be organized. Instead of penofol for waterproofing, you can choose roofing material or a special impregnation. Penofol is laid with an overlap, the sheets are connected to each other using a gas burner.
Creation of a frame from slats (50x50).

Floor lathing for the subsequent laying of mineral wool.


For the construction of the lathing, wooden logs are used. The frame elements are fixed to each other with self-tapping screws using a screwdriver. The step of the slats directly depends on the material of the thermal insulation.
Usually the distance between the slats is 50 cm, however, to install a soft heat insulator, the spacing of the frame elements should be reduced.
In order to exclude cold bridges in the structure, you need to carefully organize the thermal insulation around the perimeter. We put mineral wool between the elements of the mounted frame. Fill the joints with scraps of heat insulator and polyurethane foam.
Mineral wool, laid in the cells of the crate on the floor.

During the work, a mistake was made - due to the different dimensions of the heat insulator (70 mm) and the height of the bars (50 mm), spacers had to be made.

Raising the floor to the threshold level - 20 cm.

Arrangement of plywood sheets on the lathing frame.

When laying, plywood 10 mm sagged, therefore it is better to choose stronger sheets, for example 20 mm chipboard or OSB.
3. Insulation of walls and installation of a window sill
We begin the construction of a frame to create a window sill from metal elements. This frame will allow you to insulate the parapet from gas blocks.

We do the laying of electricians for lamps and other devices in advance.

We fill the metal frame with insulation, after which we sheathe the GKLV structure.

Correct insulation of the parapet on the advice of experts:
- Impregnation with special hydrophobic solutions;
- Fixing penofol with a construction stapler, aluminum tape, or glue;
- Filling joints;
- Installation of the second layer of thermal insulation;
- Vapor barrier. A special membrane is suitable for organizing the layer.
Then we protect other walls of the room from body loss. To create a reliable glazing structure of the loggia, the insulation of the parapet and the floor is not enough. Basically, a balcony parapet is made of material with good strength and thermal insulation (foam blocks, gas blocks), but such a fence does not protect the insulation from moisture.
Mineral wool was also selected for thermal insulation of other walls.

In addition to mineral wool, other types of insulation will also fit in its place: extruded polystyrene foam (penoplex), foil-clad polyethylene (penofol), polystyrene or polyurethane foam (PPU). The basis of all of these heat insulators are polymers that are treated with foamed compositions.
The insulated parapet is sheathed with gypsum plasterboard.

Facing the base made of gypsum plasterboard with ceramic tiles.

We ensure the evenness of tile laying with the help of special elements - crosses.

Alternative finishes are: PVC panels, wood paneling, wallpaper, block house.
In this example, the ceiling surface was not insulated. On the one hand, the apartment is located on an intermediate floor (11 out of 19) and there is no direct threat of precipitation, however, heat loss will occur through the floor slab, even if the floor of the neighbors above is well insulated.
If we are talking about insulating the upper floor loggia, then the ceiling slab can be protected by installing a roof. The canopy is built with a slope to drain rainwater and snow.
4. Installation and connection of sockets
We mount a socket with a dimming function.

To install the socket in the wall, a hole must be drilled.

5. Finishing the premises
We cover the floor with laminate, and the walls with tiles. Flush docking failed as a result of work.

In order to compensate for the deflection of thin plywood, choose a laminate with a thickness of 12 mm.
Repair flaws in a real example - a lack of finishing coat.
A small piece of ceramic tiles is missing. 
There was also not enough tiles.

In this corner with flawed finishes, a wardrobe is planned, which should hide most of the visible defects.
In order to avoid a shortage of material, on the eve of work, you should think about everything in maximum detail, drawing up a diagram according to the real dimensions of the room. It is better to purchase the material with some margin.
We decorate the window sill with ceramic tiles.

Installation of skirting boards on the loggia.

Facing the threshold with tiles.

When raising the floor to the level of the threshold, it is better to use one material in the decoration, so the surfaces will be more harmoniously combined with each other.
During the repair process, a gap formed between the window sill and the glazing structure, to eliminate which you need to use special internal corners.
The photo shows a sample of the outer corner, which was acquired by mistake.

The result of masking the gap with the outer corner.

The room after laying tiles, laminate and creating a black stretch ceiling with five spotlights.

In the future, a wardrobe will be mounted in this part of the balcony.

1. Tips from an experienced professional
A range of insulators used to form a warm space on the balcony. Features of various heaters. Practical recommendations for creating a reliable structure.
2. Workshop on the construction of a waterproofing layer
Details of the installation of waterproofing on the balcony. Laying ceramic tiles.
.