An old window frame can get a second life, becoming a stylish and functional piece of furniture -.
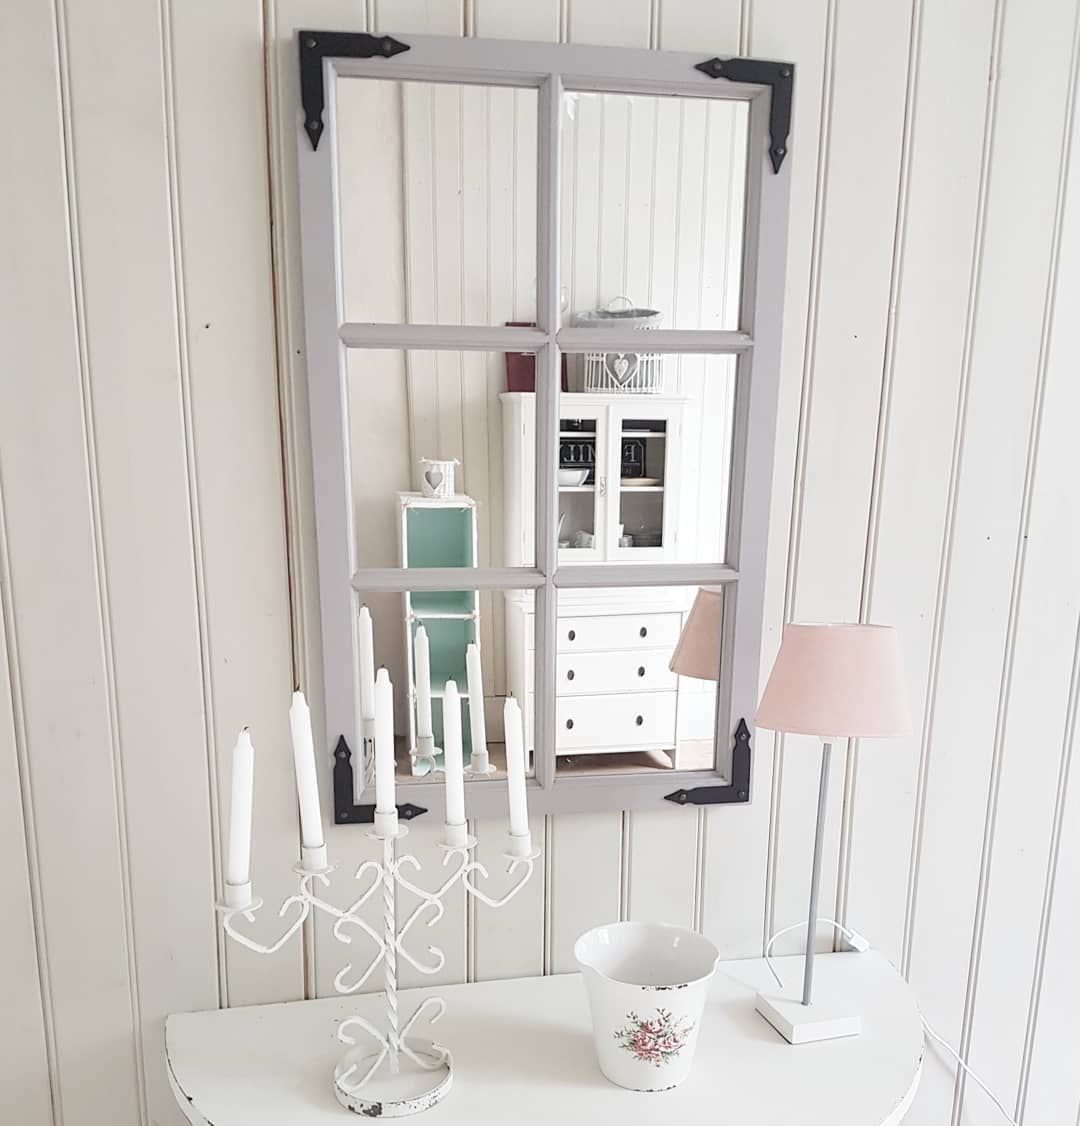
A stylish window mirror will become a highlight of your decor, as well as. Such decor will look especially impressive in a room without windows, visually correcting this lack of a room.
2 Photo collage frame
Another way to give a window frame a second life is to turn it into a stylish and original photo frame. Looks very impressive, doesn't it?

If there are still glasses in the old window, you can place the pictures behind them. If not, you can add clamps to the frame and secure the photos with them.

Photo: Instagram kraam_ja_inspiratsioon
3 Moodboard panel
However, the old frame will help to stylishly place not only photographs in the interior, but also any other images. You can even turn it into a whole mood board - an inspiring panel.

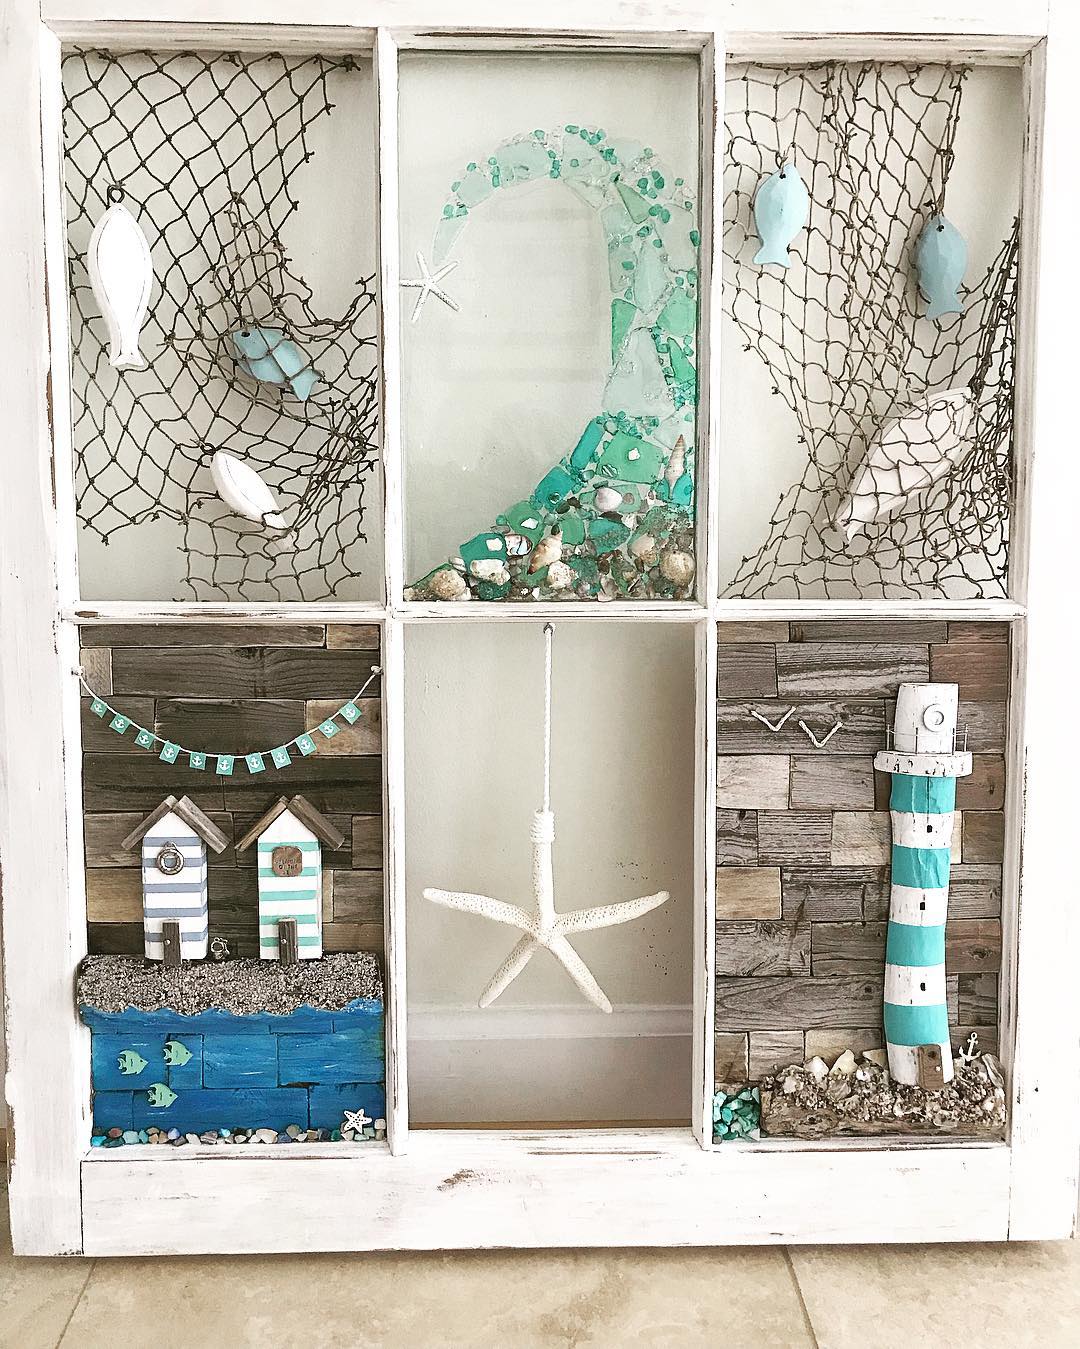
4 Decorative panel
How do you like the idea of turning an ordinary old window into a real designer decorative panel? Take a look at the photo below: an incredibly inspiring example that's also not hard to replicate.
5 Inspirational poster
An old frame can also turn into a poster with an inspiring phrase: you just have to write it with a marker or special paints on the glass.

Or, as an option, you can print your favorite saying and place it under the glass of an old window.

6 Panel-stained glass
If you have artistic skills, try turning an old window into a stained glass panel. Such an element of decor will definitely not go unnoticed in any interior.

7 Part of the decorative composition
A vintage frame will look great as part of a decorative composition (on a shelf, dresser, bedside table or mantel).

Such a decorative solution will be especially appropriate in interiors decorated in country style, eclecticism, loft,.

8 Collage of window frames
Another spectacular, but at the same time very simple decorative solution is from a few old window frames.


Modern plastic, aluminum, wooden window structures are not just a tribute to the times, but also an important improvement in the heat-saving function of a house. Very often they replace old frames made of solid wood, which can serve for a very long time, but in a completely new quality. In which? Here are 16 ideas and detailed instructions for them.
Jewelry storage frame
The small frame is an excellent base for a stand where you can comfortably hang jewelry. If desired, the tree is cleaned with sandpaper from the old paint, or the old coating is left, renewing it where required. The glasses, together with the glazing beads, are removed, and a metal mesh is inserted into the gaps. It remains to screw on the hinges from the reverse side for hanging the stand on the wall and start decorating it.
Organizer for kitchen trivia
The kitchen is a room with high humidity, so the wood needs to be protected. The frame should be coated with varnish or oil paint in a pleasant shade for the eyes. The crossbars between the glasses are ready-made bases for hooks. Such an organizer can be placed in the work area or decorate a free wall with it. A lot of ladles, stirrers, graters and other tools will find their place on its hooks.

clue! You can mount such an organizer not only on the wall, but also on the ceiling.
Greenhouse or greenhouse
Two frames with full glass will serve as an excellent base for a greenhouse on a personal plot. Choosing a garden bed. We surround its perimeter with stops. For this, ordinary cobblestones are suitable. We lay them out along the long sides of the bed. We push the two frames with their long sides into rows of cobblestones, and bring the upper sides together, getting a "house".

Advice! To give the structure stability, fasten it with door hinges.
Frame for pots with flowers
To hang 10 pots on the wall, you need to punch 10 holes for fasteners. You can do it differently. Take the old frame, remove the glass from it (or leave it as you like). We paint in a shade suitable for the interior. In the upper part, on the reverse side, we attach 2 hinges for hanging. We make 2 fasteners in the wall (screws or dowels). We hang the stand, and then we attach as many pots as we want to it.

Coffee table
The sturdy frame is a finished worktop. It can be decorated in any way: painting, carving, painting, varnishing, etc. From below, it remains only to screw the legs to get a coffee table of a suitable height.

Headboards
Rustic style requires a lot of light and unmistakable signs of antiquity in the interior. Making a headboard out of a rectangular or arched frame is a great idea. We remove the old headboard by the bed and attach a new one from 1, 2 or even 4 frames. Fortunately, wood is a pliable material for creating volumetric structures, and self-tapping screws and ordinary nails can be used as fasteners.

Picture frame
If the thickness of the frame is not very large, like its format, then it can easily turn into a photo frame. When the binding is already divided into 6 cells, this is ideal, but the internal space can be independently distributed into the required number of sectors with slats. All you need is to nail down a sheet of plywood on the back, and the stand is ready. Photos are easily attached with buttons, pins.

Tray
A small window sash transforms into a neat and reliable tray in a matter of minutes. You only need two hinge-type door handles, which we attach to the right and left, in order to conveniently carry the tray from place to place. But in the decor, you can show all your imagination.

Organizer
We have several containers, dainty hooks, decorative pouches or baskets - you can make a great organizer for anything. It is enough to distribute all this wealth over the frame in artistic order (or disorder). It is not necessary to remove the glasses. It remains to find a place for the masterpiece in the workshop or closet.

Hanger
An elegant hanger can be obtained from any frame. Glass will only add grace to the finished item. If there are 2 doors, then they are fastened at a right angle and get a hanger with a shelf. All you need to buy is hooks and wall fasteners that are suitable in size and design.

Summer gazebo
Sometimes the windows are changed as planned and as a result they get a whole bunch of large frames. It is expensive to take them out and dispose of, but making a gazebo out of them is much easier and more useful. To make the structure really strong, make 4 support pillars, the lower ends of which are dug into the ground and reinforced with cement mortar. But the frames can be attached to this frame as it is more convenient in this case.

Note board
You will need: frame - 1 piece, a sheet of plywood in a slightly smaller format. We nail the plywood to the base and cover it with black paint. In a suitable location, you can simply nail the board to the wall.

Clock
A ready-made mechanism, along with numbers and arrows, can be bought in a store, or you can use an existing one. We take a small sash and make a hole with a glass cutter. We insert the clockwork and fix the rest of the watch parts with special glue. You can hang!

Advice! The thinner the frame, the more elegant the finished result will be.
Room decoration
Colorful panels and posters are a great decoration for any interior. Together with a banal frame, you can use a more creative option. Take the window sash with glass and place the poster behind it. In this form, the picture takes on a completely different charm.

Mirror
Depending on where exactly the mirror will hang, you can decorate it in different ways. For example, use only the outer contour of the window frame, filling its inner space with a single piece of mirror. Or cut the mirrors according to the glass format and replace the glazing with them.

Garden lantern
Small frames are ready-made parts for assembling a garden lantern. In fact, we need a box in which one of the edges of the parallelepiped is folding. It is very simple to make it like this, just use furniture hinges. And from above we attach a hook for hanging the flashlight in the gazebo or on the veranda.

For several years now, I have been doing a little bit of insulation of my garden house. And the thing is that when we were building it, the plans included staying at the dacha only in the warm season. But the more the garden surrounding the house became like a real garden, the more I wanted to stay in nature longer, until frost, or even stay a little in winter.
But my house is too light, a real summer cottage. We put a prefabricated panel board wooden garden house on a high base made of rubble. They put it in half a brick, not even a brick. It took about 10 years and we insulated a little of the wall. A vapor barrier and Isover mineral wool were laid between the clapboard of the house's boards and the brick. It became much warmer, despite the fact that the brickwork itself turned out to be of such poor quality that when we removed the lining of the inner cladding, the cement seams suddenly penetrated bright sunlight. It was both funny and sad - the builders slipped such a hack to us!
Here you go. We insulated the walls, but there were still quite large gaps between the window frames and the walls. Therefore, the husband removed the platbands from the side of the street and blew out the cracks with foam. But the most interesting thing was further.
Window frames were included with the house and provided for glazing in one glass. And so it was done. But such windows suffer too much heat loss. No matter how heal the cracks, the single glasses themselves do not keep warm well. It was possible to put a second frame. But, after some thought, another solution came up.
I decided to make double-glazed windows in old wooden frames. There were two options for the execution of the idea. The first one is to add another glass to the existing one, laying thin wooden strips-slats between them around the perimeter and then fix the second glass, but most likely not with glazing beads, since the groove of the window frame will not be enough, but in the lining with a slat.
If you do everything with the use of silicone, you get a fairly sealed glass unit.
The second option was to order double-glazed windows from the glass factory with the smallest possible gap between the glass, so that the package would fit into the existing groove in the frame.
The information on the plant's website was encouraging. My preliminary calculations based on the data of the plant's prices turned out to be not so terrible. If we compare the price of one of the cheapest metal-plastic windows and a window glazed with double-glazed windows in the existing frames, it turns out that plastic is at least 5 times more expensive!
On that and decided. I removed the dimensions from the old window frames (fortunately, they are well preserved here, being protected by shutters) and sent them to the factory. They miscalculated everything for me (my calculations turned out to be correct), accepted the order, and in a week all the double-glazed windows were ready.
This is what a double-glazed window looks like for a window

Two glasses with a metal gasket, 6 mm wide, hermetically connected-glued along the perimeter with rubber. 6 millimeters is the minimum glass gap. Each glass is 4 mm thick. In total, two glasses of 4 mm each plus a gap of 6 mm, we have a glass unit thickness of 16 mm. This is exactly what the glass groove on my frames turned out to be.

For work, I needed the following tools and materials: a screwdriver, a hammer, self-tapping screws, a screwdriver, a tube of transparent silicone and a gun for it. It took quite a lot of silicone, about one tube per window.


They simply held on to the nails, so it was very easy to do this with a simple flat-head screwdriver.
After freeing the window frame from the glazing beads, the glass was very easy to remove. This is what the frame looked like without glass

Then, having slightly cleared the freed groove, I laid a "sausage" of silicone into it.

I put a double-glazed window on this "sausage". I must say that the silicone fits very well and holds the bag in the frame, even without additional fastening. 
Then the pre-prepared slats were used. They were supposed to replace the traditional glazing beads in such cases, fixing the glass in the frame. Previously, I sanded them (fortunately, there is a simple grinder, it makes work very easy), then I impregnated them with glaze for wood and sawed them to the desired size. A machine also helped me to cut - my son gave me an electric hawk for my birthday :) Without it, I would have had to mess around much longer, and I would have to put in more strength.
These are the glazing beads that came out:

The next step was to apply silicone directly to the perimeter of the glass unit.

And on top I fixed the prepared strips "in the overlay"

We got such windows

My windows are inserted the other way around so that they open inward, since we have shutters outside. Therefore, my glazing beads are on the outside of the frames and look like this

The effect of the work done was not slow to affect. The house has become very quiet, sounds from the street are almost inaudible. And before, I could not put my grandson to bed, so I could hear everything.
A few days later, a cyclone came, it got very cold and a very strong wind rose. Previously, in such cases, the curtains on the windows were shaking. And now - a complete calm :)) I am very pleased with the work done. And saved money :)))
The entry is posted in sections:
Today in many apartments you can still find wooden windows with old glass, installed many years ago by builders. Despite the fact that a lot of time has passed, such structures are particularly durable, and they periodically require cosmetic repairs, namely painting, pasting with paper, etc. In addition, more serious repairs may be required. If you don't want to change windows, check out the question of how to update old wooden windows with your own hands using inexpensive materials.
If old windows have loose putty instead of glazing beads, and the surface is covered with a swollen or half-blown paintwork, you can put a little effort and renew the old but sturdy frame. It is also worth mentioning the significant savings. Doing it yourself, repairing and restoring windows will be much cheaper.
Repair of wooden windows
For the manufacture of wooden windows, an environmentally friendly material is used. In addition, it becomes possible to make a beautiful and durable structure that can be easily repaired and restored.
By doing the repair of old wooden windows and doors with your own hands, you can return them to functionality and original attractiveness.
If a decision is made to repair the windows with your own hands, then first you need to inspect them for the presence of defects. Any flaw can be eliminated by performing simple manipulations.
How to eliminate gaps between the window frame and the frame?
Often the problem with wooden windows is the lack of tightness, which causes drafts. If you take a good look at the window, you can find a gap between the frame and the box, formed as a result of poor sealing of the shutters in the half-tenons.
You can get rid of such a defect without any problems by placing a good seal in the half-tenon of the window sash. Such a product can be rubber, foam or made of PVC. As a result, it becomes possible to cope with several tasks at once, namely to make repairs and insulate wooden windows.
In some cases, it is possible to correct such a defect without using a seal. It is necessary to bend the hinges in the opposite direction from the half-tenon of the sash. In situations where a gap is formed along the entire length of the door, all the hinges have to be bent. If the defect is visible only in one place, then you need to bend the loop where there is a gap.

What to do if the sash closes tightly?
A common and common problem with wooden windows is their distortion. For this reason, the flaps either close with difficulty or do not close at all. If there is a suspicion of this defect, then the first thing to do is to inspect the hinges, as a rule, they tend to settle. There are several options for solving this problem. So, you can install the hinges in new places on the frame or wind a wire on the rods of these hinges to adjust the height of the flaps.
In some cases, skewing appears as a result of deformation of the frame, which occurred due to the swelling of the tree. Then you can shave off everything unnecessarily with a plane, adjusting the frame to the box. If it was not possible to immediately determine the place of pinching, then the following manipulations are done: when closing and opening the window, you need to stretch a strip of copy paper between the frame and the box. In accordance with the marks, you need to cut off the excess areas on the frame. Often old frames will not close due to the application of a large layer of paint, so you have to clean it off. This can be done using coarse sandpaper.
What to do if the window sashes are skewed?
As a rule, window sashes can be skewed due to loosening of the corner frame joints. There are several methods for eliminating such a defect, while the easiest and most reliable is the use of metal corners installed at the corners of the binding.
To fix the corners, it is tedious to cut out the seat nests on the frame with a chisel. Corners are laid in these places and screwed in, so they will appear slightly below the surface of the frame. The place where the corner is installed is carefully putty and cleaned using sandpaper.
If part of the binding or frame rots
Old decaying fragments may appear on old wooden structures. In such situations, the damaged parts are cut out with a chisel, while it is advisable to grab some healthy material to prevent the spread of decay. The resulting indentation must be smeared using epoxy resin or wood glue. A previously prepared new piece of wood must be placed in this place and secured. When the glue has completely hardened, sand the area with a sanding machine or paper.
If paint peels or cracks

Any renovation or restoration of windows may require renewal of the paintwork. It is not recommended to apply another coat on peeling paint. Of course, this can prevent the process of wood decay, but the appearance will not improve at all. Ideally, it is best to get rid of the old paint coat and then apply a new coat.
What materials do you need to get for the restoration of windows?
- You need to buy a coarse wood putty to close up significant defects and large gaps. In this case, this applies to wooden windows, doors and other joinery.
- You need a fine-grained putty for wood, in other words, a mixture for finishing. Better to buy a white putty. Beige is also suitable, but if you plan to varnish the window frame. In the event that the window frame looks very bad, you need to choose a putty and white paint, so you can hide visual defects.
- You will need a deep penetration primer, which is very often used for decorating an apartment and for other repair work. Using this mixture, you can achieve better adhesion of wood and putty, as well as putty and paint.
- You cannot do without paint for wood, only it is best to give preference to glossy materials that are easy to clean.
- If you plan to re-glaze the window frame, you need to buy wooden glazing beads, as well as nails for them, the length of which should be about 2 cm.
- It would not hurt to buy some masking tape.

What preparatory work needs to be done?
Before making repairs to wooden windows with your own hands, you must first check for noticeable damage and defects. Sometimes, in addition to applying a layer of new paint, glass replacement or frame repair may be required. Note that in places where paint has peeled off, wood can rot.
After determining the degree of damage to the window frame, it will immediately be seen whether the damaged areas can be repaired or whether it is easier to replace them altogether. As a rule, the older the windows are, the more defects there are on their surfaces.
In addition, it is important to pay attention to how the box adheres to the window frame. A very common cause of pinching is a deformation of the frame or a very thick layer of obsolete paint that must be removed. In the case of deformation, you will need to work a little with a plane, so you can tightly fit it to the window frame.
What's the best way to remove old paint?
In order for the restoration and repair work to be carried out as efficiently as possible, it is necessary to remove the old peeling paint from the surface of the wooden frame.
First, the old window must be removed from the hinges, the glass and all metal parts must be removed. Of course, this may not be done, but in this case, the duration of the work is significantly increased.
You can remove old paint from a wooden surface using several methods, including heat or chemical treatment.
Very often, equipment such as a construction hairdryer is used. With the help of such a tool, the dismantling of old paint is carried out as quickly and efficiently as possible. If there is no building hair dryer at hand, then the work can be done with the help of abrasive materials, spatulas and scrapers.
When the old peeling paint has been removed from the wooden frame, it is imperative to wipe the structure, removing dust and other dirt from it. After that, the surface must be treated with an alkaline solution, which can be bought at any hardware store. It is also recommended to visit the carpentry department, which sells everything that may be required to repair windows with your own hands.
Wait about 15 minutes for the paint to peel off the wooden frame. After this time, you can easily remove the old coating with a scraper.
Of course, to facilitate the work, it is better to use a building hair dryer. Its principle of operation is to supply a hot jet of air, which acts on the paint. As a result, it quickly softens and is easily removed.
If it is planned to perform work with a hair dryer, you need to hold it in one hand and the spatula in the other. Direct the hot air stream to a small area of the surface. As soon as the paint starts to swell, you need to immediately remove it with a spatula.
Such an electric tool must periodically cool down, as there is a risk of burning it. It is recommended to work in this mode: operate for 5 minutes, turn off for 10 minutes.

How to replace glass in old windows?
If there are broken glasses or cracks in them, you need to replace the frame before painting, which needs to be cleaned of a layer of old paint. The glass is easier to remove if you remove the glazing beads or remove the putty. After that, you need to measure the dimensions of the required glass and order it from the master.
If you have sufficient skills and knowledge in the field of glass cutting, you can do such work yourself.
It is not difficult to insert the cut glass into the frame. To do this, you need to apply a fresh layer of putty to the folds. As a result, reliable protection of the window from moisture penetration will be provided. It should also be noted that such a putty fits snugly enough to the window frame.
Having installed the cut glass on the folds, you need to cover up all the gaps with the same putty. After one month, it is required to paint the frame with a hardened putty paint. By performing such actions, you can additionally protect the window from moisture ingress.
Window treatment with sanding, filler and primer
This stage of work is carried out in order to prepare the window frame for the application of a new layer of finishing material. Using sandpaper, you need to eliminate the remaining imperfections. In addition, you will need to putty the targets and, if any, irregularities. The applied material must dry for at least 12 hours, and then the process must be repeated again. After the second layer has dried, the final leveling of the surfaces is required.
The primer must also be applied in at least two coats, with each coat drying very well.
Painting windows
The simplest process in restoring old wooden windows is painting them. Having picked up the appropriate shade of paintwork, you need to pour a small part of the composition into a separate container. If there is a need to give the paint the required thickness, you can dilute it with a special solvent.
It should be noted that the first coat of paint is applied to impregnate the wood. Thus, the composition gets into all cracks and pores. Based on this, it is important to say that the paint should not be very thick. In the worst case, the effectiveness of impregnating the frame will be minimal.
The second layer of the composition should be applied only when the first layer is completely dry. As a rule, a few hours are enough for this, but do not forget that the paint can be different. If this feature is not taken into account, then wrinkles and bubbles may appear on the surface of the frame.
It would not hurt to apply a third coat of paint, with which the coating will adhere better. In addition, reliable protection of the material from damage and moisture penetration is provided.
When the window frames are completely dry, they need to be reinserted into the box. When installing the structure, you need to ensure that there are no cracks. If they do form, then you cannot do without the use of a sealant.
What tools and accessories are needed for window restoration?
The list of required tools will depend on the condition of the window frames. Usually, the same list of building tools is required to repair windows and doors. We recommend that you familiarize yourself with this list:
- you can not do without a construction hair dryer, with which you can remove the old layer of paint from the wooden frame;
- spatulas of various sizes are needed, with which old paint will be removed and putty applied;
- for gluing glass, you need a special gun for applying sealant;
- a set of brushes for painting the frame is purchased;
- it is imperative to purchase sandpaper with a suitable grain, with which the wood and putty will be cleaned;
- the list of required tools should also include a hammer, chisel, pliers and pliers;
- in any case, you will need a jigsaw or a handy hacksaw for wood;
- sometimes a small pocket knife can come in handy.
How to remove paint residues?
When repairing old windows, the question often arises of how to quickly and efficiently clean windows at the end of the repair?
You can use a regular solvent to wash off the fresh paint coat. With this solvent, you need to moisten a napkin and wipe off all stains with paint formed on the glass. As a result of such simple actions, the window takes on a beautiful and attractive appearance.
As you can see, the repair and restoration of old wooden windows does not require special knowledge and experience. It is enough to familiarize yourself with the simple instructions, which describe the recommended sequence of work.
Many owners of houses and apartments strive to make their homes as environmentally friendly as possible. For the same reason, they do not seek to replace wooden windows with plastic ones, but prefer to restore them, i.e. renovate old wooden windows.
The advantages of wooden windows:
- naturalness of wood;
- wood is hygroscopic, i.e. does not interfere with air exchange in the house;
- low thermal conductivity allows you to save heat;
- long service life of wood with proper care;
- aesthetic appearance. Wooden windows can fit into various interiors.
All this speaks in favor of the restoration of wooden windows.
When do windows need renovation or repair?
First, when it starts to blow from the window opening;
Secondly, when the appearance of the window is lost due to deformation of the frames, the appearance of fungus, damage to the wood or one of the nodes (window fittings).
How to repair a wooden window with your own hands?
Let's start with the fact that we will understand the definition: window repair or restoration are similar works that do not have a fundamental difference, they consist in cleaning, filling, painting, sealing, etc. Painting of windows does not apply to repair work, more to restoration work, since it does not affect the functional qualities of a wooden window. Only the appearance changes.
Depending on the degree of deterioration of windows (frames, glass and fittings), the approach to carrying out restoration work will differ.
The technology for repairing wooden windows is quite simple, but it requires scrupulous execution of each stage of work.
Redecoration of wooden windows
Elimination of local damage. For example, fungus damage to a part of a window frame.
- identification of the site of damage. To do this, you can conduct a small test: you need to push through the shabby or suspicious parts of the frame with an awl, if the tip easily falls through, then the wood is damaged;
- cutting off an unusable layer;
- the cleaned area is dried. To do this, you can use a building hair dryer or a heater (be careful with glass, direct the air flow directly to the wood);
- application of wood hardener and preservative;
- applying putty. Layer thickness - according to the instructions. If you need to apply several layers, you need to wait until the first one dries well;
- painting the window.
More details - in the photo.

Overhaul of a wooden window - complete restoration
Tool and materials:
- hair dryer to remove paint. Referring to the reviews of the masters, we note that many are trying to remove the paint without it, but this only damages the wood more;
- grinder and sandpaper. For leveling the surface;
- shoe knife for removing old paint
- putty knife. Reconstruction of wooden windows presupposes the obligatory filling of the surface of the frame and sashes;
- paint and varnish brushes;
- chisels;
- fittings, glass (if replacement is expected);
- drying oil, varnish and / or paint;
- putty;
- primer;
- sealant.
The cost of repairing wooden windows depends on the price of consumables, tools and, of course, on the condition of the frames. On the other hand, do-it-yourself window restoration does not require any special skills. However, it should be noted that this work cannot be done in one day.
A few words about preparation. It is best to do the work on a warm, sunny day. The main condition is dryness, because high humidity will have a detrimental effect on the result (wood changes geometry, dries poorly, etc.).
 We remove the window sashes from the awnings. If the glass is put on a putty, we remove it with a chisel, if on glazing beads (a rail for glass), then carefully dismantle them. After that, we take out the glass.
We remove all the accessories (it is better to replace it with a new one). You also need to remove the wooden drips on the windows (the wooden planks located on the bottom of the frame outside the window are also called "dripstone"). They are attached to nails that have probably already rotted away. In general, all screws, nails, metal corners, etc. are removed from the frames.
We put the “bare” frame on a flat surface and measure it - all the diagonals must be of the same length, otherwise, the skew in some place will lead to the formation of cracks, which is unacceptable. We fasten the frame tightly to the surface (it can be a board made of boards).
Dowels for windows can be knocked out with a hammer (they are cone-shaped, therefore, you need to knock out from the thin side), provided that they are located evenly (symmetrically to the corner) and lend themselves. But, under pressure, the dilapidated frame can deform, therefore, it is better to drill out. If the dowel dangles, you can fix it before drilling - a couple of drops of superglue in the slot and after 5 minutes the drill will go like solid wood.
At the next stage, when the window is dismantled, we proceed to cleaning it from paint.
How to remove paint from wooden windows
There are several ways to remove paint from windows
Removing paint with a building hairdryer
 You need to work carefully, ideally remove the glass first, or direct the flow of hot air so as to exclude direct contact with the glass. The high temperature may cause the glass to break (crack and spill out).
Set the temperature regime on the hair dryer to 250 degrees.
The task of removing the paint is not fast, but high quality. At higher temperatures, the wood will char and lose its properties as a result of the burn.
 In the process of warming up, the paint will begin to rise in bubbles, which must be cleaned off with the correct tool.
It is better to do this with a boot knife (a palette knife is also suitable - a trowel knife for mixing paints on a palette in painting). The fact is that the spatula will slide over the paint, or cut into the wood, leaving burrs.
Removing paint by chemical means
You can remove old paint from the window frame with special solutions (removers, liquids). They also use the "tricky method" - kerosene and a plastic bag. It is kerosene, because solvents and solvent destroy the structure of the wood.
Execution technology
- The wooden frame must be wrapped with a cloth (rags) and the whole structure must be placed in a plastic bag.
- Moisten the cloth abundantly with kerosene, then tie the bag and leave for a day or two. During this time, the paint should soften and be easily removed (the above tool is used for cleaning).
Tip: remove the planks from the bag gradually, i.e. one pulled out - cleaned, etc., if you remove everything at the same time - the kerosene will evaporate (dry out), therefore, the paint layer will return to its original state (dry, harden) and stop separating.
Of course, there may not be such a large package for a whole window frame, therefore, you will have to disassemble the frame into elements. Or, as an option for processing the assembled frame, you can moisten the fabric and wrap it tightly with plastic wrap, additionally tying the layers with rope in order to maximally seal the surface to be treated.
Advice: keep in mind that removing paint from windows in this way is accompanied by a pungent odor, plus, the technique is fire hazardous, therefore, it must be performed on the street or on the balcony.
 The inner window sill and sill also needs to be cleaned.
 After removing the paint, the frame will look something like the photo. This is clearly not a suitable type for finishing work.
 Remains of paint are removed with sandpaper or a grinder.
Elimination of deformation of a wooden window
Sometimes old wooden windows are deformed, which can manifest itself in the form of distortions and curvatures of the frame. For example, one or more sashes of the window led. This will be especially noticeable when installing the stack, when it falls into the selected groove, and the glass weighs in the corners, or vice versa, the corners lie down, and there is a gap in the middle.
If the window is removed and disassembled, you can put it under a press, which is made from wooden panels and a weighting agent.
If on the installed window, it is possible to insert a stop (a bar, a bar of a suitable size) in the place of the bend (curvature), and applying an effort to close the window, fixing it with bolts or invent a fastening with self-tapping screws (for example, screw the bar diagonally to the frame). All these manipulations are performed without glass.
We leave in this state for 2-3 days, after which we increase the thickness of the spacer, and thus bring it to the desired position.
The method is controversial, but sometimes it helps. Cracks may appear that can be repaired. We take a regular syringe and use it to inject PVA glue into the crack. Because the glue is liquid, it will flow out, the place needs to be pecked with tape. After drying, repeat the procedure, and then clean everything, putty and paint.
Restoration of wooden windows - restoration of decayed parts of the frame
If a fragment of the frame has rotted, it can be replaced or restored. If replacement is not foreseen, then restoration remains. To do this, you need an epoxy putty for wood (the composition may include fiberglass, which will significantly increase the rigidity of the structure).
The damaged area is cleaned of paint and debris is removed. Then putty is applied.

Apply the mixed putty to the damaged area; the mixture should fill all cracks and cracks well. Recreate the missing section so that it is slightly larger than the desired plane, i.e. there should be a volume left for subsequent grinding. Drying (hardening) of the putty lasts a day (at room temperature). Then, using a grinder or emery paper fixed to a block, we grind the surfaces until they are completely leveled.

It should be understood that such a restoration allows you to restore the appearance, but does not guarantee sufficient density, especially in places of active use (places where the window sash is tightly adjacent). But if the window is deaf or rarely used, then it is a completely self-sufficient way to get out of the situation without completely replacing the window or frame elements.
- checking the frame for damage;
- marking with dots the damaged area;
- cutting out the zone;
- preparation of replacement;
- replacement. The prepared part of the frame is installed in the desired place, fixed with glue and clamped with clamps. After 24 hours, the clamps are removed;
- grinding of the junction of the old frame and replacement. This will avoid a drop in height;
- priming;
- staining. Material prepared for the site www.site
More details - in the photo.

 After cleaning the frame of paint, you need to putty it.
Putty for windows is sold as a finished product, at the same time, you can prepare it yourself. To do this, mix 3 parts of sawdust in one part of liquid nails.
The technology is simple, but the solution dries quickly, therefore, we mix quickly and in small portions.
Mixed up - putty, etc.
The homemade putty is based on glue, and therefore, it quickly hardens.
Grind the dry and dense surface with a machine or fine-grain emery paper (sandpaper).
Oil impregnation
Wood processing with drying oil is a good "old-fashioned method", time-tested. But, it should be borne in mind that the modern drying oil differs from the drying oil of the times of the USSR. Now it is difficult to find natural drying oil, as a rule, they sell something derivative, such as "Oksol". The point is that the real one is made from natural ingredients (linseed, hemp oil), and not from synthetic derivatives. There are many good impregnations on the market that have replaced drying oil and its production from vegetable oils is simply unprofitable. Alternatively, for aesthetes, you can make your own drying oil.
Coating of window frames with linseed oil is carried out with a brush, the first layer as impregnation, the second or third final. It is necessary to maintain a time interval between the layers (preferably until it dries completely, and this process is not quick). If the surface does not stick, then you can continue to work.
Hot linseed oil impregnation
A method of processing with hot linseed oil is also used. Here it should be understood that drying oil is a combustible material and, in contact with an open fire, is highly flammable.
How to heat drying oil?
You can warm up the drying oil in a water bath, and the second method is more dangerous - heating to a boiling state. To do this, make a flask from an iron pipe, one end of which is welded. Linseed oil is poured into it and heated with an electric stove or a construction hairdryer to a boil (during the heating process, fire is possible, extinguished by throwing burlap). After that, the bars of the window frame are lowered into the hot drying oil for 5 minutes, and they are crocheted. high temperature and laid to dry. According to reviews, impregnation with hot drying oil creates a coating for centuries (the effect of wooden railway sleepers).
Again, this is very important(!), heating drying oil is a dangerous undertaking.
To proliferate windows or treat them with an antiseptic, everyone decides for himself, each of them has pros and cons.
Coating with stain and varnish
 If the condition of the window frames after removing the paint is good and there is a desire to preserve the naturalness of the wood, then you can treat the surface with a stain.
Stain can be used to change the shade of the wood, for example, tinted pine can look like bog oak as a result.
Before treating the window frame with wood stain, it is better to check the consistency of the solution on a separate board (preferably the same type of wood and shade), i.e. choose the tone of the wood.
Staining wooden windows not only improves their aesthetic qualities, but also makes the wood more resistant to UV rays, and also prevents rotting and the development of fungus.
In addition, the stain penetrates deeply into the structure of the wood, therefore, if later you have to sandpaper it somewhere, it will not disturb the shade and texture of the frame.
The wood stain finish is finished with varnishing. Dry window frames are covered with clear varnish (it is better to use acrylic varnish for wood, glossy or matte).
After complete drying, window fittings (awnings, handles, latches) are installed and glass is inserted.
Installing glass in a window
Correct glazing of wooden windows provides for a sealed glass installation, because it is in the micro-gap between the glass and the frame that it will blow. The glass is planted with silicone glue (aquarium sealant). Squeeze out a thin layer of aquarium glue along the groove under the glass of the window frame and insert the glass, which we fix with glazing beads. We wipe the protruding glue with a sponge dipped in vinegar. Do not rub off the nail heads, a thin layer of sealant will additionally protect them from rust. We leave the windows to dry; it will take at least a day for the glue to harden.
Sometimes the restoration of wooden windows is accompanied by the replacement of glass, if there are defects (cracks, cloudiness, abrasions, traces of welding or grinder). After all, glass also has its own resource. When ordering glass, you need to accurately measure the opening, but order by 2-3 mm. less, because the glass expands under the influence of temperature, and the resulting gap will not allow it to burst.
The glass is fixed in the frame using glazing beads and small nails. In this case, the glazing beads must be prepared in advance (impregnation with linseed oil, painting or staining). You can even drill holes in the glazing bead with a thin drill. Then, when hammering, the glazing bead will not crack and the glass will not crack.
Below is a photo gallery - a master class on installing glass on a putty, without glazing beads. For example, glass is broken, needs to be replaced, but there is no rail for fastening the glass at hand, or there is simply no need for it. Putty for glass is bought ready-made or made independently (mix chalk on drying oil).

When choosing how to process wooden windows, take a closer look at the quality of work.
If you are satisfied with the surface condition (i.e. no deep damage, uniform color), give preference to varnish. At the same time, in order to even out or change the tone of the wood, you can treat the frame with wood stain. She will also hide minor defects.
If there are many areas with putty, then it should be covered with paint.
Oil or acrylic paint is used for staining. The first lasts longer, but dries for a long time, the second, on the contrary.
First, you need to dilute the paint, too thick will poorly saturate the wood and drips may appear. Better to apply several coats of more liquid paint.
The first layer is to saturate the wood. Only after it dries well can a second coat can be applied, etc.
You need to start painting from the inner surface - from glass.
After painting, remove the tape (while the paint is still wet). If there are stained marks on the glass, they are removed with a blade.

How to remove tape marks
If the windows were not pasted over with masking tape, but with packing tape, then there will be traces that are very difficult to erase. In this case, it means pasting with tape not only of glass, but also of the frames themselves (both wooden and plastic).
The first thing that comes to mind: gasoline, diesel fuel, alcohol, cologne, etc. But, these funds cannot be used if you do not want to damage the paintwork. There is a simple and environmentally friendly way to remove traces of adhesive tape - adhesive residues on window frames are removed with vegetable oil (sunflower oil), and then washed off with a cleaning solution.
If old window hinges (awnings) are worn out, they should be replaced. The hinge replacement technology is shown below. First you need to correctly determine the place of attachment. For this, the window frame must be inserted into the window opening and secured with wedges. When the gap is the same along the entire perimeter, we mark the places for installation. With a chisel we select the groove for planting the hinge and fasten it with self-tapping screws.

Sealing and insulation of windows
A rubber seal for wooden windows, fixed around the perimeter of the frame, will reduce heat loss.
You can repair wooden windows by. Its essence is that you need to select a groove in the sash. A special euro-strip silicone tubular seal is installed in it. It is not afraid of low and high temperatures and has a twenty-year warranty.

The final touch in the restoration of windows will be the installation of window fittings (handles and latches). Only then is the window set in place.
How to update wooden windows - video
Conclusion
As a result, we note that correct instructions at each of the stages for the repair of wooden windows and periodic analysis of their condition are a guarantee that the windows will serve you for more than a dozen years.