A major overhaul of a house or apartment requires a decent financial investment, and sometimes you really want to update the interior of your home! You can breathe newness into the design and slightly embellish it without spending money, simply by calling on creative thinking to help. One of the spectacular and inexpensive ways to decorate is wall decoration. Panels, collage, fabric paintings, paintings, drawings, butterflies ... That's just the last type of decor we'll talk about today.
After all, making butterflies on the wall with your own hands is simple, and most importantly, low-cost! You only need ready-made stickers or hand-made applications.
Fluttering beauties are widely used in the interior. They decorate ceilings, chandeliers, frames of paintings and mirrors, but most often decorate walls. It is no coincidence that they are preferred. Butterflies not only bring a special zest to the design of rooms, but, according to the canons of Feng Shui, are the messengers of mutual love and joy, symbols of natural beauty and rebirth. Their placement in the bedroom will bring new meaning to the relationship, awaken long-forgotten romance, and be able to rekindle the fire of love. At the same time, fluttering moths should not be attached singly, they should be arranged in pairs or whole compositions. DIY wall butterflies are made from a variety of materials: colored paper, vinyl film, thin cardboard, fabric, and even metal. They can be of various sizes, shapes, colors. As for the type of accommodation, it all depends on your imagination. A chaotic round dance, a swift whirlwind, airy compositions, various moth figurines - the options are unlimited and are welcome in the interior in any interpretation. Harmony with design Butterflies will become an appropriate interior decoration in any style, whether it is technological high-tech, sophisticated classics or ascetic modern. But they will give a special charm to rooms decorated with a cute rustic comfort, in a country style. The main thing at the same time is to keep the color balance, otherwise the design will “crush” with tinsel and hint at a lack of taste. Bright, colorful moths are the perfect complement to a monochrome interior. For example, red or green butterflies on a beige background. Luxurious decoration of light walls (white, gray, pastel) will be black applications. Moth compositions can be kept in one color or delight the eye with multi-colored magnificence. Often the beauty of the decoration is enhanced by neon lighting, which creates the illusion of a 3D decoration. Designers recommend decorating the bedroom and nursery with butterflies. Although, if desired, they can decorate the walls of the living room. Having prepared the material you like, draw butterflies of the desired size on it. At the same time, do not get carried away with art, drawing the most complex curves and ruffles on the wings - all this will create difficulties when cutting. Also take care of the method of attaching applications to the walls - glue, decorative pins, pushpins. As mentioned above, the picture of the location of the moths on the wall can be different, but with the condition of combining the decor with a pattern on the wallpaper, decorative plaster and other interior elements. A whirlwind, scattering, flocks, clusters of butterflies in the form of a bouquet of flowers or a heart will fill the room with the freshness of spring and the desire for romance. Having recreated in your head a clear vision of the decor, mark the main points / lines of the moths on the walls with a pencil or chalk. This will help you not to deviate from the intended pattern in the process of fixing jewelry. This is the easiest way to plant fluttering beauties on the walls. The basis for the decor can be plain or colored paper. The drawing can be drawn by hand or created using graphics programs on a computer. A significant plus of this method is the low price of the material. The paper is also easily and securely fastened, and the wings of the moths acquire dynamism, effectively fluttering from air currents. An annoying decoration can be removed at any time without damaging the design and without regretting the money spent. The first thing to do is to make a stencil out of cardboard. By applying it to colored paper, you will outline the outlines of butterflies, and then cut them out. If you prefer bright, multi-colored moths, turn to the help of read glossy magazines with colorful drawings. There is another option to make butterflies on the wall with your own hands - find photographs of moths on the Internet and print them on a printer. To make the decorations temptingly glow in the dark, you can cover them with luminescent paint. Finished moths are attached to the wall with pins, glue or double-sided tape. Only the center of the layout is fixed, while the wings are left free in order to beautifully sway from air currents. Butterflies made of thin cardboard will be much stronger and more reliable than paper ones. Although cutting them out will take much longer than the first option, cardboard moths will take and keep any shape you specify. The wings can not only be beautifully bent up, but also give them a rounded look. To implement this idea, slightly wet the cardboard and bend it, pressing it down with a heavy object. After drying, it transforms into the model you need. Cardboard moths can be cut out of notebook covers, old geographical atlases, packages from under nylon tights. Since this material is heavier than paper, it is necessary to fix it on the walls in reliable ways. One of the surest ways to make the decor original is to make butterflies on the wall with your own hands from old vinyl records. They will turn out to be more voluminous and durable, and most importantly - glossy, luxuriously sparkling and shimmering under any light source.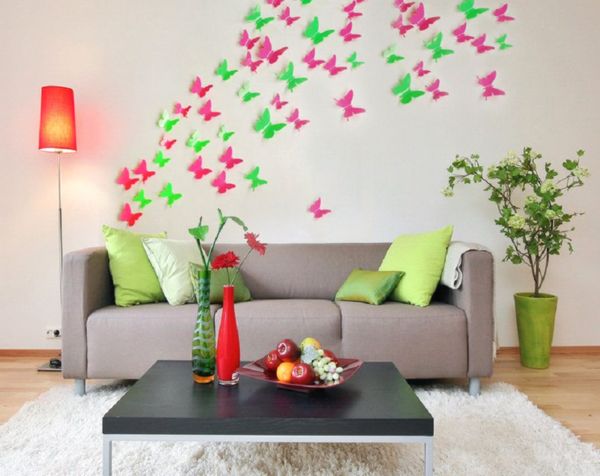
Preliminary actions
Butterflies on the wall with their own hands. 7 ways to decorate:
From paper
From cardboard
From vinyl records
An important role in creating a cozy atmosphere is played by decorative gizmos and compositions. But not always and not everyone may have enough money to adequately decorate their home with expensive decorations. Creating such interior items with your own hands often becomes the best way out of the situation, moreover, such needlework brings a lot of pleasure - both in the process and in the end result. To date, moths and butterflies have become a popular type of home decoration. These creatures fluttering along the walls can cause a lot of positive emotions, reminiscent of beautiful sunny days. We will devote our article to an overview of the various possibilities for self-decorating walls with butterflies, and also consider how to make them.
Butterfly wall compositions
Butterflies in the interior of a particular room can be presented in different ways: they are placed in the form of panels, scattered in chaotic or ordered compositions, they decorate certain areas with them (for example, around lamps, artificial trees, etc.) or they are painted on the walls, often with the use of luminous paints. One has only to look at the photo of a beautiful panel in the form of a scarlet heart made of butterflies, and you will immediately want to place this romantic composition in your bedroom.
The advantage of moth decor is their ability to complement the interior of any room, regardless of its functional purpose and the style present. It is important to choose the right color solution so that it matches the overall design. For example, red or green moths will look great on a beige wall, black ones on a white one. In the children's room, you can create multi-colored paintings from butterflies fluttering cheerfully over the crib, and in the living room, decorate an empty wall with a whirlwind of plain butterflies.
Luminous moths created with the help of special paints look unusually beautiful. In the evening, they become an original decoration of the room, enlivening it and filling it with mystery.


Butterflies on the wall with your own hands: manufacturing methods
If you decide to decorate your apartment with such decorations on your own, we suggest that you familiarize yourself with the various ways of making butterflies. Although the work will require some costs, time and perseverance, but the result, believe me, will undoubtedly please. To make the composition look more natural, it is better to make moths of different shapes and sizes for it, using templates that you can draw yourself or take ready-made ones from the Internet.
How to make butterflies out of paper and cardboard
The easiest way to make paper butterflies. To do this, you can take white sheets and decorate the winged beauties at your discretion, or get a set of colored paper. The advantage of this material lies in the ease of working with it, so it is quite possible to involve a child in the manufacture, for example, by decorating a panel of butterflies in a nursery. In addition to paper, you will need accessories such as scissors, templates, pencils, PVA glue (for bulk products).
There are two ways to make a butterfly out of paper. The first is to take a ready-made template and use it to transfer the outlines of a moth onto a sheet of paper, cut it out with scissors. The second way is more simple. First, we cut out a square (rectangle) from paper, fold it in half, apply a half butterfly template to the fold line, circle it with a pencil and cut it out. Then we unfold and get a beautiful moth. The advantage of butterflies cut out of paper is their airiness - if a light draft blows, their wings will move like real ones.
You can give the butterfly wings more elegance by cutting out pre-drawn internal details with nail scissors or a clerical knife. To make a magnificent butterfly, cut out two identical blanks from paper of different colors or the same, and then glue them together. In this case, the lower plane - the base - can be simple, and the upper one is decorated with patterns or clippings. For fastening use double-sided tape.
A cardboard butterfly is also cut out in two ways - using a full or half template. As a basis, you can use not only ordinary colored cardboard - multi-colored moths cut out of old postcards and magazines look beautiful.


Corrugated Paper Butterflies
One of the successful ways to make a voluminous moth is to use corrugated paper. To do this, you additionally need to prepare a needle and thread. On sale you can find material of various variegated colors and create a real colored moth cloud.
First you need to cut out a strip of paper measuring 7x10 cm (you can use other sizes, depending on the desired size of the butterfly). Using a needle and thread, we form an accordion in the central part and tighten it, as shown in the photo. We fold the resulting side canvases, connect them and, slightly stretching them to the sides, get rid of the folds - we got a blank of two wings, which now need to be given a beautiful wavy shape. You need to cut out two wings at the same time, not forgetting to also select areas for the antennae. In this case, templates are not needed - the shape can be given at your discretion.
At the final stage, we unfold and straighten the workpiece, and twist the antennae with our fingers. Butterfly is ready!


paper origami butterfly
A beautiful, voluminous butterfly can be made using the origami technique. It is a little more difficult to make it than in previous cases, however, when you make a couple of such beauties, things will go much faster. Beginners need to use the schemes of such work, which are quite a lot on the World Wide Web, be patient and perseverant. The art of origami does not stand still, constantly evolving, so there are a variety of ways to fold butterflies - from simple to modular, capable of moving wings, etc. Since we are learning how to make an origami moth for wall decor, you can use a simplified technique.
First you need to cut out a paper square, bend it along the possible diagonals and twice through the center. We fold the opposite sides, and bend the lower corner tops, turn over - we get a double triangle. We bend its tip so that the tip is located above the entire part, after which we wrap it and fold it in half along the central guide. At the final stage, fold the part twice. Making a voluminous butterfly in this way, you do not need to intensively smooth out the folds.


Making fabric butterflies
Knowing the origami technique, you can make a magnificent butterfly out of matter. To do this, you need two rectangular pieces of different fabrics of the same size. We sew them together along the perimeter - we get a canvas-base, from which, following the step-by-step scheme presented below, we form the product. To fix all the necessary folds and the final design, an iron is used. Butterflies made of fabric will be an excellent decoration for the room. In the work, you can use materials of various colors and structures, including tulle and lace.


Butterflies from tin cans
If you still have empty cans of drinks, do not rush to throw them in the trash - they can be an excellent material for making shiny winged beauties. Using scissors, it is necessary to cut off the top and bottom of the can, cut it in half, getting the base canvas. Next, we will use the template and apply the image of a moth to the surface, cut it out, giving the edges a waviness. To prevent the wings from curling, you can give them a corrugated finish by making longitudinal recesses with the blunt side of a knife or scissors. The resulting blank is decorated with multi-colored markers.

Luminous butterflies do it yourself
Luminous moths look amazing and excellent in the interior, capable of captivating with their mystery in the dark. In this case, their images will be applied to the wall using phosphor paints. To get the glow effect, you need to make sure that there is some kind of light source next to the decor.
So, for work you will need paints of different colors, a sponge, a brush, glue spray and stencils. First, we prepare stencils of future moths from cardboard and glue them on the wall. We attach a piece of sponge to the brush and use this simple tool to decorate the butterflies. To better understand which paints will look more profitable, it is better to work in the twilight. After applying, you need to wait a quarter of an hour and remove the stencils. The paints will dry completely in two hours, after which you need to outline the contours with a pencil. To "revive" the composition, you can apply additional strokes of paint near the wings. The decor is ready. We turn off the light and admire the beauty of our luminous fluttering moths.


Butterflies on the wall - decor photo
In conclusion, we invite you to visit our photo gallery. Here we tried to collect the best examples of decorating an apartment with butterfly compositions. We hope these creative works will bring you a lot of pleasure and inspire you to create your own wall decorations. Happy viewing!
Butterflies decorate postcards, notebooks, photo albums, furniture and even just walls. Finished products can be purchased at the store and simply stick to the right place, or you can make it yourself, which is undoubtedly a more exciting experience. What can you make a butterfly out of?
Consider several ways to make a butterfly out of paper.
Butterflies in quilling technique

The simplest, but no less beautiful decor option is a paper butterfly. With your own hands, you can make it in several ways.


And every time you get a unique option. More complex options are a paper butterfly made from double-sided strips. This technique is called quilling and requires certain skills, tools and a lot of time. But the products are amazing.


Having made these kinds of insects of different sizes, you can hang them under the ceiling or chandelier, using a very thin fishing line, at different levels, which will create a wonderful effect of weightlessness.


They can be used to decorate curtains and walls, postcards and albums, and even as jewelry.
Openwork butterflies

Another option is a do-it-yourself paper butterfly using the vytynanka technique.


This technique is one of the types of folk decorative art. Its essence is to cut out paper using scissors or special knives.


Works in this style can be simpler, and can reach the heights of elegance.


Most often they decorate windows or mirrors and other glass surfaces. They are attached with soapy water. And also used in the creation of postcards.


To make such an ornament, they use paper butterfly patterns, according to which they cut out their products. Figured butterflies can also be cut using a plotter.


It's such a special tool. Then, of course, you will spend much less effort and time creating them if you need a large number of decorating elements.
simple paper butterfly garland
It is absolutely easy to make a garland, the main element of which is a paper butterfly, with your own hands.


Moreover, you will surely find everything you need at home. And all you need to brighten up a dull room or arrange a fun party is a few sheets of multi-colored double-sided paper and decorative or plain wire. A ribbon or rope will also come in handy, on which the garland will be attached.


For one butterfly, you will need 2 squares measuring 15 x 15 cm. Fold each of them diagonally. You should get a triangle. Now fold both triangles towards each other, that is, from the edge to the center, fold with an “accordion”. The width of the fold should be no more than a centimeter.


Do the same with the second square. Then connect them together in the center and wrap them with wire, the edges of which are bent in the form of antennae. That's all. Our paper butterfly is ready. Make as many as you need. Now it remains only to attach them to the tape and hang them where they are supposed to be.
Origami Butterfly

Consider another way to make a butterfly out of paper. It cannot be called simple or complex. Rather, both options are present.


Everything will depend on the pattern of paper butterflies used. And believe me, there are a huge number of them.


And all of different levels of complexity. And, of course, the more complex and intricate the scheme, the more interesting the origami paper butterfly looks in the end.


When folding your product, make sure each time that all the folds are perfect and do not warp. If you choose material with an interesting color or unusual texture, that origami paper butterfly of yours will not disappoint you. Lay the square of paper white side up. Fold it twice diagonally and once vertically.


Having made a large number of such butterflies, you can miraculously decorate any room with their help.


You can make them in different sizes and use all rainbow colors. After that, glue it to the original non-bulky driftwood, imitating the color scheme of the rainbow. And nail a snag with butterflies on the wall, for example, in a children's room.
Butterflies on a paper wall

There are many ways to "settle" such wonderful insects as butterflies on your wall. One of them is a three-dimensional transparent picture, inside of which there is a dried butterfly of a rare species. It looks amazing, but not for those who are for the preservation of wildlife.


Such people are unlikely to be pleased with this exposition. Another, no less beautiful, option would be butterflies created from feathers and wire. They often have variegated colors and look great on plain walls.


If you have walls with a pattern, then this option is unlikely to suit you, since such butterflies will be lost against this background. Or you can buy butterflies made of self-adhesive film and stick them wherever you want.
What can be done with your own hands?
You can create butterflies with your own hands not only from paper, but also from cardboard.


Perhaps the easiest option for decorating walls will be paper butterflies. Options for fixing the composition Decorative insects made or purchased by you can be fixed in a permanent location in various ways.
In total, four mounting options can be distinguished.
1. Fastening with glue. The choice of adhesive material will depend both on what you are going to attach your element of the composition to, and on the material from which the attached object is made. If we are dealing with paper insects, then most often the number one choice is PVA glue. And here the main thing is not to get carried away. If you apply more than necessary, you risk not only getting streaks, but also distorting the color.

2. You can use the pin method. It is, of course, much neater than glue, but it will fit only if there is space between the wall and the wallpaper.
3. Another mounting option is fixing with adhesive tape. You can use both flat and volume version. The latter will add airiness and weightlessness to your composition.

4. And last but not least, and perhaps even more original way - using threads and transparent wire. This type of attachment is especially suitable for butterflies that have been folded in the origami technique. This type of fixation will affect your imagination to the maximum and bring a lot of positive emotions in the process.
Preparing to create paper decor
Although paper insects are the cheapest option for decorating, it still gives you options that no other method can.

When creating paper butterflies, you can make them flat or voluminous, smooth or textured, as well as layered and even openwork. And even combine everything in one. The main thing is to approach this issue not only creatively, but also wisely. After all, your composition should maximize the room. Breathe life and dynamics into it, and not become an indicator of bad taste.

It should also be noted that the paper color range is not only very wide, but can also be easily supplemented with all kinds of colors. Although in fairness it should be noted that the most win-win option is black plain butterflies.

In general, before you get down to work, think through everything to the smallest detail. Starting from the shape and color and ending with the ways of fixing the composition.
The process of creating a butterfly for a wall composition
In order for you to get a paper butterfly, which will become one of the elements of the future wall composition, you will need the following materials and tools.
First, it is paper and small decorative elements for decoration, if you want to use them. For example, it can be rhinestones. Secondly, scissors, glue, pencil and everything you need for fastening. Also use ready-made templates, according to which you will cut out insects for your composition.

So, let's look at how to make a butterfly out of paper. Cut the paper you will be using into squares. The sizes of the figures depend on your idea.


Fold each square in half and on one side carefully circle half of the sketch of your future butterfly, working through all the details. Without unfolding the square, carefully cut out all the elements, and only then unfold.
You will get a completely symmetrical insect. After all the butterflies are cut out, decorate them as you intended and start attaching to the wall. On the surface that will be the basis of the composition, mark up in advance so that in the end there are no unpleasant surprises.
To create a unique interior today, different options are used. Butterflies on the wall, photos of which you will see in this material, are an original way to revive an empty wall.
The repair is over, the furniture is arranged, new curtains are already hanging, but something is missing to complete the image of the room. Butterflies made of paper on the wall are a creative idea that cannot but attract attention.


Creating such a decor will require a minimum of material and the availability of free time. Even if there is no suitable paper in the house, it is sold in any stationery department and is inexpensive. If you don’t want to bother with cutting out silhouettes, you can purchase ready-made stickers with a sticky base.
But fluttering beauties can be made not only from paper - there are other materials suitable for embodying the idea. This will be discussed.

Butterflies on the wall with your own hands
Butterflies as a design move are used not only to decorate walls. They decorate the frames of photographs and paintings, chandeliers and floor lamps, mirrors, ceilings. However, butterflies in the interior on the wall are the most popular option. And this is not just a beautiful element of scenery: according to the laws of Feng Shui, butterflies are considered a symbol of joy, rebirth and mutual love.

Their appearance in the bedroom will give new colors to marital relations, bring back slightly extinguished feelings, kindle the fire of passion. Fluttering beauties should not be bored alone - they are glued to the walls in pairs or large groups.

For the manufacture of bright moths, different materials are used:
- Colored paper.
- Rough cardboard.
- Vinyl records.
- Starched fabric.
- Thin metal (cans of beer, Coca-Cola).

The sizes of the soaring beauties can also be different, different shapes and colors are also allowed. The embodiment of the idea depends on the imagination and the material at hand.

Advice! You can arrange butterflies on the wall randomly or depict a swift whirlwind. Moths can be used as a frame for any composition, for example, from several photographs.

What style is suitable for such decorations
Decorating the wall with butterflies will be appropriate in any style of interior:
- rustic provence;
- teeming with high-tech technology;
- ascetic modernity;
- stingy minimalism;
- noble classics.

The main thing is that miniature appliqués are in harmony in color with the overall interior. Otherwise, they will look ridiculous and tasteless. Just do not need to make butterflies from paper of the same tone as the walls, they will simply merge with the background and will be almost invisible.

The following combinations are ideal:
- green or red moths on a beige wall;
- black or dark brown on a white or gray background;
- a combination of bright blue and bright red on a pink wall.


Preparation for work
First you need to think over the composition and make a stencil of butterflies on the wall. Photos of ideas can be peeped on the Internet, this is in case your own imagination does not suggest anything. Then you should choose the material, and if there is nothing suitable in the house, you will have to go to the stationery or arts and crafts store.

Moths of the desired shape and size are drawn on paper or vinyl film using a stencil. Ideally, there should be several stencils, then the figures will differ in variety. When choosing a mounting method, you need to consider some points:
- if the moths will hang on the wall, at least until the next repair, then you can use glue to fix them;
- if the owner of the apartment is not sure that the butterflies are for a long time, it is better to fasten them with pins or small buttons.

Advice! Having clearly imagined the future composition or drawing up a sketch on paper, you need to mark the lines of the location of the butterflies on the walls with a pencil. This will make it possible not to deviate from what was planned, which may well happen during the gluing of the elements.

Colored paper moths
This is the most common decoration option, which requires colored paper. You can use a computer program to create a sketch. Buying paper will not hit the family budget, which is an important factor.

There will be no problems attaching the paper to the wall, because it is light, and the thin wings of butterflies will sway at the slightest movement of air. If the presence of moths on the wall begins to bother, they can be removed at any time without receiving material damage and without damaging the wallpaper.

By placing butterflies near the lighting fixture, you can create a beautiful three-dimensional effect.
Bright, shiny butterflies come from old, long-read magazines. Photos of butterflies can be taken from the Internet and printed on glossy paper. In order for the applications to shimmer with multi-colored lights, they are coated with acrylic varnish with the addition of glitter. The effect is amazing! Compositions with fluorescent paint look no less tempting.

Advice! When fixing butterflies on the wall, only their middle should be fixed, and the wings should remain completely free and bent, creating volume.

Wall arrangement of colored butterflies of different sizes and shapes
Fabric composition and painted butterflies
If the room is finished with liquid wallpaper, butterfly decor on the wall is an ideal solution, but it is better to choose fabric as a material. Any colorful or plain patches that are sure to be found in any home will do. For fastening it is better to use PVA.

So that the edges of the matter do not crumble and fray, and the fabric is more rigid, it is recommended to pre-wet it in water with the addition of PVA glue, dry it, and only then cut out the figures.

Drawn moths look no less luxurious. To create a unique composition you will need:
- a stencil, which is made of plastic or thick cardboard;
- acrylic and fluorescent paint;
- thin brush;
- sponge for washing dishes.

Using a stencil, the main pattern is applied to the wall with acrylic paint, then the contours of the butterflies are outlined with fluorescent paint. In the dark, soaring moths will mysteriously twinkle.

Advice! You need to prepare several identical stencils and fix them on the wall with masking tape. The stencil should be removed only after the paint has dried, otherwise it may flow along the wall and ruin the finish. For the same reason, the paint cannot be applied in a thick layer.
Wall panel of bright butterflies on a beautiful turquoise background
The bright pages of the magazine will be used to make butterflies, the number of which is determined by the size of the frame - there should not be few figures, but they should not be sculpted too thick either.
First, a background is made, for which a sheet of colored paper is used or the base is simply painted with acrylic paint. You can fasten the elements of the composition with PVA glue or double-sided tape. It is better if the butterflies do not fit snugly to the base, but slightly rise above it. To achieve this effect, you need to put small fragments of foam rubber under the adhesive tape. The finished panel is framed and hung on the wall.
Beautiful picture of butterflies in pastel colors
To create a luxurious room design, it is recommended to use several techniques at once, which will be combined with each other and make the room harmonious:
- One wall is decorated with a composition of butterflies.
- A panel is hung on the opposite wall.
- They attach moths to a fishing line or a colorless thread and hang this origami on a chandelier.
DIY multi-colored butterflies will replace the chandelier
Butterflies go well with flowers, small bird figurines, bees and ladybugs. If pins are used, they must be decorative (beads, beads). For fastening on wallpaper, the sharp end of the pin is bent 90 ° and driven under the paper cover. Butterflies seem to float in the air.
For such creativity, any ideas are suitable, but patience is also required. The reward for perseverance and diligence will be the unique decoration of the room.


