Everyone who decides to equip their balcony strives to make it beautiful, high-quality and functional. To do this, changing the floor, wall and ceiling decoration. Consider what is better to lay on the floor on the balcony.
Types of flooring
There is no single option than to lay the floor on the balcony. Almost all floor coverings have the same characteristics and perfectly cope with their functions.
To make floors on the loggia, the options may be as follows:
- linoleum;
- laminate;
- carpet;
- ceramic tile;
- wooden floors;
- Self-leveling floors.
Consider the features of each type of coating and decide which floor is better to do on the balcony.
Features of linoleum
Linoleum has a number of positive characteristics:
- Low price.
- Easy to operate.
- Fairly easy to fit.
- A variety of colors and types, which allows you to quickly and easily choose exactly what you need.
- Long service life.
- Pretty good quality.

Linoleum, in addition to the listed advantages, has several disadvantages. The floor on the balcony should be made from a single piece of material. If you lay the floor in several pieces, then moisture will accumulate under the linoleum, which is bad. And one more minus: after some time, the coating fades and loses its original appearance.
Characteristics of the laminate
In winter, laminate flooring cannot be laid on the balcony. Especially if the temperature is below 10 degrees, and the humidity is more than 70%. Work can be carried out at temperatures above 5 degrees.
This material is beautiful and light, however, it has a significant drawback - it does not tolerate high humidity. It can be used on the balcony only if it is glazed with high quality and moisture does not get inside.
Carpet on the balcony
You can also use carpet on the loggia. This material has a long service life. Perfectly adapts to various conditions. Carpet can also be used on uneven surfaces. However, in order to make it convenient and comfortable to walk on it, it is necessary to make the concrete screed as even as possible.

You can walk barefoot on the carpet, as it is pleasant and soft to the touch. Large selection of colors, which makes it possible to select materials for any interior.
The disadvantage of this coating is that it absorbs a lot of dust, so you need to vacuum frequently.
Laying ceramic tiles
Choosing what to put on the floor on the balcony, you can decide in favor of ceramic tiles. Beautiful appearance, a huge number of color variations and patterns. You can lay tiles on the balcony yourself. The service life is quite long. The appearance does not change for about 10 years. Easy to care for: most often simply wiped with a damp cloth.

The tiles are of high quality. However, this material is very cold and requires additional insulation. This can be done using various underfloor heating systems (more details: ""). Ceramics is a heavy material, and it is not advisable to overload the balcony slab. Therefore, you should pay attention to lighter types of ceramic tiles.
Wood floors
When choosing boards, you should pay attention to their humidity, it should be no higher than 10%. And also for distortions along the edge and thickness, not more than 2 mm and 1 mm, respectively.

In order for the wooden floor not to rot and serve for a very long time, the boards must be treated with special protective compounds and varnished. It is not difficult to make such a floor on the balcony; not even a professional can handle it.
The disadvantages of such a floor include the need for periodic updating of the coating. After some time, it will lose its attractive appearance.
Self-leveling floors - modern coating

The bulk floor needs to be additionally insulated. In order for the coating to last as long as possible, it must be varnished in several layers. This floor needs periodic updating.
Which cover should you choose?
It was decided to ennoble the floor on the balcony of what to make better - a question that everyone asks. When choosing a material, you need to take into account all the features of a particular floor covering. The final decision is influenced by the service life and quality of the material, ease of installation, range, cost and weight.
Under any selected floor covering, it is necessary to lay vapor and moisture insulation. They will not allow moisture from the lower tiers to enter the room. In this case, there will be no high humidity on the loggia (read also: ""). If a balcony is finished in an old building, then it is better to choose lighter materials. It is not necessary to create an additional load on the bearing concrete slabs that have lost their original strength.

The easiest material to install is linoleum. All you need is a sharp utility knife and a tape measure. If the percentage of humidity in the room is higher than allowed for linoleum, then you should not lay it.
Then what to make the floor on the balcony from? In this case, you can make the floor out of wood (oak or hornbeam). This option is simple and high quality. The floor of this material is made very simply, in addition, it is warm and has a long service life.
Wooden materials are considered the best in terms of price and quality. It will not be necessary to repair such a coating soon. It only needs to be varnished or repainted once every few years to maintain its original appearance.
Summing up
There are a large number of floor materials that will make the coating warm and cozy, and will also be combined with the interior. And yet, what floor is better to do on the loggia?
Among the coatings that are in great demand in terms of price-quality ratio, the leading position is occupied by a wooden floor. The price of a tree is lower than, for example, a tile.
The wooden floor on the balcony makes its design unique and opens up a lot of technical possibilities. For example, to install underfloor heating.
In this article we will tell you how to properly lay a wood floor and do all the preparatory work.
In fact, laying the floor with boards is possible for many, if you choose the right wood and take measures against atmospheric factors on the balcony.
Do you want reliable beautiful floors, but do not know how to quickly and efficiently make a wooden floor on a balcony or loggia with your own hands? Take advantage of our recommendations.
Below you will see prices from the Moscow company of the manufacturer ":
| Rough floor finish | |
| wooden beam |  |
| from 1 000 rub./m2 | |
 |
|
| from 1 000 rub./m2 | |
| DSP screed |  |
| from 1 500 rub./m2 | |
| GVL |  |
| from 2 200 rub./m2 | |
| Expanded clay |  |
| from 600 rub./m2 | |
| Floor finishing | |
| Laminate |  |
| from 1 200 rub./m2 | |
| Batten |  |
| from 2 500 rub./m2 | |
| Linoleum |  |
| from 900 rub./m2 | |
Calculate wood flooring in the Moscow company
(Only for residents of Moscow and the Moscow region), send a request to calculate the cost:
Good afternoon, dear readers of the site. Today I will tell you how to make the floor on the balcony with your own hands using sandwich technology. I will accompany each step with a photo with a detailed description, but if you have any questions, then I will be ready to answer them in the comments, so feel free to write.
In cold countries such as Iceland, Norway, Denmark, Sweden, Canada and Finland, great attention is paid to heat. It is not for nothing that the so-called Finnish houses and houses built using Canadian sandwich-type technology are very popular in the post-Soviet space. But, if many have heard about houses and walls made of sandwich panels, then much less people know about sandwich floors. But it is sandwich floors that are very popular in Canada and the countries of the Scandinavian Peninsula.
Balcony sandwich floors are becoming popular due to their heat-saving properties, ease of installation and cost, which is much lower than any other floor. That is why on our balcony we decided to make and insulate the floor using this technology.
In this article we will teach you how to make / insulate with your own hands. For convenience, the whole process will be shown step by step.
Required Tools
To begin with, we need to prepare all the tools and purchase all the materials necessary for the job. To do this, we have prepared for you a list of everything you need.
- Electric jigsaw.
- Perforator.
- Screwdriver.
- A hammer.
- Roulette.
- Dowel.
- Hammer drill.
- Construction marker or graphite pencil.
- Spare blades for jigsaws.
- Spare drill bits for perforator.
- Spare drill bits for drill.
- Screws of different lengths for wood.
- Acrylic or silicone sealant.
- Sealant gun.
- Portland-M500 brand cement or frost-resistant tile adhesive.
- Styrofoam or mineral wool two centimeters thick (density can be any, but we recommend taking it denser).
- Insulation or thermal insulation mat with a reflective element.
- Wooden slats measuring 2x4 cm.
 Group of necessary tools 1: jigsaw, drill, hammer, screwdriver
  Tool group 2: drill, caulk gun, accessories, cement
  Group of required materials 3: foam, plywood, insulation, timber
 Starting to lay the floor on the balcony
After all the materials and tools are prepared, we proceed directly to the installation and laying of the floor.

Any repair and construction always begins with taking measurements. So we, armed with a tape measure, measure the working area on which we have to work. In our case, the working area is a balcony. It is 1 m long and 3 m wide.

ATTENTION! It is very common for floor screed companies to list a curing time of three to five hours in their user manuals. But very often it is far from reality. Based on experience, we recommend that after pouring the floor screed, wait at least 24 hours, that is, one day.
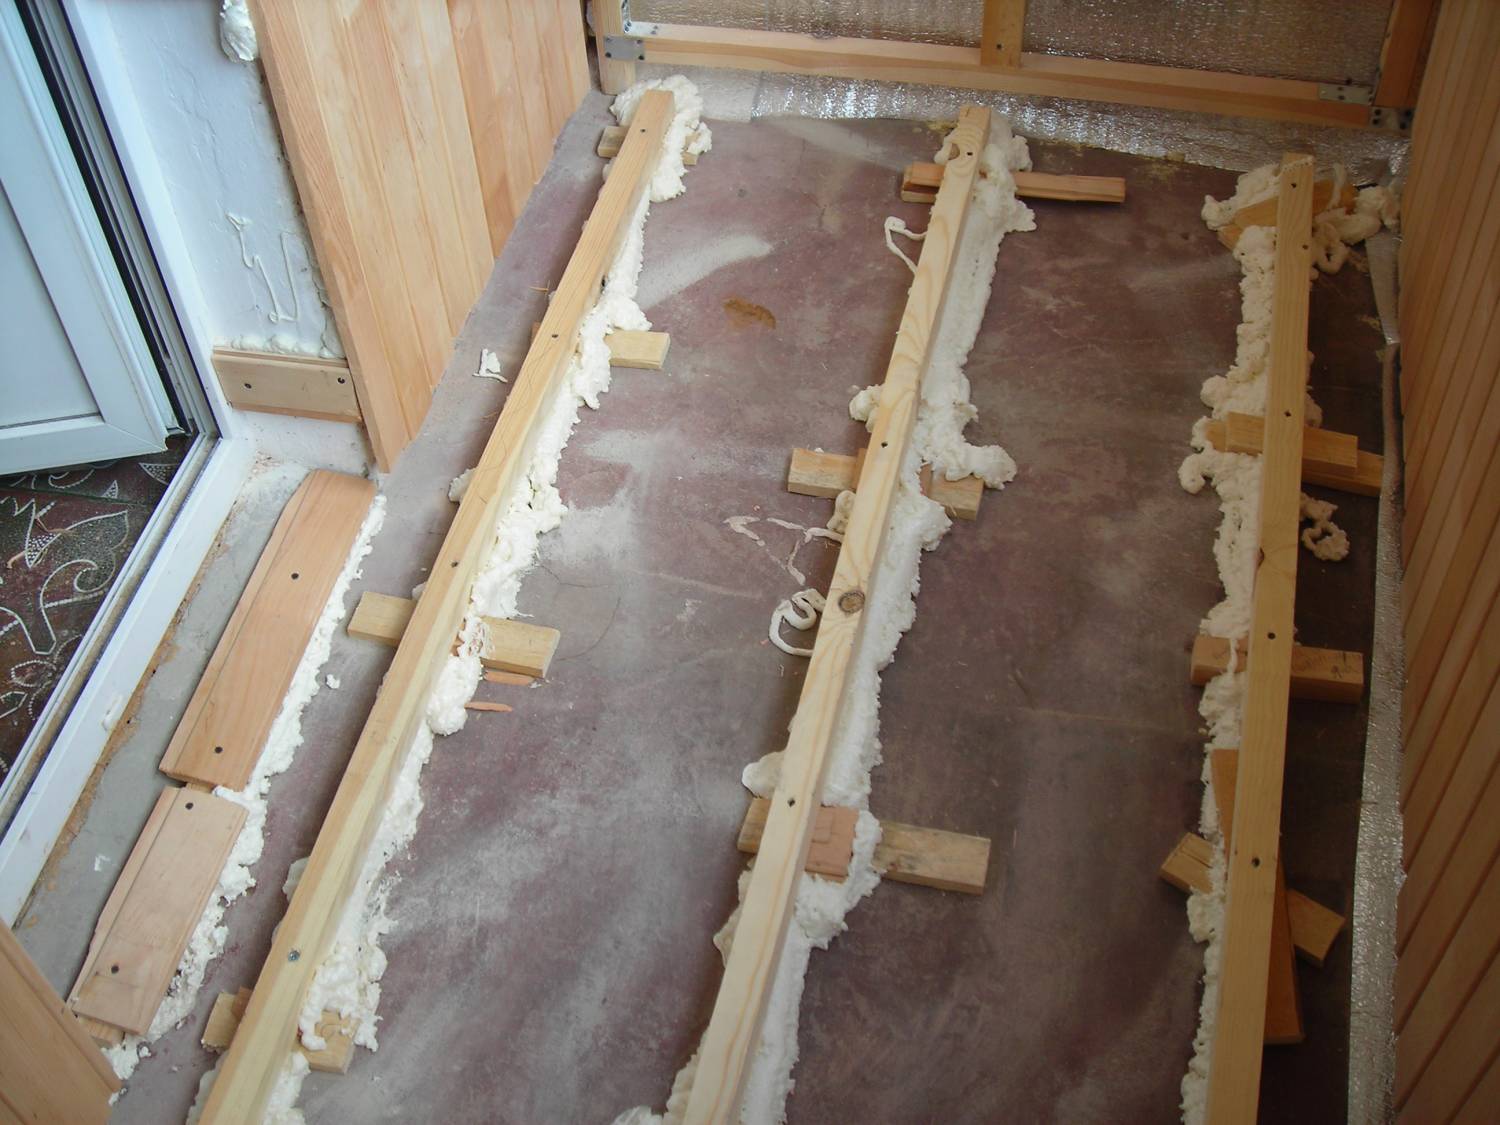
After the screed on the floor has hardened and become solid, we move on to creating the formwork. In our case, it will act as a kind of barrier, since in the mounting foam under the influence of various natural phenomena (water from rain, direct sunlight, wind), cracks and micro-slits form over time through which air can blow.
Installation of formwork bars for the floor
The formwork is assembled from wooden slats. To begin with, the bar is placed along the length of the balcony (let me remind you, we have it 3 meters) at a distance of 3-5 cm from the balcony frame. Further, with the help of a tape measure, we will be able to find out the size of the wooden lath, which will be used by us for the construction of the formwork in width.
 A sample rail that is suitable for creating formwork on a balcony
 Having received the size of the rail we need, we transfer all measurements to the “wooden” area. To do this, we use a construction marker or graphite pencil.

After the bar is cut off, we put it in place for fastening. Now the impact drill comes into play. With its help, we drill through holes in the rail in increments of 30-40 cm.

After we made holes in the bar, its appearance should be something like this.

Now, moving the wooden lath to the side, in the floor we should see the remaining traces of the through holes that we made with the impact drill.
 Making holes in concrete with an impact drill or hammer drill
 Now we insert the dowels into the holes that were made in the wooden lath. We put a wooden rail with dowels inserted into it in its place.
Now the hammer comes into play. With it, we hammer the dowels into the floor.
After the wooden log is attached to the floor with plastic dowels, we hammer the screws into them with a hammer. After all the screws are driven in and the bar is fixed in place, it should look something like this.

After the bar is fixed in width, we move on to the bar, which is fixed in length. We fasten it in the same way as the first bar.


The only difference is in the step of attaching the rail. If we fastened the rail in width in increments of 30-40 centimeters, then in length we observe a step of 50-60 centimeters. We also fasten the next bar in length, observing a step of 7-8 centimeters. The bar is attached to the dowel. Further, with a distance of 6-7 cm, we fasten the next lag with the help of dowels.

After the slats have been fixed, you should have something like this.
 Balcony decking installed
 ATTENTION! When drilling holes in the floor for dowels, the drills break very often. Based on this, we strongly recommend having three or four spare drills in reserve.

Floor insulation on the balcony with foam
After the lags are laid in length, the next stage is. To do this, we cut the foam into equal strips of 7-8 cm in length. It is best to cut the foam with a regular construction knife. After the foam is cut, we lay it between the wooden joists, as shown in the photo. When the foam strips are completely laid, the floor will look like this (photo below).

Our next step is to mount the second layer. Using a tape measure, we measure the size of the lag we need in width.

After we have measured the size of the rail we need, we transfer it to a wooden plane. Next comes the electric jigsaw. With it, we saw off the timber of the size we need. Now it's time for the screwdriver. We try on the bar and places for fastening the screws. By the way, for fastening we use wood screws measuring 3.5 x 35 mm.

Now we fix the log on the self-tapping screws.

The lag, fixed with a screwdriver and self-tapping screws, looks like this.
The next rail, which we will fasten in length, is part of the formwork. It must be fixed a little "overlap", that is, with a ledge closer to the balcony frame. It is attached with self-tapping screws.

After we have fixed the second layer of formwork, we proceed to the stage of pouring the formwork. To do this, we prepare a solution of frost-resistant adhesive for tiles or cement of the Portland-M500 brand. When the solution is ready, apply it with a spatula to the inside of the formwork. The solution is applied to the inner part along the entire perimeter of the formwork.
 Cement pouring process
 When the entire inner part of the formwork is completely filled, we proceed to the stage of mounting the rails in width.

We fasten the lags with self-tapping screws and a screwdriver. We screw the screws using the “board to board” method (as shown in the photo). In the same way, we mount all the other lags, which we lay in width. In this case, it is important to observe a step of 15 cm between the slats.
When the next layer of rails is mounted, we proceed to the passage of all the remaining slots. We fill the cracks with a solution of frost-resistant tile adhesive. After all the cracks are processed and sealed, leave the solution to harden. This usually takes one day. After 24 hours, the solution should completely harden and harden. In this case, the formwork should look like in the photo.

We check the formwork for strength. To do this, it is enough to try it with your fingers, if everything is dry and hard, then everything is in order, you can safely proceed to the next step.
Insulation of the concrete floor on the balcony with a second layer of foam
The sequence of actions is as follows:
- We cut the foam into pieces 15 cm wide.
- The cut polystyrene is laid in the distance between the wooden slats.
- We close the cracks in the floor with small pieces of foam to form a surface without gaps and cracks.

Prices for popular types of heaters
insulation
Insulation laying
ATTENTION! Insulation we lay the reflective surface up.
- The insulation should go on the edges of the walls and on the balcony frame by about 3-4 cm.
- We tuck the excess and wind it back into a roll.
- Using a construction knife, we cut off unnecessary insulation.
- We straighten and smooth the insulation, forming a smooth surface.

We put a log on top of the insulation and try it on in length. After the lag is laid out, we fasten it to the screws. For this we use a screwdriver.

- We lay the log, fixing it with self-tapping screws.
- Between the lag, similarly to the steps that have already been taken above, we lay a layer of foam.
- On top of the foam layer, we lay the chipboard, fixing it with self-tapping screws to the formwork from the bars.


We sheathe the floor on the balcony with clapboard
In our example, the floor will not be sheathed, but with special slats, because. this layer will not be finished yet. But if you want to finish the floor at this step, it will also be a very warm construction, so we continue on.
So the technology of mounting wooden slats:
- we fasten the rails with self-tapping screws and a screwdriver tightly to each other;
- in order for the floor to be stable “did not play”, it is recommended to screw in self-tapping screws with indents of 5-7 cm from each other.
Also in the photo you can see that our balcony frame is reinforced with a connector, which, in turn, stiffens the balcony frame. The photo also shows that the amplifier protrudes a little. Let me remind you that we need all the slats to fit snugly against the walls and the balcony frame. To do this, we need to use a jigsaw to cut a notch in a wooden lath.

- We take a pencil or marker and transfer the size of the protrusion of the frame amplifier to a wooden rail.
- Using a jigsaw, we cut out a notch of the size we need.
- After we "worked" with an electric jigsaw, we get this result.
- Now we try on the bar. As you can see, she perfectly “lay down” in her place.

ATTENTION! When laying the floor, do not forget to use the level. Everything should be smooth.
We proceed to laying the second reinforcing layer. To do this, with the help of a screwdriver and self-tapping screws, we fasten the strips in length closely one to one.


After the second reinforcing layer is laid, something like this should appear before you.
Laying the finish coating (MDF) on the reinforcing layer
After we have completed the installation of the third reinforcing layer, we already have a picture of our future floor.

- Now we transfer all our measurements to the fiberboard sheet.
- We cut fiberboard along the contours using a construction knife.
- Let's try fiberboard.
- Fiberboard, even in the corners, should lie flush.
 Laying fiberboard sheets on the floor
 - After fitting, remove the fiberboard and use a pistol to “fill in” the sealant in the slot.
- After treating all the cracks with sealant, you should get something like this.

ATTENTION! Sealant should be applied in a thin layer. Also, it should not protrude, otherwise the fiberboard will not stick tightly to the floor. If suddenly the sealant lays down too thick, it does not matter, it can be easily removed with a damp cloth or napkin.
Well, now, when we “blew out” all the cracks with the help of a sealant, we proceed to the final stage - laying fiberboard.

- After the fiberboard is laid, it must be properly pressed to the floor. This is done so that all excess silicone gets out.
- Now we fasten the fiberboard with a screwdriver and wood screws measuring 3.5 x 25 mm.
- We fasten the self-tapping screws in the form of a “Christmas tree” with a step in all directions of 40 cm.

Prices for fibreboards (fibreboard, MDF, HDF)
Fibreboards (Fibreboard, MDF, HDF)
OK it's all over Now. All work on the installation of underfloor heating on the balcony of a multi-storey building has been completed. In this article, we reviewed step-by-step instructions for installing the floor on the balcony with our own hands using the "sandwich" technology. Good luck with your repair!
Floor coverings made of wooden boards are popular not only for flooring in a residential area, but also for making a surface on a balcony, loggia or terrace. The wooden floor on the balcony is beautiful and warm. Moreover, the comfort of the surface is ensured not only by the possibility of laying insulation under the plank floor, but also by the characteristics of the material. Subject to the installation technology, the balcony flooring will serve you for decades. If you do not know how to make a wooden floor on the balcony with your own hands, the step-by-step instructions from our article will help you with your work.
Advantages and disadvantages of a wooden floor on a balcony

Before you make a wooden floor on the balcony, consider the main pros and cons of such a coating. Wooden floorboards are a naturally occurring material traditionally used for flooring. The tree has a low thermal conductivity, so the floor on the balcony of the boards is the best option for creating a comfortable and warm coating in a room without heating.
The benefits of this type of flooring include:
- aesthetic appeal;
- the possibility of using in any interior;
- ease of processing (fastening and sawing of wood is performed without the use of special equipment);
- environmental cleanliness is very important for homes with children and allergy sufferers;
- if you lay a floor made of durable beech, oak or larch wood, then the surface will serve you for several decades while maintaining all performance characteristics;
- the best solution for balconies with a low floor is to cover it with boardwalk along the logs (in the end, you will be able to understand it to the level inside the room);
- to level an uneven concrete slab base, the easiest way is to lay a plank floor;
- installation of a wooden structure will allow you to perform high-quality insulation of the balcony;
- it is possible to lay wooden floors even on dilapidated concrete slabs, since the structure does not load them at all.
The wooden floor on the loggia or balcony has its drawbacks:
- wood is susceptible to rot, mold and insect damage;
- the material is highly flammable;
- wood quickly absorbs moisture from the air and deforms from this.
Important! All wood imperfections are minimized if the elements are treated with antiseptics to protect against decay and fire retardants to prevent fire. In order for the coating to absorb moisture so quickly, the floors are painted with paints and opened with varnishes.
It is best to lay the floor with boards on a glazed balcony, so the operating conditions will be as close as possible to the living space. If you decide to cover an unglazed balcony with plank flooring, then carefully approach the choice of wood. Give preference to moisture-resistant species, such as larch, and get ready for more thorough surface care.
Preparation of the concrete base of the balcony
If you are making wooden floors on the balcony with your own hands, then pay special attention to preparing the base. If the concrete slab is strong enough and in good condition, then the preparatory work is as follows:
- Using a cement-sand mortar, we close up all cracks, holes and crevices in the base. Using mounting foam, we seal all joints of structures.
- Let's start leveling the surface. To do this, cut off the protruding mortar, concrete and mounting loops.
- We prime the surface with the use of primer solutions of deep penetration. They are applied to the concrete slab and the lower part of the walls.
If the concrete slab is old and has many defects, a new screed is made:
- A waterproofing mastic is applied to the junction of the wall of the house and the slab. The composition is brought to the wall and slab to a width of 10 cm.
- Along the perimeter we fix temporary formwork to a height of 100 mm.
- We install beacon rails along the plate. Align them in a horizontal plane according to the level.
- Pour the cement mortar and level it over the beacons.
- The next day, we take out the lighthouse rails and fill the voids with a solution.
- Let the screed dry for a couple of weeks.
Floor waterproofing

When making a wooden floor on a loggia with your own hands, do not neglect the waterproofing of the base. It will protect the floor from moisture, mold and fungus. To this end, the surface can be treated with impregnation, paint, waterproof plaster, rubber, liquid glass and covered with rolled materials.
When performing waterproofing, pay attention to the following recommendations:
- The easiest way to make waterproofing with polyethylene film. The material is laid with an overlap, and the joints are glued with adhesive tape. Use two layers of film and run it on the wall to a height of 150mm.
- Ruberoid is laid on bituminous mastic, applying it with a spatula to the base. And the rolled material with the mastic already applied is simply warmed up before laying.
- Paint waterproofing suitable for self-study. Typically, latex-acrylic compounds are used, which are applied with a wide brush to the floor and bottom of the wall.
- Mixtures for penetrating waterproofing applied in several layers to walls and floors. The substance crystallizes in the pores of the material and reliably protects against moisture.
- For application moisture resistant plaster compositions use a brush or spatula.
- Liquid rubber and the same glass are the most reliable materials for waterproofing.
The device of a wooden floor on logs
The floor on the balcony of a wooden house is often below the floor level in the room, so while walking you have to overcome a step, which is not very convenient. Thanks to the arrangement of the floor along the logs, it will be possible to smooth out the difference in heights and bring the surface to the same level as the floor in the apartment.
Installation log for the floor

Dried timber is used to make the frame. Its section is determined from the height to which the surface is raised, minus the thickness of the boardwalk.
We work in the following order:
- We lay two beams along the longitudinal edge of the balcony and against the wall.
- Next, measure the distance between them and cut the bars of the same length. There are enough transverse bars so that they can be laid in increments of 800 mm across the balcony.
- We treat the blanks with an antiseptic and cover with drying oil.
- The bars are laid out and aligned in a horizontal plane. We fasten the extreme longitudinal and extreme transverse bars to each other with metal corners and self-tapping screws. We align the structure horizontally by placing plywood scraps or wedges under it.
- Inside the frame, we install the remaining transverse bars and fasten them to the crate with corners and self-tapping screws.
Important! We fix the resulting wooden frame with dowels to the concrete base.
Floor insulation with lags
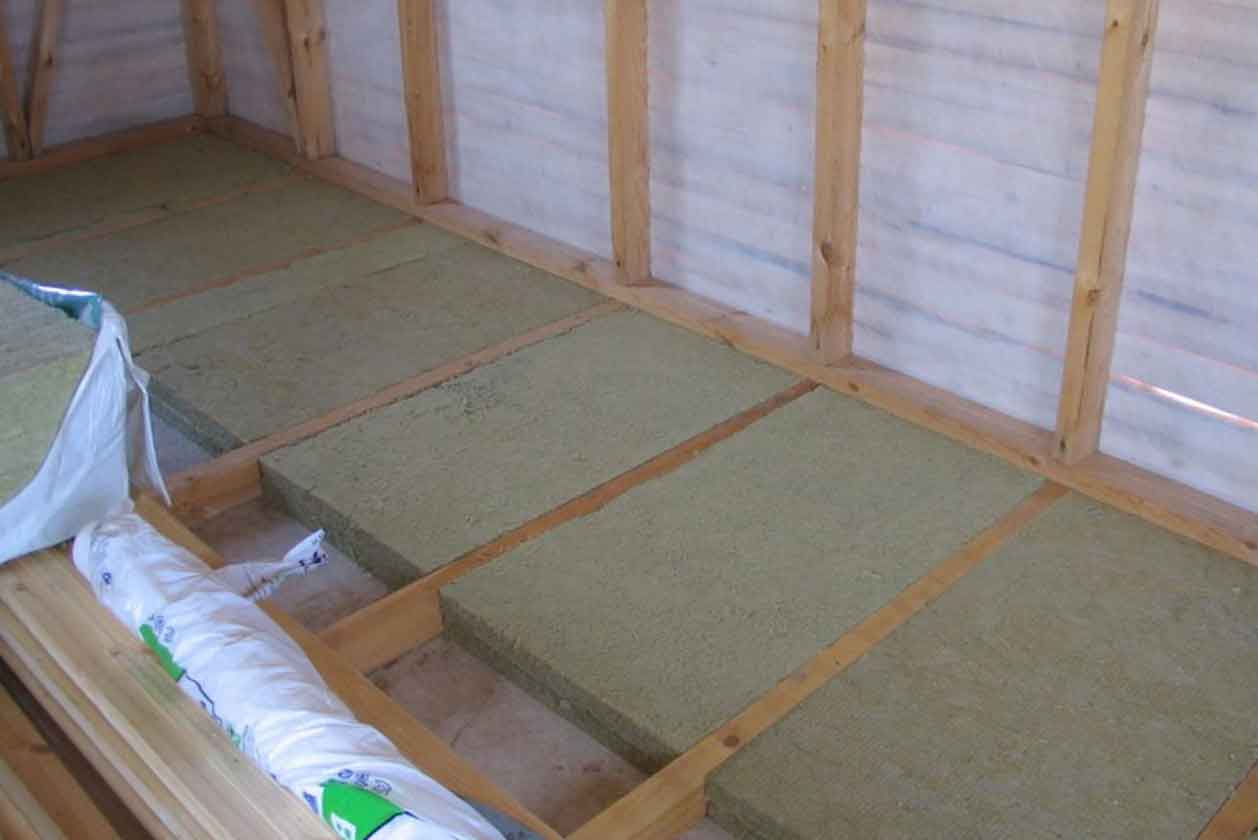
Despite the low thermal conductivity of wood, the structure must be additionally insulated. This is simply necessary if there is an unglazed balcony or open space below. For insulation, rigid board materials and roll insulation based on mineral wool are used:
- extruded polystyrene foam;
- slag wool;
- perlite-cement slabs;
- glass wool;
- basalt wool.
The insulation is cut into rectangles of a suitable size and laid between the lags. For dense laying, the dimensions of the insulation take a couple of centimeters more than the gap between the structures.
Important! A balcony without glazing is not insulated due to the lack of such a need and due to the possible accumulation of moisture in the heat-insulating material.
It is also allowed to use bulk materials as a heater. Expanded clay, sawdust, granulated polystyrene foam, ecowool, vermiculite are suitable for filling the voids between the lags. The selected insulation is poured into the space and slightly compacted. If necessary, the material is topped up.
Plank flooring

As a flooring, it is better to use boards with locking joints. We impregnate all elements with antiseptics before laying. This is done especially carefully from the back side and along the ends, because after laying it will not be possible to get to these places.
Installation is carried out in the following sequence:
- We lay the first element with a groove to the wall with an indent from it by 1 cm. We fix it to the logs with self-tapping screws or nails.
- We insert the spike of the next floorboard into the groove of the previous one and press it tightly. We also fix to the lags.
- Similarly, we stack all the following elements. We cut the last board to the required size and also lay it.
- If two boards are used in one row, then the place of their junction should fall exactly in the middle of the log.
- We install a wooden plinth.
Repair in a balcony room, it would seem, is the simplest process that does not require significant time or money. But, we must not forget that this room most of all requires protection from temperatures and precipitation, because it is located in the open air and consists of fragile cladding structures. Open balconies are especially affected, the interior decoration of which, along with external materials, lends itself to constant corrosion and destruction. And how to forget that it is from the balcony that the draft and cold from the concrete floor enter the apartment. Therefore, the question: what to lay on the floor on the balcony is of interest to the domestic inhabitant.
The need for insulation
Most of all, the need to insulate the surface of the balcony floor arises in the winter season, when a merciless draft enters the apartment. Housewives are saved by closing the floor gaps, but this is not the most effective way. Some prefer to lay warm carpets on the floor on the balcony, but this option is only suitable for glazed rooms.
Raising the floor level on the balcony
The most common and economical ways to insulate a room are to raise the floor level and use additional heat-saving materials. We must not forget that facing materials are also able to slightly increase the warmth of the floor surface.
Raising the concrete pad
A universal option that will suit both open spaces and glazed balconies is the imposition of an additional layer of cement mortar. This method will save you from questions about how to lay the floor on the balcony. This technique has a number of undeniable advantages, including the durability of the material, the ease of laying the floor, the increase in the level of the surface and its heat resistance, the short time to complete the work, as well as the possibility of surface coating with any facing material.

Applying an additional layer of cement on the balcony
Getting started, you should prepare all the necessary materials, namely: a level, spatula, dry mortar, clean water and a mixing cavity. First you need to clean the surface of dust and excess moisture, if any. Then you need to measure the level of the floor and its irregularities. It is important to remember that pouring work should begin from the side where the floor height is greater. Further, gradually, moving from one edge to another, a uniform layer of cement is applied, which needs about two days to harden. This is a rough coating, which, after drying, will need to be leveled with a face fill.
After completing all the work and drying the final fill, you should decide how to cover the floor on the balcony in the apartment. The warmth of the floor and its comfort during operation depend on the facing material. The modern consumer is offered a lot of affordable options that differ in prices, colors and performance features.
Logs - a way of warming
If you decide that a wooden floor should be laid on the floor on an unheated balcony, then you cannot do without the help of a log. By the way, this is one of the most effective ways of warming. The fact is that the organization of the wooden coating is associated with the creation of an air cushion between the concrete surface and the wooden flooring, which prevents the transfer of cold from the main structure to the flooring. Also, the creation of such a niche allows you to place various types of heat-insulating material in it.
Working with lags begins with cleaning the surface, as well as measuring its level. Since concrete can accumulate moisture, it is necessary to first cover the surface with a layer of stained fiberboard. This will prevent the ingress of water and dampness. What is better to lay on the floor on the balcony as waterproofing, if not such material? Fiberboard is attached with self-tapping screws. After that, wooden logs are placed on the floor with the same distance. They not only adjust the height of the future floor, but also make it possible to level the surface. To do this, in the right places under the beams, a strong non-sagging material should be placed.

Floor insulation with logs and fiberboard
After the end of the procedure, you will have a surface with uniform niches in which the insulation is placed. You can choose any type of insulation material, from expanded clay to all types of fiberglass. What to lay on the floor on the balcony as insulation should be decided according to your personal needs and capabilities. The final stage is the fixing of the facing plank surface, which is then varnished, painted or laminated.
Linoleum and laminate
The facing material is no less important than the layer under it, so the selection of materials must be taken with all responsibility. If you decide what to lay on the floor on an open balcony, then linoleum will be your ideal option. This is a material that is practically unaffected by atmospheric phenomena. The only thing that can suffer is the paint of the drawing. But the quality of the base from this will not lose at all. Also, linoleum refers to budget materials and its fixing does not require significant effort. The advantage of the variant is that it can be equivalently fixed both on a concrete pad and on a wooden floor. The main thing is to pay attention to the fact that the edges of the coating at the walls of the balcony do not create gaps for the passage of moisture.

Laminate on the balcony
Laminate flooring is more susceptible to weather conditions, especially when it comes to frequent rainfall. Therefore, choosing what is best to put on the floor on the balcony with an open facade, the laminate should be excluded from the list. This material will not retain moisture and will not prevent dampness. If the coating is used with a glazed facade, then a warm carpet can be laid on top of the laminate, which will add comfort and coziness to your balcony room.
Decorative tiles
Facing tiles are a good option if you are busy looking for solutions for what to put on the floor on the balcony. It is laid only on a flat concrete pad, since the installation method implies the presence of gaps between the units of material. Tile is a durable material, so it will serve you for a long time and reliably. The methodology also has disadvantages. In particular, when moisture gets on the surface, it becomes slippery and dangerous, so you should provide additional coverage that will protect you and your family from accidents. You also need to pay attention to the fact that the material may suffer from mechanical shocks. In general, this is one of the best options - than to lay the floor on the balcony in conditions of lack of time and resources.
If you have not yet decided what is best to lay on the floor on the balcony, then pay attention to more expensive options. Overhaul of the surface and the use of only reliable and high-quality materials will allow you to forget about the problems of leveling and warming the balcony room for a long time. Moreover, the area of \u200b\u200bthe balcony is small, and you can do all the work yourself.

We make wooden floors on the balcony ourselves
After reading the article, you will know what materials and tools are needed to build a wooden floor, how to correctly mark and prepare the slab (base), fix the flag and adjust it according to the insulation level of the balcony floor and cover it with laminate.
And so you decided to do the interior decoration of your own balcony.
It starts with the installation of the floor - this is the main phase of the work, since the wall frame mark with plastic, MDF or wood lining is made from ground level.
This binds the lower bar or profile to which the platform is attached.
The floor on the balcony can be cement, bulk, wood, tile, linoleum, carpet or other flooring.
Consider the technology of attaching a wooden floor to a standard three-meter balcony of an ordinary five-story building.

Photo of the balcony after exterior finishing and removal on the window shelf.
Materials and tools
To do the job you will need:
- console 50 * 100 - 6 m;
- straight suspension 47 * 17 - 20 pieces;
- dowels 6 * 30 without cover - 40 pieces;
- self-ends 32 mm with a press - 40 pieces, wood 35 mm - 100 pieces, 45 mm - 50 pieces;
- sheet OSB 2500 * 1250 * 21 moisture resistant - 1 pc;
- foam assembly;
- outflow (mineral wool) - 3 m2;
- limited - 2.5 m2;
- pedestal 2.5 m - 3 pcs.
Corners and connectors;
- the standard set of tools is drilling with a 6 mm concrete drill bit, drilling, hammer, construction knives, saw, tape, pencil and construction level.
Installation and preparation of the balcony panel
Balcony flooring installation starts with clearing the panel of debris and foreign objects. Fill the foam for assembly with the slots left after closing the balcony from the outside. Not only wind and moisture can penetrate through them, but also insects and even birds!
Particular attention should be paid to the cut along the periphery of the plate, which is between it and the outer finishing material, usually exceeding a distance of several centimeters. The outer skin falls off so the foam is not visible from the outside. If the distance is too high, place it with a stick, polystyrene, or a galvanized cover.
Keep labeling the panel.
The magazines are finished, the distance between them is 60 cm. The size was not chosen randomly. First, depending on the rods that lie at such a distance from each other, the OSB board under the weight of a person will not be difficult. Secondly - with this arrangement of supports, OSB sheet can be practically used without residues with the least number of pieces.
The first gap, from which the marking starts, is on the side of the balcony, which is at a distance of 10-15 cm.
from the edge of the panel. Using the line, we remove the line, we can pour it out, roughly spread it out, and we already explain them over the bedside table. The roulette determines the location of the third and fifth backlog.
Yes Yes! She was third and fifth! They will combine the joints of the cut parts of the OSB sheets.
I will repeat it. The first gap is located at a distance of 10-15 cm from the edge of the panel, the third - 126 cm. The distance is taken along the width of the panel - a distance of 125 cm + 1 cm. The center of the fifth interruption should be at a distance of 125 cm from the center of the third, with the following OSB plates 125 cm , whose edges lie in the center of these two rays.
All logs must be perpendicular to the load-bearing wall of the house.
You can control the market.
The second and fourth lags are among the open ones, and the distance between the fifth and fourth, and the fourth and third is 60 cm, and between the first three it is reduced to about 50 (due to the fact that the first beam moves 15 cm, the plate lies on the edge ).
This will result in stiffness and power on the floor when exiting the balcony.
The last 6th lag is placed at the end at a distance of 10-15 cm from the other end of the balcony.
Place uneven rods, draw their place on the concrete and delete.
Magazine montage
On towed lines, attach dowels to the suspension - three fasteners to each delay.
Dissolve the sizes already and size.
Reliable floor on the balcony - what to do, choose the material
Since flat plates are extremely rare, the level is controlled by a wire at the highest point, and the remainder is adjusted using wooden blocks or plastic wedges. We eliminate congestion by fixing them through hangers.

Photos lag on the balcony.
The height of the floor on the balcony is adjusted according to the floor in the apartment and the presence of a door before departure.
Heat up and place the base plate on the balcony
Soil the soil with mineral wool.
Alternatively, foams, styrofoam or penofol foam can be used. Thermal insulation between support feet and lid with pre-impregnated OSB board.

The procedure for installing a wooden floor on a balcony.
The table is over. The measured width of the soil is reduced by 1-2 cm, taking into account the gap. We get 2 parts 1250 mm. (leaf width) by 750 mm, which are completely located on pre-defined flags.
The last part is cut to the size of the rest of the wrong bottom and adds the missing part of the door.
The plates are screwed into the flag with the help of screws, on the threshold "foam". Paul is ready!
Laminate on the balcony

Photo laminate on the balcony.
The laying of the laminate is carried out on the inner wall of the wall.
To avoid shrinkage and knocking, use a soft base, start with all the tape along the balcony. Leave a gap of 5 mm from the edge of the coating to the walls around the perimeter. For the presentation, you can use cut bars and a half or special plastic wedges.

Internal finishing of a balcony with a wooden floor.
Laminate at the edges is compressed by a plastic sheet and gives the whole appearance of the floor.
Profile views:
Material selection
Leveling the floor on the balcony
Installing a wooden floor on logs
Balcony laminate flooring
Linoleum
Balcony floor heating
Plate for closing the bottom of the loggia
Most homeowners lounge on an outdoor balcony and strive for glazing and insulation using the best technology available today.
Regardless, the floor on the balcony is not difficult. The approach to this must be professional, take into account all stages of work, and then the floors will be warm, beautiful and last a very long time. Think about how the floor will be with your own hands.

Material selection
It is difficult to imagine a comfortable house that does not have glazing and insulation.
In this way, a microclimate suitable for indoor flowers or for filling with fresh air is improved in the room. Simple glazing can increase the temperature on the body by about 5-7 ° C, and if the apartment is on the south side - about 10-12 ° C. An isolated loggia is another complete apartment.

If you decide to combine a loggia and an adjacent room, warm the walls and floor well.
When choosing a flooring material for a balcony, you should analyze all the options available and stay the most suitable.
You can insulate the floor in several ways. For example, installing a "warm floor" system.
But before that, you need to do other kinds of work:
- soil leveling;
- thermal insulation;
- fire protection.
Then you can start underfloor heating and finishing.
Depending on the capabilities of the owners and the properties of the premises, the materials necessary for all stages of floor installation are selected.
Note:
- characteristics of the device on the balcony;
- degree of isolation;
- Glazing type;
- financial opportunities;
- target temperature after heating.
Even if insulation and glazing are not performed, the device on the balcony floor takes the following steps:
- surface leveling;
- finishing.
Economy, reliability and beauty are an integral part of the balcony floor.
The building materials from which it is made must transmit:
- the impact of the external environment;
- sudden changes in temperature;
- precipitation and weather surprises.
You should also consider the type of house.
If it is an open balcony, concrete screeds with expanded clay should be made, and at the end - ceramics or tiles, ceramic granite, artificial or natural stone. And if it is closed, finishing the floor on the balcony can be done using materials such as laminate, lining, warm linoleum (read: "Reliable floors on the balcony - what to do, choose the material").
Leveling the floor on the balcony
Typical houses have poor surfaces and curved surfaces. Since almost all finishing materials must be laid on a flat surface, the floor must be leveled on the balcony.
This will also prevent the accumulation and penetration of water into the room.
If, on superficial examination, it is clear that the bottom of the bed is uneven, then the quality of the final extensions must be observed.
Minor violations and shortcomings should also be avoided. For this purpose, a self-leveling compound is used. In the case of serious surface defects, a screed or retardation on wooden floors is used for leveling (see "On the balcony we carry out soil leveling: leveling options").

No additional load should be placed on the base plate, the balcony floor installation should be made of lightweight materials.
Regardless of what final materials will be used, do-it-yourself installation of the floor on the balcony is carried out according to the following technology:
- removal of old gaskets;
- get rid of rot and moisture;
- seal all existing seams and cracks;
- treatment with an antifungal drug;
- alignment and sealing;
- enter the surface or prepare the base for finishing.
Level the floor in the house in several ways:
- Standard cement screed without thermal insulation and without filler.
- Dry screeds with expanded polystyrene or expanded clay insulation;
- Dry and semi-dry screed with heater.
- Harmonization in the "warm floor" system.
- Wooden floor on a log with or without a heater (more: "How to make wooden floors on a balcony - installation and processing instructions").
- Under linoleum or laminate, leveling can be done in any way.
- Slate under tiles.
A layer of expanded clay for good heating should be at least 3 cm.
Dry sawing is allowed along with the expanded clay, but this only happens if the soil is airtight on the glass box.
It is made from a mixture of sand and cement, the ratio of which depends on the ratio between water and sand. The cement brand should also be considered. There is little water in a semi-dry screed, and cement and sand mix well. The slurry will crack if it is dry, especially if the temperature is high or low. The decision for guests is not difficult.
The consistency of the soil leveling mortar should be thick sour cream. This solution completely covers the expanded clay, and if the mixture is very liquid, it can float.
Do-it-yourself floors on the balcony: step by step instructions
The dry screed is laid out with gypsum fibers or fibrous sheets on a well balanced plate surface. The joints of the sheets are glued and fastened with screws at intervals of approximately 20 cm. Then lay the PE foam foil aside, apply laminate or linoleum to it.
Installing a wooden floor on logs
If it is difficult to find materials for the floor, it is better to use wood.
It is a natural material that is resistant to wear. Wood has been used to complete floors in homes longer than other finishing materials.
You can make not only the floor from wood, but also make an inverted wall of the balcony.
You should also choose the color of the floor on the balcony.

The usual installation of the floor on the balcony with your own hands is carried out according to the following technology:
- Clean the surface and prepare for leveling.
- A simple screed is performed.
- When the screed is dry, the floor is waterproof on the balcony.
To do this,
expanding waterproof film. - Magazines are stacked and attached to the base.
- Claydite or other insulation is covered.
- The base layer or backing is placed at the end.
In the ground on logs, it is necessary to take into account the height of the threshold of the door on the balcony and the insulating layer.
The size of the sticks is selected separately, since the height of the floor on the balcony may be different. For example, if you intend to install multi-layer insulation, then you must raise the height of the floor. Wood flooring is made directly on the concrete slab. It is recommended to apply a waterproofing film.

If you want to put a flag on a balcony, you need the same distance from each other and better in all directions.
This will make it easier to adjust the horizontal level. The space between the flags is covered with expanded clay.
The end plates are tied to the logs. You can use a ready-made wooden shield and secure it with a tripod.
Do not forget about the existence of the threshold, which should be beautifully decorated (more: "We produce balconies: what material to choose"). It will open a gap and expand the difference in floor height on the balcony and in the living areas.
Balcony laminate flooring
If the area of the house is small, you can buy expensive and high-quality laminate. It will take a little time, and therefore buying it will not have a significant impact on the budget. For a balcony or loggia, buy a laminate that is resistant to moisture, as water will get wet with regular laminate and weaken (also read: "The laminate was placed in a log installation with my own hands").

If you intend to install a "warm floor" system, you must choose a laminate with an appropriate label. However, such material will cost more.
Linoleum
The floors are also covered in logs also with insulated linoleum.
This flooring is practical. Unlike simple thin linoleum, there is a large thickness and fibrous base. The price of insulated linoleum is higher, but the difference is obvious. The soils will be much warmer than normal linoleum, you can walk barefoot.
The base for linoleum is also stable and warm. Thin linoleum can also be warm if you are insulating the base or using a "warm floor" system.

Ideally, the whole piece will be. If the floor is difficult on the balcony, the maximum space and length are measured, and these measurements add 2-5 cm. When you buy the appropriate size linoleum, it needs to be stretched at home, so it will be leveled. After a few days, the leaf shape is spread under the floor of the box with a sharp knife. The edges should be crushed with something heavy.
If you suddenly remove an extra 2-3 cm, do not worry, these defects will hide the pedestal. How well the edging of the edges depends on the quality of the linoleum.
It is advisable to use removable slats with an adjustable edge. It completely surrounds the surfaces of the joints.
You can hide under the footer:
- communications and wires;
- fixed telephone wire;
- electrical cable;
- Internet cable;
- Antenna cable for TV.
The measurement of the knitting length is necessary taking into account the connection that fixes the decorative corner.
After placing the platform on all sides, the corners are assembled. All corners should be well-attached and attached to the wall. The entire length of the base is attached to the wall with a self-tapping screw with the same pitch.
And how to make floors from linoleum logs? This task is not easy. "Cold welding" is used to fasten parts with completely straight edges. To heat the adhesive, which refers to the back of the linoleum, cardboard or other host material is placed under the beam. The heat must then be extended with either a blow dryer or a hot iron to allow the adhesive to "take".
The adhesive is very difficult to remove, so it must not protrude through the seam. When the glue is complete, the boxes and cartons will be removed. The result is a smooth seam.
Balcony floor heating
Think about how to make a warm floor on the balcony. To obtain quality insulated floors, all joints and cracks must be very well sealed. The balcony should have good waterproofing of the floor. For this purpose, it is easier to use pre-assembled foam, silicone or sealant.
It is necessary to work carefully so that everything is pleasant to see. To clean the silicone pigments, the remaining foam must be removed.
When designing a warm floor, there are two layers:
- Draft with laid heating system;
- Finishing with finishing.

As the top cover, you can choose:
- marble slabs;
- porcelain tiles;
- tile;
- carpet covering;
- parquet board;
- laminate;
- linoleum.
The height of the base layer for insulation of any type of "warm floor" should be 10-15 cm.
Thresholds will hide the difference in levels.
It is better to have underfloor heating installed by professionals. To save money, you can make your own ties.
Plate for closing the bottom of the loggia
In an open box, the perfect finish for any tile will be, especially if the base is a cement screed. The choice of color, pattern, texture is huge. Most often, in the end, you will find tiles, ceramic tiles and porcelain pots.
The soil of such materials will, of course, be reliable and durable if you do not hit heavy objects. The bottom of the tile has disadvantages: slippery and cold. As a rule, a warm carpet is installed on this floor.

The floor is laid on the balcony as follows:
- Old surfaces are removed and the surface is ready for leveling.
- The waterproofing film is washed.
- The heater folds up.
- We evaluate or mix.
- In the usual way, using the "crosses" that are needed to ensure that the joints are of equal thickness, the tiles are placed on the appropriate adhesive.
- Treatment of joints with injection mass or sealant.
A balcony floor is better than a hard porcelain pot.
However, there are problems with styling: due to its power, it shrinks significantly. There is also a special tile that fits seamlessly. It forms even a hard surface, for example, under marble.
It was found out how to properly make floors on the balcony of various materials, so it turned out beautiful and lasted a long time.
Types of flooring
Features of linoleum
Characteristics of the laminate
Carpet on the balcony
Laying ceramic tiles
Wood floors
Self-leveling floors - modern coating
Which cover should you choose?
Everyone who decides to equip their balcony strives to make it beautiful, high-quality and functional.
To do this, changing the floor, wall and ceiling decoration. Consider what is better to lay on the floor on the balcony.

Types of flooring
There is no single option than to lay the floor on the balcony.
Almost all floor coverings have the same characteristics and perfectly cope with their functions.
To make floors on the loggia, the options may be as follows:
- linoleum;
- laminate;
- carpet;
- ceramic tile;
- wooden floors;
- Self-leveling floors.
Consider the features of each type of coating and decide which floor is better to do on the balcony.
Features of linoleum
Linoleum has a number of positive characteristics:
- Low price.
- Easy to operate.
- Fairly easy to fit.
- A variety of colors and types, which allows you to quickly and easily choose exactly what you need.
- Long service life.
- Pretty good quality.

Linoleum, in addition to the listed advantages, has several disadvantages.
The floor on the balcony should be made from a single piece of material. If you lay the floor in several pieces, then moisture will accumulate under the linoleum, which is bad.
And one more minus: after some time, the coating fades and loses its original appearance.
Characteristics of the laminate
And what else can you lay on the floor on the balcony? Laminate can be used as a floor finish. A wide range allows you to choose a coating suitable for any design.
The laminate is laid on a flat concrete base, on which a substrate is spread, which prevents friction between plastic and concrete, and also serves as a heater (for more details: “We lay the laminate on the loggia - do-it-yourself installation”).
In winter, laminate flooring cannot be laid on the balcony. Especially if the temperature is below 10 degrees, and the humidity is more than 70%.
Work can be carried out at temperatures above 5 degrees.
This material is beautiful and light, however, it has a significant drawback - it does not tolerate high humidity. It can be used on the balcony only if it is glazed with high quality and moisture does not get inside.
Carpet on the balcony
You can also use carpet on the loggia.
This material has a long service life. Perfectly adapts to various conditions. Carpet can also be used on uneven surfaces. However, in order to make it convenient and comfortable to walk on it, it is necessary to make the concrete screed as even as possible.

You can walk barefoot on the carpet, as it is pleasant and soft to the touch. Large selection of colors, which makes it possible to select materials for any interior.
The disadvantage of this coating is that it absorbs a lot of dust, so you need to vacuum frequently.
Laying ceramic tiles
Choosing what to put on the floor on the balcony, you can decide in favor of ceramic tiles.
Beautiful appearance, a huge number of color variations and patterns. You can lay tiles on the balcony yourself. The service life is quite long. The appearance does not change for about 10 years. Easy to care for: most often simply wiped with a damp cloth.

The tiles are of high quality.
However, this material is very cold and requires additional insulation. This can be done using various underfloor heating systems (for more details: “How to make a warm floor on a loggia with your own hands”). Ceramics is a heavy material, and it is not advisable to overload the balcony slab. Therefore, you should pay attention to lighter types of ceramic tiles.
Wood floors
The actual question that arises when the floor is made on the loggia: what to make it from?
You can use wood. He is the easiest to work with. The material itself is warm, so it almost does not require warming. On a wooden floor, your feet will always be warm and comfortable. The advantages of the boards are their light weight and durability (read: "How to make a wooden floor on a balcony - installation and processing instructions").
When choosing boards, you should pay attention to their humidity, it should be no higher than 10%. And also for distortions along the edge and thickness, not more than 2 mm and 1 mm, respectively.

In order for the wooden floor not to rot and serve for a very long time, the boards must be treated with special protective compounds and varnished.
It is not difficult to make such a floor on the balcony; not even a professional can handle it.
The disadvantages of such a floor include the need for periodic updating of the coating. After some time, it will lose its attractive appearance.
Self-leveling floors - modern coating
Bulk floors are not in great demand.
This is a pretty good cover. The floor can be made in absolutely any color, for this you need to add the appropriate color scheme.
You can also draw a drawing you like or cover the floor with various ornaments (for more details: “How to pour a self-leveling floor on a balcony with your own hands”).

The bulk floor needs to be additionally insulated. In order for the coating to last as long as possible, it must be varnished in several layers. This floor needs periodic updating.
How to lay the floor on the balcony
Which cover should you choose?
It was decided to ennoble the floor on the balcony of what to make better - a question that everyone asks. When choosing a material, you need to take into account all the features of a particular floor covering.
The final decision is influenced by the service life and quality of the material, ease of installation, range, cost and weight.
Under any selected floor covering, it is necessary to lay vapor and moisture insulation. They will not allow moisture from the lower tiers to enter the room. In this case, there will be no high humidity on the loggia (read also: “How to make a floor on a loggia with your own hands - finishing steps”).
If a balcony is finished in an old building, then it is better to choose lighter materials. It is not necessary to create an additional load on the bearing concrete slabs that have lost their original strength.

The easiest material to install is linoleum.
All you need is a sharp utility knife and a tape measure. If the percentage of humidity in the room is higher than allowed for linoleum, then you should not lay it.
Then what to make the floor on the balcony from? In this case, you can make the floor out of wood (oak or hornbeam). This option is simple and high quality. The floor of this material is made very simply, in addition, it is warm and has a long service life.
Wooden materials are considered the best in terms of price and quality.
It will not be necessary to repair such a coating soon. It only needs to be varnished or repainted once every few years to maintain its original appearance.
Summing up
There are a large number of floor materials that will make the coating warm and cozy, and will also be combined with the interior. And yet, what floor is better to do on the loggia?
Among the coatings that are in great demand in terms of price-quality ratio, the leading position is occupied by a wooden floor.
The price of a tree is lower than, for example, a tile.
Tools and materials that you will need to place the floor on the balcony with your own hands:
layout diagram
- perforator;
- drills and nozzles for bolt bolts;
- sawing machines (as far as possible);
- a hammer;
- construction knife;
- balloon polyurethane foam;
- construction pistol;
- pencil;
- roulettes;
- dowels;
- self-tapping screws;
- heater 5 mm thick;
- I dont know;
- plywood;
- polystyrene or expanded polystyrene.

Laying insulation
All work on a balcony or loggia, especially for processing, should begin with cleaning.
You need to carefully clean the soil, wash and properly carry. First, the flags are placed in order to provide a higher layer of isolation.

Scheme of installation on a glass grid.
Then you need to take up such a creative process as isolating isolation. Thermal insulation should be thin and placed on the entire surface of the balcony.
It needs to be cut where necessary and try to install it in such a way that leads and leads are as small as possible.
When the first layer is laid, you should carefully review the result. If this is satisfactory, you can proceed with the installation of embedded foam around the entire circumference of the insulation. Each seam and seam is foamed, and then again look at the result.
Finally, the excess foam must be cut with a knife.
Then you need to put another layer of insulation.
On the balcony we produce floors: 3 easy steps from concrete slab to laminate or tile
In order to make this layer accurate and of high quality, it will be necessary to make the laying motion, while we try to avoid the impact of the bottom and bottom seams. It all matures together, dries out and reduces the excess again. After that, isolation is no longer needed.
You should be aware that you don't need to install the logs. In some cases, you can do it without them.
Laying order
The next step will be laying wood and plywood.
Before doing such an important job, you will need to measure the balcony. The soil is measured from the wall to the parapets, after which some measurements are taken.
Particular attention should be paid to measuring the angles, which are often asymmetrical, so the distance to the balcony fence can be different.
Once the required data is obtained, the grate and plywood will be measured and cut.
The first stick should be placed not close to the wall, but with an alignment of 10 cm. All subsequent segments of the rods should be parallel to each other, the distance between them should be at least 40 cm.
The last part must be installed the same way as the first.

Balcony location.
Expanded polystyrene or expanded polystyrene is firmly inserted into the cells between the rods.
The second option is better. This is because the foam releases a small amount of toxic substances and therefore it is not even advisable to use it in logs that will be used as a flat. Also, foam can break easily. Remember that you will need to fill in the slots left after installation by fixing the foam.
Then the second layer of the beam is applied.
It must be perpendicular to the first. This method of thermal insulation can create an air cushion that can improve thermal insulation and add strength to the base.
On the second layer of the beam is plywood, in which the finishing material should be laid in the future.
It should be noted that not all boilers will be on the balcony. We do not recommend using expanded clay instead of plywood. This material is a poor heat insulator, and requires a large thickness of the insulating layer for its operation. You can use mineral wool, but this can cause additional inconvenience in the form of vapor barrier equipment, which must be done in the highest class.
Floor heating device with electric heating
It should be noted that you can simply put electric underfloor heating on the balcony.
In this case, the heating cable must be installed under a special parking panel. This arrangement can be done in the winter while you are using it on the day of installation.

Scheme of electric heating installation.
Electric floor heating will not lead to high energy costs.
In this case, the main thing is the correct installation of equipment and its economical use. Another advantage of this floor is that it does not require additional heating of the balcony.
If other methods are used, even with the strictest process work and high quality insulation in winter, it can be quite cold. You will need to install additional heat sources.
It should be noted that heating the loggia with central heating is strictly prohibited.
The most suitable sources of additional heat for insulating a balcony are electric heaters.
In addition, oil heaters and convectors can fit perfectly inside and provide a comfortable temperature. The installation of air conditioners will perform a double service: in summer you will get coolness and in winter you will warm up.
Various conclusions are possible
Everyone understands that the easiest way to complete a painting.
Several types of colors are suitable for this: pentafentine, alkyd and silicone.
First, the surface must be washed and dried.
In the case of wells and irregularities, they can be cemented with cement mortar. Don't forget that you will need to set a flag.
The advantage of this method is low cost.
Weaknesses - This floor cannot last long.
Another option is heating and covering with a wood panel. The panel should run along the length of the balcony. In this case, plywood can be useful (for wall decoration). First you must set the flag.
The downside is that wood is not a solid and has a habit of bursting due to differences in humidity and temperature.
The next option is linoleum. In this case, you must measure the dimensions of the balcony before buying and buying linoleum in one piece.
Stacking is done in one piece. Linoleum should be chosen thick, lined to provide at least additional warmth. In this case, no deviation is required.
As with paint finishes, you need to repair any cracks and cracks. If this is not done, the linoleum may be sold.
The advantage of this option is that linoleum has a pleasant appearance and can be washed with a normally damp cloth.
Instead of linoleum, you can use laminate.
It's very easy to care for, has a stylish look and doesn't require an expert to install laminate flooring. In case of uneven bottoms, you will need to install magazines.
We make a wooden floor on the balcony with our own hands
After reading the article, you will learn what materials and tools are needed for installing a wooden floor, how to properly mark and prepare the slab (base), fix the logs and level them, how to insulate the floor on the balcony and cover it with laminate.
And so, you decided to do the interior decoration of your balcony yourself.
It’s worth starting with the installation of the floor - this is the main stage of work, since the marking of the frame for wall cladding with plastic, MDF or wooden clapboard is made from the level of the flooring.
It is also used to bind the lower beam or profile to which the plinth is attached.
The floor on the balcony can be cement, self-leveling, wooden, covered with tiles, linoleum, carpet or other floor coverings.
Consider the technology of installing a wooden floor on a standard three-meter balcony of an ordinary five-story building.
Photo of the balcony after the exterior finish and removal along the windowsill.
Materials and tools
To complete the work you will need:
- timber 50 * 100 - 6 m;
- straight suspension 47 * 17 - 20 pcs.;
- dowels 6 * 30 without a hat - 40 pcs.;
- sharp self-tapping screws 32 mm with a pressure washer - 40 pcs., for wood 35 mm - 100 pcs., 45 mm - 50 pcs.;
- moisture resistant OSB sheet 2500*1250*21 - 1 piece;
- mounting foam;
- isover (mineral wool) - 3 m2;
- laminate - 2.5 m2;
- plinth 2.5 m - 3 pcs.
Corners and connectors;
- a standard set of tools - a hammer drill with a drill for concrete with a diameter of 6 mm., a drill, a hammer, construction knives, a hacksaw, a tape measure, a pencil and a building level.
Marking and preparation of the balcony slab
Installation of the floor on the balcony begins with cleaning the plate from debris and foreign objects.
We fill with mounting foam the gaps remaining after the balcony was sheathed from the outside. Through them, not only wind and moisture can penetrate under the flooring, but insects and even birds! Particular attention should be paid to the gap along the perimeter of the slab, since there is usually a distance of several centimeters between it and the exterior finish material.
The outer skin is lowered, so the foam from the outside will not be visible. If the distance is too large, lay it with a beam, polystyrene or close it with a galvanized strip.
Let's start marking the plate. The logs are placed across, the distance between them is 60 cm.
The size was not chosen by chance. Firstly, leaning on the bars lying at such a distance from each other, the OSB plate will not sag under the weight of a person. Secondly, with such an arrangement of supports, the OSB sheet can be used practically without residue with a minimum number of cuts.
The first lag, from which the markup begins, is located on the side of the balcony exit at a distance of 10-15 cm.
from the edge of the plate. Using the level, we draw a line, you can cut the logs, roughly spread them out and outline them already along the lying beam. Roulette determines the location of the third and fifth logs. Yes Yes! Exactly the third and fifth! The joints of the sawn parts of the OSB sheet will fall on them.
I repeat. The first lag is located at a distance of 10-15 cm.
from the edge of the slab, the third - 126 cm. The distance is taken along the width of the slab - 125 cm + 1 cm. of the gap. The center of the fifth log should be at a distance of 125 cm from the center of the third, they will lay the next 125 cm piece of OSB, the edges of which will lie in the center of these 2 bars.
All logs must be perpendicular to the bearing wall of the house.
You can control it with a square.
The 2nd and 4th lags are located between the exposed ones, the distance between the fifth and fourth and the fourth and third will be 60 cm, and between the first three it will decrease to about 50 (due to the fact that the first beam was shifted from 15 cm, and the slab goes all the way). This will give rigidity and strength to the floor at the exit to the balcony.
We lay the last 6th lag at the end at a distance of 10-15 cm from the other edge of the balcony.
Having laid out the bars, we outline their location on the concrete and remove them.
Lag installation
We fasten suspensions with dowels along the drawn lines - three fasteners for each log.
We sort out the logs already cut to size in them and set them according to the level. Since even slabs are extremely rare, we control the level from the beam, which is located at the highest point, adjusting the rest with the help of pieces of wood or plastic wedges placed under them.
We fix the lags by screwing them through the suspensions.
Photos of the lag on the balcony exposed by level.
The height of the floor on the balcony is adjustable relative to the floor in the apartment and the presence of a threshold in front of the exit.
We insulate and lay the floor slab on the balcony
We warm the floor with mineral wool.
Alternatively, you can use foam boards, polystyrene foam or foil foam. The insulation is laid between the load-bearing joists and covered with a pre-sawn OSB board.
The process of installing a wooden floor on a balcony.
The plate is sawn across.
We reduce the measured width of the floor by 1-2 cm, taking into account the gaps. We get 2 pieces of 1250 mm. (sheet width) by 750 mm., which will perfectly fit on pre-set logs. We cut the last piece to the size of the remaining part of the wrong floor and add the missing part of the nut.
We fasten the plates to the lags with self-tapping screws, we “penim” a piece at the threshold.
The base of the floor is ready!
Laying laminate on the balcony
Photo of laying laminate on the balcony.
Laying the laminate is done after the interior wall cladding.
What floor to lay on the balcony
To avoid creaking and knocking, we use a soft substrate, we start with a whole strip along the balcony. From the edge of the coating to the walls around the perimeter, we leave a gap of 5 mm. To expose it, you can use centimeter bars chopped to the floor or special plastic wedges.
Balcony interior with wooden floor.
The laminate is pressed along the edges with a plastic plinth and gives the floor a finished look.