In the old days in Russia, the construction of a bathhouse lasted more than a year, but now you will not surprise anyone with ready-made baths, which are brought directly to the site and assembled in a few hours. However, after the departure of the builders, you are left with a log box that is not equipped with a heating device.
Therefore, the construction of the chimney in the bath and the installation of the stove falls on the shoulders of the householder. Doing it right with your own hands requires knowledge and experience, because a frivolous attitude to this problem promises increased costs for maintaining the required temperature, the risk of fires and the danger of carbon monoxide poisoning.

Chimney classification
The chimney for a bath can be equipped in several ways, depending on the place where the stove is installed. Methods for organizing the removal of smoke from the bath are classified according to the following parameters:
- Material used... To make chimneys, metal or heat-resistant bricks are used. Brickwork is considered a more traditional option, but modern stove-makers prefer the metal chimney of the sauna stove. Its advantage is quick do-it-yourself installation.
- Mounting method... The chimney in the bath is installed inside or outside the building. Installation of an external chimney system is a North American technology, according to which pipes are led out through the wall to the street. It was developed in response to the shortcomings of the indoor method of running a pipe through the ceiling to the roof.

The choice of material and the way in which the installation is carried out depends on the financial capabilities, the placement of the stove and the construction skills of the master. Experienced stove-makers do not recommend that those who are comfortable without experience do not combine it with a ventilation system, it may be unsafe.
Advantages of a brick chimney
A chimney for a bathhouse made of heat-resistant bricks was built before the appearance of metal ones. This is easily explained by the fact that there was no metal that can withstand high temperatures in mass production.
Only a true professional can make a brickwork of a chimney with his own hands; installation is carried out according to a scheme, violation of which will ruin all the work done. Compared with a metal chimney made of bricks, it has the following advantages:

- Heat-resistant brick, designed specifically for the creation of stoves, demonstrates high thermal insulation and heat-conducting qualities, due to which the brick chimney effectively retains and accumulates heat inside the steam room.
- Long service life. A chimney made of high-quality bricks, laid out with your own hands in compliance with the technology, lasts much longer than metal counterparts, therefore it does not require periodic replacement.
- High fire protection. Fire-resistant brick does not burn and does not allow the spread of fires. Since the bath belongs to premises with a high risk of open fire, the fire-fighting properties of bricks can save the property and the life of the owner.
It is important to promptly clean brick chimneys, as its rough structure accumulates ash, dust and other contaminants, reducing stove draft or leading to smoke in the bath.

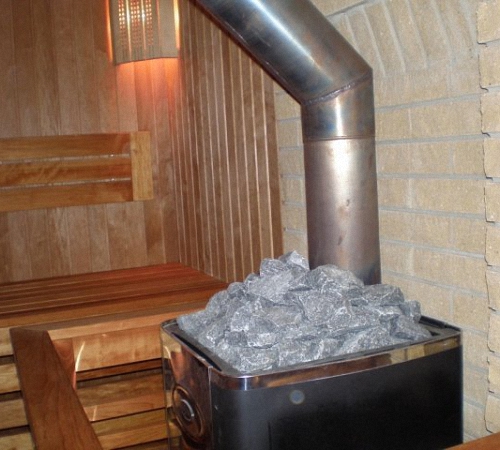
Metal chimney device
For those who make a do-it-yourself chimney for stoves, metal pipes are an ideal option that reduces material costs and installation time. In hardware stores, they sell ready-made systems consisting of straight pipes, bends and clamps. In favor of metal pipes says:
- Affordable price... The cost of a metal chimney is several times lower than that of a brick pipe. In addition, I carry out the installation of a metal chimney with my own hands, and this saves the customer a considerable amount that he would pay to a professional furnace master.
- The surface of the metal pipe is smooth, even slippery, so soot and other small particles do not linger on it. This allows the air to rise upward under the influence of the temperature difference inside and outside in a single, directed stream.
The only drawback of this method of organizing a stove chimney is that metal pipes do not have such heat-insulating qualities as brick counterparts, because of this, in winter, when the difference between the internal and external temperatures is maximum, condensate settles on the inner surface, this problem is solved by modern sandwich pipes protected by a layer of insulation.
Selection of elements of the chimney system
If you decide to do it yourself, it is important to choose the right pipe cross-section. Furnace manufacturers indicate the recommended diameter for each model in the instructions.
In the absence of this information, this parameter is calculated based on the power of the furnace, and the number of turns. However, it is better to entrust the calculations to an experienced consultant, since the draft and safety of the chimney depends on it.

Chimney system of metal pipes
Please note that the length of horizontal pipe segments should not exceed 100 cm, neglect of this simple rule threatens weak furnace draft and soot deposits inside.
- If you lead the chimney through the wall, it will be correct to place it at a distance of 50-60 cm from the edge of the overhang.
- When installing the pipe through the roof, try to place it 50-150 cm from the ridge.
- If the location of the stove does not allow this, the chimney umbrella is raised above the highest point of the roof by 1.5 or more.
- Usually, the internal chimney system is laid strictly vertically, if necessary, to change the direction, bends with an angle of 45 or 90 degrees are used.
- In order for the seller to choose the correct chimney for the stoves, it is better to make its diagram with dimensions.
Installation technology
It is better for an inexperienced craftsman to opt for an internal chimney made of metal pipes, which is led out through the roof and ceiling of the bath. DIY installation looks like this:


It is important to ensure that the joints between the pipe segments do not fall on the overlap in order to seal and tighten with wide metal clamps.
A well-assembled chimney for a bath is a sign of a real Russian bath, in which it is warm even 6-7 hours after the end of the furnace.
Video instruction
The correct design of the smoke exhaust pipe will improve the quality of the bath. Such a device will remove smoke in a timely manner, and will not allow the oven to cool down too quickly. The correct chimney can be constructed with your own hands. Consider the features of the device and its correct installation.


Peculiarities
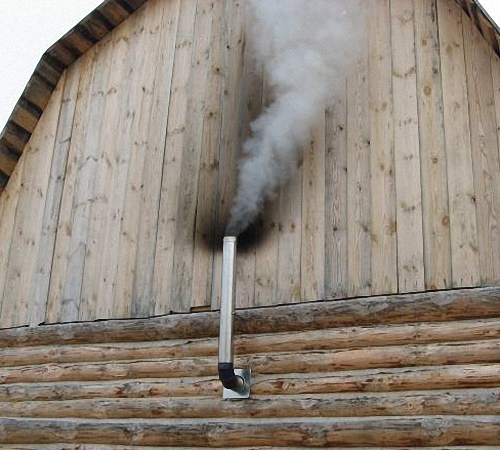
Work on the arrangement of the chimney cannot be started without knowledge of the design features. For example, each sauna stove manufacturer recommends its own chimney diameter and height. Technical indicators require maximum compliance with certain requirements. The performance of the device will not be better if the thrust is higher than the required standards.
With a strong draft, the hot gases will not have time to heat the stove, they will escape into the chimney. With insufficient draft, little oxygen will be present in the furnace. The room will be smoky, which will lead to an uncomfortable person in the bath and the possibility of carbon monoxide poisoning.


Draft is an important indicator for a chimney, which reflects the movement of smoke inside the structure.
The air in the chimney moves from bottom to top. To check the correct direction of movement, a candle or a lighted sheet of paper is used, which must be brought to the furnace. The fire must be drawn inward. With an incorrect chimney arrangement, reverse draft often occurs. The main consequence of this phenomenon is the unpleasant smell of smoke and burning inside the premises. Smoke and fumes are bad for the health of people, wall coverings, ceilings and furniture in the room.


The ideal chimney should be strictly horizontal. However, the construction of such a structure is not always possible. If the chimney requires a change in direction, so-called elbows are used. Modern manufacturers offer a huge selection of devices that differ in the ratio of angles and turns. Elbows in the chimney make it difficult to clean. Therefore, it is recommended to use this option if possible to equip a horizontal structure.

Another feature of the sauna chimney is the ability to install a structure inside and outside the building. Each option has its own merits and demerits. It is considered that the external chimney is less fire hazardous in comparison with the internal structure. It is easier to install, fix and carry out subsequent cleaning. The main disadvantage of an external chimney is large heat losses.
If the chimney is internal, the concept of heat loss is automatically excluded. However, the installation of this structure is more complicated. In addition, this design is not entirely fireproof. The external and internal chimney will have fewer drawbacks if you use modern materials in your work. The characteristics of the raw materials and elements used must correspond to the characteristics of the bath. It is necessary to take into account the temperature in the room, sanitary standards, the structure of the bath itself (preferably the presence of wooden materials).


Kinds
Chimney design options are selected depending on the material used for the construction of the bath. All elements of the device can be purchased ready-made or built independently. Until recently, the main material of the chimney was brick. It is distinguished by ideal characteristics, durability, fire safety.

For the construction of a brick pipe, special knowledge and skills are required. This option is not suitable for every bath. Without a lack of practical experience in laying a brick pipe, it is almost impossible to build a correct chimney. The structure of the brick has characteristic rough areas, which cause soot to accumulate in the chimney, which leads to rapid clogging of the structure. In addition, soot deposits can lead to sparks when firing up the stove, which is unsafe.


Modern craftsmen often choose a stainless steel chimney for a sauna stove. The main advantage of such a device is quick installation. In addition, metal chimneys are free from problems that can arise in a brick stove structure. Chimneys made of stainless steel are often sandwich structures. The straight iron chimney of the bath is easy to install with your own hands.
The inner part of the steel pipe has a smooth surface. The absence of edges and roughness contributes to better smoke extraction from the stove. But with temperature changes, condensation appears on the steel pipe. When the pipe is closed with thermal insulation, this phenomenon does not occur. It is worth remembering about this effect when organizing the arrangement of the structure with your own hands.


Another type of chimney for sauna stoves is ceramic. This design is distinguished by its resistance to fire and reliability. Modern ceramic pipes are suitable for solid fuel boilers, as well as devices operating on liquid fuels.
The main differences between these structures from other types:
- universal system (the ability to select different diameters);
- ease of chimney processing, even with a side passage;
- water and vapor tightness (availability for stoves with a heater);
- mechanical strength.


Varieties of ceramic, metal models and brick products imply the obligatory presence in the structures of a base, a tank for accumulating condensate, a tee for cleaning and inspection.
The bases for any chimneys must be perfectly flat and strictly horizontal.
Construction options
Arrangement options require calculations that take into account the amount of air supplied to ensure fuel combustion. There are complex and simplified calculation methods.
For the first calculation, the optimal characteristic features of the bath chimney are needed:
- temperature of gases at the outlet of the pipe +120;
- the minimum movement speed is about 2m / s;
- the recommended length is 5 meters;
- combustible fuel with one filling in the furnace - 10 kg / h.
To calculate the diameter of the chimney, there is a formula: D = √ (2 & 4xVr / 3.14x2)
Here D is the pipe diameter and Vr is the amount of air.


The geometry of the section may be involved in calculating the height of the chimney. A graph is drawn up for this calculation. The graphical calculation involves the area of the furnace and the area of the pipe. Divide the first value by the second and determine the percentage.
With a section equal to 10%, the minimum chimney height will be:
- 7 m - with a round pipe;
- 9 m - with a square pipe;
- 11 m - with a rectangular pipe.

All values are valid for the construction of a direct chimney. In most cases, chimneys require pivoting structures that reduce the pulling force. To prevent this, when calculating a chimney with curvatures, the resulting diameter can be slightly increased. If the stove for the bath is purchased, the stage with calculating the diameter of the chimney can be skipped altogether. All the necessary parameters for chimneys are usually indicated by the manufacturer in the instructions for a particular model.

The internal values of the pipe are calculated taking into account the power of the stove. The standard bath pipe is 150-200 mm. It is worth considering that with an increased size of the structure, the heat in the furnace will not linger. With a small cross-section, there will be no required thrust. When constructing a prefabricated structure, it should be borne in mind that the diameter of the pipe sections should not be less than that of the outlet part of the stove.
The exact value of the pipe height is interrelated with the location of the structure on the roof. If the pipe is in the middle of the slope, the structure must be raised above the ridge to a half-meter height. This parameter is closely related to the location of the oven inside. If there is more than one stove in the bath, each of them must be equipped with its own chimney system. Otherwise, it will not be possible to achieve normal traction force.


To maintain heat in the steam room, the chimney must be placed closer to the inner wall. This is where traction is most effective. In the absence of such a possibility, the walls must be solid and solid. With thin walls of the bath, you can never wait for heat inside.


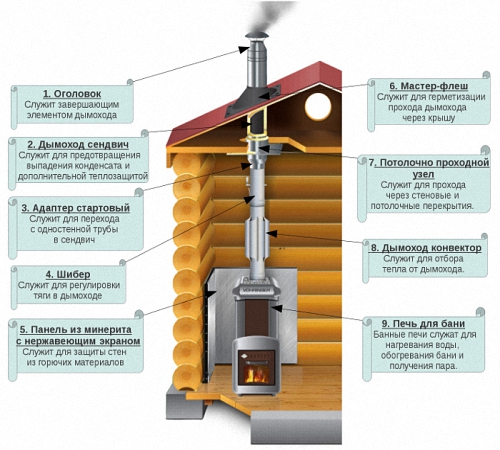
Chimney system elements
Standard kits include:
- cylindrical pipes or panels;
- adapters;
- tees;
- fixing elements (brackets and clamps);
- branch pipes;
- end pieces of various shapes;
- branch elements.


In some cases, additional components are applicable. When assembling any chimney, it is important to be guided by building regulations and fire safety requirements. All pipe components that come into contact with flames or flue gases must be made of sheet steel with refractory characteristics. Equivalent similar materials are acceptable for use.
In production, the elements of the chimney structure are usually divided into two groups. The first one includes double pipes, sandwich panels. Elements include an outer and inner tube with different diameters. Between themselves they are insulated with thermal insulation with non-combustible characteristics. This design provides faster and better heating. This causes the temperature to rise in a short time above the dew point, which reduces the amount of condensate, which is often the cause of corrosion.


Elements of the first group are used in the construction of ventilation and smoke ducts that pass through unheated parts of the bath (for example, through the attic). This design is applicable for the external arrangement of the chimney. Verticals of the second order, which are not in contact with flames and gases, are permissible from a galvanized base or stainless steel. The second group of chimney elements is usually single-circuit, it has a diameter of 80 to 400 mm.


Usually, stainless steel is acceptable for chimneys in the absence of insulation. It has a smooth surface to the touch.
Special elements allow you to assemble structures that are unlimited in height, place and method of installation, these include:
- wall supports;
- installation sites;
- gates;
- bends;
- telescopic brackets;
- clamps, spark arrestor, heat exchanger.

During installation, double pipes must not be used as an initial structural element.
The initial part, installed on the outlet of the stove, should be a single pipe with an allowable length of up to a meter and a metal thickness of 1.0 mm. An exception may be a stove with a container for water. To switch from one type of element to another, start sandwiches are used.


How to install?
For arranging a chimney with your own hands, metal pipes are the ideal material option. They reduce construction costs as well as labor costs. The installation of the chimney begins towards the oven already installed in the bath. An ordinary iron pipe is installed up to the first knee. Correct fastening will be ensured by special structures with fire-resistant characteristics.
The initial part is connected to the oven nozzle. A gate is immediately installed - a gate valve that will allow you to add or subtract traction force. Then a hole is made in the roof, which can be square. Next, a metal box is assembled with a through hole corresponding to the size of the structure. Through it, the chimney will be led to the attic. The height of the box should be greater than the materials of the ceiling decoration.


The box is securely fixed in the ceiling. The free space of the box is filled with mineral wool or expanded clay. In the attic, the structure is closed with a lid with a hole for the pipe. At the point of passage of the chimney, a sheet of heat-resistant material is fixed. The upper pipe is protected with sheets of mineral wool or asbestos. A special waterproof cuff is used as thermal insulation. Gaps can be sealed with sealant.
The installation of an external metal chimney will require even less labor. The device assumes a suitable hole in the wall (not in the roof). To turn the pipes from the furnace, they acquire a special elbow. Taps are different, choose the option you need.
The branch is installed on the stove pipe. Then a tee is placed on the outside. From it, the chimney is laid up along the wall, if necessary down. It is correct to use a similar metal box filled with non-combustible bulk material as wall insulation.


Outside the building, the chimney must be fixed along its entire length. For this, special holders are used. They can be made from available non-combustible materials.
When arranging an external structure, it is important that it rises 50-60 cm above the ridge: such an installation will guarantee good traction. To protect the chimney from small debris and rain, a special umbrella is put on top.
Brick chimneys can be indigenous or mounted. The best option for sauna stoves is indigenous. If the stove is made of brick, then a structure from the same material is attached. If the stove is made of metal, the brick chimney is connected to the branch pipe with a special pipe.


A brick chimney is arranged in the form of a square pillar, which is equipped with a well-shaped section. The size of the section is related to the power of the sauna stove; it can be half a brick, a brick or two bricks. The basis for a brick structure is a foundation of the same thickness with a sauna stove, making up a single whole with it. The pipe is raised to the desired height, where the valve is installed.
Immediately mark the space for the structure on the ceiling and in the roof. Use a level to maintain strict verticals. Start the work with the laying of the overhead part, for which there is already a point on the stove. Pass the brick rows evenly: any unevenness will impair the quality of traction. Control the position of each row. For control, a stretched thread is suitable between the angle of the initial row and the angle of the hole in the roof.


To protect the ceiling from fire, a fluff is laid. The fluff is the expansion of the outer walls of the pipe, which also ensures the stability of the structure. The widest point of the fluff should be at the level of the ceiling material. After completing the laying of the fluff, the chimney is fixed with edged boards. Further, the fluff is narrowed, the pipe is aligned to the initial value.
The outer perimeter of the chimney is laid out until the roofing material appears. A structure is being built upstairs, which will serve to drain rainwater. It has increased dimensions by about a quarter of a brick. Lay out the structure in a similar manner with fluff. Its height is related to the angle of inclination of the roof.

It is worth considering an important nuance: the beginning of the structure should be located from the bottom of the roof and protrude above the top point in several rows.
Next, lay out the neck of the chimney. It is allowed to install a metal cap on top of the structure. It is important to carefully seal the joints between the brick chimney and the roof structure. Choose methods of work and additional elements depending on the type of roofing material. The methods of this work are different, decisions on the use of one or another method are made at the place where the pipe is installed.
It is difficult to correctly install a brick chimney with your own hands. In addition, the design is expensive. Therefore, you should not start masonry if you have seen a brick and a trowel only in the video. Modern materials make it possible to construct simpler and more efficient designs of pipes for a bath.


After the construction of the chimney, as well as some time of use, it is important to take care of regular cleaning of the system. The most proven way to clean a chimney is by using power tools. For this, special ruffs, weights, in some cases a crowbar and a sledgehammer are suitable.
Working as a chimney sweep is a dirty job, because everything is taken out of the bath in advance, the surfaces are covered with newspapers or film:
- The easiest method is to use a special brush that can be used to clean the chimney. It is enough to insert the brush into the pipe, then gently push it upward until the resistance due to accumulated soot runs out. It should not be twisted around the axis, otherwise there is a risk that it will get stuck in the pipe and will have to be removed in parts.
- Another effective method of chimney cleaning is burning aspen wood. The method will help with a small amount of soot on the pipe surface. When burning aspen logs, the best traction force is created, which is able to carry the soot out of the chimney.


- Potato skins have similar properties. But to prepare the required amount of material, you will have to come to grips with cleaning more than one kilogram of vegetables.
- Modern methods of protecting pipes from soot with the use of chemicals have become frequent in use. Modern preparations include special components that, when burned, carry out soot. The components can act as a soot separator, which will eventually fall off the pipe walls.
It is believed that the best time to clean the chimney is after rain. It is easier to maintain the pipe in a humid environment. Timely pipe cleaning will guarantee high-quality wood burning. This will keep the sauna warm.
A chimney for a sauna stove is a very important element in the design of the entire sauna. After all, it performs the function of removing carbon monoxide outside and does not allow soot to settle on the walls of the room. And in order to choose the right design, you need to familiarize yourself with what types of chimneys are, what material is better to use and how to properly install such a design.
The task of the chimney is to prevent carbon monoxide from entering the bath. To do this, you must adhere to the requirements of building codes and fire safety rules.
What designs are better for a bath
First of all, a chimney for a sauna stove must withstand high thermal loads and have good draft. To date, the following types of chimneys for a bath are used:
- Brick;
- Chimney sandwich;
- Chimney made of steel pipes.
Materials of such structures have high heat resistance and thermal conductivity, and also do not emit harmful substances. For the device of a brick chimney, a special refractory brick is used that can withstand high temperature loads. But the process of erecting a brick structure is a very difficult job.
It is necessary to correctly observe the entire installation technology, therefore this type is not installed so often.

It will be much easier to install a chimney sandwich, which consists of two stainless pipes, and a layer of mineral wool insulation is laid between them. Parts of a sandwich pipe are connected using elements such as:
- Knee;
- Tee;
- Brackets;
- Pass-through pipe;
- Roof cutting.
For firm fixation, all elements are fixed with clamps and special sealed gaskets.
The sandwich pipe must be selected based on the parameters of the furnace.
The chimney made of steel pipes is mounted by welding, which connects the elements to each other. In this case, the welds must be made to the highest level in order to prevent leakage.
The role of a heat exchanger for sauna stoves
A heat exchanger for a sauna stove performs a very important function, which no sauna can do without. This is water heating. According to the method of placement, heat exchangers are:
- Hinged;
- Built-in.

The advantage of hinged structures is that the heat exchanger, which is located on the flue pipe, uses the heat of the emitted hot gases. By contacting the hot surface of the chimney pipe, the heat exchanger heats up the water, and then it goes through the pipes into the hinged tank. Due to the large volume of the chimney, the heat exchanger quickly heats up the water and maintains a high temperature for a long time.
The heat exchanger, which is located inside the sauna stove, differs in that it consumes heat from the heating of the stove.
Whichever installation method is used, a prerequisite for the correct operation of the system is to fill it with cold water before firing up the furnace.
The heat exchanger is connected using two fittings, which are attached to the top and bottom to the battery or a hinged tank. Further, the heat exchanger works thanks to the circulation of the liquid, which is heated or with the help of an electric pump.
Today the heat exchanger is installed together with the following structures:
- With a brick sauna stove;
- With a metal oven.
The advantages of a metal oven are:
- Fast heating of the bath;
- Easy to install;
- Compactness;
- Aesthetics.

Thanks to all of the above qualities, as well as having many varieties and modifications, metal furnaces every year more and more displace brick installations from the building materials market.
Installation of a chimney for a bath
The installation of a chimney for a bath should be carried out strictly in accordance with the requirements of building codes. The chimney for a sauna stove performs a very important function - it removes flue gases outside, which are formed during the combustion of fuel. Therefore, it is extremely important to comply with fire safety rules when installing the structure.
By far the most popular is the chimney sandwich. But the sauna stove has very high combustion temperatures, therefore, to install the structure, it is necessary to select especially heat-resistant pipes. By the method of installation, chimneys for the stove are divided into types such as:
- Internal;
- Outdoor.
The internal method is the classic installation option for the structure. Its advantage lies in the fact that the room is additionally heated. But this design is more laborious to install.
For outdoor installation, the chimney is led out through the wall to the street. When the chimney passes through the wall, a high-quality insulation of the pipe is a prerequisite. The disadvantage of such an installation is that the pipe will not be able to give off heat to the room and, accordingly, the fuel consumption will increase.

Indoor and outdoor chimney
The chimney is an important part of the bath, since it is he who transports the products of fuel combustion from the room. Each of the sauna stoves needs a chimney arrangement. We will consider further how to make a chimney in a bath.
Design features of the chimney for a bath
There are a huge number of chimneys, each of which is associated with a certain classification parameter. Among them are single and double-circuit chimneys made of brick, steel or ceramics, etc.
Before starting work on the manufacture of a chimney, you must first study its main components.
The ideal version of the chimney is a strictly horizontal structure through which all combustion products are removed. Although, there are situations when the construction of such a chimney is not possible. Therefore, it is necessary to equip the chimney vertically, then horizontally and again vertically. For these purposes, you will need elbows, nozzles, tees and other connecting elements, which are the main elements of the bath chimney device.
A knee is a connector that ensures a smooth installation of the chimney. For example, in the absence of the possibility of arranging a strictly vertical chimney, its direction is changed by using a knee. There is a huge selection of knees that vary in angle ratios. When leaving the horizontal section from the stove in front of the chimney, a knee or tee is also installed here.
Please note that cleaning the knee is a rather complicated process, therefore, if possible, in arranging a vertical chimney, it is better not to use it.
The use of a tee is versatile, as it allows you to easily clean ash and combustion products using special mechanisms. Inside the tee there is an element in the form of a glass, which is pulled out, if necessary, and cleaned.
The only prerequisite for the correct installation of the tee is its perfect connection with the pipes. Otherwise, smoke and combustion products will enter the room, which will bring discomfort to the people in it.
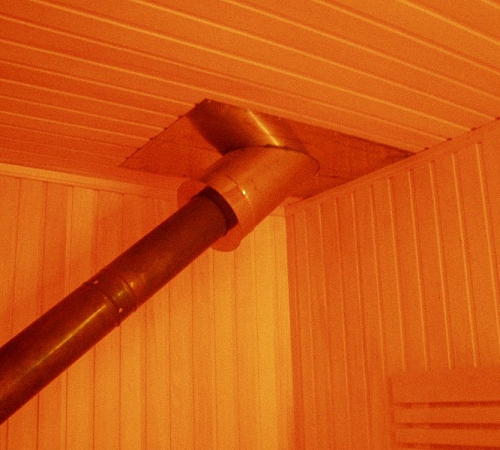
If there is a wooden floor on the second floor, you will need a branch pipe that will protect the tree from the high temperature that is present in the chimney. To install it, you will need to make a hole, install a branch pipe, isolate it and connect it to the pipe. The same pipe is needed to prevent contact of the chimney with the roof and attic.
In addition, during the installation of the chimney, you will need brackets that are able to hold the pipe and fix it in the desired position. The interval between their fastening is about 200 cm.
The last, but very important element of the chimney is called the roof cut. It is with its help that the tightness of the pipe and roof connection is ensured. The cover prevents atmospheric agents, dirt and dust from entering the attic. Please note that roof splitting is a must in the chimney and should not be replaced with cheaper options such as sealants or homemade structures. During the shrinkage of the bath, the integrity will be violated and all the smoke, rain and snow will fall into the room.

Tip: In the process of buying a chimney, you should check for certificates that confirm its quality, as well as technical characteristics that describe the materials from which each of the elements of the system are made.
Chimney pipes for a bath: features of choice
In relation to the material from which the chimney is made, it happens:
1. From stainless steel - this material is most suitable for making a chimney, as it is resistant to moisture, overheating and does not accumulate soot.
Tip: When choosing this type of chimney, you should clarify about such a parameter as the resistance of steel to acids. Since during overheating, sulfur contacts with coal, and gas is released, a rather aggressive type.
Among the advantages of using stainless steel in the chimney manufacturing process, it should be noted:
- resistance to corrosion;
- high strength;
- affordable cost;
- lightness of weight;
- aesthetic attractive appearance.
2. Chimney made of concrete pipes - this option is distinguished by its low cost, durability, ability to restore and good sealing. In addition, the manufacture of such a chimney does not require the involvement of specialists. In the manufacture of monolithic structures, soot will practically not accumulate in the chimney.
Among the disadvantages of a concrete chimney, the severity of its weight is noted, which significantly loads the structure of the building. Although, to eliminate this parameter, expanded clay additives are introduced into the concrete mixture.

3. Pipes made of asesto-cement - are distinguished by their reliability, low cost, good insulation. Such pipes are environmentally unsafe, unstable before the formation of condensate masses, soot quickly accumulates in them, so they require constant maintenance.
4. Brick chimney - characterized by a rough surface, on which a lot of soot accumulates. As a result, there is a decrease in draft, only after the chimney has been cleaned, the system's performance is restored. Among the positive qualities of this chimney, the attractiveness of its appearance, a high level of fire safety, and the duration of operation are noted.
5. A metal chimney is the simplest and most affordable option, especially for a bath. This chimney is characterized by a high heating of the pipe, on which a special tank is often installed, due to this, water is heated in it. The option of installing a steel chimney using sandwich systems is quite common. In this case, the pipes are connected, so that they are inserted into each other, and a heater is laid between them. The result is minimal heating of the outer surface and no condensation.
There is an option for installing corrugated pipes for arranging a chimney. With their help, rotary elements of the system are created.
6. The ceramic chimney in the wall of the bath is characterized by such qualities as high cost and practicality. The operating time of such a chimney is the longest. It is resistant to intense heat, chemical attack, and corrosion. In addition, the ceramic chimney is quite smooth inside, so it does not retain any soot or ash on the walls.
The ceramic material absorbs heat well, so the outer part of the chimney does not heat up. Ideal for a sauna made of wood.
7. Pipes made of vermiculite - characterized by zero condensation formation, and, therefore, ease of maintenance. Such a chimney is very light, unable to absorb moisture, resistant to high temperatures, mechanical damage.
In order for the chimney to serve its owner for many years, simple rules should be followed:
- providing a sealed fastening;
- regulation of heating and draft temperature;
- arrangement of ventilation ducts;
- insulation;
- weather protection;
- ensuring the removal of condensate masses;
- the correct type of fuel;
- lack of overheating and hypothermia;
- regular cleaning.

How to make a chimney for a bath through the ceiling
Correct chimney installation requires a serious attitude to the conduct of this process. A poorly installed chimney adversely affects not only the decoration of the room in which it is installed, but also the health of the people staying in this room. Since gases and combustion products entering the room can provoke serious poisoning.
There are two options for installing the chimney:
- smoke - in the process of performing work, a tee is required to drain condensate;
- condensate - no need for a tee.
The initial stage of installing a chimney in a bath involves preparatory work related to the selection of a project for a chimney. It is advisable at this stage to use the help of specialists who will calculate the optimal pipe length that provides good traction.
Next, you should inspect the ceiling to determine the location of the chimney. It should not be directly above the beam. Select the location for the chimney in such a way as to obtain the minimum number of bends. Since soot accumulates well on horizontal sections, and as a result, traction decreases.
In the bath, the chimney pipe must be assembled, if desired, these works are carried out directly at the installation site of the chimney. Clamps are used to fix all butt joints on the chimney, and the support brackets will help to fix the tee, if any.
The third stage is the arrangement of the chimney in the bath through the ceiling. For its construction, a special cutting is required, the choice of which is carried out in accordance with the type of roof and the angle of its slope.
Next, the section for the passage of the pipe is determined, work is carried out to mark it and cut the opening from inside the room. The pipe is led outside, behind the roof, the roof sheet protects the inside of the chimney, and the cut provides protection from the outside. To adjust the angle of inclination of the chimney, use the tapered section of the cut, its ends are wound directly under the roof.
On sections of the walls, in the locations of the branch pipe, work should be carried out to install insulation in the form of foil mats or basalt wool.
In the bathhouse, the installation of the chimney is completed by attaching the pipe to the surface of the apron and sealing it at the junction. This is how the chimney is built up to the desired size. The steel umbrella will provide reliable protection of the chimney from the weather.
Areas of the chimney that are corroded should be treated with heat-resistant paint, and sealant should be used to reinforce the joints on the clamps.

1. Lack of joints with all kinds of pipes. The chimney should not adjoin various communication systems.
2. It is not allowed to equip horizontal sections in the chimney with a length of more than 100 cm.
3. It is not allowed to install the chimney near gas or electrical communication systems.
4. The minimum number of chimney cleanings during one season is two times.
5. The minimum length of the flue outlet above the roof surface is 50 cm.
Features of installing a chimney in a bath
Before installing the chimney in the bath, we suggest studying the instructions for its manufacture using sandwich pipes for upper and lower purposes:
1. First, the pipe should be cut into two sections, which are processed with insulation.
2. From a sheet of galvanized steel, you need to cut two parts from which pipes are constructed, the edges of which are connected by means of rolling.
3. This sheet is required to cut a metal strip that will serve as a clamp.
4. In addition, parts in the form of four rings must be made from galvanized steel, which will help to close the insulation at the end sections.
5. A metal strip 0.2 cm thick and 4 cm wide is welded on the bottom of the pipe. It will function as a pipe.
To make a chimney in a bathhouse with your own hands, you should cut out two holes that will help the chimney pass through the wall or ceiling. Please note that the chimney must pass exactly through the central part of the hole.
Next, you need a steel sheet, from which two sections will be made, fixing the ceiling to the roof and to the ceiling. Holes should be drilled along the corner sections of the workpiece, in which the fasteners will be installed.
Chimney installation instructions:
1. A hole with a diameter of the chimney should be made in the center of the metal workpiece. A casing made of galvanized steel should be installed on the pipe.
3. On the lower pipe, position the upper pipe and connect them together. Be sure to adhere to the tightness of the connections. Use a clamp for a secure fit.
4. Place the second metal piece on the roof. The resulting area should be filled with clay, asbestos or expanded clay.
The flue gas duct is an obligatory element of any bath. He is responsible for the speed of warming up the steam room, the cleanliness of the air in it, and fire safety. Therefore, the arrangement of the chimney must be approached as responsibly as possible.
Chimney types - making the right choice
Until recently, smoke exhaust pipes for baths were built exclusively from bricks. There was simply no real alternative to this material. The brick is characterized by thermal storage and thermal insulation characteristics ideal for a steam room, long service life, maximum fire safety and excellent durability. But, unfortunately, not every home craftsman can build a brick pipe with his own hands. Considerable knowledge and skills are required, as well as practical experience in performing masonry.
In addition, brick smoke ducts have corners and a rough inner surface. This promotes soot deposition inside the pipe, leading to clogging and, as a result, to a significant reduction in thrust. If the chimney in the bathhouse is not periodically cleaned (and this, believe me, is not easy at all), after a while it becomes impossible to use it, and sometimes it is unsafe. There is a risk of ignition of soot deposits from sparks when firing up the stove.
More modern metal chimneys are devoid of these problems. They are often made in the form of sandwich structures or in the form of conventional single-wall pipes. Such structures are easily installed by hand. Their inner surface is very smooth, due to which the smoke escapes outward in a turbulent directional flow. The disadvantage of metal chimneys is the high probability of condensation forming in them. This usually happens when using the bath in the winter. The problem is solved quite simply. It is necessary to select a pipe with a thick layer of thermal insulation. Then the risk of condensation will be minimal.
Having decided to make your own chimney in the bath, you must immediately choose the option for its installation. The path can be external and internal. Next, we will talk about the advantages and rules for installing a metal pipe for both options.
Internal flue gas duct - it will always be warm in the steam room!
With this method of installation, the pipe is installed over the stove in the bath, stretched to the ceiling, passed through the attic, and then through the roof. The height of the tract should correspond to the level of the roof ridge or be 0.5–1 m longer than it. In this case, high-quality traction is guaranteed. The main plus of the internal chimney is that the heat energy coming through the chimney from the stove heats both the steam room itself and the attic. As a result, the required temperature in the bath is reached quickly and with low fuel consumption. The disadvantage of the internal structure is the laboriousness and complexity of laying the pipe through the roof and ceiling.
It is possible to correctly make a smoke exhaust duct indoors using a simple algorithm. First, draw a diagram of the chimney, focusing on the dimensions of the steam room. Decide on the number and length of the parts you need (turns, straight sections). Order the required metal parts for pipe assembly from a building store. Along the way, purchase two sheets of metal with holes in the middle. You will put these products on the floor of the attic and on the ceiling in the bath (below). The diameter of the holes must correspond to the section of the pipe used. By the way, it should be chosen as competently as possible.

The pipe must have a diameter (internal) within 15–20 cm. A design with a smaller section will not provide the required traction. If you take a pipe with a large diameter, the thermal energy will very quickly leave the stove and the room will not warm up well. The recommended height of the metal flue gas duct is 5 m. One more tip. Choose a pipe with a wall thickness of 1–1.2 mm. Such a product will serve you for a really long time.
Additionally, you will need to prepare a rubber seal (you will put it on the tract after bringing the pipe to the roof) and a sealant for high-quality waterproofing of the structure. A step-by-step guide for installing a metal chimney in a bath is given in the next section.
We lay the pipe from the inside - laborious, but reliable
The installation instructions for the internal flue gas duct will be relatively simple, since the entire system is almost completely vertical. You need to assemble the chimney by pushing its individual elements on top of each other. Moreover, if an ordinary pipe is installed, the assembly is carried out "through the smoke" - a superior one is put on the lower part. But when using a sandwich system, installation is done "through condensate" from the inside and "through smoke" from the outside.
Important nuances:
- 1. If the stove and chimney are located dangerously close to wooden walls, it is advisable to fix several layers of heat-resistant products (for example, asbestos boards) on the walls. Then they will never catch fire from excessive overheating.
- 2. The joints between the individual parts of the chimney should not fall on the levels of the roof and the loft.
- 3. Sections of connection of the tract parts are necessarily coated with a hermetic compound with a high heat resistance index, and then additionally secured with large-width clamps. These special retainers are sold in hardware stores.
- 4. If there are noticeable gaps between the pipe elements, they should be insulated with an asbestos cord. This seal must be carefully but firmly inserted into the gap.
Directly installing the pipe begins with connecting its first element to the furnace nozzle. Immediately, it is worth putting in a gate - a special valve that allows you to adjust the draft. Then you need to make a square hole in the ceiling and assemble a metal box with a through hole corresponding to the diameter of the pipe. Through it we will pass the tract to the attic. The height of the box is taken 0.4 m more than the thickness of the ceiling surface.

Then everything will go faster. Mount the box in the ceiling, fix it, pass the pipe into the attic. In the free space of the box, place stone mineral wool or expanded clay (material with medium grain is optimal). In the attic, the box should be covered with a lid (a hole must also be made in it). In the place where the chimney passes through the roof, cut a hole, fix a sheet of heat-resistant asbestos to it from below. From above, the pipe must be covered with sheets of mineral wool or asbestos in order to protect the roofing structure from fire. Pull the rubber waterproof cuff onto the path insulated in this way and treat the gaps with a sealant. The work has been completed!
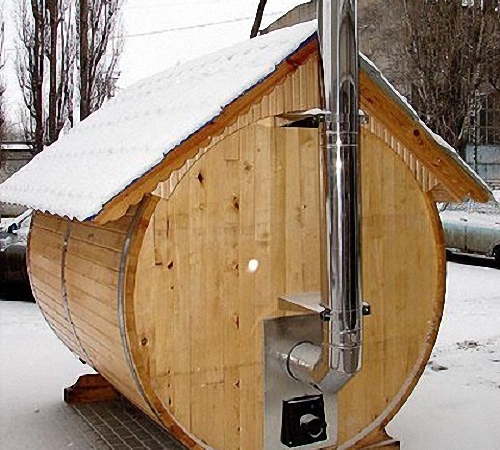
External chimney - rules for quick installation
The external tract is much easier to mount. It is done faster, requires little labor, which is important when the work is done by hand. Such a chimney does not rise to the ceiling, but is laid through the wall in the bath. To turn the pipe in the desired direction, a special elbow is used (a metal elbow with a suitable bend angle). It is this element that is connected to the stove pipe, and then to the pipe, which is taken out. For this, a box is used again.
A tee is installed on the outside of the bath. It allows the tract to be routed up, along the wall surface and down.
The pipe is fastened with holders. They have a special shape, guaranteeing high-quality fixation of the structure. The outer pipe rises above the ridge by about 0.6 m. Its upper end must be covered with an umbrella (it is also mounted on internal chimneys), which will not let rain drops and small debris into the system. Seal the gaps between the wall and the pipe outlet with heat-resistant sealant.
As you can see, it is easy to install an outdoor structure. It does not require punching holes in the ceiling and roof, eliminates the risk of floor leakage. But he also has a serious drawback - rapid cooling. For this reason, external systems are additionally insulated with mineral wool and other heat-insulating materials.
Choose a suitable steam room flue gas duct that you can easily build yourself. And enjoy a relaxing bath treatment whenever you want.