Active children's recreation most often requires considerable effort and work on the part of parents. Restless character and energy of real adventures and attractions. Of the entire list of children's swings that can be made and installed on a home or summer cottage, the most interesting are the children's nest swings. You can make them at no special cost, especially since most of the materials can be searched in the garage or bought in addition on the market for little money.
What is the secret of the swing nest
The main difference between the hanging swing nest and the usual bench or basket versions of the carousel swing is the unusual rounded shape of the seat, for which the children's attraction got such an unusual name. At first glance, the swing nest is no different, but this is not entirely true.

Thanks to the specific shape of the support platform and the method of its suspension, children have several additional opportunities at once:
- The design allows you to swing both in the longitudinal and transverse directions, rotate and even bounce;
- A round swing nest with a sufficiently large seat diameter can accommodate several people at once, which eliminates competition and childish insults;
- The oval version of the swing can easily be transformed into a regular hammock or a place for a child's daytime rest.
Note! The load on the ropes and cords of the nest swing is several times higher than the force on the suspensions of conventional rides.

Therefore, safe polypropylene ropes or metal chains with a fabric sheath are used for the suspension system. Children most of all like polymer ropes, since it is impossible to bounce and absorb on steel hangers in the nest.
Children's attraction device
In order to make a swing nest with your own hands, you will need to make four main parts:
- A supporting structure made of wood and metal, to which the ropes and the nest itself will be attached;
- Suspension system with loops and rings;
- The central part of the attraction is the seat. For the home version, the easiest way is to make a round swing nest.

Most of the ingenuity and effort will need to be devoted to the creation of the nest itself. Children will agree to ride on simple suspensions such as a car tire, but there will be much more positive emotions and joy if you do not limit yourself to creating a fabric version, but try to make a round swing nest with a mesh in the central part of the seat.
How to make an attraction for the whole summer
In order to make the swing as safe as possible, without the risk of cuts or injuries to the hands and knees, the seat and suspension are sheathed with fabric, and the central part is woven from a towing or climbing rope, very durable and flexible.

The choice of finishes for the mesh and the solid base of the seat is quite large, for example, patchwork, macrame or tatting. If you have the skills, you can even knit a nylon thread cover for the nest, which is easy to remove and, if necessary, clean and tidy.

Make the main part of the swing
There are several options for making a nest, they all equally follow the same pattern. In order to make a beautiful and at the same time durable and comfortable seat, you will need the following materials:
- Steel water pipe 3.5-4 m long or a pair of gymnastic hoops;
- Thin felt, synthetic tent fabric, preferably in bright colors, and a sheet of foam rubber, at least 30 mm thick;
- Climbing safety cord or repic, 5-6 mm in diameter. The amount of material will have to be selected experimentally, based on the density of knitting and the dimensions of the metal frame;
- Safety steel locks or carabiners with a mesh size of at least 50 mm.
Advice! The suspension mount can be made from three or four mounting clamps used to assemble exhaust pipes on small cars.

The landing diameter of such ties ranges from 50 mm to 90 mm, so you will have to make several selections before you can choose the optimal size.
At the first stage, you will need to make a steel frame for the nest. Despite the fact that it is planned to make a do-it-yourself nest swing for children no older than 10-11 years old, practice shows that older children also enjoy playing on the attraction. So an extra margin of safety does not hurt.

The simplest version of the nest frame can be made from steel hoops folded in a package. The metal profile cannot be drilled to connect two hoops into a frame; it is best to use clamps or loops. You will get a nest for a swing, designed for the weight of one baby, but this option is unlikely to suit him and you.
If a swing needs a large diameter nest, for example, 100-150 cm, the ring frame can be bent from a steel pipe on a pipe bending machine. The optimal pipe diameter is 12-15 mm. After rolling and welding the ends, it will be necessary to clean the seam, and at the same time the entire surface of the metal for painting.

In this version, the rings for hanging the seat to the swing frame can be made of steel wire and immediately welded to the steel pipe of the frame. It's time to make the swing frame and suspension system.
How to attach a hanging nest system to a swing
After completing the hardest part of the work, the hands themselves reach out faster to finish the swing nest with a net and hang it on an anchor hook for the first test. In fact, you should not rush to do the finishing, you will still need to choose a place, hook the lines on the seat and check the operation of the swing in the draft version.

To install a swing, it is best to make a classic support frame from a bar with a section of 100x100 mm or a profiled steel pipe. To do this, you will need to make two supports in the form of the letter "A" and one crossbar, you can use the same beam, but it is better to install a two-inch steel pipe. The distance between the supports is chosen equal to the height of the swing.

Suspension straps made of polypropylene rope or fabric-covered chains can be attached to the crossbar tube in pairs.

Under the tied knot, you can make a lining of polyester fabric, this reduces the abrasion of the rope. The nest itself is attached to at least four carabiners. If there are problems with the correct separation of the lines on the crossbar, you can make a suspension according to a combined pattern, as in the photo.
After assembling and hanging the nest on the swing, tests must be carried out. To do this, it is enough to lay several boards on the frame hoop and load them with a weight of 100-150 kg. At the same time, it will be possible to determine how much to tighten the suspension lines in order to maintain the optimal distance to the ground.
Finishing and decorating the swing nest
In the classic version, such attractions are made like a swing nest with a net. Mesh weaving provides a comfortable fit on the seat, allows children to grab the ropes with their hands, does not collect water in the rain, it is almost impossible to slip off the nest mesh.
Weaving a seat can be done in several ways. The most popular option - "Web" is at the same time the simplest, most durable and reliable.

Initially, you will need to pull two loops of rope tightly. For weaving, it is best to use jute ropes, since polypropylene stretches a lot. Each loop must be aligned so that the intersection is in the center of the nest, and fixed on the hoop. So that the ropes do not weaken, the knot on the hoop can be impregnated with an emulsion of PVA glue and water. After all the loops of the nest are stretched, you can make a gossamer braid from a softer material, for example, a rope sheathed with a soft cloth.
If desired, you can make other options for weaving, they will work on a swing no worse than a web.
Before finally hanging the nest on a swing, the hoop is covered with a two-layer protection. Initially, foam rubber is glued to the metal, then polypropylene thermal insulation for pipes, after which the hoop is wrapped with a rope, as in the photo.

The outer edge of the nest must be soft to prevent bruising and injury, and at the same time resistant to abrasion. Most of the load when children ride on a swing falls on the nest frame, so you can additionally make several interchangeable covers from polyester fabric.

Unusual swing option
For relaxation and active pastime in the country, you can make unusual options for a home attraction - a cocoon swing. Initially, the design was conceived to be used as an alternative to the rocking chair, but later the children were successfully able to make their own version of the swing out of it. If there is no nest swing in the country house, you can make a cocoon in which it is equally convenient to swing and relax.
The construction of a cocoon, unlike a nest, will require much more effort and money. It is necessary to bend a dozen arcs on a pipe bender, with a profile resembling a drop or a cocoon.
The most difficult thing is to weld the arcs in the form of a half cocoon. After assembly, you will need to correctly determine the center of gravity line and attach a suspension, preferably a cable or chain. After painting and equipping with cushions, the swing chair can be fixed to the frame. Unlike a light nest, the weight of a cocoon is several tens of kilograms, so the suspension must be made on a very strong ceiling.
Conclusion
According to numerous reviews of parents, the nest swing is very popular with children. In some cases, the kids got so used to the nest that they completely ignored the usual swing-carousels with wooden seats. But it is worth remembering that any children's attraction requires constant attention, you have to constantly adjust and tighten the lines, clean the nest cushions and check the fastening of the carabiners, so work on the swing never ends.
In the warm season, almost any city dweller dreams of getting out into nature and spending at least a few days or even months there. Outdoor recreation is necessary for every person, and it is very important to have a comfortable hammock or chair for this. A hanging chair is considered very popular, which can plunge a vacationer into childhood. After all, all children love to swing on a swing. But since the cost of this piece of furniture is quite high, skilled craftsmen learned how to make it on their own.
The right approach to business will help create a product no worse than those sold in stores.


Varieties
The first hanging chair appeared in Denmark in the middle of the 20th century. This designer furniture is most often used for arranging a garden plot and less often for apartments in megacities. An unusual design combined with a variety of materials makes this piece of furniture in demand among many buyers.

A hanging chair is a comfortable seating area that is usually made from natural or man-made materials such as wicker or rattan. The product itself is either suspended from the ceiling or mounted on a special stand so that you can swing in the lounger. It is also called a rocking chair or swing chair, because their main purpose is to rock a person.
It is interesting that such a product is able to withstand a very large weight. Therefore, a mother with a child or two teenagers may well rest in it. The main thing is that the dimensions of the furniture allow you to accommodate more than one person.

Hanging chairs can be divided into wicker, fabric, hard and soft, and they differ in shape and material. These products are designed to swing in different directions. There is only one type of hanging chair that does not move diagonally and back and forth. It is attached to the floor and ceiling, and therefore can only spin in a circle.


The frame of the product can be made of various materials. Rigid ones are made of rattan, wicker, metal, acrylic or transparent plastic. And in order to soften the product, it is covered with a soft blanket or a synthetic winterizer mattress is placed inside. Sometimes the base is covered with a dense fabric, and small pillows are placed on top.
The hammock chair has a soft frame, because it is made of a fabric base, which is suspended from the ceiling.


Also, the hanging chair can be divided according to its purpose. For example, a garden product is designed to be installed outdoors, and therefore its material must be moisture resistant. But the children's product should have a small size and a soft seat.
Construction types
There are many models of hanging chairs, and each of them can be an addition to a garden plot or apartment. Making furniture with your own hands has a number of advantages over purchased goods, because they allow you to show your imagination and make sure of its quality.


The complexity of the work depends on the design of the product, and therefore it is worth familiarizing yourself with all types in order to make a choice.
Hanging swing
These unusual chairs can be made from different materials. The design itself is lightweight and reliable, and most importantly, it can have both a soft and a hard base. Swings can decorate a summer house, a sleeping area, a children's room, an attic or a playground. It is within the power to make it yourself, using strong ropes and dense textiles.


braided cocoon
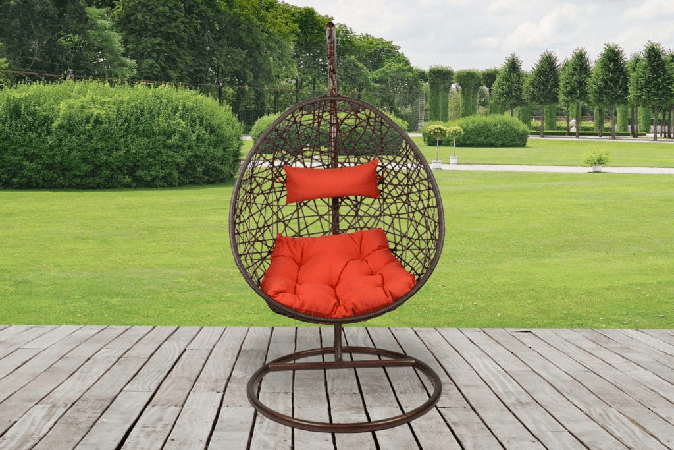
The cocoon chair, or egg, is one of the most popular models. It differs from other products by the presence of walls that hide almost the entire interior space. It is made, as a rule, from natural or artificial rattan, and sometimes a vine is used. This design will appeal not only to adults, but also to children. After all, in such a cocoon you can find solitude.


Hoop nest chair
This model is interesting in that for its manufacture you only need an iron hoop, which must be braided with strong yarn. The structure itself must be hung from the ceiling with strong ropes. The nest can fit in any room, even in a small room.


A variety of models also provides for the method of attaching the base. The chair can be suspended from the ceiling or stand on a stand. The choice of mounting depends on the characteristics of the room and the personal preferences of the owner.
The type of product chosen depends on the material for its manufacture.
So, for the construction of a swing, it is necessary to prepare a dense fabric, strong ropes and wooden blocks. And if the product involves weaving, then willow, bird cherry and rattan will do. Their flexibility should be sufficient to be woven by hand.
To make a nest chair, you will need an iron or plastic hoop that has sufficient rigidity. And to give a unique style, it is important to use durable fabric, foam filler, braiding laces and wooden boards.


Much depends on the technique of weaving. One of the most famous is the macrame style, which involves the interlacing of knots of rope or ropes. With it, you can achieve a sophisticated look of the product.
To ensure the reliability of the base, apply the patchwork technique. To do this, a patchwork bedspread is attached on top of the base material.


The base of the product can be tied with strong yarn or laces. Weaving from multi-colored laces will look especially beautiful.
An openwork pattern can be created using the tatting technique. Such a product will seem weightless and light, which will undoubtedly attract the attention of guests.

When choosing a material for weaving or creating a base, you need to take into account its characteristics. After all, not every material has sufficient strength to withstand the weight of an adult. It is also important to select strong fastening elements so that the structure can withstand the weight of the seated person and not break.
How to do it yourself?
There are many drawings and step-by-step instructions for the independent manufacture of this type of furniture. But the simplest is the swing chair, which will appeal to both adults and children.
To make it, you will need two meters of dense textiles, a thick meter-long wooden stick, a drill, carabiners, a strong cord, reliable threads and paint.


Performance:
- First you need to take the fabric, fold in half, measure 18 cm from the top corner and draw a diagonal to the bottom right corner. You will get an uneven triangle that needs to be cut and removed. The main part of the fabric needs to be unfolded and stitched along the sides of the cut, while picking up their edges by a centimeter.
- Next, you need to form pockets for the laces. The edges of the long workpiece must be bent by 3 cm and sewn on a sewing machine.

- Four holes need to be made on a wooden block, two from each edge. The distance between the two holes should be 4.5 cm, and the distance between the central holes should not be less than 75 cm. Thread the laces through them and fix them with strong knots. It is also necessary to make a knot in the center of the rope so that a loop is formed on top, which is then hung on a hook.


- Hanging pieces of cord must be passed through the fabric and pass through the holes in the stick, which are located along its edges. Then you need to make knots for reliable fixation.
- Two connected carabiners need to be attached to the ceiling hook, you need to thread the cord into the lower carabiner. Thus, the structure will gain sufficient strength for safe rocking in the chair.


You can decorate the resulting product with decorative pillows with a bright print. It is ideal for the outdoors if placed on a veranda or under a large tree.
Another interesting model for self-production is a drop. To do this, they purchase about 500 rattan rods, a steel hoop, several metal pipes or strong ropes that will be woven together in the form of a circle. Then you will need PVA glue, strong rope, cord and chain.
Stages of work:
- Before starting work, it is necessary to calculate the size of the drop. Then you need to clean the rattan rods from the bark and cut them into equal pieces. To give good flexibility when weaving, the rods need to be steamed and beaten off.
- The furniture frame can be made from polypropylene pipes, metal or a slightly compressed hoop to get a semicircular shape of the product. If a pipe is used for the frame, then its ends must be fastened with special fasteners. In the future, it will be necessary to attach rods to it, the length of which should be 30-40 cm higher than the product.


- Rods are attached to the base so that the distance between them evenly increases, approximately to the middle of the product, and then so that this distance decreases. To shape the chair, the rods need to be bent during the weaving process.
- To fix the rattan, its rods need to be bent through the hoop several times and fixed their ends with strong ropes. Next, the structure must be intertwined with thin rods, starting from the bottom and ending at the top. To give the product additional strength, all attachment points must be lubricated with glue.

In the finished chair, you can lay a thin blanket or put a large flattened pillow.
Necessary materials
Depending on the type of product chosen, different materials may be needed. First of all, you need to prepare those that will make up the design of the hanging chair. It can be pipes, a hoop, rods, ropes or bars. If a swing chair is made, then only durable and wear-resistant fabric is needed.


It is important to decide what will be the filler for the bag, which will be in the chair. After all, being in it should be as convenient and safe as possible, so it is better to purchase a synthetic winterizer or foam rubber. But the foam pillow will not be able to transfer moisture, and therefore it is better to use this option in the house.
In an effort to comfortably equip living space, many people prefer non-standard design solutions. They are able to bring originality to the familiar interior, provide additional comfort. These items include hanging chairs that you can make yourself.
What hanging chairs can be made with your own hands
Among the variety of hanging chairs, there are models that you can make yourself. Such options will be the highlight of your interior. In addition, independent production allows you to realize an individual plan, which is based on proven and reliable designs.
Hanging swing
Unusual swing chairs are made from various materials. A feature of such structures is their elegance, simplicity and the ability to use both rigid and soft frames. These armchairs can become a stylish decoration of a country house, an unusual addition to the interior of a bedroom, living room, children's room or veranda.
wicker cocoon
No less popular is the cocoon chair or the egg chair. A feature of the model is the presence of walls that hide the internal space by about 2/3. Such chairs allow you to enjoy privacy, they are most popular among children because of the external resemblance to a hanging house suitable for games. Usually cocoons are made from natural materials intended for weaving.
Hoop nest chair
The role of the most popular home-made model is a nest chair, made on the basis of a hoop frame. Such a model can be equipped with many decorative elements, and its shape harmoniously fits into the living space of modern apartments. In the manufacture of a nest chair, a variety of weaving techniques are used.
Materials and techniques for making home chairs
When choosing the materials necessary for the manufacture of hanging chairs, first of all, consider the features of the model of interest.
- Dense textiles, synthetic ropes of various types and wooden bars are suitable for swing chairs.
- The chair-cocoon is made of rattan, willow, bast, willow or bird cherry twigs, which have the necessary flexibility.
- For the manufacture of a nest chair, plastic or steel hoops are required to ensure structural rigidity. And also you can not do without wear-resistant textiles, synthetic fillers, decorative cords for weaving and wooden blocks of different sizes.
To create the seats of hanging chairs, craftsmen use various techniques:
- macrame. The artistic interweaving of rope and rope knots gives the chairs airiness, providing an impeccable appearance;
- patchwork. To ensure the strength of the seat, a patchwork fabric is sewn over a dense wear-resistant material;
- knitting. The combination of durable cords of various colors allows you to implement unusual design solutions;
- tatting. Due to their openwork, these designs look weightless, instantly attracting attention.
Remember that the selected materials must meet certain weight loads. Too thin fabric or openwork weaving can tear under the weight of a large person. Fastening elements also deserve special attention and strength testing: chains, ropes, braid, on which the structure is suspended.
DIY hanging chairs - gallery
Suspended fabric swing chair - a convenient addition to a country house  Cocoon chair made of dense fabric will appeal to children
  Rattan cocoon hanging chair is strong and durable
  Hanging chair-nest made of thick fabric is suitable for relaxing in a summer cottage
  A simple model of a swing chair is easy to do with your own hands
  The original hanging chair, made by hand, will be the pride of the owners
  Hanging swing chair woven using macrame technique adds coziness and comfort
  An openwork seat for a hanging chair can be woven from a thick cord
  Hanging chairs can be used as a cradle for an infant
Step-by-step instructions for making a hanging swing chair
The swing chair can rightfully be called one of the simplest models that you can do with your own hands. To create it you will need:
- 2 meters of dense fabric (canvas, satin, trouser fabric);
- a wooden stick about 1 m long and 5–6 cm in diameter;
- drill and twist drill (15–20 mm);
- carabiners (11 cm) with a load capacity of 160 kg;
- rope for static insurance with a thickness of 10–11.5 mm with a breaking load of 2600 to 3200 kgf;
- sewing machine, scissors, ruler.
- paint, brushes, iron and strong threads made of synthetic fibers.
Having prepared everything you need, you can start making an unusual interior detail.
- Fold the chosen fabric in half, then count 18 cm from the top corner.
- Carefully cut off the resulting triangle (photo 1).
- Hem all sides of the fabric cut, while bending the edges by 1.5 cm (photo 2).
- Form pockets for the ropes (Pic 3). On the long side of the workpiece, fold the edges 4 cm and sew them with a sewing machine (photos 4 and 5).
- On both sides of the wooden stick, make two holes at a distance of 5 cm from each other, while the distance between the pairs of these holes should be about 80 cm (photo 6).
- Pass the rope through the holes located closer to the center of the stick and fix it with knots. At the same time, in the center of the cable, also tie a knot necessary for attaching the carabiner.
- Pass the lengths of the cable hanging under the stick through the fabric blank, and insert its ends into the free holes located closer to the edges of the stick. Fix them with a reliable knot (photo 8).
- Attach two carabiners connected to each other to a hook previously fixed on the ceiling. This will ensure that you can safely swing in the chair. Pass the cable through the bottom carabiner.
The resulting hanging swing chair can be additionally equipped with soft cushions that provide comfort.
How to make a hanging hammock from a hoop and fabric yourself - video
Drawings and diagrams for the design in the form of a cocoon
To make an original model of a hanging chair, you will need:
- rods of rattan or willow with a diameter of 10 or 15 mm, approximately 450 pieces;
- finished metal hoop, metal pipes or several thick vine branches woven together in the form of a circle;
- strong rope and glue, which will be needed for tying the frame;
- knife, ruler, pruner and awl;
- nylon cord with a cross section of 4 mm, used for weaving the back (it can also be made from a vine);
- ropes, chains or cords for hanging the finished structure from the ceiling.
For beginners, a ready-made cocoon scheme is useful, which allows you to correctly calculate the dimensions of the future chair.
When making, follow the instructions.
- Cut the vine, remove the bark and steam, then carefully beat off. These manipulations will provide her with the flexibility necessary for weaving.
- Then proceed to the formation of the frame of the future chair. It can be made from metal pipes or a slightly flattened hoop if the final shape of the product should be oval. In case of using a pipe, connect its ends with inserts.
- Attach all the remaining elements one by one to the pipe acting as a frame base. If the chair is mounted vertically, use rods 6-8 mm thick, the length of which should exceed the height of the chair by 250-400 mm.
- Attach each of the rods to the upper parts of the frame so that a gradual separation is maintained between them. In the middle of the backrest, the distance should be 20 - 25 mm.
- By bending the rods, give the future chair depth and shape. Make sure that they reassemble at the bottom of the structure.
- When using horizontal rods in the process of creating a frame, fasten them to the sides of the workpiece. Mount them at a distance of 20-25 mm from each other, then give them the desired shape.
- To secure the vine, gently bend it through the pipe from the inside of the chair to the outside. Secure the ends with a rope.
- Weave the finished structure with thinner rods, moving from bottom to top.
- If it is necessary to braid the frame from horizontally fixed rods, start work from the middle of the backrest in both directions. Bend the end of the rod that is on the pipe and twist it around the base.
- Press each new layer of thin twigs as tightly as possible to the previous one.
- Braid the entire basket. Bend the end of the last rod, tuck it in and securely fasten it in the main weave.
To give additional comfort to the seat of such a chair, you can use a thick pillow.
You can braid the frame in different ways. Beginners will benefit from simple techniques that provide a solid base for seating.
Simple weaving techniques from rods - gallery
 Even beginners can cope with such weaving
  Various weaving patterns can be used to make hanging rocking chairs
  With the help of weaving rods, you can create a dense base for a chair.
How to make a nest chair with a knitted bottom
To create a nest chair, which will become an exquisite decoration of an apartment or garden, you need to prepare the following materials:
- a metal hoop with a diameter of 90 to 110 cm, a cross section of at least 35 mm;
- 700–800 m of polyester cord with a diameter of 4.5–5 mm;
- crochet hook No. 8–9;
- slings - 12 meters;
- roulette;
- scissors.
Wrap the hoop taken as a basis with strong twine, fixing every tenth turn with a knot, this will not allow the cord to unravel.
To create the bottom, you can use a variety of crochet techniques. To make such a seat, you will need from 120 to 160 m of cord. The exact amount depends on the selected knitting pattern.
- Start from the center. Work the circle as tight as possible using single crochets and air loops.
- Start forming the seat from the 6th-7th circle, and then move on to the back in the form of a knitted mesh.
- Pull the finished napkin over the hoop, evenly distributing it over the entire base. The resulting design should not sag. Fasten to the hoop from the side of tight knitting, without cutting the cord.
- Attach slings to the finished product.
Making a seat using macrame technique
For this version of the hanging chair you will need:
- 7 threads of 6 m;
- 4 threads of 5 m;
- 4 threads of 4.5 m;
- 2 threads of 4 m;
- 2 metal hoops with a diameter of 90 and 110 cm.
Having prepared the cords of the required length, proceed to attach them to the hoop.
- Starting from the center, fasten 7 long threads in pairs at a distance of 6 cm from each other.
- Continue fastening the threads along the sides of the warp. As a result, on one side there should be 2 threads of 5 m each, 2 threads of 4.5 m each and 1 thread, the length of which is 4 m.
- Then start weaving the pattern from the center of the workpiece.
- As a result of the work, you should get an openwork circle.
- To prevent the cable from moving in a circle, fix each thread with a flat knot.
- When knitting, constantly maintain tension, placing knots at 6 cm intervals.
If it is necessary to create a fringe, the length of the threads should be increased by about a meter and, at the end of work, do not cut the remaining cord.
Equip the resulting structure with reliable slings and a soft pillow.
Hanging hammock chair using macrame technique - video
Suspension mounting options
Hanging chairs can be attached in a variety of ways. One option is a ceiling mount on a hook. The finished product, suspended in this way, can swing in different directions, but moving it to another part of the room is very problematic.
This method can only be used if there is a high-quality concrete floor or with coffered ceilings that allow fastening directly to the beams.
No less popular is the rack mount, which can be purchased at specialized stores. This design is equipped with circular platforms that provide stability. The armchair on the rack can be easily moved around the apartment and even taken out into the street.
Another option is axial fastening, which allows you to fix the structure between the ceiling and the floor. This method is suitable for decorating children's rooms.
If the ceiling in your house is not sufficiently reliable and hollow, you can install a hanging chair using a chemical anchor. This method involves the introduction of polymer paste into the ceiling cavity from a syringe, after which the product is installed.
Simple options for making a hanging chair at home are available even to novice craftsmen. Unusual designs decorate the interior, give the room originality and comfort. Good luck with your work and create with pleasure!
Swings are one of the favorite children's attractions. In principle, this is not a very complicated design that you can do with your own hands. "Nest" - a suspended model that has some advantages over other structures. It is a good option for installation in a summer cottage or in the yard of your own home.


Design features
The design "Nest" is quite popular, it is also called "Basket" and "Spider Web". The main feature of the product is its round seat. Thanks to this form, the swing has additional advantages:
- the model can fit several kids at once, if you choose a sufficiently large diameter of the seat;
- due to the method of suspension, the structure can swing in different directions, bounce and make rotations;
- if you choose the oval version of the seat, the attraction can also be used as a hammock for adults and children to relax.


On the other hand, in this modification, the suspension ropes bear a significant load, so strong and safe ropes must be used. If we take the standard factory model, then it has the following characteristics:
- the seat mesh in it is created using machine knitting, so it easily withstands constant stretching;
- you can hang it at a height of 2-2.5 m above the ground;
- ropes are usually made of polypropylene, they are strong and safe, have a thickness of at least 1 cm;
- fasteners and rings are made of galvanized steel.


Finished structures are made taking into account the effects of ultraviolet radiation and high humidity, therefore they are immune to negative external conditions. All these points must be taken into account if it is decided to make the swing "Nest" with your own hands. This is advantageous, since the cost of products made in production is quite high.
Construction device
To independently make a practical, convenient and reliable model, you will need instructions and knowledge of the device of this attraction. You should also think about the materials from which the main elements will be made.
- The support for the swing is a frame made of metal profiles, it is also made of wooden beams.
- The base of the seat can be made from a hoop, plastic or steel, this central part of the structure must be well thought out both in form and in raw materials. There are usually no questions with the mesh - it can be woven from a climbing rope, it will represent the central part.
- The basket, as a rule, is complemented by a round pillow with high-quality artificial filler and a nylon cover, which can always be easily removed for washing.


It makes sense to take the following materials for the manufacture of home swings:
- safety cord or towing rope (diameter 5-6 mm) for knitting the seat;
- synthetic tent fabric, felt and foam rubber, since the outer part of the suspension needs a multi-colored or at least bright material that children will like;
- a steel water pipe (about 4 m) is suitable as a support;
- two steel (gymnastic) hoops with a diameter of 90 cm to create a frame.


You will also need to acquire steel carabiners with a 50 mm cell or locks.
How to arrange a seat?
The arrangement of a children's swing should begin with the manufacture of the seat. First, the steel frame of the seat is made, for this two hoops are taken, they are connected using a loop or clamps. If it is assumed that adults will also use the structure, it is better to use a steel pipe with a cross section of up to 15 mm and a length of 150 cm, which is bent on special pipe bending equipment and welded.
You can weave the net for the “Nest” swing in any way, as long as the knitting is strong enough. For this, weaving techniques such as tatting, macrame or patchwork are used. However, it should be borne in mind that the use of an openwork fabric or too thin cords is suitable for the use of the structure by one child. You should also pay attention to the fact that the mesh does not sag - the cords for this are pulled extremely, tightly. The created seat canvas must be securely attached to the frame with knots.

There is another option for making a seat from the rim of an ordinary bicycle wheel and a polypropylene pipe, which, by bending, is inserted into the rim and fixed through the holes for the spokes. To fix on the frame, you will need four rings and two carabiners.
Creating a suspended structure
When the central part of the structure is ready, you can proceed to the manufacture of the frame. It makes sense to use the traditional version of a profiled pipe or timber (100x100). Procedure:
- two supports are prepared in the form of the letter "A";
- for a horizontal crossbar, a steel pipe is mounted to them, while the height of the swing should be the same as the distance between the supports;
- ropes and slings are fixed in pairs on the crossbar, preferably polypropylene cables, but chains pre-wrapped with dense material can also be used for suspension;
- so that the cable does not undergo abrasion, a polyester gasket is made under it;
- four carabiners are needed to fasten the basket.


After installation, it is necessary to test the structure for strength - this can be done by laying bars with a total weight of up to 120-150 kg on the frame. At this stage, the degree of tension of the ropes is usually checked and the optimal distance of the seat from the ground is adjusted. After checking, before hanging the basket completely, the metal frame should be pasted over with foam rubber, and then with special foamed polypropylene, after thermal insulation of the steel pipe.
The outer edge is carefully braided with a rep, it must be applied evenly, and supplemented with a polyester cover on top. Self-production of such a model of a swing will not take much time and will require a minimum investment of money. The main thing is to follow the instructions so that the structure is strong, durable and safe.


How to make a swing "Nest" with your own hands, see below.
Hanging chair - comfortable and unusual garden furniture designed for relaxing outdoor activities. This device appeared in the 50s of the last century and in a short period of time became an integral part of the house, which claims to be a truly comfortable home.
A beautiful "cocoon" can be used as a swing, a place to sleep or meditate. It is noteworthy that a hanging chair for a home or a summer residence is easy to make on your own from improvised means.
Users often search:
Types of hanging chairs
Currently, there are several types of products:
- With a rigid framework from a rattan, plastic. The design is covered with a strong fabric. A vine is also used as a base.
- With a soft frame (reminiscent of a hammock). The main difference is in the size: the chair is smaller than a hammock, and therefore takes up little space. Such a product adapts to the human body, which means that it is convenient to both sit and lie in it.
- Chair-cocoon. A distinctive feature of this modification is the 75% hidden interior space. This effect is achieved thanks to the wicker walls - macrame. "Cocoon" will appeal to those who love secluded relaxation, hidden from prying eyes.
- "Drop" - usually used in the children's room. In appearance, the chair looks like a small house, sometimes equipped with doors. Excellent rocking chair for a child.
Self-made hanging chair
Making a comfortable hammock for a comfortable pastime is not as difficult as it might seem at first glance. First you need to prepare the necessary parts:
- Metal hoop with a diameter of 90 cm.
- A piece of strong fabric 3 m long, 1.5 m wide.
- Braid, interlining or dublerin.
- An eight-meter line.
- Steel ring for mounting the structure to the ceiling.
- 4 iron buckles.
- Sewing supplies, tape measure and scissors.
Let us dwell in more detail on the choice of a hoop. As a supporting structure, you can use the following materials at hand:
- Hoops for gymnastics. Aluminum and plastic are not suitable for this purpose, as they will not withstand the load of the body of an adult. Only steel models can be considered. The maximum cross section of such a hoop is 16 mm, while for the manufacture of a durable product, 32 mm is needed, which is twice as much (for a wicker chair, this figure should be 40 mm at all). However, the gymnastic ring is perfect for a children's version. A small cross section is compensated by the multilayer filler.
- Softwood. Such hoops are light, but require careful processing, as moisture and heat contribute to the destruction of the tree.
- Plastic water pipe. Perhaps the best option for the implementation of the idea. PVC is a cheap and durable material. The hoop is made by folding the cut off part of the pipe into a ring. For fastening, parts made of wood or plastic are used.
The list of materials suitable for creating a hoop is not limited to the listed options. Everyone chooses the basis for the frame - it all depends on the imagination.
Case preparation
Cutting material for a hammock chair requires accuracy and care. If in doubt, it is better to leave a small supply of fabric, in the future it can be removed without problems.
The principle is this: measure seven times, cut once.
- First, take a 3-meter piece of fabric and cut out 2 squares from it - 1.5 meters long and wide each. We add both in 4 times. In the corner in the center we mark a circle with a diameter of 65 centimeters. We draw a line along the marked points. Cut out identical circles from each square. We move away from the edge of the circle 4 centimeters and draw a dashed line.
We cut out the squares
- On the first circle we put two holes. They are for slings. Next, fold the fabric 4 times and iron. We take folds as reference points. Two slings should have a slope of 45 degrees, the others - 30 each. Having selected the corners, open the circle and iron it again. As a result, axes are obtained, indicating the points of the slot for the sling.
- We select the necessary holes on all axes - rectangular figures 10 cm wide and 15 cm high. Y is marked in the inner part. A cut will occur along its contour. We add circles between ourselves, but in such a way that the threads do not combine with each other. Because of this, the cover will be able to withstand the load better. Put the circle on top. We cut the marks on two circles at once.
- We bend the ends of the cut holes to the reverse side. We attach a braid around the perimeter of the figure or process it with doubler so that the material does not crumble. Next, cut through completely and sew along the edge, leaving 3 mm.
Bend and sew the edges
- Leaving the marked 4 centimeters along the edges, we connect the circles with each other, highlighting the cut for inserting the hoop. The left pass is cut in such a way that the teeth are obtained along the entire edge. Turn cover right side out and iron.
- We cut the filler in strips, then sheathe the hoop (preferably in 2 layers). We insert the processed design into the case. Moving the ring towards the edge, we sew all the circular parts at a distance of about 7 cm from the end.
Insert and sew the hoop
- The edges of the unsewn cut intended for inserting the hoop are turned inside out. We carefully cut off the allowances from the front side so as not to damage the correctness of the circle. We connect the edges and scribble on a typewriter, leaving a few millimeters. We move the frame to the stitched end, we sweep the fabric by 7 cm.
Sew the edges
- Syntepon mode through the slots and move it inside the material, securing it with threads. We close the side holes with a hidden seam. Then we fix the cover on the hoop, stitching it along the verified 7-centimeter basting. Make a knot after every 4 stitches. Further rows are made at a distance of 7 cm from the previous one, so that the thick fabric can gather into soft folds.
- Sling mode for four 2-meter segments. It's better to burn the edges over the flame. We put the end into the hoop through the prepared slot. It is necessary to fold so that a loop is formed. With the help of a needle we cut off and sew a line. For all lines, the algorithm is the same.
Attaching the slings to the hoop
- We put the end from each into the buckles, then into the ring and again into the buckle. It is necessary to weave everything well in order to be able to change the height and tilt of the chair. The ring serves to collect the slings.
Pattern example
Hanging chairs are a kind of swing, a cozy place for relaxation and solitude.
Making a wicker chair
Macrame technique allows you to create original products on your own.
Photo: egg-shaped wicker hanging chair - a comfortable place to read books in the fresh air
This unusual structure consists of several circles woven together in a macrame. For such an "egg" you will need the following details:
- 2 metal-plastic rings with a section of 35 mm. One for the backrest measuring 1.1 m, the other for the seat - 70 cm.
- Polyamide 4 mm thread, 900 m long. In the store, ask about the option with a polypropylene base, which guarantees strong knots.
- Twelve meter lines.
- 2 thick ropes for connecting hoops.
It is worth mentioning that rings of smaller diameter are also suitable for the product, since these characteristics are the maximum for the chair. It is better to buy a thread of the required length immediately in order to avoid differences in color or quality. After preparing all the parts, you can safely begin to work on creating an "egg".

For weaving the back, any patterns are suitable. The cord is attached to the top. The work is going down. On the lower hoop, the knots are tightened, the remnants of the threads are collected in tassels. The design requires reinforcement with 2 wide cords connecting the seat to the back. Slings are attached to the finished product - and the “egg” hanging chair takes its well-deserved place in the summer cottage.
Having made such a device, you will get a cozy corner for secluded relaxation and forget about problems and stress for a long time!