Ondulin roofing is the cheapest roofing material after roll roofing. As it is well known to consumers, there are no cheap and at the same time high-quality goods, respectively, in all performance indicators, ondulin is much inferior to more expensive roofing materials.
The warranty period does not exceed 15 years, but in practice even this short time is not kept. The slightest deviations in the technology of roofing work have an extremely negative effect on durability, ondulin does not have a margin of safety, which makes it possible to neutralize minor construction errors.

The only advantage is the relatively low cost of coverage. Why relatively low cost? It's simple. It is necessary to take into account not only the price of materials, but also the general operating costs of maintaining the building. And this is where big problems arise. Ondulin is made from waste paper, after crushing the mass is dried, impregnated with bitumen and painted. The sheets are pressed to form a wavy shape. Such material cannot be durable and strong, over time, the extreme waves bend, snow blows in these places or water leaks appear. It is very difficult to repair an ondulin roof; the sheets do not support the weight of the builders. In addition, the surface burns out, the slopes lose their attractiveness.
Disadvantages of ondulin
- Complexity of installation... Even under normal temperature conditions, ondulin does not have the required rigidity; during fastening, it is strictly forbidden to walk on it. And if the weather is sunny, then the surface of the dark sheets heats up very much, the strength drops to almost zero, even hammering nails into such material with the necessary effort is problematic, the ridges are immediately crushed. And at temperatures below minus five degrees, the material becomes brittle, which also greatly complicates the roofing work.


- High flammability. Paper and bitumen burn well, and it is very difficult to extinguish the flame. All assurances from manufacturers that ondulin surpasses even metal roofing materials in terms of fire safety is an outright lie.

- Ugly appearance. Ondulin is attractive exactly until mosses begin to grow on its surface, and they quickly master new surfaces. The fact is that the surface of the sheets is rough, dust quickly accumulates on it. Because of this, after several years of operation, excellent conditions are created for mosses, they cover the roof surface with multi-colored spots. High design values are irretrievably lost. But this is not all the problems arising from mosses. Their roots penetrate deep into the sheets of ondulin, its strength is critically reduced.

Experienced builders recommend using ondulin only in extreme cases and only for irresponsible buildings: carports, outbuildings, etc. It is not economically feasible to use material for arranging the roofs of residential buildings. And the appearance of such houses in a few years will raise many questions. After a short time, the roof will have to be changed, and this significantly increases the total estimated cost of the house.

Prices for various types of ondulin
Step-by-step instructions for laying ondulin
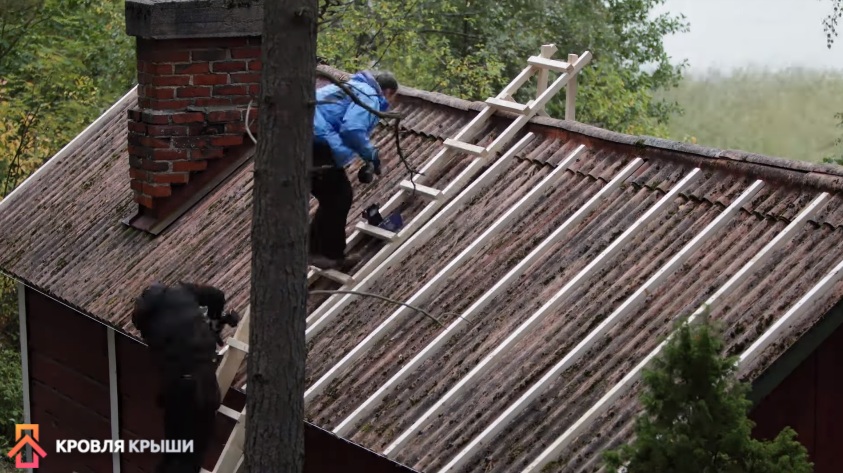
Consider an example of a quick repair of a suburban building, this is the most optimal option for using ondulin as a roof covering. The work will be inexpensive, there is no need to dismantle the existing roof, which further reduces the estimated cost. And for such an old building, the service life of 10-15 years is critical; ondulin will calmly withstand this time. You need to know that dismantling old coatings is a very costly business; during these works, the rafter system is often damaged. Another problem is that dismantling work can only be done in dry weather, and no one can give an accurate forecast.
A small house is located in the forest on the shore of the bay, the roof is made of asbestos-cement slate, it has been in operation for about 25 years. During this time, it completely lost its original appearance, mosses grow on the surface, a lot of leaves and other debris have accumulated. Although the tightness remained at the same level, the owner of the house decided to update the exterior of the building. I decided to do it quickly and with minimal cost.

Practical advice. After a preliminary audit of the condition of the slate roof, the craftsmen decided not to dismantle the old slate, it is long, expensive and unsafe. One of the advantages of ondulin is its low weight, and this allows it to be installed on old coatings; the rafter system can withstand minor additional efforts without carrying out work to strengthen the load-bearing elements.
Another factor was taken into account - roofing works are done in late autumn, during this period it often rains. If the building has an old roof covering, then the work does not depend on the weather. The roof is gable, the area of the slopes is 50 m2.
Step 1. Count the amount of materials. For the lathing, you will need 30 running meters of 50 × 50 mm timber; to cover the slopes, you will need 36 sheets of ondulin. The total weight of the materials is only 220 kg, which allows them to be transported in an ordinary passenger car. To fix the ondulin, you need to purchase 880 nails. 20 for each sheet, and the rest are required for attaching the skates (12 pieces, one meter long). The lathing is fixed with self-tapping screws, for vertical beams the length of self-tapping screws is 80 mm (you need 240 pcs.), For horizontal 70 mm (you need 300 pcs.). The dimensions of the sheets are indicated by the manufacturer on the packaging, and the quantity is calculated using ordinary arithmetic formulas. If it is difficult to do this on your own, then the sellers will always provide practical assistance in calculating the roof and all additional elements.
Step 2. Purchase roofing materials and stack them neatly on a flat area. To make it easier to take the sheets of ondulin, it is recommended to fold them on bars. If the materials will be stored for a long time, then they must be protected from sunlight.


Step 3. Prepare your tools. For the production of work, you will need an ordinary hacksaw, an assembly knife, a hammer, a screwdriver, a tape measure, a pencil, a chisel, a rope, and a building level. The list of tools is elementary, every owner should have such. Be sure to read the manufacturer's instructions for installing ondulin. These are general advice, the manufacturer cannot foresee all the specific situations that arise during roofing, but you will have a general idea.

Prices for popular models of screwdrivers
Screwdrivers
Step 4. Craft two ladders from the bars. One ordinary, and the other with a toe on the skate. It is recommended to work on the roof very carefully in compliance with safety regulations. In addition, it is not recommended to walk on the ondulin, and such a special ladder allows you to perform roofing work anywhere on the roof.

Step 5. Clean the surface of the old slate. To do this, you can use any tools and brushes at hand. There is no need to achieve ideal cleanliness, but the main vegetation should be removed. The fact is that mosses grow well and in the most unfavorable conditions, if they are not removed, then the elements of the wooden crate will quickly lose their original bearing parameters.

This completes the preparatory work, you can start installing the crate.
Installation of the lathing
Work should begin by checking the dimensions of the slopes. If the house was built by responsible builders, then the edges of the slopes are strictly parallel and are located at right angles. If there are inconsistencies, then during the installation of the battens, the maximum dimensions must be taken into account. Check the position of the slope corners immediately. The crate can eliminate rather large deviations of the old rafter system.

Step 1. Prepare blanks from the battens for the lathing according to the available dimensions.

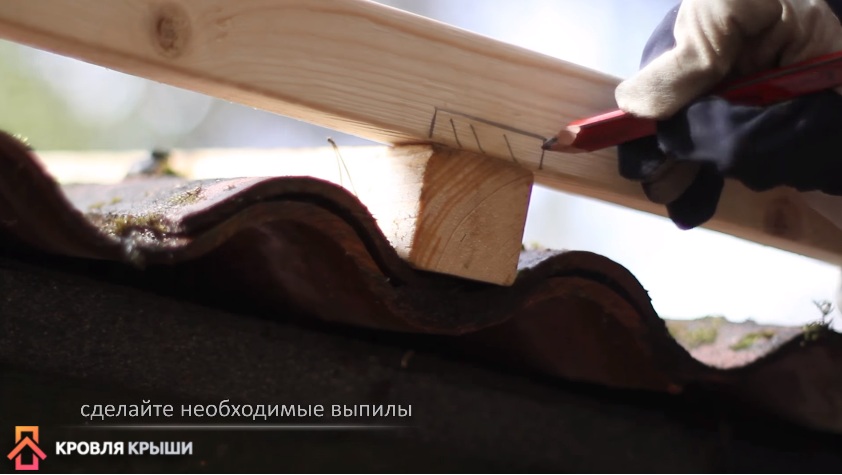
Important. Cuts should be made under the ridge on the old roof, due to this, the surfaces of the structures will be located in the same plane. The depth of the cuts should be equal to the height of the ridges of the ridge elements.

Step 2. Proceed to fix the longitudinal battens of the lathing.

In order for the self-tapping screw to get into the old crate, pre-drill holes in the slate. These holes, by the way, will greatly facilitate the process of screwing in the screws.

The strength of the slate is much higher than the strength of ondulin, it is very difficult to screw a self-tapping screw into it. Attach the outermost bars, pull the rope between them.


All the remaining lathing bars will be fixed along it. It is not necessary to very accurately check the elements of the crate for several reasons. First, the old roof is mostly flat; critical deflections are very rare. Secondly, it is impractical to correct the deviations in the position of each bar. Thirdly, ondulin is a very flexible material and will bend without problems in the right place, depending on the position of the crate.
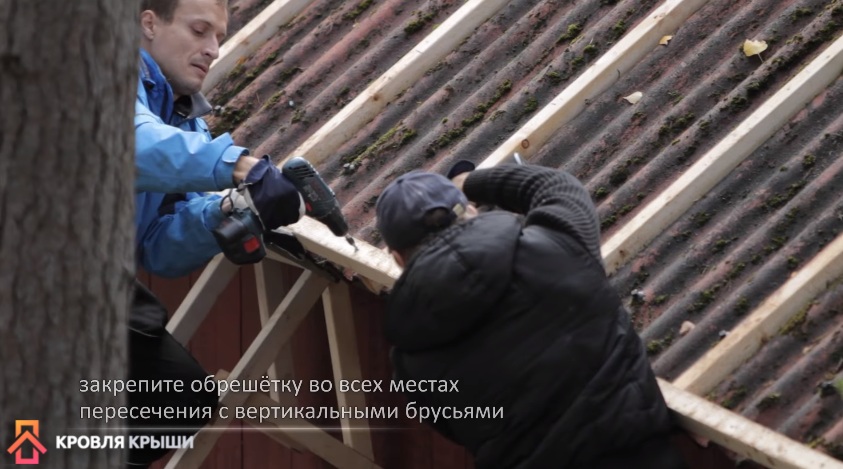
Step 3. Reinforce the beam in every fifth wave of the beam, align the lower ends with the stretched rope. The fastening scheme is the same - first, holes are drilled in the bar and slate, and only then the self-tapping screw is screwed.

Important. Special bars are attached near the chimney, the distance between them does not matter. The main condition is that the bars must be in the last wave of slate before the brickwork.
Step 4. Start nailing the horizontal bars. Joints should be made in the center of the vertical sheathing elements.

Practical advice. In places where two waves of asbestos-cement slate overlap, you need to make a drink in a bar, due to which the difference in the height of the coating will be leveled and the lathing will be even. The depth of the cut should be equal to the increased thickness of the coating at the overlap. The data is taken after taking measurements.
The bars are fixed with self-tapping screws 70 mm long, at the joints they are screwed in at a 45 ° slope. Due to this technology, the risks of cracking of the ends of thin bars are minimized.

The horizontal bars of the lathing should be fixed with a pitch of 61 cm along the axes, these parameters are standard for ondulin sheets, but the pitch of the ridge changes taking into account the dimensions of the slopes.

To facilitate the work, it is recommended to make two templates and use them to control the distance between the horizontal lines of the crate. Working with them is much more convenient than checking the distance between each bar with a tape measure. The length of the template should be 61 cm minus the width of the bars, in our case 61 cm -5 cm = 56 cm.


Step 5. From the outside on the ends of the roof, nail the bars to which the wind board will be fixed in the future. Nail them strictly at right angles to the horizontal battens. This parameter must be accurately controlled; the position of the first sheet of the onduline coating is set according to it. And the first sheet is considered the most important, it is quite difficult to correct the mistakes made later.

Step 6. Saw off the protruding ends of the cross bar, this is done after fixing the bar.

The lathing is completely ready, you can start laying the ondulin.
Installation of ondulin
It was already mentioned above that the roof has some limitations: you cannot work in too hot weather and at subzero temperatures.
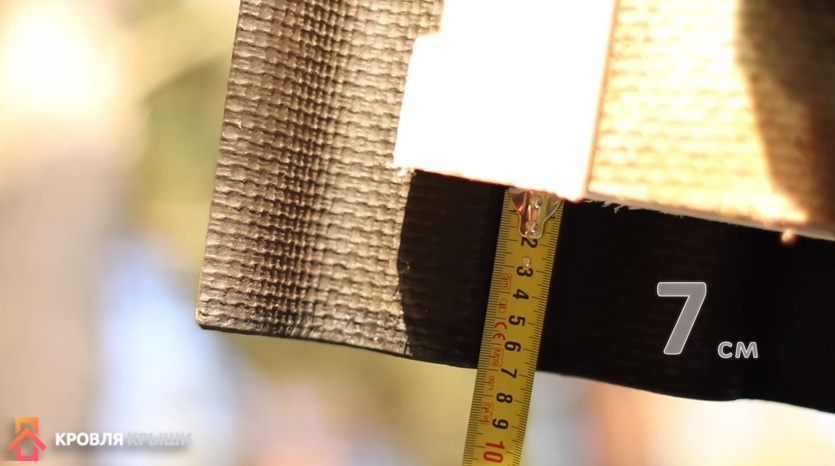
Step 1. Try on the first sheet of ondulin, so you can find out the length of the sheet that will have to be cut off at the ridge. When trying on, keep in mind that the overhang should be within 7 cm, and the overlap of the sheets is about 14 cm.

Step 2. Along the edges of the slope, temporarily screw two pieces of bars, a rope is attached to them. The amount of the offset is 7 cm, keep this in mind when fastening the segments of the bars.

Screw the self-tapping screws into the ends and pull a rope between them, all the lower sheets of ondulin are installed along it. Stretch the rope.


Installation of sheets should start from the opposite side of the prevailing winds, in this way it is possible to reduce the likelihood of roof leaks.

We have already mentioned that ondulin, when heated by the sun's rays, softens greatly, if in this state the wind acts on it, then the edges are bent upward, in these places in the future the tightness of the coating will necessarily be broken. Of course, the appearance of the roof will also be significantly affected.
Step 3. Try on the sheets of ondulin and prepare the upper ones, they are shorter than the lower ones. Sheets across the waves are sawn with an ordinary hacksaw, and it is better to cut the waves of the waves with an assembly knife. To reduce adhesion, the fabric should be periodically moistened in water.

Important. The first top sheet must be made twice as narrow as the usual width, this is required to prevent the appearance of the junction of four corners in one place.
Step 4. Install the first bottom sheet of ondulin, check its position along the rope.

If everything is normal, then fix the sheet. To do this, first you need to drive nails into the two extreme waves of the bottom row, then into the middle row. On three hardware, the sheet is securely fixed, now you can drive in all the other nails. If it is difficult for you to get into narrow bars, then draw marks on the surface of the ondulin. To do this, use a flat board, lay it on a sheet and align the side surface with the middle of the bars. Use a pencil or marker to mark each waveform. If the nail did not hit the lathing rail, there is no need to be upset. Feel free to pull it out and drive it in a new place. There will be no noticeable leaks through the small hole in the upper crest of the wave. If a few drops of rain fall into the under-roof space, they will dry out quickly.
Step 5. Drive in the rest of the nails in a checkerboard pattern. Work carefully to avoid damaging the coating. The plastic part of the nails should touch the comb, not press into it. Remember that ondulin cannot withstand heavy loads.

Sheet fixation, scheme
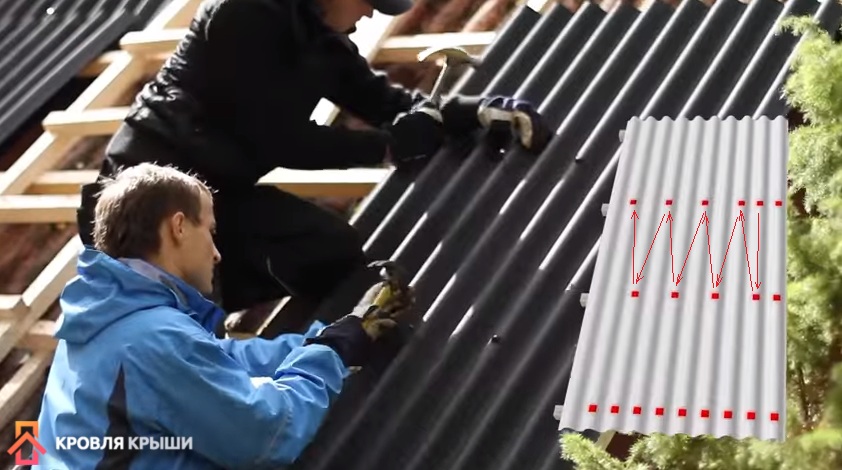


Installation of Ondulin, photo. Used at 20 nails per sheet
Nail the extreme wave overlap simultaneously with the sheet of the next row, remember that at least twenty nails should be used on each sheet. This amount can increase in places with the greatest possible gusts of wind. The bottom row is driven into each wave, then two rows through one. Ondulin manufacturers complete their roofing material with nails made of stainless alloys or galvanized, the lower part has notches to increase the fastening force of hardware. All these devices serve only one function - they increase the profits of the producers. Ordinary nails perfectly hold not only ondulin, but also ordinary slate. Experienced builders are not aware of cases when the roof was torn off due to the fact that metal nails were completely rusted. Moreover, under the ondulin, the material will simply break over the nails, and will not pull them out of the wooden beam.
And the last thing. How can they rust when located under the roofing material? If so, then there is a leak in this place and it must be repaired immediately. Remember that the overlap under the ridge must be at least twelve centimeters.
Horizontal and vertical joints should be located in one line along the entire length of the slopes, periodically check their position. You can hammer in nails only after the sheet has lay flat on the crate, do not stretch it, do not break the sequence of driving in nails.
Step 6. Carefully measure the dimensions of the ondulin cut at the chimney bypass. Sheets should adjoin the pipe with minimal gaps. To firmly fix the roof in these areas, install additional sheathing beams.

Step 7. Try on the last sheet, find out where the wind board is fixed. It should enter the top wave of the sheet from the back side. Screw the timber flush with the ends of the sheathing, cut off the excess with a hacksaw.

Step 8. Fasten the adjacent sheet of ondulin, but you do not need to drive in the last row of nails, this is done only after installing the wind board.
Step 9. Install the wind board and fix the ondulin to it. Reinstall the eaves.


Skate installation
Prices for various types of roofing skates
Roofing ridge
This completes the covering of the slopes, you can begin to mount the skate. You should also work from the opposite side of the prevailing winds in the area. The overlap of the ridge is at least ten centimeters, the element is nailed to each wave of sheets.


Answers on questions
Due to the fact that ondulin roofing began to be used relatively recently, some developers have quite reasonable questions. We will try to give professional answers to them.
The step of the lathing 60 cm raises concern, is there any reason?
Yes, such a distance between the horizontal battens of the battens cannot be considered reliable, especially during the summer period. There are times when you have to work on a ready-made roof covering, install antennas, ventilation equipment and other engineering systems. The material will not withstand the weight of the installers at such a step, you should not trust the statements of the manufacturers. Always nail the battens more frequently to increase the stability of the flooring. It is not necessary to nail nails to all the slats, the layout of the hardware may remain unchanged.
Is it possible to install onduline coatings in the northern regions of our country?
It is possible, but not necessary. Although the coating can withstand significant loads, it becomes brittle at subzero temperatures. In winter, there is a lot of snow in these climatic zones; the rafter system is deformed from the heavy weight. Such deformations cause the formation of cracks in the sheets of ondulin, as a result - the appearance of leaks, the need for repair work.

How to remove moss from the surface of sheets?
It is strictly forbidden to use metal brushes, and soft brushes almost do not remove vegetation. You can try various pesticides, but you need to work with them in compliance with all safety rules.

Moss remover prices
Is it possible to align the deformed sheets of ondulin on the roof?
No, you can't, you have to completely change the coating. There are several reasons for deformation: incorrect fixing order, too high heating temperature of sheets in summer, violation of installation technology. But the main reason is the poor quality of the coating.
What is the real service life of ondulin?
A very difficult question, manufacturers give a guarantee from 15 to 50 years. Practice shows that after 8-10 years of operation, the ondulin roof requires major repairs. Overhaul - large material costs, which completely offset the low cost of the material.

Video - Installation of an ondulin roof
Ondulin (English onduline) is one of the most popular roofing coatings. The demand is determined by its strength, aesthetic appearance and durability of operation. If you want to improve your own home, we will tell you how to cover the roof with ondulin with your own hands as efficiently and quickly as possible.
What is the material
Initially, before proceeding with the installation, you need to study the properties of the material. Ondulin is similar to slate, however, it has a flexible base. Such a roof consists of the following layers:
- the main board is cellulose-fibrous;
- mineral additives and fillers, which are responsible for strength;
- bituminous resin, which guarantees moisture resistance;
- pigment - responsible for the aesthetics of the slate.

The price of 1m 2 ondulin starts at 200 rubles, so the cost of a sheet with a width of 0.95 m, a length of 2 m, a thickness of 3 mm, a wave width of 9.5 m and a weight of 6.3 kg is 395 rubles. You can buy material at any hardware store, many also provide home delivery.
Advantages of ondulin
The modern material onduline is made on the basis of bitumen. Of the advantages, the following points can be highlighted:
- ease - because of this, the construction of a reinforced rafter system is not required before laying the roof;
- the budgetary cost is provided due to the manufacturing method and the available constituent materials;
- elementary care - you just need to douse it with a hose or wait for the rain;
- the material is resistant to irritants of an acidic and alkaline nature;
- there is no risk of mold on the surface and inside the layers;
- the ondulin roof is environmentally friendly due to the features of the components;
- resistant to precipitation in the form of snow and rain;
- the manufacturer defines a period of operation of 15-20 years;
- installation of ondulin is possible on top of the old roof, which will save on dismantling.

Disadvantages of operation
It is necessary to note the shortcomings of the material in order to ensure the possibility of an objective choice of the roof:
- sun and rain can provoke roof burnout, which will negatively affect the appearance of the coating;
- resistance to water is ensured only during the service life specified by the manufacturer;
- if you intend to purchase a large volume of slate, it may turn out that some sheets differ in shade;
- fragility - you should not walk on the surface, as most likely dents or other damage will remain on it, the same criterion should be taken into account during transportation;
- As you can see in the photo, the limited color gamut has only 4 colors so far: brown, green, red and black.

The technology for laying ondulin is similar to fastening slate, but before starting work, you should prepare a little.
Features of working with ondulin
In order to correctly attach ondulin to the roof, you should study some of the intricacies of working with fashionable material. Having studied them, you will be able to lay the sheets yourself on the roof of any design.
- If you still need to walk on the laid material, then step better on the crest of the wave.
- To renew the roof for a long time, it is better to carry out all installation work at an ambient temperature in the range from -5C to + 30C. If the temperature exceeds the norm or, conversely, below -5C, postpone the work to another time.
- Approximately 20 nails are used to fasten one sheet. This is the number of nails that can hold the sheet in gusts of wind.

- Due to the nature of the composition, the coating may stretch. This leads to the appearance of waves over the entire roof area, which will only have to be removed by dismantling. To prevent stretching, the ondulin fastening scheme involves the use of sheets that are perfectly flat in shape.
- Check for sufficient overhang. Too long will look ugly, and too short will lead to the collection of debris and dust under the roof. The most dangerous thing is that precipitation will constantly fall under the short overhang.

What you need to prepare initially
Note that the competent choice of the necessary tools and materials is much more responsible than the installation itself.
Calculate the exact amount of coverage you need. The dimensions of a standard onduline sheet are 200 x 95 cm. When calculating, be sure to take into account the overlap allowances. For the overlap, you will need to leave 9.5 cm wide and 10-15 cm long. It turns out that the useful area from one sheet will be 1.6 m 2. If you know the total roof area, you can simply divide it by 1.6. This will give you an almost exact number of sheets needed. Be aware that the result can vary depending on the angle of the roof and the shape of the roof.
Preparation presupposes the presence of such tools:
- hand saw for wood;
- hammer;
- nail puller;
- ladder;
- roof ladder.
In addition, you should purchase auxiliary parts, without which the work will not be of high quality:

- gable elements (protective shields) for the edge;
- cornice filler (foamed polyethylene, which prevents debris from getting between the sheets and the crate);
- skate (flexible);
- rubber dropper aprons;
- specialist. fasteners-studs with a rubber cap.
Manufacturing of lathing and its features
- Laying ondulin on the roof presupposes the arrangement of a continuous sheathing. It is extremely necessary so that the material does not sag later. For installation, waterproof plywood or OSB boards are used, and the step should be 40-45 cm.
- If the roof slope is more than 15 percent, then the pitch of the lathing can be increased to 60 cm. And for areas with a lot of snow in winter, the pitch of the lathing should be minimal. For the construction of the frame, bars with dimensions of 4 x 5 cm, 5 x 6 cm or 5 x 5 cm are used.
- Install an additional sheathing under the tong and ridge. The lathing for the ridge is installed at a distance of 5-10 cm from its axis. This distance varies with the degree of inclination of the roof slopes.
- The cornice is designed with a rubber apron, which is able to bend, enveloping the cornice lathing at any angle. The apron is attached to the crate with ordinary self-tapping screws, and the overlap between the elements is 5 cm.

Important! Immediately before the construction of the lathing, it is necessary to carry out waterproofing work.
- The last is the wind board, which should protrude 3 cm from the sheathing frame.
- After the frame is erected, be sure to check the entire structure for compliance with the geometry. To do this, measure the diagonal of each roof slope. If the values differ, all errors should be eliminated.
Installation instructions for ondulin
To properly cover the roof with ondulin, you must adhere to a certain algorithm.
Important! Initially, you should take care of your own safety.
For your attention, instructions for laying ondulin with your own hands:
- The fastening of the first sheet must be started from the side farthest from the wind, and always from the bottom of the ramp. To align the sheets, pull the cord along the lower edge, taking into account that the sheet overhang should end at a distance of about 5 cm from the drop apron. The extreme wave of the sheet should go onto the wind board. Place the filler in the space of waves between the sheet and the crate, freeing the ventilation holes in it with a screwdriver. If this is not done, then birds can fly into the holes under the waves, and even hornets can settle.

- Special nails are equipped with special caps, so the fastening is carried out as follows: with a hammer you punch a nail with an open head at an angle of 90 degrees, and after driving it in, put on a decorative cap.
- Remember that on each sheet you will have three lines of fasteners. To hit the lathing with a nail, either mark the sheet or pull the rope along the lathing line. It is important to remember that the indentation of the lines along which the nails are driven in will depend on the step of your lathing, however, there cannot be less than 3 lines of nails on the sheet. Further fastening is carried out according to the scheme below.

- Lay the second sheet with an overlap on 1 wave, and you will already be nailing its first wave together with the overlap, that is, immediately into the crate through two sheets. In the process, make sure that the second sheet does not protrude beyond the borders of the lace that regulates the horizontalness of the bottom of the roof. In any other situation, the sheets will lie obliquely. If you need to cut off the tip of the sheet, you can use a hacksaw.

- The second - the next row relative to the first one lays down in the order of a checkerboard. To do this, take and cut the sheet longitudinally in the middle. Install an overlap between the rows of 10-15 cm. If the slope of the roof allows, then it is permissible to reduce the overlap, thereby achieving savings in material consumption.

- After finishing the installation of the last segment, you can proceed to fixing the roof accessories that perform the functions of protection and decoration.
- The gabled elements are installed on the wind board, which is pressed tightly against the ondulin. The overlap of the tongs is about 15 cm. It is nailed into the butt with the same nails.
- The ridge for ondulin is attached from the edge of the roof opposite to the prevailing wind direction, like the sheets. A skate is nailed into each underlying wave, alternately on both sides. The overlap of the ridge elements is also 15 cm.

Important! Pay utmost attention to the quality of the fastening of the nails. Their caps will be very visible on the surface, so take care of their correct geometry initially.

Now that you know the step-by-step instructions for laying ondulin, here's a video instruction for a more detailed acquaintance with the installation process.

Now you can easily cover the roof with ondulin. Perhaps you already have experience with this material? Share your impressions with readers below.
One of the most popular ways of arranging roofing in private housing construction is laying sheets of roofing ondulin. Taking into account the specifics of this modern French roofing material, the technology of its installation has a certain number of features, taking into account which allows you to obtain a high-quality and durable roof.
Installation options and methods
In the modern building materials market, roofing from is one of the most advanced roofing systems that are widely used around the world. Today, there are several options and methods for installing this inexpensive but high quality roofing material.
To the old roof
A significant advantage of ondulin is that there is no need to dismantle the old roof covering. It is enough just to mount a layer of insulation, on which the roofing sheets are laid in accordance with the same technology as in the process of installing a new roof covering.
Stages of installation on an old roof:

- pulling the rope along the lower segment of the bars and aligning the remaining vertical bars along it, installed at the distance of every fifth wave of wave roofing material or after 60 centimeters;
- fastening the vapor barrier across the slopes using mounting brackets with a pitch of 15 centimeters, followed by gluing the joints with mounting tape;
- installation of a horizontal bar flush with the ends of the vertical lathing and fastening at the points of intersection with vertical bars with 70 mm self-tapping screws;
- to provide the places of layering of two sheets of the old coating with a cut at the level of the horizontal crate;
- laying of thermal insulation and breathable membrane;
- laying ondulin from the roof section opposite to the prevailing wind.
On roofing material
It is allowed to mantle onduline sheets on the surface of the old roofing material, while all breaks in the old coating should be eliminated. For a high-quality installation, a new counter batten should be installed in the length of the rafters and the batten across the rafter system. Such work will allow condensation or trapped moisture not to stagnate on the roofing material. A bar with a section of 5x5 centimeters is used.
The counter lattice is placed at intervals of the rafters, and the lathing is installed at intervals of 60 centimeters. Further, all work on laying the sheets of ondulin is performed according to the attached instructions.
New roof
When creating a new roof from sheet ondulin, preliminary laying of high-quality lathing should be carried out at intervals according to the angle of inclination of the slopes. After completing the lathing, the ondulin sheets should be carefully marked. To cut the marked roofing material, a hacksaw for wood is most often used, which is pretreated for high-quality sliding with oil.
During installation, the basic requirements must be observed:
- the starting row of sheets should be fixed from the side opposite from the blowing wind;
- the next row of sheets is attached from half of the previous one;
- the sheets should be fixed for each wave.
DIY styling rules and technology
- For continuous lathing, used with a slight pitched slope, moisture-resistant sheet lumber or thin tongue-and-groove boards are used. The maximum gap between such materials should not exceed five centimeters.
- For slopes with an average slope, a thinned crate is required with a distance between the elements - 45 centimeters.
- For a roof with a significant pitched slope, it is necessary to mount a thinned type of lathing with a step of 60 centimeters.
Scheme and instructions for installing ondulin on the roof
On the correct execution of installation work, the ondulin is applied by the manufacturer to each manufactured product. The main stages of self-installation of a roof made of sheet ondulin are as follows:

- to facilitate installation work, the ondulin starting sheets should be attached to the opposite leeward side of the roof edge. The second row begins with half a sheet of the first row, which forms three sheets at the corner joint;
- fasteners are driven in along each wave at the end segment and the overlap of the sheet, as well as on both sides of the side overlap. Fastening to intermediate battens is made through a wave. Twenty roofing nails are used per sheet;
- The installation of the ridge elements begins at the back of the leeward side of the roof edge using an overlap of 12.5 centimeters. The place of attachment of the ridge elements is the wave of the roofing sheet joining with the ridge and additional lathing bars;
- it is imperative to install valleys, gable elements, as well as correctly form the side roofing joints at the junction with vertical surfaces by means of a covering apron;
- installation of a ventilation system involves the use of a roof fan, ventilation pipe and a special comb;
- in order to arrange an exit to the roofing surface and organize the lighting of the attic, it is required to mount a roof window, which is attached to each wave of the sheet at the junction. By means of the top sheet, an overlap is made on the base of the roof window;
- to perform high-quality waterproofing of the joints of the roofing surface with vertical surfaces, it is recommended to use the Onduflesh insulating tape.
For more information on DIY styling, see the video.
Roofing cost
Despite the fact that the roof covering made of sheet ondulin is easily assembled independently, many homeowners prefer to use the services of professional craftsmen who not only quickly and efficiently perform this type of roofing work, but also provide a guarantee for all work performed.
The average price of turnkey roofing works, excluding the cost of ondulin, depends on the volume and type of work performed:
- without dismantling the old roof, including cleaning the roof, installing counter-battens and stepped lathing, as well as laying roofing ondulin, ridge, wind and cornice strips and a chimney - 400 rubles per square meter;
- instead of the old roof with the strengthening and repair of the rafter system, including dismantling the roofing carpet of the old coating, strengthening and repairing the rafter system, installing ondulin with waterproofing, as well as all accessories - 800 rubles per square meter;
- complete roofing pie with Mauelrat, including insulation, windproofing, waterproofing, vapor barrier and inner lining with ondulin installation - 1200 per square meter.
Summing up
- the basic rule of self-installation of ondulin is to perform all work in strict accordance with the attached instructions;
- you cannot save on the quality of lumber for lathing, and all lumber used in the roofing system must be treated with special antiseptic compounds;
- the type and pitch of the lathing should be strictly observed, depending on the slope of the roof slopes.
Roofing is a responsible business that does not tolerate fuss. Therefore, while drawing up the project of the country house, I thought hard about this. How to cover the roof? I went through all the modern materials, looking for something that would combine beauty, high performance and ease of installation. The last condition was very important, since I decided to deal with the roof covering alone.
The object on which I was going to mount the roof was a 6x6 m aerated concrete country house, supplemented by a 3x3 m porch. There is one floor and an attic. Insulation is not planned, due to living in the country house exclusively in the warm season.
The roof of the house is gable, the angle of inclination is 45 °. Quite steep, it is difficult to move along it, but otherwise there are solid advantages. The crate under the cover can be set with a large pitch, snow retention will be at a minimum level, rainfall will be able to drain faster than on a shallower roof.
Why did I choose Ondulin?
Ondulin is considered the most suitable material for installation by one person. Moreover, it is not necessary to have extensive experience in the construction industry for this. Installation is very simple, the sheets themselves are light, so you can lift them to the roof yourself, even several pieces at a time. The savings in time and effort are evident.
Ondulin does not "make noise" in the rain. This is a huge plus in comparison with the same metal tile or seam, along which raindrops beat out a real drum roll. Here you either have to isolate noise, or get used to it. I don't want to get used to such noises, so initially I was more inclined towards soft tiles or ondulin. But soft tiles, for all their merits, did not suit me for budgetary reasons. Too expensive in my opinion. But ondulin is just right. And inexpensive, and beautiful, and does not require maintenance. What else is needed?
In fairness, it is necessary to note the shortcomings of ondulin, information about which was found by me on the World Wide Web. Sellers do not admit this, but this is understandable - their business is to sell.
So, first: ondulin on the roof is unlikely to serve you more than 20 years. In our conditions, only slate can live for 50 years, all other foreign novelties are not suitable for him in this regard. At the same time, nothing is eternal. Ondulin will deteriorate in 15-20 years, you can change it to a new one. So I decided and dismissed this drawback as insignificant (for me personally, of course!).
Second: ondulin burns out in the sun. Green material loses its color especially noticeably, so you need to think a hundred times before choosing it. A significant disadvantage, but only at first glance. When studying the issue, it turned out that ondulin can be painted. The manufacturer produces a special acrylic-silicone paint for these purposes - Ondupaint. Any water-based acrylic paint that matches the color will work instead. Everything turned out to be very simple.
The advantages of ondulin for me turned out to be more significant than its shortcomings. And the question of the choice of material was decided in his favor.
Ondulin roof structure
The sequence of roofing layers was chosen as a classic one. A win-win, judging by the neighboring roofs of our summer cottage village, in which half of the modern roofs, regardless of the coating, are made in the same way.
If you look from the inside of the attic, the pie is as follows: rafters, waterproofing, counter battens, lathing, ondulin. This design provides wind and water protection of the space under the roof, the absence of condensation and, accordingly, rotting of the rafters and lathing.
Roof covering with ondulin
At the beginning of the roofing work on the rafters, the Favorit A wind-moisture protective film was fixed with a stapler. This film is vapor-permeable and ensures the escape of vapors from the under-roof space. Plus protects against wind and atmospheric moisture. Despite the fact that the manufacturer insists on the complete tightness (with proper installation) of the ondulin roof, leaks do occur. It is better not to take risks so that water, for example, seeping under the nail heads, does not start dripping onto your head.
It is necessary to lay the waterproofing, starting from the bottom. First, spread the first strip along the eaves, then - on top of the second strip with an overlap of 15 cm. And so on, up to the ridge. Having finished with the first slope, I just threw a vapor-permeable film over the ridge, I did not cut it for ventilation. The second slope was laid in the same sequence. He fixed the film on each rafter with a stapler.
Step 2. Arrangement of counter battens and battens
I nailed bars along the rafters, with a section of 50x30 mm. This is a counter-lattice that creates a ventilation gap between the ondulin and the waterproofing film.
Next comes the crate. I decided to use 120x25 mm boards for it. He stuffed them across the lathing bars with a step of 400 mm. In general, for slopes with an angle of inclination of more than 15 °, you can take a step of 610 mm, but I decided to play it safe, especially since I initially had suitable boards on the farm.
Step 3. Flooring ondulin
For the topcoat, I bought a brown DIY ondulin and special nails with snap-on caps. Now the kit does not include fastening materials, you have to buy them yourself. The dimensions of DIY ondulin sheets are 2000x760 mm, they have 8 waves, in contrast to standard sheets with 10 waves. This reduction is made especially for coatings of small structures. It is very convenient for self-construction. A particularly beneficial benefit is reduced weight. In 5 minutes, I alone threw 10 sheets of ondulin onto the roof; using any other material, an assistant would be required.
So that the edge of the roof was even, I beat off the level of the overhang of the sheet, stepping back 50 mm from the bottom board of the sheathing. I put the wind boards at the ends, nailed them to the crate.
Ondulin laid it from below with an overlap in 1 wave. The second and third rows were staggered with a horizontal overlap of 17 cm. If the slopes were flatter, the overlaps would have to be increased - up to a maximum of 2 waves vertically and up to 30 cm horizontally. To ensure a checkerboard order, the edge sheets had to be cut lengthwise. I did this using a hacksaw for wood, the teeth of which I periodically lubricated with transformer oil - to prevent them from getting stuck in the bitumen material.
Along the overhang and ridge, as well as in the overlaps of adjacent sheets, I hammered nails into each wave, on the wind board - every 250 mm, along the central area of the sheet - in a checkerboard pattern. To make it easier, at first the sheet was fixed at the edges, and then fastened with intermediate nails. It is important to ensure that the roofing nails do not bump into the sheathing nails when hammering them into place. Then they, having encountered an obstacle, bend over and can leave a hole in the ondulin. You will have to change the damaged sheet, otherwise the first rain will negatively affect the roof.
The nails should be driven into the wave ledge, making sure that the plastic washer fits snugly. Here you have to adapt to the force of the blow. A couple of times, when I overdid it, the waves were simply flattened, and the neighboring ones were stretched out. It is ugly, since such an area looks deformed, skewed. I had to redo it.
There is another pitfall: some of the nail caps, which should snap into place when lightly hit by a hammer, didn't want to. Then I got used to closing such caps even before starting the installation. To do this, I made a plate with a hole, set a nail there with an open cap and hit it with a hammer. The cap slams off on impact. Its surface does not suffer.
If in the foreseeable future you are going to dismantle the roof, then it is better to use self-tapping screws instead of nails for fastening. By themselves, of course, they will look out of place. But if self-tapping screws, instead of nails, are inserted into the flap caps, it is a completely different matter. Such a mount, in appearance, is no different from the usual nail. But unscrewing the screws is much easier than removing the nails. These are the little secrets, maybe someone will come in handy.
In general, it is easy to work with ondulin, due to the low weight and pliability of the material. For an hour, I stacked, on average, 3-4 sheets. Very fast in my opinion.
At the end of the cladding of the slopes, ridge parts were laid on top, along the ridge. This completed the roofing work.
Finally
The total period for which the roof was covered was 7 days. I did not notice any special barriers to the installation of ondulin by one person with minimal construction skills. Therefore, without a twinge of conscience, I can recommend this material for all beginners or inexperienced roofers. If you follow the manufacturer's instructions, the roof will surely turn out to be excellent - both in appearance and in quality.
1.
2.
3.
A very popular roofing for the roof of a house today is ondulin. It has a pleasant appearance, is reliable in operation and, in principle, is not much inferior to the most common coatings on the roofing materials market.
There is no particular difficulty in covering the roof with ondulin with your own hands, but it is important to understand the technical characteristics of the material and the rules for its correct installation.
This roofing material of organic origin, very light, wavy, slightly rough, is nothing more than bituminous sheets, or rather cardboard, glued on both sides with bitumen with the use of various additives. Ondulin roofing is painted in the desired color shade immediately after installation.
For a high-quality roof covering with ondulin, it is necessary to understand all the advantages and disadvantages inherent in this roofing material.
The main advantages of ondulin:
- ease of installation (it is not necessary to have any special skills and knowledge);
- the material is conveniently stored and transported due to the low weight of its sheets.
- Among the disadvantages of ondulin, it is customary to distinguish the following:
- the material is too susceptible to burning;
- to prevent damage to the sheets for the roof, it is imperative to install a crate;
- due to the plasticity and fragility of such a material as bitumen, all maintenance and repair work, of course, is complicated.
In today's construction market, it is no longer surprising to surprise anyone with such roofing materials as metal tiles, slate, corrugated board, roofing felt, tiles of various types. But the distribution of ondulin really has a wide scope. If you follow all the instructions and standards, the roof covering with ondulin with your own hands can be done efficiently, and the roof itself will be reliable, beautiful and very light.
It is no secret that outwardly ondulin rather strongly resembles such a material as euro slate. However, not everyone knows that euro slate is the same ondulin, only slightly modified. Various impurities are added to it, and it is produced through several technologies. The composition of Euroslate sheets includes cellulose or fiberglass, which are covered with bitumen and painted in different shades.

Directly covering the roof with ondulin is a completely simple and even convenient procedure. The material is also characterized by the fact that when it rains, it, like a metal roof, does not make any noise, but is prone to fading due to prolonged exposure to the sun.
The operational life of ondulin can reach 50 years, but at the same time its price is quite high, although more and more countries are now mastering the technology of its production.
If there are remnants of material from the category of metal, roofing felt or flat slate on the roofs, there is no need to remove them, you can only deform the sheets of ondulin in some way, which is done for better laying.
These sheets can be laid on a surface with absolutely any curvature. At the same time, special nails are included with them, on which there are special gaskets, but it would be better to fix the material with screws or self-tapping screws.
The laying of ondulin also requires a lathing device, since this material for the roof, due to its flexibility and light weight, can break or sag. If the sheets of materials are too large, they can always be cut with a hacksaw or jigsaw.
Sheathing device for ondulin
For ondulin, a solid crate is best suited. It will prevent the material from sagging from heating in the hot season and will help to evenly distribute the snow in winter.

To begin with, it is important to learn how to perform marking on onduline sheets, which can be problematic due to their wavy shape. In this case, ordinary pencils can also be used, and another sheet will help to draw a straight line.
To cut the sheets along the desired line, a grinder or a hacksaw for wood is used, which from time to time needs to be oiled to prevent it from getting stuck.
Since the weight of a standard sheet does not exceed 6 kilograms, it will not be difficult to lift the sheets onto the roof, and the weight of the roof itself will be very small.
You need to start laying the roof from the edge of the sheathing. It is better to nail the sheets in each wave, this will provide them with a more reliable fastening. One sheet of ondulin requires an average of 20 nails.
Materials for fastening ondulin
In order to secure ondulin, it is customary to use special nails. Their base and appearance are similar to screws, which makes it possible to more reliably fix the sheets in the wood.
On the top of such a nail there is a rubber gasket with a color identical to the color of the sheets. It is designed to provide the material with even greater waterproofing at the attachment point. In those places where the material is docked with the wall, it is customary to use special valleys. Special attention should be paid to waterproofing in these places.

If there is a stove in the house, it must also properly dock with the ondulin during cladding. Therefore, it is necessary to use special rubber aprons.
It is extremely important to process all the joints very carefully, creating additional waterproofing and thereby preventing possible rotting of the roof and the negative effect of moisture on it. By following the recommendations for creation, it is possible to ensure that the ondulin laid on the roof will serve longer and more reliably.
How to properly cover the roof with ondulin?
In order to achieve the most positive characteristics of a roof covered with ondulin, it is necessary to strictly follow a number of rules that will help achieve the desired result.
These rules include the following:
- If it becomes necessary to move along the laid sheets of ondulin during work, then you need to step on the wave crest, so the places between the crests cannot withstand a person.
- It is better to cover the roof with ondulin at an air temperature of -5 to +30 degrees. If the temperature does not coincide with this range, it is better to transfer the installation work.
- About 20 nails should be spent on one sheet of ondulin, which are supplied with the material. This will make the coating better withstand wind gusts. When performing work by a construction team, it is recommended to check this moment.
- The cross-section of the beams should be 60x40 millimeters.

The pitch of the roof lathing is directly influenced by its angle of inclination. The following conditions should be observed:
- if the angle of inclination is less than 10 degrees, then the crate should be made of OSB boards or plywood;
- if the angle of inclination is from 10 to 15 degrees, then the sheathing step should be a maximum of 450 millimeters;
- if the angle of inclination is more than 15 degrees, then the maximum value for the pitch of the lathing can be a distance of 610 millimeters.
It is also important to carefully measure all overhangs, because if their length is too large, the ondulin can bend, which will negatively affect the visual appeal of the roof, and if overhangs are too short, various debris and precipitation may fall under the material (be sure to read: "