The construction stapler is a multifunctional mechanism. It is used when it is necessary to connect the same or different not particularly hard materials with each other, for example, plastic, wood, film, insulation, plywood. This tool is called differently: tacker, staple gun, staple gun, nailer, staple gun. Fastening of individual elements to each other is carried out using staples, pins or small nails. To know how to work correctly with a construction stapler, you need to understand its design, suitable types of fasteners, a method of setting and replacing staples.
The furniture stapler is widely used by builders and furniture makers, as well as by representatives of other fields of activity. By type of energy used to fire a shot during operation, the following types of takers are distinguished:
- mechanical;
- electrical;
- pneumatic.
The first two varieties are intended for domestic use, and the last type of tool is considered professional and is used mainly when performing work in large volumes. The principle of operation of mechanical and electric staple guns is based on pushing out the fastener by the force of a cocked (compressed) spring. After pressing the trigger, it is unclenched, which causes the movement of the striker. He hits the bracket (nail or hairpin), driving it into the surface of the material.
Mechanical stapler design
Manual (mechanical) stapling machines differ from analogs in a simpler design. They consist of the following units and parts:
- platoon handle;
- a safety clip that protects against accidental shots when transporting the tool;
- impact mechanism springs;
- shock absorber;
- drummer;
- striker;
- impact force regulator, which provides the ability to work with material of varying degrees of hardness (different density);
- hulls;
- cocking spring;
- store for fasteners;
- rammer (with spring and retainer);
- tip that allows you to accurately drive fasteners.
A diagram of the device of a staple gun is shown in the photo below.

Impact mechanism- This is the main unit of the stapler, cocked by the strength of the worker's muscles. It can be equipped with two types of springs:
- twisted;
- spring (plate).
Manufacturers indicate the type of installed spring in the operating instructions for the products.
Coiled spring mechanism shown in the photo above are equipped with cheap models. They can be easily distinguished by the adjusting screw located on the tool body on the opposite side from the staple protrusion hole. But it is also possible that the wing will be absent, then you will need to refer to the instructions to determine the type of installed spring.
Leaf springs more powerful, but more expensive than twisted counterparts. At the same time, the recoil from the tool equipped with them during operation is less. They also have a long service life and are easier to cock. The leaf spring mechanism is installed on models intended for professional use.

For the convenience of working with the tool, the handle is covered with rubber pads, and the store is made with a transparent insert (which makes it easy to control the presence of staples or nails).
Design features of electric and pneumatic staplers
The device of an electric stapler of a network type is shown in the photo below.
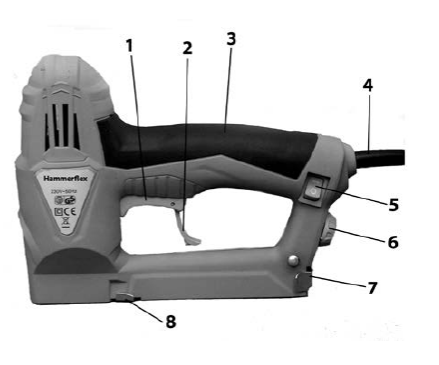
The numbers in the photo correspond to the following structural elements:
- trigger trigger;
- fuse;
- handle with a special coating;
- power cord;
- on / off switch;
- impact force regulator;
- pushing mechanism;
- shop.
Inside the instrument is located electric drive and impact mechanisms... In this case, the electric motor is designed to charge the spring.
In rechargeable models, there is no power cord: instead of it, batteries are installed.
The device of a pneumatic-type furniture stapler is more complicated than its mechanical counterparts. The pneumatic tool consists of the following structural elements:
- hulls;
- a cylinder with a piston located inside it;
- starting systems (trigger mechanism);
- store for fasteners with a pusher;
- shock mechanism;
- an inlet fitting for connecting a high pressure hose to the tool;
- a regulator of the penetration depth of fasteners (impact force);
- air distribution unit.

The pneumatic-type scooper is powered by compressed air supplied by a compressor or from a cylinder. After pressing the trigger, the gas passes through the air distribution unit. Then the compressed air enters the cylinder, driving the piston. The latter transfers energy to the striker striking the fastener. After the impact, the staple or nail is driven into the surface of the material.
Classification of used staples
You need staples to use the stapler. They are divided into separate types according to the following criteria:
- by the material from which they are made;
- by the degree of hardness;
- by the availability of coverage;
- by size;
- in shape.
By material of manufacture
Material staples are:
- aluminum, used in work with non-solid materials;
- copper (expensive), also designed for soft parts;
- steel, suitable for both non-hard and soft materials, but rusting over time;
- made of stainless steel (stainless steel) - this is a reliable option in a variety of conditions, but at a high price.
Furniture staples can also be galvanized to prevent rusting.

By hardness
By hardness, fasteners are divided into the following varieties:
- simple;
- very hard;
- red-hot.
The ends of the fasteners can also be sharpened differently, making it easier to drive in under certain conditions.
By form
Based on the shape of the staples, the following varieties are distinguished:
- U-shaped;
- U-shaped;
- T-shaped (pins).
Most often, in practice, fasteners in the form of the letter P are used, and U-shaped fasteners are used mainly during the laying of cable lines. The pins are almost invisible fasteners... They are used when fasteners need to be as invisible as possible.

Standard sizes of staples
Almost all taker manufacturers also produce their own staples for them. But at the same time, there is a mandatory standardization of product sizes - this allows, when replacing, insert staples into a staple gun from different companies.
The dimensions of fasteners are understood as the following parameters:
- the thickness of the staple (denoted by the English letter a);
- the length (width) of its back (b);
- leg height (depth).
Based on these overall parameters, the following are distinguished the most popular types of staples in practice.
- 53 is the most common standard size with a = 0.7 mm, b = 11.4 mm and a leg height of 4 ÷ 14 mm.
- 140, having the following dimensions: a backrest width of 10.6 mm, a thickness of 1.2 mm and a depth of 4 to 14 mm.
- 36 - This mark indicates that U-shaped fasteners can be used for the staple.
- 300 are nails that only fit a staple gun.
It should be borne in mind that different companies designate the same types of fasteners differently. To compare fasteners from different manufacturers, use the table below. Determining the size of the brackets will not be at all difficult.

There are no universal types of fasteners suitable for any job.
How to insert staples into a stapler
Changing staples in a mechanical tacker is easy. To charge new fasteners, proceed as follows:
- the tool is blocked from accidental starting with a fuse;
- from the back of the staple, open the magazine cover, behind which there is a groove for fasteners;
- a rod equipped with a pusher spring is taken out from the inside;
- the rail from the staples is turned with the tips against the handle, and then inserted into the groove;
- a rod with a spring is installed inside the tool in the same place where they clamp the fasteners;
- close the lid of the store;
- remove the fuse;
- make a few shots in test mode to check the performance of the tool.
With nails when charging the stapler, proceed in the same way.
The photo below shows how to place the staples in the mechanical stapler.

Blocking the staple gun from accidental firing is a mandatory procedure to ensure the safety of the work.
To fill with staples pneumatic or electric staplers, proceed in the same way as a mechanical tool:
- block the device;
- turn the tool over;
- by pressing a special button, they take out a tray for fasteners;
- correctly insert staples or pins (nails) into the tray;
- insert the "clip" until a click appears;
- unlock the tool and check its operation.
Depending on the model of the stapler you are using, the fastener tray may slide out or open when you press the button on the stapler.
Some modifications of mechanical staple guns have a different principle of replacing fasteners: they are made with a chute that can be pulled out at the push of a button. Staples are placed in the extended tray and inserted back into the store until it clicks. The whole process, showing in detail how to fill the staples in the considered case, is demonstrated in the video:
Stapler adjustment sequence
Setting up the staple gun is needed in the following cases:
- after purchasing the tool before starting work;
- if the stapler stops completely driving in the fasteners;
- when starting work with a material of a different density than the previous one.
If the stapler stops driving in fasteners completely, this is due to a gradual wear of the impact spring or with its loosening. For some time, regulation will help, but after that you will need to purchase a new stapler.
It is necessary to take into account the dimensions of the fasteners for which the taker is designed: if the size of the brackets exceeds the allowable one according to the operating instructions, then the adjustment has nothing to do with it, you just need to select the appropriate consumables.
Coil spring mechanical staple guns have a screw that adjusts its compression ratio... It is shown in the photo below with a red arrow.

If you turn the adjusting screw clockwise, then the spring will be compressed more strongly, its potential energy will increase. The result will be a blow of greater force. The ejected bracket will go deeper into the surface of the material. Turning the adjuster counterclockwise will loosen the spring. This will also make the impact weaker. By rotating the screw, you can adjust the stapler to work with materials of varying hardness (density).
For mechanical models of staples with a spring (leaf) spring of the impact mechanism, the regulator is located under the handle... Rotating it in different directions, they regulate the force of the shot. It is required to reconfigure the striking mechanism each time when starting to work with a different material. After adjusting the spring compression, it is advisable to test the operation of the tool on a workpiece that is no longer needed.
The setting process ends when the fasteners with the entire length of the legs enter the material without punching it with the "back". It is recommended to exercise by rotating the adjuster from minimum to maximum spring compression.
Rules for the safe use of the tool
When working with a construction stapler, it is imperative to follow the safety rules. The main requirements are reduced to the following points.
- When replacing staples, you need block tool by means of a fuse against sudden, unexpected start-up.
- It is forbidden to point the instrument on the hand or another part of one's own body, as well as on other people or animals.
- When transporting or storing the stapler, it is necessary to fix its handle with a safety catch.
- Only a person in a normal psychological state (not under the influence of alcohol, psychotropic substances or drugs) is allowed to work with a brace.
- The work area must be well lit and clean.
- It is necessary to constantly use such individual protection means like glasses, so that nothing accidentally flew into the eye. To prevent the bracket from flying off when fired, it is required to monitor the presence of metal inclusions on the working surface, bypassing or removing them in a timely manner.
- If the fasteners get stuck, they must be carefully removed.
- When working with small-sized workpieces, they must be fixed motionless with the help of a vice or clamps; it is forbidden to hold it with your hands.
- The position of the body should always be stable and as comfortable as possible, and shoes with non-slip soles.
Safety instructions with electric and pneumatic staplers contains more additional points:
- the mains power tool must not be used inside hazardous areas;
- only switched off equipment is allowed to be connected to the outlet;
- the power cord with a plug and the case of the operated model must be intact;
- it is forbidden to use an electric staple gun in the rain or indoors with a high level of humidity;
- unauthorized persons should be at a distance of more than 2 m;
- the pneumatic tool used, the high-pressure hose to it, as well as the rest of the system must be free of mechanical damage;
- during work, it is necessary to ensure that the power cord is located behind the tool so that it does not interfere.
There is nothing complicated when using mechanical, pneumatic, as well as electrical types of construction staplers. It is only necessary to use suitable (specified in the operating instructions) fasteners for work, and before it, adjust the impact mechanism for a specific material. At the same time, constant adherence to safety precautions will prevent injury. Attentiveness and accuracy are one of the main guarantees of high-quality performance of any work.
For those who like to do home repairs on their own, it will be useful to learn what a construction stapler is, how to use it correctly and for its intended purpose.
A construction stapler works on the same principles as a stationery stapler, and allows you to staple various materials.
A stapler is a well-known stationery that, using a special mechanism, releases fastening staples. Using a regular stapler, you can staple stacks of paper, and building paper - several layers of thin materials. Their principle of operation is the same, but they have fundamental differences and are used in different cases. To understand the features of the instrument, it is necessary to study the principle of operation of the mechanisms.
Operating conditions
Using the stapler is very simple: you just need to direct it to the material that needs to be fixed on the selected surface and pull the trigger. In this case, the tool must be pressed tightly to the object. The powered mechanism will drive the bracket in and lock it in place. The characteristic impact sound will be heard clearly. That's the whole principle of action in a nutshell. There is no particular recoil during the "shot", but one should take into account the force with which the mechanism drives the fastening element into the material.
The main difference between a construction stapler and a conventional one is the power of the mechanism. The building model is able to drive the bracket even into a tree. It is with the help of such powerful tools that they fix the upholstery of sofas, as well as fix the plastic film on the wooden frames of greenhouses.
Varieties of the instrument
On the construction market, you can find several types of staplers, which have their own characteristics and principle of operation. Let's consider them.

- The mechanical stapler is the most recognizable standard stapler. It is capable of driving staples thanks to a powerful spring that is triggered by a trigger. It has a simple design with three main parts - body, trigger and feed mechanism. It is quite easy to understand the details, although there are riveted models that are difficult to assemble after disassembly or cleaning. One of the drawbacks is the slow operation of the tool, because the force of the hands must be used to bring the mechanism into working condition. For small volumes of work, this is the best option, the cheapest and easiest of all types.
- The pneumatic stapler clogs the staples using air pressure. The compressor helps make incredibly powerful shots of staples. This tool can punch through almost any type of wood. It costs more than a mechanical one, weighs several times more, but is able to drive in a huge number of staples in a short period of time.
- The electric stapler is a professional tool. Can be powered by mains or battery. Able to drive a huge number of staples without interruption for a long time or until the block ends. The design is slightly lighter than the pneumatic model. Penetrates any type of wood and is mainly used in furniture manufacturing. Most expensive instrument in the category.
Each type of stapler has a safety device designed to prevent accidental shots of the staple out of operation.
Maintenance and repair
Each type of stapler has a block of staples that is fixed inside or outside the tool. After the stock of staples runs out, the block must be replaced with a full one. All models have easy access to the unit and instructions for correct replacement.
If a blockage or breakage occurs, the easiest way to understand is a mechanical stapler. Such a mechanism can be repaired by simply replacing a few screws in the structure or by changing a part. The case is very easy to assemble and disassemble.
Electric and pneumatic staplers are subject to exclusively warranty or professional repair and maintenance due to the complexity and design features. A person who does not have the skills and experience in repairing special equipment will not be able to repair it on his own or at least determine the cause of the breakdown.
Use in everyday life and production
A power tool is best suited for household chores. With the help of it we can easily repair furniture upholstery or we can fasten several layers of thin materials. It is also very convenient to use it when building a greenhouse to fix the film on a wooden frame.
In construction, a pneumatic stapler is most often used. The large block of staples that this type of tool possesses is great for quickly securing wood sheet materials. It can be used for riveting fiberboard, plywood and soft plastic, as well as some types of siding. Occasionally used in the installation of roof coverings.
The electric stapler is an extremely professional tool that is used to fix upholstery materials in furniture production. This type of stapler is too expensive and powerful for home use. Great for uninterrupted hours of operation from the network.
I would like to emphasize that no matter what stapler you choose, pay attention to its equipment, with which the tool works. Indeed, thanks to its standard size, you will find out the real purpose of this product.

A construction stapler is a functional tool with which you can fasten various elements together. Such devices are now produced in various types and modifications, so it can be difficult to choose the only correct option.
Varieties of staplers
Before you go to the store for this tool, you should clearly assess the purpose of its purchase and the parameters that should be present in the device. Only after that in the presented assortment it will be possible to choose what is needed.
Manual stapler
This is a device that works mechanically, that is, to get the bracket out of the device, you need to press the handle and apply some physical force. The main positive quality of this furniture stapler is its autonomy. So, you can work with it even on the street, the performance of the device does not depend at all on the availability of an electrical network.
But, if it is planned to carry out a large amount of work, then this will require considerable expenditures not only of time and effort. It can be concluded that this type of furniture stapler is good for home use when solving small tasks.
Electrical appliance
Such a device, in turn, requires an electrical connection or a battery. This furniture tool is already used by professionals for longer work. But, as a rule, an electric stapler has a low impact force and a quick failure of the mechanism.
Pneumatic stapler
For tasks performed on a production scale, pneumatic devices are used, which are faster, stronger and more durable than other options.
The pneumatic stapler is suitable for working with denser materials, for example, it will be indispensable in the process of fixing chipboard sheets to each other.
Choosing the right stapler
Based only on the nature of the future work with a furniture stapler, you can already choose it. For example, for a single change of upholstery on an armchair or sofa at home, a mechanical model is quite suitable. This is due to the fact that for the formation of furniture frames in production, mainly soft types of wood are used and much effort is not required to attach the fabric to them.
If the work is associated with installation on a solid base, then the mechanical option will not help. In this case, an electric stapler will help out. Of course, you can choose a pneumatic tool, but its cost is high, therefore, if you do not need a professional device for constant use, it makes no sense to buy it.
Here are those additional design details that greatly facilitate the use of a mechanical stapler and which you should pay attention to when choosing:
- Transparent compartment for staples. This addition will allow you to monitor the amount of consumables and, if necessary, quickly respond to its end.
- Impact force adjustment to adapt the stapler to any material.
- Stopper on the handle, which will prevent accidental shooting with a staple.
- The presence of a rubber grip on the handle prevents the tool from slipping in the hands.
Selection of staples
For each stapler, you must select the consumable that will ensure the smooth operation of the device. Usually, the types of staples for a particular tool are indicated in the instructions for it. You need to know about the basic parameters of staples for a stapler:
- The depth, which can be varied, is from 4 to 14 mm. They choose it depending on the material with which to work. For example, for upholstering furniture with tapestry, you will need staples 8 mm deep.
- The type of staples must be matched with the brand of the stapler. So, staples of incorrect marking, for example, too small, can cause flying out one after another during operation or jamming of the tool.
Do not replace the staples specified in the instructions for the stapler with others. In appearance, they may be the same, but the geometry, imperceptible to the eyes, may well differ, which will contribute to the failure of the unit.
Working with a mechanical stapler
To learn how to carry out repair work with a construction stapler, you need to know about the basic rules of this process.
Charging the device
Before starting to carry out, for example, the upholstery of a sofa, it is worth learning how to charge the stapler. This is done step by step according to the following algorithm:
- Installing the device on a fuse.
- Folds out the flap at the back of the stapler, behind which is the staple compartment.
- Pulling the rod with a spring out of the compartment.
- Install the staples with the folded upper part towards the stapler handle.
- Releasing the rod to clamp them.
- Swinging the sash until it clicks and starting work.
Some models have a different mechanism and therefore many people think about how to refuel them. There is nothing complicated here either, just take out the special groove that appears when you press the button. The staples are installed in it with the sharp ends down. After the filled element is inserted back.
We attach the brackets to the base
After clarifying the charging instructions, it will not be superfluous to learn how to use the stapler during direct work.
This is done like this:
- The materials for fixing and the instrument itself are prepared.
- Mark the line along which the fastening of the staples will go. This makes it easier to mount the fasteners exactly in the place where you plan.
- The stapler is applied in the right place quite tightly.
- Without lifting the device from the surface, press the lever.
- After that, if done correctly, a characteristic sound will be heard, and the bracket will securely attach to the base.
To ensure safety in the process of working with a furniture stapler, the following recommendations must be observed:
- Before fixing the staples with a mechanical stapler, adjust it on an unnecessary piece of material. To do this, after the shot, they look to see if the bracket has completely entered the base. If so, you can start working right away. If not, then you will have to turn the screw mechanism from minimum to maximum in order to achieve a good position.
- When working, be sure to hold the material to avoid displacement with your free hand.
- After the end of the work, the handle must be put on a safety lock to avoid accidental pressing and operation of the device.
The construction stapler allows you to fix any material on the surface of the furniture in the shortest possible time. The tips from this article will help you choose the right tool and correctly approach working with it.
The furniture stapler is widely used in the household, with its help you can easily nail down the greenhouse film, cover the furniture with fabric, and it will also come in handy in other situations. The variety of models will baffle the uninformed person, so in this article you will find useful tips on choosing how to use it, which braces are suitable for which models.
Home staplers on sale are presented extensively, the first thing you need to pay attention to is the type of staple. The most popular and frequently used type of staple is type 53. Most of the models use exactly type 53. This type has the following dimensions: staple width 11.4 mm, thickness - 0.7 mm. Of course, you don't need to know these sizes, you just need to know on which brackets your "pigal" works, their type.
The second is how deep the staples can be driven.
Furniture pistols are simple (staples 4-8 mm deep, inexpensive). Most often made of plastic, intended for infrequent use. Only small staples are used, so they can only nail fabric or paper. Cheap and unpretentious, the price is about 100 rubles. Like these ones.

There are also options 4-10 (staples from 4 to 10 mm inclusive). Such pistols are already made of metal, although there is no adjusting screw. Yes, however, and to nothing, staples of 10 mm can be hammered in without maximum adjustment. Typically type 53 staples are used.
Staplers 4-14 mm (the very first photo in the article). Most popular and best selling. Made of metal, solid, high quality.
Use staples 4-14 mm deep with 53 types. The main difference from others is the presence of an adjusting screw, with which you can increase or decrease the impact force. As a rule, if the bracket is more than 10 mm deep, then the screw must be tightened in the direction of increasing the impact force, otherwise the bracket will not completely enter the tree. A wide range of staple sizes (4,6,8,10,12,14 mm) will allow you to choose the optimal depth for the job. Of the good models, one can single out the firm "Zubr" - reliable and high-quality, the price is 330 rubles.
Also from household models it is necessary to single out a model with a staple type 140. It is thicker, has dimensions: width 10.6 mm and thickness 1.2 mm. If you load Type 53 staples into a Type 140 stapler, it will shoot 2 staples at once. Therefore, it is so necessary to know the type on which the "pigal" works. Most often, pistols with type 140 support several types of staples, these are small nails and semicircular staples for driving a cable. We can say that this is a universal option, which is a pleasure to work with. However, it does not support the most popular type 53 bracket. The Stayer stapler shown in the photo below supports 4 types of staples: type 140, type 300, type 500 and type 36. Its price is 650 rubles. 
Staple type 53
Most used, used in most staplers. 
Rectangular
Staple width 11.4 mm
Thickness 0.7 mm.
Dimensions (depth) 4-14 mm.
Sold in packs of 1000
There are 2 types: hardened (hard) and simple. Hardened are used for sturdy or glued wood (chipboard). Conventional staples are 2 times cheaper, they are designed for soft wood.
Type 140

Powerful, thick staples are also used to attach material to wood, plywood, chipboard.
Rectangular bracket.
Width - 10.6 mm
Thickness - 1.2 mm
Dimensions 4-14 mm
Packs of 1000 pieces.
The cost is higher than 53 types of staples.
Type 36

Semicircular cable fixing brackets.
Bracket width - 7.6 mm (you can pin a cable with a diameter of no more than 6.4 mm)
Thickness - 1.2 mm
Sizes - 10, 12.14 mm
Type 300

Small carnations with a T-shaped head. They are used for fastening to wood, duner, chipboard.
Nail thickness - 1.2 mm
Sizes - 10, 12 and 14 mm.
Type 500
Carnations without a cap (like finishing ones). Generally similar to Type 300, only the cap is missing.
Dimensions - 10.12, 14 mm.
If you are engaged in furniture production and use the appropriate tool constantly in a hard mode, then ordinary household models will not last long. Therefore, there are professional options for such purposes. The RAPID tool has proven itself very well. This company specializes in the production of only furniture pistols, so they are of excellent quality. However, their cost is rather big, for example. A standard pistol for type 53 staples costs 2,200 rubles. However, according to the reviews of buyers who bought a couple of such models from us, they are very strong. Before that, they bought ordinary household appliances, but they often failed. Therefore, it was decided to buy 1 professional for a trial - he survived 10 conventional staplers. As you can see, the difference is huge. For home use, the usual inexpensive one, for example, the firm "Zubr", is quite enough.
How to insert staples
For those who have picked up a stapler for the first time, this can be a problem. But after the first time, learn right away, nothing complicated. Here's a photo.

First, take out the "staple pusher" with a spring from the pistol, then insert the staples with the tip down and push them with the "springy piece" all the way until it snaps into place.
Preparing the stapler for work
Pull out the latch located at the back of the stapler.
Insert the staples into the groove. The staples must be inserted with the tips down. (NS)
Reinstall the spring gate valve.
The stapler is ready to use.
How to use a stapler
Place the stapler firmly on the surface where you want to drive the staple.
Without lifting the stapler from the surface, press the lever until you hear a characteristic sound. This action will require mechanical effort.
If the staple does not fly out, then it is stuck and you need to get it out by following the 4 steps of preparing the stapler for work.
Ready. The staple is successfully driven.
In order not to be injured by a furniture stapler, it is important to thoroughly understand how to use such a tool. If you are using a mechanical stapler, adjust the screw adjuster first. Adjustment must be made on the rough material, turning the regulator from minimum to maximum. If the fasteners are not included in the material from the first blow, then you will need to adjust your furniture stapler again, and if it does, then you start working on the "clean copy".
To hammer the staples at the desired distance, it is best to mark such places in advance with a pen or pencil. You can also use a lock, which must maintain the same distance when driving in fasteners without preliminary marking.
Do not forget to also hold the material when making shots, so that the material cannot move out when driving the staple. Do not forget to also monitor the presence of braces so as not to be left without them at the most inopportune moment for you.
Secure the handle with a safety catch when not in use. This is due to safety precautions. When you follow these simple recommendations, you can easily cope with the upholstery of a sofa or other necessary task related to a furniture stapler, the price always depends on the type of tool and its manufacturer.
Repair of a construction stapler.