for example, abb busch jaeger, which is best understood by professionals in their field. But there are situations when you need to see the condition of the electrical panel. For example, when you buy an apartment. So, how is an electrical panel revision done?
Your task is to check the electrical panel, fix all the shortcomings. For example, you bought a house, but not everything is in order with the electrician:
- the light works with flashing;
- there are problems with the sockets.
It is required to revise the electrical panel. We can talk about a shield in an apartment or one that is located in a country house. There is also an option with its own section in the switchboard on the floor of an apartment building.
Before checking the shield, lighting must be provided. It is necessary to turn off all machines, including the introductory one. In the course of work, all safety rules must be observed.
Examining the outer part of the shield
Checking the inside
If you open the lid, then dust appears in front of you. It is necessary to remove the casing that protects the elements, wipe it gently. Using dry brushes or brushes, you need to remove dust from the switching devices and all wiring. All cables must be labeled. In this case, the machines must be signed. Anyone opening the device should be clear about how the wires run.
Checking contacts
In the electrical panel, wire connections are divided into three types. These are the connections in which the wires are connected to the housing with protective terminals, as well as the contacts of the terminal blocks. When checking the connections, you must pay attention to the fact that there are no oxidations and traces of rust on the wires at the point of contact. If necessary, it is necessary to disassemble the connection and strip the wire. From the end of the wire, a ring is made a little larger than the bolt in size. Bolted connections must have a washer. In this case, the bolt connection is reinforced with a spring washer. A lock nut is used to strengthen the nut connection.
In addition, it is necessary to check the grounding contact of the shield. For this, the ground wire is removed, it is stripped, the bolt is checked. If necessary, the connection can be reinforced with a second nut. Of course, any quality equipment, such as a busch jaeger, should be checked by specialists. In this case, it will work for a long time.
If you need to find a malfunction of equipment or electrical wiring, one of the operations that is performed first of all is to test the cables and wires with a multimeter (tester) to check the serviceability of the circuit (no breaks in it), the presence of a short circuit and determine its resistance (if necessary ). Thus, it is possible to easily and quickly enough check the lamp, iron, switch, fuse, transformer for serviceability. How to ring the wires with a multimeter correctly will be discussed in this article.
What you need to know about the device to ring the wires
If you plan to ring the wiring in an apartment, you need to know a few fundamentally important facts about multimeters. First of all, it is worth noting that you can check the wire with the simplest device. An inexpensive Chinese model with minimal features is fine.
But at the same time, it is most convenient to use a device that has the dial function itself. In order to set the handle of the device to the appropriate position, it is necessary to turn it in the direction of the diode icon (as an option, an image of a sound wave can be additionally applied). This means that when checking the continuity of the wire, a beep will sound when the contacts are closed.
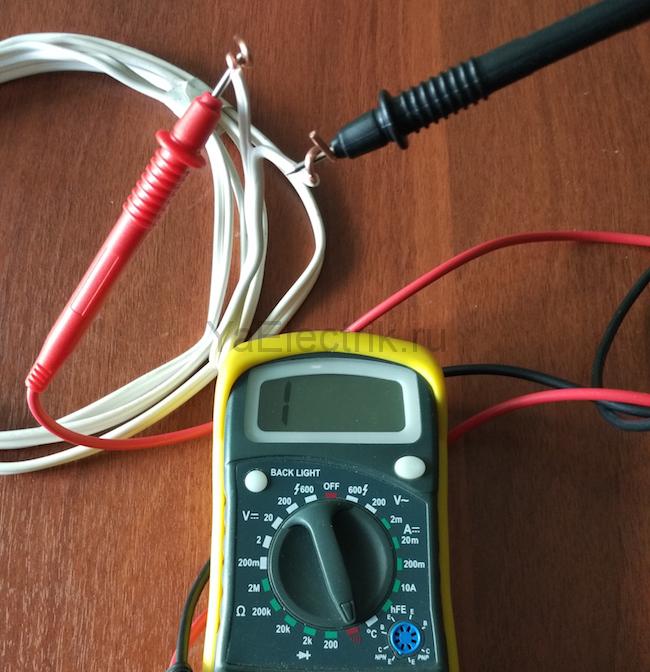
But the presence of a soundtrack is completely optional for the continuity of the wires with a multimeter. An open circuit will be indicated by a unit on the display indicating that the resistance level between the probes is higher than the measurement limit. If there is no damage on the investigated area, the resistance value will be displayed on the screen, which ideally should tend to zero (provided that it works in small household networks).
Sequence of actions when dialing
- Before ringing the circuit with a multimeter, you need to turn the handle of the device to the desired position.
- Install the ends (test leads) into the corresponding sockets. The black wire goes into the socket marked COM (sometimes it can be marked with "*" or the grounding sign), and the red wire goes into the socket where the Ω sign is indicated (sometimes they put the R sign). It should be noted that the Ω sign can be applied both separately and in combination with the designations of other units of measurement (V, mA). This is the correct position of the test leads, which will allow you to maintain polarity during further measurements. Although if only the integrity of the wires is checked, their mutual position will not affect the result obtained.
- Switch on the device. For this, a separate button can be provided, or switching on can occur automatically when the knob is turned to the desired position when selecting the measurement limits or operating mode.
- Close the measuring ends together. If a signal sounds, it means that the device is in good working order and ready to work.
- Take the cable or wire under test (its ends must first be stripped of insulation, stripped to a metallic sheen, dirt and oxides removed from the surface). Touch the test leads to the bare sections of the conductor.
- In case of continuity, a beep will sound, and the meter reading will either be 0 or indicate the resistance value. If the display shows 1 and there is no sound signal, it means that the tested conductor is interrupted.
Safe dialing rules using a multimeter

continuity of the network cable with a multimeter
Working with electricity does not allow unprofessionalism, therefore, there is a certain list of rules that make it possible to make it as accurate, fast and safe as possible.
- It is most convenient to use special tips at the ends of the test leads for continuity, which have received the more common name "crocodiles". They will make the contact stable and free your hands when taking measurements.
- When dialing, always the tested circuit must be previously de-energized (even low-current batteries must be removed). If there are capacitors in the circuit, they must be discharged by shorting. Otherwise, the device will simply burn out during work.
- Before checking the integrity of a long conductor during measurements, it is important not to touch the bare ends with your hands. This is due to the fact that the resulting readings may be incorrect.
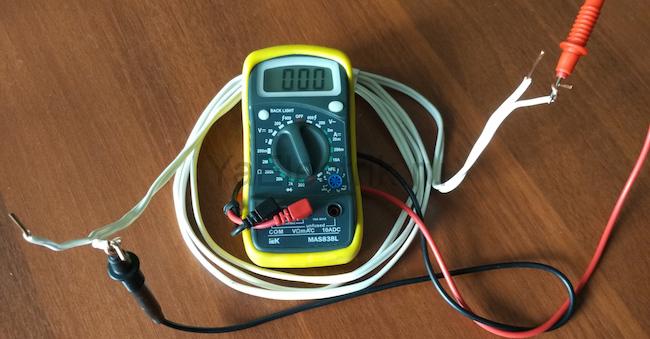
When a multi-core cable is ringing, it is necessary to separate and strip all existing cores from both ends. After that, you need to check the circuit for the presence of short circuits: for this, a "crocodile" is fixed on each core one by one, all the rest are touched with the other measuring end in all possible combinations.
We check if there is a short circuit between the cable cores. If the indicator shows "1" and there is no sound signal, then everything is in order, otherwise there is a short circuit.
In this case, the sound signal will mean the presence of a short circuit between the tested cores. This may not be of practical importance for small multi-conductor cables operating in low current networks, but when working with high voltage it is fundamentally important.
We call the cable cores. There is a sound signal - everything is fine, otherwise the vein is damaged.
To determine the integrity of the cores, the same operation is performed, only at one of the ends of the cable, all the stripped cores are twisted together. When searching for a break, it is important to take into account that the absence of a sound signal at any of the ends will indicate a violation of the integrity of the conductor.
We call the wiring in the apartment with a multimeter
Consider, as an example, a modern apartment in which the wiring is carried out in accordance with current requirements and regulations. This means that when laying the lines for lighting and powering the sockets, they were divorced, and separate wires were laid for each of the rooms for them. Each of these circuits is powered from the apartment panel through a separate circuit breaker.
If the light has disappeared in one of the rooms, first it is worth checking the serviceability of the lamp. Before starting work, it is necessary to de-energize the room / apartment, depending on the power supply scheme. When using an opaque incandescent lamp in a luminaire, it is difficult to visually determine the integrity of the filament, so a multimeter and its continuity function will be required. Let's figure out in stages how to do it correctly.
First, you need to check the flap for the presence of triggered machines. In the first case, they will be in the on position (then the malfunction may be hidden in the room switch, lamp or socket). The likelihood of damage to the wiring in such a situation is small. If the device worked, it will be necessary to check everything except the room switch, including the switchboard itself.
If the machines did not work
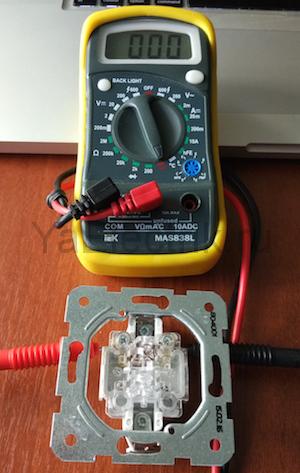
We call the switch. When the switch is on, there should be a sound signal, when it is off - silence and "1" on the indicator.
- Make sure that there is voltage at the input and output of the machine. If it is, you can proceed to further verification.
- Prepare the device for operation and check its serviceability by short-circuiting the measuring ends.
- Unscrew the lamp from the socket.
- With one of the measuring probes touch the base (the metal part of the threaded lamp), and the second touch the central contact of the lamp (the insulated center of the end part of the base).
- A beep and a readout other than 0 or 1 mean that the lamp is working properly. If it is faulty, you need to replace it, which will be the solution to the problem.
- We check the cartridge for serviceability. To do this, you need to disassemble the lamp, make sure that the wires and contacts are intact. If everything is in order, then the cause of the breakdown is not in the cartridge. If faults are found, they must be eliminated. The lamp must not be screwed in yet.
- We check the health of the room switch. To do this, remove the plastic cover, unscrew the screws and take it out of the mounting box. We inspect the equipment for the appearance of carbon deposits, check the tightening of the fasteners. If everything is in order, you need to install the measuring ends of the tester on the contacts of the switch. The appearance of a sound signal when dialing in the on position will indicate that the equipment is in good working order. In this case, the wires do not need to be disconnected.
During such a check, as a rule, a malfunction is revealed, which becomes the cause of all the troubles. Eliminating it allows you to quickly solve the problem.
If the machine is triggered
To ensure electrical safety when carrying out work, in this case, the voltage is turned off using a general apartment machine. Next, the serviceability of the cartridge and the wires connected to the lamp is determined according to the algorithm described above. In the absence of faults, you need to check the wiring itself using a multimeter and a dial function. Such malfunctions are rare enough, but they still happen, for example, when installing suspended ceilings or decorative elements of the interior.
In this case, the wiring call is performed as follows.
- Using a screwdriver, disconnect the supplied conductor (if the installation is done correctly, it is at the bottom) and take it to the side. The "zero" of this group is, as a rule, on the zero clamp under the machines.
- We unscrew the incandescent lamp from the holder. With the help of a tester, ready for operation, we check the line by connecting one of the measuring probes to "zero", and the other to the disconnected conductor. If the device beeps, then the wiring is short-circuited.
- In this case, in the room under the ceiling above the switch, we find and open the junction box. Disconnect the wires.
- We check all groups of wires for a short circuit.
To determine the section of the circuit in which there is a short circuit, we again check the circuit on the apartment panel with a multimeter. If the signal sounds, it means that it is the wire laid from the shield to the box in the room that needs to be repaired. Otherwise, the search will need to continue until the result is obtained.
Video
From all of the above, we can conclude that having a multimeter with a dial function in the house is an objective necessity for any home craftsman. With such a device, in most cases, it will be possible to quickly eliminate minor malfunctions without seeking help from specialists.
In this article we will consider a very important and interesting topic - how to check the wiring in an apartment or house with our own hands. The need to check the electricians arises in several cases: when buying a new home, during repairs before finishing the walls, in case of malfunctions, and also sometimes after flooding an apartment. If you doubt your abilities and have absolutely no experience in electrical work, we recommend calling a master who can quickly, and most importantly, correctly revise the electrical wiring. However, if you know how to use the tester and at the same time are a regular reader of ours, we recommend that you familiarize yourself with the test method described below.
Initial inspection after purchase
If you just bought a house or apartment, the first step is to check the condition of the wiring, because even the slightest malfunction may subsequently lead to electric shock or fire. In a new and an old house, the revision technology will be different, so we will look at both methods separately. Immediately, we draw your attention to the fact that before checking the wiring, it is imperative to turn off the power in the shield. Work under voltage, especially for inexperienced electricians, is strictly prohibited!
New building
It is most often necessary to check the electrical wiring in a new building after installation after purchase, before a major overhaul - wall decoration and furniture arrangement. The importance of this event lies in the fact that if you do not inspect the cable line from the very beginning, in the future it will be much more difficult to check the wiring under a stretch ceiling or behind drywall sheets.
First of all, you must calculate the total power of the electrical appliances that you will use, on the basis of which and compare this value with the section of the conductor already laid in the walls. If the cross-section is insufficient, be sure to replace the electrics, however, experience shows that such problems do not arise in new buildings.
The next step is to check the condition of the hidden wiring. The insulation should not be damaged, and all wire connections must be made using terminal blocks or other connectors (for example, PPE caps), but not by means of twists. Twisting is prohibited, see the list of permitted connection methods in. PUE clause 2.1.21. It is also important to check the ratings of the sockets. Copper conductors with a cross-section of at least 2.5 mm 2 must go to the socket group, the rating of the circuit breaker of the socket groups should not exceed the rated current of the sockets, usually 16A.
If all of the above requirements are met, the last thing left to do is check the wiring in the apartment for load. In other words, you yourself need to check the correct assembly of the switchboard. When you connect all the equipment and turn on all the lamps in the rooms, the machines should not work. If, then the wiring is not able to withstand the load from the connected electrical appliances, as a result of which you will have to replace the machines, etc. If the machines in the dashboard did not turn off after turning on the load, then the home wiring is correct. It does not hurt to additionally check the reliability of the connection of the machines in the dashboard, as well as the verification of the ratings with the load that comes to them.
Old housing
It is more difficult to check the condition of the electrical wiring in an old house or apartment, especially if you have just bought a house and have no idea how the electrical wiring is done in rooms. So, the audit of the electrical network must be performed according to the following method:
- Find all the junction boxes by room. Opening the lid, you can understand which cable is used for the hidden electrical wiring: aluminum or copper, as well as the cross-section of the wires. You should also immediately check the condition of the insulation - if the wiring is old, even the slightest bend in the cable will cause the insulating layer to crumble or crack. Such wiring must be changed unconditionally. It will be correct (so to speak for breakdown and current leakage). Its resistance must be at least 0.5 MΩ. But not everyone has such a device, so you can “for decency” measure the resistance at least with a multimeter, although this can hardly be called a normal test. If the insulation resistance is poor, leaks will occur and an RCD may trip if you upgrade the electrical panel. It is equally important to immediately inspect all wire connections - there should be no damage or twists, especially aluminum with copper. If necessary, you need to immediately connect the wires with terminal blocks instead of twists. We talked in detail about the apartment building in the corresponding article.

- Check outlets and light switches. In sockets, it is necessary to inspect the integrity of the wires, insulation, and also determine the rating for which they are designed. If three-wire wiring is connected to the outlets, it is imperative to determine where the phase is, where is zero and where is the ground. To do this, you need a multimeter or an indicator screwdriver, and we have provided the technology itself in the corresponding article. Once you determine where the grounding conductor is, it is necessary. We also talked about this in detail. Another very important point - if the socket is installed in a metal socket, it is better to replace it with a more modern, plastic one. As for the light switches, you need to disassemble them yourself and make sure that the phase wire is going to break, and not zero. If before that the unfortunate electrician failed to break zero, you will have to redo the connection, because this option is unsafe - even when replacing a light bulb in a chandelier, you can get an electric shock.

- Examine the lead-in box. It should be equipped with modern machines, and not the plugs that were used in the distant past. Be sure to check that it is installed on the electrical wiring in the bathroom, which will protect against electric shock in case of insulation breakdown, etc. At the same time, please note that the installation of an RCD in a two-wire wiring () is prohibited according to the PUE clause 1.7.80 (see). Also check the quality of all connections and the cross-section of the lead-in cable. If the cross-section is insufficient, replace the cable with a more suitable one.

- When all the most important nodes have been analyzed, it remains to check the old wiring for load, as we described above. As experience shows, in old private houses and apartments you cannot do without replacing the electrics, but you can wait for some time (for example, before repairs), just do not turn on many powerful electrical appliances at once.
You should also talk about a special device with which you can check the correctness of the wiring - a megohmmeter:
Video: a technique for professional diagnostics of an electrical network
That's the whole technology of checking old and new home wiring. As you can see, it is not very difficult to make a revision, but it will take enough time! We draw your attention to the fact that in your house or apartment you need to check the condition of the electrical wiring about once a year. All you have to do is tighten the screws on the wire clamps, and also visually see if there is any burnt insulation.
What else is important to know
Sometimes it's not enough just to check the electrician and replace all the inappropriate wiring yourself. Sometimes, for example, after flooding an apartment, you need to check the network for a short circuit. For this, it is best to use a special tester - a multimeter. We have described in sufficient detail in the corresponding article.
I would also like to separately note that during the audit of the electrical wiring, you need to pay attention to the convenience of the location of the sockets and switches, because after the repair it will not be entirely logical to rearrange them. It seems to be a simple moment, but many people miss it.
That's all I wanted to tell you about how to check the wiring in an apartment and house with your own hands. We hope that the provided methodology was clear and useful for you. Do not forget to rate the article and share information with your friends!
A switchboard is a collection of several devices. In its design and production, a rational approach and the best technical solutions are required to ensure the reliability of the operation of both components and the entire product. The assembly of electrical panels is carried out by experienced specialists. Nevertheless, it is important for the consumer to know what to be guided by when checking the quality of the purchased equipment.
Upon completion of manufacture, the low-voltage electrical panel must comply with standards, design acceptability (drawings, diagrams, special conditions), manufacturer's installation instructions, manufacturer's internal instructions.
Let's take a closer look at the process of assessing the quality of the assembly of an electrical panel.
First, carry out a comprehensive check, including a survey of electrical wiring, as well as a test of the operation of electrical equipment.
At this stage, it is necessary to confirm the compliance of the manufactured panel with the drawings, specifications, diagrams (that is, check the quantity, type and nominal characteristics of the equipment), the compliance of the wiring (connections of power and secondary circuits). You also need to make sure the quality of the wiring (wire cross-section, crimping and tightening), check the marking of wires and equipment.
Next, you should inspect the equipment with a check:
- air gaps and paths of creepage currents at the points of connection of wires and buses;
- the degree of protection, that is, make sure that there are elements providing such protection in accordance with the requirements (cover, oil seals, front panels, etc.), in the absence of damage to the casing (cuts, drilling, etc.) that reduce the degree protection;
- availability of a manufacturer's nameplate or technical documentation, which indicates the manufacturer's name, contract number and all technical characteristics related to the switchboard (voltage, current, neutral mode, short-circuit current, degree of protection, personnel protection equipment, dimensions and weight of the switchboard, etc.) .);
- the work of the electrical part, which includes inspection of the wiring and checking the functionality of the switchboard (relay protection equipment, instrumentation, mechanical and electrical interlocks, etc.).
Secondly, carry out an insulation test. To do this, connect all devices, except those that are not designed for test voltage. For a switchboard with a rated operating voltage of 230/400 V, a test voltage of 2500 V / 50 Hz must be applied for 5 seconds: between all live parts and interconnected open current-carrying parts of the switchboard, between each pole and all other poles connected during this test to the interconnected open conductive parts of the board.
The test is considered satisfactory if no breakdown or arcing has occurred between the various parts under test. If the switchboard is not subjected to the dielectric strength test, it is necessary to measure the insulation resistance using an insulation resistance tester at a voltage of at least 500 VDC. The minimum value for the insulation resistance must be 1,000 Ohm / V.
Third, evaluate the remedies. It is necessary to check the presence of screens to protect against direct and indirect contact with live parts, visually check the presence of contact washers in the connecting nodes; the presence of an earthing conductor on doors with electrical equipment and the presence of a PE conductor.
In order for the electrical panel to meet the above requirements for workmanship, the following conditions must be observed during its production:
- the shield must be installed evenly in the horizontal and vertical planes;
- the meter window should be located at a certain height from the level of the finished floor;
- built-in shields must be recessed to the full depth in a previously prepared niche, unless otherwise specified;
- panels for surface mounting can be used for semi-recessed mounting, while it should protrude equally from under the finish along the entire perimeter;
- the cross-section of conductors from the input machine to metering devices (meter, current transformer, etc.) or distribution (cross-module, bus, etc.) must be no less than the cross-section of the input cable, but if there is an input machine with a lower rated current in the switchboard, than the input cable can pass through the current, it is permissible to reduce the cross-section of the conductors after the input machine, while the cross-section of the conductors is selected according to the rated current of the machine (the same rule applies to the connection of internal machines in the switchboard);
- powering of group machines should be performed in an optimal way, with a minimum use of buses, jumpers and wire breaks, since the more connections there are, the higher the probability of failure on one of them;
- if there is no distribution bus, then the devices can be powered with a wire jumper of the appropriate diameter, while the jumper must be continuous;
- cutting and laying of supply and outgoing wires and cables should take up a minimum of space and provide a maximum free gap between the machines and the side / front walls of the switchboard, while providing an easy visual identification of the conductors and their connection points; the main place for placing outgoing conductors is the free space under the panel DIN rails;
- when powering 1-phase loads from 380 V, it is possible to distribute the load and the machines evenly in phases and power each resulting group of machines from its phase, while the use of a 3-phase distribution comb is not required; this is very important if the length of the DIN rail is less than 9-12 modules, in this case, the most powerful consumers are powered first, then the less powerful ones;
- the cross-section of the grounding shield of the conductor (from the ground loop to the GZSh - the main grounding bus) must be not less than the cross-section of the input cable and in any case must not be less than 6 sq. mm for copper;
- in the metering and distribution boards, it should be possible to seal the input machine (for example, by placing the input machine in a separate box);
- the body of the metal shield must have direct contact with the PE bus;
- the length of the connected conductors must ensure the possibility of their reconnection, that is, have a margin of length;
- it must be possible to quickly and easily change machines and other equipment;
- bundles of wires and their cores must be connected and securely fixed inside the shield; it is desirable to form bundles according to the type of conductors (phases, zeros, etc.);
- if possible, all bends of the conductors should be at 90 ° angles and with a bend radius of at least five conductor diameters;
- N and PE buses should not interfere with the input of supply and outgoing conductors, these buses should have the maximum free access for additional connections or repair work;
- the color marking of the conductors must be provided in accordance with the PUE, it is allowed to wiring with white conductors with mandatory color marking of the phase, zero and protective (grounding) conductors at the ends;
- it is allowed to connect several (up to 4 pieces with a cross-section of up to 2.5 sq. mm) outgoing conductors into one machine (or RCD), while the conductors must be twisted;
- it is allowed to clamp several conductors with the same cross-section under one bus screw zero (N) or earth (PE), while the conductors must be twisted and ensure their reliable contact;
- all stranded conductors before connection must be either soldered or terminated with ferrules;
- all lugs in the shield must be carefully pressed and their shanks insulated with cotton tape;
- it is allowed to connect single-core conductors without a tip for a screw, but always with a “ring” for a nut and washer; stranded conductors must be connected only through a lug or terminal connection;
- if the input is carried out by single conductors into the shield, then they must be additionally protected from damage to the insulation by a PVC pipe or a piece of rigid PVC pipe.
After assembling the shield, the numbering of the machines and other modular equipment must be carried out and a table of correspondence between the apparatus and its purpose must be drawn up (name of the protected circuit, its parameters, etc.). Numbering is carried out from left to right and from top to bottom.
The final check of the correct assembly of the panel is carried out by testing all outgoing circuits with a load (for example, a light bulb). Circuits that are also protected by an RCD (or differential machine) must be tested with a more powerful load, for example, a hammer drill. All RCDs and differential circuit breakers must be triggered when the TEST button is pressed.
Finally, clean the inside of the shield, check for markings on the shield, check the exterior for scratches, the condition of the paintwork, etc.
Materials provided by HC "URALELEKTROTEKHNIKA"
Full or partial reprint of materials - only with the written permission of the publisher!
An unscheduled shutdown of electrical machines is a problem faced by almost every resident of an apartment and a private house, the owner of a summer house, a country cottage. Most often, traffic jams fly out due to surges in the power supply network, short-term current overloads after turning on powerful household or building appliances, short circuits. In order to restore the power supply, it is necessary to determine the reasons for the shutdown, start the electrical machine.
Knocked out the light in the apartment: what to do
Before you climb into the switchboard yourself, you need to figure out the reasons for the shutdown. So, if there is no light in the whole house and neighboring ones, then problems at the power plant, rolling power outages could become the reason for the shutdown. In this case, disconnect all electrical household appliances from the sockets (so that it does not burn out when high voltage is applied), and wait for the restoration of the power supply. If you live in an apartment building of the post-war years of the twentieth century, (for example, in Khrushchev), then, most likely, safety plugs have been knocked out in your apartment or electrical panel on the site.

In order to return the power supply, you must:
- Exit to the landing;
- Open the electrical panel;
- Determine which of the plugs has flown out (this can be done visually: the white button on the black round plug will stick out from the body by a few cm);
- Press the white button into the fuse body.
New electrical machines may be installed at some sites. If the pedals of the machine are down, then the plugs are knocked out. In order to return the light, it is necessary to move the pedals to the upper position.
What is it for and how to turn off the electricity in the apartment
When carrying out any electrical work, long-term departure of the owners or the occurrence of potentially dangerous situations related to the quality of the wiring, the apartment must be de-energized. This can be done from the landing.
So, in order to turn off the electricity in the apartment, you must follow these recommendations:
- If the plugs in the vending machine are old, ceramic, without buttons, to de-energize the apartment, it will be enough to simply unscrew them;
- If the traffic jams on the site are black, with buttons, you must press the small red buttons on all of them;
- If there is a new machine on the site, in order to de-energize the apartment, you will need to lower its pedals down.
After that, you need to check whether you have disabled your machine. Otherwise, during the repair work, you can be badly damaged.
Rather and it will be easier to control the shutdown using a special indicator screwdriver.
It is simple to work with such a tool: you just need to insert a screwdriver into an outlet and check whether the indicator on the tool lights up. If yes, then the apartment is not de-energized. Any outlet in your apartment is suitable for such a check.
How to de-energize an apartment from a staircase
Several groups of switches can be located in the apartment panel. One group can be responsible for the light in the rooms, the other for the current in the sockets. In order to de-energize the apartment in this case, it will be necessary to move all the machine's toggle switches to the lower position or find a common switch to which the phase and zero are connected. It is this switch that is responsible for bringing the electrics into the apartment. Such a switch is located under your group in the electrical panel.
In old houses, in addition to the main machine, it is necessary to turn off the switch, which is responsible for zero.
There is such a switch in the bottom panel. There are often two such switches on a standard staircase. You can logically determine which of them belongs to your apartment: the one that is closer to your apartment will be your switch.

In this case, it is necessary:
- Always check whether the apartment has been de-energized (voltage at sockets) using an indicator screwdriver;
- Warn neighbors about possible outages;
- Disconnect household appliances from the outlet that require delicate handling (computer, refrigerator, washing machine);
- Do not touch the plugs in case of faults in the electricity meter: a broken electricity meter can be misleading, showing that electricity is not supplied;
- To continue repairs that require electricity, it is necessary to use special carrying cords with sockets connected to the vending machine wires. At the same time, such manipulations should not be carried out without a specialist.
In order that, if necessary, you can quickly find and turn off your machine, you can sign it. So, above the working group with a marker, you can write the apartment number.
Several ways to open the flap in the entrance without a key
The electrical panel is made of refractory material, is located at the entrance and, often, consists of two or three sections responsible for the machine, light metering devices and devices operating from weak currents. Each section has its own door, which can be locked with a key. This key can be held by the electrician who maintains the house, the concierge. Often, duplicates are removed from the main key, which are issued for each apartment. This is done so that, in case of unforeseen situations, residents can quickly react and not wait for an electrician. But what if the key was not given to you?
There are several ways to open the electrical panel without a key:
- If the flap is protected by built-in small locks (like on mailboxes), you can use a female hairpin to open them. To do this, insert the pin with one leg into the upper part of the lock, the other into the lower one, and try to turn the mechanism. Any other thin but durable object can be used instead of a hairpin. The main thing is to act carefully so as not to break the object in the lock.
- Simple mechanisms can be opened with a flat screwdriver. To do this, insert a screwdriver into the lock and turn it to the right.
- Padlocks can be opened with a crowbar or pliers.
Before breaking open the flap, you can contact your neighbors. Often, tenants who have lived in a house for a long time have their own keys. In this case, after an emergency de-energizing the apartment, the flap must be closed. This will keep curious children and adults at home safe from injury.
If the plugs are knocked out, how to turn on the electricity (video)
Blackouts in old houses are a common thing, because the old electrical wiring and the machines themselves are not designed for modern electrical engineering. Therefore, quite often, with the simultaneous inclusion of a large number of electrical appliances, the machines are knocked out. If your light turns off often, then you, like no one else, should know how to quickly turn on the machine. After all, there is not enough time to wait for electricians. Use the above tips and turn on the machines yourself quickly and safely!