The idea of \u200b\u200bhow to start repairing in the apartment, begins to bother the future owners of housing, long before the lucky "treshka" or "double room" was officially framed, and the keys from the entrance door moved from the realtor to new owners. With the purchase of housing in the new building everything is clear, in this case, the best option will make a rough repair of the apartment with your own hands. With housing acquired in the secondary market, the situation is more complicated.
Which option is preferable, capital or cosmetic
It is clear that the decision on which planning the repair of the apartment, where to start and the sequence of work will be based primarily on the condition of the residential premises. To a large extent, the planned scope of work is to pay attention to and where to start repairing the apartment - secondary, depends on the whole range of conditions, including plans for the future, abilities and luck of new owners:
- If the apartment was purchased in a relatively new home, 4-10 years of construction, complete with high-quality steel doors, plastic windows, laptos, but "live" floors, it is possible that it is possible to do with the cosmetic repair of the apartment;
- Purchase an apartment in an intermediary, especially if in residential premises it smells just performed with cosmetic repairs, designed to hide all flaws and problems, will surely require capital alterations of most parts;
- The third option is to buy a very old apartment in which there has been no repair for a long time. In this case, it will be necessary to spend pretty forces and time to identify all the shortcomings and problems.

In the latter case, the decision is obvious, it is necessary to repair an apartment from scratch, easier and more convenient to carry out overhaul of premises before the tenants enter the new apartments. In such a situation, you can move away from the standard sequence of work when repairing an apartment and decide on our own, where to start repair, based on financial capabilities and free time.

Apartment with cosmetic repair, where to get started
The most problematic in terms of planning the stages of the apartment is considered a second case. Not only is the cost of cosmetic repair is automatically included in the cost of purchased housing, the dexterity of the magician will also need, so that, does not break the fresh finish, determine the real state of the most important areas of the room:
- Quality of floor covering, condition and degree of floor base wear;
- Health of pipes of water supply, sewage, heating systems;
- Wiring condition.
For your information! Flooring, floor and wiring enough just to check with your own hands. For revisions and repair of pipes, radiators and sewers, it is best to invite specialists.
As a result of the audit, the answer to the question where to start, and what are the further stages of the renovation of the secondary apartment, become obvious. First of all, repair work is performed in areas, on which the safety and the possibility of using housing depends. Next to make the apartment repairs can be in random order, it is clear that it is best to start with the most dusty and dirty works and finish the painting and decor sticker.

How to organize and start cosmetic repairs
Specialists are recommended when planning the purchase of an apartment in the secondary market to reserve funds for overhaul, even if, at first glance, housing is in a balanced state. If you are lucky with the purchase of an apartment, and there are no urgent problems that require urgent repairs of a capital nature, then you can start with "cosmetics", and a solid reworking of the premises to schedule for a couple of years ahead when funds and time appear.

Cosmetic Repair of a one-room apartment
It is more difficult to plan repairs in the "Oder", there is not enough free space, materials and tools for repairing an apartment is almost nowhere. The cosmetic renewal of the interior has to be done in a situation where time to the star and reflections, where to start repair, almost no left, from day to day tenants will enter new housing.
In this case, repair work in the apartment, which is called, is conducted "from wheels":
In the completion of the work, wooden floors are painted or parquet. If there is no time and the ability to fulfill the cosmetic apartment repair in full, then it is better to start with the restoration of the floor covering.

Even if it was necessary to enter the unrealized apartment with furniture and property, in the future you can always find a couple of free days when you can make repairs in the apartment. Always, at all times the repair of the floor was the most difficult and problematic, so the laying or replacement of the flooring should be done at the first opportunity.
We repair a two-room apartment
Cosmetic procedures in the two-room are much easier, as it is possible, before starting work, transfer furniture and part of things in a free room.
Masters recommend starting repair work in an apartment with a change of two most difficult parts to replace windows and elements of the heating system. In addition to a fairly high price, both parts of the life support system are affected by weather conditions and season.
Therefore, it is necessary to replace radiators or window frames to customize the entire plan for repair work, for example, plan to start a cosmetic repair somewhere at the end of August, during the next vacation. Prices for double-glazed windows and radiators are already beginning to decline, to cold weather, and the central heating system is not yet filled with water.

Already in September, you can start climbing the slopes and paint pipes. On the street is still warm enough to make final repairs in the apartment. If autumn frosts are in time during work, it will still be warm enough to make repairs in a two-room apartment with minimal loss of time.
How to start the overhaul of the problem apartment
Unlike "cosmetics", which is planned, based on the principle - from the dirty to clean, the overhaul of repair must begin with solving the most complex and in-depth problems. For repair work, you can leave for several weeks, it is best to start with early spring, when most of the profile workshops are no longer so much, ahead of the summer, and there is an opportunity to prepare an apartment:
- Solve the problem of obtaining permits, for example, to redecessing the apartment, transfer the meter, installation of individual heating;
- Remove part of furniture, flowers, household appliances for the cottage;
- Stock bags for garbage and coated polyethylene films;
- Purchase materials and tools.
The main thing is necessary to make a step-by-step instruction, if the overhaul in the apartment is made from scratch. The useful list of work will avoid inconsistencies and loss of time, especially if there are several masters at the same time in the apartment.
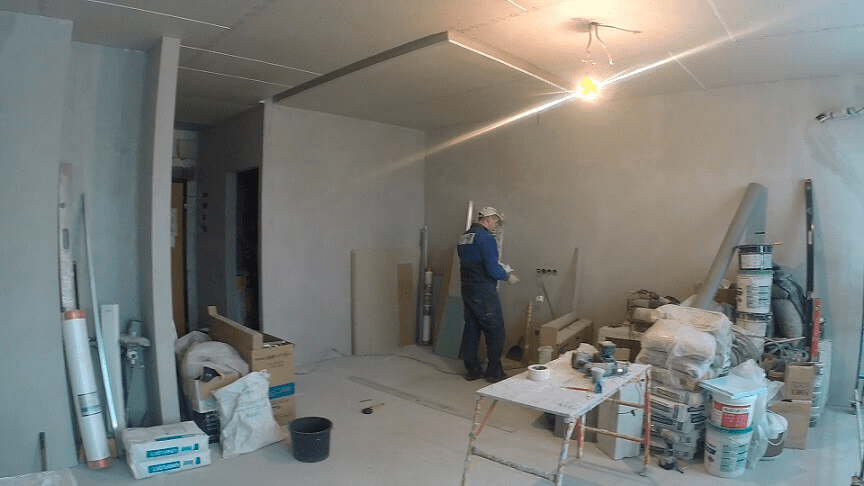
Sequence of repair work
Preparation is completed, permits received, materials purchased, you can begin the process of restoration of the apartment. Traditionally, the overhaul is planned in the following sequence:

Installing interroom doors, laying flooring, installation of luminaires are transferred, as the least urgent, on the final part of the repair. Start the restoration process of the room is necessary with the removal of old trash.
Dismantling of door lutkov, flooring and old plaster
According to the majority of newcomers, it will correct to start the overhaul in the apartment from the installation of capital type entrance doors. It can be armor, metal or double oak doors, anyway, just to have a fairly large opening, at least 90 cm wide, and have good sound insulation.
Outdoor walls are definitely attaching, the internal decoration of the slopes can be transferred at the time of shockting walls. At the same time, you need to start cutting all the doorways inside the apartment, the old wooden frames are dismantled. The opening is tightened with a thick polyethylene film. Before starting plastering, you need to install double-glazed windows.
Transfer of partitions and wall alignment
Further, the dirtiest part of the work is performed - the plaster is cut, the chalk or lime ceiling whitewashes. The flooring is removed to the concrete base, wooden floors disassemble and removed from the apartment.
If the work plan provides for the transfer of partitions, the next step is the layout of the hypotoblock or drywall of new wall structures. First of all, plumbing is removed in the bathroom, the pipes and sewage pipes change. Next, it is leveled to the finish of the surface of the walls in the toilet, in the bathroom and in the kitchen. You can invite masters to the laying of new communications, but for now you need to start working with plastered walls and the ceiling in apartment buildings.
Unexpected problems
Capital work related to the use of perforator, grinding machines, drills, any other "noisy" power tools must be performed only during the daytime.
Any repair work can be performed from 8-00 to 20-00. In some cases, the order by the municipal authorities is prohibited to work with a high noise tool from 13-00 to 15-00, so it will be useful to first know when and how many repairs can be made in the apartment so as not to get into the conflict situation with neighbors.
Laying new electrical wiring
As soon as the process of aligning the walls of the plaster plaster is completed, you can start the wiring laying. If the apartment does not plan to transfer the counter, the channels are immediately cut, the electrical wiring is made, the installation of conversion and conclusions for lamps. In the case of transferring the counter, the wiring is displayed to a new installation site, the connection and check can be started only after filling the instrument.

Simultaneously with the styling of the wiring, you can start finishing the bathroom and kitchen, first of all the walls, then the floor and the ceiling. At the same time installed plumbing. Before starting the repair of the floor, work in the kitchen-toilet must be fully completed.
Installation of doors and floor repair
As soon as the walls and ceiling turn out to be ready for finishing - painting or pasting with wallpaper, you can start repairing the floor. Most often on concrete laminate or parquet stove is stacked, but you can collect a real wooden floor. Outdoor coating is ground, dried and covered with a film.

At the next stage of repair, the logs of interior doors are collected. The doors themselves are not yet valid, the platbands are not nailed until the walls of the walls and the ceiling are finished.
The final stage of repair
The final stage of repair can be started with setting out rosettes, switches, lamps, window fittings adjustment. If the floor assumes painting or varnishing, you will need to install a fortification fan, otherwise the drying process will delay for several days.

Having gathered to make serious repairs in a separate room or apartment as a whole, you should draw up a full work plan and estimates, including such items as dismantling of old equipment (batteries, window sills, lamps, switches). If there is a replacement of windows and doors - turn on the list of work and removal of construction debris. In most cases, this is a significant article of spending, especially in an apartment building within the city.
It is very important to identify the real scope of work and relate them to their financial capabilities. It is extremely undesirable to make adjustments after the start of repair and finishing works - for example, after painting the walls, they wish parquet instead of laminate instead of laminate or instead of decorative plaster stuck wallpaper. Therefore, all design and design decisions must be taken before the start of repair work. Redoing consignable, long and sometimes impossible.
Why start repairing the room?
Having coped with the preparatory process and being in front of bare encouraged walls, you still do not fully imagine all the volume of upcoming costs and works. However, it is already possible to navigate where and what will be, which colors are optimal in a particular room and where the computer, TV and other electrical equipment will be installed. We definitely pay attention to the location of the windows and the need for additional lighting rooms. What for? Because starting repair follows from the equipment or re-equipment of the electrical network, including the location of the lamps - the main and additional.
It is necessary to do in old apartments that are repaired completely and in new buildings. It's no secret that in new homes, the wiring is mounted without taking into account the wishes of the owner. Each Novosel has invariably arise a desire to make the most accommodating housing for their needs. The abundance of electrical equipment requires an optimized powerful power grid with many branches. Very uncomfortable in the new apartment to unwind all sorts of extension cords and install additional outlets.
In parallel with the electrical network, mount the air conditioning system and the elements of the fastening of the heating network devices. It is also necessary to perform work, requiring loaves, drills, cutting of grooves, fines, recesses and other ugly walls, gender and ceiling, accompanied by the formation of dust and fragments of bricks, concrete and gypsum. Then calmly clean the garbage and proceed to the preparation of the foundation of the future floor. Here are some options:
- installing a draft millet;
- pouring a concrete screed;
- preparation for the installation of a warm floor;
What's next?
The next stage of repair work concerns windows. If replacement is required - change. If the windows are already installed and satisfy your request, then this stage is missing, without forgetting to inspect the state of slopes, the presence of thermal insulation, the sealing of the slots. It is worth checking how the flaps are open and closed, there is no distortion, what are the vertical and horizontal levels. It is very difficult to eliminate these seemingly obvious disadvantages after plastering and painting walls or sticking wallpaper. Internal window sills are also desirable to install. Polyethylene film will help protect them from splashing and putty.
Of course, this work can be done later, when installing interior doors, but this option is more practical.
If the wall room requires additional leveling and a significant amount of work before painting, then calculate the total number of building mixtures required for the processing of all walls to be repaired. Building materials, despite the high cost, should always be taken with a slight margin. It is very inconvenient to run for a bag-two putty, which, as a rule, ends in the most inappropriate and responsible moment.
Sequence of work on repair and decoration of the room: Frequent questions
What is first: band screed or plaster / putty wall?
The answer to this question is unequivocal - before starting the walls of the walls, it is necessary to finish all the preparatory work with the floor. It should be ready, after cleaning, to the installation of decorative flooring.
Floor coating is mounted last, be it laminate, parquet or bulk floor with 3 D effect. The prepared base of the floor is closed by cardboard or film - it will make it easy to remove traces of plaster works, and such arise inevitably.
Prior to the start of putty-plaster work, it is necessary to finish all manipulations with plasterboard, if any. All partitions, niches, decorative and functional parts must be made before the "wet" phase of the finish. All the works of this kind, including the ceiling leveling, must be performed in one technological cycle, so as not to return to them, remembering, for example, that "somewhere here" a niche for storing a ski or installation of a safe.
What at first: floor covering or installation of doors?
Outdoor coverage of any type should be formed before installing interroom doors. This will help to avoid mistakes when they are installed and achieve a minimum gap between the threshold or the floor plane and the door sash. Installation of the door - the work is clean and accurate, not requiring the use of solutions, glue or other substances capable of blurred clean floor. The tools used to damage it at the same time, with neat work, not in a position.
But it concerns the doors directly. The door frame can be put before - before aligning the walls. This will allow you to remove all the gaps and irregularities near the opening. If the walls and openings are originally perfect, you can postpone the installation of the box for later. In case of early installation box, it is important to take into account the height of the future flooring!
What is first: glue wallpaper or laying a laminate (parquet, carpet)?
The wallpaper of any type on the prepared walls are glued before the start of work on laying the decorative flooring. This is true for painting walls.
True, on this issue there are different opinions. Supporters of the second option respond to this question as well as the question that first: paint the ceiling or glue the ceiling plinth. According to their position, the wallpaper is glued after installing the floor and the ceiling plinth, because it is possible to replace the walls of the walls at any time, not the touched plinths neither from below. And the edges of the wallpaper just just cut into the level of the plinth.
Painting the ceiling is made after installing the upper plinth. In this case, it is very convenient to eliminate all the irregularities and loosenness of the connection, and then the plinth and the ceiling are painted in one intake and look monolithically.
What is first: stretch ceiling or wallpaper / painting?
The specificity of the stretch ceilings allows them to install them at the final stage of the repair work, after painting the walls and sticking wallpaper. This work is very clean, and damage the walls or the floor when it is fully difficult.
The principle of the priority of work "top-down" in this case does not work. It concerns mostly traditional repair work. New technologists make their own adjustments. Specialists who mounted stretch ceilings are recommended to invite them by the end of repair.
If you make a short list of sequence of repair work in the room, it will look like it will be in this way:
- wiring;
- heating and air conditioning system;
- preparation of floor base;
- dismantling / installation of windows;
- preparation of walls under wallpaper or painting;
- ceiling (all works);
- painting of walls or pasting wallpaper;
- finishing floor;
- installation of doors;
- thresholds and outdoor plinth;
- stretch ceiling.
This order is not an axiom. Each master chooses the sequence that is convenient to him. But in general, the order looks like this.
How to paint the ceiling without divorce? What are the reasons for stains and divorces and how to fix it?
What is the height of the outlet and switches?
How to close a hole in the wall?
How to remove old wallpaper from the walls?
www.domfront.ru.
Repair in the room: Why start?
The very first thing to be done before starting repairs in any room is to understand what we want to achieve as a result.
Ask yourself a few questions:
- How should the room look like after repair?
- What would I want to leave unchanged?
- What does not suit first and require changes?
- What wishes regarding the view of the room have people who will use it (for example, other family members)?
- Need overhaul or will be enough cosmetic?
Think over the details the appearance of the room can be independently. If it is difficult, you will have to turn to a professional designer. This stage should not be postponed for later, they say, let's start repair, and then let's see what happens. From what we want to see the room depends a lot - from the choice of materials before performing the most different types of work. It is better to think about everything in advance than redoing.
Stage of preparation
So, the future view of the room is thought out. Before starting any manipulations in the room, you need to take the following steps.
- Sewage as you can live a sequence of repair work.
- Explore the information about the materials you plan to use, and about all the types of work you are going to do yourself.
- Select the start and end of the repair date, highlight the preparation time. It is necessary in order for the goal to be clearly defined, and the repair did not delay in long months.
- Calculate the number of necessary construction and finishing materials.
- Choose and buy all building materials and tools that you need throughout the repair.
- Decide to those who will perform repairs. Think whether you will do everything yourself, you will find yourself assistants or still certain types of work trial to hired specialists.
- Book in advance the windows and doors in order not to delay the work due to the fact that you have to expect their manufacture.
- Think about how and where the garbage will be taken. Its in any case will be a lot.
- Note the new location of switches and sockets.
Tip: Building materials should always be bought with a small margin.
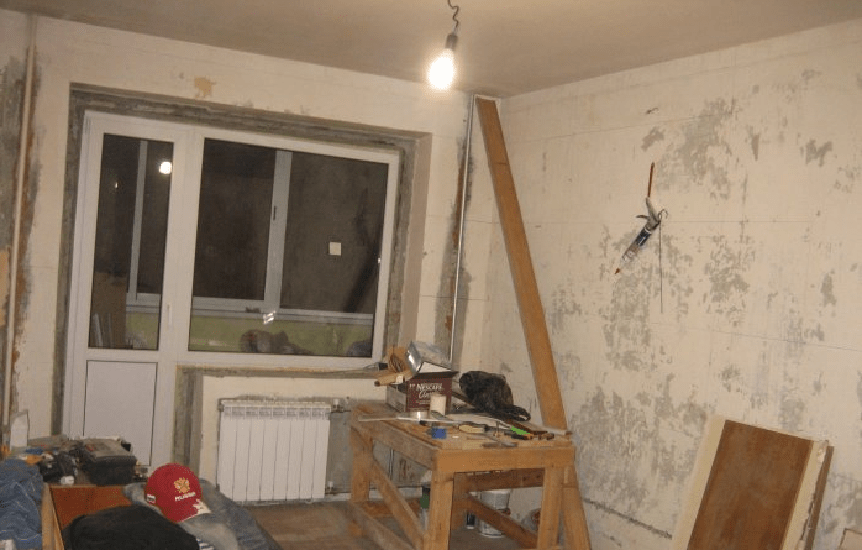
Preparing the room to repair
Consider the option of major repairs in the residential room, involving not only the change of wallpaper, plinths, paint renewal on the ceiling and walls, but also replacing windows, doors, wiring and other large-scale events.
Before starting directly the repair itself, you need:
- free room from furniture and other things - the room must remain absolutely empty;
- to remove from the walls and the ceiling, everything that might be fastened to them, leaving them empty;
- remove old wallpapers, remove the tile, the old floor covering (if the floor remains unchanged, you need to take care of its safety, for which it should be sealing it with a durable film);
- stew door openings wet sheets so that the construction garbage subsequently does not figure out all over the apartment.
- remove the doors;
- remove the old wiring, without forgetting to turn off the power supply;
- disassemble old heating radiators in the event of a solution to replace them.
Sequence of repair work
The room repair plan is made individually depending on which work will be carried out. In order to make it, you need to know where to start. Experts recommend an approximate sequence of actions that it is not necessary to adhere to strictly, but it is necessary to keep in mind.
- It is advisable to start with the replacement of windows, including window blocks, window sills, slopes. After installation, in order to avoid contamination and scratching, the window is necessarily closed with a polyethylene film, the window sills are covered with an organity.
- Electrician changes. Old wiring is already removed, the channels are strokes for a new one. After that, the cable is stacked, and the channels are embarrassed by plaster.
- Installed heating radiators.
- The ceiling and walls are leveled, the floor preparation is carried out (screed, insulation).
- Complete ceiling finishes, up to painting and gluing baguette.
- If parquet or laminate is chosen as an outdoor coating, it is placed after sticking wallpaper. The piece parquet is stacked earlier, cyclically and is covered with the first layer of varnish. After that, the wallpaper must be blocked, and only after the parquet is covered by subsequent layers of varnish.
- New doors are put. You can change windows and window sills not only at the very beginning, but at this stage.
- Wallpaper are glued.
- Pins and platbands are attached.
- Holes for wall shelves, eaves, paintings, paintings, etc. are drilled.
Make repairs in the room from the beginning and to the end - the case is quite a long, time consuming, requiring a variety of skills and skills and, in addition, patience. But arranging furniture in an updated room, you will please with satisfaction that it cost.
mr-Build.ru.
Where to start repairing the apartment and finish it in the shortest possible time
Where to start repairing the apartment so that the repair work does not stretch out for an indefinite period, and the end result would undoubtedly pleased, it is about this and will be discussed in today's article. Repairs in the apartment requires serious preliminary preparation. The most important point is to draw up a detailed plan of future repair, taking into account the smallest nuances. Consider, on points, advice of professionals for the right organization of repair work in homes and apartments.

First of all, you need to determine the complexity and volume of future repair. To make an apartment with a bright and clean, sometimes enough to hold cosmetic, surface repair: replacement of wallpaper, ceiling whitening, change of old linoleum, painting of walls, etc.
If you want to completely get rid of all the annoying and old, solve the overhaul with the replacement of windows, alignment of the walls, installing new floors, modern ceilings. Your house will be transformed and becomes new and beautiful.
Do not refuse to help experienced specialists when conducting overhaul. This is especially true of creating a modern design of your apartment, which includes redevelopment and demolition of some walls and partitions.
Plan repair work based on your financial opportunities.

Decide with interior design and repair plan
First, decide with the interior and design of each individual room that you plan to change in your apartment. You can seek advice to professional designer, which will slightly increase your total financial costs for repairs. For rooms where repairs will be carried out, it is necessary to perform detailed drawings of consecutive steps of repair work.
We recommend performing five detailed repair sketches for each individual room. On the first drawing, display the view of the room from above, and on the other four - each wall. Each drawing will complement a detailed description and a sequential repair work plan, which will avoid omission and inaccuracies in work.
- Think out the location of the furniture. Those walls that will be most likely to get into the eyes need to pay special attention and apply the most high-quality finish.
- Think out where it is best to place lamps and chandeliers so that the light covers the room as much as possible.
- Given the location of household appliances, specify spaces for outlets. To then competently design the installation of electrical wiring in all rooms.
- Consider the location of the main decorative elements: paintings, mosaic, brick wall.
In terms of repair, it is necessary to indicate the desired finish option: walls of walls with wallpaper, painting, etc. To split the room to separate zones, designers recommend one of the walls to paint in different color to emphasize attention on it and visually divide the room. These moments also need to be reflected on the plan.

Determine the sequence of repair rooms
According to the advice of experienced specialists in order to avoid unnecessary dirt and dust during repair work, it is recommended primarily to perform repairs in the rooms most distant from the entrance door. The final stage of repair is desirable to choose a passing room and a corridor through which building materials and tools are constantly rushing. It is necessary to not be swollen or scratching the finish of the already repaired wall, do not damage the new floor.
An additional protection of the repaired room can serve a cellophane film (fixed from the outside of the door), which reliably protect the room from construction dirt, dust, plaster, paint, random damage.

Repair will be made independently or with specialists
Not all repair work should be performed independently. At your request, the fulfillment of all repair work or only the fulfillment of particularly complex repair operations can be entrusted with qualified professionals. First, experience and knowledge will allow them to perform repair work quickly and efficiently. Secondly, you do not have to additionally buy expensive tools, with which the screed tower is perfectly poured onto the floor or a tile is laid out.
Even if you seem easy to install interior door, the slightest inaccuracy is unacceptable here. Of course, hang and arrange kitchen furniture, equalize the walls and make a small color you can independently. But more complex repair work trust the specialists so that you do not have to redo what it can significantly increase your financial costs for repairs.
Make a list of essential materials and tools
#one. After the final choice of design of the appearance of rooms, furniture and interior, it is necessary to make a complete list of the necessary building materials. Their quantity and total cost depends on the volume of repair work and the methods of their conduct. If you allow you to budget, you need to purchase construction materials with a small margin.
# 2. Separately make a list of decor elements: holders, shelves, mirrors, paintings, etc. Start purchases from the selected decor elements. If the planned decor element is in stock, you will be able to quickly change or make a new design version of the apartment.
# 3. Make a list of necessary construction tools to perform repair work. To do this, you can use the advice of the seller-consultant in construction stores or qualified repairman masters.

Counting expenses
When preparatory work was carried out: Plans and sketches of repair were drawn up, the lists of the necessary materials, tools were prepared, the decision was made on the possibility of independent repairs or with the help of repairmen specialists, you can calculate the approximate total cost of the planned repair.
Do not hurry to buy all the materials when visiting the first store. In compiled lists of materials and tools, plunder the prices of different stores, which will allow you to purchase the minimum cost. Carefully treat the selection of repair brigades. Pay special attention not only to the proposed cost of repair work, but also on feedback from your acquaintances on the quality of the implementation of repair services.

Release of premises
To protect furniture from damage, construction dirt and dust, collect it in the central part of the room. After that, thoroughly cover with a plastic film. So you will free access to walls and ceiling. Dear appliances and clothes transfer to other rooms.
Where to start repairing a separate room and what is the order of work
Repair work should be started with the most dusty: replacement of window blocks, window slips and installation of new windowsill. This will avoid dirt and dust while performing painting works when it is forbidden to open the windows to avoid temperature drops and increasing humidity. When windows, slopes and window sills are installed, close them with a polyethylene film or anger to avoid random mechanical damage and contamination.
Make the installation locations of additional sockets, make a liner of electrical wires. At this stage, do not install sockets and do not connect them to the shield.
In the case of applying welding (for example, when replacing heating radiators), perform them simultaneously in different places of the apartment to quickly perform this dusty and complex stage of work, sometimes involving the breakdown of the walls.
Before repaired walls, floors, ceilings, it is necessary to check their condition with a laser or water level. Start working with the drawing of the thick layers of the solution. During their drying, you can do other minor repair work without downtime.
After the completion of this preparatory stage, proceed to the repair work, performing them in such a sequence: repair the ceiling, walls, floor. Initially, work is performed using putty, cement, gypsum mixtures. Then proceed to the installation work on the floor, doors, slopes.
Finishing repair work:
- Casting or coloring ceiling.
- Casting wallpaper or painting walls.
- Installing flooring.
- Installation of plinths, thresholds, platbands.
Video: What you need to know before the start of the repair of the apartment
srbu.ru.
What is it worth starting the repair of the room?
Room after repair
"Do you have a plan, Mr. Fix?". This is a phrase from a very popular cartoon previously. But it lies the answer to many questions. So, if you do not know where to start repairing the room, then think about what you want to do in this room and make a plan of work performed.
The total sequence of work in the room is published on this site, but, in addition to the sequence of all the works that we planned, we need to know if we have a sufficient amount of money for repair. And for this you need at least a primitive estimate for finishing work in the room. How to make a whole estimate for finishing work, you can look at this site.
What materials will be needed for repair in one room
Studio room
So you already know what you want to see your room. Make a simple estimate on the costs of purchasing materials and payment by specialists of those work that you cannot do yourself. How to make a estimate for repair and construction work, you can see here on this site. And now let's just see which materials you need to repair so that you can include them in the estimate.
Plasterboard sheets will be needed, most likely, only for mounting the ceiling, as the installation of plasterboard sheets takes free space, and we do not have much. So you need ceiling plasterboard.
Since drywall is necessary to cling to something, then you will need to make a frame for which CD profiles, UD profiles and fasteners for profiles. For the assembly of the frame and hanging the sheets will be needed dowels and screws. You will also need baguettes.
You may want the ceiling from the MDF panels. In this case, you will need the MDF panels themselves and a decorative plank to transition to the wall. The frame for the MDF panels is usually made from the rails. To do this, they will need rails and again the mounting brackets for fastening the rails. For the assembly of the frame and the entire ceiling will be needed dowels and screws. And to attach the MDF panel to the rake, you will need kleimers.
Laminated floors in the room
For the putty of the walls and the ceiling you will need two types of putty - starting and finishing. Before applying putty on the surface, you need to apply a layer of primer. And in the completion of the putty, it will take paint.
If you decide to inject laminated floors, then it is necessary to prepare a draft floor for them. And this, as a rule, the fill of the screed for which you will need sand and cement, and in order for this screed to be smooth, we need lighthouse profiles. And for the setting of the laminate itself, the substrate will be required, and to complete the floor - plinth.
If you want to glue the wallpaper, it means that you will have to align the starting putty wall for which the lighthouse profiles and primer will be needed. For the immediate wallpaper stickers also need primer and, of course, glue.
You may need to replace the window and interroom door. The cost of the window includes all components and work, but for installation the door will need a door frame, loop and lock. We also need screws of different lengths, dowels and mounting foam.
You may want something else, which is not in this list. But the principle remains the same - in order to score a nail into the wall, not only a nail, but also a wall and a hammer.
Start and brief repairs
Wallpaper in the children's room
Based on experience, I can say that at the beginning of the repair it is best to change the window. Then proceed to clean the walls, the ceiling (if you are putting off on the stove) and dismantle the old floor. Then pour the screed. Make wire wiring and install the door frame. The door is laid later.
Swipe the walls of the walls (Start Puttail) and take off on the window, and then do the ceiling. Make the ceiling to the end, right up to painting and glue baguette and only after that, proceed to the finishing of the walls and slopes. Stelite the floor and then hang the door. Sockets and switches Install the walls after finishing walls.
Most of the happy owners of apartments in the secondary market concerns the issue of arranging their real estate. Before starting repairs you need to decide on its scale. Some secondary housing needs only in cosmetic update.
But it happens that the overhaul of secondary housing is required with the replacement of all communications. If all work do on your own, it turns out good savings. Before proceeding with the alteration, you need to decide which work will be performed and where to start repair.
Types and types of repair

These stages usually pass here:
- Coordination of redevelopment of premises.
- Replacing electrical wiring, sockets, carrying out additional lighting. Changing water supply and drainage pipes, as well as plumbing devices. Update the heating system.
- Replacing window frames, interroom and entrance doors.
- The work of the necessary additional work before finishing walls, floors, ceiling.
- Change of old finishing materials.
- Installation of embedded furniture and technology, if provided.
Redecorating

It can only be limited to the change of finishing materials on the walls, floor and ceiling, leaning on the finished design project. But before such a replacement, it is necessary to spend thorough preparation of surfaces.
There are three reasons for this.:
- So that new decorative coatings are not falling off with the old putty or plaster.
- So that new finishing materials are not spoiled while working with them.
- To the selected finish looked properly.
Counting expenses

For work not over time, due to the lack of material support, it is necessary to correctly calculate the upcoming costs. Depending on what is going to repair, the necessary measurements are made.
Knowing the size of the room can be made any calculation. Then in specialized stores are monitored by the prices of the building materials of interest. To repair the kitchen it is worth making a separate cost of expenses if embedded techniques are installed.
From which room start repairing in the apartment

The update of several rooms is better to perform in stages, starting with the longest. So it turns out to avoid unnecessary mud, which is formed from the construction trash. Another sequence will help solve the problem associated with the release of the repaired room from furniture.
Where to start repairing in the kitchen - with the preparation of the design project. It will definitely show where to position the sockets with switches where to display pipes, at what height it is necessary to lay the apron of the working area. Therefore, the kitchen repair is better done step by step, drawing on the design.
Severity of repair rooms
In order for repairs in the apartment proceeded by systematically, it is necessary to observe a certain sequence.

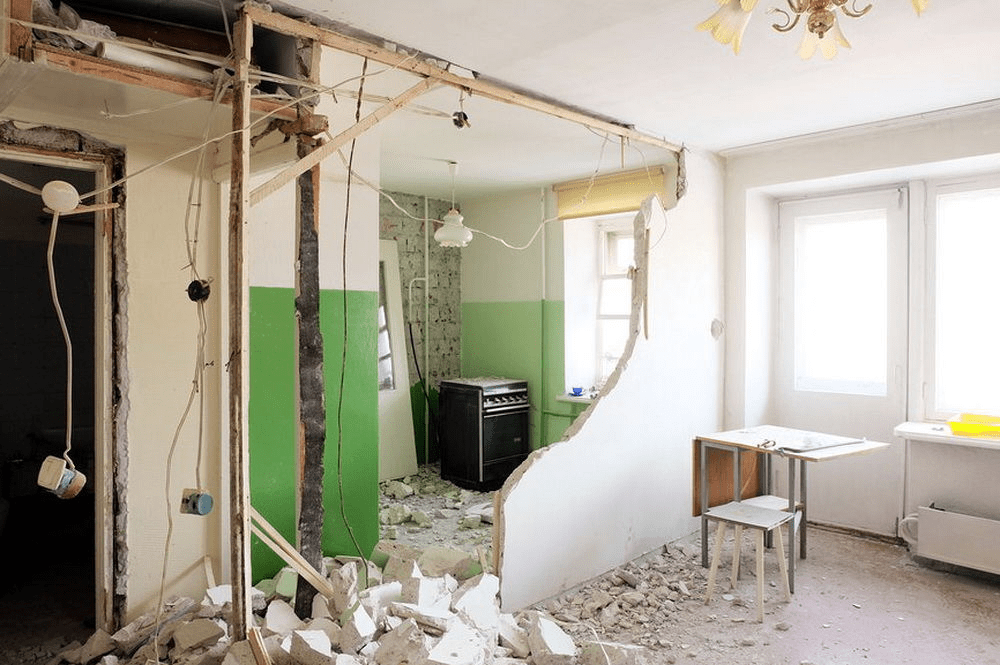
- Dismantling works
The beginning of the overhaul begins with dismantling work. Old finishing materials are removed from the walls, floors, the ceilings. If necessary, changes in the openings and demolition of unnecessary partitions are made.
Carrying out the repair of a one-room apartment, disassembly better produce immediately in all rooms - in the room, in the kitchen, in the bathroom with the toilet and in the corridor.
So it will be saved on the removal of garbage. If the repair of a two-bedroom apartment and more, then dismantling can be done alternately, in that sequence, which rooms will be repaired.

- Preparation of surfaces
After the disassembly, it turned out an apartment without decoration. In an empty "box", the power supply system is replaced, all openings are prepared, new additional partitions are erected and walls are plastered. Pipes of water supply, sewage, heated towel rail and heating radiators are changing.
You must take carefully to the water supply and power supply systems, making repairs in the kitchen and the bathroom.

- Alignment of walls and ceiling
Once all the electrical wires and pipes are hidden into special shoes, the walls with a ceiling by plastering and shtcloth are equalized. Starting with the ceiling. The levels of surfaces are checked by the level.

- Repair ceiling
The aligned ceiling can be painted, stick it on it or make a stretch. It all depends on what kind of room design.
The kitchen ceiling or in the bathroom must be done so that a large condensate is not formed. Otherwise, the mold will be formed in the future.

- Replacing windows and doors
When replacing windows, all the slots must be carefully insulated or pour by mounting foam. Then the windowsill are installed, slopes, and outside are low. During the whole process, it is necessary to monitor the level of installation. This is necessary so that the window does not shift during operation.
With windows, it is better not to remove the protective film until the end of the repair work. Door boxes are usually not difficult to install. The main thing is that everything is exhibited by level.

- Pole repair
After working with the ceiling and walls can be started to the floor. Making the repair of a three-bedroom apartment, furniture and things can be transferred to the new floor only if the plinth will be installed.
An old coating is removed from the floor, an aligning screed is made. Only after the floor becomes smooth over the entire surface, you can start laying decorative materials.

- Repair in the bathroom and toilet
By repairing a bath with a toilet, it is worth paying particular attention to the tightness of the installed pipes and water lines to the plumbing.
In such premises, decorative coatings are selected, not afraid of moisture. New baths, shower, toilet and bidet are installed. In rare cases, they make the restoration of enamel bath.
Expert advice, how to avoid mistakes for repair
- When purchasing materials it is necessary to make a small supply to avoid its lack during repair.
- So that the work does not get up is to prepare all the necessary tools in advance.
- Dust will fall as much faster if during dismantling or sticking to spray water with a pulverizer.
- Defended partitions should not be related to the bearing walls, since their dismantling is strictly prohibited. Especially if it is a panel house.
How to make repairs in the apartment
The very first thing to be done before starting repairs in any room is to understand what we want to achieve as a result.
Ask yourself a few questions:
- How should the room look like after repair?
- What would I want to leave unchanged?
- What does not suit first and require changes?
- What wishes regarding the view of the room have people who will use it (for example, other family members)?
- Need overhaul or will be enough cosmetic?
Think over the details the appearance of the room can be independently. If it is difficult, you will have to turn to a professional designer. This stage should not be postponed for later, they say, let's start repair, and then let's see what happens. From what we want to see the room depends a lot - from the choice of materials before performing the most different types of work. It is better to think about everything in advance than redoing.
Stage of preparation
So, the future view of the room is thought out. Before starting any manipulations in the room, you need to take the following steps.
- Sewage as you can live a sequence of repair work.
- Explore the information about the materials you plan to use, and about all the types of work you are going to do yourself.
- Select the start and end of the repair date, highlight the preparation time. It is necessary in order for the goal to be clearly defined, and the repair did not delay in long months.
- Calculate the number of necessary construction and finishing materials.
- Choose and buy all building materials and tools that you need throughout the repair.
- Decide to those who will perform repairs. Think if you will do everything yourself, you will find yourself helpers or still certain types of work trigger.
- Book in advance the windows and doors in order not to delay the work due to the fact that you have to expect their manufacture.
- Think about how and where the garbage will be taken. Its in any case will be a lot.
- Note the new location of switches and sockets.
Tip: Building materials should always be bought with a small margin.
Consider the option of major repairs in the residential room, involving not only the change of wallpaper, plinths, paint renewal on the ceiling and walls, but also replacing windows, doors, wiring and other large-scale events.
- Electrician changes. Old wiring is already removed, the channels are strokes for a new one. After that, the cable is stacked, and the channels.
- The ceiling and walls are leveled, the floor preparation of the floor (, insulation) is carried out.
- Complete ceiling finishes, up to and gluing baguette.
- The finishing of walls and slopes of doors begins.
- and switches.
- If it is selected as an outdoor coating, it is stacked after sticking wallpaper. The piece parquet is stacked earlier, cyclically and is covered with the first layer of varnish. After that, the wallpaper must be blocked, and only after the parquet is covered by subsequent layers of varnish.
- New doors are put. You can change windows and window sills not only at the very beginning, but at this stage.
Normal everyday business: Apartment clearly requires repair, and there is little money. How to make an inexpensive apartment repair with your own hands? It seems to be the simplest, obvious way: Surface cosmetic repairs. That is, the plywood of the wallpaper, the plains of the ceiling, painting, fixing the creaking floor; Perhaps - replacement of windows.
However, if you calculate the labor costs and consumption of materials, it turns out that by increasing the cost of labor half, and the consumption of money on a quarter, you can give the apartment a completely different kind, and for a long time. How much you need to invest specifically - depends on the prices in the region, but the general methods that the apartment can be made cozy and elegant inexpensive, the same.
Cash savings in the repair of the apartment with their own hands, as well as the Earth in ancient legends, on three whales and slowly hurrying the turtle under them:
- Do not worry work. Nothing happens from nothing. Or money, or work.
- Everywhere, where possible, the capital, but did not change the kind of old, but reproduce.
- Maximum savings we take where it does not affect the quality of work and will not be visible.
- We are broader the expenditure of labor and money in time: I conceived repairs in the summer or in the fall, we spend the preparation for the year, and then they wear everything and make everything quickly. Sharely post 200-300 thousand rubles - a problem, but to split them with parts per year - it is quite possible. In addition, there will be a time to death seven times - a rejection once.
Where it is difficult to save
The only site where you have to invite a specialist - alteration and strengthening of electrical wiring, if it is old and weak. Here is the only way of savings - to negotiate with the Dazov electrician. It will perform the work of pieces, in his free time, but the probability of hacktare will be even less than that of the "branded" specialists: after all, he then all this and serve.

It is better not to save on the electric and wiring, but some moments, such as setting the sockets can be carried out on their own.
Tool
A good specialized tool makes much easier and cheapens work. But buying it for it. Therefore, tool as needed to rent better. On costs it will come out a bit if you decide in advance with the design and make up an approximate work plan for yourself.
Season
Plumbing
Patient question with independent cheap repair - replacement of plumbing. If she is still "live", only closed, then you can clean and paint. How to do it will be described below. But if there are chips and cracks, then you want - do not want, you need to change.
For such a case, here's the information: Novoseli, especially in the houses above the budget category, often at the entrance to the entry overhaul, and excellent, completely new faience and cast iron plumbing turns out to be in the landfill. Polygon operators (simply - dusty garbers) have long been turned by this circumstance in a profitable business.
In direct contact on the service phone with strangers, they do not go, but the methods of the sarafined radio to them are quite possible to reach them. The rate is from a third to half of the factory price for the subject of ego. And do not think that you will be held on a landfill and show where it lies. You will be offered to choose from clean, thoroughly washed products, for which at least sit down immediately.
Construction garbage
The next sick question is the export of construction garbage. The operation is not cheap, and requires paper hassle. Output: basement, barn, cottage or chunnel and a few b / y bags from plastic cramps purchased for a penny. The construction garbage does not waste and does not boot, then you can pour it on the bucket into the container on the house damage. There is nothing illegal in this.

Rake, Boards, Bar and Plywood
For various utility work and firmware, you will need wooden rails and plywoods. Reiki You can buy not lagged, and the porridge is waste from sawing business wood. The gorge on sale goes raw, but if you purchase it in advance, in March-April, and to withstand in a dry room until the autumn, it will not give way to edged lumber in the dryness.
As for plywood, the drop-down packaging phaneer from the disassembled used container can be turned into a waterproof in the following way:
- We buy 10 liters canister or two PVA putty; It looks like a very liquid glue PVA and is cheap.
- Paul at the cottage, in the barn, in the attic or in some other non-residential room we will drag the plastic film. The air temperature is not lower than +13 degrees.
- We put on the floor of the plywood sheet, pour it to the center of his puddle putty and accelerate the brush.
- We drag the phaneer with plastic, lay the following sheet, just as shit, etc.
- To the soaked ply, plywood plywood stagnaya genet Better - dispersed in Square: Bricks, Metal Slices, Concrete, Old TV, etc.
- After a week we repeat the procedure, turning each sheet.
- After another two weeks, even waterproof plywood is ready to use. Additional exposure under the oppression will improve its quality.
Boards and large pieces of a thick bar can also be obtained from the used container - pallets under load. Announcements about their sale are often found.
Materials
Very economical repairs - and; For economical owners, the MDF is cooled. When sheeling on a wooden crate of a hill in 80% of cases does not require alignment of walls and ceiling, which already excludes high labor and money.
Even more can be saved by trimming the walls in the belt or on the chest, and the ceiling saves fliseline wallpaper. The work is simplified and hesitated, and the bottom of the wall, which beats most and dirt, will be reliably protected by resistant material.
The most economical option of flooring is. Paul training is not required in 90% of cases. But for the bathroom and the toilet marmoleum is not suitable; There will have to fork out to the tile, especially since it will take it a bit.
If you want to have a floor-like sex in the rooms, it will be not much more expensive, but perhaps the floor will have to align.
Walls in the bathroom can be covered with laminated organot instead of tile - it is hygroscopic and does not require surface preparation.
Balcony
If it is supposed to be glazed and insulated a balcony, it is better to do it separately from everything else and in advance: in the period from the end of March to the beginning of May. Outside, but inside it can, instead, sew plywood, saving it with a self-stale film.

Windows and doors
Solving how to make the repairs of the apartment economically, you need to pay special attention to the windows and doors: they account for a significant proportion of costs. As for windows, here is the most economical option :. It is advisable to buy them more expedient in March-April, when prices are falling on business wood, and put in the late spring - at the beginning of summer, when the tree does dry and give a shrinkage. The technology of installing wooden windows in the openings is quite accessible to homemade master of the middle hand.
Doors will better update. Remember yourself prepared waterproof plywood? Here it is both both faces of the door, on the mounting glue, putting the door removed from the loops to the litter of plastic and under the oppression. At the same time at the same time you can cover the window in the internet door, if it is not necessary.
The door will be thicker. Here are two options:
- Reinstalling the loops is not the best way "for the lazy".
- Remove the old cladding with the door; It is most often done from construction cardboard or thin fiberboard, and impose a new, plywood on the frame. In this case, the crown angles immediately "go".
And in that, and in another case, the new door is covered with self-tech under the tree or with another texture and varnishes. And you will be surprised (nice, of course) her new form. A tight plywood cheeks will provide durability doors. The slopes of the doorway are better from the same plywood: it will be cheaper and more beautiful than to carry.
Sanusel
Toilet and washbasin
Zamzbanny plumbing, if it is safe, you need to clean. Recommended for this pretty expensive active detergents can be replaced by a cheaper table vinegar - it is also weak acid - with the subsequent washing of risking nodes, the most common washing powder. Just do not use detergents with abrasive - they scratch the glaze, and objects, especially the toilet, will be very quickly dirty.
To clean the vinegar makes the square - the knob from the rag on the stick. The vinegar is poured to where it does not learn, or make in it square, and the circular movements with pressure are pursuing. Particularly "stubborn" specks in the recesses are removed with a small square and technical hydrochloric acid. All this, of course, is made in latex shopping gloves, plastic apron and at open doors and windows. It is also desirable to wear a respirator, at least a cheap "petal".

Tile on the walls and floor
The tile is not a pie and not cracked can be restored by using the way well-known motorists; They thus update wipped plastic spoilers and bumpers:
- All the lined surface of my pembolux; Apply active detergents on acid can not!. On the bathroom in Khrushchev, enough 1 l; On large - respectively, more.
- After the pematuks, we wipe the rag, richly moistened with the same table vinegar: an alkaline-based pematux, and vinegar neutralizes its residues.
- We wipe several times the wet cloth "to a clean cloth"; Now we got rid of contamination from the pollution surface.
- We accumulate the edges of the tiles with a painting ribbon ("paper scotch"), except for the seams.
- Seams stain from the nitrocracial pulverizer in two layers; The second is after complete drying of the first.
- Remove the ribbon, splashes and drums of paint on the tiles are removed with a cotton swab, moistened with solvent 646 or 647.
- We buy on the car market or in the auto shop by a liquid silicone lubricant, and how we should spray tiles with seams.
- If the lubricant absorbed immediately, you have to sprinkle again.
- If, after 2-3 days on the tile, the silicone is still "taken", wipe the surface with a rag moistened with vinegar.
The meaning of such treatment is that silicone tightens the microcracks and pores in which the dirt accumulates. Processing is enough for 3-5 years, and then it can be repeated.
Bath
Cast-on capital bath can be renovated. Complaints on its briefness arise from violation of the technology of preparing the paint composition and its application. With accurately compliance with the technology, the renovated bath serves another 10-15 years.
Heated towel rail
It is not at all necessary to change on an expensive from a stainless steel or brass and make a distribution (bypass). The heated towel rail is taking off to the metal after stripping the bath under the painting of the same cord brush in the cartridge drill. If it did not find faster, it is painted by the residues of the compound from the painting of the bath. The view will be at all worse than modern company, but durability - like a bath.
Video: Bathroom Repair
Fastener
On the fastener during the repair you can save up to 1000 rubles, applying is not galvanized or patronized (brilliant), but phosphatated (black). Heads of self-tapping and dowel-nails will still have to close, and in the apartment rain and frost does not happen.
Design
To make cheap repair, you must first know what and how to do how the apartment should look after repair. Do not be lazy to advise several times with the whole family, look more pictures of ready-made apartments. Design is not something incomprehensible-sublime; Most people are endowed with artistic taste. The professionalism of the designer in most cases comes down to understand the taste of the client and guess what he wants. And you, since you do for yourself, you need to understand what you want. Up to 50% of the costs at amateur repair arise due to the fact that they start the Namobum and then in the course of the case corrected and rewind.
Sequence of work
And finally, its share in repairs will make work in the correct sequence: we start from published from the entrance door, and during the work gradually approaching it. Living room, bedroom and can be repaired in any order. Then there comes a turn of the kitchen. We make the hallway in the penultimate, and complete the repair of the bathroom. Savings are obtained on the number of construction garbage (and he is half - the waste of materials for which they are paid) and on the alteration of the evacuated and beaten with the unreasonable organization of work.
Guided by the foregoing, it is possible to make an integrated apartment repair with an original design, spending money to a little more than for cosmetic repairs.
Video: Reflections on the quality of quality and cost of repair
(No ratings no)
Discussion:
Ksenia said (a):
I have a junior renovation in a communal room in a communal, a maximum of three and a half thousand. Of these, wallpaper and glue about three thousand. The girlfriend gave me a pod of free three kg, small irregularities embellished, the spatula bought. The bank of paint bought and brush. In general, with the world on the thread, and the view is generally another. More often, ask familiar materials, many also remain after repair, and throw out a pity.
Olga said:
We were able to safely save on the decoration of the walls, but unfortunately, did not immediately realize how to do it, so we had one bedroom at the price cost a corridor and an entrance hall or a kitchen room.
The bedroom was blocked by wallpaper with a discount (ourselves) - 4000 rubles, and the rest was placed her husband.
The putty (the usual) diluted with acrylic primer and the kel (on YouTube, they found rollers with decorative plaster).
He did the first time, but it turned out very worthy.
Alexey said (a):
When you do repair yourself, it is already saving. The hired brigade will do everything to oversee the price and not the fact that the work will be performed qualitatively. You will always do as you need and saving. On the tool, you can accurately save, for example, ask for a neighbor \u003d). I have a whole tool that is needed for repair, so all familiar and save on me, taking it on time. The most important thing is without a rush to do everything. It is necessary to start with small rooms or from a toilet, bathroom and slowly make counting means and repair design.
Vladomir said:
I never really did repair in apartments, because by virtue of my profession of the military, they were all temporary. So on trifles: Bloom out wallpaper, somewhere to cut, twisted and nothing more. It all started with the production of permanent housing in 1994. Then I had to be able to work well and learn a lot. I literally tortured sellers in stores and mace neighbors. Nevertheless, no one hire no one, slowly, but right I learned about my own hands to glue wallpaper correctly, lay and customized linoleum, cyclish parquet, to carry the doors, sockets and switches, to change the plumbing, lay out brick walls and plastering them, as well as much more. Designer decisions began to come. For example, I am to universal indignation of my parents, rushes a storage room ("Tekhchina Room"), as a result of which the almost full-fledged 3rd room turned out. Yes, it was a real school that was subsequently useful to me many times! Therefore, it is not for nothing that they say: "Eyes are afraid, the hands are doing." There is no need to speak about significant savings.