Do-it-yourself budget bathroom and toilet repair.
Good day, ladies and gentlemen! I want to tell my story of bathroom and toilet renovation, separate. Since the purchase of the apartment, the bathroom renovation was postponed for 3 years, since other rooms were the priority. Now the right time has come, we were just on vacation with the whole family in another city, spontaneously decided to come home a month earlier before the end of the vacation to start work. This was at the beginning of 2016. Therefore, all materials were purchased in Mirny, if they had planned in advance, they could have been ordered from the mainland and would have received significant savings. The budget turned out to be in the region of 150 thousand (approximately, another + -30 thousand), purely on the basis of materials. The main amount is collected from baths, tiles, plumbing. Basically I did all the work myself, if others did, then I can safely add another 150-200 thousand for the work to the amount of materials (probably). In our city, all prices are very high, this is a fact.
We have a house in 1996, the area is small, the bathroom, toilet, balcony is very tiny. But the prices of apartments are the same as in Yakutsk, but the squares are lower.
Probably I will make a post in the form of a photo report with notes. We got a lot of photos.
Go. Housing problem.
On the floor lay old Soviet square tiles, which were glued either with concrete or with super glue, hammered with a perforator for 3 days 3 nights). Sorry neighbors again. The walls were covered with wallpaper that was painted.
A good semi-professional assistant in the repair and cleaning of carpets.
I bought tiles, I honestly don’t remember how much they cost. Wall-mounted ones cost 110 rubles / tile. Russian production. The quality is 3 minus. Even in the same box, the dimensions in length and width are different, so when you glue, the level begins to play. And if they had ordered from the mainland in advance, then for this money it would have been possible to order branded imported tiles, they do not say such a jamb.
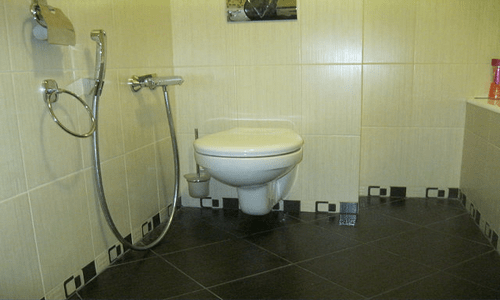
A simple toilet, for 7 thousand. Karl. Big mistake.
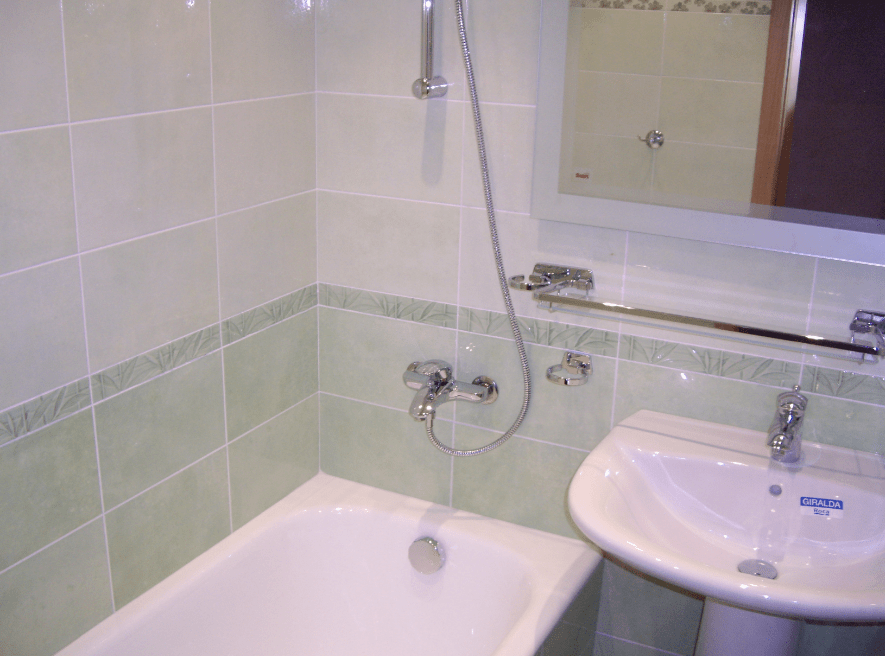
The bathroom is acrylic, I like it, it is voluminous. Length 150 cm.
The old bathtub was made of metal. cooled down quickly.
The preparation of the sub-floor is in full swing. Deep penetration primer application. Then the concrete screed.
Neighbor Aunt Lyuba made adjustments from time to time, Soft tasty buns!
Work on replacing old metal pipes. I called the plumbers of the housing and communal services, they cut off the water, made 2 transitions to plastic from the hot water and cold water risers, and also installed 2 counters, 1 heated towel rail. Having emptied my wallet for $ 10,000
This photo shows how old metal pipes are clogged.
For a complete replacement of pipes they asked for another 15 thousand rubles. This is still without gouging the walls. And my wife had an interesting idea. After watching a video on the installation of polypropylene pipes on YouTube, I decided to do it myself. I bought a welding machine for 2 thousand rubles. In principle, nothing complicated. The main thing is not to overexpose the pipes in the welding machine.
Didn't like the paint on the wall. To remove paint, I made just such a structure from a 5 liter bottle with a connection to a vacuum cleaner. The result was not particularly pleasing, because very long, dusty and noisy. I'll tell you in advance, it's easier how to do it: the paint that leaves itself - we clean it, then we go through the paint again with a scraper or chisel, then we buy a solution - concrete contact, apply and that's it. The surface becomes flaky, like rough sandpaper. Tile glue is calmly kept on it.
There are traces of a grinder on the wall.
Since the floors are very uneven, the slope is 3-5 cm per 1 meter, it is necessary to make an even level using the so-called beacons (green dots on the floor). Then, between the beacons, we throw a concrete solution and connect the beacons. We will fill in the inner squares along these lines.
As a result, we get a flat floor. There will be a bathtub on the right, so there I decided to save some concrete, we will level the level with the help of the legs.
We glue the tiles, make a distance of 2mm between the tiles, using crosses. In the future, the inter-tile space is filled with a special grout.
Bath installation. Behind the bathroom, he chipped the wall and put a pipe from the mixer in there. When you switch the mixer mode to the shower, water will flow from above. This is the wife's idea.
On the left there is a strobe for electrical wiring, a washing machine was connected and sockets were made. Right for the shower. Red is the concrete contact layer.
2 mixers)) The bathroom fills up 2 times faster))
We begin to glue the tiles on the wall from the level of the bath. First we go through 1 horizontal line, then 2 rows of tiles. You can see how to glue tiles on the Internet, I watched YouTube)). There you can find the entire repair process.
By the way, our walls are very crooked, sometimes with a propeller, sometimes with a slope ... a nightmare. And no one knew how to level the walls and would not have time. The most difficult areas were the corners. More glue, time and nerves. Now the walls are not crooked at all.
My mistake. I glued the mirror to the tile glue. The mirror is old from the previous owners.
Here you can see very clearly. Above, the corner goes back to back, and from below it begins to diverge. The question was solved by grouting and more glue)).
The ceiling has already been made. Lighting - 5 point diode lamps, enough for the eyes. A shower is installed, it works well (China), bought in Yakutsk, I don't remember which store.
Drying glue spoiled the reflective layer.
Dismantling with your favorite hammer drill.
I bought an ordinary countertop, we have nothing but ordinary things in our city. Or in the tridoroga they will make a "cool type" to order.
Found a bedside table just in size.
Not a single centimeter between the cabinet and the bathroom. End-to-end. My perfectionism gets high. I installed the tabletop on the corners in the wall and on the bedside table. Holds on tight. At least jump.
Voila. The joint was smeared with white sealant.
Here is the final result.

It is not for nothing that the proverb “Cheap fish is a bad ear” exists among the people. You and I need to find a middle ground so that the repair in the bathroom turns out to be excellent, and we had to pay for it at a minimum. This article will consider budgetary and at the same time successful repair options for a small-sized bathroom.
Before proceeding with the decoration of the walls and floor, you and I need to find out in what state the bathroom room is. Do the walls need to be aligned? Leave the floor in the same condition or do it a little tweak? What is the condition of the ceiling? After evaluating the premises, we draw up a specific work plan and begin its phased implementation.
Economical option for decorating walls in the bathroom
Do not forget that we are very limited in the area of the premises. This is not a royal mansion, but a compact room, which was built in the era of Nikita Khrushchev or even earlier. This means that for wall decoration we will choose methods that “steal” the already modest space in the room to a minimum.
- Tip 1. It is better to cover the walls in the bathroom with plaster than sheathe them with some kind of drywall.
- Tip 2. What to choose: tiles or wall panels? Of course, the first option, since the panels take up a lot of free space, which is already lacking.
Of course, each case is different. If you are planning a major overhaul and want a nice bathroom, you can sacrifice free space.
To begin with, you and I need to clean the walls from the old finish. If this is an old tile, the easiest way is to knock it down with a perforator, although you can do with the old old-fashioned way by picking up a chisel. The paint is well cleaned with a special brush with a metal bristle.
After removing the finish, we feel free to move on to replacing all communications. We will not dwell on this aspect in detail. We only note that after it you start leveling the walls (if necessary). Of course, there is also a more economical option - to sheathe the bathroom walls with some kind of moisture-resistant drywall. Alternatively, you can try cement slabs. Just remember to treat the wall with a good antifungal agent.
Painting the walls
This finishing method is the least expensive. In principle, everything is simple here - they chose paint, applied it to the walls, waited for a while. Even if the paint is not ordinary, but textured, it will still be inexpensive. Wall cladding or paneling is much more expensive.
Perhaps the only drawback of painting the walls in the bathroom is the final result. He is not even an amateur, he is a rare gourmet. By the way, if you decide to paint the walls, you will need to align them very well, since any curvature will be very noticeable.
Summarize. Painting the walls is the cheapest way to renovate a bathroom. It can be recommended to people who operate on a limited budget or are fans of minimalism.
Wall cladding with panels
Wall panels are sometimes referred to as plastic clapboard. This name is quite understandable. Plastic panels for wall decoration will be offered to you in any, even a small hardware store. The economical option is white, the panels are more expensively laminated on the outside. Their cost is not too different from natural wood.
The plating process is as follows. The panels are mounted on a frame, which is a wooden beam. Before that, it is treated with all kinds of means: antifungal, water-repellent, bactericidal. This helps prevent rotting. The frame is attached to the walls by means of dowels.
Wall panels are glued using "liquid nails", they are easily connected to each other into a lock.
By the way, you can hide a couple of massive boards under the plastic. It is very convenient to screw in the fasteners of the numerous shelves and cabinets that you will hang in the bathroom.
To summarize, bathroom wall paneling will cost you a little more. Another drawback is that it takes away free space in the room. However, this material looks much better than ordinary painting.
Wall cladding with tiles
This finishing method is considered the most practical. Here's a quick step-by-step guide:
- First, markings are applied to the wall to determine the vertical and horizontal lines. Required tools: plumb bob, level of sufficient length.
- Tile adhesive is applied to a flat wall. To do this, you can use a spatula or a special grater.
- Grooves will need to be formed on the adhesive composition. They must be of the same depth.
- The tile is applied to the glue layer, pressed by hand as tightly as possible. In this way, 3-4 tiles can be laid. After that, it is better to pick up the level and once again check how correctly and evenly the material was laid. Mistakes made at an early stage of installation are much easier to correct than trying to do it at the end of the repair.
- The final stage of finishing will be the grouting of the joints between the tiles. To do this, you will need to purchase a special composition at a hardware store.
The cheapest option for finishing the bathroom floor
If you repair the floor from the beginning, you will need to remove the old material. The ancient screed and trim are removed with a hammer drill. Waterproofing materials are laid on top of the cleaned substrate. A new screed is poured from above.
The most economical and simple coating option is linoleum. Today this material is relatively inexpensive and practical. It is not afraid of moisture, it can be easily replaced in case of damage. In addition, if linoleum was laid in the kitchen or in the hall, you probably have a couple of squares left. You can safely take it and put it in the bathroom.
Alternative estimate of repair work in the bathroom with the involvement of a team of craftsmen

Of course, the ideal is to buy a waterproof laminate flooring. Its modern versions are not afraid of moisture and do not swell.
As in the case of the walls, ceramic tiles have been and remain unchanged classics here. But even here you can easily save money. Just don't buy oversized tiles - you end up with a lot of unnecessary waste.
Costs for the cheapest bathroom renovation - estimate
- Removing old plaster - 500-600 rubles
- Plaster, wall leveling (from 450 rubles per square meter)
- Laying tiles - about 400-500 rubles per square meter.
- Floor screed - the same amount.
Prices are indicated without the cost of the materials themselves. By the most conservative estimates, renovating a bathroom from scratch will cost you 150 thousand (~ $ 3500- $ 4000) if everything is done from scratch, including the replacement of the door and wiring. It's great if a person has even hands and at least part of the work he can do on his own. Then the repair really turns out to be economical, really cheap.
Video: economical / budget bathroom renovation
The video briefly and clearly indicates the points where you can save a lot when renovating a bathroom.
In a crisis, I especially want to save on repairs, but the requests remain the same: beautiful, original, exquisite. Like any other renovation, wall and floor decoration in the bathroom has its own nuances. Take them into account at the planning stage - and you can save more than one thousand rubles, and all the work will be completed on time.
If a bathroom renovation is planned, then most people associate it with tiles. Indeed, in most cases, the customer prefers this particular material as a finishing material. But on the tile, the light did not converge like a wedge, because repairs in the bathroom room can do without this material altogether. In this article, we will raise the question of how to repair a bathtub without tiles.
Immediately I would like to note that the Teplo Dom company is engaged in repairs. We have all the necessary specialists to make a turnkey renovation. We will take into account all your wishes, draw up a project, make an estimate, purchase materials and do exactly what you ask.
Tiling: cons
Decorating walls in a bathroom with tiles is one of the most common solutions. We will not talk about the pros now, there are actually enough of them. There are people who, for some reason, want to renovate a bathroom without tiles. We do not intend to persuade them, on the contrary, we will highlight the disadvantages of this method.
First of all, I would like to note that tiling implies the whole stage of preparing the walls... The old coating is removed, the walls are leveled and only then can be veneered.
Tiling is quite expensive. Here we are talking not only about the price of the material, but also about the cost of the work itself. The work of a good tiler is not cheap.
For example, if a tile is used as a floor covering, then it is imperative insulate plus to look towards the technology "warm floor". The point is that ceramics have high thermal conductivity. If nothing is done, the coating will be cold.
Tile itself is a fragile material... It must be transported carefully, and care must be taken when carrying out work.
Ceramic tiles perfectly does not create sound insulation.
And the most important thing is lack of customer desire use this material as a finishing material.
Of course, the tile has a lot of advantages that actually bring this material to the 1st place when it comes to finishing in the bathroom, but you can read about them in the following articles: "", "".
But if not a tile, then what? You may not know, but there are more than enough options.

Plastic panels

How to renovate a bathtub without tiles? The answer is simple: use plastic panels instead. Recently, this finishing method has gained immense popularity. Firstly, due to the ease of installation, secondly, the absence of the need to align the walls, and thirdly, because of its price. Yes, the cost of finishing a bathroom with plastic panels will come out much lower than with tiles. In turn, PVC panels have a number of positive properties:
- The material is resistant to temperature extremes.
- Has good moisture resistance.
- It's cheap.
- Wall cladding with plastic panels can be done by hand.
- It is easy to hide the unevenness of the walls.
Undoubtedly, negative moments also take place. Among them, the lack of strength, installation "eats up" a lot of useful space, and so on. But if you abandon the tiles, then it is better in the direction of plastic panels. You can read more about how Teplo Doma decorates a bathroom without tiles using PVC panels in the article - "".
Dye
When you need to save money on renovating the bathroom, it is better to opt for moisture-resistant latex or acrylic paint. If you need a simple solution, then paint is perfect. A bathroom that has been finished without tiles with paint can look just as good as with plastic panels.
Advantages:
- It's pretty easy to maintain the walls.
- You can choose any color.
- Repair work can be done by yourself.
- Low cost.
 Repair in the bathroom without tiles photo
Self-adhesive film
A great option to repair the walls in the bathroom without tiles is to use self-adhesive tape. It is easy to do, it is inexpensive, and it looks quite acceptable.
 Bathroom renovation photo without tiles
Linoleum
Oddly enough, not only can there be linoleum on the floor. Some people prefer to use this material for wall decoration in the bathroom. Linoleum looks quite attractive, is inexpensive, and has been serving for more than 10 years. It is easy to take care of such a coating, and repairs can be done by hand.
I inherited an apartment from my grandmother. A small two-room apartment in which there was no repair for twenty years. Having entered into legal rights, the first thing I decided to do was make repairs. There was no money to hire a team of builders, and I decided to do everything myself, with my own hands, so to speak. After reading books and watching a bunch of training videos, I decided that I would start making a budget one.
Small room 1.3 x 2.5 meters with a ceiling height of 2.7. I don't know if it was possible to call the architect who created this, but now there was no time for reflection.

Dismantling (remove all unnecessary)
The first thing I did was remove everything that could be removed. With a friend they took out a bathtub (cast-iron, on the back side they found the release date of this miracle - 1961!). I removed it, having previously drowned out the water supply pipes and the central sewage drain of the bathtub. Tore all the tiles off the walls. (It should be noted the very good work of the builders, kept up well.
The floor did not touch, it was practically free of defects and very durable. In a word, I prepared the front of work.

Garbage collected six bags!
Preparing the walls
Started a budget bathroom renovation from the walls.
I impregnated the walls with a mold-free primer, looked at the level, turned out to be ideal for a plumb line. I decided that the renovation in the bathroom is not forever, budgetary, so I will use, not as I wanted, but ordinary wall ones. Since my bathroom renovation is budgetary, this type of wall covering is the most suitable. Cheap and angry. Panels of size (240 * 2700) are fixed on horizontal guides. I decided to make the guide rails from wood in the size 50 * 20 * 2000. Fixing them to the wall with dowels and self-tapping screws.

Having previously painted the pipe with acrylic paint. He began to install the panels, fixing them to the guides with an ordinary construction stapler.


Installation of PVC plastic panels
I decided to renovate the bathroom not in a dull monotony, but using three colors - blue, white and red.
The most difficult thing when repairing a bathroom turned out to be to remove the corner, I suffered for a long time before I realized a little trick - to insert, using a construction trowel (narrow), gradually leading the next panel into the guide (inner corner)! In short, I coped with the walls.
The next step was to bring the bath. The most ordinary steel bath. Size 1700 * 750mm with legs

and only after that he continued to decorate the wall with panels for better water drainage. The only difficulty was to lay the panels at the hot and cold water outlet.


but did it quite successfully, using a wood drill of the appropriate diameter. There were no difficulties and in the place where the front door was, it turns out that installing PVC panels is very simple, you just need to read the instructions and use a good tool

in order to hide the edges of the slices, I glued a plastic corner 50 * 50 * 3000. It turned out very well, the door just changed.
Installation of the mixer did not take much time, and there were no difficulties.


Ceiling (installation of skirting boards and ceiling panels)
Having finished with the walls, he began to work on the ceiling. On the level, I put in a ceiling plinth (special fittings for PVC panels) and with the help of white PVC ceiling panels 500 * 3000 began to lay the ceiling, making it slightly lower than the original one.

In parallel, having made the lighting distribution for two spotlights.

The ceiling turned out to be just wonderful - my first ceiling in my life!

Laying tiles on the floor
The sealant went over the seams of the tub and leveled it with the set bolts on its legs. It's time. Since the budget renovation in the bathroom, and saved on the walls and ceiling, you can put tiles on the floor. Moreover, the volume is not large. I just learned how to lay tiles when the floor ended.
Used floor tiles, two colors blue and red. Successfully combining them, it turned out even very cute!
Not used, gray and blue are great combined. I connected the bathtub to the sewerage system and put a screen on the bathtub to hide the insides, which are not very aesthetic. The screen was taken ready-made, hinged, to simplify the approach to drain cleaning systems.


I decided to use the sink for washing together with the cabinet in the colors of the tiles on the floor, killed two birds with one stone, hid the sewer drain and decorated the bathroom with a stylish decor element! The mixer can easily reach the sink.


And the final touch is the mirror above the sink! THE BEAUTY!

I realized that the most important thing is to believe in yourself and not stop before difficulties! The eyes are afraid, but the hands are doing!
We suggest watching a video on the topic:
Stylish budget bathroom renovation
When purchasing a new home or a long stay in an old one, it becomes necessary to repair it. Any updates are associated with costs that even the most economical person cannot always afford. In the absence of a significant amount of money, it is not at all necessary to postpone the replacement of damaged finishes on the back burner. It would be wiser to plan budget repairs using inexpensive but high quality materials. And you should start with the bathroom, which is one of the most important rooms in the house.
Repair, like any change, begins with getting rid of the old and unnecessary. And this process can be called the most pleasant and easiest part of the work: coverings that have outlived their days can be safely removed from the walls and ceiling without worrying about their safety.
Cleaning the premises is carried out in several stages:
- Disconnecting plumbing;
- Removing old coatings from walls, floors and ceilings;
- Removal of old layers of plaster, screed and waterproofing residues;
- Cleansing the room from dirt and dust.
After getting rid of debris, all surfaces must be leveled with cement mortar. It is imperative to seal the cracks with a sealant.
An obligatory step is waterproofing the room. For the floor, you can use a plaster, which is applied to the screed in one or two layers.
Do-it-yourself cheap bathroom renovation: material requirements
The bathroom is characterized by a special microclimate, which leads to the rapid deterioration of materials. Therefore, when making even low-budget repairs, it is worth choosing a finish whose performance meets the requirements.
The materials used must have the following properties:
- Resistant to high humidity;
- The presence of antiseptic additives that prevent the appearance of fungus and mold;
- Resistant to aggressive compounds used to clean the bathroom;
- Ease of care.

The best option for the bathroom is smooth surfaces. Due to the absence of irregularities and various volumetric patterns, the material does not accumulate dirt on itself, retaining its original appearance for many years.
When choosing a finish, you should also pay attention to the possibility of self-assembly. A simple DIY repair will require less costs (approximately twice).
How to paste over a bathroom cheap: decorating the walls
A significant part of the cost falls on the design of the walls, which have the largest area when compared with the rest of the surfaces being trimmed. One of the options for the "economy" class is wallpaper, but before you paste over the bathroom, you should think carefully. This type of finish is very unstable to high humidity in the room.
Painting with a water-repellent emulsion is the cheapest way to decorate walls. For finishing, a special compound on a polyester or acrylic base is used, which is applied to the surface after it has been leveled. The paint lasts for 5 - 8 years.

Among the budget options, the following types of finishes also have the necessary properties:
- Plastic panels;
- Ceramic tile.
PVC panels are an inexpensive material that saves not only finances, but also time. Plastic strips, fastened together, do not require preliminary leveling of the walls and removal of old finishes. Installation of panels is done quickly and will be within the power of even a non-professional.
If you want to design a small bath inexpensively, you can also consider laying wall tiles. This material is resistant to moisture and mechanical damage, has a huge number of colors. The tiled bathroom looks nice and tidy. A small budget in this case will not be a problem: you can purchase domestic products that have more affordable prices.
Bathroom renovation options: how to finish the ceiling and floor
The ceiling can be decorated in the same way as the walls. For example, paint with white paint or install plastic panels. This option is the most economical and practical.
For a small bathroom, the installation of a stretch fabric can be an ideal solution. The cost of such finishing depends on the area of the room, so the installation of a false ceiling in a small restroom will be cheaper than other options. Especially if you abandon the idea of a designer canvas and make a matte white.
16.jpg)
Finishing the floor is the most important task on which the safety of the use of all plumbing depends. That is why experts recommend first of all to update the waterproofing in the room, and only then to repair the coating itself.
For finishing the bathroom floor, two materials are suitable that have high durability and a variety of designs:
- Linoleum;
- Ceramic tile.
Linoleum will cost less than tiles, but if we are talking about a small bathroom or toilet, there will not be much difference in their cost. Therefore, the choice of coverage in this case depends on personal preference. However, it should be borne in mind that the installation of linoleum is quite simple and done by hand, which also significantly reduces costs. Having given preference to tiles, you will have to work hard with its installation. Or finish the floor with the help of a specialist.
Repair of a small bath: we update the plumbing
Buying a bathtub and sink is the biggest expense in a renovation. However, you can save money in this case too. The solution to the problem will not be the purchase of new equipment, but the restoration of the old one.

The update is carried out in two ways:
- Application of two-component polyester enamel on the inner surface of the bath (the cheapest option);
- Restoration with liquid acrylic (it will cost more, but the result will be more durable and beautiful).
If the bathtub is in a completely deplorable state, you can purchase an acrylic insert. This is a special insert that is attached to the inside of the bowl with a sealant.
The listed methods may not seem budgetary, because are not very cheap. However, in any case, it will be more profitable to restore an old bathtub than to buy a new one.
Do-it-yourself quick budget bathroom renovation (video)
Self-repair of the bathroom can be done with almost any income. It is only important to carefully plan the entire process and purchase the necessary materials. The modern market offers a variety of finishes, so it will not be difficult to choose a high-quality coating of low cost. The main thing is not to get carried away, trying to save as much as possible: you need to pay attention not only to the price of the material, but also to its properties.