After assembling the log house and installing doors and windows, you need to think about installing the flooring. How to make a floor in a bath in various ways, we will tell in this article. Observing all the stages, you can complete the work without errors and with high quality.
Before installing the floor in the bath, you need to decide what it will be: wooden or screed. Several factors influence the choice:
- The type of material from which the floor joists are made.
- The material from which the bath is built.
- What is the planned drain system.
- Appointment of premises (steam room and washing room combined or separate, use dry steam or wet, etc.)
- The material side.
Wooden floor - features and purpose
 The wooden floor in saunas is used in most cases. Such popularity is associated with the availability of material and the speed of installation (no need to take technical breaks in work). You can buy floorboards or logs already treated with an antiseptic and dried. And the installation process is simple, and even a beginner, after reading the step-by-step instructions, will be able to lay the floor. Of course, mistakes are made in any work, but if you watch a thematic video and read the article to the end, you can handle it. It is difficult to carry out flooring alone, so it is better to look for 1-2 assistants.
For a bath, there are several ways of laying floors, but the simplest:
- "Cold" flowing;
- "Warm" not leaking.
Let's consider each in more detail.
Cold floor - design features
 Boards of "cold" coating are laid with a gap of 4–5 mm. It is necessary so that moisture does not accumulate in the baths, but flows into the underground. Since the floor of such a structure is always cold, it is recommended to use it only in the southern regions of the country or for a bath at a summer cottage.
The structure cannot be insulated, so it will not be comfortable to use the bath in cold weather. Of course, there is an option when the flooring is raised above the level of the cushion under the stove, and special ventilation is made. So the floor warms up during the heating and dries quickly. We will talk in more detail about how to do this with your own hands in one of the following articles.
"Warm" floor - design features
 The warm version is mounted from boards tightly adjacent to each other, which have a slight slope. The slope is mounted to a special drain, which, in turn, is built into a collection where all moisture accumulates. From there, water flows out by gravity through inclined pipes, outside the bath. This construction resembles a "pie". The upper boards are laid on the rough bottom boards, insulation is placed between them. It is hidden from moisture and steam is made into insulation.
The main advantages of this design:
- moisture does not accumulate near the foundation;
- the floor is additionally insulated, which means it will warm up;
- due to the special drainage system, the floorboards will last longer.
Concrete screed in a bath-features and purpose
Screed floors in a bath is a more time-consuming process that requires some skill and theoretical knowledge. Concrete screed for the bath floor can be done in several ways: pouring directly onto the ground, screed on the subfloor. It is easier to perform the first method on your own.
Screed on the ground - features
 A concrete screed is performed on previously removed soil and a sand cushion (similar to that shown in the photo). After drying, the coating looks unsightly and needs a finish. Of course, you can simply paint the floor with paint, but since the bath will be constantly heated to high temperatures, the chemical compositions in the bath are undesirable. The easiest way is to install ceramic tiles or natural stone. But both are costly and time consuming.
Recently, the know-how of “warm floor” has been used in concrete screed. It comes in infrared, water and cable. But laying in damp rooms requires special knowledge, therefore it is not recommended to do it yourself.
It is important, when using a concrete screed in a bath, to properly waterproof and insulate the floor. Insulation is made of polymeric material, for example PSB-S-35. Material price from 70 rubles.
Installation of flooring in baths and saunas
Any of the options under consideration is suitable for a bath in a private house or summer cottage. And how to make the coating correctly, observing the basic rules and features of the technology, we will tell you in more detail.
Installation of "cold" leaking floor
 As lags for a leaking floor, you can use metal or wooden sticks of rectangular or rounded cross-section. You need to choose depending on the material from which the log house was built. So, for a bath from a bar, it is better to use a tree with a cross section of at least 100 mm.
Before laying, the logs must be treated with antiseptics and impregnations. Used machine oil is used as an economy. Antiseptics take any, but it is better for direct use "for baths."
Before laying the wood, it is dried to a moisture content of less than 12–10% or it is purchased ready-made, chamber drying.
Laying the base under the floor
Installation of the lag must be carried out parallel to the wall, which has a shorter length. To give rigidity, reinforced concrete columns are poured under them, the distance between them should not be more than 1 m.They are laid out in the following stages:
- at the installation sites, the top layer of soil is removed and a cushion of rubble and sand (10-15 cm) and a reinforced mesh is filled;
- columns of red brick are laid out or pieces of reinforced concrete slab are laid;
- the structure is waterproofed with bitumen mastic.
If the foundation for the bath was columnar, then the level of the lag should be parallel and equal in level to the embedded log. With a tape - the top of the foundation.
On top of the pillars, waterproofing is laid in 2 layers and logs are mounted. They need to be placed leaving a distance of at least 4-5 cm from the main walls, from all sides, these gaps are needed for ventilation.
Installation of a drain underground
 It is necessary to implement a system that will quickly remove excess water, and will not allow it to accumulate near the foundation. To do this, you need to study the soil, since the design will depend on the absorption of moisture:
- With a soil that absorbs moisture well, the top layer is removed along the entire perimeter of the bath and a cushion of crushed stone with a minimum thickness of 250 mm is poured. It is used as a filter. Moisture will pass through the filter and be absorbed into the soil. This is the easiest way.
- In case of poorly absorbing soil, a 10 ° slope is made towards a specially prepared drain (a pit at least 30–40 cm deep, in which a PVC drain pipe with a diameter of 15 cm or more, covered with rubble is laid). In order for the water to drain more evenly, the soil can be covered with clay and tamped.
Laying floorboards
Floorboards can be used even not edged, the main thing is to level and trim them. Laying begins from the wall, stepping back 2 cm. In relation to the lags, the laying is perpendicular.
You can fasten boards to the logs with self-tapping screws or nails at an angle of 45 °. To make the gaps between the boards the same, use pieces of plywood 3-5 mm thick.
Installation of "warm" non-leaking floor
Lags under the structure are laid in the same way as in the first case. To organize the slope of the floor, you need to make cuts of 2-4 mm in each log, except for those located near the walls.
Installation of the drain system
A pit of 400x400 mm and a depth of 300 mm is used as a water intake (the design diagram is in the photo above). You need to dig it between the two supports. For waterproofing, a "clay castle" is made in the reservoir or the walls are poured with concrete and coated with bitumen.
At the bottom, stepping back 2 cm, a drain pipe is mounted, which must be laid at an angle. For this, a PVC pipe with a cross section of at least 15 cm is suitable.
Laying floorboards
 The installation of the floor begins with a rough bottom layer. To fix it on the beams, 50x50 mm bars are attached on both sides along the entire length. Rough boards are laid on these bars, you can use any remaining after construction, even a small round timber. From the top of the beam, you need to retreat at least 60 mm, it depends on the thickness of the proposed insulation, it should not overlap the upper part of the log.
Waterproofing is spread on top of the subfloor. it must be laid with an overlap, and the joints must be fastened with bitumen mastic or tape (depending on the type of waterproofing). Insulation is placed on top of the waterproofing (mineral wool, ecowool, expanded clay, sawdust with PVA, etc.). The insulation must be protected by covering it with a layer of a vapor barrier.
The vapor barrier is laid with an overlap of 15 cm, attached to the logs with a construction stapler.
A finishing board is mounted on top. it is better to use tongue and groove with tongue and groove. This prevents water from getting between the boards. It is better to mount the boards by putting each subsequent one on a spike, so there is less chance of spoiling the lock connection. A pipe is mounted in an inclined drain, the end of which will go into the catchment.
It is important to leave a ventilated gap of at least 10 - 15 mm between the main coating and the insulation, where an additional exhaust pipe is brought out.
It is better to use products that are resistant to water as floorboards for a bath, for example, larch, aspen. Otherwise, the floor will quickly rot, which will never happen with a concrete screed.
Installation of a concrete screed - features of installation in a bath
 The top layer of soil is removed along the entire inner perimeter, at least 30-40 cm. The soil is rammed. On top, 100 mm of coarse sand is laid. Then a layer of crushed stone 200 mm and two layers of roofing material. In this case, it is important to leave a place for future acceptance before filling the sand.
The next step is to dig out a place for acceptance, its walls must be concreted to a thickness of at least 50 mm. From above it is covered with rubble and a drain pipe is removed. Only then can you start screed.
Pouring screed on the bath floor
The screed is installed in the following stages:
- The first layer is poured with concrete to a height of 5 - 6 cm, it is allowed to dry out (but not completely dry);
- A layer of PSB-S-35 thermal insulation is spread (you can take any thickness, standard 5 and 10 cm);
- To give rigidity, a reinforced mesh is laid;
- A 6 - 9 cm finishing layer of concrete is poured. To harden it, the finishing layer must be poured at an angle of 10 - 15 ° towards the drain where the pipe is mounted.
Above, the concrete screed is decorated with tiles, there are many of them in construction centers, the price starts from 210 rubles / m2. You can think over your own design and choose a coating for it. All depending on the size of the wallet and imagination.
All the options under consideration can be done by hand, and our experts are always happy to advise how to avoid mistakes.
The concrete screed on the bath floor can be called the most optimal option. Such a floor has many advantages over a wooden structure, the key ones being its strength and durability. Everyone knows that high humidity is always observed in bath rooms. It has a negative effect even on wood treated with special compounds, while concrete in a humid environment first hardens, and then reacts very little to its effect.
The main difficulty of the screed device on the floor in the bath is that the surface must be located at a certain angle. Therefore, starting work on the installation of the sewerage and drainage ladder, at first it is worthwhile to thoroughly figure out how to fill the floor in a bath with a slope to quickly leave the used water.
To create a good, durable, insulated concrete floor with a drain hole, certain materials are required:
- Sand, sand and gravel mixture and cement nt for the manufacture of mortars and backfills. It will be optimal to use, in addition, special plasticizing additives and microfiber - for increased strength of the upper concrete layer.
- Roofing material, polyethylene film with a thickness of at least 200 microns - for waterproofing the floor.
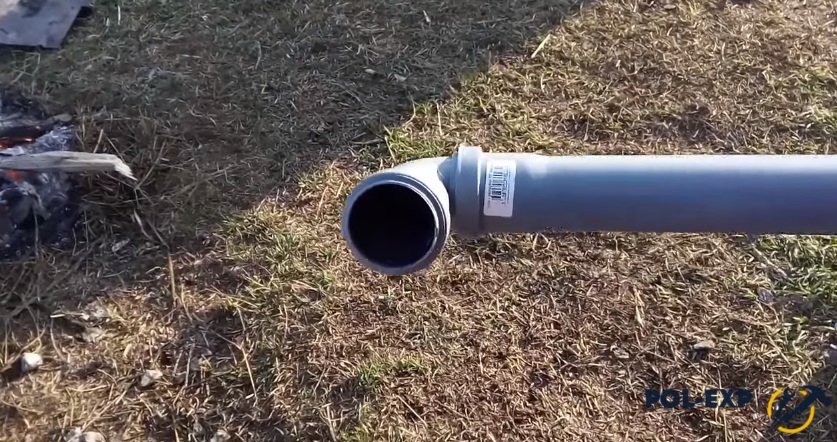
- Sewer polypropylene pipe with a cross section of 50 mm.
- Insulation material - best of all extruded polystyrene foam, 30 ÷ 50 mm thick, with a density of at least 35 kg / m³.
- Reinforcing mesh with cells from 50 × 50 to 80 × 80 mm.
- Guides for beacons or a special kit for forming a floor slope.

- Drain ladder, with a diameter suitable for the selected pipe section.
- Tile adhesive - for damp rooms or for outdoor use.
- Ceramic floor tiles - important to on the was rough, non-slip in wet bathing conditions.
Prices for extruded polystyrene foam
extruded polystyrene foam penoplex
Floor drain
Separately, one of the most important elements of water drainage in a sloped floor system should be considered - a drain. It performs several functions at once:
- Provides a tight connection between the drain pipe and the drain.
- Filters the water entering the sewer pipe, thanks to the presence of a filtration grate, which significantly reduces the number of blockages - for example, leaves from bath brooms will linger on the grate.
- The odor trap installed inside the siphon protects the room from the penetration of unpleasant odors from the sewer well and cold air.
Floor drains are manufactured in two versions - with straight and side connections.

- If the pipe is buried, and its exit into the room occurs vertically, then a ladder with a direct connection is used.

- In the event that the pipe is stretched in such a way that it comes out of the wall, or it is embedded in the floor layers almost horizontally, then a drain ladder with a side connection should be used.
Ladders are made of durable polymers, non-corrosive metals, or in a combined version.

Before purchasing a ladder, it is necessary to check whether it is suitable in height for a given room when installing a floor in several layers. Therefore, first you need to calculate how much it is possible to raise the floor in the bath as much as possible. If it is not possible to find the ladder of the required height, then each of the screeds will have to be made a little thinner, or the thickness of the backfill layers will have to be reduced.
It must also be remembered that the height of the drain ladder is a parameter to be guided by when calculating the rise of the floor in the area of \u200b\u200bthe drain connection, which means, near the walls, the surface will rise even higher.
When buying a drain, it must be immediately equipped with all the necessary parts - couplings and drain pipes of the required diameter.
Sewerage pipe installation
In order for the work to be of high quality, control over it must begin with a sewer pipe in a certain place on the floor of the bath. This process begins after the foundation is erected and the formwork is removed from it, and often even during the "zero cycle" work.
If draining into gender assumed mounted in the corner of the bath room, then the pipe is drawn along one of the walls of the foundation.

Provided that the drain is located in the center of the room, the pipe is laid along the diagonal of the room. Here it must be remembered that its direction should not have sharp turns, otherwise the pipe in these areas can often become clogged. Therefore, the angle of rotation should be approximately 140 ÷ 150 degrees, but it is best if the places where the drain in the bath and the cesspool (pits) are connected in a straight line.
When digging a trench, it is necessary to adhere to a slope throughout its entire length, at least three to five degrees from the structure to the pit.
If there was no hole under the foundation or in its wall for the passage of the sewer pipe, then you will have to dig under it under the tape.

Therefore, it is recommended to think about this issue in advance. Before pouring the mortar into the formwork, in a certain place a piece of pipe is laid in it, with a diameter that will exceed the size of the sewer pipe by 50 ÷ 100 mm. The pipe to be laid should have a length equal to the width of the formwork, and it is lowered to a depth of about 450 ÷ 500 mm from the ground surface. Having carried out such preparation, you can get rid of unnecessary, rather laborious work.

Another option, when directly in the foundation stack is embedded nozzle of the required diameter, which then it will become part of the sewer pipe itself.
Its other end, on which the drain will be mounted, is extended with a pipe of the required height.

Vertical riser - it is possible to increase it to the desired height
If it is planned to drain in two rooms of the bath, for example, in the washing and shower rooms, then wiring is made from the pipe, and in each of the rooms its own branch pipe is installed.
After the installation of sewer pipes, the trenches are filled up, and on the ground inside the inside of the foundation, i.e. underground, a sand pillow is poured and compacted. For the duration of the work, it is recommended to plug the pipe openings with a stopper made of dense fabric or close it with a special lid, in order to avoid debris or concrete mortar entering the cavities.
Formation of floor layers
This diagram clearly shows the sequence of the arrangement of the layers of the concrete floor in the bath.

- The first step after backfilling the soil with sand, it is recommended to install a protective box made of boards or several layers of roofing material around the pipe. It is necessary so that in case of an error in choosing the height of the nozzle, it can be replaced with a shorter or longer one.
- Next comes the device of a concrete rough base.
- To keep the floor relatively warm and not freeze through in winter, a heater is laid on the frozen concrete slab. Extruded polystyrene foam is well suited for this room. The optimal insulation thickness is 50 mm.
- The insulation is closed with another reinforced screed, the thickness of which must be at least 40 ÷ 50 mm.
- After drying, the middle screed is covered with a waterproofing material - roofing material or thick plastic wrap.
- On top of the film, at a slope to the drain pipe, guide metal profiles are set. Their slope angle should be 3-4 degrees.
- Then the top screed is poured, forming a slope.
- The leveled screed is tiled or covered with one of the waterproof materials.
To carry out all the listed work correctly, you need to consider the features of the technology of each stage. In addition, an important point in the arrangement of the bath floor is the correct installation of the drain. All layers of the "pie" are mounted around the sewer pipe.
Roofing material prices
roofing felt
Basic concrete base
The strength of the upper layers of the floor determines the reliability of the underlying concrete base, so this work must be done with great care.
- The first step was filling and ramming a sand cushion - its compacted height should be 100 ÷ 120 mm.
- On top of it, crushed stone is poured and tamped. This layer is made with a thickness of 100 ÷ 150 mm. It is well tamped with a hand roller, while the bottom layer of rubble will be pressed into the sand. It should be noted that crushed stone can be replaced with expanded clay, which will create an additional insulating layer.

- A reinforcing metal lattice with cells of approximately 80 × 80 mm is laid on the crushed stone - this option is suitable for this stage of work. The mesh can be fixed in some places with bent steel wire staples to the already laid layers. Thanks to this fixation, its edges will not rise and interfere with further work.
- Beacons made of metal profiles are also placed on top of the mesh. They are leveled at the building level and fixed on the slides of a solution made on a gypsum basis. This compound solidifies quickly and helps save time on work.

- Next, a concrete solution is laid out on the prepared surface, made of sand and cement or sand and gravel mixture and cement in proportions, respectively, 3: 1 or 4: 1. The thickness of this layer can be from 80 to 120 mm. The solution is leveled with a rule that is moved along the profiles of the beacons.
- After that, the concrete base is left for the initial curing. This will take at least 7 ÷ 10 days, depending on the thickness of the poured layer.
Installation of insulation
Before installing the insulation, it is recommended to lay a polyethylene film on a concrete slab with a bend on the walls by 150 ÷ \u200b\u200b200 mm, which will become additional waterproofing. The strips are overlapped st other y to another 200 ÷ 250 mm, and glue the joints with waterproof tape.

After that, expanded polystyrene is laid on the surface, the plates of which are tightly joined to each other. The gaps formed between the wall and the insulation must be filled with polyurethane foam. It will not only close the cold bridges, but also fix the insulation in the right place.

If expanded polystyrene will be mounted without film covering, immediately on concrete, then it can be laid on tile adhesive.
Second layer of screed
Since expanded polystyrene is a rather fragile material, it is recommended to cover it with a reinforcing mesh with cells of 50 × 50 mm before laying the second layer of concrete. Some craftsmen lay another layer of polyethylene under the mesh.

Beacons are again installed on the mesh, along which the screed will be aligned. While the gypsum mortar is drying under the guides of the beacon system, set along the perimeter of the room, at the bottom of the walls, a damper tape is glued. This element is necessary for the construction of a concrete screed, since during a temperature difference that is quite likely in a bath, the concrete layer can expand, and the damper tape compensates for these linear vibrations.

After the screed hardens, the protruding edge of the damper tape is cut off.
Waterproofing and slope formation
- Before laying the waterproofing layer, it is necessary to dismantle the box installed around the sewer pipe. If necessary, the branch pipe can be replaced with another one having a suitable height.
- The space around the pipe is filled with cement mortar mixed with foam crumbs or pieces of foam and polyurethane foam. You can fill the space with ordinary concrete mortar.
- Further, the entire surface is covered with roofing material, the canvases of which are overlapped one on top of the other for 100 ÷ 150 mm and are hot glued using bituminous mastic. This waterproofing layer should rise and adhere to the walls 150 mm, rounding the floor-wall joint.
- For the passage of the pipe, a hole is cut in the waterproofing, and then the lower part of the drain is fixed to it.
- Instead of roofing material for waterproofing the floor and the lower parts of the walls, you can use a special compound - "liquid rubber", which forms a dense elastic waterproof film on the surface, or a modern roll material - "isoplast".
- On top of the waterproofing around the drain, sections of metal profiles are set at an angle, which rise against the walls, forming a slope towards the drain. The minimum slope that can be is 10 mm per linear meter.

- Today, special kits are sold, consisting of profiles made at the desired angle - they are installed and fixed on a flat surface, where they form a frame for a sloped screed.
- A drain ladder is temporarily installed in the sewer pipe, and the height of the future screed is determined from it.
- The grate of the drain should be flush with the ceramic tiles that will be laid on top of the screed.

- After that, the inside of the drain is mounted, which must be recessed into the screed. Its grid is installed after gluing the tiles, and is a removable part.
Slope-forming screed and subsequent finishing
- A sufficiently thick concrete solution is laid on the prepared frame. Using the rule of the desired length, the screed is aligned with the frame guides.
- The leveled mortar is left to mature completely. This process will take quite a long time, since the concrete must be completely ready for finishing. In order for the screed to be strong and not crack, it must be sprayed with water, starting from the second day, after pouring, and then covered with plastic wrap.

- When the screed is ready, on its surface, under the tiles, you can install a cable or infrared floor heating.

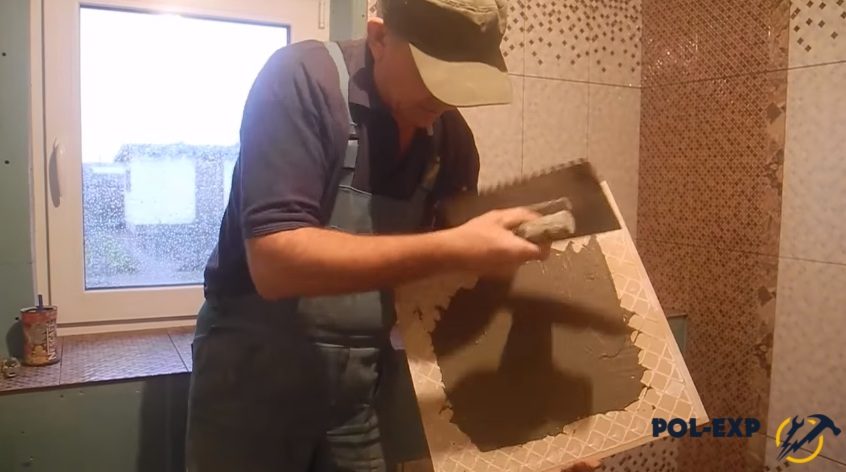
- Further, on top of the finished concrete surface, ceramic tiles are laid on tile adhesive.
- Small tiles fixed on a flexible substrate will fit well on a floor with a slope. It can be easily cut and adjusted to fit the sewer.

- For example, it is very easy to cut a square of the desired size in the middle of it and put it on the pipe, having previously applied tile glue around it. And from this, already tiled section of the floor, it will not be difficult to lay the finishing material in all directions.

Its sufficiently flexible structure allows repeating all “relief fractures” of the floor
- The seams between the tiles are sealed with a special grout, which is usually matched to the color of the material.
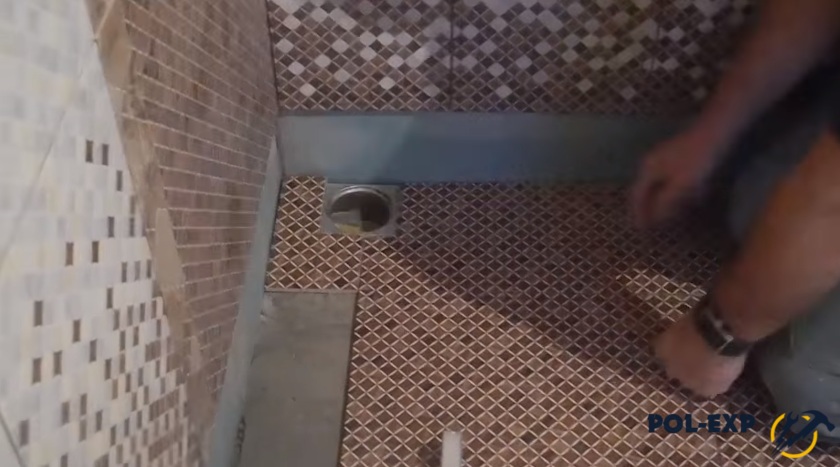
- The last step is to install the drain grate.
Floor installation with the installation of a drain with side inlet
Above was presented instructions for creating a floor using a ladder with direct liner. The sewer pipe ran along the ground, and its branch pipe was located at right angles to it and passed vertically through the floor layers.
Now the second option will be considered, when the pipe runs horizontally and is connected to the ladder from the side. This arrangement is convenient if the main sewer line passes in the next room and it is necessary to connect a drain in the bath to it, or if the pipe from the drain pit immediately goes at a certain angle.
The base screed is arranged in the same way for both options for connecting the drain, so it is worth considering immediately from the next stage of work.
| Illustration | Brief description of the performed operation |
|---|---|
 | On the diagram on the left, it is clearly visible how a ladder with a lateral lead to the sewer pipe is installed and connected on a flat concrete base, and what opportunity exists to organize the desired slope of the pipe from the ladder. |
 | In this case, a drain ladder is connected, which is connected to the drain pipe in the adjacent room and is output to the sewer main, which is embedded in the floor - this ladder is called a checkpoint. For this, measurements are taken between the nozzles, and the location of the drain ladder is determined. If necessary, the ladder rises a little - for this, linings are made under it and one of the pipes. For them, it is better to choose a material that is not affected by moisture, for example, pieces of old ceramic tiles are perfect. |
 | Further, pipe sections are attached to the ladder, which will connect it to the nozzles. All pipe connections are sealed with silicone or a special sealant. |
 | The next step is to install the floor insulation. This option uses two layers of material. The first one is laid around the pipes - it should have a thickness of 50 mm and should be pressed tightly against them. The density of polystyrene foam for the floor must be at least 35 kg / m³. |
 | For the second layer, the thickness of the insulation is selected depending on the height of the drain. The expanded polystyrene is placed directly under the edges of the bottom drain box. The bath room is completely covered with insulation material, and then along the entire perimeter of the room, along the walls, narrow foam strips are installed or a damper tape is fixed. In the future, it will serve as expansion joints during thermal expansion of the screed material. It is recommended to reinforce the foam with fiberglass mesh - it will give the surface strength, which will extend the life of the floor. In addition, beacons made of perforated metal strips are placed on the insulation, along which the screed will be aligned. It is better to secure them with wire staples to the foam. |
 | The next step is to lay out a concrete solution on the surface of the insulation, which should fill all cavities around the flange protruding from the insulation. The solution must be well compacted. |
 | Further, using the rule, the screed is leveled, bringing it to the same level with the ladder flange. The concrete layer is left to solidify and ripen, periodically, starting from the second day, is moistened with water. |
 | After the readiness of the concrete layer, on the walls, using a level, the highest points of the future screed are marked, which will form the slope of the surface. Here you need to take into account the thickness of the waterproofing material, the screed itself and the finishing material from the tiles, and at the same time the slope should be at least 2 cm per linear meter. |
 | Further, it is recommended to lay a waterproofing material on the flange - most often “isoplast” is used for this. It is cut in the shape of a square with a round hole in the middle, with a diameter equal to the drain hole in the flange. |
 | The upper part of the flange is hermetically pressed on top of the "isoplast" with screws. |
 | The next step on the surface of the entire floor should be covered with roofing material waterproofing. But before that, it is tried on, and a hole is cut in the material that is larger than the diameter of the flange, by about 50 mm. |
 | The prepared waterproofing material is laid on the entire surface and hot glued. In the case when several sheets of roofing material are used, they are laid with an overlap of at least 100 mm, and they are also glued together using a burner. The coating must be completely sealed. |
 | Particular attention should be paid to waterproofing floor and wall joints and corners. In corner joints, “isoplast” is fused to the walls, and then solid strips of roofing material are glued to the walls and floor. |
 | Further, a siphon with a grid is installed in the built-in part of the drain, using an O-ring to seal the connection. After that, only the upper grill will remain removable. |
 | Now guides are mounted to form a sloped screed. They can have a ready-made shape, or metal or wooden (plywood) strips are taken, which are set at the desired angle and glued to the concrete solution. When installing the guides, you need to remember that the siphon should have them lower than its height by the thickness of the ceramic tile and the glue to which it will be glued. |
 | Further, a concrete solution is carefully laid out on the surface and aligned with a guide trowel and a rule. A slope is formed along the guides, along which the water will flow freely into the ladder. In order not to clog the siphon grate at this stage, it is recommended to protect it by covering it, for example, with a piece of roofing material. |
 | The seized solution must be rubbed until smooth. For this, the surface is moistened with water and smoothed with a trowel. If the guides were made of boards or plywood, then they must be carefully removed and the resulting gaps must be filled with concrete mortar. If the gaps are wide, then pieces of foam can be installed in them - they will serve as deformation inserts. |
 | After that, all joints are glued with a waterproof waterproof tape. |
 | After all the solutions have dried, ceramic tiles are mounted on the surface. Its laying begins from the ladder. The tiles must be cut with great precision so that they fit perfectly together. It is advisable to select the size of the tile, which will be a multiple of the distance from the walls to the ladder, then you can save yourself from unnecessary work - trimming the tiles installed near the walls and the grate of the ladder. It is very important that the grate of the ladder does not protrude above the tile, but is on the same level with it. To install tiles in this humid room, you need to purchase a special contact adhesive, which will create good adhesion for adhesion of materials. After the glue has completely dried, the joints between the tiles are sealed only with special waterproof grouting. |
Acting in accordance with the instructions presented in the article, having some experience in laying ceramic tiles, it is quite possible to carry out the work on your own, without inviting the masters from outside.
As a "bonus" - another original way of forming a slope to the drain hole using the technology of semi-dry screed.
Video: creating a screed with a slope for ceramic tiles
You can equip the floor in the bath with your own hands if all the necessary work is done correctly. The service life of the floor depends on the quality of the preparation of the base, the choice of insulating materials and the topcoat. We will consider the device of floors for a bath, the features of their installation, as well as the technological nuances that must be taken into account.
Features of the device floors in the bath

How to make a durable and wear-resistant floor in a bath? The construction of a bathhouse as such is carried out taking into account many nuances. A room with a specific microclimate provides extreme operating conditions for the floor covering. High humidity, constant temperature fluctuations and contact of the floor base with water can significantly shorten the life of the floor.
The choice of a specific method for arranging the base in a "damp" room depends on the following factors:
- method of heat and waterproofing;
- type of foundation and the presence of underground;
- seasonality of using the bath;
- type of soil under the building;
- design features of the building.
If the bath is planned to be used throughout the year, in this case it is more expedient to make a capital base with concrete screed pouring. In a frame building, which is used only in the warm season, it is best to make a wooden floor, since its assembly from an economic point of view will be more profitable.
Types of wood floors

The device of the base with the help of wooden flooring will be the most acceptable for seasonal buildings. Wood has low thermal conductivity, therefore it helps to conserve heat in a "damp" room. However, high humidity can cause wood to rot. To avoid this, experts recommend using floor joists and flooring made of coniferous wood. They are less hygroscopic due to the presence of natural resins in the tree structure.
All types of wooden coatings for baths can be roughly divided into the following categories:
- Leaking. Boards are laid at a certain interval, so water is immediately drained from the room due to the cracks formed in the coating, the size of which varies from 3 to 7 mm. The device of such a base is beneficial for several reasons:
- easy installation;
- low cost of floors;
- no need to install a drain system.
- Non-leaking. A monolithic covering, assembled from boards, can be used in buildings that are used all year round. However, in this case, it is necessary to install a water collector at the base, with the help of which the waste water would be discharged into the sewer. The device of a leak-proof coating has the following advantages:
- long period of operation;
- good thermal insulation of the room;
- the possibility of assembling heated floors.
Necessary tools

The construction of a bath is a laborious and responsible process, but one of its most important stages is the arrangement of the floors. The microclimate in the room depends on the quality of the installation work associated with the installation of the sewer system and the laying of floor materials. To implement all the stages of floor construction correctly, first of all, you need to have the necessary tools at hand.
The device of a concrete base is possible with the following tools:
- concrete mixer;
- lighthouses;
- rule (for alignment);
- building level;
- container for solution;
- shovel.
To make wood flooring, you need other tools:
- a hammer;
- jigsaw (angle grinder);
- plane;
- roulette;
- nails.
To understand how to properly install the floors in a bath, consider a step-by-step guide to laying wood and concrete floors.
Standard floor construction

The base installed in the steam room should be 8-9 cm above the zero level. In this case, the room temperature will remain at the required level for a long time. At the same time, the base is made slightly lower than in other rooms of the bath. This avoids water leakage under the floor into the dressing room, shower room, etc.
The standard flooring is represented by a multi-layer cake:
- waterproofing layer (placed on the ground);
- bars for wooden lathing;
- rough coating;
- insulating materials (insulation, waterproofing);
- lags for assembling the lathing;
- heat and water insulators;
- lining;
- air bag;
- wood and concrete layer;
- decorative coating.
Features of base preparation
The traditional construction of a warm floor begins with preparatory work. To ensure a long service life of the topcoat, the following works are performed during the preparation of the base:
- In place of future floors, a mineral pillow is laid, represented by broken brick or expanded clay granules. The thickness of the drainage layer must be at least 15 cm;
- Gravel or gravel 10-15 cm thick is poured on top;
- Then the laid materials are well tamped.
Laying a mineral pad helps to break the capillarity, which causes soil moisture to rise to the base and destroy it.
Preparation of working mixture for concrete floors

To make a high-quality solution for pouring a screed, you need to strictly observe the proportions and order of adding the necessary components. To improve the thermal insulation properties of the mixture, perlite can be added to its composition. The process of preparing the solution itself is carried out in two stages.
First step:
- 10 liters of clean water are poured into the concrete mixer;
- Then, about 2 buckets of expanded sand are poured;
- The components are mixed;
- Then add 5 liters of cement grade M-300, not lower;
- The mixture is mixed well;
- Then add about 5 more liters of water;
- Stir the solution until a homogeneous mixture is obtained.
If necessary, you can slightly improve the technical characteristics of the composition by adding perlite to it. To do this, perform the following actions:
- 10 kg of perlite are poured into the previously prepared solution;
- Add about 2-2.5 L of water;
- The components are mixed until the concrete mass turns into free-flowing;
- After 10 minutes, the components of the mixture are again thoroughly mixed.
Ultimately, a free-flowing composition will turn out, which in consistency will resemble plasticine. After that, a screed is made on the prepared base.
Filling the first layer

If the area of \u200b\u200bthe rough coating is small, the screed is made all over the site at once. To fill the screed over a large area, the room is conventionally divided into strips, processing each one in turn. How to put the first layer of concrete mix correctly?
- The thickness of the "rough" screed must be at least 12 cm;
- The horizontality of the laid layer is checked with a level;
- Level the mixture using a rule;
- So that water does not accumulate on the surface of the finished floor, the screed is made with a slight slope towards the pit;
- The slope of the screed must be at least 1 cm per meter.
Heat and waterproofing of concrete floors
As soon as the screed hardens, you need to go to the stage of heat and waterproofing of the coating. Before laying insulating materials, the concrete surface is checked for bulges, cracks and dents. If necessary, defects on the coating are repaired.
As a rule, the following are chosen as waterproofing materials:
- bituminous mastic;
- plastic wrap;
- rolled roofing material.
After arranging the waterproofing, it is necessary to make the floor insulation. For these purposes, the following can be used:
- mineral wool;
- polystyrene;
- penoplex;
- granulated expanded clay;
- foam concrete.
The thickness of the insulating layer should be equal to 10-15 cm. As practice shows, expanded clay is the optimal insulation for concreted surfaces. It does not absorb moisture, weighs little and also has good sound insulation.
Pouring the finishing screed

Laying the finishing layer of the screed technologically differs little from the previous version. But in this case, the thickness of the screed can vary from 8 to 10 cm. It should be borne in mind that in the process of pouring the mixture, it is necessary to observe the observance of the slope towards the sump.
Still, the flooring in large and small rooms is slightly different. If the base area is large enough, to give the structure more strength, it is worth putting a reinforcing mesh before pouring the screed. In this case, even with intensive use of the bath, the rough coating will not crack.
Features of wood floors
Wooden flooring is a traditional type of flooring that is used for arranging floors in a bath. Despite hygroscopicity, this type of material is still in demand among consumers, due to the following qualities:
- The wood is environmentally friendly and safe for health;
- The flooring has a low thermal conductivity, in contrast to concrete;
- The wood flooring creates a cozier atmosphere in the room.
In addition, a wooden base can be made in just a few days, since the stage of "wet" work can be bypassed, which cannot be done when pouring a screed.
Laying wooden floors

How to properly lay wood floors? It is quite easy to mount a wooden base, but you need to take into account a lot of technological nuances. The whole process of arranging floors is divided into the following stages:
- Erection of support posts... To install the supports, sufficiently thick beams with a section of 15 cm are used. It is the racks that will experience the greatest load during the operation of the base of the floor covering. They are placed on metal or brick posts, secured with steel brackets. When arranging floors in a bathhouse, erected on a pile foundation, the lag is laid on a mortgage crown;
- Installation of the underground. In the case of assembling leaking floors, a 20 cm layer of crushed stone or expanded clay is laid underground. If the soil is clayey and does not absorb moisture well, a tank is installed under the floor to collect waste water, which flows by gravity into the sewer through the pipeline. If you need to make a leak-proof base, it is mandatory to insulate it (expanded clay, foam). To ensure normal ventilation of the underground, ventilation holes are made in the foundation for better air circulation;
- Laying logs and finishing flooring... For the arrangement of leaking floors, the logs are placed in random order, observing horizontality. When installing a leak-proof base, we make a slope from the log towards the pit. In the case of non-leaking floors, cranial blocks are nailed to the logs, onto which rough boards are thrown. Then a layer of hydro and heat insulator is placed on them. After that, the wooden crate is sheathed with a tongue-and-groove board. Inside the "pie", between finishing boards and logs, there should be a gap of 10-12 cm for ventilation of the underground.

It is very problematic to build a bath with a wear-resistant floor, given the specific microclimate in the room. In order to increase the period of operation of the floor covering, such moments should be taken into account during its installation.
The bathhouse is a special room when it comes to the microclimate at the time of its direct operation. There is high humidity and the same temperature. Although the baths are different, both in the number of rooms related to it, and in the characteristics of the microclimate, mainly of them - the steam room. Somewhere the steam is dry and the temperature is over 100˚C (sauna), in another case there is moisture, but the air temperature is lower, within 70˚C (Russian bath). How can such features affect the choice of the method of flooring in these rooms, and how to make a suitable option with your own hands? These, and some other issues related to floors in the bath, will be the topics of this article.
What gender is preferable in the bath?

You can simply wash yourself in the bathroom or shower. The bath, regardless of its type, is intended, rather, for recreational activities and positive emotions. Therefore, it is important that everything is as natural and natural as possible. So any polymers in the outer finishing layer of bath rooms, especially in the steam room, disappear. The same goes for floor materials.
The second requirement for a floor covering is the ability to withstand changes in temperature and humidity. These indicators, again, depend on the type of steam room.
The third condition is comfort in tactile contact with the floor material. It should be of an acceptable temperature, since it is not customary to wear shoes in the bath. This factor depends not only on the coating itself, but also on the quality of the thermal insulation barrier.
Which flooring materials meet all three requirements? These are wood products and tiles. The latter is suitable for a wet steam room with a relatively low temperature, wood will be the best in a sauna, where dry air is provided. The tile for a Finnish bath is not suitable, as it will heat up to such a temperature that it will be impossible to step on it. Wood products will not last long with constant moisture. It is undesirable to process them with all kinds of impregnations, since this will have to breathe. The wooden floor is still made in Russian baths. But at the same time, you should select more durable types of wood (aspen, larch), or be ready to replace the flooring in a few years.
The wooden floor is laid along the logs; for laying the tiles, you need to make a screed. Are there any features of the device of the base under the tiles in the bath, and which of them should be considered? More on this later.
Features of the screed in the bath

The base of the floor under the tiles in this room, in the overwhelming majority of cases, is done on the ground. Based on this, the first two activities to consider are:
- isolation from ground moisture;
- creation of a thermal insulation barrier, especially if it is supposed to be used in winter.
Another feature of the screed, when compared with living quarters, will be the creation of a slope of the surface towards the sewer water intake. This will prevent water from accumulating on the surface and forming uncomfortable puddles.
What material to choose for the device roughing and finishing subfloors? Taking into account the usually small volumes and not too strict requirements for the surface designed for laying tiles, in either case, classic concrete is quite suitable. If desired, for the finishing layer, you can use a liquid or semi-dry cement-sand mixture instead of concrete. It is desirable to strengthen the finishing layer with reinforcement, especially if there is a layer of insulation below.
Are there any special requirements for the concrete base in the bath, taking into account the characteristics of the microclimate? If the screed surface were the final floor surface, then it might be worth it to additionally provide it with moisture repellency. Taking into account that it is now unlikely and tiles will be laid on top, moisture will not affect the base in any way.
When it comes to temperature changes, there are options. The high temperature in a wet steam room will not affect the structure and durability of concrete or other similar material in any way, since the heat goes up. The screed here will warm up to 40 максимальноC as much as possible. This is absolutely not a critical temperature for any cement-based mortar.
It is another matter if at least minimal heating is not provided in the bath, and in winter the temperature in the room will drop much lower than 0˚С (summer cottage option). Then, in the manufacture of a mixture for the device of a concrete screed, it is worth adding substances that improve frost-resistant qualities to it, and with the subsequent laying of tiles, purchase an appropriate glue.
Diy rough base device

In both versions of the finishing flooring (both wood and tiles), the first step is to create a rough screed, which would become a reliable, solid foundation for the structural elements of the floor that will be located above. Therefore, the step-by-step instructions below are applicable in both cases. To carry out the work, you will need the following tools:
- concrete mixer or container for manual mixing of concrete;
- manual or mechanical ramming;
- water (laser level);
- rule;
- half-trowel or trowel;
- earthwork tools.
Materials should be prepared as follows:
- large crushed stone (gravel);
- fine gravel (fraction 1-1.5 cm);
- river (washed) sand;
- cement grade 400;
- dense plastic film.
Now about the sequence of the device of the rough sub-floor on the ground
- Surface soil layers are carefully tamped and leveled.
- A bedding is made. First, a layer of gravel, then fine gravel, half with sand. With the thickness of the proposed insulation 50 mm, the top layer of the fine filling should be 15-17 cm below the desired level of the finishing screed.
- The fine bedding is leveled, a plastic film is laid on top with an overlap on the walls to the level of the upper edge of the finishing base. If the film is not continuous, the adjacent areas overlap by about 15 cm. The film will serve as a hydro-barrier in the path of ground moisture, and will also prevent moisture from leaving the concrete.
- Concrete is being prepared. For a rough screed, a solution with a reduced binder content can be used. Therefore, the ratio of 4: 4: 1, where, respectively, fine gravel, sand and Portland cement M-400, will be quite acceptable for these purposes.
- A rough screed does not imply a perfect leveling of the surface, therefore it is not necessary to install beacons here. But draw a horizontal line along the perimeter of the walls, using a water or laser level and some kind of marker, preferably. The smoother the surface, the easier it will be to lay insulation or install joists under a wooden flooring. The prepared concrete is poured, starting from the wall farthest from the entrance to the room, and leveled first with a trowel, and then with a rule.
Important! In order to make the rough base as even (within reasonable limits) as possible, when the concrete grasps to the point that it can be stepped on, it is necessary to tread the pliable surface as a rule, removing strong convex irregularities. The solution that is removed in this case can be immediately placed in the largest recesses. This method allows you to sufficiently level the surface for subsequent technological operations.
Do-it-yourself insulation and finishing screed

To create an insulating barrier under the concrete base of the floor, it is better to use moisture-resistant polymer insulation. In our case, you can use sheet polystyrene with a density of 35 kg / m3, but extruded polystyrene foam, which is stronger and absolutely impervious to moisture, is better. In addition, slabs of this material are equipped with docking protrusions, which makes it easier to install without gaps.
If the sub-base is flat enough, the insulation boards can be laid directly on the surface. When the existing irregularities do not allow to lay polystyrene foam qualitatively, you can use polymer-cement glue, which will help smooth out irregularities and "nicely" lay the sheets of insulation. Plates should be positioned offset to avoid long longitudinal seams. A gap of about a centimeter should be left between the expanded polystyrene and the wall to allow deformation expansion. It is advisable to fill all seams and gaps with polyurethane foam so that cold bridges do not form.

In the case when glue was used to lay the insulation, you should wait a day, after which you can install beacons. A long building level is used for control. As guides, you can use plaster beacons with a T-shaped end, or guide profiles that are used to assemble frames for cladding. Lighthouses are installed on a thick cement-sand or plaster mortar lined with slides. When adjusting their position, they are pressed into the enclosed mixture.
If there is a desire to make a slope, beacons should be placed at an angle. In order for the water to drain from the tile, and at the same time the inclined surface does not create discomfort while walking on it, the optimal height difference is in the range of 1.5-2 cm / m.
Taking into account possible temperature differences, even with a small area of \u200b\u200bfinal pouring, a damper tape should be fixed to the wall along the perimeter, which would protrude 2-3 cm above the surface level. The excess can then be cut off or covered with a plinth.

If for the device of fine pouring the choice fell on concrete, the proportions of the solution are as follows: 4: 2: 1, where, respectively, the volume fractions of sand, fine gravel and cement M-400. The cement-sand mixture is prepared in a ratio of 4: 1. The prepared solution is poured between the beacons and leveled with a rule. When the mortar sets, the surface should be rubbed using a plaster float. Lighthouses during the subsequent laying of tiles can not be removed. If this is done, the seams should be filled with freshly prepared mortar and smoothed.
Wooden floor in the steam room

In the room that will be a Finnish bath, everything inside should be wooden. Only wood at temperatures that are provided here will not cause temperature injury to the body. Therefore, you need to make a wooden flooring as a floor.
Pouring the floor on the ground is the simplest and most reliable way of arranging a bath, it excludes the presence of wooden structures, which significantly increases the service life of the structure.
In terms of complexity and cost, the work belongs to the middle segment and consists of three stages.
| Filling stages | Short description |
|---|---|
| A very important stage, the problem of water drainage from the bath is being solved. All work should be done correctly, otherwise the wooden structures are affected by mold and rot. In the most difficult cases, the foundation can be undermined, the consequences of such a situation are the most unpleasant. |
| The structure consists of several layers, each of them fulfills its own important function. The number and parameters of layers can be adjusted depending on the geodetic characteristics of the soil and the climatic zone of the location of the building. |
| The choice of materials depends on the wishes of the owner. Modern technologies, in addition to ordinary floors, make it possible to arrange coatings with electric heating - the comfort of taking water procedures is significantly improved. |


To facilitate independent work, we will give detailed instructions for performing each stage of pouring concrete floors. Having this information, each developer can make their own changes to them, taking into account the wishes and possibilities.
Step 1. Make a drainage plan, taking into account the location of the steam room, changing room and other premises. At the same time, carefully consider the place of installation of the water receiver, if any. The receiver can be made from an ordinary metal or plastic barrel with a volume of about 100-200 liters; holes should be cut on the sides and bottom of the container using a grinder.

Step 2. Dig trenches according to the diagram drawn up. Observe the slope, the difference in height per linear meter should be about 1–2 cm. There is no need to use special devices, the slope can be checked by eye or using an ordinary level.

Step 3. Trim the bottom and lay the plastic pipes. It is not necessary to make a sand bed, the depth of the trenches is insignificant, the sewage system will not experience much pressure. If we take the drain level in the steam room as zero, then the maximum depth of the trench at the exit from the bath, 6 m wide, will be about 25–30 cm. There is no need to be afraid that the water will freeze in winter. First, it is warm. Secondly, the slope provides a complete drain, the pipes are always empty, there is nothing to freeze.

How can the bubble level control the slope of the pipes?
- Place the device on a flat surface, take a ruler and place it to the level at a distance of 50 cm from the beginning.
- Lift the device until the gap between it and the plane is equal to a centimeter.
- Visually remember the position of the bubble on the scale or make a mark with a marker. In the future, when checking the slope of the pipes, use the mark made.
Step 4. Assemble the drain inlet and attach it to the pipe. To facilitate the assembly process, you can use soap, soapy water or sunflower oil. Wet rubber seals with these fluids. It is strictly forbidden to use automobile oil for this purpose - the rubber in the seals is ordinary, automobile oil will spoil it, you will have to completely change it.


Step 5. Check the operability and serviceability of the drain. To do this, fill up the water in a liter jar, place an empty container of the same volume at the outlet of the sewer pipe. Pour water into the receiver and see how much it poured out of the drain. If the volume is much less than the filled one, then this means that the pipe is laid with differences in height, water is retained in uneven areas.
Practical advice. If less than 500 ml is delayed from a liter, then there is no need to redo the sewage system, minor oversights will not affect the performance of the structure. If there is more than 500 ml of water left in the pipe, then you need to find the problem area and eliminate the marriage.
Everything is normal - fill up the trench, thoroughly ram every 10 cm of soil height. For ramming, you can use any convenient means at hand.

It is advisable to slightly moisten the earth before compaction. Keep in mind that subsidence under concrete can be a big problem. After installing the drain, further construction work can be continued.
Prices for the range of septic tanks "Termit"
Termite septic tanks
Stage two. Pouring concrete
Prepare materials, tools and equipment. For pouring, you will need gravel, sand, cement, a concrete mixer, as a rule, a container for mortar, a trowel and a level. The amount of materials depends on the size of the bath and the thickness of the concrete. The minimum pouring height cannot be less than 10 cm. To increase the stability of the structure, it is recommended to use building reinforcement with a periodic profile with a diameter of 6–8 cm or metal meshes.
Preparatory work
Step 1. Remove fertile soil and large debris from the site. If possible, treat the soil with special agents to prevent weed growth.


Step 2. Using a laser or water level, mark the floor around the perimeter of the foundation. It is from this mark that the depth of concrete placement and the thickness of all layers will be controlled. Calculate the parameters and, if necessary, deepen the pit. The earth can be removed by hand, while the horizontal surface of the bottom should be constantly checked.
Step 3. Start backfilling the pit with gravel.

The thickness of the material is within 15–20 cm. It should be filled in layers of about 10 cm, then the gravel is leveled and rammed. Leveling is much easier with an ordinary metal rake.

It is recommended to use screening with fine gravel for the first layer, it compresses better and holds loads. If the floors are poured in several rooms of the bath, then work should be started from the most distant one, the material can be transported along wooden ladders. This sequence eliminates the need to re-level the bedding.
Step 4. Each layer of bedding must be tamped separately. This can be done manually or using a special unit. Working manually is long and difficult, and the quality can be unsatisfactory, professionals recommend using vibratory plates.

You should go through one place at least three times, pour in large depressions at once, remove the bumps. The smoother the filling, the less expensive concrete will be needed to fill the floor.
Step 5. After tamping, a layer of crushed stone of fraction No. 10–20 with a thickness of 10–15 cm should be poured. After leveling, tamping follows, the algorithm for performing the work is the same as for fine gravel with screening.


Practical advice. You should not use crushed stone of large fractions, it is much more difficult to work with it, and there is no noticeable positive effect.
The thickness of each layer should be controlled using the marks previously made on the foundation tape.

Step 6. Prepare the last layer, you can use sand or fine screenings for it. Choose the material that is cheaper in your area, from a practical point of view, there is no difference. Tamp down thoroughly after leveling. It is advisable to moisten the last layer with water and let it stand for at least one day, during which time the bedding will sit down, gaps and other problem areas will be found. They must be immediately removed and re-tamped.


Step 7. Install the beacons according to the selected screed thickness. Lighthouses are much easier to set up with a laser level. Drive wooden pegs or pieces of metal bar into the bed along the line of the beam. If there is no laser level, then the extreme beacons can be set at the water level, then pull a rope between them and adjust all the remaining ones in height. The distance between the beacons is 40–50 cm. The width of the lines should be 15–20 cm less than the dimensions of the float.
Step 8. Use a mesh reinforcement to increase the strength of the concrete floor. Lift it above the bedding, the mesh should be about 1/3 of the concrete height. Building codes forbid it to be placed in the middle of concrete; in this position, it does not reinforce the structure. To raise the mesh, you can use various pads or pour some concrete under it with a shovel and tear it off the ground with your hands.

Step 9. Pour concrete over a row of pegs.

Important. The concrete should be mobile but not runny. Observe the recommended proportions of the components, in most cases the mass requires one part cement for three parts gravel and two parts sand. But this is an optional recipe, if a more durable coating is required, then the amount of cement increases by 15–20% and vice versa. There are marks on the basement of the bath, opposite which the pegs of the lighthouses were hammered. Using a trowel, smooth out the concrete a little and make dashes over the pegs, they will help you navigate when laying the rail.

Step 10. Put metal or wooden slats in place, carefully check their position, the quality of the concrete floor depends on the correctness. Move rivers with left / right movements until they completely shrink. Raise the reinforcement mesh, adjust the position of the slats again.


Practical advice. In our case, the water will be drained in the middle of the steam room or washing room. Such a device requires the floor to be at an angle towards the drain. This condition is fulfilled when laying ceramic tiles. Concreting floors with a slope towards the center is very difficult, keep this in mind while performing work.
In order not to damage the hammered pegs during concreting, it is recommended to cover them with bricks on both sides.
What is the quickest and easiest way to pour a concrete floor? There are several recommendations from experienced builders.
To facilitate the process make a gutter for the concrete mixer, along it the mass will be directed to the right place. To prevent the gutter from pressing the reinforcing mesh to the backfill, place a piece of brick under it and lift it up.


During work constantly move the mesh into the concrete layer, lift it off the ground. Use a shovel to alternately throw concrete between two lines, the thickness of the material should slightly exceed the height of the beacons.
Recommended first, perform a rough straightening of the mass with a shovel and trowel... Due to this, the rule pulls together less concrete, it is much easier to work, the surface is even, even after one pass. If the network is hollow, then pour a mass into them and re-walk the rule.
It is physically difficult to pour a concrete floor by hand, you have to constantly work in an inclined position. Today, there are very practical knee pads, we advise you to buy and use them. They will allow you to change body position as you get tired.
Do not sprinkle the mixture over a large area - very difficult to edit. The width of the section should allow you to easily reach the edges with your hands in a kneeling position.

Raise the net again after each alignment.During walking, it constantly lowers, if the reinforcement lies on the bed, then there will be no increase in the strength of the floor, remember this. Use the same method to screed the entire room.
Experienced builders use the 2.5-3 meter rule, lighthouses are made at about the same distance. Due to this, not only does the pouring speed significantly increase, but the surface becomes smoother. An additional condition is that the rule should be quite rigid and not bend in the middle while pulling off excess concrete, otherwise small depressions will form between the lines. For accurate pouring, this is unacceptable, but it is not a problem for a finishing leveling screed.

While working with the rule need to constantly clean the slats from pebbles, the plane of the instrument should not bounce. Remember that it always takes much less time to follow the recommendations than to eliminate the marriage. Do not try to simplify the technology yourself, such experiments do not lead to anything good.
Do not pull up a large block of concrete. The rule will necessarily bend, the surface will have to be trimmed several times. If you are a little mistaken with the amount of concrete poured between the beacons, it doesn't matter. As soon as the rule has collected a large volume, scatter the mass with a trowel over the free places and only after that continue to pull it together.

Leveling the mortar with the rule - photo
It takes approximately 14 days for the concrete to harden according to the current regulations., during this time it gains at least 50% of its maximum strength, which allows it to continue construction work. Inexperienced builders try to continue working on the floor after a few days, once the structure can support their weight. We strongly discourage doing this. The fact is that immature concrete gives microcracks, which are invisible to builders at first. But then, over time, microcracks will certainly increase in size, the strength of the structure will not correspond to the expected parameters. The consequences of haste can be the most unpleasant.
Concrete floors do not remain in this state, they must be completed. there is several options for finishing.
- Wooden logs or slats are laid on concrete, boards are laid on top.
- The floors are finished with ceramic tiles. If the concrete is poured correctly and evenly, no screed is required. If during the production of work the technology was violated or the master does not have enough practical experience, then it will be necessary to make a leveling screed.
Video - DSP screed with a slope to the ladder
We will take a quick look at the option of a concrete floor with ceramic tiles.
Stage three. Finishing the concrete floor
As we mentioned, the drain should be located at the lowest point of the floor. It is allowed to install it not only in the center of the room, but also against one of the walls. The decision should be made taking into account the placement of shelves for the steam room or shower, structural features, etc.

Important. There is no need to make the slope of the pavement too large, just a few millimeters per linear meter. In any case, the water will all go away, and it will become much easier to work. Another important nuance is that too much bias creates difficulties during the adoption of water procedures.
There are recommendations from some builders to make a floor in a heated bath. Of course, you can listen to them, but we do not recommend doing this. Why? Firstly, the floor in the bath is already warm; in principle, it cannot be cold. Secondly, electrically heated floors require special wiring, the total capacity of the installation exceeds 5–7 kW. For rooms with high humidity, there are very strict PUE safety requirements, it is difficult and expensive to fulfill them in full. Thirdly, if you are afraid that your feet will freeze, it is much easier to make wooden trellises. Put them not only in the bathhouse, but also in the dressing room and other rooms. It will be very cheap, it will become comfortable to wash.


Keep in mind that the larger the tiles, the more difficult it is to lay them on a slope. All corners are located in different planes; it will not be possible to make the joints smooth. The best option is to use mosaic tiles. This material makes it possible to make any turns and tilts, a large number of small plates correct minor errors.
How to install ceramic tiles with a uniform slope?
Step 1. Take four tiles, place them at the corners on the drain and mark the diameter of the hole on them. Using a grinder with a diamond disc, carefully cut the holes.
Step 2. All tiles at the drain must slope in two directions. We have already mentioned that there is no need to make a large angle, a few millimeters are enough. Small slopes can be done with glue, for large ones, you will first have to deal with the screed or use a cement-sand mortar for gluing.
Step 3. Throw the material under the surface of the first tile, put it in place and gradually sink it with your hands so that the drain point is the lowest. Check the slope immediately. In the same way, lay the remaining tiles at the drain, making sure that they all slope towards the hole.


Step 4. Finish the first row with only one plane to be controlled between adjacent tiles. This is much easier than setting two planes at the same time.

Step 5. The position of the tiles of the second row must be controlled by two parameters. The edges should be in the same plane with the first row and be parallel to each other.
Practical light. In order for the tiles not to move spontaneously, the mortar should be made a little thicker than usual.
At first, it is recommended to lay out four tiles around the perimeter of the drain, to allow time for the glue to harden. The fact is that these tiles will be used as a template in the future; any displacement is strictly not allowed. The position of the rest is constantly monitored for the first tiles, the load on them during the production of work is the greatest.


Step 6. Further work is recommended to continue in parallel rows. If you have concerns in your qualifications, then you can increase the area of \u200b\u200ba square area by alternately laying out tiles on each side of the square. This algorithm takes much more time, but it allows you to correct the mistakes made in time. For beginners, it is advisable to first make a dry layout of the tiles, and instead of glue, use stands of various thicknesses.

Tile marking


The larger the floor area, the longer the level should be. The tool must simultaneously control the position of at least three tiles, this is the only way to avoid kinks. The seams are closed after the glue has completely hardened, with their help you can slightly smooth out the sharp joints of the tiles.

This completes the work on pouring the concrete floor in the bath, you can start finishing the interior surfaces of the room.
Video - Laying tiles with a slope under the drain