Unfortunately, ordinary compacts and smartphones often do not know how to create beautiful bokeh. This is due to the fact that such devices have a built-in matrix of a smaller size. What should owners of budget cameras do? We can recommend them - use the Photoshop program, where it is not difficult to make a blurred background. You just need the appropriate practice, which you will now receive.
How to blur the background in Photoshop?
First, you need to clarify that not every photo is suitable for blurring the background. It is best to choose a picture in which the person's legs are not visible, as well as nearby objects. In our case, the person is standing against the background of the forest, this frame is ideal for processing. If there was also a bush or tree in the foreground of the photo, then there would be great difficulties.
Immediately, you should remember that the desired effect is achieved using the "Gaussian Blur" function. When applied to any shot, it feels like the photographer forgot to focus his camera. But we need to figure out how to blur the background in Photoshop, not the entire image. Therefore, initially, you should select the object that remains in the field of focus. There are several ways to do this. The easiest is to use the Magnetic Lasso tool. If you already know how to use it (in one of the previous lessons we talked in detail about its work), this is very good. If you don't have enough skills, then you have to sweat. But in this lesson we will only briefly touch on this method. First of all, it is worth talking about how you can get a blurred background using a mask. It's difficult for a beginner, but the result is impressive. It may take you 15-20 minutes to process one photo.
Blurred background in Photoshop CS5
First you need to create a copy of the existing layer. This is done in the Layers panel. Just open this palette and press the keyboard shortcut Ctrl + J. You can also drag the "Background" layer onto the "Create New Layer" button. This will also result in a copy of it. 
The newly added layer needs to be blurred. As mentioned above, the Gaussian Blur filter is used for this. It is located under the "Filter-Blur-Gaussian Blur" path. The filter is adjusted by dragging the slider that affects the blur radius. Focus at this moment on the background. It should be blurred as if you were taking a picture with a DSLR camera at wide aperture. Do not overdo it, otherwise the picture will not look realistic. If the changes are not displayed on the photo, then check the box next to the "View" item. This creates a blurred background in later versions of Photoshop CS5. 
When the degree of blur suits you, click the "OK" button. Now you need to apply a layer mask to this layer. To do this, go to "Layers-Layer-Mask-Show All". You will not notice any external changes after clicking on this item. But in the "Layers" panel, you will see a white rectangle. 
And now the hardest part begins. Masks in Photoshop allow you to remove the effect of the applied filter from the specified areas. Therefore, you need to tell the program that the person in the photo should remain sharp. To do this, you will have to paint it completely in black. It's tricky, so zoom in to 100%.
Pick a black color and then go to the Brush tool. Set the hardness to 20%. The diameter depends on the resolution of your photograph and the size of the person. When the diameter suits you, start painting in black over the subject. 
Make a blurred background in Photoshop
Gradually, you need to make the whole figure of the person sharp. It's not scary that you will slightly go beyond its edges. You can press the Latin X key at any time. This will change the color from black to white. Now all that remains is to go with a brush over those places that have inadvertently become sharp. The filter action will be applied to them immediately. 
Walk in white along the outline of the person. You have to make sure that even a part of the background is not sharp. For accuracy, you can reduce the size of the brush and increase the scale of the picture up to 200-300%.
Most of the work is ready: we have already succeeded in making a blurred background in Photoshop. But now there is a kind of halo around the person with its blurred outline. You need to get rid of it. To do this, use the Clone Stamp tool.
Combine both layers into one. To do this, go to the path "Layers-Run flatten". The background layer must be unlocked. To do this, double-click on it in the Layers panel and give it a name. Next, use the Clone Stamp tool. Set the pressure to 10%. It remains only to remove all existing artifacts. You should already know how to work with this tool. If this is not the case, then Photoshop will explain everything to you. In short, this tool copies one area of the picture to another location. The area to be copied is selected by pressing the Alt key and the left mouse button. Then click next to the outline of the person so that a stamp appears on it in the form of a copied circle. Do not forget to adjust the diameter of the brush, otherwise you run the risk of climbing a person's figure too much or taking too long.
As a result, we get a pretty good image. Some people might get the impression that it was captured with a good lens and DSLR camera. But in fact, it is enough just to look closely, as some artifacts will become noticeable. Only a very painstaking photo processing, which sometimes takes an hour, will help to get rid of them. That is why experienced photographers use high-quality high-aperture optics. Better to spend a decent amount, but then save a lot of time. 
How to blur background in Photoshop CS6?
As for the second method of blurring the background in Photoshop, it is very similar to the first. A copy of the background layer is also created, and the unlocked background layer is blurred using the above method. Then you have to go to the top layer and select the person in any way you like. The most commonly used tool for this is the Magnetic Lasso. Then all that remains is to invert the selection and enjoy the result. This is also how you can blur the background in Photoshop CS6 and later versions of the graphics editor.
This concludes our lesson. Today you have mastered another useful skill that you can then apply to almost any portrait photo. Now you know how to blur the background in Photoshop, which should only make your photos look better.
Dear friends, if you are tormented by a question how to make a blurred background in a photo in Photoshop, then this lesson is 100% for you. In this tutorial, I show you how in Adobe Photoshop, using simple techniques, step by step, you can quickly and easily blur the background of any image.
And so let's do everything in order.
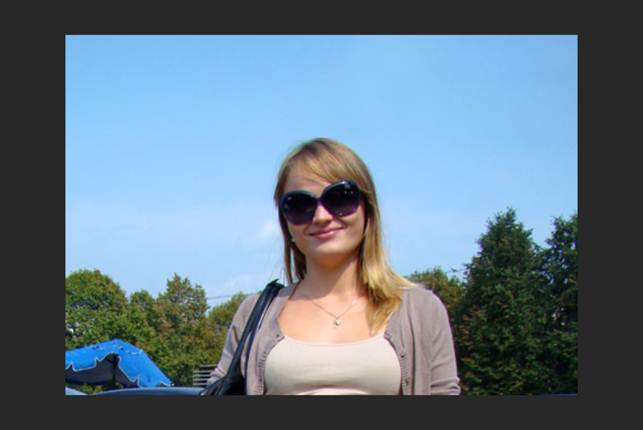
In this tutorial I will use this photo of the bride.
Detailed lesson - How to blur the background in Photoshop
1. Download the photo to your computer and open it in Photoshop File -> Open(File → Open or CTRL + N - in parentheses, along with the translation, I will indicate abbreviations - in other words, “hot” keys that save time in Photoshop).

Versatile photo editor
« Home Photo Studio»Is a modern and efficient photo processing software. Using the basic functions of this software, any user can quickly and efficiently edit the necessary photographs. In addition to the standard set of actions (retouching and eliminating defects, improving image quality, etc.), this graphic editor includes over 100 unique effects and filters, dozens of photo design options: masks, frames, collages, as well as the ability to create postcards and calendars based on your pictures. The application can be downloaded from the official website of the program:

2. The photo is large, let's reduce it a little (to fit on the screen, you can skip this step), go to the menu Image → Image Size(Image → Image Size ... or Alt + Ctrl + I) and reduce the size of our photo, I made it 500 pixels wide, the program automatically made 750 pixels in height, then click OK.

3. Let's put 100% scale for the photo, for this we double-click the left mouse button on the tool Scale(Zoom or Z).


4. After that, go to the menu Window(Windows) and select the palette Layers(Layers or F7). A palette for working with layers in Photoshop opens.

Select our layer, now it is the only one in the document, right-click on it and select the item Create duplicate layer(Dublicate Layer ...).

A copy of the layer is created (the layers are completely identical to the initial one). Let's call it Copy and press OK.

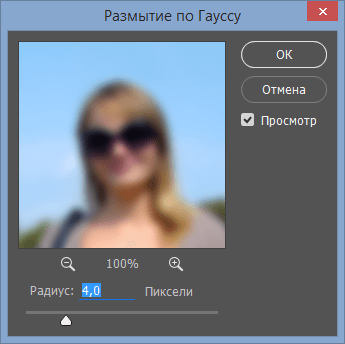
4. Now let's move on to creating blur in the photo. Go to the menu Filter(Filter) and select the command Blur(Blur, as you can see there are several ways to blur, we will select the item Gaussian blur, Gaussian Blur).

I chose 3 pixels.

In the end, I got it like this.

And so we blurred the background (hope everything is clear here and you won't have any more questions how to make a blurred background in photoshop), it remains to make our bride in the foreground clear. To do this, go to the palette Layers(Layers, F7), select our blurred layer and click on the button Add layer mask(Add Layer Mask).
A mask is added to the layer.

I will briefly tell you how masks work in Photoshop, painting on the mask with black, we delete (as if wiping) the contents of the layer, painting on the mask with white, we restore the contents of the layer.
Let's go back to our example. We take the tool Brush(Brush, B), set the foreground color for it: #000000 - black (in the palette with tools at the bottom there are 2 squares - the first color of the foreground, the second - of the background) and click OK.

After that, select our blurred layer, select the mask icon in the layers palette.

Now painting with a brush on our layer (I started with the face), the image on the layer will be deleted. You can also change the size of the brush, the hardness of the brush. With the selected instrument Brush, there are tool settings on top, select the small inverted triangle (next to the brush size).

A window drops out in which you can select the brush size and hardness.

If everything is clear with the brush size, the larger the number, the larger the brush size. As for the stiffness, I will explain that the higher the percentage of hardness in the brush, the sharper the edges are when painting. If you set the hardness to less than 100%, the edges of the brush when painting are blurry, thereby obtaining a smooth transition in our lesson. We need to experiment with stiffness while processing the image.
I took a brush with hardness in 20% and drew it in the area of the girl's face and this is what I got:

And if you look closely at the mask icon, you can see black spots in the places where we painted with a brush.

Let me remind you once again, by painting with black, we delete the contents of the layer, if now switch to white and start painting, we will paint over the contents of the layer - this is what masks are good for, they are universal and you can always delete or return the contents of the layer without touching the image itself ...
Now it remains to simply select with a black brush (changing the hardness, brush size and brush color in the right places) our bride, in the end I got it like this:

As you can see blur the background on the photo in photoshop not at all difficult (with a little practice in this, you will perform such operations automatically).
If you have any questions during the lesson, please ask them in the lesson comments.
13.08.2016 27.01.2018
Detailed lesson, instructions on blurring in Photoshop. You will learn how to create a blur of any objects and images.
Group filters blur has existed in Adobe Photoshop for a long time, since early versions, the group includes many options for blurring - Gaussian Blur, Motion Blur, Surface Blur and many others, this group of filters is located in the menu Filter Blur (Filter-Blur). Starting with version CS6, new types of blur have appeared, with a wider range of settings, you can open a subgroup with new filters by going to the menu Blur Gallery Filter (Filter-Gallery Blur).
In the lesson, we will get acquainted with the most popular type of blur and, using an example, we will learn how to make blur in Photoshop.
Gaussian Blur gives a blur effect throughout the image, you can go to this filter through the menu Filter-Blur-Gaussian Blur (Filter-Blur-Gaussian Blur).
Let's open the photo with the girl (https://cloud.mail.ru/public/C9Q6/jDda1wyej), the background and the girl in this image have the same degree of clarity, which is why the girl is lost in the background. According to one of the rules of aerial perspective, the main object should be clearer and more contrasting, then our eye will immediately catch where the main things are in the composition, and where are the secondary ones. File-Open (File-Open):
Duplicate the layer (Ctrl + J) or double-click on the layer in Layers Panel - Duplicate Layer. Opening the filter Gaussian Blur, Filter-Blur-Gaussian Blur (Filter-Blur-Gaussian Blur). The following window will open:
Radius blur directly depends on the size and resolution of the image, as well as on the desired result. Let's choose a radius in 5 pixels- so the effect will become clearly visible. For this picture, this value of the blur radius is a bit too much, but we chose it in order to make the difference more obvious.

Add to the blur layer layer mask, click on the icon layer masks v layer panels:

We choose Brush tool (Brush), tool hotkey V(in English layout):
Colour foreground - black:
Making sure that mask layer active, erase black brush on layer mask blur with a girl. If you accidentally erased excess, we change Colour tassels on White and return the deleted fragment. Black color on layer mask- erases, White- restores the visibility of the image.
This is how it looks mask layer after processing black brush:

And the picture as a whole:

Usage masks layer has one negative point - a halo appears at the junction of the main object and the background, this can be easily avoided if before blurring with tool Stamp (Clone stamp tool) , functions Content-Aware Fill or any other convenient tool for you to clone the background at the junction with the object, inside the object itself. In the case of our photo, it looks like this (forgive me, this lovely girl!):

Briefly about work instrument Stamp (Clone stamp tool).
Tool shortcut key - S. Using the tool, you can clone parts of the image to other areas. In order to select a sample for transfer, click left keymice with a clamped keyAlt then let go Alt and move a piece of the selected image to the desired area, click again left mouse button- and the piece "takes root" in a new place.
Again, at the junction of the object and the background, we take a sample from the background and transfer it to the object, and so on along the entire outline of the main object.
And here is what the image looks like if you blur not the original layer, but the processed along the contour the Clone Stamp Tool and then erase by layer mask blur from the girl:

There is no halo, the boundaries are clear, the emphasis is on the girl, the background does not distract attention.
So we learned how to blur in Photoshop.
30/05 6758
Photosearch wants to take time today Photoshop CS6... This version has been at the top of the download list for over three years. It is comfortable, fulfills all the tasks and desires of the master. If you do not want to take training courses, you can master the program while sitting at home online. What are her opportunities and why do photographers love this editor?
"Blur" filter "Blur" and three types of blur
The program provides many functions for processing photos. The most favorite filter among photographers "Blur" ("Blur"). It allows the viewer to focus on one element. The subject is highlighted and the rest of the background is blurred. All work consists of changing filters. They have a good control system, so it will be quite difficult and time-consuming to repeat the effect outside the filters.
There are three types of filters in Photoshop CS6. The first of them " Field blur"(" Blurring the area "). You might think that apart from the usual blur, you will get nothing more. But this is wrong.
The developers have made the filter much more interesting:
... You can create multiple blur points, and each can have its own parameters.
... You can fully adjust the edges of the blur, combine them and create the most natural and beautiful result.
... In any photo, you can turn on the mask by pressing "M" and see the elements that are most blurred. As you can see in the image below, there is a man with a spray can in the center, so they were not touched in any way by the treatment. The woman on the right is a little blurry, but the area at the top left is blurred with a soft transition.


Thus, it seems that you initially set a shallow depth of field. And to make the work even easier, there are hot keys: by pressing "P", you can view the source, and "H" - allows you to see the result without unnecessary icons.
The second type is " Iris blur"(" Focus Simulation "). You end up with an oval area that sharpens the subject while blurring the rest of the background. This shape can be changed, made more round or oval, depending on the subject of photography. It can also be changed to a rectangle using the square at the top right. Additional control over four points. They track the gradient of the blur so that the transition is crisp or blurry.


And the last kind of filters - " Tilt-Shift"(" Simulated Tilt-Shift Lens "). This blur mimics the "side" effect of the optical axis, where the depth of field of distant objects remains shallow, and all objects in the front look unnatural. This area you can also rotate, resize, move wherever you want, and fix the edges of the field.


You can view the result of your work using the mask. It immediately shows all the elements that are blurred and those that remain clear. You can see this in the picture with the ships. As you can see, the yachts themselves have remained sharp, but looking up, you can see how the picture begins to blur.

And here it is - "Bokeh"
There is one more tab that is available for any filter - “ Bokeh"(" Boke "). For photographers, it’s not worth explaining what it is and that you can easily create a drawing from circles in the blur area. This addition will look most effective in night photographs where there are point light sources.

To make the bokeh effect as noticeable as possible, set a high aperture setting on the camera. With small circles, the frame will not look so impressive. You can make the bokeh even more attractive by using the color, which is available in the “ Bokeh Color"(" Colored Bokeh ").
Each of these filters is used for its intended purpose. By using Field blur you can create the effect of a wide aperture photo. Second filter Iris blur highlights the main element in the frame. With this function, you do not need to look for the main subject for a long time, and then you can easily highlight any detail. A Tilt-Shift Blur best used in landscape photography. Each of these filters can make your photo look perfect.
In some cases, to make your photo look more interesting, you need to make the background behind the person or subject blurred. Using a professional camera, you can do it without any problems. But if you have the most common lens or you have already worked on the photo and replaced the background image, then you can blur the background using a computer and Adobe Photoshop.
You can read how you can cut out a person in Photoshop and replace the background for a photo by clicking on the link. In this article, let's take a look at two ways to help make a blurred background on a photo in Photoshop.
In the first, we will use creating a new layer with a mask.
Open the desired image: "File" - "Open" or "Ctrl + O".
Go to the layers palette and create a duplicate of the background layer. Click on the "Background" layer with the right mouse button and select "Duplicate Layer" from the menu.

Let's name the created copy of the background layer "Layer 1", click "OK".

In the Layers Palette, "Layer 1" should remain selected. Now we will apply a Gaussian blur to it. Click on the "Filter" tab and select "Blur" - "Gaussian Blur".

A dialog box will appear. In it, use the slider to select the blur radius, the result can be immediately seen in the photo. If nothing changes in the main photo, check the Preview box. Click OK.

Create a mask for "Layer 1". On the layers palette, keep it selected, click on the "Add layer mask" icon.


From the toolbar select the "Brush Tool" (Brush). Black should be selected as the primary color, white as the secondary color. Pick the size you want and paint over a person or object with a black brush, which should remain clear in the photo. If you accidentally erased the wrong area with blur, change the color of the brush to white and drag over it with the mouse.
The girl in the photo becomes clear, and the background behind her remains blurred. To correct the edges, zoom in on the photo and walk over the girl with a small black brush, over the background with a white brush.

In the layers palette on the mask, those parts that we went through with the brush will be highlighted in black.

As a result, we will get the following image: now the background behind the girl is slightly blurred.

Let's move on to the second method. here we make a copy of the layer and select the desired object.
Let's hide the image for which we blurred the background in the previous way: remove the eye in front of the "Layer 1" layer.
Create a copy of the background layer. Click on "Background" (Background) with the right mouse button and select "Duplicate Layer" (Create a duplicate layer).

Let's name the new layer "Layer 2". Leave it selected in the layers palette.

To blur the background for the photo, apply a Gaussian blur filter to the "Layer 2" layer. Open the dialog box, as described above, select the appropriate radius and click "OK".

Now you need to unlock the background layer. To do this, click on the "Background" layer twice with the mouse, in the next window you do not need to change anything, click "OK". After that, the name of the background layer will change to "Layer 0", and the lock opposite will disappear.

Leave "Layer 0" selected on the layers palette. On it, you need to select the object that should remain clear in the photo. We will highlight the girl.
On the toolbar, select the "Quick Selection Tool" (Quick selection). Set the appropriate brush size and click on the girl with the mouse, thus expanding the selection area - it will be highlighted with a dotted line. If you mistakenly select an extra fragment, hold down "Alt" and click on it with the mouse.
There are various ways to select in Photoshop. By clicking on the link, read the article and choose the one that suits your property best. Then the selection will not take long.

On a blurred background, we will leave clear the girl and the packages in front. After we select them, on the layers palette, put "Layer 0" in front of the layer "Layer 2" - we applied a blur to it, it will be used as the background layer.

Invert the selection: press "Ctrl + Shift + I". We do this so that the entire photo is selected, except for the girl with the bags.

Hit "Delete" to delete everything selected on "Layer 0". You can deselect the selection with the "Ctrl + D" key combination.

Thus, we made a blurred background in Photoshop for the photo. First, we duplicated the main layer "Layer 2" and applied a filter to it. Then unlocked the background layer "Background" and it became "Layer 0". Select the girl on "Layer 0" and place the layer in front of "Layer 2". Then we inverted the selection and removed the background to "Layer 0". As a result, the blurred background on "Layer 2" was substituted for the girl cut out on a transparent background on the layer "Layer 0".
