The built-in wardrobe is very easy to use, and therefore is very popular. The built-in wardrobe in the hallway or other room can be seen in the photo on our website. They save space as they fit even in small spaces. This is due to the fact that modern doors for a built-in wardrobe slide sideways, and therefore do not take up free space. There are models on sale with a built-in TV, which are convenient and functional. You can see incredible TV products, photos can be easily found here.
Drawing of a direct wardrobe
A cabinet built into a niche can be purchased at a profit or assembled by yourself. If, after looking at the photo, you realized that the built-in wardrobe suits you better, carefully study the description below to understand how to proceed to obtain the desired result.
To date, there are several types of products of this type. It:
- direct wardrobe in the living room - classic products, whose facades are laconic and versatile in design. The easiest way to make them with your own hands is to equip any room. The classic coupe runs in a straight line. The problem is that it is difficult for such products to give an original look, you can try to work only with the doors, equipping them with a mirror or add paint to their design. It is better to look at the built-in wardrobes and hallways in the photo in order to understand whether such a thing fits into your interior;
- built-in corner wardrobe. The main advantage is that the corner wardrobe fits well into a relatively small space. A compartment in a small hallway is a complex shape, which makes it more costly to manufacture corner cabinets. We calculate the costs and understand whether we can afford triangular built-in wardrobes or cabinet models;
- radius models are becoming more and more popular, as their design is distinguished by style and originality. A complex system of door operation is provided, which significantly complicates the process of self-production.
Straight cabinet Corner cabinet Radial cabinet
Which wardrobe to choose in the end depends only on your preferences, capabilities and availability of free space. If you are a novice craftsman or craftswoman, it is better to give preference to built-in or cabinet furniture in the corridor, whose facades run in a straight line. Even a small hallway is suitable for installing a built-in wardrobe.
Features of the choice of material
The process of creating a built-in wardrobe according to individual dimensions and its design depend on the right choice. Most often, options such as wood and lining are used to make facades. The first type is considered traditional and prestigious.
However, wood is not very suitable for a built-in wardrobe, since it can warp due to high humidity.
If this does not frighten the master, then he should choose a straight-layered material without any flaws, well seasoned and impregnated with a special substance, for example, heated linseed oil or a special emulsion. Lining and MDF are allowed to be used without additional processing, however, there is another limitation regarding the frames of the door leaves. They should be assembled on the basis of wood parts, while observing the conditions and rules described above.
Do not forget that PVA can be used to connect the lining panels, since the grooves and tongues provide a fairly reliable fastening.
Also, drywall can be used to create a wardrobe in the hallway. It is quite easy to work with it, in addition, it provides the master with a lot of new opportunities. Even amateurs, not professionals, can make very good compartment lockers based on it. However, the material is very heavy and fragile, therefore it is more suitable for finishing. Laminate, MDF, fiberboard are the most suitable varieties. To create a built-in wardrobe or a conventional wardrobe based on them is the simplest task, the implementation of which is accompanied by a minimum investment of time and effort.
The listed options have all the same advantages as wood, however, they remain resistant to gradients and changes in moisture.
Wardrobe with photo printing
Modern shops offer photo-printed doors. They will make facades more stylish and presentable, and allow you to bring many ideas to life. It is enough to choose the perfect sample. By making such a model, you will transform the hallway into a Khrushchev building.
How to quickly make a built-in wardrobe?
A coupe in a classic style is quite simple to make. A minimum cost is required that can be quickly calculated. Such wardrobes include three walls, a bottom, a tire. The step-by-step manufacturing of a compartment in the hall includes several stages. It:
- Purchase of material at the preliminary stage. The options presented above are suitable for making a built-in wardrobe in the hallway with your own hands. Consider the design and operating conditions to make the right choice. The calculation of the parameters will allow you to determine how much material is needed for the job. It will be easier to create a built-in wardrobe if you use a calculator.
- Internal filling. Here you need to observe a valuable rule: the necessary and small things should be placed right in front of your eyes, and valuable things - in boxes. It is undesirable to install a section for outerwear in the center of the structure, as the moisture from it will disperse to the sides. It is better to build it from the side so that moisture naturally seeps out.
- DIY project of doors, which are considered the most important structural elements. First you need to decide how many leaves there will be, what width the door should have, what kind of suspension structure to choose. The width of the door should be such that the overlap does not exceed 50-70 cm. Do not experiment with dimensions, otherwise difficulties may arise when using the door.
- The choice of suspension method. Today there are several options: double-rail with a lower support, double-rail with a support located on top, and monorail.
- The choice of the layout of the shelves, the calculation of their length and depth. The same suspension options are not suitable for a built-in wardrobe as for cabinet types of furniture. It would be more rational to build a solid frame into a niche, however, this is a rather complicated and costly procedure. It's easier to use a special adjustable suspension system. Its use greatly facilitates the task of the master, who plans to make a built-in wardrobe with his own hands. If the calculation is too difficult a task, then he should choose a ready-made system.
- Preparatory work carried out on the niche.
- Measuring dimensions and creating a circuit. Here, the basic parameters are calculated, on the basis of which the drawings of the wardrobe equipped with small lockers are made. If you are planning to make a coupe, the dimensions must be indicated under each element. It is very important to carry out the calculation correctly, since the repair of built-in wardrobes is a very difficult matter.
- Purchase of fittings and materials suitable for the installed product. This will allow you to give the integrated products the desired design.
- Calculation and production of blanks.
- Assembling the built-in wardrobe in the hallway in Khrushchev. If you have any problems while performing this work, you can always watch a training video or a suitable picture, which clearly shows how the individual parts are installed and a complete installation of the built-in wardrobe is performed. Probably, after that there will be no questions left about how to assemble a built-in wardrobe with your own hands.
- Installation of structural elements provided for in the plan.
Making a wardrobe in a room full of the wall or repairing an old element of the interior at home is a simple job, the main thing is that the calculation is done correctly. By following the step-by-step instructions, you will easily cope with the task at hand. The finished design can be supplemented with mirrors, patterns or drawings. The mirrored double-leaf version in the hallway will look very presentable. It is wiser to put a wardrobe in the living room with a built-in computer table, whose photos can be found on our website.

Sliding wardrobe with a computer table
Examples and ideas of different types of jewelry are easy to find here. The site is filled with interesting ideas that can be realized. You can upgrade the device and make your own wardrobe with a built-in TV. Designer models cannot be compared to a custom-made fitted wardrobe.
In the hallway, you need a wardrobe or hanger for storing clothes. An ordinary wardrobe is inconvenient due to swing doors that block the passage, and a hanger with a bunch of clothes looks far from as aesthetically pleasing as we would like. Therefore, lately, more and more often they put a sliding wardrobe in the hallway. This type of furniture allows you to rationally use the entire useful volume - due to shelves, baskets, hangers, etc.
Types of structures
Sliding wardrobes are of three types. Built-in ones differ in that they occupy some kind of niche and do not have their own walls, floor and ceiling. A similar design is made when it is possible to fence off part of the room from wall to wall. In this case, they simply order the facade (doors) for the wardrobe with a system of rollers and guides. Partitions are placed inside and the filling is attached / installed. In some hallways, a built-in wardrobe is made on the site of the former pantry; with a different layout, it is possible to fence off a part at the end.
If this is not possible, put a cabinet wardrobe. This is a full-fledged large wardrobe with a back wall. sidewalls, floor and ceiling. It differs in door design and filling. Another difference is that they are trying to make this type of storage systems right up to the ceiling in order to make the most of all the space. And it looks more organic.

Decoration and design ideas
First, let's talk about what sliding wardrobes are made of. The whole structure can be divided into a body and a facade (doors). The body is made of laminated chipboard or. The option with chipboard is cheaper, but only straight-line structures are obtained - this material does not bend and its manufacturing technology does not allow obtaining curved surfaces. MDF is a more environmentally friendly and expensive material. Here you can form rounded edges from it.

Facades or doors for sliding wardrobes are made of different materials, framed in a frame from a profile. Use:
- Laminated chipboard and MDF. Laminating film can repeat the texture of wood, leather, be monochromatic matte or glossy, with a geometric or floral pattern.

The texture can be any - up to imitation of crocodile skin
- Glass. Transparent glass is almost never used, but colored or frosted glass can be found.

- Mirror. A very common material. Drawings are applied to the surface using sandblasting technology. They can cover the mirror almost entirely, leaving small fragments of the mirror intact, or they can only be applied in fragments.

- We should also mention photo printing. This technology allows you to transfer any image to film. This film is then glued to the façade.

But most often you can find combined facades. Various combinations of the above materials provide an incredible number of design options. You can develop a design for any interior and taste. Some examples are in the photo below.
Read how to make sliding doors for a wardrobe on your own.

Horizontal division is a widely used technique

Three textures at once - fiberboard, mirror and sandblasting drawing


Sliding wardrobe with lighting - convenient


Floral ornament is one of the common themes

Imitation of a wooden surface, but an unusual combination with a different direction of "grain"


Simple and tasteful - matt glass with horizontal division

Using even the space above the doors is a good idea for a small hallway.

Many apartments do not have a lot of space in the corridor to accommodate a voluminous and really spacious wardrobe, and the modern furniture market often offers models that are simply not suitable for home interiors. In this case, the ideal option would be to independently create furniture for the hallway, which will significantly save finances and allow you to create exactly the closet that perfectly complements the interior, while maintaining the available space.
Each wardrobe has a description, but the main purpose of placing a wardrobe in the hallway is to store clothes and shoes of various seasons, as well as hats and even household appliances. Such an interior detail is considered not only fashionable, but also quite comfortable, because a wardrobe with sliding doors takes up much less space compared to a traditional wardrobe with swing elements.
In order for the cabinet to fit perfectly into the interior, not interfere with the passage and simply be located in its place, it is recommended to adhere to simple rules.

Namely:
- To increase the illumination of the room, you can order a wardrobe with already built-in lamps in the visor of the furniture.
- Mirror doors will help to visually expand the space of often small hallways.
- The closet should have shelves that allow you to place hats, bags and umbrellas.
- In the lower part of the furniture there should be shelves for shoes.
- Next to the wardrobe, you can place open shelves, a curbstone or hooks on which you can hang outerwear. Such an addition will facilitate the design and will be an excellent functional addition.
- The standard depth of the wardrobe is 60-65 cm. When the depth of the furniture increases, the hallway space will be "eaten up".
The walls of the apartment and the floor can act as the back wall, side panels, bottom and roof of the wardrobe, so you can save on materials. It is not recommended to use this solution if the walls are made of plasterboard.
Do-it-yourself sliding wardrobe in the hallway
It is quite possible to independently design a wardrobe. This option will help not only save money, but also allow you to create the furniture that will best fit into the already formed interior design of the corridor.
In order to make a wardrobe with your own hands, you need the presence of such tools and materials as furniture screws and a screwdriver, a tape measure, a construction knife, hinges and corners, a saw (or jigsaw), handles, monorails for sliding doors, stoppers and the material itself for cabinet making.

To make furniture with your own hands, you do not need a professional tool or special skills.
It is enough to correctly measure and decide on the interior filling of the furniture in the hallway according to the following rules:
- Necessary and small things should be in front of your eyes;
- Valuables are put into boxes;
- Dry - fit higher on the shelves.
It is worth remembering that over the years, the family can grow, children appear or relatives come, which requires additional space. It is recommended to think over all functional sections in advance and make the wardrobe more spacious.
Due to the wide variety of materials, furniture in the corridor can be made in the desired shade, ranging from the lightest and bleached to dark wenge. The design of the cabinet must necessarily take into account the curvature of the walls and ceiling, because when creating a corner cabinet, the existing angle of the walls is unlikely to be equal to 90 degrees.
Cutting and cutting of material at home should be taking into account a margin of 2-3 cm for further adjustment. This advice will allow you to avoid errors in calculations and will save the material.

An excellent option would be to use materials such as laminated chipboard or chipboard. In some cases, drywall is also used in the creation of cabinets.
When cutting and cutting cabinet parts, you need to remember that:
- The height of the base of the cabinet is 10 cm;
- A gap of 1-2 mm is left on the edge;
- The gap of the front of the drawer must be 1.5 mm;
- The inner parts of the cabinet must be 10 cm less than the very depth of the outer cabinet of the furniture.
An excellent option in the process of creating furniture at home will be the use of a plumb line and a building level, which will take into account all the unevenness of the floor, walls and ceiling. In order to assemble a wardrobe at home, you need to spend up to three days.
Sliding wardrobe for the hallway photo diagram and dimensions
Before purchasing material and accessories, it is recommended to draw up a detailed diagram of the facade part. The drawing should take into account the optimal dimensions of the doors - 60-90 cm and the width of the profile - 4 cm.
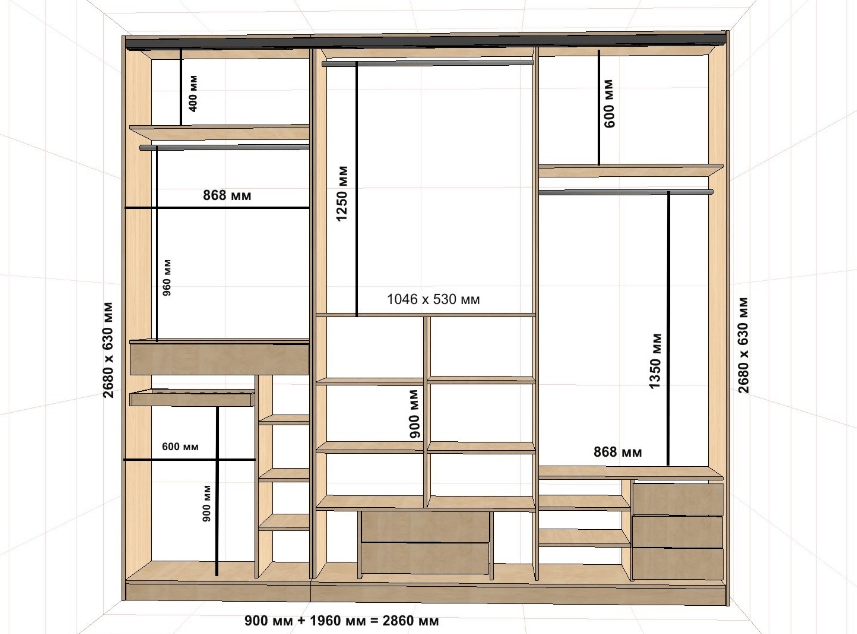
The scheme of the inner space of the wardrobe is formed based on the following dimensions:
- The permissible distance between the shelves is 30-40 cm;
- The height of the section for clothes should be equal to its length and an additional 10 cm;
- The maximum height of the mezzanine shelf must not exceed 50 cm;
- The permissible drawer depth is 50 cm with a total cabinet depth of 60 cm;
Drawings of the wardrobe should also be formed taking into account the thickness of the partitions.
How to make a wardrobe in the hallway with your own hands and assemble it correctly
You can also form a wardrobe at home from elements that will be cut to order. This option will avoid many errors and unnecessary costs for the purchase of additional material. To assemble the cabinet parts, you will need screws, furniture corners and dowels. Before sawing doors and shelves, it is recommended to decide in advance which suspension systems and fittings will be used, because the final result of cutting the elements depends on the suspension method and the required clearances.

Cabinet assembly sequence:
- A plinth or adjustable cabinet legs are installed on the bottom of the furniture.
- The sidewalls and internal filling are attached (niches are formed).
- A roof is attached to the structure, and additional shelves are installed.
- After installing the furniture in its place, the front parts and glass shelves (if any) are mounted.
The wardrobe in the hallway can be finished with mirrors, wood and painting. Of course, it is better to use acrylic mirrors, which are less fragile and lighter. If there is a desire to create an additional light source in the cabinet design, then it is worth stopping at low-power halogen bulbs (12V). Power supply for such luminaires is carried out using an adapter plugged into an outlet. It is not safe and not rational to wire 220 V into the cabinet.
Assembling a wardrobe in the hallway with your own hands (video)
Thanks to the creation of a wardrobe with your own hands at home, you can save up to 50% of the cost of purchased furniture. The big advantage is that the wardrobe will fit perfectly into the size of the existing hallway. It is also worth noting that it will take up to two weeks to make a custom-made cabinet, and the final result may not be pleasing at all.
A sliding wardrobe is an excellent solution for rooms with limited space. The doors slide open, like on a train, which allows you to install the cabinet in small hallways and narrow corridors. A similar design is offered in all furniture salons, however, the typical dimensions are not always suitable for your room size. You can order a wardrobe designed according to your measurements based on the characteristics of your premises, but the cost of one copy doubles. For those who need a cabinet larger or smaller than a standard cabinet, there is another solution - to assemble the structure with your own hands. This is not very difficult to do if you know where to start.

photos
Choice of cabinet design and placement options
Placement of the cabinet in a niche. Residential designers are sometimes very resourceful, which is why half of typical houses have niches of unknown purpose in the hallway. It is in this niche that you can make a wardrobe. To do this, you will need to install door guides and order the doors themselves with fittings. This way you save space, time and money.

Wardrobe along the entire length of the wall. A good solution is to arrange a cabinet along the entire length of the wall. Firstly, the room is not broken by the corners of furniture and visually does not lose space. Secondly, such a cabinet can serve not only as a wardrobe, but also as a storage room where skates, skates, skis and even car tires are stored.
A sliding wardrobe can separate the hallway area from the living area in studio apartments. The wardrobe is installed in the entire width of the room, a through sliding door is made in its center, and compartments for clothes on the sides. Some people prefer to have all the doors on both sides, which allows access to clothes from the hallway and bedroom at the same time. A very convenient option when access to outerwear is from the hallway, and access to bedding from the living area.

Materials (edit)
The most optimal for creating a cabinet is chipboard and MDF of high or medium density. This material is not very expensive and relatively dense. But when choosing a chipboard, be sure to pay attention to its category (should be E-1) and the coating (preferably laminated from all sides). Chipboard, when heated, emits formaldehyde and phenol, so if there are heating pipes in your hallway, then do not risk it and choose another material. Another disadvantage of chipboard can be considered a weak retention of screws.


MDF is safe for humans, because when heated, lignin is released, which is contained in natural wood. True, the price of MDF is significantly higher, and it is a fire hazardous material.


Wood is a traditional material, however, if you plan to make a built-in wardrobe, then it is better not to use it. The concrete wall creates additional moisture, and the spruce and pine, from which boards are usually made, have a low moisture resistance.
It is better not to use drywall, because this material is not for the manufacture of supporting structures. It is fragile and if you do not think over the complex structure of the base, it will not hold the doors of the wardrobe.

One of the possible options is the preliminary design of the cabinet, and then the purchase of ready-made components in stores or the creation of such components to order in the workshop (it is still cheaper than buying ready-made furniture).

What to consider when designing
When designing your own wardrobe, consider the following:
- useless space (this is what takes up space, but is not used for its intended purpose. In the specific case, this is a sliding system. It is necessary to lay 10 cm on it and add to the useful space, which should be at least the width of the hanger. Thus, the depth of the wardrobe with the standard bar is: the width of the largest hanger + 10 cm for the convenience of placing things + 10 cm for the door mechanism);
- if you are assembling on the floor (do not mount the cabinet in a niche or directly to the wall), then the height of the structure must necessarily be lower than the ceiling height in the hallway by at least 10 cm at a depth of 70 cm, and preferably even more so that it can be raised and put the cabinet upright;
- if you plan to put the cabinet on adjustable support legs, then lay a place for them next to the nearest partition (no further than 30 cm from it);
- the rigidity of the structure is provided by transverse ribs on the rear wall of the cabinet, without them the structure will stagger;
- if space does not allow installing a cabinet with a standard longitudinal bar, lay several sections for the cross bar;
- when designing drawers, lay 7 mm between the fronts on the downwardly projecting width of the lower rail. If this is not done, the boxes will not close;
- the most important thing when designing internal sections is to take into account the width of the sliding structure! Therefore, decide in advance on the number and width of doors in order to then fit the entire system under them. If the width of the door does not match the width of the section of the chest of drawers, the drawers will not open. Bulkheads between compartments must coincide with the boundaries of the doors;
- the shelves have a distance of about 30 cm;
- the compartment for hanging clothes is calculated based on the length of the longest thing and another 10 cm is added to it;


In any closet, especially if it is alone in the apartment, there should be sections for storing outerwear, shoes, hats, linen, bedding, suitcases, pillows, blankets, dresses, jackets and trousers. The picture shows the optimal placement of the sections in the wardrobe for the hallway.
Drawings can be made in design programs: "Astro Furniture Designer", "Pro 100", "bCAD" and others.

How to make wardrobe in the hallway with your own hands? The article contains valuable recommendations for self-assembly of a wardrobe in the hallway and a photo.
Self-assembly instructions will tell you about the list of required tools and materials.
The reader will also learn about simple tips that will help to simplify this process as much as possible, and the graphic support in the form of pictures will clearly show how and what to do at each stage of the wardrobe assembly.
In contact with
classmates
Instruments

To assemble a wardrobe with your own hands, one desire is not enough. This requires the skills of a carpenter and the appropriate power tool:
- screwdriver;
Each owner has the rest of the tool:
- hammer;
- screwdriver;
- sandpaper;
- pliers;
- roulette.
Create a sketch
Sketch with the dimensions of the wardrobe
To make the correct measurements, you must first decide where the wardrobe will stand. For example, in the hallway, sliding wardrobes have a rectangular shape. Drawings for such a cabinet are made simply: the width and height of the wall are measured. Further, the parameters of the wardrobe are adjusted to these dimensions.
The figure shows that the master sketched the dimensions not only of the width and height of the cabinet, but also the depth and even the dimensions of the doors. It is worth noting that depth measurements require a small offset of 0.03 mm, this is how much the cabinet doors take. In other cases, measurements are made as shown by a tape measure.
Purchase of materials

Fittings for sliding wardrobes
With the finished sketch, we go to the building materials store, where the sellers will help to calculate the amount of required materials. Order the service of sawing chipboard sheets of the required size, so as not to waste a lot of time and effort on manual work.
In this way, blanks for doors, walls and the ceiling of the wardrobe are made. In the same store you can also choose accessories - rollers, rivets, fasteners and corners.
Steel materials are also purchased:
- doors with self-tapping screws;
- special corners for mounting shelves;
- magnetic latches;
- awnings;
- sandpaper;
In the process of making a wardrobe, you will also need sandpaper and varnish.
Preparation of the workplace

The first step is to level the floor and walls. Particular attention is paid to this process only if you plan to make a corner wardrobe. The floor can be leveled with cement mortar (screed), and the walls in two ways, depending on their unevenness.
If the walls have large drops - from 2 cm or more, then plaster will be needed to level them, in other cases, putty is enough.
After the building materials have completely dried, the working surface is treated with antiseptic compounds. The plastered surface is additionally covered with a primer, and the putty - with water-based paint.
Helpful advice: the evenness of the walls and the corner can be checked with an ordinary corner or rule.
Frame assembly sequence

Assembling a frame for a wardrobe
The frame is assembled in a strict sequence:
- The bottom of the structure is placed first on a flat floor. Lock it in this position.
- Side sheets are placed on the bottom.
- The assembly of the frame ends with the installation of the top chipboard sheet. Before installing it, it is necessary to check the verticals of the side sheets again. If the level shows "0" - we fix the roof of the wardrobe with the help of corners and self-tapping screws.
Take a note: never try to install the side panels yourself; it is best to do so with an assistant. One person holds the side panels, and the other clings to the corners from the bottom and top of the chipboard sheets. The evenness of the structure is checked by the level.
We put shelves and other horizontal elements

Assembling shelves for sliding wardrobes
The installation of internal elements is the most time consuming process. It can be conditionally divided into two stages:
- Installation of clamps.
- Installation of shelves and accessories.
It is better to choose places for clamps according to the scheme: 1 element for every 30 centimeters. Thus, even a small meter-long wardrobe will have three shelves. The holes for the clips are made with a drill and a large drill.
It's important to know: in order not to damage a thin sheet of chipboard, stick electrical tape on the drill, measuring exactly 0.3 mm from its beginning, and begin to carefully drill the holes to the mark.
Do not forget to measure the distance between the clips, especially in height, they should be at the same level. This will keep the shelves level and level. All clips sit on the glue.
Installation of fittings and shelves
Installation of doors in a wardrobe
At the second stage of internal work, it is necessary to install the fittings. It is installed in two ways: without level checking and with checking. Which way is better, we think, it is not necessary to say. So, first, the fittings are mounted on the bottom chipboard sheet, then on the side panels. The rollers are fixed with special self-tapping screws included in the kit.
Expert advice: To make the self-tapping screws easier to tighten, drill a small hole in the sheet with a drill. The exposed fittings are not screwed until the whole structure is checked with a level.
After installing the fittings, the doors are mounted as shown in the picture:
After installing the doors, you can proceed to the set of shelves. They are attached to pre-installed clips. The screw caps can be covered with rubber plugs, they are sold in any hardware store.
The final stage is the installation of hangers and painting of the wardrobe

Retractable hanger for wardrobe
It remains to attach hangers to the finished structure and the wardrobe can be used. It is recommended to mount the hangers at eye level.
Using a tape measure, the same distance is measured, the place is marked with a pencil directly on the chipboard sheet. In the marked places, small holes are drilled into which the hangers are mounted using self-tapping screws.
The cabinet must be polished with sandpaper before painting. It is better to use regular varnish and a paintbrush to paint the cabinet. The wardrobe is painted several times. Recommendation: paint the old varnish coat only after it is completely dry (after 2-3 days). It is also recommended to open doors and windows after staining to ventilate the room.
Video on how to make a wardrobe with your own hands.
In contact with
Do you see inaccuracies, incomplete or incorrect information? Do you know how to make your article better?
Do you want to offer photos on a topic for publication?
Please help us make the site better! Leave a message and your contacts in the comments - we will contact you and together we will make the publication better!