Loft is not a new direction. In the last century in the 50s, when old factories were used as living quarters, it was relevant. A characteristic feature of the style was a combination of a modern look at old things. It was a great way to show yourself as a creative person who loves comfort and coziness.
Furniture in this style combines a variety of components. For example, a rack or bedside table can be created from metal racks and handles. The table can be made from wooden boards and iron pipes. Furniture is created from aged material, because it is the highlight of the loft style.
In all people, over time, a certain amount of old building materials is collected in the pantry or in the garage. It is from them that it is really possible to create loft-style furniture. This is very beneficial: firstly, the rubbish will decrease, secondly, a designer original thing will be created, and thirdly, you can save a decent amount of money. In the loft style, flaws in materials are advantages, which serves as another advantage.
Bench made of pipes for plumbing
Pipes are an excellent material for those who make furniture for the first time. Almost nothing needs to be done with them, it is enough to cut them according to the specified parameters. Assembly is also not difficult. This does not even require welding.
So, for work you will need:
- Bulgarian;
- vise;
- drill with a set of drills;
- pipes;
- fittings-connectors;
- mechanism for cutting external threads on the pipe.
The vise is firmly fixed, because during threading you will have to make an effort. Making loft-style furniture with your own hands is very simple. For further work, cut the pipes to the required length and prepare the following  details:
- Long pipes for connecting the right and left legs - 2 pcs.
- Element for fixing in the middle of the bench, its length depends on the legs - 1 pc.
- Legs of the same length - 8 pcs.
- T-shaped fittings - 7 pcs.
- Corner fittings - 4 pcs.
- Short pipes for mounting T-shaped and corner parts - 4 pcs.
- Round connection for fixing the pipe to a straight surface - 1 pc.
- Seat boards.
The pipes are threaded. To make sure that the design meets the desired parameters, it should be pre-assembled. If everything is done correctly, the bench frame is disassembled. Then the pipes are cleaned of rust with sandpaper. A primer is applied to them, they are covered with the desired paint. To create an antique, after the paint dries, scratches can be made on the pipes.
Now it's time for the boards. A pipe structure is placed on the boards, and places for holes are marked into which the legs of the bench will be screwed. This is not easy to do. They must be the exact size. You can also use a round connection to fix the pipe to a flat surface. It will be used in the middle.
Boards are cut for the shop itself. Then they should be sanded and applied with a dark stain and varnish. From below, with self-tapping screws through through holes, the upper part is connected to the lower structure.
The height of the legs is adjustable with thread. Decor elements are installed. A garden bench can be made from a profile pipe. It is also easy to do. But this option will require welding and a little imagination. The pipe is attached to  seat. Furniture from a profile pipe has a high wear resistance.
Loft furniture can decorate a summer cottage or become an original design for an apartment. In this case, it is not necessary to use pipes at all. It is enough to inspect unnecessary material after construction or repair. During the selection of raw materials, attention should be paid to its strength, because it must withstand the operational load.
Before you start making something, be sure to think over the project in advance, make a drawing. Sometimes you can not do without a layout. You also need to see if there is the right material at home. In the loft style, modern material is also used, do not forget about it.
Coffee table from coil or pallet
Furniture in this style can be made from any wooden object. Consider a master class for making a coffee table from a pallet or reel. You will need the following material:
- not a new construction coil or pallets;
- self-tapping screws;
- screwdriver;
- screwdriver;
- furniture wheels.
Wheels for furniture are screwed to the bottom of the coil using self-tapping screws.  Next, the future table is carefully polished. After that, it can be used.
For the second model of a loft-style table from pallets, we are preparing aluminum wheels. We apply patina to them, which will create the effect of antiquity. The pallet is disassembled, all nails are pulled out. Then, using self-tapping screws, two pallets are connected. The gaps are sealed with the remaining boards.
Acrylic varnish is applied to the surface of the product. The wheels are wiped with fine sandpaper. Now it should be collected. The mobile coffee table is ready. In this style, white is mainly used, but it all depends on the imagination of the master.
Loft not only for giving
Loft furniture will look harmonious not only in the country, but even in restaurants and cafes. A loft-style interior for a bar can be very attractive, because it will look bold and original, as well as give the room comfort.
At the same time, during the creation, you do not have to spend a lot of money. This is true for those owners who cannot afford a luxurious renovation. This style makes it possible to play on the interior design and turn all the disadvantages into advantages.
For inspiration, images of the loft style in photographs can serve.
In the 40s of the last century, the loft architectural style began to gain popularity in the United States. It originates in the industrial areas of New York, where a lot of industrial premises were abandoned by their owners due to rising land prices. Bohemians were the first to notice them, and after the purchase they began to use the abandoned factory buildings to create housing and place furniture. It turned out cheaply and tastefully, which allowed the style to remain popular until today. Now such an arrangement of an apartment is very popular, and do-it-yourself loft-style furniture is great for both private houses and offices.
When creating loft-style furniture, materials are used that usually go to a landfill during a major overhaul. This explains its low cost. Old metal pipes and rough-hewn boards in skillful hands will turn into magnificent loft-style designer pieces. The only limitation when choosing a material is the overall style of the house. Loft furniture should emphasize it, so you have to think about the color scheme and the overall interior. Wood and metal are the most used materials in the loft. The elements of decor are things made of concrete or roughly hewn stone. There is no need to purchase noble materials like marble for decoration. Plastic is an undesirable raw material, because it does not correspond to the style direction. The loft originates in industrial premises, so the material should be similar to that used in the design of industrial buildings. However, it is not always possible to find deck boards or metal barrels. Then the thing can be artificially aged, giving it a casual look.
The easiest way to make loft-style sofas, beds, ottomans and tables for various purposes. To create the first two, you will need used varnished pallets. It will be enough to put pillows and a mattress on top. Metal structures found, for example, at a local factory, can act as a bed frame. If there is sufficient skill in working with metal, then they can be altered to your taste, covered with a cloth. Deck boards will be a non-standard and original choice as the basis for a loft-style bed. The sofa can also have a similar design, but also have its own characteristics. For example, metal barrels are suitable for the base. The top is carefully cut off, the surface is polished, then the sofa is filled with a durable substance and soft pillows are placed on top.
Ottomans are obtained from pallets, metal or wooden barrels, industrial mechanisms, even old suitcases. Tables can also be made from anything, the main thing is that there is enough imagination and skills. Everything will be used - from old boards and solid layers of wood to the frames of sewing machines. Even wooden cable spools can be turned into a stylish coffee table.


What can be made
There is no such furniture in the loft style that could not be made independently. Moreover, it can be structures of various sizes and purposes.
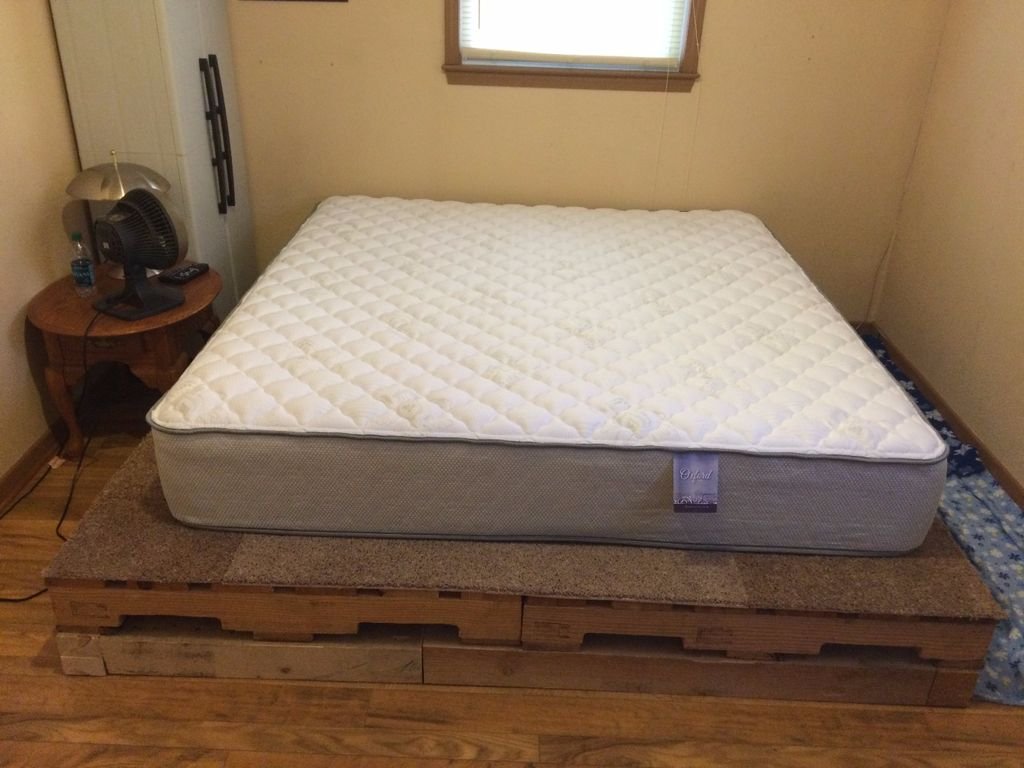
pallet bed
This option is increasingly becoming popular due to two factors - originality and cheapness. Pallets can be purchased for 100-150 rubles, and the most expensive part of the structure will be the mattress. It is best to purchase pallets with the EUR / EPAL marking. Due to their high quality, they will last longer. Often, new or used pallets are in a damp state. Therefore, you should first sand them with sandpaper and paint. You can leave the natural look by using wood impregnation, or you can experiment with color. The originality of the composition of the loft depends on the ability to find a use for things that are no longer new. If the budget is limited, the pallet is made by hand from the boards, but there will be more hassle. In addition, these beds have one major drawback - the inconvenience of cleaning. However, it will not be so important for true connoisseurs of the loft.
For a standard pallet bed you will need:
- three pallets sized 120x80;
- primer and paint on wood;
- roller and brush for coloring;
- grinder and sandpaper.
First you need to walk along the wooden surface with a grinder, and smooth out those places where it did not reach with sandpaper. Then the pallets are wiped with a damp cloth. Next comes the woodworking with primer and paint. If necessary, apply two layers. The pallets are then stacked one by one to form a bed frame. In conclusion, it remains to put a mattress and pillows on top. There is a more functional option with niches. To create such a bed, eight pallets and an additional wood drill will be required. First, you need to remove the extra boards so that niches for the boxes form when applied. Then the process is repeated: cleaning with a grinder or sandpaper, wiping with a damp cloth, processing with a primer and paint. It is recommended to leave the pallets to dry overnight. Photos of pallet loft beds can be found below.


Draft assembly

The basis of the future bed

Installing pallets on the base

From above, the base is upholstered with a soft cloth or carpet

table
The design of a standard loft-style table, which is sold in a store, is very simple - a wooden tabletop on a metal frame in the shape of a parallelepiped. But such elementality hides a considerable price, so it is best to do such a thing with your own hands. For this you need:
- two fir boards measuring 250 * 15 centimeters;
- three pine beams 250 * 5 centimeters;
- 30 7 cm screws;
- grinder or sandpaper;
- drill;
- dark walnut and ebony wood stain;
- polyurethane varnish.
Before assembly, you can make drawings on the computer.
The process is as follows: first, the frame is assembled with the help of screws. It is recommended to pre-drill holes for fasteners in each corner. Then the boards are polished, and the countertop is impregnated with "dark walnut". The frame for the table is treated in two layers with "ebony" to give it a metallic look. Using twelve screws, the tabletop is attached to the frame. Then the table is turned over and three screws are screwed into each board from the inside out.

Instruments


Fixing leg corners

Fixing leg corners

Leg attachment


Bedside table
Probably the easiest loft-style piece of furniture to make is a bedside table. It can be made from metal racks or handles, but sometimes a painted metal barrel is sufficient. Sometimes, for the sake of the industrial roots of the loft style, the role of a bedside table is played by two cinder blocks placed together. The main thing is that the material makes one of the most expressive parts of the interior from the simplest element of furniture. In addition to originality, a bedside table can have many functions. To make it, you need pine boards, two pieces of pipe with a diameter of half an inch, four wheels for furniture:
- first, the side parts of the cabinet are assembled. Small strips with pre-prepared holes are attached to each other with glue;
- two holes are made on each of the boards. Before that, you should check them for a match in size - they must be the same;
- two boards are screwed to the middle and bottom shelf. In order for them to be the same, planks are attached to the middle;
- the lower part is installed under the side bases with glue and euro screws;
- the remaining strips are installed on the sidewalls from above. The top shelf is assembled from three boards;
- holes prepared in advance are filled with a special composition;
- defects on the walls should be removed with sandpaper;
- the nightstand is covered with stain and left to dry. After applying one layer of varnish;
- when it dries, wheels are installed on the screws with glue at the bottom of the tube.

wooden pallets


Bedside table width

Finished frame for the frame

Grinding workpieces

Table top assembly

Wall mounting

Making a box

Finished box

Shelf making

Cutting a hole in the shape of a heart

Closet
The largest piece of furniture on this list. For its manufacture, wood and metal are best suited. A great addition would be to use two types of wood. Standard decorative ornaments, especially in the form of flowers or ornaments, will turn out to be superfluous. Loft is an industrial style, and “tenderness” in the ornament will be inappropriate. If the cabinet has mirrors, then they should be decorated in a classic way or in the form of fragments. Some decor is allowed, but it must be industrial. For example, doors made in the form of wooden shutters. Loft-style wardrobes can be:
- case - have a full-fledged frame, they are not particularly difficult to move;
- built-in - they make the most practical use of space and do not contain walls. Perfect for small apartments
- semi-embedded - part of the frame, for example, a wall, is missing;
- diagonal - well suited for dwellings with a large area;
- trapezoidal - the side wall will be smaller than the other. The cupboard is turned by it towards the doorway.
Sometimes you don't have to do it all over again. An ordinary old cabinet is decorated with metal brackets or rivets, which makes it look like steel doors at the factory. Nails with decorative caps are well suited for this purpose.
In addition to metal fixtures, staining and subsequent wrapping with a cloth are suitable. In the photo, the loft closet is guaranteed to look like a passage on a warship. To give style features, you don’t have to do a complete rework, just add a few details. For example, from an old barn or abandoned construction site, you can take a wooden ladder, clean it and use it for tall cabinets.
The photographs show the above-described pieces of furniture in the loft style. They will help you understand what this direction is. Particular attention should be paid to the description of the pallet, which can be useful if the furniture elements of the loft are made independently.

built-in

Wardrobe

In the 40s of the twentieth century, the industrial style of decorating your home became very popular in the United States. It gained popularity due to the lack of affordable affordable housing for ordinary people. In the course for the arrangement were premises that were not originally intended for living - attics, attics, abandoned premises of factories and warehouses. The premises were settled in hastily, therefore they were left in their original form, only slightly made suitable for life. Thus, a new loft style was formed.
The originality of the loft style is that the space, reminiscent of an industrial one, is modern and comfortable.
Soon, creative personalities - artists, artists, owners of spacious country houses - began to decorate their houses and apartments in this style. Loft has existed for over 60 years. It has no territorial and temporal boundaries, because the originality, unusualness of the interiors in this style fits perfectly into the life positions of people who are creative, free in spirit.

The urban loft style in the interior arose as a direction that combines the features of the underground and bohemian
This direction allows you to equip your living space so that it becomes possible to embody the most daring ideas, go beyond what is permitted, stand out with your individuality. There are many people striving for everything unusual, not only in America, but also in Russia there is a large number of followers.

Initially industrial interior in the loft style of the last century - housing for the poor
The introduction of the main elements will help to build the right interior in the loft style.
- Open space without partitions. Enclose only the bathroom, toilet. Even the bedroom is organized on a common territory.
- Huge windows to the floor, which are the main source of daylight. As a rule, windows are not covered with curtains.
- Massive beams under the ceiling, open ventilation pipes, iron fittings.
- The walls are not decorated with wallpaper and decorative plaster. Leave or imitate brickwork, concrete walls. The decoration contains wooden elements, sheets of plywood and aged metal.
- The floors are most often left concrete, replaced with old wooden boards. Available in marble slabs.

Modern housing furnished in loft style

The loft is popular due to its versatility.
Within the framework of the style, three main directions were formed.
- Bohemian. It is preferred by "creators". Artists and theater-goers hold fashion shows, theatrical shows, place art galleries. In personal interiors, it is used more and more often.

Bohemian Loft in interior design

Loft-boho assumes the maximum preservation of the theme of the industrial premises in the decoration, but the furnishings are made in a colorful style.
- Glamorous. It differs from others in a more delicate color palette. Heavy iron beams and brick walls are mixed with graceful chandeliers and baroque furniture.

Loft-glamor - the usual stone-wood and pastel colors are diluted with a bold combination of gray and lilac, pink and turquoise

Glamorous loft provides an emphasis on lighting
- Industrial. The most popular. To implement this direction, the space is filled with elements resembling a workshop, a warehouse with the effect of an uninhabited space. Here it would be appropriate to make do-it-yourself loft-style furniture, ventilation forks, external wiring, chains, a combination of rough wood, aged iron and raw stone. Everything is simple, without excessive embellishment.

Industrial loft - housing is diluted with elements of factory equipment

For an industrial loft, simple furniture with the correct geometry without unnecessary elements is suitable.
- Spacious common space without partitions, with high ceilings, visually divided into zones. It must necessarily retain the characteristic features of a large factory premises without traces of fresh finishes.
- Walls decorated with author's paintings, paintings by unknown modernist and expressionist artists, unusual posters, photographs.
- Designer furniture, sculptures, musical instruments. Furniture in the setting, choose vintage or artificially aged, with traces of wear. Most of the elements can be made with your own hands from improvised materials. Wooden pallets, antique boards, pipes and metal elements will be used - parts of beds, spinning wheels, sewing machines, wire spools and even barrels.
We delimit space: how to place accents?

The white loft in the interior is quite original - pastel colors soften the excessive expressiveness of the situation, and it becomes light and airy
As mentioned above, a characteristic feature of the industrial style is a spacious, single room, divided into zones. With the help of pieces of furniture, light screens, carpets on the floor, we highlight the boundaries.
A beautiful bar counter with a countertop made of a single piece of wood or stone will help separate the kitchen from the dining room. Open shelving will visually hide the bedroom from the living room. The loft is attractive because it combines old and new, luxury with the ugliness of unplastered walls.

Loft style involves the use of furniture not only for its intended purpose, but also to separate one functional area from another.
Furniture in this design plays an important role. With its help, accents are placed. Playing with style, it is not necessary to rush to purchase designer furnishings. You can make them with your own hands, because the essence of it lies in the fact that the environment should first of all be functional, and only then beautiful.

Homemade wooden cabinet for a loft-style bedroom
Materials needed to make furniture
When we decided on the style of the house, thought out the color scheme and the interior as a whole, we choose furnishings that emphasize it. It is not necessary that all products be made to order or purchased. You can make a couple of items yourself, using literally everything that is at hand. It can be pipes, old boards, concrete elements.
The most popular materials used in this direction are the following.
- Natural aged wood.
- Metal and stone.
- Glass.
- Leather, textiles - in the upholstery of upholstered furniture.
- Plastic imitating wood, marble.
Sofa and bed: DIY

Wooden pallets are great for DIY furniture
The central element of the living room, no doubt, is the sofa. You can make it yourself using wooden pallets that will go to the frame. Assemble the shape of the sofa, sand the surface, sew soft pillows and a mattress. Lay on the frame, and make shelves for books and magazines in the armrests. It will be inexpensive and effective.
Pallets are also useful for making beds. Three pallets for a bed of standard sizes will be enough. Making it, following certain recommendations, will be easy. This is done in several stages:

There is another interesting option - a podium bed. It can be built in additional storage space. It is made of plywood or boards, painted or varnished.
Shelving and coffee table: to make quickly and cheaply!
Shelves and open shelves made by hand will perfectly “flow” into the interior. The metal thin frame of the rack, painted black, looks beautiful. It is this color that makes it almost invisible. Shelves are made from solid pine, oak. To emphasize the structure of the tree, treat the shelves with a tinting compound. Fill the shelves with books, photo frames, vases and designer accessories.

Assembling the table frame
Loft-styled furniture in stores is expensive. The price of a rectangular coffee table on a metal frame is high.

Attaching the leg brackets
To make it yourself, you need to take only two boards of the right size, four bars or metal pipes for legs, screws, varnish, stain. You can make a tabletop from a pallet. Screw it to the base of the wheel and the table is ready.

Fixing table legs to the base

We paint or cover with stain, and then with varnish
Do not limit the flight of your imagination, feel free to combine the incongruous, mixing styles and colors. Everything is possible in Loft, and you need to use it!

Finished coffee table in the interior
Video: Do-it-yourself loft-style table. DIY furniture.
Creating loft-style furniture with your own hands is not the most difficult task. It does not require large expenses and fine work. But without a sense of style can not do.
The loft was born in the middle of the 20th century during the conversion of industrial premises into residential ones. Today, he increasingly comes to small and large apartments, outwardly adapting them to industrial areas. Here you can connect metal, wood, glass. At the same time, the space remains only conditionally zoned. Walls, pieces of furniture are made quite roughly, most of them are universal and mobile.
Table, console or nightstand
The proposed item can serve as a bedside table, console, small mobile bar counter, TV cabinet. He will find a place and tasks in any corner of a loft-style apartment. Table dimensions - 60 ″x16.25 ″x36 ″ (152.4x 41.3x91.4 cm).
Get ready to get the job done
List of required materials:
- Pine boards.
- 2 pieces of galvanized pipe 1/2″ (1.3 cm) in diameter, 60″ (152 cm) long.
- Galvanized caps for pipes - 4.5 "(11.4 cm).
- 4 large swivel furniture wheels.
- Drill with a drill.
- Device for pocket holes.
- Roulette, joiner's square.
- Socket wrench.
- 2″ (5 cm) screws.
- 2.5" and 1.25" (6.4 cm and 3.4 cm) pocket screws.
- 16 hex head screws.
- Large screws for attaching swivel wheels.
- Screwdriver.
- Joiner's glue.
- Sandpaper.
- Stain.
- Matt varnish for wood.
Prepare the wooden parts of the table by cutting them with a circular saw. Or order a cut in the workshop, providing a list of the necessary elements:
- 4 strips 5.25″ long;
- 6 boards 56.5″;
- 4 boards 11.25″;
- 4 pieces 27.75″;
- 3 boards 59.5″;
- 1 piece 56.5″;
- 1 piece 51.5″.
Description of work
- Start assembling the side parts of the table. To do this, install small planks 5.25 ″ (13.3 cm) long, connecting them in pairs at the top and bottom of the 27.75 ″ (70.49 cm) parts. Using a special device, prepare hidden (pocket) holes for their connection. Apply glue to the contact points and holes. Using a screwdriver, drive 1.5″ (3.81 cm) screws into the prepared holes.

Attention! Be sure to use wood glue when assembling. Excess protruding at the joints should be removed immediately with a damp sponge. Then the finish will lie evenly, without spots.
- Check 6 boards 56.5″ (143.5 cm) long, they should be exactly the same. Prepare 2 pocket holes at the ends of each.
- Screw 2 boards each to the matching long edges of the middle and bottom shelves.

- To make the bottom and middle shelves the same, attach 11.25″ (28.6 cm) end strips to the middle.
- Install the bottom shelf at the bottom of the side bases, and the second approximately in the middle. Use glue and large euro screws to connect.
- Attach the remaining two 56.5″ (143.5 cm) planks to the top of the sides. They will be under the top shelf.
- Also, having prepared pocket holes in advance, assemble the top shelf from 3 boards 59.5 ″ (151.1 cm). Set it in place.
- Using a special nozzle, prepare holes for metal parts. They will serve as a rear shelf limiter. The holes should be located approximately in the middle, at the same distance from the shelf below.
- Check how the rod falls into place.
Take care of finishing the table.
- Fill the screw holes with a special compound.
- Lightly sand the shelves and walls with sandpaper, removing large defects and excess putty.
- Cover the product with stain. Leave to dry.
- Apply 1 coat of matte varnish to the table. Let the coating dry.
- Flip the shelf. Install on large screws and glue wheels.
- Insert the stop rods into place.

Bar stool for loft interior
Complement your mobile console table with matching bar stools. If necessary, they can become flower stands, lamps or a bedside table. In addition, the height of the seat can be adjusted to the most comfortable position.
What to buy
- 2 boards with a section of 2 × 2 (5x5 cm) 8 feet long (243.8 cm);
- round board with a diameter of 12 ″ (30.5 cm) or 2 × 12x12 (5x30.5x30.5 cm) for the seat;
- metal screw rod with a diameter of at least 3 cm;
- welding machine (if you know how to work with it), protective equipment;
- device for preparing pocket holes;
- drill;
- circular saw;
- metal plate;
- nuts and washers;
- screws for pocket holes;
- glue for wood;
- sandpaper;
- roulette;
- square;
- pencil;
- putty;
- stain;
- wood varnish.

Prepare the parts according to the list:
- 2 pieces 12.5″ (31.8 cm) long for the cross base cross. At the ends of the parts non-parallel bevels of 10 degrees.
- 1 3/4″ (1.9 cm) plywood top piece 8.5x8.5″ (21.6x21.6 cm) long.
- 4 support elements 2x2 (5x5 cm) 23.5″ long with parallel bevels of 10 degrees at the ends.
- 4 crossbars 2x2 (5x5 cm) 9.6″ long. Non-parallel cuts at 45 degrees at the ends.
- 1 round seat piece 12″ (30.5 cm).
Description of the assembly of the chair
- From the top of the base piece, cut all 4 corners at 45 degrees, as shown in the figure below.
- Mark both structural elements of the cross. Using the marks, make the central grooves to a depth of 0.75 ″ (1.9 cm) with a circular saw. When connected (glue only), the parts should be flush.
- Assemble the base of the chair. Prepare pocket holes first. Then make connections with glue and screws.
- Attach with screws on the outside of the outer leg rest piece. You only need one screw per connection. Secure them with glue.
- Install to the center of the metal plate (by welding) a large screw rod that will hold the seat. If you do not have experience in such work and equipment, contact the workshop.
- Mark the center of the back of the seat. Then attach with 4 large screws and a metal plate with wood glue.
- Drill a screw hole in the crosspiece using a special nozzle and the same one on the top of the base. Check if the screw rod can enter them.
- Fill the screw holes with putty. Let the compound dry.
- Use sandpaper to lightly sand the surface of the structure.
- Cover the product with stain. Leave until completely dry.
- To make the chair last longer and have a finished look, apply 1-2 coats of varnish to the wood.
Now you can arrange your own loft corner on the balcony, kitchen, living area, etc.
Creating loft-style furniture with your own hands is not the most difficult task. It does not require large expenses and fine work. But without a sense of style can not do.
The loft was born in the middle of the 20th century during the conversion of industrial premises into residential ones. Today, he increasingly comes to small and large apartments, outwardly adapting them to industrial areas. Here you can connect metal, wood, glass. At the same time, the space remains only conditionally zoned. Walls, pieces of furniture are made quite roughly, most of them are universal and mobile.
Table, console or nightstand
The proposed item can serve as a bedside table, console, small mobile bar counter, TV cabinet. He will find a place and tasks in any corner of a loft-style apartment. Table dimensions - 60 ″x16.25 ″x36 ″ (152.4x 41.3x91.4 cm).
Get ready to get the job done
List of required materials:
- Pine boards.
- 2 pieces of galvanized pipe 1/2″ (1.3 cm) in diameter, 60″ (152 cm) long.
- Galvanized caps for pipes - 4.5 "(11.4 cm).
- 4 large swivel furniture wheels.
- Drill with a drill.
- Device for pocket holes.
- Roulette, joiner's square.
- Socket wrench.
- 2″ (5 cm) screws.
- 2.5" and 1.25" (6.4 cm and 3.4 cm) pocket screws.
- 16 hex head screws.
- Large screws for attaching swivel wheels.
- Screwdriver.
- Joiner's glue.
- Sandpaper.
- Stain.
- Matt varnish for wood.
Prepare the wooden parts of the table by cutting them with a circular saw. Or order a cut in the workshop, providing a list of the necessary elements:
- 4 strips 5.25″ long;
- 6 boards 56.5″;
- 4 boards 11.25″;
- 4 pieces 27.75″;
- 3 boards 59.5″;
- 1 piece 56.5″;
- 1 piece 51.5″.
Description of work
- Start assembling the side parts of the table. To do this, install small planks 5.25 ″ (13.3 cm) long, connecting them in pairs at the top and bottom of the 27.75 ″ (70.49 cm) parts. Using a special device, prepare hidden (pocket) holes for their connection. Apply glue to the contact points and holes. Using a screwdriver, drive 1.5″ (3.81 cm) screws into the prepared holes.
Attention! Be sure to use wood glue when assembling. Excess protruding at the joints should be removed immediately with a damp sponge. Then the finish will lie evenly, without spots.
- Check 6 boards 56.5″ (143.5 cm) long, they should be exactly the same. Prepare 2 pocket holes at the ends of each.
- Screw 2 boards each to the matching long edges of the middle and bottom shelves.
- To make the bottom and middle shelves the same, attach 11.25″ (28.6 cm) end strips to the middle.
- Install the bottom shelf at the bottom of the side bases, and the second approximately in the middle. Use glue and large euro screws to connect.
- Attach the remaining two 56.5″ (143.5 cm) planks to the top of the sides. They will be under the top shelf.
- Also, having prepared pocket holes in advance, assemble the top shelf from 3 boards 59.5 ″ (151.1 cm). Set it in place.
- Using a special nozzle, prepare holes for metal parts. They will serve as a rear shelf limiter. The holes should be located approximately in the middle, at the same distance from the shelf below.
- Check how the rod falls into place.
Take care of finishing the table.
- Fill the screw holes with a special compound.
- Lightly sand the shelves and walls with sandpaper, removing large defects and excess putty.
- Cover the product with stain. Leave to dry.
- Apply 1 coat of matte varnish to the table. Let the coating dry.
- Flip the shelf. Install on large screws and glue wheels.
- Insert the stop rods into place.
Bar stool for loft interior
Complement your mobile console table with matching bar stools. If necessary, they can become flower stands, lamps or a bedside table. In addition, the height of the seat can be adjusted to the most comfortable position.
What to buy
- 2 boards with a section of 2 × 2 (5x5 cm) 8 feet long (243.8 cm);
- round board with a diameter of 12 ″ (30.5 cm) or 2 × 12x12 (5x30.5x30.5 cm) for the seat;
- metal screw rod with a diameter of at least 3 cm;
- welding machine (if you know how to work with it), protective equipment;
- device for preparing pocket holes;
- drill;
- circular saw;
- metal plate;
- nuts and washers;
- screws for pocket holes;
- glue for wood;
- sandpaper;
- roulette;
- square;
- pencil;
- putty;
- stain;
- wood varnish.
Prepare the parts according to the list:
- 2 pieces 12.5″ (31.8 cm) long for the cross base cross. At the ends of the parts non-parallel bevels of 10 degrees.
- 1 3/4″ (1.9 cm) plywood top piece 8.5x8.5″ (21.6x21.6 cm) long.
- 4 support elements 2x2 (5x5 cm) 23.5″ long with parallel bevels of 10 degrees at the ends.
- 4 crossbars 2x2 (5x5 cm) 9.6″ long. Non-parallel cuts at 45 degrees at the ends.
- 1 round seat piece 12″ (30.5 cm).
Description of the assembly of the chair
- From the top of the base piece, cut all 4 corners at 45 degrees, as shown in the figure below.
- Mark both structural elements of the cross. Using the marks, make the central grooves to a depth of 0.75 ″ (1.9 cm) with a circular saw. When connected (glue only), the parts should be flush.
- Assemble the base of the chair. Prepare pocket holes first. Then make connections with glue and screws.
- Attach with screws on the outside of the outer leg rest piece. You only need one screw per connection. Secure them with glue.
- Install to the center of the metal plate (by welding) a large screw rod that will hold the seat. If you do not have experience in such work and equipment, contact the workshop.
- Mark the center of the back of the seat. Then attach with 4 large screws and a metal plate with wood glue.
- Drill a screw hole in the crosspiece using a special nozzle and the same one on the top of the base. Check if the screw rod can enter them.
- Fill the screw holes with putty. Let the compound dry.
- Use sandpaper to lightly sand the surface of the structure.
- Cover the product with stain. Leave until completely dry.
- To make the chair last longer and have a finished look, apply 1-2 coats of varnish to the wood.
Now you can arrange your own loft corner on the balcony, kitchen, living area, etc.