Installing an air conditioner in a residential area has its own characteristics. In order for this climatic technology to work most efficiently, it is important to carry out the installation correctly. Not less important suitable capacity... The main parameter for calculations is room volume... But the side of the world that the windows face is also important. So, if it is south, the room will be a priori warmer than in a similar area, but with windows to the north. Therefore, you should choose a device that is 30% more powerful. A low-power air conditioner, even with the correct installation, will not be able to fully cope with the function assigned to it.
Where to start?
So, there is a suitable air conditioner. What's next?
- choice of installation time;
- choice of installation site;
- choice of installation method.

Most often, split systems are installed in apartments, consisting of an internal (evaporator) and an external (condenser) unit. They are interconnected by a tube containing wires and freon. Recently, devices with two indoor units operating autonomously from each other are gaining popularity - this facilitates the installation of an air conditioning system in adjacent rooms.
The optimal time to install the air conditioner is not spring or summer, but the repair time.

A separate line must be drawn from the wiring shield for the air conditioner, and if this is done during the repair process, the wires can be successfully masked. And the preparation of the hole for the freon tube is a work, in the literal sense, dusty. Therefore, if there are repairs in the near future, it is better to wait with the installation of the air conditioner.

How to install the external unit correctly
The installation of an air conditioner always begins with the installation of the condenser. Based on the weight of the outdoor unit, brackets are selected that can withstand this load. The brackets must be attached not to the insulation or the cladding of the house, but directly to the wall - a solid foundation.
To protect the device from precipitation, it is recommended to cover it with a visor. It is not necessary, but such a measure will prolong the effectiveness of the apparatus. If the air conditioner is located on one of the first two floors, it will not be superfluous to make a metal cage for it - this will protect the device from theft.
According to the installation rules for this type of climatic technology, the drainage pipe extending from the outdoor unit must be discharged into the sewer.

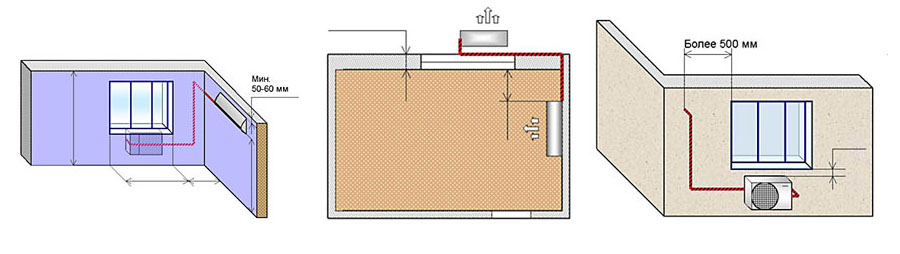
Placing an outdoor unit under a window
In practice, in our houses, especially multi-storey ones, this is impossible, because the pipes are left to hang freely. But the sound of dripping condensation can be very annoying for the neighbors living below. And this is natural - the knock of drops on the windowsill over time only distracts and annoys more. If you want to maintain good relations with your neighbors (as well as your nerves, which can go into figuring out who is right), it is worth considering this moment.

Installation of an outdoor air conditioner unit on the balcony
The optimal way out is to lengthen the drainage tube so that drops fall from it along the wall along a line where there are no window openings or balcony structures. Don't forget about the alternative - application.
Where is the best place to place the indoor unit
The distance between the blocks is directly proportional to the power loss of the device. Therefore, the shorter the distance, the more efficient the air conditioner is.
For this reason, it is preferable to install the indoor unit on the same wall as the outer one, or as close to it as possible.
It is important to remember that air conditioners:

Sometimes the most convenient option seems to be to place the air conditioner over the cabinet - no one will see it there. But, firstly, this will interfere with the normal operation of the device, and secondly, every time you start the air conditioner, all dust from the surface will be swept down, and people will breathe it. Therefore, this option is not as good as it seems at first glance.

Important so that the indoor unit of the air conditioner is freely accessible. This will not only provide better performance, but will also allow the device to be cleaned in a timely manner.
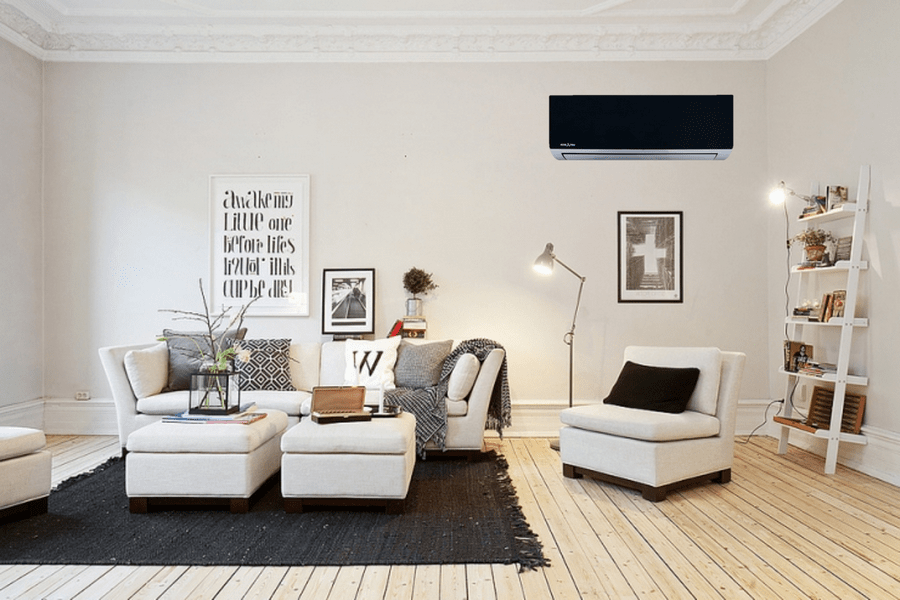
Sometimes they tend to mark the internal block behind curtains or lambrequins - so as not to attract undue attention. Of course, it may not be suitable for a sophisticated interior design, but such a disguise prevents productive cooling of the air.

It is better to spend a little more time choosing an air conditioner and find such a model, the evaporator of which will be in harmony with the interior.

Protective reflector for air conditioner - prevents cold air from directly entering the person
Modern manufacturers offer various options - from laconic classics to very bold decisions, up to, therefore, searches will certainly be crowned with success.
How to install the indoor unit
Actually, the principle of its installation is similar to the principle of installing an external unit. First, a suitable place is selected, then the brackets are attached to the wall, and the evaporator itself is installed on them. The only difference is that before installing the indoor unit, a hole for the freon tube is being prepared.
After that, the indoor and outdoor unit are connected and the air conditioner is connected to the network. The fewer bends in the tube, the more efficiently the air is removed, which means that the more efficiently the device works.

Advice. At the end of the installation, be sure to check the air conditioner for operation.
For this, there are special test programs that allow you to determine if the system is installed correctly.
Should you do the editing yourself?
The installation principle of the air conditioner is generally simple, but the details are very important. So, it is necessary that both blocks are installed exactly - without distortions. Otherwise, condensation may accumulate and, as a result, an early breakdown of the device.

In addition, in some companies, a broader guarantee is provided if the installation is done by their qualified specialist, which is quite understandable: this removes all doubts about improper installation as a probable cause of unit breakdown. Nevertheless, for any air conditioner in the instructions there is a detailed description of how exactly this device should be installed. Therefore, if there is an irresistible desire to do the work on your own, this is quite real.

True, it may be difficult to find a tool in order to install the brackets and drill a hole for the freon tube. And on the floors above the first, it is not so easy to install an external unit: you need insurance. The specialists will not have any problems with this - all the equipment is included, they know how to use it, they do it quickly and efficiently.
- it's real, but entrusting the installation to specialists is more efficient.
A properly installed air conditioner does not emit abnormal sounds. It requires only preventive cleaning once or twice a year - in spring or spring and autumn, depending on the intensity of use, as well as refueling with freon once every two years.
For many, air conditioning at home has become simply irreplaceable. It creates a comfortable indoor climate when it's hot outside. But this is only possible if it is installed correctly.
In the hot summer, people begin to understand what they lack in home improvement.
Air conditioning allows:
- get rid of problems such as heat and stuffiness;
- maintain the desired temperature level in the room, as comfortable as possible for humans and household appliances.
Unlike fans, causing drafts and leading to colds, modern air conditioners maintain a predetermined temperature regime in automatic mode without problematic movements of air flows.
By design, household appliances are divided into two main classes:
- monoblock;
- multi-unit devices.
Monoblock plants consist of one working unit and are subdivided into the following main types:
- Window. Such devices must be installed in the window opening. Modern systems produced with a capacity of 1.5-6 kW, can have an additional air heating system, automatic temperature control and remote control. The price of such an air conditioner is from 12,000 rubles and higher depending on the configuration.

- Monoblock air conditioner mobile type designed to be installed on the floor and can move around the apartment. He does not require special installation; the only condition is that the air outlet hose must be brought out. The hose has a diameter of up to 15 cm and a length of up to 2 m, which limits movement in distance to the window.

- Rooftop devices, which are rarely used as household installations.
Multi-unit structures are split systems of various installations with two or more units. They have an external unit containing a compressor and are installed outside the room, and one or more internal ones for air distribution.
- The most common type of split system is the wall-mounted version of the indoor unit. It connects electrically and hydraulically to the outdoor unit and mounts to the wall anywhere in the room. Such devices are produced with a capacity of 2-7 kW and are capable of cooling a room with an area of 12 to 75 sq. m. The distance between the elements (pipeline length) is selected up to 7 m.

- Unlike a simple split, which provides for 1 indoor unit, the multi-split system is based on the installation of 2 to 5 indoor devices, which can have different designs and capacities (within 2-5 kW). Such a system allows you to install air conditioning throughout the apartment, without cluttering the outer surface of the wall with additional blocks.

Calculation of the power of the air conditioner
Selecting an air conditioner by power. This important parameter of the device depends on the volume of the room.
- S- the area of the room;
- H- ceiling height;
- q- the heat transfer coefficient of the walls (for the sunny side q = 40, for the shadow side - q = 30) with the addition of 10% for the heat generated by people and household appliances (except for the kitchen).
For example, for a room with an area of 30 sq m and a height of 2.5 m, facing the sunny side of the house, the power should be 30 x 2.5 x 40 x 1.1 = 3300 W. Standard range of split-system capacities: 2; 2.6; 3.5; 5.3 and 7 kW. Hence, you will have to choose an air conditioner with a capacity of 3.5 kW.
How to choose the right air conditioner
With the onset of the summer season, many are wondering: which air conditioner to choose? When selecting, in addition to power, We recommend paying attention to the following characteristics:
- electricity consumption, length of the freon line;
- weight;
- drainage features, design;
- importantly - the presence of automatic temperature control, remote control, the presence of fittings for fastening;
- and, of course, the price of the device.
Watch our video on how to choose the right air conditioner:
The principle of operation of the air conditioner
All household split systems have a similar operating principle:
- Air cooling occurs due to the fact that refrigerant(freon) at the moment of transformation into gas in the evaporator chamber takes up a lot of heat.
- With a vacuum pump, the gaseous freon is pumped out of the chamber and enters the condensation chamber, where again turns into liquid.
- Then a new cycle begins, and this is repeated constantly. It should also be taken into account that in the evaporation chamber when the freon evaporates, water condensate is formed, accumulating at the bottom of the chamber and requiring drainage (drainage).
A feature of the split system is remote separation of the location of the condensation chamber, compressor and vacuum pump, and the evaporation chamber.
Due to the fact that all elements that emit noise (compressor, pump) are located in the outdoor unit and removed from the room, it is ensured silent work.
Freon is distilled through annealed copper tubes through the internal block, where the evaporation chamber is located and the air is cooled.
The energy consumption of the system can be reduced by the following measures:
- minimum length of the freon line;
- good drainage of the evaporation chamber;
- exclusion of heating of the outdoor unit under the influence of direct sunlight.
Energy consumption is reduced when the outdoor unit is located lower than the indoor unit, as when heated, any liquid itself rushes upward, which means that it does not have to be artificially promoted.
The tightness of the entire system is important - any microscopic defects can lead to the volatilization of freon.
Installing an air conditioner and split system with your own hands
Installation of a split air conditioner includes the following main steps:
- Preparatory work.
- Installation of outdoor and indoor units.
- Freon pipeline layout.
- Drainage system installation.
- Installation of an electrical circuit.
- Filling the refrigerant and sealing the system.
- Test and launch.
For installation  do-it-yourself air conditioner, you must prepare the following tool in advance:
- hammer drill, electric drill and screwdriver;
- set for rolling;
- vacuum pump and gauge manifold;
- pipe processing tool - pipe cutter, scraping, reamer, pipe bender;
- screwdriwer set;
- a set of socket and wrenches;
- Adjustable wrench;
- tester;
- level and plumb line;
- Bulgarian.
How to choose a humidifier? What is the use of this device, and is there any harm? Details.
How to choose the right one and install it yourself? Let's figure it out.
How much does it cost to the family budget to use an electric boiler to heat a private house? ...
When installing the device with your own hands, you will need the following installation material and equipment:
- for freon route: copper tube (two sizes); return nuts for tubes (two sizes); material for thermal insulation of the track;
- for electrical installation: cable, circuit breaker at least 25A, connecting (terminal) block, RCD, PVC insulating tape, corrugated pipe for cable;
- for the drainage system: hose for outdoor and indoor units, fittings for connecting to the sewerage system and connections;
- for fastening: brackets for the outdoor unit, mounting plate for the indoor unit, anchor bolts, dowels and screws, rope (cable) to hold the outdoor unit during installation;
- for filling and sealing: freon cylinder, silicone sealant;
- auxiliary elements: plastic boxes for pipes and drainage (60-100 mm) and cable (20-30 mm), clamps, fasteners for the pipeline, screws, dowels.
Preparatory work
The preparatory stage includes a number of activities without which you can not start work:
- preparation of the mounting kit;
- studying instructions;
- checking the availability of all parts;
- determination of the place of attachment of blocks;
- route marking; clarification of the possibility of the power grid.
Installation work must be started by studying the instructions for use. Without instruction, where the specified parameters of the device are given, high-quality installation is impossible... If the instruction is lost, then you should find an air conditioner similar in model (company office, service centers, Internet).
The instructions specify the following parameters:
- working current;
- permissible length and diameter of the pipeline;
- drainage requirements specific installation requirements;
- type of refrigerant and its working pressure;
- mass of blocks.
Placing blocks

When determining the place where it is necessary to install an air conditioner in an apartment, certain rules must be followed.
- The internal one is installed close to the ceiling, but not closer than 15 cm.
- There must be a free gap of at least 10 cm around the block.
- During installation, the unit should be hung obliquely at an angle of up to 5 degrees.
- The location of the element should allow free supply of pipes and cables, as well as be away from heat sources.
- The distance to the block from the window should not exceed the maximum dimensions established for the length of the freon line.
- The outdoor unit is installed on the outer side of the wall lower than the inner one, but no more than 3 m.
- Its location must be chosen so that the installation can be easily carried out from the window opening.
- The length of the tubes from the unit to the entry into the room should not exceed 1 m.
- During installation, the outer element moves away from the wall by 10 cm. It is prohibited to install the unit near a gas pipeline.
Planned the installation locations of the blocks are marked with chalk or marker with markings for mounting brackets. Then, in between the route of laying pipes is marked for freon and power supply cable. It is noted attachment point for the electrical junction box. Drainage systems are being marked s and discharge it into the sewer.
Wiring and laying of a freon route
 The installation of the system consists in fixing the blocks, conducting and fixing the pipeline, electrical wiring and drainage system.
Piping and cable can be laid along the wall in three ways:
- shtraba;
- plastic box;
- corrugated hose.
Shrabs allow you to make a hidden track, but they require a lot of time and effort. For laying all highways in concrete, a standard channel size 40 x 60 mm.
Slitting is carried out using a grinder, perforator or wall chaser. The easiest and most qualitative way is to use a wall chaser, which allows you to make a channel in one pass, but the cost of such a power tool is high. More a common method is to cut 2 longitudinal slots with a grinder with subsequent sampling of concrete between the slots with a perforator.
An easier way of laying is a plastic hose or box. They are attached to the wall using dowels, for which holes with a diameter of about 8 mm are pre-drilled in the marked places. To guide the track through the wall, it breaks through hole with a diameter of 5-8 cm using a punch.
Drainage system installation

Correct installation - drainage of the air conditioner into the sewer, but this is realized only when the sewer pipes are located close. Most often, the drainage hoses are simply led out (the volume of condensate is small and released in the form of drops). A feature of the drainage is the need to ensure the gravity of water, i.e. the hose should drop 3 cm for every 1 m of the length of the pad.
Electrical connection
The power cable for the units is placed in a corrugated hose or pipe punched in the wall. It extends through the wall into the same hole as the pipes. Along the outside wall and in the hole in the wall the wiring is placed in the corrugation. The channel for laying inside the wall has dimensions of at least 10 x 10 mm.
The outlet of the air conditioner electrical circuit from the main power grid is carried out in the nearest junction box, if the cross-section of the supply wires allows. Often, necessary to an existing channel extend additional cable(wire) of the required section. A terminal block is installed in the junction box, in which the connection is made.
Introductory an RCD is installed on the electrical panel with a circuit breaker for a current of at least 25 A.
The figure shows the wiring diagram for connecting the air conditioner:

Split system installation

The outdoor unit is mounted on brackets, the dimensions of which should take into account the weight of the device, as well as weather factors (snow, icing, wind). The brackets are fastened with anchor bolts, and the holes in the wall for them are punched with a puncher. Usually, brackets are included. It is recommended to install a visor above the outdoor unit.
To install the indoor unit preliminarily on the wall is fixed with dowels mounting plate included with the air conditioner. Holes for dowels are drilled with an electric drill or punched with a puncher. The unit itself, according to the installation technology, is installed with an inclination at an angle of 3 to 5 degrees to direct the flow of cooled air downward.
When laying copper pipes, special care should be taken in their bending. To exclude deformations, bending should be carried out using a special device - a pipe bender. The permissible bending diameter is 20 cm. The tube must be cut with a pipe cutter, and the cut end must be machined with scraping.
A heat-insulating polyurethane foam hose is put on the tubes(flex). Threaded flanges (return nuts) are installed on the ends of the pipes, and the end is rolled with a reamer... The flanges are installed on the block fittings and tightened, but so as not to deform the soft copper base of the tube.
Special attention - flange threads should be directed towards the end, and when fastening the cold outlet of one block must not be allowed to be connected to the hot outlet of another.
Charging with refrigerant and completing the installation
The final stage of the air conditioner installation includes filling the system with refrigerant, sealing and testing.
After the installation is completed, the power supply is connected and the system is filled with freon. 
- air is evacuated using a vacuum pump;
- then the system is filled with freon from a cylinder where it is under pressure.
The tightness of the structure is controlled by a gauge manifold.
If the manifold does not show an increase in pressure within 60 minutes, then the tightness is considered normal; otherwise, check the sealing of the joints. The easiest way to check is with lather. The broken joints are sealed by applying a silicone sealant.
Testing is carried out when turned on in different modes. Turning on is done using a circuit breaker, and the test mode is set on the air conditioner.
To learn how to install the air conditioner yourself, watch the video:
Rules for the use of air conditioners
When using an air conditioner in everyday life it is worth adhering to some rules:
- you cannot direct a strong stream directly to a person so as not to cause a cold;
- it is not recommended to allow a temperature difference between adjacent rooms of more than 10 degrees;
- the optimum temperature is recommended - 20-22 degrees;
- the device should be periodically turned off and the room should be ventilated to restore the ozone content;
- recommended for use;
- it is necessary to carry out preventive measures - replacing filters, adding freon, cleaning the system.
Do not turn on a faulty air conditioner: sparking in places of electrical contact, clicking inside, heating of the cable, refrigerant leakage.
Air conditioner installation cost
Do-it-yourself installation of an air conditioner requires certain costs - the purchase of fasteners, refrigerant, auxiliary materials. In general, all costs should not exceed 1000 rubles.
Installation of the air conditioner by a specialist can be produced without spending your own time and effort, but will require at the lowest prices from 6000 rubles... By time installation of a split system will take no more than 8 hours with the right tools and materials.
Installing a split-system is a difficult job, and to watch the process of installing an external air conditioner unit on the wall of a high-rise building is sometimes, frankly, even creepy. But there is nothing supernatural in this work, and below it will be described how to install the air conditioner yourself, however, you will probably need an assistant.
Tools and consumables
Self-installation of the air conditioner will require the use of expensive tools. This primarily applies to a vacuum pump, the simplest version of which costs a couple of hundred dollars. This equipment can be rented, asked from a familiar master, etc., because how to properly install the air conditioner without it is very difficult. True, looking ahead, let's say that it is possible to do without a vacuum pump, there will be no quality guarantee.
So, you will need the following materials for installation:
- The vacuum pump we just talked about.
- A professional SDS + hammer drill with a power of at least 750 W with a 22 mm drill, but it is better to use a special industrial hammer drill with a 40 mm drill, then you will not have to drill two holes in the wall.
- The hammer drill also requires 6x60 mm drills for fixing the indoor unit and 12x200 mm for fixing the outdoor unit.
- Good rolling, preferably with a polished taper. Otherwise, when rolling, you will definitely cut copper dust and shavings, which will damage the compressor.
- Pipe cutter. You cannot cut the pipes with a regular hacksaw. The reason, again, is the large amount of chips formed and the uneven edges of the cut-off site, which makes it impossible to perform high-quality flaring, and the installation of the air conditioner with your own hands will be performed poorly.
- A pair of brackets that can support a weight of up to 60 kg for attaching an outdoor unit.
- Copper tubes for arranging the track with a diameter of 3/8 and 1/4 inches - these are for household air conditioners of low power 7 and 9 BTU / h (British thermal unit, the number is indicated on the package). More powerful devices use other diameters.
- Spongy special insulation for thick and thin copper pipes.
You will also need a plastic drainage tube, aluminum tape for winding pipes behind the wall, a 60x80 mm box for the route in the apartment, as well as a level and other materials for installation, usually always available in stock.
More about the air conditioner device
To understand how to install the air conditioner yourself, you need to understand some of the details of the device and the principle of the air conditioner. The main element is the outdoor unit and, accordingly, the compressor. Into it the plant has already pumped in freon to fill a five-meter track, although self-respecting installers usually take a refrigerant cylinder with them just in case. You can read about how to fill the air conditioner.
There are two unions on one side of the outdoor unit.
On one you can see a couple of nuts:
- the first, with a copper or plastic plug - for connecting a thin copper tube of the route;
- the second, deaf, under which a control valve with a valve for a hexagon is hidden - by turning it into the system, freon is started after the installation of the air conditioner with your own hands is completed.
The second union has three nuts:
- with a plug - for connecting a thick copper tube;
- blind nut, under which the valve is located;
- the third, located in the opposite direction to the highway, hides the filling port.
It is connected to the system until the control valve is turned and serves for refueling, as well as measuring the pressure of the refrigerant. When installing the air conditioner with our own hands, we will use it - it will be needed to connect the vacuum pump.
Brass nuts with a cone connect the ports with copper pipes without any gaskets - tightened with a force of 70-80 kg, it completely seals the copper to the cone. These nuts can be loosened a little, but the plugs cannot be removed - nothing should get inside. Next, we will tell you how to install the air conditioner yourself.
Indoor unit installation

It is better to mount it closer to the outer wall so that the installation of the air conditioner with your own hands is not accompanied by the laying of a long route. It is necessary to leave thirty centimeters from the ceiling for the indoor unit so that nothing interferes with the air intake.
The metal mounting frame of the device is mounted horizontally along the level. Next, you need to decide where the box will be, for which an internal block can be attached to the frame. Drainage will go along the box to remove condensate, so it should be placed at a slope, but not large - about 5 mm by 30 cm in length.
Difficult stage
After completing the installation of the indoor unit and marking where the box will come out to the outer wall, you can start drilling the hole outward. You can use a powerful professional hammer drill, but you will have to drill not one, but two and in some cases even three holes.
Drainage will be displayed in the lower one, wiring and copper pipes in the upper one. For obvious reasons, both holes should be drilled at an angle - the same or even steeper than that of the box. At the end of the work, you should stretch communications.
Outdoor unit installation
It is installed on an external wall. If there is an open balcony - great, installation of an air conditioner in winter will even be safe. On the loggia, the air conditioner can be mounted on the front or side, which is usually in the shade. The rules for installing the air conditioner prohibit installation inside a glazed balcony, or during its operation, the windows must be open.

First, the brackets are attached - holes are marked and drilled, the first bracket is set according to the level, then the second. The distance between the legs of the fastening of the outdoor unit must be measured in advance in order to know at what distance from each other to mount the brackets.
A block is installed and twisted on them. The track should already be stretched by this time. Copper pipes in concrete do not need to be insulated, but in the rest of the sections they must be insulated - tighten the sponge insulation pipes, rewind the joints with electrical tape, ensuring the tightness of the connection, otherwise the installation of the air conditioner with your own hands will be of poor quality.
Assembling the track
Brass nuts are unscrewed from the short pipes of the indoor unit and plugs are removed, copper pipes are connected. At the beginning of the process, a hiss will be heard - this is an inert gas that has been pumped into the unit at the factory to prevent corrosion.
Before you install the air conditioner yourself, it makes sense to practice cutting and expanding copper pipes, as this is a very important process. After the indoor unit, the outdoor should be connected to the track in the same way. At the same time, there is no need to be afraid of freon leakage - you have not opened the ports yet.
System evacuation
Although the air conditioner is being installed independently, a vacuum pump is still needed. It connects to the filling port and turns on for 15-30 minutes.
The main thing in this process is not the removal of air from the system (which happens literally in a minute), but the removal of moisture from the system, which is destructive for the compressor.
Within a quarter of an hour, observe the pressure gauge needle, which should not "creep" back to zero. If the arrow is stationary, you can proceed to the next stage, if not, then the tightness of the connections was not achieved. In this case, before you install the air conditioner yourself, you need to find and fix the leak.
System startup
- Insert a hexagon into the control valve of the lower port (near a thick copper tube) and turn it carefully until it stops. Until then, the pump hose must not be disconnected!
- After filling the line with freon, the filling port will be closed - the vacuum pump hose can be unscrewed.
- In the same way, open the second port next to the thin tube on the upper fitting.

When you have installed the electrical part, run the air conditioner in cooling mode. After a few minutes, cold air will come out of the indoor unit.
Installation secrets
By the way, installation of an air conditioner in winter is also quite possible. True, the installation of an air conditioner in winter is carried out in less comfortable conditions, and you need to be more careful that snow or water does not get into the line during operation. But it is better to open the valves and run freon into the system at a positive temperature - the rubber gland of the valve "dubs" and may fail.
In conclusion, we will tell you how to install the air conditioner yourself without the vacuuming process and, accordingly, without a pump. This is possible on a hot summer day when the air is very dry. To do this, the nut on the thin copper pipe must be tightened not completely, and then very slowly open the control valve at the thick pipe.
Freon will displace the air with its pressure, but you need to accurately catch the moment when cold freon comes out from under the nut on a thin tube and quickly tighten it. This method, we repeat, is incorrect, especially if the air conditioner is being installed in winter, you cannot check the tightness of the connections, but in certain situations such an independent installation of the air conditioner is possible.
Video instruction
Below we present a video in which, in five minutes, the process of installing an air conditioner is described in some detail - installing an external unit, an internal one, connecting a route and filling the system with freon.
In contact with
To put the air conditioner, as a rule, you need to call specialists, who, upon completion of the installation of the equipment, will give you a document confirming the correct work. When installing a split system with your own hands, you lose the right to service under warranty. But, in order to save finances, many home craftsmen are trying to install the air conditioner with their own hands. In this case, one point should be taken into account: in order to qualitatively connect the external unit of the system with the internal one, and then start the unit into operation, you will need to purchase a fairly expensive equipment... In addition, installing a split system is a rather troublesome business if you carry it out yourself. The purchase of equipment is advisable in the following cases:
- you are planning to move one or more units to new locations;
- if you have purchased several units;
- you are planning a serious renovation in the apartment, implying a complete dismantling, and then the reverse installation of the split system;
- you want to help your friends or relatives install the split system;
- if you need this set of tools to repair your car air conditioner.
In other cases, installing an air conditioner in an apartment with your own hands is impractical.
The standard equipment of a split system usually includes such components.
Important! To install the air conditioner with your own hands and start it up, you need to supplement the standard equipment of the device.
Installation materials and tools
To install a split system yourself, you will need to purchase the following materials.

You also can't do without a special tool:
- pipe bender (how to use, shown in the video);
- rimmer stripping;
- pipe cutter (you can learn how to use it from the video);
- rolling (see video);
- gauge manifold;
- Vacuum pump.
Choosing a mounting location for the indoor unit
The location of the indoor unit should be such that when using it you do not experience discomfort from the cool air flow. If you look at the next picture, it will become clear without words what are the ideal options for installing an air conditioner in an apartment.

When placing the module over the head of the bed, the flow of cold air will not enter the rest area and will not harm your health. It is recommended to locate the workplace so that the air flow is either from the side or from the back. If the desk you are working at is under the air conditioner in your apartment or office, you can install a special screen under the hairdryer to direct the flow along the ceiling.
Indoor unit installation requirements
There are the following rules for placing the indoor unit of the air conditioner in the room:
- the distance between the hair dryer and the ceiling must be at least 15 cm (some models are installed at a distance of 20-30 cm from the ceiling);
- the distance from the installed block to the wall on the right or left is at least 30 cm;
- the obstacle in the path of the air flow must be at least 150 cm.
Sometimes the question arises: at what height should the indoor module be hung if the room has high ceilings? On average, you can hang the air conditioner on the wall at a height 280 cm from the floor, as it shown on the picture.

The following figure shows examples of different installation options to illustrate how best to install the air conditioner.

Outdoor unit installation requirements
It is customary to place the external module of the unit under a window, near a window or on a balcony. If the balcony railing is strong enough, then you can fix the module on it.

If the apartment is located on the first floor, then the outdoor unit must be located at a height of at least 2 meters from the ground, adhering to the rule: the outdoor unit must be mounted slightly lower than the indoor unit, or at the same level with it.
When installing split-system modules, remember the values of the minimum and maximum distance between them. These values may differ for different manufacturers of climate control technology. For example, for Panasonic split systems, the minimum distance between modules can be 3 meters, and for Daikin - from 1.5 to 2.5 meters.
Some manufacturers do not specify the minimum distance at all. In this case, the blocks can be placed back to back.
The maximum route length between modules is usually 6 meters. More is allowed, but in such a situation it will be required refueling with freon, which entails additional material investments. Therefore, if you are installing the air conditioner yourself, it is better not to exceed the indicated 6 meters.
Installation procedure
The procedure for installing an air conditioner, including an inverter air conditioner, implies a phased installation of all its modules and highways. Installation must be done by following the step-by-step instructions below.
The rules for installing the air conditioner state that the first stage will require the installation of an indoor unit (hair dryer) of the air conditioner. To do this, follow these steps.
- To properly install the air conditioner yourself, take a steel mounting frame and attach it to the wall where the hair dryer is supposed to be installed (taking into account all the distances described above). It is important that the frame for mounting the air conditioner is placed strictly horizontally(use building level).
- Mark the places for the fasteners.
- Use a punch to punch holes in the wall and hammer in plastic dowels.
- Place the plate against the wall and secure it with self-tapping screws.
- The hair dryer is hung on the mount (plate) for the air conditioner, after which it is necessary to check the horizontal again. If the air conditioner in the room is skewed in the opposite direction from the drainage channel, then the liquid will accumulate in the pan and drain along the walls.

Preparation of communication channels
Do-it-yourself installation of the air conditioner continues with the preparation of the channel for the highway. To lead out the tubes of the freon circuit, supply cables and drainage, it is necessary to make a hole in the wall of the appropriate diameter. For this, a hammer drill with a long drill is used. For a free outflow of condensate to the street, it is necessary to make slight bias.

Outdoor unit installation
Installation of an external air conditioner unit is considered the most time-consuming process when installing split systems. Difficulties are associated with the fact that the weight of the module can reach 20 kg or more, due to the compressor located in it. In addition, most often the external module is installed at a high altitude.
To get started, mark out using a level. Then, using a punch, punch holes. Further, anchor bolts are screwed into them, and the brackets themselves are screwed to them with nuts. After the brackets are securely attached, the outdoor unit is installed on them.
When installing the air conditioner, especially the outdoor unit, you will need the help of at least one person... If the module is installed at a high altitude, then you will not be able to install the air conditioner yourself. It is better to use the services of climbers to hang this module.
The outdoor unit is bolted to the brackets. It is recommended to use thick rubber under the feet to reduce vibration.

Connection of blocks with communications
To continue installing the split system with your own hands, you need to connect both modules to each other.
- First of all, remove the protective plastic covers on the terminals of the outdoor unit. Using the instructions, connect the control and power cables that come from the indoor unit to them.
- Carefully, in order to connect the modules in the future, make track installation your air conditioner, after putting heat insulation on the tubes (the ends are fixed with reinforced tape). To prevent debris from getting into the tubes, also tape the ends of the tubes. The track is secured with clamps screwed to the wall. After that, measure the length of the line and cut the tubes, leaving a margin of 10 cm. Put the union nuts on them and seal the ends. Using a rimmer, remove the chamfer. The laying of the route (highway) for the air conditioner can be carried out both outside the room and inside, if, for aesthetic reasons, it is forbidden to place any communications on the facade of the building.
- Using union nuts, screw the tubes first to the fittings of the outdoor unit, then to the fittings of the indoor unit.
- Secure the drain tube using plastic clamps.
Below is a diagram of the connection of split-system modules.

Evacuation
Without evacuating the lines, refrigerant must not be introduced into the system. This procedure requires a vacuum pump and gauge manifold. The pump is connected to the filler neck through the manifold, as shown in the figure below (the valves on the manifold must be in the “closed” position), after which it is switched on for 20-30 minutes. to remove residual air from the system.

After turning on the vacuum pump, open the handle located under the low pressure gauge. After a short period of time, the needle on the pressure gauge will begin to drop and reach zero, within 30 seconds or more. The evacuation time depends on the length of the line and the diameter of the tubes. The position of the arrow at zero means that in the line a vacuum has formed.
Do not turn off the pump at this stage. Continue evacuation for about 30 minutes more. After the specified time has elapsed, first turn off the tap on the manifold, and only then turn off the pump. If the tap is not closed, air will leak into the system.
Filling with freon
Freon is launched into the system without disconnecting the hose connected to the service port valve. If this is done before the refrigerant starts up, air will enter the line.
In order to start the refrigerant into the system on its own, it is required, using a hex key, to slowly open the valve located on the liquid valve. After filling the line with refrigerant, you can unscrew the hose connected to the service port located on the gas valve.
Attention! When disconnecting the hose, the release of freon is possible, which can freeze your hands and damage your eyes. It is recommended to wear safety glasses and gloves. The face must be kept away from the fitting.
It is necessary to unscrew the union from the valve as quickly as possible in order to reduce the loss of freon. Do not be intimidated by loud hiss. When the refrigerant escapes, the nut may be covered with frost. Do not touch it without gloves, so as not to get burned.
All connections can be washed to check for leaks. After checking, tighten all valve plugs, not using great force, but well enough. If you twist them loosely, then it is possible that during the winter period freon leak.
After you are convinced of the tightness of the line, turn on the split system for a while, and then check all the connections again. At this point, the installation of the wall-mounted air conditioner is complete.
Do I need permission
People often ask if permission is needed to install a split system, and can it be installed without the approval of the authorities? As a matter of practice, permission is not required to install an air conditioner. An exception may be cases when it is necessary to coordinate the installation of climatic equipment with the authorities in buildings that are monuments of architecture or have historical, aesthetic value. In other cases, approval for the installation of climatic equipment is not required.
The main tasks of the climatic equipment are the supply of cooled / heated, purified air inside the apartment, house, office and other premises. This is especially true with the onset of the warm season (cooling), off-season (heating). The main thing is that the device does its job well. High-quality, efficient functioning of the climate system to a large extent (up to 80%) depends on professionally organized installation. By observing certain rules for installing the air conditioner, it is possible to extend the service life of the equipment, enjoying its flawless operation every day.
Internal unit of the split system above the bed
Air conditioning. What is it?
More and more often on the facade of the house you can see the outline of the external block of the air conditioner. The use of climatic equipment has long become a norm of life, its sales are gaining momentum, the model lines are replenished with enviable constancy. But what is this unit, commonly called the word "air conditioner"?
As a rule, by this concept, the majority means precisely split systems, consisting of two parts: an indoor unit intended for installation in a room, and an external one - on the facade of the house. These are the most popular options for climatic equipment, which have become such due to an acceptable balance of price-quality-functions.
The blocks are interconnected by pipes with freon, electric wires, forming a well-coordinated working system for cooling, heating, purifying the air inside the living space of an apartment building, a country cottage. A split system is just a variation among other air conditioning devices (monoblocks, chillers and fan coil units, cassette, duct, column devices, central systems, etc.).
When purchasing equipment, you must, of course, decide on the model, functional equipment, and design. But in addition, it is important to take care of the professional installation of the system, because its further high-quality work, the duration of the service life, and the level of comfort created depend on this.
Indoor unit installation rules
 Indoor unit above the door
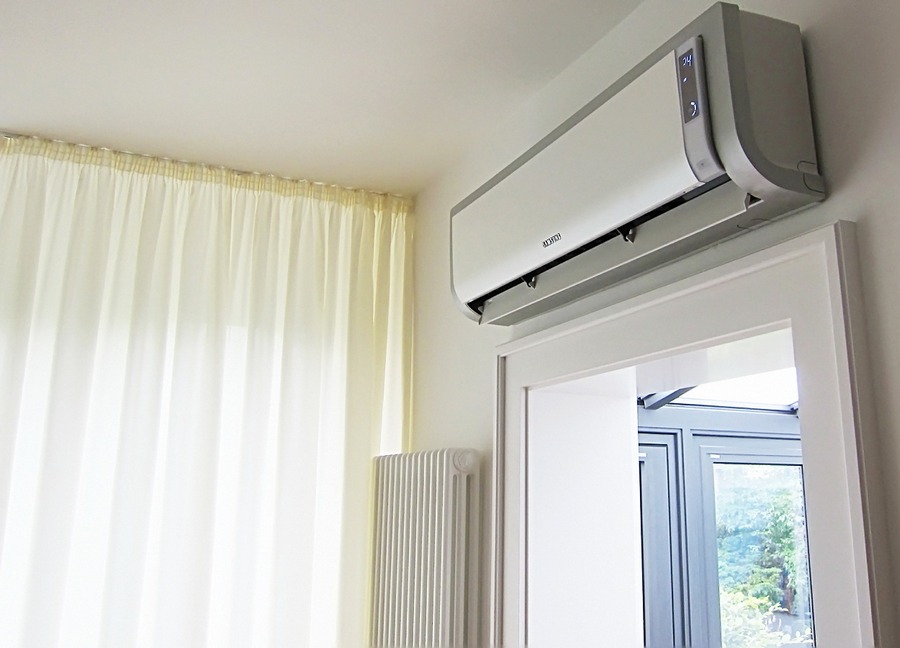
 The indoor unit is that part of the split system, the design, functional improvement of which is given great attention. And it is not in vain, because it is located inside the premises, one might say, is the "face" of the climatic equipment.
There are many requirements for the installation of the indoor unit of the air conditioner, which are designed to organize it in the best possible way. We list the basic rules for installing the indoor unit of a split system used by specialists:
- Installation of the device is best done before or after indoor repairs. This way you can lay communication paths in the most convenient, less costly way.
- It is necessary to observe strictly indicated distances to the nearest walls, ceilings: to the ceiling at least 10 cm, to the walls at least 10 cm, taking into account the fact that from the device to the exit point of communications - at least 50 cm.
- Do not install windows behind curtains, in niches. This will restrict the cooled air flow, it will only circulate through the space of the window opening.
- Should not be installed over tall chests of drawers, cupboards (minimum - 1m). The airflow will also be limited by the obstacle, and dust accumulated on the furniture will enter the room.
- Cannot be installed above elements of the heating system. A temperature sensor inside the unit will continuously detect high temperatures, prompting it to continuously operate in cooling mode. This will lead to rapid wear of parts, failure of the climate system.
- Locate in such a way that places of rest, work, frequent stay of people are outside the direct cooled air stream.
- The climate device must be located strictly horizontally to avoid the accumulation and then overflow of condensate from the drainage tank.
Rules for installing the external element of the climate device
 External block of the air conditioning split system
 The installation of air conditioners on the facade of the building is also determined by strict regulations. Factors such as:
- Mounting brackets are installed with a safety margin that is 2-3 times greater than the weight of the device. Mounted with anchor bolts.
- The outer surface of the building must be smooth, solid. Fastening to a dilapidated wall is excluded. The vibration force looses the mountings and the device may fall.
- When installing air conditioners on the facade, it is necessary to take into account its finishing. If it is insulated with foam or a ventilated façade is constructed, make sure that the fixings are mounted to the wall itself and not to the façade trim.
- There must be a distance of at least 10 cm between the wall and the climate device, and at least 10 cm from any object at the top of it. This ensures a natural circulation of the air flow around, allowing it to cool down in time.
- Fastening is carried out taking into account further unhindered access for maintenance.
- It is placed strictly horizontally in all planes in order to organize the correct free movement of freon along the cooling circuit.
 Installation diagram of the external block of the split system on the facade of the building
 - From the ground, the location is not lower than 1.8-2 m, preferably in a protective crate.
- When installing on higher floors, it makes sense to consider placing the system on the roof of the house. This will avoid calling for industrial climbers. It is important to remember that the maximum distance between the elements of the split system is 15 m.
- It is recommended to install it on non-glazed balconies, loggias, which will significantly save the climate device from mechanical damage and unfavorable atmospheric conditions.
- Installation inside a covered balcony is extremely undesirable due to insufficient convection of the air flow, which is so necessary for the outer element of the split system.
The rules for installing air conditioners on the facades of buildings are general, they are applicable to all split systems to the same extent.
Installation rules for communications
During the installation of the air conditioner, a considerable amount of time is allotted for the correct installation of the route for the cooling circuit, which is due to the following factors:
- The maximum distance between the blocks is 30 m. At a distance of up to 5 m, all the properties of the coolant are retained. The greater the distance, the greater the loss.
- The connection of copper pipes must be tight, the freon supply system is insulated as much as possible in order to avoid gas leakage, which will reduce the performance of the climate system, up to and including its failure.
- It is best to grind a route in the wall for the cooling circuit. Communications will be hidden, which will preserve the aesthetics of the premises. If the repair has already been done, the pipes are closed with a plastic box. In this case, it is necessary to provide access to the connections for service.
 Minimum distance
 - The freon pipe must not be kinked so that the coolant circulates freely.
- For the climate system, it is recommended to run a separate electrical cable with a separate switch in the panel in order to remove the load from the general power supply network, especially if it is already old.
- Insulate all electrical wiring connections securely.
- The drain tube is best placed in a separate groove.
- It will be correct to lead a branch pipe to the sewer pipe to drain the condensate.
- If this is not possible, the pipe can be brought out near the outer element of the climate system, making sure that the condensate does not subsequently spoil the facade of the building, does not fall on passers-by.
- A cup holder is installed inside the opening of the outer wall, through which the connecting communications are passed.
- Refrigerant pipes, electric cable, drainage pipe must be packed with a foam rubber pipe, wrapped with vinyl tape.
- After attaching the outer part of the air conditioner to the facade and connecting the climate system, it is necessary to vacuum it (at least 50 minutes) using special equipment. This ensures complete removal of air and liquid from the cooling circuit, excluding the appearance of corrosion on the inner surface of the pipes.
- It is imperative to carry out a test run of the air conditioner at the end of installation work.
- It is necessary to check the device for the absence of refrigerant leakage, the presence of constant pressure inside the circuit, the timely removal of condensate. The main functions of the climate system are being tested.
Features of installing air conditioners in residential buildings
 Installing the indoor unit of the air conditioner on the wall
 The regulation for installing air conditioners in residential buildings is the same as in an apartment building. A distinctive feature is that when planning the purchase of a climate device, it is necessary to take into account the availability and capabilities of the ventilation system at home.
Suburban housing is characterized by the use of multi-split systems (one outdoor unit + several indoor units). Often a central air conditioning system is used for ventilation and air purification. Also, private houses can be equipped with duct air conditioners, which is very convenient to organize in the space of a large building.
The main condition is that climatic equipment should not interfere with the operation of the main ventilation system. Their work is a well-coordinated, complementary functioning.
Improper installation of the air conditioner will definitely affect the quality of its operation in the future. The consequences can be serious, often it is necessary to replace a faulty climate device with a new one. One of the most common problems is the leakage of coolant through leaking pipe joints. Undetected in time, it threatens the failure of the compressor, condenser, and other important components.
Also, a consequence of improper installation of the air conditioner on the wall of the apartment is the overflow of condensate from the drainage tank outward, into the room (not strictly horizontal).
Ignoring the basic rule for installing the outdoor unit of the air conditioner is fraught with its fall down. At best, it will generate a lot of noise during operation.
Professional installation of climatic equipment is a prerequisite for its reliable, efficient operation for a long time.
Friends! More interesting materials:
 Room air conditioning