Using a stapler without any nails, materials of small width and density can be stapled. It is an indispensable tool in the office, construction and furniture industries. In this article, we will figure out how to insert paper clips into the stapler.
Stationery staplers
These tools are very simple and designed for the average layman who is not versed in technical "troubles". Everything is simple here. You flip the top cover - and the spring with the pressure mechanism moves back. You insert a clip of paper clips with the points down and close the lid. The clamping mechanism returns to its place, and the tool is again ready for work.
Those interested can watch a video in which the boy shows how to do this correctly.

Construction staplers
They are more massive and have a slightly different structure, although the principle of operation is the same. The spring-loaded clamping mechanism pushes the clip to the impact mechanism, after each actuation, the next clip takes its starting position and, as a result of pressing the spring-loaded key, the impact mechanism drives it into the right place, thereby pressing the next sheet of cardboard to the wall with a clip, the material to the wood from which the frame is made upholstered furniture, or only for the formwork of the future concrete foundation. Let's figure out how to insert paper clips into a construction stapler.

Wrong option
The mistake of many is that when the stapler runs out of staples, they, pulling back the double-sided lugs of the frame lock, open it and try to insert the next clip of staples through the front part from the side of the striking mechanism. As a result, with an awkward movement, the spring mechanism now and then throws the clip back, and it flies away many meters, after which it is necessary to search for it for a long time. Often the clip can fly into the eye of the hapless "stapler operator". Here is a video showing how not to do it, although the operator himself does not know about it.

Correct option
The correct way to insert staples into a construction or furniture variety stapler is to press on the back of the spring-loaded staple holder to release its slot from the lock hole and pull it out completely. After that, you can even insert more than one clip into the frame and return the spring of the mechanism to its place, thereby ensuring its uninterrupted operation for a long time. Here's a video on how to do it right.

The frame should be opened as in the first, incorrect case, only when one of the paper clips gets stuck in the exit slot.
We hope our article was useful to you. Enjoy your "recharge"!
A stapler (translated from English as "stapler") is a necessary thing in the office. The stationery stapler is designed for quickly stapling sheets of paper with metal staples.
Types of staplers
Staplers are divided into several types: according to the number of sheets that can be stitched at the same time.
Mini stapler
Compact model that you can put in your pocket. Staples 10 to 20 sheets. Mini stapler staples are different: 10, 24/6. The design and color of the case is very interesting: colored, transparent, there are devices that look more like a toy than a stapler itself.
Desktop stapler
Sufficiently compact stapler, does not slip on the table and does not leave scratches on it, as it has a rubber sole. Staples 10 to 50 sheets. Standard staples are used: 10, 24 / 6-8.

Bookbinding stapler
A specialized stapler with adjustable stitching depth. Equipped with a ruler for ease of use. Stitches brochures, catalogs and newspapers at the fold of the pages. Designed for a different number of sheets, works on different staples.
Printing or typographic stapler
The most powerful stapler. Staples archives, bulky paper reams. Used in government agencies, libraries, clinics. On average, it can sew up to 250 sheets. Designed for both standard and specialized brackets.
Anti-stapler (de-stapler)
Used to remove the staple from the paper. The stapler remover is often built into the stapler itself, it extends from the back of the stapler and uses the pointed tip to pry and remove the staple. But a small object resembling a frog looks much more original on the table, which firmly grips the bracket from both sides. Staple removers come in the form of regular paper knives with a curved tip.

Stapler plier
The plier is a special stapler in the form of pliers, it can be used in a canopy. Plier is used by florists when packing bouquets; it is suitable for attaching labels or tags to fabric.
Tucker
This is a "mounting stapler" made in the form of pliers. Hammers staples like nails. It is used for pinning ads and posters. Interestingly, many desktop staplers in use today function as a tacker.
Staplers also differ in the type of staples that are used with them.
Stapler No. 10
Suitable for stapling a small number of sheets, typically up to 15 sheets of standard weight paper.
Stapler No. 23
The most powerful stapler.
Works with 23 types of staples. Staples up to 260 sheets of paper, depending on the length of the staple used.
Staplers No. 24
Universal stapler, staples both small quantities (1-2 sheets) and large quantities (20-30 sheets).
What to look for when choosing a stapler
... Staples
The brackets are always written with two numbers, for example, 24/6 - what does this mean?
The first number is the type of staple. This is a conventional unit that includes the staple width, section dimensions and wire steel grade (gauge) defined for this standard.
The second number is the leg height. It is measured in millimeters. The higher the leg height, the more sheets can be stapled. The thickness of the staple increases in proportion to its height. To determine the maximum thickness of the sheets to be sewn, subtract 3-4 mm for their bend from the length of the legs.

When choosing the length of the staple leg, remember the main rule - 2/3 of the leg should be in the material to be fastened, and 1/3 will hold the fastened material.
A high-quality staple is made from a notched wire (equal in diameter on any segment) - then all staples will be equal. Quality staples have pointed ends that allow for easy paper piercing.
What material for the staple should I choose? For stapling thick paper and large stacks, we recommend using steel wire staples, as it is stronger than galvanized iron. By the way, all staples with a leg height of 10 mm or more are made of steel.
The quality of the staples is related to the reliability of the stapler, so if you are buying a quality stapler, you should also purchase the corresponding staples.
... Inside the stapler
The internal mechanism of the stapler is very important and will affect the operation of the device.
The stapler's motor system is driven either by a spring or by a special metal plate. What's better? The plate is more practical: it lasts longer and provides a smoother glide, and the spring tends to stretch. The stapler tongue is made of metal (more durable) or plastic (ensures smooth feeding of staples).
... Body and design
Pay attention to the material from which the stapler is made - its durability depends on it. The metal case is more reliable in operation and looks very impressive. But plastic also has its advantages: it is lighter, more convenient during transportation, it is more pleasant to hold it in your hands. Models with combined cases are very convenient: metal + plastic, metal + rubber, metal + plastic + rubber.
The color of the stapler depends on the size and specific application.
The more powerful the stapler, and the more functions it performs, the more restrained its color.
... Power and depth
The characteristics of the stapler always indicate the punching power (or the amount of binding) - how many sheets or millimeters of paper the stapler pierces. As a rule, office paper with a density of 80 g / m2 is taken into account.
The piercing depth is the distance from the edge of the paper to where it is pierced. The depth of stitching in mini-staplers is 35-40 mm, for desktop staplers - from 50 mm or more.
... Package
The packaging will always tell about the quality of stationery, be it a stapler or staples for it. In addition, the product itself must be labeled indicating the country of manufacture, the company and the type of staple used. Sometimes the stapler comes with a package of staples.
... Paper
The thickness of a standard sheet with office papers is 80g / sq.m. It should be borne in mind that depending on the thickness of the sheets to be stapled, the stapling power will also vary.
How to charge the stapler
Before loading the stapler, determine the size of staples that will fit the stapler.
The number of the staple used in a particular stapler is written on the package.
Peel back the cover of the stapler. It is connected by a spring to a plastic element that presses the staples against the opposite edge of the metal groove in which the staples are placed. Opening the lid will pull the spring along with it, and then the plastic element, thus making room for new staples.
Take one section of staples and place them in the metal groove, ends down. Close the lid and click to sample with the stapler once. If a staple with ends concave inward fell out of it, then everything works, but if this did not happen, or the staple is bent incorrectly, repeat the procedure or change the stapler.
← go back
The mechanical stapler allows you to nail plastic panels, clapboard clamps, fabric to furniture, wood or plastic surfaces.
There are three types of staplers: mechanical, electrical and pneumatic.
Mechanical staplers are affordable, compact, lightweight and easy to maneuver. Further we will tell only about them.
How to choose a stapler?
In short, it is undesirable to buy the cheapest options, as well as plastic models. Metal tools are more powerful and reliable.
Choose professional models that have an adjusting screw (wing) at the top. It helps to regulate the force with which the tool will pierce the material.

Many people forget
Before working, adjust the adjusting screw according to the material of the surface to be worked on.
If it is tough plywood, a strong punching will be required, therefore it is worth setting a lot of force. If this is a loose surface, the force must be reduced so as not to break through the fabric, or, for example, the pvc panel that you are targeting.
During operation, it is recommended to press the lever with one hand, and press the adjusting screw with the thumb of the other hand. Then the recoil will be minimal and the load will be evenly distributed in the stapler. You will be able to hammer in the parentheses much better.
How to insert staples into the receiver
The design of all mechanical hammers is practically the same. There is a lever handle, due to which the pressing occurs, and at the bottom of the stapler there is a metal plate that opens the receiver. This is where we have to load the staples.
Before buying brackets from a hardware store, you need to know what size is right for your device. As a rule, the size and type of suitable brackets are indicated on its body.
For example, the body of our stapler has a width of 12 mm and a depth of 6-14 mm. This means that you will only be able to charge staples from that range.
Smaller or larger brackets will not fit the receiver. The size of the staples in millimeters is also indicated on their packaging.
To load the projectiles into the stapler, you need to open the metal plate on the back surface.
To do this, take it with your thumb and forefinger on both sides, then pull it towards you and slightly down. Thus, we squeeze the metal tab on the back surface of the plate, and draw out a metal spring, similar to that found in a conventional stationery stapler.

If there are still staples in your stapler, they will fall out after you pull out the spring. If they are not there, then the time has come to put new ones for further work.
The staples are inserted into the receiver (hole at the “P” position).
How many shells will fit
Now a little about how many projectiles fit in a stapler. The staples are sold in small rows. The row can be divided into several parts by yourself, slightly breaking it with your hands.
The tool is filled with 1-1.5 rows. 2 rows rarely fit in the receiver, so if there is a lot of work to be done, it is better to prepare the halves of the rows before starting work.
What to do if the parenthesis is stuck
It is worth noting one more very important point that will help you in your work.
How to fill a construction stapler with staples
It happens that the staples will bend and get stuck in the outlet. They cannot be driven into the surface and cannot be pulled out by hand.
In this case, we need to pull out the feed magazine completely.
This opportunity exists for almost all professional staplers.
To begin with, you will have to repeat the opening of the metal plate and pull out the spring.
This will pull out the entire feed magazine that was in the tool.
You will see a jammed staple that can now be easily removed by hand.
Assembling the stapler back is not difficult: the entire removed block is returned to its place with a push.
When doing this, you should hear a click. Do not forget to replace the spring afterwards.
Not just brackets
Some staplers can work not only with staples, but also with various shapes of studs. The designations of what the stapler works with are indicated on its body or in the instructions.
I fill the stapler with nails in the same way as with staples, but you need to be careful after pulling out the spring. A row of studs must be loaded along one of the outer edges of the letter "P", and not inside this very letter!
If you want, when working with a stapler, he issued two nails side by side at once, the second row is loaded along the second outer edge. Then the spring is inserted and the stapler closes
Stapler, how to charge a construction stapler?
Very often in construction, it becomes necessary to connect parts. This is done with nails or staples. At the modern level, a tool such as a stapler is used. There are many types of this tool, but in all the principle is the same - stapling. You can recharge the stapler yourself when they run out.
How to refill the stapler
They, like a stapler, are sold in any hardware store or in construction markets. There are features that you can watch in this video.
To insert a new block of staples into a construction stapler, remove the clamping bar, which is located at the back of it from below.
Next, insert the staples down with their paws and insert the clamping bar again. In order for the stapler to work without interruptions and not hit two or three staples at once (you must admit that this happens for many), you need to use only those staples recommended by the stapler manufacturer.
The construction stapler is a multifunctional mechanism. It is used when it is necessary to connect the same or different not particularly hard materials with each other, for example, plastic, wood, film, insulation, plywood. This tool is called differently: tacker, staple gun, staple gun, nailer, staple gun. Fastening of individual elements to each other is carried out using staples, pins or small nails. To know how to work correctly with a construction stapler, you need to understand its design, suitable types of fasteners, a method of setting and replacing staples.
The furniture stapler is widely used by builders and furniture makers, as well as by representatives of other fields of activity. By type of energy used to fire a shot during operation, the following types of takers are distinguished:
- mechanical;
- electrical;
- pneumatic.
The first two varieties are intended for domestic use, and the last type of tool is considered professional and is used mainly when performing work in large volumes. The principle of operation of mechanical and electric staple guns is based on pushing out the fastener by the force of a cocked (compressed) spring. After pressing the trigger, it is unclenched, which causes the movement of the striker. He hits the bracket (nail or hairpin), driving it into the surface of the material.
Mechanical stapler design
Manual (mechanical) stapling machines differ from analogs in a simpler design. They consist of the following units and parts:
- platoon handle;
- a safety clip that protects against accidental shots when transporting the tool;
- impact mechanism springs;
- shock absorber;
- drummer;
- striker;
- impact force regulator, which provides the ability to work with material of varying degrees of hardness (different density);
- hulls;
- cocking spring;
- store for fasteners;
- rammer (with spring and retainer);
- tip that allows you to accurately drive fasteners.
A diagram of the device of a staple gun is shown in the photo below.

Impact mechanism- This is the main unit of the stapler, cocked by the strength of the worker's muscles. It can be equipped with two types of springs:
- twisted;
- spring (plate).
Manufacturers indicate the type of installed spring in the operating instructions for the products.
Coiled spring mechanism shown in the photo above are equipped with cheap models. They can be easily distinguished by the adjusting screw located on the tool body on the opposite side from the staple protrusion hole. But it is also possible that the wing will be absent, then you will need to refer to the instructions to determine the type of installed spring.
Leaf springs more powerful, but more expensive than twisted counterparts. At the same time, the recoil from the tool equipped with them during operation is less. They also have a long service life and are easier to cock. The leaf spring mechanism is installed on models intended for professional use.

For the convenience of working with the tool, the handle is covered with rubber pads, and the store is made with a transparent insert (which makes it easy to control the presence of staples or nails).
Design features of electric and pneumatic staplers
The device of an electric stapler of a network type is shown in the photo below.
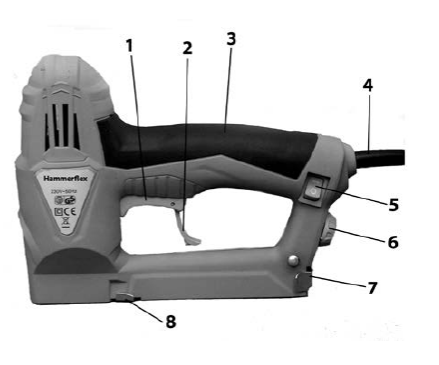
The numbers in the photo correspond to the following structural elements:
- trigger trigger;
- fuse;
- handle with a special coating;
- power cord;
- on / off switch;
- impact force regulator;
- pushing mechanism;
- score.
Inside the instrument is located electric drive and impact mechanisms... In this case, the electric motor is designed to charge the spring.
In rechargeable models, there is no power cord: instead of it, batteries are installed.
The device of a pneumatic-type furniture stapler is more complicated than its mechanical counterparts. The pneumatic tool consists of the following structural elements:
- hulls;
- a cylinder with a piston located inside it;
- starting systems (trigger mechanism);
- store for fasteners with a pusher;
- shock mechanism;
- an inlet fitting for connecting a high pressure hose to the tool;
- a regulator of the penetration depth of fasteners (impact force);
- air distribution unit.

The pneumatic-type scooper is powered by compressed air supplied by a compressor or from a cylinder. After pressing the trigger, the gas passes through the air distribution unit. Then the compressed air enters the cylinder, driving the piston. The latter transfers energy to the striker striking the fastener. After the impact, the staple or nail is driven into the surface of the material.
Classification of used staples
You need staples to use the stapler. They are divided into separate types according to the following criteria:
- by the material from which they are made;
- by the degree of hardness;
- by the availability of coverage;
- by size;
- in shape.
By material of manufacture
Material staples are:
- aluminum, used in work with non-solid materials;
- copper (expensive), also designed for soft parts;
- steel, suitable for both non-hard and soft materials, but rusting over time;
- made of stainless steel (stainless steel) - this is a reliable option in a variety of conditions, but at a high price.
Furniture staples can also be galvanized to prevent rusting.

By hardness
By hardness, fasteners are divided into the following varieties:
- simple;
- very hard;
- red-hot.
The ends of the fasteners can also be sharpened differently, making it easier to drive in under certain conditions.
By form
Based on the shape of the staples, the following varieties are distinguished:
- U-shaped;
- U-shaped;
- T-shaped (pins).
Most often, in practice, fasteners in the form of the letter P are used, and U-shaped fasteners are used mainly during the laying of cable lines. The pins are almost invisible fasteners... They are used when fasteners need to be as invisible as possible.

Standard sizes of staples
Almost all taker manufacturers also produce their own staples for them. But at the same time, there is a mandatory standardization of product sizes - this allows, when replacing, insert staples into a staple gun from different companies.
The dimensions of fasteners are understood as the following parameters:
- the thickness of the staple (denoted by the English letter a);
- the length (width) of its back (b);
- leg height (depth).
Based on these overall parameters, the following are distinguished the most popular types of staples in practice.
- 53 is the most common standard size with a = 0.7 mm, b = 11.4 mm and a leg height of 4 ÷ 14 mm.
- 140, having the following dimensions: a backrest width of 10.6 mm, a thickness of 1.2 mm and a depth of 4 to 14 mm.
- 36 - This mark indicates that U-shaped fasteners can be used for the staple.
- 300 are nails that only fit a staple gun.
It should be borne in mind that different companies designate the same types of fasteners differently. To compare fasteners from different manufacturers, use the table below. Determining the size of the brackets will not be at all difficult.

There are no universal types of fasteners suitable for any job.
How to insert staples into a stapler
Changing staples in a mechanical tacker is easy. To charge new fasteners, proceed as follows:
- the tool is blocked from accidental starting with a fuse;
- from the back of the staple, open the magazine cover, behind which there is a groove for fasteners;
- a rod equipped with a pusher spring is taken out from the inside;
- the rail from the staples is turned with the tips against the handle, and then inserted into the groove;
- a rod with a spring is installed inside the tool in the same place where they clamp the fasteners;
- close the lid of the store;
- remove the fuse;
- make a few shots in test mode to check the performance of the tool.
With nails when charging the stapler, proceed in the same way.
The photo below shows how to place the staples in the mechanical stapler.

Blocking the staple gun from accidental firing is a mandatory procedure to ensure the safety of the work.
To fill with staples pneumatic or electric staplers, proceed in the same way as a mechanical tool:
- block the device;
- turn the tool over;
- by pressing a special button, they take out a tray for fasteners;
- correctly insert staples or pins (nails) into the tray;
- insert the "clip" until a click appears;
- unlock the tool and check its operation.
Depending on the model of the stapler you are using, the fastener tray may slide out or open when you press the button on the stapler.
Some modifications of mechanical staple guns have a different principle of replacing fasteners: they are made with a chute that can be pulled out at the push of a button. Staples are placed in the extended tray and inserted back into the store until it clicks. The whole process, showing in detail how to fill the staples in the considered case, is demonstrated in the video:
Stapler adjustment sequence
Setting up the staple gun is needed in the following cases:
- after purchasing the tool before starting work;
- if the stapler stops completely driving in the fasteners;
- when starting work with a material of a different density than the previous one.
If the stapler stops driving in fasteners completely, this is due to a gradual wear of the impact spring or with its loosening. For some time, regulation will help, but after that you will need to purchase a new stapler.
It is necessary to take into account the dimensions of the fasteners for which the taker is designed: if the size of the brackets exceeds the allowable one according to the operating instructions, then the adjustment has nothing to do with it, you just need to select the appropriate consumables.
Coil spring mechanical staple guns have a screw that adjusts its compression ratio... It is shown in the photo below with a red arrow.

If you turn the adjusting screw clockwise, then the spring will be compressed more strongly, its potential energy will increase. The result will be a blow of greater force. The ejected bracket will go deeper into the surface of the material. Turning the adjuster counterclockwise will loosen the spring. This will also make the impact weaker. By rotating the screw, you can adjust the stapler to work with materials of varying hardness (density).
For mechanical models of staples with a spring (leaf) spring of the impact mechanism, the regulator is located under the handle... Rotating it in different directions, they regulate the force of the shot. It is required to reconfigure the striking mechanism each time when starting to work with a different material. After adjusting the spring compression, it is advisable to test the operation of the tool on a workpiece that is no longer needed.
The setting process ends when the fasteners with the entire length of the legs enter the material without punching it with the "back". It is recommended to exercise by rotating the adjuster from minimum to maximum spring compression.
Rules for the safe use of the tool
When working with a construction stapler, it is imperative to follow the safety rules. The main requirements are reduced to the following points.
- When replacing staples, you need block tool by means of a fuse against sudden, unexpected start-up.
- It is forbidden to point the instrument on the hand or another part of one's own body, as well as on other people or animals.
- When transporting or storing the stapler, it is necessary to fix its handle with a safety catch.
- Only a person in a normal psychological state (not under the influence of alcohol, psychotropic substances or drugs) is allowed to work with a brace.
- The work area must be well lit and clean.
- It is necessary to constantly use such personal protective equipment like glasses, so that nothing accidentally flew into the eye. To prevent the bracket from flying off when fired, it is required to monitor the presence of metal inclusions on the working surface, bypassing or removing them in a timely manner.
- If the fasteners get stuck, they must be carefully removed.
- When working with small-sized workpieces, they must be fixed motionless with the help of a vice or clamps; it is forbidden to hold it with your hands.
- The position of the body should always be stable and as comfortable as possible, and shoes with non-slip soles.
Safety instructions with electric and pneumatic staplers contains more additional points:
- the mains power tool must not be used inside hazardous areas;
- only switched off equipment is allowed to be connected to the outlet;
- the power cord with a plug and the case of the operated model must be intact;
- it is forbidden to use an electric staple gun in the rain or indoors with a high level of humidity;
- unauthorized persons should be at a distance of more than 2 m;
- the pneumatic tool used, the high-pressure hose to it, as well as the rest of the system must be free of mechanical damage;
- during work, it is necessary to ensure that the power cord is located behind the tool so that it does not interfere.
There is nothing complicated when using mechanical, pneumatic, as well as electrical types of construction staplers. It is only necessary to use suitable (specified in the operating instructions) fasteners for work, and before it, adjust the impact mechanism for a specific material. At the same time, constant adherence to safety precautions will prevent injury. Attentiveness and accuracy are one of the main guarantees of high-quality performance of any work.
To nail a film, lining or vapor barrier to the cladding, chipboard or upholstery to furniture - all these tasks will help to carry out a construction stapler. This device is also called a stapler, staple gun, staple gun, nailer or tacker. In this article, we will talk about there, what types of staplers are, how to choose them correctly, and also how to insert staples into a furniture stapler.
Types of staplers
First you need to decide what type of stapler you need. By the type of driving force, these devices are.
Mechanical
They are powered by hand power, have a low performance, a small number of staples that can be “tucked in” into it. When working with hard materials, this tool is quite complex and requires considerable effort.
However, mechanical tackers are relatively small and lightweight, which makes it possible to work in awkward positions. In addition, many are attracted by their low price, although there are models with a fairly high price tag.
Electrical
In such tools, the bracket flies out after the trigger is pressed, but the mechanism is powered by electricity. There are models that run on batteries, there are - from the mains.
Of course, the performance of such staplers is much higher than that of mechanical staplers, but their prices are also much higher, especially for battery types. The dimensions are also larger.
Important! For models that operate on the mains, the cord can interfere with work, and for battery types, a bulky handle and weight are inconvenient. But physical effort is minimized.

Pneumatic
Here the driving force is compressed air, under the influence of which nails or staples fly out of the store. Such devices have high productivity and a fairly large store - you can immediately fill a furniture stapler with a large amount of consumables.
However, the disadvantage of pneumatic models is that they are powered by a compressor that makes a very loud noise. It is very difficult to move with such a unit, so this type of tackers is more appropriate for professional use in a certain place.
Important! If you only need a construction stapler for one-time work - only for the time of building or finishing a house, then it is better to choose a mechanical or electrical model.
Household and professional
Like all other tools, construction tackers are conventionally divided into household and professional ones. At the same time, the difference in cost is significant - several times. And this is justified, because the point is in the functionality, the number of operating modes, settings and in the working resource:
- In household models, a small working resource, since they are mainly made of plastic.
- Professional tools are made of steel, often stainless steel. They contain plastic elements, but, as a rule, these are metal grips to soften the recoil.
Important! There is also an intermediate class - semi-professional. They fall between these two categories in terms of quality and price. Often it is in this group that it is better to look for a tool for use at home. It does not work badly, and is relatively inexpensive.
Staples for a stapler: types and selection
Each stapler works with a specific fixture. Therefore, besides the fact that you need to know how to refuel a furniture stapler, you also need to have an idea of what consumables can be used for this. When heading to the store for staples, you need to know the type, or at least the dimensions.
Taker staples are made of the following materials:
- Aluminum is a good choice for working on soft surfaces such as pine, but will not work on harder surfaces as they will wrinkle.
- Copper is a rather expensive option that is used in rooms with high humidity. Also used for soft surfaces.
- Steel is a budget option that can be used for harder surfaces. However, their disadvantage is that they rust.
- Stainless steel and zinc plated are excellent choices, but quite expensive. But the fasteners are reliable, for any conditions.
Important! In addition to the dimensions (back width and leg length) and material, it is also necessary to pay attention to whether there is a sharpening or not. For softer surfaces this is not so important, but when working with tougher surfaces it can be a decisive moment: sharpened species are much easier to penetrate plastic and dense boards.
How to refuel?
A construction stapler store can be of two types. The tool is more convenient to use when the store opens. Then inserting staples into a construction stapler is as easy as into a stationery:
- Pull back the spring.
- Place a block of staples in the store.
- Release the spring.
Important! In the process of work, the stuck bracket can be removed at any time, the unit can be corrected and continue to work.
In the event that the stapler model is with a retractable magazine, it is also easy to install the staples:
- Release the latch.
- Pull out the spring.
- Insert the staple block.
- Return the spring to its place by locking it into the flap.
Important! With such a structure, it can be quite difficult to remove the staple that is stuck. We'll have to pry it out of the striker, and this can be dangerous - the trigger must be locked in this case.
A stapler is a universal thing. It will always come in handy not only in a professional, but also in a home environment. Nailing insulation, covering the greenhouse with foil, changing the upholstery of furniture or fixing the cable - the possibilities for use are wide. There are so many pistols on the market today, it is not always easy to know which one is better. But it is important to understand this issue, because different types of pistols are used in different ways. The device, the type of tool, the size of the staples - the head can go round.
Pistols can be divided into several groups:
- mechanical;
- electrical;
- pneumatic.
Application of mechanical staplers
Usually, a simple mechanical device is used in everyday life. In another way, it is called a construction stapler. If the tool is needed for a one-time use (upholstery in a greenhouse), then it will be quite enough. It can be made of plastic or metal. Plastic is cheap, but breaks down quickly. Metal is more reliable and slightly more expensive. Which one is more suitable, you need to decide on your own.
What if the choice fell on a mechanical construction stapler? How to use? Very simple.
Tips for using a mechanical stapler:

Operation of electrical appliances
Most often, electric furniture staplers are used for hauling interior items and for other large-scale repair work. They differ from mechanical ones by more massive charges. Their service life is longer. And it's easier to use electric ones. Such a furniture stapler costs several times more than mechanical models.
Often people ask a question about a stapler for furniture. How to choose? There are many options. Electric staplers differ in the following parameters:

How do I insert staples into an electric furniture stapler? The scheme is simple. It is enough to find a button on the back of the pistol and pull out the slide bar. Then load the brackets with the ends down and slide the chute. It is important to observe safety precautions.
Pneumatic Construction Staplers
Differences from mechanical and electrical devices:

Staplers are useless without staples. And "cartridges" differ in many ways. Manufacturers themselves make all kinds of stapler shells.
Material:

Hardness degree:
- Simple - suitable for working with pliable materials.
- Hard - used to interact with dense materials such as plastic and wood.
- Hardened - for the most stubborn surfaces.
Sharpening the ends of the staples will be an important point. Sharp? It will be much easier to clog.
- Flat - the most common types of staples, their choice is very large.
- Semicircular - more often used to secure the cable.
- The pins (similar to the letter "T") are used to hide the fasteners. The most inconspicuous.
Each stapler has its own type of staple. The marking is indicated on the gun box or body. It is important to use only staples that are suitable for marking, otherwise the device will work, firing at several fasteners or not at all.
What to do if the pistol does not pop out a staple:

Safe working technique
Using a mechanical stapler.
By observing the safety rules when using the device, you will avoid unnecessary injury. And the device will last longer:

When working with an electric or pneumatic stapler, the safety rules described for the power tool must be observed. More important:

Mechanical, electric or pneumatic staplers are easy to get along with. But it is important to use the tool correctly. You need to charge it with fasteners with the markings that are indicated for your model. And it is also necessary to adjust the mechanism for the required driving force of the staples. The main thing is to follow the safety rules when using. Careful handling and accuracy in use are the key to productive work with any stapler.