The most important advantage of a country house in the age of urbanization is the ability to breathe clean air in full. Alas, in overpopulated megacities, many have simply forgotten not only what a real forest looks like, but also a clear sky. Particular envy among the owners of private cottages is caused by houses with open or closed verandas, where you can gather in the morning and evening with the whole family.
The aroma of summer or falling leaves in autumn cannot be compared with anything, and if you still have a cup of hot tea in your hands, then it seems that all wishes in this life have come true. It's nice, admit it, during the first thunderstorm of the year on the open veranda to feel the sweetness of ozone, and also to hear the rustle of green leaves under the rain.
All this is possible only under one condition - the interior of the veranda will not repel her, but rather attract. If you are lucky, and you have a closed version of such a room, you can place a dining room here, which, by the way, will be in the summer. However, in order to extend the impression of the view from the window, we need high-quality interior decoration of the veranda.

Choosing materials
Before answering the question - how to decorate the veranda inside, it should be said that they should carry not only an aesthetic, but also a practical orientation. It should be borne in mind that the veranda is usually not heated and has similar elements with a gazebo, which is attached to the main house.
In this situation, the corresponding requirements are imposed on the decor:
- the beauty;
- resistance to high humidity;
- are not afraid of temperature changes.
Wood processing and insulation
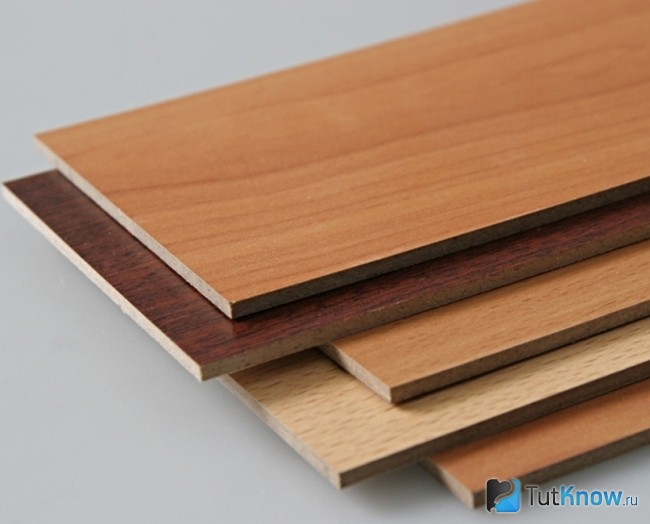
Most often, in private houses, wood is used to build verandas; probably not a single building material can compare with it. But, because of its naturalness, it can cause a lot of trouble. Therefore, before finishing, it is necessary to treat the wood with antiseptic compounds.
If you have it with the conduct of thermal insulation work for the walls under the windows, as well as ceiling structures. Try not to rush and do everything carefully so that you can use the room until almost frost.

To insulate the ceiling, you can use those materials that are easiest for you to work with, for example, mineral wool, polystyrene foam or polystyrene foam, professional teams can treat the surface with liquid polyurethane foam.
The price of the latter, taking into account the work, is high, it is best to take XPS boards and mats or mineral wool rolls.
- Secure the waterproofing to the walls and ceiling using a waterproof film.
- Glue the joints between the sheets with metallic tape.
- Install a wooden crate. The cross section of the beam must match the height of the insulation, the crate cell must correspond to the width of the heat insulator.
- Insert insulation between the bars.
Tip: before installing mineral wool, it must be wrapped in a waterproof material so that it does not get damp and deteriorate after a few years.
- Install a foil insulation over the insulation (foil inside the veranda). Seal the seams between the sheets with metallic adhesive tape.
- Insulate the ceiling in the same way.
Veranda decoration
The veranda is finished inside with your own hands only after all the preparatory work is completed. There are two ways here - trust your feelings and invite a professional designer. Usually they choose the first method, since there are plenty of options to transform the inside of the veranda today.
PVC panels
An inexpensive way to decorate, which will help turn an ordinary room into an interesting and cozy one. The material is not afraid of high humidity and does not deform with sudden changes in temperature.
Installation is easy and without any tricks. Thanks to the different color design of the panels and their texture, you can get a pretty decent room that you are not ashamed to show to your friends.
Of the shortcomings, the fragility of the material should be noted, although today you can also buy “armored” types, the cost of which is 2 times more expensive than conventional options. Therefore, you should be careful when moving chairs or leaning on it.
Tip: a construction trick will help solve the problem - the 1st plank of the crate is installed at the level of the knee, the second - the pelvis, the 3rd - the shoulder.
The instructions below will tell you how to do everything at minimal cost:
- Prepare wooden slats for the frame with a section of 20x30 or 10x30 mm, you can also use a profile for drywall sheets. Wood material should be pre-treated with an antiseptic.

Tip: use wooden battens on the wall facing the street. Thus, the formation of "cold bridges" can be avoided. For too uneven walls, it is better to use a profile on suspensions.
- Fasten the slats perpendicularly. For example, for vertically installed plastic, they should be placed horizontally in increments of up to 500 mm.
Tip: finish the panels with a pattern from left to right, plain - on either side.
- Attach a starting corner to the finished crate with self-tapping screws, if you will finish the wall next to it with other material, or a mounting corner for joining the panels to each other. On the ceiling, install the fixing strip under the plinth.
- Insert the first panel into the guide profile, with the tongue in the installation direction. Screw it to the crate with a self-tapping screw with a press washer.

Tip: do not fasten the plastic tightly so that it does not deform from this.
- Insert the spike of the next panel tightly into the groove of the previous one, secure it and continue to install the rest on the wall and ceiling as well.
Tip: leave a thermal gap for the material at the bottom and top of the wall within 20-30 mm and close it with a plinth.
MDF
An alternative to plastic is MDF panels, which are also popular among DIY enthusiasts. You need to know that, although they are ahead of him in strength, they are very sensitive to moisture. Install them only on closed verandas.
The installation process resembles the previous one, only the fastening takes place with the help of clamps, special metal devices. They can be fixed with a construction stapler or small nails, doing this through a guide so as not to damage the edge of the material.
Wooden lining
The most traditional finishing option for the veranda is considered to be a wooden lining. It is a sheathing board in which special grooves are cut to facilitate installation, the material thickness is up to 22 mm.
It is used for open and closed verandas. Treatment with antiseptic compounds increases the service life up to 20 years. So far, no artificial material can compare with natural wood.
How to choose
There are two types of lining - solid and spliced, when the best pieces are interconnected in a special way. Although the latter looks perfect, it cannot be used to decorate the veranda. An increase in humidity can cause cracks at the gluing points, which will greatly spoil the interior.
There are also 4 classes of material:
- "premium" - the most expensive, but almost always spliced;
- classes "A", "B" and "C" - from solid wood, differ in the number of knots per 1 running meter. and defects. Often they are treated with putty at the production stage.
Tip: When buying material in a pack, be sure to unpack it and inspect it so that you do not come across low-grade or defective planks.
Preparation and installation
Natural material must be adapted to the conditions in which it will be mounted. To do this, the lining must be left on the veranda for several days. After adaptation, be sure to treat it with antiseptics.

Work on preparing for the installation of the surface is similar to the previous options.
You can attach it in different ways:
- Drive a galvanized nail into the center of the board, then drown its head with a hammer.
- Self-tapping screws. Pre-drill a hole in the board from the side of the spike to a depth of about 10 mm, and select the diameter of the drill according to the diameter of the screw head. Screw the lining to the crate by inserting a self-tapping screw into the hole, close it with a dowel and sand it.
- Use a mechanical or pneumatic stapler to drive the mounting brackets into the board.
- Cleimer installation. Similar to MDF panels.

At the last stage of installation, close the joints and corners near windows and doors with a corner and treat the boards with stain or varnish. Start the process from the ceiling and end with the walls.
Output
The work on finishing the veranda is not difficult, more like a creative one. Set aside time for yourself on the weekend, prepare the material in advance and update its interior so that everyone feels comfortable and comfortable in it. In the presented video in this article you will find additional information on this topic.
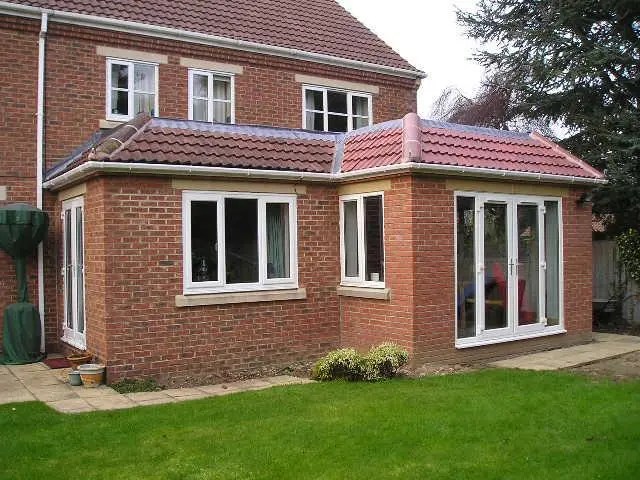
When talking about a veranda or terrace, most often it means an open or closed extension to one of the load-bearing walls of the house. Here you can conveniently and comfortably spend time, relax or just have lunch. Decorating the walls on the veranda will help you truly enjoy being there.
Terrace - veranda. What is the difference?
It is worth immediately clarifying that the veranda differs from the terrace in that the first is most often a closed extension, and the second is simply an open version of the first.
In general, a terrace is a building that rests on pillars, has a roof, it adjoins the main building (house) so tightly that it is simply difficult to call it an independent element of the house. The terrace is monolithic with the house.
It so happened that three of the four walls of the terrace are open, only one - adjacent to the house or building - is limited, and then - due to the fact that in this part it is a continuation of the house.
Such buildings (or, rather, extensions) can create the effect of maximum harmony with nature, because fogs, rains and winds in such an extension are felt very, very well. In addition, if your house is located in close proximity to the forest, all the sounds coming from its depths will be perfectly audible.

If we talk about the decoration of an open veranda (terrace), then it requires a special creative mood. Fantasize and give free rein to the most daring ideas: you can decorate it with various green plants or wickerwork, create a winter palace or a stone one. All in your hands!
If the interior is carefully thought out, then the terrace will acquire a special, unique look. Everything is used, even woodcarving, climbing ivy, etc.
Terraces are usually attached to one of the sides of the house, but an extension around the whole house is possible. In the case when the terrace is attached in length along the entire perimeter, then it can be framed as a gallery. If the terrace is a kind of rectangle, then this is already a real pavilion.
About finishing
Exterior and interior decoration of a veranda in a private house or a terrace (and the difference, as we found out earlier, is in the type - covered or not covered on the sides of the building) - the process is purely creative and depends only on what your taste preferences are and what you want to see in your building.
Only a responsible and competent approach to finishing will help create an atmosphere of coziness and comfort for those who spend time on the terrace. Of course, you will have to take into account certain subtleties and follow the rules so that the result of the finish is not only beautiful, but at the same time high-quality and reliable.

exterior and interior decoration of the veranda
If it is firmly decided that the extension to your house will be open, and a terrace is being planned, you must first of all make sure that the finishing materials used in the work have sufficient indicators of resistance to atmospheric phenomena: moisture, dampness, strong winds, temperature modes. Consideration should be given to the climate in the region where the construction is planned.
Materials such as plastic panels, special perforated sheets, stone and tile coatings are considered almost universal. If you plan to use wood materials, then in this case additional impregnation with compounds such as antiseptics, antifungal liquids will be required. Such a measure will save wooden materials from deformation, various types of pests - from fungi to rodents.

Furniture and interior items for the veranda
Let's say your house is located on the coast of the sea or lake. In this case, it would be very unusual to opt for a polycarbonate finish. Transparent visors and elements perfectly let the sun's rays and heat pass through them, and also do not interfere with contemplating the beauty of the environment.
It is possible to provide for such extensions that can be closed in the cold seasons and open in the warm ones. Furniture and interior items on the veranda are better to choose weather-resistant. For example, plastic varieties of chairs or transforming furniture. Wicker furniture (rocking chairs, sofas, tables) is also suitable.
What materials will be required
To date, one of the most popular solutions for the decoration and construction of verandas and terraces is the frame type of extension. To build this structure, it will be necessary to lay a reliable foundation and build a solid skeleton (frame) of our extension. Finishing is a matter of taste and preference.

Finishing is primarily a matter of taste and preference.
We will need:
- concrete pillars;
- wooden beam;
- the so-called crate;
- pre-selected materials for wall decoration.
You can finish the walls using wooden or plastic types of lining, polystyrene tiles, MDF panels, various composites, stone, metal, etc. To create such a building with your own hands, you will need to additionally purchase various tools and fixing tools: corners, brackets, screws or nails etc. For a material that performs a roofing role, a profile, varieties of tiles are suitable - from flexible to metal tiles, glass.
In any of the options for a terrace or veranda, insulation and waterproofing of the flooring will be required. Taking into account the pre-selected style of decoration and decoration of the extension, you can use options such as: slabs or stone imitation, linoleum, boards or laminate. In the case of choosing the latest materials, it is worth remembering about additional processing. Of course, it is better to give preference to materials that are resistant to moisture and temperature effects.
The so-called perforated sheet (perforated sheet) will make it possible to divide the extension into sections or zones. In some cases, it can be used to achieve a unique design of the ceiling covering. Do not forget about electrical communications.
The most popular option for finishing a terrace or veranda is the use of plastic panels. This option has sufficient thermal insulation if the weather conditions at the construction site are characterized by low air temperatures. The use of such panels will facilitate the entire building as a whole and will allow in the future to make the same light windows and the opportunity to save on double-glazed windows by making simple wooden windows with your own hands. An important point is the insulation of walls and floors.
For finishing, special moisture-resistant gypsum boards are suitable. True, in this case, when using them, it will be necessary to carry out "hydrophobization" of walls or floors, both from the outside and from the inside.

Features of the interior decoration of the terrace
Mineral wool or expanded polystyrene are perfect as wall insulation.
The finishing process itself consists of the following steps:
- installation of heaters;
- applying a vapor barrier;
- installation of MDF sheets or drywall;
- reinforcement with PVC panels or lining.
If additional painting or plastering work is planned for decorative purposes, then wall panels should be preferred. If such panels are made of wood, then they will definitely require additional processing and subsequent care.
The cheapest and most practical option for finishing a terrace or veranda will be imitation timber finishing. This option is distinguished by relative durability and ease of installation. In addition, some manufacturers or building materials stores offer a range of different types of imitation, already impregnated and treated with special compounds. The buyer will only have to carry out finishing work.

Clapboard finish
Clapboard trim is a great option. It is characterized by increased wear resistance, resistance to moisture, excellent mechanical properties.
Advantages of clapboard finishing:
- ease of assembly and installation;
- creating perfect sound insulation;
- ease of maintenance and dismantling of damaged areas.
The choice in favor of clapboard finishing provides subsequent expanse for imagination and a choice of color design options. True, when choosing it, it is worth considering that at low temperatures it becomes quite fragile.
Glazing
As we said earlier, it is possible to make glazing in such a way that, under favorable weather conditions, it can be removed, and under unfavorable weather conditions, it can be installed back. In this case, design planning taking into account such a decision will come in handy.

If you decide to choose glass coverings for finishing the veranda, then the option of decorating several windows or removable window panels of different sizes and locations will be very unusual and interesting. By creating a terrace of this type, you will not only be able to solve problems with lighting, hide from rain and wind if necessary, but also emphasize the sophistication and uniqueness of your terrace or veranda.
Exterior finish
Creating an impeccable appearance of an extension, whether it is a veranda or a terrace, located at the entrance or around the premises, is a way to emphasize the image and building skills of the owner of the house.
For classic outdoor finishes, panels with imitation of stone or wood are perfect. Special plinth panels can be combined not only in terms of colors, but also in terms of types of imitations.
The most popular option today is exterior siding. This is understandable - its use is relatively cheap, practical, it is easier to care for siding panels, and the installation features make it quite an attractive material.

There is a so-called vinyl type of siding. It is characterized by additional operational properties, the presence of a large assortment in colors, convenience and ease of installation work, as well as a fairly affordable price compared to other finishing options. In addition, the features of the installation of siding, the horizontal arrangement of the panels will add aesthetics to any terrace or veranda.
Materials and their features
- The most popular material for finishing a terrace or veranda, as we have already noted, is wooden lining. It is suitable for both ceiling and walls. But absolutely not suitable for the floor. Differs in high environmental friendliness, excellent appearance, pleasant smell.
- Water resistant drywall also characterized by sufficient environmental friendliness, incombustibility, ease of installation. In addition, it is easy to process, and also allows you to perform the most daring finish.
— MDF - e It's kind of like an imitation of wood. It is characterized by strength, but does not tolerate moisture at all. Suitable for covered porches.
— PVC. PVC panels are relatively inexpensive, resistant to moisture. They have a wide range of colors, are easy to install, easy to clean, and also have good incombustibility and strength.

Terrace finishing materials and their features
— Siding- almost a favorite topic. Differs in a practicality and availability. It can be found with imitation under wooden coverings, stone and many others. It is not subject to rotting, unlike wooden analogues, it is resistant to fire, various temperature conditions. It also has a fairly high service life.
Conclusion
To create a unique image, both external and internal, of your terrace or veranda, do not hesitate to fantasize and allow yourself to realize the most daring and unexpected decisions. The main thing is to comply with the technology, and then your extension will not only be cozy and comfortable, but also reliable and will serve you for many years. Good luck!
An important role in creating the interior is played by the decoration of the veranda from the outside and from the inside. Since the veranda is an unheated extension to the house, the material used for finishing the veranda in a private house must be resistant to temperature extremes and high humidity. Although the veranda is not heated, you can put a heater for the veranda, and so that the heat does not go away quickly, it needs to be insulated. It will definitely be necessary to lay some kind of insulation under the finishing material that is not afraid of moisture, which is formed from the temperature difference between night and day.
Wooden decoration of the veranda inside photo
First, the waterproofing of the veranda is laid, which must be hermetically glued together with metallized adhesive tape, and then the insulation is laid and covered with a layer of vapor barrier and finishing material. It is necessary to insulate not only the walls but also the floor and ceiling. On the insulated veranda it will be about 7 degrees warmer than on the street, so the insulation of the veranda is not economically viable.
You can trim the veranda from the inside with different materials. Most often, the arrangement of the veranda is made with wooden materials such as clapboard, eurolining, block house.
 As if a veranda made of logs was finished from the inside photo
 Before equipping the veranda with wooden materials, it is necessary to treat with an antiseptic composition not only the wooden materials themselves, but also the wooden parts of the veranda that will cover the finishing materials.
PVC panels are also widely used for finishing the veranda.
 PVC pavilions and verandas are very neat and beautiful.
 Plastic panels are very light and resistant to high humidity. Plastic panels come in different colors and with different patterns, so you can make a colorful veranda out of them. You need to mount PVC panels on a specially pre-mounted frame made of wooden beams with a section of 30 x 20 or from a metal profile that is used when installing drywall. Since the panels expand very much at high temperatures, it is necessary to leave gaps of 2 cm at the edges and close them with skirting boards.
MDF panels mimic the structure of wood.
 The summer veranda attached to the house is sheathed with MDF panels from the inside
 They are much stronger than plastic panels. However, MDF panels are very much afraid of dampness. Fasten MDF panels in the same way as PVC panels to clamps.
If you finish the gazebo with OSB plates, then you will need to make a good and powerful frame from bars with a section of 10 x 10 cm.
 Attach a veranda to a country house sheathed with OSB slabs
 OSB boards can be fastened from the inside and outside, but the outside of the board will need to be covered with siding or corrugated board, otherwise they will get wet from the rain and collapse as a result. If insulation is laid between the plates on the veranda of OSB boards, then it will be necessary to put waterproofing and vapor barrier to protect the insulation from moisture.
From the outside, it is best to finish the veranda with siding. 
They produce siding in a variety of colors and shades. Vinyl siding is considered standard because it is lockable, durable and easy to install. Siding is usually fixed in a horizontal position. Siding is mounted on a pre-prepared crate of 40 x 50 bars in increments of 40 or 50 cm. Be sure to remember to fix the bars around the windows.
At the very bottom, a starting profile is attached strictly horizontally to the crate. Then the side profiles are installed and fastened at the outer and inner corners. The side profiles must enter the starting profile by 5 mm. Also, side profiles are attached around windows and doors.
 Country houses with a veranda photo
 You need to cut the panels not equal in size, but less by 5 mm, since the siding expands when the temperature rises. The panels must first be led into one corner profile, and then, having bent the panel in the middle, lead it into the opposite corner profile. Having aligned the panel in the center, we bring it to the bottom in the starting profile until it clicks, and then the upper edge of the panel. It is not necessary to fasten the screws to the crate tightly so that the panel moves freely to the left and to the right. We also insert the following panels into the corner profiles, snap them into the lock at the bottom, and fasten them to the crate with screws from above. Before installing the last panel, you need to fix the finishing profile strictly horizontally. If necessary, the last panel will need to be cut to width. Having installed it in the corner profiles, you will need to snap it into the lock at the bottom, and insert the top into the finishing profile.
If an attached veranda is made to the house from polycarbonate, then it will not need to be finished and insulated.
 Sliding polycarbonate veranda attached to the house
 Polycarbonate is mounted on the roof of the veranda and on the walls using self-tapping screws with rubber washers. To make a polycarbonate veranda, you will need to make a frame of wood or metal that will serve as a support for the polycarbonate. The frame is made in increments of 60 - 80 cm.
It is possible to sheathe a small house and a veranda from corrugated board in the country house, which can be used as a protective material or as the wall itself.
 The veranda is made of a profile pipe and sheathed with corrugated board
 Decking must be fastened to a wooden, and preferably to a metal crate. If the veranda crate is made of a metal profile, then you need to fasten the corrugated board to it using metal screws with thermal washers on the cap, but first you need to treat the crate with an anti-corrosion compound.
The content of the article:
Finishing the veranda is a set of measures aimed at its improvement. A veranda is called an extension adjacent to the wall of the house. It belongs to the type of summer unheated premises and can be in a closed or open version. Depending on the type of extension, the interior decoration of its walls is carried out. In addition, the configuration of the veranda and its exterior design should fit well into the exterior of the entire building. With simple construction skills, you can finish the walls of the veranda with your own hands.
The choice of material for finishing the walls of the veranda
The materials chosen for finishing the walls of the veranda must meet practical and aesthetic requirements. A feature of their choice is the lack of heating in the closed annex and the serious impact of climatic conditions on the structure of the open veranda. Therefore, the material used for decoration should not only be visually attractive and consistent with the design, but also withstand exposure to the sun, high humidity and temperature fluctuations.
Sheathing the walls of the veranda can be done with many finishing materials that are used for interior and exterior work:
- . It belongs to the classics of the genre, as it is the most popular material for wall cladding due to its environmental friendliness, excellent appearance and pleasant aroma exhaled by natural wood.
- Plasterboard sheets (GKL). For verandas, their moisture-resistant version is suitable. Such products differ from ordinary plasterboards in their green color. The material is environmentally friendly, easy to install and easy to process in numerous ways. It can take almost any shape, and this is important when decorating walls. Such cladding is used in closed verandas.
- . This material imitates natural wood. It is quite durable, but wet environments are not for it. Therefore, MDF can be used for sheathing the walls of a closed veranda.
- PVC panels. It is a durable and inexpensive moisture resistant material. It is represented by a rich assortment of various shades and colors, can have a different texture, is very easy to use and not particularly whimsical to care for. Suitable for wall cladding of extensions of any type.
- Siding panels. They are practical and affordable. They often imitate wood and come in a variety of colors. The material does not rot, is resistant to temperature changes and fire, is easy to clean and durable. Most often used for exterior wall decoration on the veranda.
Preparatory work before finishing the walls on the veranda

If the veranda has glazing, it is better to finish its walls after installing thermal insulation under the windows. In this case, the room can be used almost until the onset of frost.
To insulate a closed veranda, you can use mineral wool or polystyrene foam. To begin with, waterproofing should be fixed on the walls, as it can be taken as a moisture-proof plastic film. It is overlapped by 150-200 mm, the joints of the sheets must be glued with metallized tape.
After that, it is necessary to install a crate on the walls. The material for it can be a wooden beam, pre-treated with an antiseptic. The cross section of the timber should be selected according to the thickness of the insulation, and the size of the cell of the crate should correspond to the width of the insulation.
Then the insulation, in particular mineral wool, should be packed in a waterproof material and laid in the cells of the crate. Wrapping the insulation will protect it from moisture and keep it functional for many years.
After that, a foil membrane should be fixed on top of the insulation on the crate and its joints should be glued with adhesive tape. In the process of insulation, it plays the role of a heat-reflecting screen. On this, the thermal insulation of the walls can be completed.
Technology for finishing the walls of the veranda
Having chosen how to sheathe the walls on the veranda, you can start finishing them. Below we will consider several of its options.
Finishing the walls of the veranda with PVC panels

This method of decoration is inexpensive, but it can make an ordinary room cozy and interesting. The panels are not afraid of high humidity and sudden changes in its temperature - they are not able to cause deformations of this material. Panel installation is easy and hassle-free.
The disadvantage of the material can be called its fragility, although at the present time it is possible to purchase "armored" panels, the cost of which will be twice as much as usual. Therefore, after installing such a cladding, you should carefully move chairs towards it or lean against the wall. To minimize the risks, there is such a construction trick: the first plank of the panel lathing is mounted at the level of the knees, the second - the pelvis, and the third - the shoulder.
The frame for plastic panels is made of wooden slats or a profile that is used when installing gypsum boards. Reiki can have a section of 30x10 or 30x20 mm, before use they should be treated with an antiseptic.
The fastening of the laths of the crate should be carried out in a perpendicular direction relative to the installation of the panels. For example, if the plastic on the wall needs to be placed vertically, then the rails for its fastening should be stuffed horizontally on the wall, the step between them should not exceed 50 cm.
After making the crate in the corner of the room, you need to fix the mounting corner or the starting profile with screws or nails. The corner will allow you to dock the panels with each other. The starting profile is installed if the adjacent wall will be sheathed with other material. On the ceiling, you need to install a mounting plate for the plinth.
The first panel is inserted into the guide profile with a spike towards the mounting side. Then it needs to be fixed on the crate using a self-tapping screw with a press washer. Then the spike of the next PVC panel must be firmly inserted into the groove of the previous one and fixed. All other trim panels are mounted in the same way.
Due to the fact that plastic has thermal expansion, a gap of 20-30 mm should be left at the bottom and top of the wall to compensate for it, masking it with a plinth.
Important! Panels with a pattern when sheathing walls are installed from left to right. Plain panels can be mounted starting from either side.
Finishing the walls of the veranda with MDF panels
This material is quite popular among adherents of self-finishing. MDF panels are stronger than plastic, but not resistant to moisture. Therefore, they should only be used on closed verandas.
The installation process of MDF panels is similar to the previous one. Only in this case, their fastening is carried out using special metal devices - clamps, which are fixed on the material with small nails or a construction stapler. This must be done through the guide, it will prevent damage to the edge of the panel.
Finishing the walls of the veranda clapboard

Lining is called a wooden board up to 22 mm thick, which has special grooves, with the help of which the installation and joining of the cladding elements is carried out. If the material is treated with an antiseptic, its service life can be extended up to 20 years.
According to the production method, the sheathing board can be solid or spliced. In the latter case, pieces of high-quality wood are interconnected in a special way. Such products do not have flaws in the form of knots or cracks, but are not suitable for sheathing the walls of an open veranda.
The reason for this is the formation of cracks at high humidity in the joints of the board, which spoil the appearance of the finished cladding. The most expensive lining is almost always spliced. It has an “extra” class, and products of classes A, B and C are made from solid wood.
Before finishing the walls on the veranda with a sheathing board, the material must be left to adapt in a closed room for several days, and then the lining should be treated with a protective compound. Mounting the board on the walls of the veranda is similar to installing PVC and MDF panels.
There are several ways to attach it:
- The simplest of them is fasteners using galvanized nails. In this case, they are driven in along the center of the planks, and the caps are sunk into the wood with a punch.
- Fixing the sheathing board with self-tapping screws is more laborious, but at the same time, the attachment points are not visible. A hole is drilled in the board from the side of its spike, having a depth of about 10 mm. The diameters of the drill and the caps of the fasteners must match each other. Then the bar is screwed to the lath of the crate, and the screw is recessed into the hole and closed with a dowel on top. The place of fastening is then polished.
- The board can be attached to the crate using mounting brackets. For this, a pneumatic or mechanical construction stapler is used.
- Another way is to fasten wooden sheathing with kleimers. At the same time, it is first attached to the rear wall of the mounting groove of the first bar. Then it is nailed to the wall and only then the kleimer is fixed. The same kleimer is installed on the second board, its spike is inserted into the groove of the previous plank and the kleimer is fixed on the crate rail. With the help of such fasteners, only internal wall cladding is performed.
Before painting the walls on the veranda, it is recommended to apply the selected varnish to a sample of the material and allow it to dry. It happens that after drying, the shade of the coating changes, and it is quite difficult to remove a layer of varnish that does not correspond to the plan. Therefore, it would be better to buy a small container with a paint composition for testing, and if it suits, purchase the rest.
If there is a need to leave the planking wood in its original form, a colorless glaze containing an ultraviolet filter can be applied to it. It will help prevent fading of the walls of the veranda from exposure to the sun.
Exterior decoration of the walls of the veranda

It can be done with lining or siding. Wooden cladding in this regard is somewhat capricious. Despite the treatment of its elements with various antiseptics, when exposed to precipitation, sunlight and seasonal temperature changes, the skin may lose its original appearance if it is not taken care of.
Therefore, every year it will be necessary to carry out various measures to preserve it: impregnation, staining, etc. But if the choice in favor of using wood has already been made, it is important to remember that the horizontal fastening of the outer sheathing boards should be done upward with a spike, fixing them in 2 rows on each side of the lock connection.
Exterior decoration of the walls of the veranda with siding is a better option. This cladding got its name in the 19th century. Planed and painted boards were fastened at an angle to the plane of the wall in such a way that each subsequent horizontal element slightly hung over the previous one. This position of the boards allowed the water to roll down the cladding without delay. Nowadays, siding performs two functions - protective and aesthetic.
Most often, vinyl siding is used for exterior wall cladding. Its popularity is due to ease of installation, practicality and affordable price. Externally, the material looks like an ordinary board, which is used for facade cladding.
However, vinyl will not lose its appearance even after a couple of decades, despite seasonal temperature fluctuations, bitter frosts and heavy rains. In addition, dirt does not stick to this material and maintenance is minimal - only wash off the dust from the lining with a garden hose. Due to the huge number of shades, siding can be matched to any exterior of the house, it will perfectly fit into the overall ensemble everywhere.
Installation of vinyl siding panels is carried out in the following order:
- First you need to make and install a crate for facing the walls of the veranda. This will require an unedged board 30 mm thick or a wooden beam with a cross-sectional dimension of 40x50 mm. It must be fixed in a vertical position with a step of 400-500 mm over the entire surface of the walls. Additional wooden blocks should be installed around the windows, at the corners of the veranda, along the upper and lower edges of the future sheathing.
- From below, along the perimeter of the walls in a strictly horizontal position, it is necessary to fix the starting profile to the crate using self-tapping screws.
- After that, you need to install corner profiles around the openings, as well as in all corners of the building. The lower edge of the corner profile should be 5-6 mm below the level of the starting bar.
- Then you should cut the panels. Vinyl can be easily cut with scissors, a hacksaw or an electric jigsaw. Due to the fact that vinyl panels have thermal expansion, each of them must be made shorter than the wall by 5-7 mm.
- After that, the prepared panel must be slightly bent in the center, and its edges should be brought into the grooves of the profiles located at the corners of the wall. Then the panel should be aligned and its lower edge should be brought into the starting profile. The upper edge must be fixed with screws to the crate through special holes.
- Tight pressing of the screw heads to the panel material is unacceptable. The oval shape of the mounting holes is specially designed for free movement of the material relative to the screw part of the fastener with changes in air temperature. There should be a distance of 1.5 mm between the screw head and the crate.
- The next panel must also be inserted into the corner profiles, snapped into the groove of the previous element and fixed to the wall sheathing.
- Before installing the last panel, it is necessary to level the finishing profile on the crate. The panel is then cut to the required width and snapped into the previous skin by simply inserting the free edge of the product into the finishing profile. This is where the wall cladding of the veranda with siding ends.
The vast majority of country and country houses are built with a mandatory veranda, whether heated or not. What a cottage without a veranda, a full-fledged living space, at the same time a place to store all kinds of utensils. After the construction of the building is completed, sooner or later you will have to decide how and with what to sheathe the veranda inside, so that it is inexpensive and beautiful.
Living in a barn-like room is uncomfortable, and spending extra money is out of hand.

Finishing material requirements
Before looking for material and a way to sheathe a veranda inside, you need to look at the conditions of the room, and only then look for suitable material inexpensively.
Let's focus on the main ones:
- Temperature and humidity indoors. It depends on which side of the house the veranda is located on, sunny or shady, whether it is possible to sheathe the walls inside with materials based on cellulose fibers, or you have to buy plastic, inexpensively and reliably;
- The frequency of people living in the house and using the premises. For a house in which a constant temperature is not maintained, and people live with long breaks in time, the problem of how to sheathe the walls inside turns into a question of dealing with water condensate;
- The age of the veranda and the entire building. It makes no sense to try to sheathe the walls inside the room until the processes of shrinkage of the foundation and the box of the building have ended.

In the simplest case, it is possible to sheathe the walls from the inside with a cement-bonded particle board, very inexpensive, practically not afraid of dampness, does not warp even with strong condensate. But from an aesthetic and practical point of view, most owners would like the lining inside the veranda, first of all, to be comfortable and safe for health, and only then it would be inexpensive and practical. Therefore, out of more than two dozen plating options, we will leave only the most suitable for the listed requirements.

How to sheathe a veranda with wall shrinkage, inexpensively and efficiently
Instead of traditional vertical boarding, you can sheathe the walls with horizontal stuffing on a cross crate. Get it cheap and practical. So that during shrinkage the finish is not torn off the walls, the board is stuffed with a maximum gap at the tongue-and-groove joint and the obligatory laying of insulation, for example, from foamed polyethylene.

After three to four years, the decoration on the veranda can be updated inexpensively:
- Remove the board, insulation and crate;
- Treat wood with antiseptic impregnation, stain and varnish;
- Lay the crate, insulation and sheathe the walls again, but with the correct gaps in the joints between the boards.
In this way, you can inexpensively sheathe any room in a house made of wood, a bathhouse made of timber. For brick and block buildings with much less shrinkage, the veranda can be immediately sheathed according to the finishing scheme.

Popular materials for sheathing the veranda
The modern market offers a fairly large selection of materials for decorative wall cladding, including verandas. The list of the most popular finishes usually includes:
- Lining, board, wooden lath;
- MDF or fiberboard, boards and panels;
- Plywood, OSB boards;
- Waterproof plasterboard sheets GKL;
- PVC panels.
All of the listed materials fit well into the interior of the walls of the room, do not swell with moisture and do not create a feeling of discomfort for the owners, therefore, in the question of how to sheathe a veranda inside an inexpensive photo, price and personal preferences and desires remain the determining factors.

To sheathe the veranda indoors really inexpensively, you will have to do more work yourself, and pay the bulk of the costs to purchase quality material.
But not all indoor conditions are the same. Often, before sheathing the veranda inside the photo, it makes sense to turn to a specialist for advice and clarification.

Material for a cold veranda
It is quite difficult to choose how to sheathe an unheated veranda inside. There are not many options for finishing that can be used inside a cold, unheated room. Most often, the list is limited to plastic panels, waterproof grades of OSB boards and coniferous lining.

The main problem that the owners of unheated premises have to face is condensate, which is regularly released on the surface inside the skin. Therefore, you should not try to sheathe the walls of a closed veranda with cellulose fiber materials, primarily fiberboard and MDF. Even when painted with enamels or varnished, they quickly swell, which leads to warping and breakage of fasteners.

PVC panels are considered the best option. They do not rot, do not absorb moisture, the choice of colors is simply huge, and all this wealth will cost relatively inexpensively when compared, for example, with lining made of oak or cedar.
If desired, the veranda from the inside can be sheathed with plastic with an imitation pattern of precious woods, natural stone, or just a plain color scheme that matches the interior of the room.
To finish with polyvinyl chloride, the walls of the veranda will first need to be sheathed with a supporting frame made of galvanized profile. Metal profile strips are nailed to the walls in increments of no more than 60 cm. The easiest way is to sheathe the veranda with vertical PVC strips, in this case the profile is nailed in horizontal rows.

The walls of the veranda facing the street, before being paneled, are insulated with isolon or foil polyethylene, this is inexpensive and effective. Internal warm walls can be sheathed with mineral thermal insulation with a gasket inside the vapor barrier layer. In this case, it will be necessary to organize additional ventilation of the room, since plastic, like glass, creates an increased level of humidity from the inside.
For summer cottages, the problem of condensate is especially relevant during the onset of cold weather. After the owners move out with the first frosts, a large amount of water vapor accumulates through the walls, they must be removed by flow ventilation until the low air temperature turns into frost on the walls inside the room.

The choice of polyvinyl chloride in order to sheathe the veranda of the house from the inside cannot be considered particularly successful. Plastic always remains a fire hazard; at low temperatures, an accidental push with a chair or a careless blow can lead to cracking of the material.
Therefore, if you manage to buy an inexpensive lining made of oak or larch, it is better to sheathe the room inside with a tree that will last for several decades.

Finishing the veranda room with wood
Wood has always been considered the best material for any finishing work inside the veranda. The easiest way is to sheathe the walls inside the room with clapboard, both in an expensive version and relatively inexpensively, approximately at the level of PVC panels.
Standard lining is divided into four quality classes:
- Extra - the most durable and beautiful material, without a single knot or disturbance in the pattern of the fibers. Such a tree is used for expensive decoration inside the living quarters of the house;
- C-class is the cheapest, designed to sheathe a barn or utility room. Despite the fact that in the overall standings the work is inexpensive, due to the extremely low quality, it is not recommended to use verandas for interior decoration;
- Classes A, B allow some defects in the form of knots or even cracks, but most of them are located on the end of the plank. It is this lining that is best to sheathe the veranda.
Most craftsmen do not trust the information about the class indicated by the manufacturer on the packaging, most often the material turns out to be of lower quality than stated during the sale. Therefore, before sheathing the veranda inside with a clapboard, do not be too lazy to open and reject some of the planks in order to avoid marriage when finishing the walls.

In addition to the class, the material may differ in the shape of the front surface. Samples of the most popular profiles are shown in the figure. If you want to create the impression of a log vault and walls, you can sheathe the walls inside the room with one of the types of boards - a block house.

The clapboard sheathing technology practically does not differ from the technique used for PVC installation. Initially, the starting bar is laid, and then the lining boards are laid on the crate stuffed earlier. It is best to sheathe the walls of the veranda on staplers, without glue and self-tapping screws.
The larch is the most difficult to fit, but it's worth it. Even for the most comfortable veranda, it makes no sense to buy cedar or ash if you need to sheathe the room quickly and inexpensively. The best option would be high-quality spruce or pine, which can be ordered inexpensively from a private carpentry, dried, polished front and waxed.
Even an open or unheated veranda can be sheathed with such a lining. A nice bonus is the smell of coniferous forest, which appears when the walls of the veranda are heated by the sun's rays.

Conclusion
The most budget option for facing the walls of the veranda will be made from wood-fiber panels or slabs. They are relatively inexpensive, and in terms of comfort, materials made from cellulose fibers are considered one of the best.
If the room needs to be made not only warm and comfortable, but also truly beautiful, then it is best to sheathe the walls with MDF boards. It will turn out inexpensively and beautifully, but it is worth remembering that the high decorative qualities of the plate are ensured by the glued polymer film, respectively, the vapor permeability of the material is much lower than that of fiberboard. All the work will be inexpensive, but there should be no places in the veranda that fall out of the ventilation zone, otherwise the accumulated condensate will quickly destroy all the work.
Source: www.2proraba.com
External and internal decoration of the veranda
A modern country house is designed to provide the best living conditions in it. At present, all conditions have been created for this - an abundance of design solutions in housing construction, a lot of traditional and new proven materials.

One of the elements of private buildings is currently a terrace - a fully or partially open area, equipped with a roof. It allows you to fully feel like a part of nature, almost without leaving your home. About what materials and with what requirements the terrace can be finished, and will be discussed in the future.
Users often search for:
Classic terrace design
Structurally, an extension to the house, called a terrace or veranda, is a podium raised above the ground on one of the types of foundation, and a roof made of some material, based on several support beams. According to the embodiment, such structures are divided into:
open veranda
This species is good when located on the leeward sunny side. Due to the absence of fences, there are practically no boundaries between the veranda and the surrounding space. It is better if the height of the floor of such a structure is small. This is especially true when living in a country house for children.


This option requires minimal construction costs. Yes, and finishing the veranda will not require large expenses. But it is necessary to impose maximum requirements on its quality, since the structural elements will be under the constant influence of excessive moisture, frost, winds, and temperature changes.
Partially closed option
Such a terrace retains its airiness and openness, but provides high security for households and their guests. The main difference from the previous version is the presence of fences made of timber, in the form of a frame structure made of lumber, as well as blocks or bricks, followed by finishing the walls of the veranda from the outside and from the inside.

Photo: 3D project of a country house with a veranda
Due to the lack of complete isolation from the atmosphere, the operation of structures of the first and second types is possible only in the warm season. It is impossible to insulate them with high quality due to the design features, and it is quite difficult to completely protect visitors to such a terrace from the wind and raindrops flying inside.
Covered terraces
This type is most suitable for year-round use as an additional room. Even in winter cold, closed from wind and frost, you can enjoy hot tea while admiring the beauty of nature. At the same time, it is better to combine the interior decoration of the veranda with the insulation of all its walls. This will minimize the cost of heating the house as a whole.

Veranda finishing options
The manufacturing process of the described structures is not complicated and is quite accessible with your own hands, as is the decoration of the veranda inside or outside. Since the topic of the article involves a more detailed acquaintance with the second part of the work, we will consider them, focusing on the possible options, their features, advantages and disadvantages.
Currently, the lining of the veranda from the inside is performed using the following materials:
- lining wooden;
- plastic panels;
- MDF panels;
- cement plaster and cement-based artificial stone.
wood veranda trim
The classic option is the use of natural wood materials for wall decoration not only in the interior of the house, but also in outbuildings. The lining is distinguished by good appearance, ease of installation and low requirements for the quality of base preparation.


It is mounted on a crate of 40x40 mm bars with the help of special fasteners - kleimers, which grab the panels by the groove and securely fix them. Finishing details can be located vertically, horizontally or at an angle to the floor.
For exterior decoration, the veranda can only be sheathed by installing the lining parallel to the soil with the ridges up to prevent water from accumulating in the grooves.
plastic finish
Also a fairly common option. It is better to trim a closed veranda with such panels. In this case, temperature differences are less sensitive to the material, which increases its service life.

Unlike wood materials, plastic is practically not afraid of water. Modern retail chains offer many options for both color and texture design of plastic panels.
Installation of plastic trim is easier than wood. Due to the considerable width of the panels, the process is faster.
It is convenient to fasten the trim parts to the crate using a construction stapler, hammering the staples into a wide shelf along the edge of the products. Plastic panels do not require further finishing of coatings, they are well washed with a damp cloth, dust does not settle on them.
Interior trim with MDF panels
Another common finishing material for interior work is MDF panels. Like the previous version, they are distinguished by a large working width, which allows you to perform sheathing quickly enough. For fastening to a crate made of wood, clamps are used, similar to those used when installing a wooden lining.

Due to the large number of colors imitating natural wood, stone and even leather, such an interior decoration of the veranda will have a very high quality look. With all the advantages, MDF also has a significant drawback - very low moisture resistance. In this regard, it is better not to use them for finishing open terraces. Otherwise, additional protection will be required in the form of varnishing on all sides of the panels.
Finishing the walls of the veranda with cement materials
In the case of using cement-containing building materials for the manufacture of a terrace - blocks with one or another filling, or bricks, it is better to finish the walls with mixtures or parts similar in composition.
Please note that gypsum-based plaster and gypsum artificial stone are not suitable for covering the walls of outdoor verandas.
Often homeowners are stopped by the high cost of cement finishing materials. At the same time, it is not difficult to make the required amount of original artificial stone on your own in a home workshop. By adding aniline dye, you can get a unique interior in the finished room.

Polycarbonate in the decoration of terraces
As already noted, the materials listed above used in the decoration of the interior of the verandas have certain disadvantages that limit their use. In recent years, more and more external walls and roofs of terraces are covered with polycarbonate - an artificial transparent material that allows you to get a closed space while maintaining visual contact with the surrounding nature.
There are two main types of this plastic:
- Cellular. Differs in the minimum weight, high light transmission, durability therefore it is often used for a roof of terraced roofs.
- Monolithic. Its properties are close to real quartz glass, but unlike it, it does not have such high brittleness. This determined its use in frame structures of a vertical arrangement - windows, doors, transparent walls.
Modern manufacturers are not limited to the production of colorless sheets. To create a soft shadow, we recommend using green, blue, red, yellow cellular polycarbonate for the roof. You can combine several colors, giving the whole design brightness and originality.

Sheathing the walls of the veranda with cellular polycarbonate is quite affordable for do-it-yourself work. To work, you need a minimum set of tools:
- knife for cutting - any construction knife will do;
- screwdriver
Polycarbonate installation technology involves the following list of works.

The installation of cellular polycarbonate on the roof of the terrace is carried out in a similar way. If there is a ridge - the junction of two roof slopes, use a special ridge profile sold in organizations selling sheets.

In the absence of cutting experience, cutting sheets to the required dimensions can also be performed by workers at construction bases.
As follows from our review, the amount of materials for terrace cladding is sufficient to make a unique structure. Before finishing your veranda with any of them, carefully study all the features of operation in a particular case.
Source: interviewedkibest.ru
How to decorate a veranda or porch?
It is great when there is an opportunity to attach a porch or veranda to the house. This allows you to increase its usable area and organize a cozy place to relax closer to nature. However, in the process of preparation, a number of questions arise. How to finish the veranda or porch so that they are in harmony with the facade of the house? How to choose architectural solutions, materials and colors? Let's try to figure it out.
How to finish the veranda outside?
The veranda can be open (summer) or closed (glazed), as well as combined - partially closed. The finish depends on the selected type.
So, for an open veranda, finishing is not at all necessary - you can limit yourself only to the roof. If you plan to use the extension all year round, it must be closed. And that means you can't do without finishing.
The most common materials for facing the veranda: wood, brick, stone, glass, plastic double-glazed windows, siding and facade panels. The choice depends primarily on the decoration of the facade of the house.

The optimal solution for a wooden facade is a veranda trimmed with wood.
Such a house will look harmonious. Sometimes a wooden porch or veranda is also attached to houses finished with other materials.
However, this cladding is not for lazy homeowners. It must be treated regularly to protect against moisture, mold and pests.
The veranda, finished with brick or stone, looks soundly and fundamentally. It is perfect for a facade lined with the same material.
Advantages of stone and brick:
- durability,
- strength,
- frost resistance,
- moisture resistance.
However, do not forget that this is a rather heavy material. He needs the right foundation. Before deciding to finish with brick or stone, consult with experts about the possibility of laying a suitable foundation.

Glazed verandas are a common and interesting option.
Glass is combined with almost all materials. Glass has only two drawbacks:
1. This is a fragile material. If boys like to play football in the yard, it is better to refuse such decoration.
2. A glazed veranda cannot be additionally insulated with heat-insulating materials.

The veranda can be lined with polycarbonate. It looks good as a roof of an open veranda. But it can also be used as the main building material.
Such a veranda can be combined with different facade finishes, but is not suitable for every architectural style. For modern houses, it is quite acceptable, but it will not work for classic, Russian, Scandinavian and some other styles.
The disadvantage of a polycarbonate veranda is that in appearance it resembles a greenhouse.

Another fairly common option for finishing a veranda or porch is plastic siding and facade panels.
They can be used for facing a closed or open veranda, as well as for finishing a porch.


Advantages and disadvantages of finishing the veranda with siding
The advantages of siding as a material for finishing the veranda and porch are many:
- moisture resistance;
- frost resistance and resistance to temperature extremes;
- the possibility of additional insulation of the veranda;
- unpretentiousness in care;
- simple and fast installation;
- affordable cost.
In addition, it fits almost any facade, because in addition to traditional siding, you can use:
- facade panels imitating natural brick and stone;
- foam siding, repeating the shape and texture of the wooden finish of the house;
- block house, outwardly almost indistinguishable from a log house facade.
There is probably only one drawback. Vinyl siding fades in the sun over the years. Depending on the additives that are included in the panels, color changes may be more or less noticeable, but they are there. Therefore, the veranda, if it is attached after a few years, may stand out a little against the background of the facade. What to do?
Ideally, of course, it is better to immediately build a house with a veranda - then the color of the finish will be uniform. Also, there are no problems if the facade was lined with white (or very light, pastel) panels. The color of such siding will remain unchanged. There will be practically no noticeable difference if the house is lined with acrylic panels: even dark ones, they do not change their color over the years.
What to do if you have vinyl siding and it has brightened? How to make an attached veranda from siding? There are several options.
1. If you finished the plinth with facade panels, you can use the same ones for facing the veranda. It will turn out quite an interesting and harmonious combination.

2. If you used several colors in the design of the facade, for example, made contrasting corners or inserts, you can finish the veranda with the same panels. In this case, the difference in shades will be noticeable much less.
3. If you have an open or glazed veranda, it looks good to finish the pillars of the veranda with siding. In this case, you can use panels in the color of the drainage system, spotlights and window openings.
4. For cladding pillars of open and glazed verandas, use the Alta-Profile exterior corner finishing system. By the way, both options are suitable if you are making a veranda or porch from carbonate and siding.
5. Finally, you can choose the same color as the facade. After a few years, the finish of the veranda will also brighten, and the colors will even out.
How to sheathe the veranda with siding?
First of all, you need to make the correct calculation of the amount of necessary materials. Unlike the walls of the house, the area of finishing the veranda is much smaller, which means there can be more waste. To save on materials, you need to make a professional calculation. The specialist will consider how the panels can be cut to minimize waste. But pay attention! If the panels are cut differently during the installation process, the amount of waste will increase and there will not be enough materials.
In general, the installation process is not complicated. And you can do it yourself. The main stages of sheathing the veranda with siding:
- Installation of the crate (we recommend using a special plastic crate "Alta-Profile").
- Installation of finishing elements.
- Installation of siding (performed from the bottom up).
A detailed description of the siding installation technology can be found in the instructions on our website.
How to sheathe a porch with siding?
The technology completely coincides with the decoration of the veranda. You can use vinyl, acrylic or foam siding, as well as facade panels. The pillars finished with decorative outer corners "Alta-Profile" look beautiful. You can sheathe the porch with siding yourself, having previously studied the instructions.
Although the finishing area is small, be sure to use a crate. This will extend the life of the panels and the walls underneath. Due to the air gap under the finish, moisture will not accumulate and mold will form.
Not only exterior
There are practically no restrictions in the choice of interior decoration of the veranda and porch. It can be wood, plastic panels, brick walls, or whatever you like.
What kind of flooring to choose for the veranda and porch?
The wood looks beautiful, but its life is limited, and the coating itself requires regular maintenance. A good alternative is WPC decking. It is made of a wood-polymer composite, thanks to which it combines all the best properties of wood and polymer. On the one hand, it is warm, cozy and beautiful, on the other hand, it is frost-resistant, not afraid of moisture and temperature changes, and does not require special treatment and care.
Before you start building a veranda or porch, consider whether it will be open or closed, what materials you will use, what colors to choose. Calculate how many panels you will need. After that, you can get to work. And let your veranda and porch be cozy, beautiful and delight you for many years.