A wall panel is an opportunity to create an individual interior by decorating walls using available materials. If we talk about a panel as a product, then it is always an author's, handmade work, which has a rather high cost. Decorating an apartment with such fakes is not always relevant, because the product is selected according to the existing interior, and if repairs are made, then the panel becomes unnecessary, and it is a pity for the money spent. But it is a completely different matter when the panel is made independently. This makes it possible to choose the theme, size, texture, material, color, but at the same time the cost of money is minimal.
How to do?
In fact, there is nothing difficult in making a panel yourself, it does not require special skills and knowledge. The first thing you need is to choose a place where it will be placed, choose a thematic direction and prepare the necessary materials, which are most often found in any housewife.
A few important points
- If the room is small, do not use large panels, they will not look harmonious and make the room visually smaller.
- When the room is large and a bare wall is decorated, you can use a large panel or several small ones, but of the same theme.
- If the room is colorful and has a lot of decorative elements, the panels should be chosen in soothing colors, with a minimum combination of colors.
- When using several panels on one wall, it is necessary that they blend perfectly with each other, support one theme, or perfectly harmonize in color.
We make from improvised means
Materials that are suitable for making panels are, as a rule, what is at hand. You don’t need to specifically purchase anything, and the execution technique resembles handmade fakes that many did in schools.
Of course, the stores offer a variety of products where it is used:
- glass;
- ceramics;
- metal;
- photography is used.
But our panels, which we will learn to make today, have nothing to do with decorated tiles and photo wallpapers. Unless they have one goal - to make everything beautiful and unique.
You can use:
- threads;
- fabrics;
- buttons;
- ear cancer;
- flowers;
- leaves;
- cereals;
- coffee beans.
You can consider the features of thematic products.
Panel on the wall in the kitchen
This is perhaps the only place where the use of food for decoration purposes will be fully justified. Here are appropriate:
- cereals;
- grains;
- vegetables;
- fruit.
But, by the way, coffee beans are a versatile material and can be used in any room. They are easy to work with, and during operation they do not lose their appearance and color.
With their help, you can lay out any pictures, for example, a cup of coffee, which already withstands the theme. You can cut out photos of beautiful fruits and vegetables, complementing them with cereals.
New Year's panel
In this case, the brighter the better. Such a picture should speak of a holiday, fun and good mood. Here it is permissible to combine any materials and surrender completely to fantasy. And if you were invited to visit, a hand-made panel will be a great gift.
Suitable use:
- spruce branches;
- cones;
- rowan berries.
As a background, you can use a New Year's picture, for example, printed on a printer and decorate it. Snow-white snow can replace crumbled polystyrene, cotton wool and even semolina.
Baby
If a girl is dancing, you can make a picture of a ballerina. Such work on a fake will definitely interest your child, so you can make a joint fake.
macrame panel
In the manufacture of such products, knowledge of weaving techniques is needed. If you made macrame, you can create an incredibly beautiful decor. The advantage of products is that everything will depend on desire and imagination. They can be:
- large;
- small;
- round;
- square.
You can decorate them:
- beads;
- stones;
- ribbons.
Material selection
Knowing about the main points, you can consider in more detail how to make panels using one or another material.
from wood
Additionally, you need wire, thin branches of wood, glue. For the frame, you can use wooden planks if you want a square or rectangular picture. For an oval or round frame, you can also use thick wire, and wrap it tightly with thread for decoration.
For the background, you can use plywood, white cardboard, burlap, or leave it blank. In the latter version, all elements are attached to each other and fixed to the frame.
Advice
In order for the tree to have a glossy surface, it is varnished.
Design ideas:
- You can place patches on the branches, which are attached with glue. So that the bottom does not look empty, you can fill it with the same blanks.
- A composition of patches laid out in the shape of a flower will look beautiful if this is a large product, you can use cones or dried flowers.
- It can be a lined heart or a star.
In order not to spoil the impression, it is better not to use synthetic materials in the composition.
From fabric
The fabric is easy to work with, and its variety allows you to create amazing paintings. With it, you can create:
- abstract drawings;
- sew animals;
- nature;
- create complete pictures.
- Absolutely any fabric is suitable for work, the more different fabrics there are, the wider the choice when implementing ideas.
- You will need threads, frames, cardboard, elements.
- As in the previous version, the frame can be made independently. Panels without frames will look great.
- The basis on which the picture will be created, you can choose any thick cardboard, fiberboard or chipboard, plastic and other improvised materials. It needs to be covered with material, and secured from the wrong side with glue or a stapler.
Advice
Do not throw away small pieces of matter and shreds, they will be useful for the following work.
Ideas:
1 It can be nature, flowers, trees. To make a tree or flower look alive, you should use the following technique. The trunk or stem is drawn on the fabric and cut out, glued to the canvas. The leaves are also cut out, but only one side is glued to the canvas. For a flower, you can first create a composition with a needle and thread to fix, and then glue.
2 Now in many interiors panels are used when using one material, without any additional elements. The idea is as follows, for example, you have a living room, where two, three primary colors are used in the interior: beige, orange, red. You need to choose a material with a pattern, where red flowers are painted on a gentle background. Or take a fabric with a red background, on which there are small beige flowers.
It is ideal to choose three different fabric options. Next, the base is taken, a square or rectangular sheet of plywood and covered with fabric. Plywood sizes can be different, the main thing is that in the end they look harmonious.
3 Pictures look great, for this you need to choose a picture as an example. Then, cutting out the details, glue them to the base. This is a bit of a time consuming process and it's best to start with simple drawings.
Advice
To add volume under the fabric elements, you can put cotton wool.
From photos
The use of photographs for decorating apartments has been used for a long time and, probably, this technique is used in every family. And although it will not work to surprise with the material, it will definitely come out with the design method.
- For this method, absolutely all photos are suitable.
- Black and white photos look great.
- Additionally, you can use photos of nature, beautiful landscapes.
Design Ideas:
Framework. Depending on what panel is expected in the final result, you need to choose a frame. It can be made of cardboard, where only the front part of the frame is cut out of thick cardboard and glued on the photo, on density it can also be glued to the back, as a base. If the photos will be glued directly to the base, but the frame is not needed. You can use fabric for the front side of the photo as a frame.
The family tree looks very beautiful in the interior, it brings comfort and creates a special atmosphere. Making it is quite simple, for this you need a base, you can work with cardboard, the main thing is to find the dimensions. It can be dyed or wrapped with cloth. Then a tree trunk and branches are cut out of the same cardboard. It is covered with paint, if something does not work out, problem areas are easy to close. Then photos are attached.
You can place photos in a chaotic manner on the same basis, and decorate empty spaces with additional elements. To delimit the photo, you can use colored tape or a thick thread.
Another original option is to take a large frame and pull the threads horizontally. Then, using clothespins, attach the photo to them.
Advice
Photos of different sizes look beautiful, while geometry and accuracy should not be observed.
From paper
Design ideas:
Butterfly panels are widely used. For this, colored paper is taken, and butterflies are cut out according to approximately one sketch. You can use one color or several, in only one color palette, for example, from soft pink to burgundy. Then butterflies are glued onto the base (cardboard, plywood) or directly onto the wall. It can be in the shape of a heart, the lightest color from below and ascending to the top. It can be a flying composition. Only the body needs to be glued, the wings should lag behind the surface.
You can create an arrangement of flowers. Here it is better to use soft paper with cardboard will be difficult to handle. We take a square sheet of paper, it needs to be folded with an accordion. Next, the accordion is folded in half and these edges are fixed with glue or a stapler, the free ones are stretched and also fastened together. To make the edges of the flower come out curly, cut the folded paper with an accordion at both ends.
You can beautifully decorate with small beads, pebbles or beads.
Advice
If you have a panel of butterflies, they can be placed additionally around the room!
plaster
They can be called luxurious and elegant. Gypsum stucco has always been appreciated, and now there is an opportunity to make panels using gypsum on your own. Gypsum can be purchased at any store, as well as molds for future compositions. But if you work a little and spend time, then you can do it without forms.
- Masters who do this professionally use special devices. For home creation, you can use any means at hand, a pencil, a spatula. That is, those objects with which it will be convenient to apply the drawing.
- You should start with the simplest forms in order to get acquainted with the material.
- Difficult works of art are unlikely to come out, but having mastered the basics, you can produce beautiful drawings.
Design ideas:
- You can work with plaster directly on the wall, but then you need to have a perfectly flat surface.
- A little plaster should be applied so that it does not have time to dry. You can decorate flowers, patterns. If you draw well, you can make difficult compositions.
- The material itself is not bright, so you can decorate it with a bright frame and paints. In the latter case, do not overdo it so that the material does not resemble plasticine.
Advice
At the first stages, you can simply get acquainted with the material in order to know how it behaves in work.
From threads
With the help of ordinary threads and nails, you can make a panel that will make him admire. Such crafts belong to the art of string art and are popular all over the world. And they sell for a high price.
- As a basis, it is better to use wood or plywood.
- In addition to multi-colored threads, you will need nails or pins, nails with beautiful hats will look beautiful.
- A sketch of the future panel (drawing) is applied to paper. Then it is applied to the base and fixed. Nails are hammered along the contour of the drawing, the less they are hammered, the more voluminous the drawing will be.
- Then the paper is torn off.
- A thread is wound on the nails, horizontally and vertically.
Registration:
- Flowers and stars. It can be three large flowers or several small ones. Flowers will look beautiful when using different colors of threads.
- It can be a big heart, a cat, a dog or a bear. Even the simplest drawing will look original and unusual.
- You can make a drawing of several elements, then it will take patience and time.
Advice
When using thick threads, the consumption will be lower, and the work will be done faster.
From beads, buttons
Such panels can be safely called bright and original decorations. Beads are used in many fakes, thanks to the multi-colored palette and hardy material, incredible compositions can be realized.
- To create such fakes, you can use beads separately, combine them with buttons or with other materials.
- Can be used as a base fabric, polystyrene, wood, cardboard.
- The material is attached with glue.
- Before creating a pattern from beads, you need to draw a contour with a pencil, and fill in small areas. First, glue is applied with a brush, then covered with beads.
Ideas :
- It is better to start artistic fakes with simple drawings, for example, flowers, trees, animal themes. Try to make a butterfly, to do this, draw an outline and select areas where different colors will be used.
- If the drawing is large, you can use buttons, so the drawing will be completed faster, but will become no less beautiful.
- When there is artistic talent, you can draw a picture, and highlight some of its elements with beads.
Advice
It is better to hang a beaded panel on an empty wall so that it serves as a bright accent in the room.
From plaster, putty
Such work is similar to gypsum, but if gypsum is used in small areas, then plaster most often acts as a material for large panels. This is not to say that this type will easily give in to beginners in this matter, but with a little training, everything will definitely work out.
Since the panel is made directly on the wall, it is better to train on some smooth surface.
Work technology:
- The drawing is applied to a piece of paper, the following work is performed on this sketch;
- Then the drawing is transferred to the plaster;
- According to the drawing, a form is applied layer by layer;
- In order to smooth the sheet and not damage the shape, it is necessary to cover this area with a film and carefully correct, smooth;
- To give the surface texture, you can use a brush with a hard bristle;
- When the pattern has formed, it is necessary that it is completely dry;
- Then, using sandpaper, aligns the zones;
- You can paint the canvas.
The process is laborious and requires patience, but the result is worth it.
Cork
The only difficulty in creating such a panel is to find a sufficient number of traffic jams. If there are wine corks at home, then creating an original panel is not difficult. This material is easy to process, light and comfortable.
- They can serve as a background if cut into circles.
- Attached with glue.
- Works well with natural materials.
Design ideas:
- There are corks in both delicate beige tones and rich brown. If you cut different corks, you can use them to lay out a picture.
- Sliced circles can be applied with letters of paint, from which the phrase is composed.
- From them you can cut out figures that are further fixed to the base.
From discs
With the advent of flash drives, disks have faded into the background. Probably, in every family there are these computer accessories. It is very good that they have been preserved, because there are many ideas on how to make unique, luxurious panels out of them.
Design ideas:
For families with children, it will be relevant to make "Smeshariki", cartoon characters. For this, details are cut out of colored paper or fabric (nose, eyes). Then, with the help of glue, they are glued to the disk. Heroes are applied to the base, which can be made of cardboard or thick fabric.
- The discs are well cut into different parts, which makes it possible to decorate panels with their help. In the light they shimmer and shine.
- Another option is to cover the disk with paint, you can choose any background that will fit the interior. When the paint dries, a pattern is applied with a pencil. Next, along the contour of the drawing, a layer of paint is removed with a knife.
- You can use a floppy disk as the basis of the panel. To do this, it can be decorated with paint or wrapped with thread.
From shells
If the family likes to relax on the sea coast, the obligatory souvenirs are shells. Kids love to collect them and replenish household supplies. But very rarely they are used, so from year to year they lie and wait for their time. Now the time has come when they can serve as the main element of a beautiful panel.
- Before using shells, they must be washed and dried well.
- To apply them to the base, you need glue.
- Before work, for convenience, it is better to sort them by size.
- To diversify the pattern, you can additionally use sand, pebbles, beads.
- Colors can be added with paints.
- To make the surface of the shell glossy and shiny, it can be coated with colorless nail polish.
Ideas:
- It can be a flower lined with shells or a chaotic arrangement. Much depends on where the panel will be placed. It is necessary to withstand the marine theme or create an overall picture.
- Such elements on burlap will look beautiful, and simple branches tied with a thread can serve as a frame.
- You can take a drawing of a marine theme as a background and decorate it with shells.
- To create volume, shells are attached to the sidewall.
As you can see, any thing can be used. Here are some more examples of how to beautifully decorate a wall.
Decoupage panels
This option can be considered an update of old things. In this case, any canvas is taken as the basis. Old painting, wooden planks, iron or glass elements. With the help of paints, beads, threads and other materials, the base is decorated.
Most often, products do not require a frame. They are hung on a rope or simply on a hook. For decoration, it is better to use natural materials. It can be several pictures that are interconnected.
As a frame, you can use designed for photos or paintings. You can do it yourself if there are thin strips. For the background, fabric is most often used, which is covered with a base. Since the doll has a certain weight, the base must be reliable - wood or plywood.
As additional materials, you can use:
- tapes;
- bows;
- beads;
- buttons.
If you have time and desire, you can make dolls that resemble family members and create a family panel.
Clock
Now you can buy any wall clock. They come in different shapes and sizes, colors and textures. But finding a unique model is unlikely to work, making it yourself is much easier. Such panels are convenient in that you can choose all the parameters yourself. The only thing to consider is the general rules for all products.
Topics can be completely different:
- time of the year;
- nature;
- romance;
- flowers;
- abstraction;
- patterns.
All that is required for the job is the selection of appropriate materials and a base. The basis can be foam, wood or plywood. First of all, it needs to be prepared. You can decorate with paint or covered fabric. If it is supposed to use multi-colored elements, then the basis should be chosen monophonic.
It is not necessary that the clock be located in the center. On the contrary, if they are located on the edge, this will greatly expand the possibilities and it will be possible to create a beautiful composition. Here you can use all the techniques presented above. If the watch has a three-dimensional glass and it looks rough in the overall picture, it should be removed.
As a rule, watches have their own background, if they have already been purchased and the background does not fit the overall interior, this problem is easy to solve. The clock is easy to disassemble, the main thing is not to damage the mechanism. The withdrawn base can be painted or decorated with beads. You can use pieces of a floppy disk that shimmer beautifully in the light.
With pockets
Such a panel will not only bring beauty, but also benefit. It is suitable for kitchen, bathroom, nursery. Its main advantage is pockets in which you can put any accessories. You can make different sizes and shapes, and use as many pockets as you see fit.
Such a panel consists of a base to which pockets are sewn. A bar is attached from above, it is better to use a wooden one. Depending on what accessories will be stored in the pockets, the basis is selected. The heavier they are, the stronger the foundation should be. Plywood is perfect, it does not deform, and it will keep the shape of the panel perfectly.
Regarding the fabric, there are no special frames, but it is also better to use a dense fabric. Pockets can be of different sizes, and placed randomly. You can use pieces of different fabrics, even if they differ in density.
Such panels are made from the pockets of old jeans and pants, which looks very original. Such a product will perfectly complement the interior of the corridor.
You can decorate:
- ribbons;
- bows;
- buttons;
- stones.
If colored material is used, then its pattern is quite enough.
You should never give up, because the first successful work will bring positive emotions and pride in the work done.
Topic disclosure
Reliability of information
- Availability
- Saving money
- The uniqueness of the design
- Time for crafts
- Sometimes hard to find materials
- Often, after an unsuccessful first attempt, work is suspended
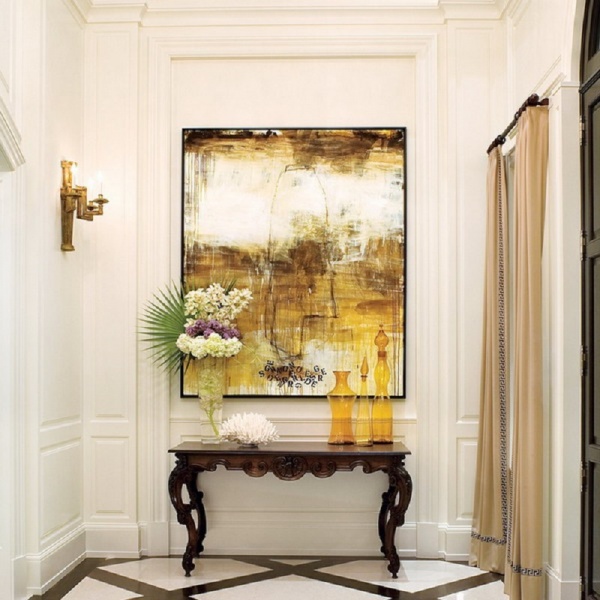
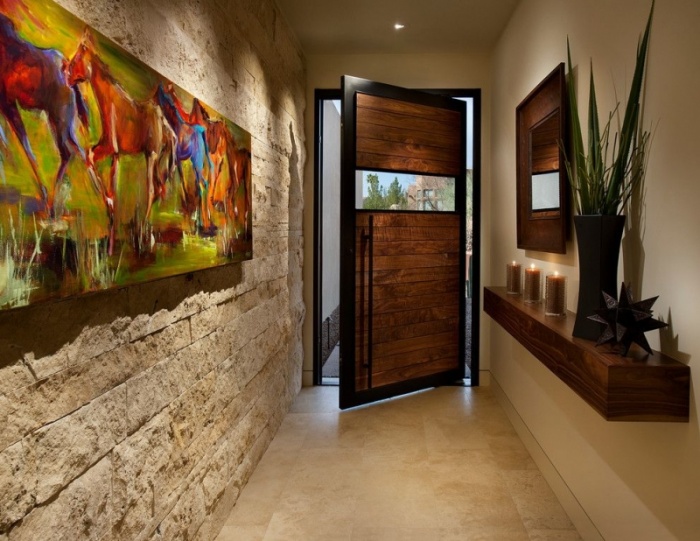
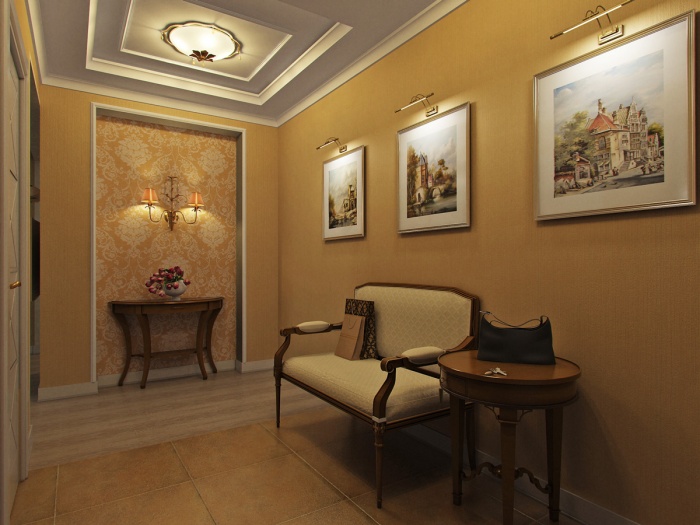
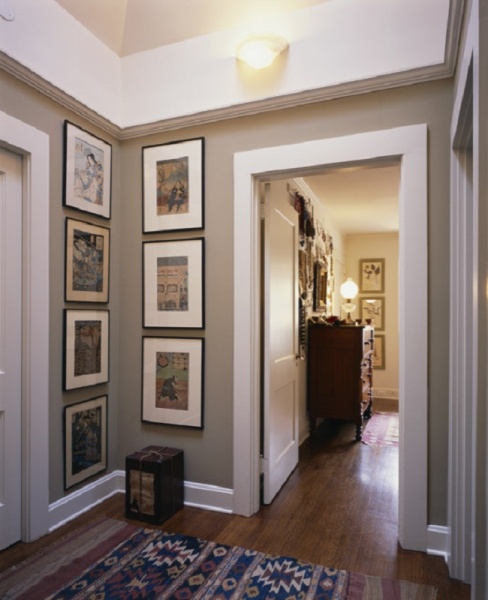
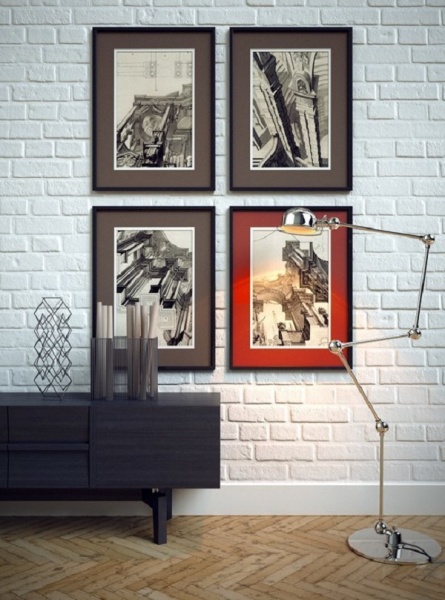
Paintings in the interior of the hallway are a worthy design element, regardless of the chosen style of the room. In order for the picture in the corridor to harmoniously fit into the overall environment, it is important to choose the right plot and color scheme. Compatibility between the style of the hallway and the image is achieved by choosing the appropriate form of execution. Photo and handmade cross-stitch are radically different in perception, even with identical plots. deserve special attention. Familiarization with the variety of design solutions will help you competently design your own corridor interior.
The choice of colors and form of execution
There are many nuances of choosing a picture in a corridor or hallway. Let's start with the color scheme. The dominant tones and plot of the canvas as a whole should be in harmony with the interior of the room and be visually pleasing. Designers recommend refusing to use gloomy and dark colors in the setting of the entrance area, pastel shades will help to achieve a cozy atmosphere.
A win-win option, when the colors of the picture and the hallway are in the same plane, but slightly differ in shades. If the ultimate goal is the formation of psychological comfort in the interior, calm tones are a priority. Contrasting combinations are closer to dynamic persons and creative natures.
Comment! When choosing a picture in the interior of the corridor, be sure to take into account the presence or absence of a pattern on the surface of the walls.
Wallpaper with a large pattern and a bright pattern are unlikely to find harmony with each other. The canvas looks much more spectacular against the background of plain walls. A bright image will successfully cope with the function of an accent element of the interior.

The design of the hallway also influences the choice of form of execution. There are several main solutions:
- A traditional oil painting, suitable for Art Nouveau, Shebi chic and all areas of classicism.
- Modern modular paintings are universal, it all depends on the plot. Scandinavian, eco-style, Mediterranean and Japanese, art deco - there is a suitable option for any hallway interior.
- Photo images are relevant for hi-tech, minimalism and other solutions for the laconic design of the hallway.
Less often, handicrafts in the form of beadwork or cross-stitch find a place in the corridor. If you want to demonstrate your own skills, you can hang a unique collage made from improvised materials. Handmade art is organic in the interior, where national or rustic notes dominate: country, Provence, Chalet.
Another point that deserves attention is the presence or absence of a frame. Frameless panels quickly gained popularity and do not give up their positions.
A variety of paintings in the interior of the hallway in the photo below:


Priority stories
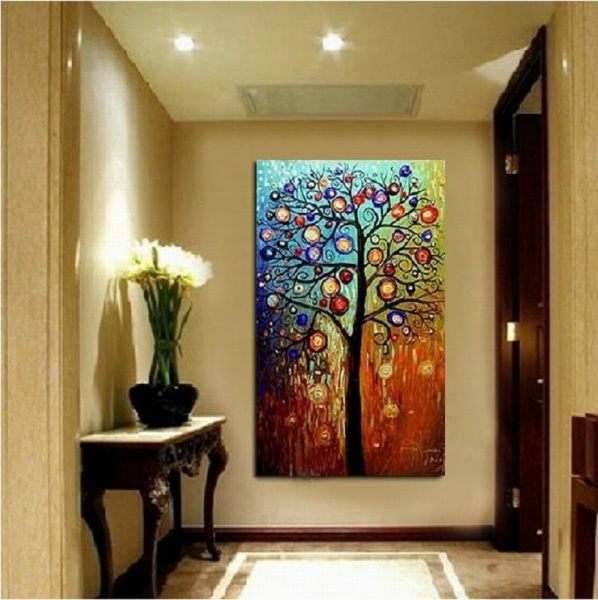
The plot of the canvas is no less important than the color palette and form of execution. Fanciful portraits, demonstrations of devastation, and other apocalyptic themes are best explored in an art gallery. For your own corridor, it is recommended to choose peaceful stories. Urban or rural landscape, images of animals, macro photography of wildlife - the most suitable solutions for the hallway. Photos of family members captured in happy moments of life are also appropriate. The laconic modern interior of the corridor will be complemented by an intricate abstraction or a canvas by an avant-garde artist.
The plot of the picture should not only be a semantic addition to the interior of the hallway, but also please all the inhabitants of the apartment. Sometimes a harmless and neutral picture causes inexplicable irritation. Listen to your own perception and avoid internal disharmony.
To evaluate the diverse storylines of paintings in the design of the hallway, photos will help:

Tips for decorating the interior of the hallway with paintings
In order for the interior of the corridor to benefit from the presence of paintings in it, it is worth listening to the recommendations of designers:
The interior of the hallway is deprived of natural sunlight, so it does not make sense to be afraid of the fading of colors due to exposure to direct sunlight. The following photos demonstrate the successful design of the corridor with paintings:


Modern photos or timeless classics
Becoming the owner of an original oil painting is not always affordable in terms of financial costs. And the functions of the corridor are not quite suitable for contemplating artistic masterpieces. Much more often, the interior of the hallway is decorated with a printed image, which is called a poster. With high quality workmanship, they look no worse than real canvases and will become a worthy element of the interior.
A relatively new design trend is to decorate the walls with frameless panels. The picture, not weighted with a baguette, looks light and concise, which fully meets the criteria for designing a modern interior. An additional bonus - the cost of such decor is in the budget segment and is available to a wide range of consumers.
Comment! Among the advantages of photo paintings is the ability to place an individual order and get a unique image in the interior of the corridor.
Among the finished copies, you can also easily find a plot suitable for the style of the hallway. The decision to decorate the interior with an inexpensive photo panel is suitable for people who have not set priorities and have not developed a clear corridor design concept. In this case, you can replace or completely remove the painting from the interior without much pity.


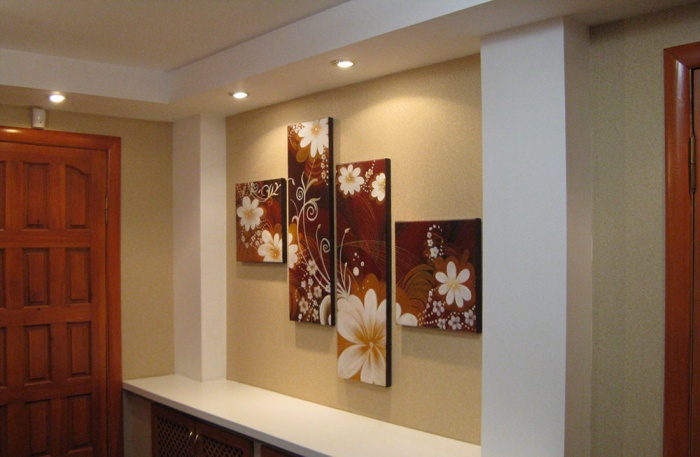
Features of modular paintings
When decorating the interior of the hallway, modular paintings are worthy of attention. A non-trivial design solution quickly gained popularity and is often used as decorative elements of modern design. A modular picture is an image divided into separate parts, usually different in size. A single image can consist of several segments:
- Diptych (2 parts) - extremely rare.
- Triptych (3 parts) - the most popular version of a modular painting.
- Penaptych consists of 5 parts.
- When a modular painting includes more than 5 segments, the set is called a polyptych.
There is a direct relationship between the number of parts and the cost of a modular painting. The key factor in choosing a modular picture in the corridor is the plot of the picture. Preference is given to simple, uncomplicated images. The purpose of the canvas from fragments is to decorate the interior and create the right atmosphere. A person who enters should not peer into small details.
As in the case of photo posters, there are companies that will make a custom-made modular picture for the interior of the hallway. The cost of the canvas will be slightly higher than the finished copy, but the exclusivity of the design of the corridor is guaranteed.
When choosing a plot, do not forget about the dimensions of the room. Abstractions contribute to the visual increase in the area of a small corridor. But an interior with small square meters will not harmoniously perceive a canvas of 5 segments. The place of volumetric paintings is the interiors of spacious hallways. There are several options for arranging modular paintings on the walls of the corridor:
- The standard position implies that the segments are on the same level. Found in most interiors.
- The ladder speaks for itself. Parts of the modular picture are hung in a cascade.
- The square is the least used. Fragments of the same size are arranged in a square. For this decision, it is important to find a suitable image that will be perceived in this form.

The interior of the hallway with the presence of a modular picture will appeal to you:
- expressive persons;
- individuals who strive to be at the peak of fashion trends;
- lovers of interior novelties.
A home interior cannot be imagined without wall decoration.
Covering with paint or wallpapering seem like boring options for modern designers.

That is why wall decoration by installing various clocks, game mechanisms, carpets, etc. is very popular.

Purpose
Paintings are a universal element of decor. They perfectly enliven the room, close unsightly places and bring their own flavor to the overall interior.
Panels are a decorated surface, the drawing on which always has a frame.

The most large-scale panel models are full-fledged panels with a large-format image or interesting ornaments. The advantage of this kind of compositions is that they do not have to be solid.

So, modular panel options help to effectively distribute accents not only on one wall, but on all at once.

The main task of such a wall picture is to decorate the room. At the same time, the panel may well divert attention from the place of inaccurate wallpaper gluing or unevenness on the wall.

In offices or cabinets, panels are used to mask safes.

Varieties
Unlike ordinary paintings, the image on the panel may be far from classical painting.

The plots of the drawings are not limited by anything, as well as the choice of materials from which the decor element is made. Therefore, designers distinguish these types of wall panels:

From textiles. Woven paintings usually have a wooden frame and are made in the style of art reproductions and antique tapestries. Often such panels depict geometric ornaments and floral applications.

The advantage of textile decoration is a variety of colors, three-dimensional image, interesting texture.

Inexpensive panels are made in mass production, but you can also find author's options for which you will need to pay more.

From a tree. These paintings have a wooden base and look quite expensive, despite the brevity of the plots. The cost of the product corresponds to its high originality.

From wallpaper. A great option for those who use ordinary paint for wall decoration, but want to correctly place accents in the interior. With this decoration, you can get rid of the remaining parts of the wallpaper that are not suitable for repair.
 The advantage of this option is that it is easy to perform even at home.


Free size (free size). This type of panel has free dimensions and, as a rule, the image has some kind of incompleteness.

Most often, this type includes modular panels that can be constantly increased by adding new elements.

Mirrored. Panel of several mirrors. A great option for ultra-modern and concise apartment interiors.

Contrary to common beliefs, mirror paintings do not differ in the severity of forms, since even those mirror surfaces that seem uneven and chipped can be taken.

Locations
Wall decoration with decorative panels is possible in various parts of the apartment or workplace.


The main thing is to select paintings for the general atmosphere and do not forget about the importance of maintaining the proportions of the room.
To place the panels in the hallway, it is better to choose small models in bed colors with calm plots.

You can purchase a modular composition with natural landscapes or a bouquet of flowers.

In the case of installing a panel in the corridor, you can focus on more contrasting and bright colors.

It is advisable to highlight the picture if there is not enough bright lighting in this area of \u200b\u200bthe house.


Often, designers suggest placing mirror panels in the corridor to visually increase the space. Panels depicting all seasons and wooden compositions are very popular.

For the kitchen, it is advisable to select a light panel that will stand out against the background of a general cozy interior.

It is worth paying attention to the compositions of wallpapers with a variety of patterns in golden, heavenly, pink tones. Recently, tiled panels depicting reproductions of famous still lifes have been in demand.

The main hall, as a place for evening rest, should be decorated with calm paintings that set you at peace.

For this part of the house, it makes sense to purchase large panels depicting marine sketches, floral ornaments.

The emphasis in such decor elements for the living room is not the plot itself, but the material from which the composition is made. Harmonious options: wooden or woven panels.

In the bedroom, wall decorations are placed opposite the bed. It is better to choose panels with limited dimensions, which depict relaxing landscape or space studies.
For lovers of long water procedures, a panel in the bathroom is suitable.

But here it is important to pay attention to the moisture-resistant qualities of the picture.

It makes no sense to install panels made of wood or paper. It is better to choose decoration with elements of stone and marble.

How to make a panel yourself
To decorate your own apartment with a unique wall decoration, you first need to decide on a specific image of the panel.

Still need to choose a place to install. The simplest composition can be made from a large piece of chipboard and the rest of the wallpaper. You will need a saw, glue and sandpaper.

First of all, you need to give the picture the desired shape.

For example, you want to make a modular panel of several elements. Then the outline of each fragment is first depicted on the boards, and then all the plates are cut out. Blanks and chipboard are applied to the wallpaper and circled. After cutting out the images, you can proceed to the processing of the panel.

It is necessary to process the wooden parts with sandpaper to align the edges. Then round off the corners.

Get rid of fragments of various irregularities and degrease so that the wallpaper sticks well. Already at this stage, it is advisable to think about how you will mount the panels.

The easiest way is to hang the picture on double-sided tape, but if the composition is very heavy, it makes sense to think about brackets.

The production of the panel ends with fixing the wallpaper. No need for special glue, so get regular PVA or Moment. However, get ready for the fact that too thin sheets of wallpaper can deteriorate.

A self-made wall panel is an organic, economical option for decorating your home. A unique picture gives positive emotions and transforms the space.

Photo of a decorative panel for the living room


The hallway and corridor are the "clothes" by which the apartment is greeted, so the importance of carefully thought-out design cannot be underestimated. This is the room that you see when you return home, and you want it to look welcoming and comfortable. In addition, the hallway has an equally important practical function: there should be enough space for outerwear, shoes and other accessories.
However, the practical function of the corridor should not run counter to the decorative one. There is a huge area for decorating the corridor, which, perhaps, not everyone takes seriously. It's about the wall. With the help of a vertical space where clothes do not hang, you can completely change the atmosphere in the hallway.
Decorating the corridor with wallpaper

The right wallpaper can do wonders. Whatever design option you like - classic style, bright colors, elegant restraint - nothing limits your possibilities. Huge selection of colors, patterns, textures! Whether you prefer stripes or floral motifs (by the way, there are very cute designs on the site http://www.mirpola.kiev.ua/oboi-dlya-korridora), flashy colors or pastels, you will always find your perfect wallpaper for the corridor.
Decoration of the corridor with wall panels

Walls always look spectacular, including in the corridor. Here you can choose not only between natural and geometric patterns, but also among a large palette of colors. Prefer natural materials? Noble wooden panels will create a warm atmosphere in your hallway.
Corridor decoration with wood

Wood can be left in its natural state or painted in any color, or combined with wallpaper or painted walls. The classic option: place the wooden panels only on the bottom half of the wall, and paste over the top with wallpaper.
Painted corridor walls

Doesn’t the soul lie either in wallpaper or in panels? Good old wall paint will always come to the rescue! Easy to apply, does not require a lot of time to repair, especially considering that there is usually very little furniture that will have to be taken out. Choose a solid pastel shade or combine calm and bright colors. Minimal cost and amazing results!
Corridor design idea: mirror

The mirror is an integral part of the corridor, otherwise where to look at an unplanned return home? :) If you are not sure about the style of your hallway, opt for a simple frameless mirror. It will fit into any style without attracting too much attention. And mirror panels as in the photo can be arranged in any sequence. Get your personalized mirror.

If you want to emphasize a certain style, then the right frame will come to your aid. For example, the carved frame in the photo above harmoniously complements the classic style of the hallway.
Interior stickers for hallways and corridors

Perhaps the easiest way to change something in the environment without resorting to drastic measures is to use interior stickers. Great idea: they can be with hooks for clothes. It turns out fervently and reduces the degree of seriousness :)
We have selected for you many more corridor design photos for every taste and color. Get inspired!
Silver wallpaper for the corridor in stripes

Discreet hallway design

Contrasting wallpaper for the corridor

Making a corridor with a photo

Romantic design with many colors

Wooden panels and black and white pictures in the hallway

Design decoration of the walls of the corridor with stone

Library in the hallway

Brick in the interior of the corridor

Soft lines, openwork wallpaper and large space

Pebble wall cladding


Any wall decoration after repair is boring, you want to change something and find a way to show your imagination, talent and creative skills.
A voluminous panel made from improvised materials is one of the fashion trends in 2017 design.

Looking through the spectacular work in the illustrations, it may seem that it is difficult. But if at school labor lessons the figures made of plasticine and salt dough turned out to be “excellent”, there is experience in working with beads or natural materials - everything will work out.

What material to choose for wall decoration
A handmade wall panel is a special decor that can enliven the most ordinary environment, introduce a new design concept and enliven the atmosphere.

The choice of material and technique to implement the idea depends on many factors:
- Functionality of the premises;
- Wall decoration;
- Creative inclinations;
- tastes and preferences;
- Availability of materials and tools;
- Skills in working with materials (sewing, knitting, modeling, weaving, drawing).
It is better to place a large panel on the entire wall in a large room, where there is a lot of empty space. Buying a picture or sticking a photo wallpaper is the easiest way. But there is nothing original in this, plus high costs, and the new facility will soon get bored.

Another thing is your own “masterpiece”, which you can proudly show to all visitors to the house.

Looking at a unique work, friends and relatives will be interested in how to make such a panel with their own hands?

First, it is better to choose a free wall, and then decide what it will be - a collage of photos, drawing, modeling or a mosaic of broken tiles. The general idea and plot of the image should correspond to the functionality of the room and practicality in care.

For example, it is not difficult to paint aquarium fish on the wall of the bathroom on a smoothly painted wall, but the paint must be resistant and indelible.

If the material is subject to destruction or accumulation of dust, it is better to cover the finished product with a colorless varnish, like a photo panel of salt dough.
The paint base for the panel should match the material of the wall cladding. For example, if it is acrylic enamel, then acrylic paints are also suitable for painting walls.

The walls in the nursery can be decorated with a wallpaper panel, which is easy to build together with the child from the remnants of rolled materials left after the repair.

Tip: Give the kids some of the fun DIY decorating process. They willingly join the creative process. This will help develop fine motor skills of the fingers and spatial thinking.

Children can collect natural materials - beautiful twigs, leaves and cones for panels. If they don’t know how to draw, instruct the child to spray paint from a spray can on a stencil.

They will enthusiastically trace large maple leaves on cardboard, cut out their outlines in order to spray gold and silver contour drawing on the walls in the hallway. Spray paints and a stencil in the decor of any room are the best solution for those who cannot draw.
Panel of edible products for the kitchen
The kitchen is the realm of products, where many bulk materials are suitable for decoration. Before you make a panel with your own hands, make an audit in your lockers.
Note!


Novice decorators have at their disposal a whole natural palette that retains its natural color for years. A panel of coffee, cereals and spices will decorate a free wall fragment in the dining area.

The work is carried out in several stages:
- Choose your favorite sample.
- Make a sketch with your corrections and apply the markup with squares to enlarge the drawing on the wall when enlarged.
- Apply the markings and outlines of the panel with a simple pencil.
- Glue decorative fragments for a specific product.
- Finished sections should dry naturally, after which you can move on to neighboring elements until the whole picture is completed.

Tip: In order to avoid disagreements, it is recommended to coordinate the plot of the panel with all family members.

Any "appetizing" materials are suitable for the kitchen:
- dried drunk tea leaves are black and brown contours of any drawing or soil in a picture;
- semolina is an excellent light base that can be additionally decorated, it also fills empty areas;
- coffee beans (green and roasted) - excellent material in brown and green tones;
- white and colored rice - a variety of sizes and shades;
- peas, beans, lentils and beans - white, yellow, orange, reddish and green fruits of various shapes, applied to the glue in halves;

- poppy - black base of the picture;
- instant coffee and chicory, cocoa powder and ground cinnamon - a loose base of brown shades;
- pumpkin, watermelon and cucumber seeds are excellent material for do-it-yourself panels, they are also glued in halves;
- cut or groats of millet, corn and wheat, oatmeal and barley - an inexpensive base of different colors and textures.
It is advisable to carefully open the finished panel with a colorless varnish in 2-3 layers, so that over time it can be easily cleaned of dust.
Note!


The image can be left as if unfinished or limited to a side (frame). Decorating a kitchen together is a fun activity that can easily involve three generations of family members.

Interesting ideas will be suggested by specialists who recorded a master class on making panels with their own hands:

Those who are good at sculpting figures, small sculptures or making dolls from any material should master the technique of working with salt dough.

For a relief panel, knead fine salt with flour 2: 1, adding a little vegetable oil, water and dry wallpaper glue, kneading like a regular dough. It should be plastic, but hard enough.

The finished mass should not stick to the hands. Small pieces or balls are separated from it, from which the faces of the characters, fruits, leaves and other elements of the panel are formed. It will hold up better if framed as a portable decor or attached directly to the kitchen wall.
Note!


You can add any other material to complete the plot, such as embroidered fabric, beads or yarn.

The relief picture dries for about a week, but then a solid durable material is obtained. The finished creation can be decorated and varnished, like a photo of the presented panel.

Expert advice on making panels from various materials
Making decor with your own hands is a fascinating creative process. Usually, after mastering one of the techniques on the example of decorating dough or cereals for the kitchen, I want to move on to decorating other rooms.

In the children's room, it would be appropriate to decorate with autumn leaves or colored paper panels made of fabric using the patchwork technique.
The bedroom of the needlewoman will be decorated with a panel of flowers, leather, fabric or buttons. A popular plot is a money tree, where coins or green coffee can be added to the buttons.

For a bathroom or bathroom, “marine” material will be an excellent decoration - smooth colored pebbles, shells and coral twigs.

The living room will be decorated with cork, bamboo, ornamental stone. In skillful hands, any material will become the basis for a homemade masterpiece.

DIY photo panels


