A compost pit is a place where organic waste is disposed of. All garden waste here is decomposed by microorganisms. This later becomes the basis for organic fertilizers. how make a compost pit with your own hands covered in this article.
There are such heaps in some way on every personal plot. These are the usual heaps to which garbage is dumped. But this waste can be turned into valuable fertilizer. To do this, it is necessary to design the pits correctly or make special boxes. In this case, you can increase the amount of valuable fertilizer and the speed of its creation.
Making a compost pit correctly is easy enough using available tools and building materials that can be found in the country and any personal plot.
Compost pit construction principles
Why make these pits and what is the use of them? In such pits, optimal conditions are created for the life of microorganisms, bacteria and worms, which contribute to the early formation of compost and an increase in the rate of its formation. These organisms live under certain conditions:
- sufficient moisture;
- elevated temperature;
- sufficient oxygen.
What is needed for all of the above conditions to be met.
- The required volume of the composting facility must be at least 1 cubic meter. This will keep the high temperature stable.
- Gaps on the sides of the structure are made for regular oxygen supply to the inner layers of the compost heap.
- The top cover must be removable so that moisture can flow in sufficient quantities.
- The bottom of the structure should stand on the ground so that worms and bacteria can make their way inside.
- The front wall should be removable or discarded so that the finished compost can be removed.
Watch the video! Making a compost
For the manufacture of a compost pit, you can use those materials that are found in the summer cottage: the remains of slate, corrugated board, boards, mesh or car tires. It is possible to build a pit with more durable materials, for example, kick out of bricks. Special structures made of plastic or metal are also sold, they are easier to install and transport.
Important! The compost pit should be installed at least 20 m away from drinking water sources. It is not permissible for the water to flow from the pit towards the well or pool.
Choosing a place for a compost pit
The compost pit should not become a source of groundwater contamination. No need to make a hole in places where water stagnates.
Things to remember when choosing a pit location:
- 20 meters to the places where drinking water accumulates. These are wells, wells, ponds. It is imperative to make sure that rainwater does not drain from the compost pit in their direction.
- 10 meters to residential buildings. We must also take into account the buildings of our neighbors. Be sure to follow the direction of the wind so that the unpleasant smell does not overshadow the rest. An excellent location option would be the far corner of the garden so that the pit does not interfere and is not conspicuous.
- Maintain a distance from trees and shrubs so that they do not feed on rotting products that enter the groundwater. This can damage both the plantings themselves and the fruits.
- A good place is partial shade. The bright sun will dry out the contents too much, it will have to be constantly moisturized.
- In order not to spoil the external impression, the pit is installed in an inconspicuous place. It would be nice to lay a path to it so that you could bring the filling into the pit on a wheelbarrow.
Advice!The compost pit can be decorated if desired. Plant curly flowers or a fence.
Making a compost pit with your own hands
To make a compost pit with your own hands, they use improvised tools and materials that can be found in most yards. Good construction will last for a long time, helping to turn debris and waste into fertilizer that will benefit your plants. There are several types of structures, consider the design of each of them and the manufacturing options.
Compost pit in the soil
To create a compost pit in the ground, you must:
- Choose the right place.
- Remove the top layer of soil of any length, 1.5 m wide.
- Deepen 0.5m.
- Pour a sand pillow so that excess water is drained from the bottom.
- Cut branches (for drainage and aeration of the heap);
- Grass;
- Dry leaves;
- Sawdust;
- Food waste;
- Manure;
- Weeds.
Sprinkle soil or peat between layers and spill water. If you need to speed up the process, you can chop it with a shovel before stacking all the contents.
The pile should rise a maximum of one meter from the ground, its total height will be 1.5 m. From above you need to cover with something, you can slate. When the temperature outside is very high, water should be used.
In just two seasons, the whole pile will turn into fertilizer under the most normal conditions. This method is the most economical and simplest.
Additionally, EM preparations can be used. In order to process waste to microorganisms in the pit, a temperature of +4 degrees is enough.
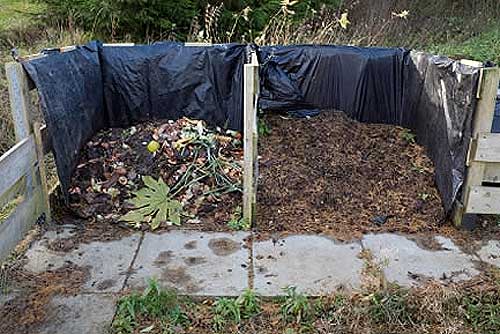
Compost pit made of boards
A compost box is made from the boards for ease of use and acceleration of the disposal process. The size 1 * 1.5m is the most convenient and suitable for these purposes.
Phased construction of a structure made of boards:
- Determination of the location.
- Markup.
- Removing the top layer of sod 10 cm thick.
- In the corners, you need to dig in copper pipes, insert bars that will serve as supports. If necessary, they must be supported.
- Wood materials to be used are recommended to be treated with protective agents. When rotting, substances are released that will damage the boards.
- It is necessary to choose boards stronger and fix them with self-tapping screws. A distance of up to 5 cm is left between the boards so that the air can pass in a heap.
- A distance of about 30 cm is left below, so that ready-made fertilizers can be selected, and new ones will be reported from above.
- As an alternative to boards, construction pallets are used. They can be connected together or disassembled into separate boards, from which you can build a box.
- It is necessary to take care that the pit is covered from heavy rainfall and bright sun. To do this, you can make a convenient lid on which to adjust the handle. It will be convenient to fix it on the back wall.
It is necessary to put the contents there through the top, and from the bottom to get ready-made fertilizer. The order remains the same as when laying a hole in the ground.
Slate Compost Pit
 One of the positive properties of slate is its strength. The material will not suffer from decay of the contents. You can choose the one that is convenient or available.
It can be either flat or sheet version.
How to make a composter:
- Make markings and deepen the sheets prepared in advance. From the outside, they are fixed with a crate made of wood or metal.
- A more durable option would be to use deep metal pipes in the corners, to which a frame made of bars is attached and sheathed with slate.
If there are wooden parts, they are covered with special products so that they do not rot under the influence of the contents. The cover can be made from plywood or boards. In such a device, the front wall is made 2 times lower than the others. You can also use a film or cover material, because it is very convenient to fix them on solid foundations.
Compost pit made of corrugated board
There is one plus in using corrugated board for making a compost box - you can immediately choose a material that is not afraid of corrosion.
How to make the construction correctly:
- Choose a location and make a base. You can use metal or wood.
- The size of the box can also be adjusted to the size of the sheets. In it, if desired, you can build several sections.
- The base is made according to the same principle as in a wooden box.
- The corrugated board is fixed from the outside, self-tapping screws with gaps of 3-5 cm are used for this.
- The top is made of boards or plywood. It is possible to coat the frame with a protective compound to extend its life.
Advice! In the warm season, the metal gets very hot, so you need to monitor the moisture level in the contents.
Wire mesh compost bin
 You can also make a waste container from a metal mesh. Then you need to make it in the form of a cylinder. The undoubted advantages of this design are that air gets into it well, the contents are ventilated, and not rotted. These structures are easy to manufacture, lightweight, can be transported and assembled.
Procedure:
- The net should be of the required length and with a 20 cm margin for entry.
- Wrap or garden textiles must be the same size.
- You can fasten the mesh with wire, put textiles or film inside.
- To make the structure more stable, it is strengthened from the outside with beams. Sometimes they are added in drops.
- Secure the edges of the material that is lying on the bottom from the outside with simple stationery clamps.
To simplify the task, you can use huge garbage bags. You can use special bags available from gardening stores. They fill it according to the same general principle, starting from the branches.
Compost pit made of concrete
 This pit has several advantages:
- its walls will maintain the required temperature for a long time;
- she is not afraid of any environmental influences;
- she is not afraid of excessive moisture or sun.
If you make such a pit with several departments, then the use will be much more convenient and practical. For example, in one compartment there is compost from one season, in another from the next, and in the third - ready-made fertilizer.
Procedure:
- The pit should have a proportion of 1.5m * 3.5m already in finished form. A depth of 70cm will be the most comfortable.
- It is necessary to make the formwork, leaving a distance of about 15 cm to the edges of the pit. You can use plywood or boards.
- The walls of the finished structure should be 40 cm higher than the ground level.
- The iron mesh is installed inside and poured with concrete.
- To make concrete, cement, screenings and crushed stone are needed in a proportion of 1 * 3 * 3.
- You can tamp it with a shovel or fittings so that there are no voids left in the walls.
- The formwork is removed when the concrete has hardened to the end, after about 14 days.
- As a cover, you can use a special covering material or wood.
It is worth remembering that when using a concrete pit, the process does not go very quickly. To speed it up, you can purchase special products and manually add earthworms.
Conclusion
There are no particular tweaks to the construction of a compost pit. The materials that are used are in any garden or cottage.
The benefit of a compost pit is that household and household waste will be disposed of in it.
When the compost pit is arranged correctly, fertilizer is formed in it, which does not contain any harmful substances, it is environmentally friendly. Its use will increase yields. Rational use and an economic approach will help to reduce material costs and improve the environmental situation.
To achieve the best result in the manufacture of a compost pit or box, you can use the tips from the article, read more about the photo and video of the manufacture.
Watch the video! How to make a compost pit yourself
To connect plumbing fixtures to the water supply network, a flexible water pipe is used. It is in demand when connecting mixers, showers, toilets and other points of water intake, and greatly simplifies the installation process. Flexible hose is also used when installing gas equipment. It differs from similar devices for water in manufacturing technology and special safety requirements.
Characteristics and types
Flexible hose for connecting plumbing is a hose of different lengths made of non-toxic synthetic rubber. Due to the elasticity and softness of the material, it easily takes the desired position and allows installation in hard-to-reach places. To protect the flexible hose, there is an upper reinforcing layer in the form of a braid, which is made of the following materials:
- Aluminum. Such models can withstand no more than +80 ° C and remain functional for 3 years. At high humidity, the aluminum braid is prone to rust.
- Of stainless steel. Thanks to such a reinforcing layer, the service life of the flexible water hose is at least 10 years, and the maximum temperature of the transported medium is +95 ° C.
- Nylon. This braid is used for the manufacture of reinforced models that withstand temperatures up to +110 ° C and are designed for intensive use for 15 years.
As fasteners, nut-nut and nut-union pairs are used, which are made of brass or stainless steel. Devices with different allowable temperatures differ in the color of the braid. The blue ones are used to connect to the cold water pipeline, and the red ones are used with hot water.
When choosing an eyeliner for water, you need to pay attention to its elasticity, reliability of fasteners and purpose. It is also mandatory to have a certificate that excludes the emission of toxic components by rubber during operation.
Features of gas connections
When connecting gas stoves, columns and other types of equipment, flexible hoses are also used. Unlike water models, they are yellow and do not pass environmental testing. End steel or aluminum reinforcement is used for fixing. There are the following types of devices for connecting gas appliances:
- pVC hoses that are reinforced with polyester thread;
- made of synthetic rubber with stainless steel braid;
- bellows, made in the form of a corrugated stainless steel tube.

Holding "Santekhkomplekt" offers engineering equipment, fittings, plumbing and accessories for its connection to communications. The assortment is represented by products and materials of well-known foreign and domestic manufacturers. Discounts apply for bulk purchases, and the quality of products is confirmed by certificates of the established form. For informational support and assistance, a personal manager is assigned to each client. The ability to arrange delivery within Moscow and to other regions of the Russian Federation allows you to quickly receive the purchased goods without unnecessary hassle.
Drainage - irrigation and drainage measures to remove excess groundwater.
If water does not leave the site for a long time, the soil gleys, if the shrubs and trees quickly disappear (soak), you need to urgently take action and drain the site.

Reasons for waterlogging
There are several reasons for waterlogging:
- clayey heavy soil structure with poor water permeability;
- the aquiclude in the form of gray-green and red-brown clays is located close to the surface;
- high occurrence of groundwater;
- man-made factors (construction of roads, pipelines, various objects) that impede natural drainage;
- violation of the water balance by the construction of irrigation systems;
- the landscape plot is located in a lowland, a ravine, a hollow. In this case, precipitation and water inflow from higher places play an important role.
What is the risk of excess moisture in the soil
You can see the results of this phenomenon yourself - trees and shrubs die. Why is this happening?
- the oxygen content in the soil decreases and the carbon dioxide content increases, which leads to a violation of the processes of air exchange, water regime and nutrition in the soil;
- oxygen starvation of the root-forming layer occurs, which leads to the death of plant roots;
- the intake of macro and microelements by plants (nitrogen, phosphorus, potassium, etc.) is disturbed, because excess water washes out mobile forms of elements from the soil, and they become inaccessible for assimilation;
- there is an intense breakdown of proteins and, accordingly, putrefaction processes are activated.
Plants can tell you where the groundwater is.
Take a closer look at the flora of your site. The species inhabiting it will tell you at what depth the groundwater layers are located:
- top water - in this place it is best to dig a reservoir;
- at a depth of 0.5 m - marigold, horsetails, varieties of sedges - vesicular, holly, fox, Langsdorf reed grass grow;
- at a depth of 0.5 m to 1 m - meadowsweet, canary grass,;
- from 1 m to 1.5 m - favorable conditions for meadow fescue, bluegrass, mouse peas, ranks;
- from 1.5 m - wheatgrass, clover, wormwood, plantain.
What is important to know when planning the drainage of the site
Each plant group has its own moisture needs:
- at a depth of groundwater from 0.5 to 1 m, vegetables and annual flowers can grow in high beds;
- the depth of the water layer up to 1.5 m is well tolerated by vegetables, cereals, annuals and perennials (flowers), ornamental and fruit and berry bushes, trees on a dwarf rootstock;
- if the groundwater is at a depth of more than 2 m, fruit trees can be grown;
- the optimum depth of groundwater for agriculture is from 3.5 m.
Do you need drainage of the site
Write down your observations at least for a while. You yourself can understand how much drainage is needed.
Maybe it makes sense to just redirect melt and sedimentary water along a bypass channel, rather than letting them flow through your site?
Perhaps, it is necessary to design and equip a storm drain and improve the composition of the soil and this will be enough?
Or is it worth making a drainage system only for fruit and ornamental trees?
The exact answer will be given to you by a specialist, whom we strongly recommend to call. But after reading this article, you will gain some awareness of this issue.
At the end of the technological and production tasks related to the arrangement of the sewer system in an apartment building, an industrial building, as well as in a private household, it is required to test the involved system by the forced spill method. This task was applied to identify possible defects or improper installation of the entire sewer part involved, and the test report for internal sewerage systems and gutters will be material evidence of the acceptance of the facility.

Visual inspection should be accompanied by the introduction into the certificate of testing of internal sewage systems and gutters according to SNIP, which is currently represented by the current regulations of the series "D" appendix, which corresponds to SP 73.13330.2012 "Internal sanitary-technical systems of the building", recently a new one has been applied updated working edition for SNiP 3.05.01-85.
Compost can significantly improve the soil, regardless of its type. If it is clay, it will become more crumbly, but if it is sandy, it will be better to retain moisture. But the price for it is quite high, and the costs will also be for the delivery of compost to the site, so people began to make compost pits themselves to fertilize the soil, but at the same time save money. In any home, a large amount of organic waste accumulates, so why throw it away when you can equip a pit, and this waste will benefit the soil. In the article, we will consider how to make a compost pit with your own hands in the country and how to properly operate it.
- The size of the pit should be made based on the approximate amount of garbage that can accumulate in a year, and then rot for at least one year.
- The process of removing humus and mixing it should not be complicated, therefore the height of the walls has its own limitations.
- The pit can be made both open and closed, one or two-section.
- Weeds and their seeds should not enter the compost.
- Worms should freely penetrate the contents of the compost pit.
- It is necessary to equip a convenient approach so that there are no difficulties with the removal of humus.
- You can put iron on the bottom, which over time will also benefit the compost.
- The smell from the closed compost pit should not seep out.
- The compost pit should not be in direct sunlight.
Compost pit technology
How to make a simple compost pit

The device of a compost pit depends on its future purpose, if it is equipped simply for the disposal of organic waste, then it can be done according to the simplest scheme.
- A hole is dug about 40-60 cm deep and 60-70 cm wide;
- a layer of dry grass, straw is laid on the bottom;
- after each waste disposal, a layer of grass is again laid on the waste. This is necessary so that flies do not get divorced, and there is no unpleasant smell;
- such a hole should be made somewhere in a remote part of the site, but not near the fences of neighbors.
DIY concrete compost pit

- This is a more labor-intensive structure. It consists of two equal compartments, one of which is for old compost and the other is used for regular replenishment. This design has a cover that rises when necessary to collect fertilizer or throw away waste.
- To make the compost of high quality, it is better not to use weeds for its preparation, they can leave harmful seeds in the soil.
- It is necessary to provide access to the closed composter for earthworms, otherwise the compost will mature much longer.
- In addition, it must be equipped in such a way that it looks like decoration on the site, has a neat appearance. But at the same time, ventilation must be present, therefore, it is not recommended to plant with climbing plants with dense foliage.
Work stages

The process of constructing such a compost pit is quite laborious.
- It is necessary to completely level and remove the topsoil;
- then a hole breaks out, about 60-80cm deep. The optimum length is 3m and the width is 2m;
- then the formwork is built, and the walls are poured with cement mortar or concrete, the thickness of which should be about ten centimeters.
Advice: for the correct construction of a closed compost pit, it is necessary to prepare a concrete solution, observing all the rules. It seems that there is nothing difficult in this, but in practice it often turns out the opposite. In order to avoid problems, and then do not have to spend a lot of time fixing errors, it is better to do everything right right away.
The concreted compost pit will have all the necessary properties for the timely processing of the compost if the proportions of all the components from which the concrete is made for its base are exactly observed.
To create a solution, you will need:
- River sand,
- Gravel,
- Cement,
- Water.
Sequencing:
- first, pour the gravel into a twenty-liter bucket and shake it very well;
- then water is slowly added using a measuring container. If this bucket contains ten liters of water, then the gravel component is 50%, and a two to one ratio is required. This means that another 10 liters of river sand should be added to a twenty-liter bucket of gravel;

- this solution should contain as little water as possible in order to avoid further bubbles. If the composition has a high water content, then after it dries, a large number of voids are formed.
Tip: Another important point in preparing the mixture for the pit is that you need to mix the solution very thoroughly. This is probably even more important than the exact observance of all proportions, so it is recommended to do this with a concrete mixer, and not manually.
A closed-type compost pit can have one section, but it is better to immediately make it with a two-section. In the second case, it is more convenient to use, especially if it is decided not to use drugs to increase the rate of compost maturation.
If the decay process takes place naturally, it will take about two years. Then it is very convenient to use each section separately. The first year you can use one, and when the second year comes, throw waste into the second part. While in one compost reaches the desired state, the other is used.
DIY high compost heap construction

A wooden compost heap is easy to build even without construction experience. Moreover, it can be made so that it will not interfere with either the summer residents themselves or their neighbors.
- Racks should be installed in the corners of the pit. The base for them is made of pipes, and the part that is above the surface of the earth can be made of a bar with a section of 10 cm;
- One edge of each bar is sharpened to fit the size of the pipes. It is preliminarily recommended to impregnate all wooden parts of the structure in a special solution so that they do not succumb to the processes of decomposition and decay;
- Further, the bars are driven into the cuttings of the pipes and transverse boards are stuffed onto their above-ground part, which will serve as the walls of the pit;

- it is better to fasten the boards with self-tapping screws or metal corners, which will provide a more reliable grip;
- finished walls are covered with paint, preferably acrylic.
Of the nuances in this work, it is necessary to consider:
- the diameter of the pipes must match the size of the bars;
- the height of the walls usually does not exceed a meter, this is due to the fact that large and tall structures ultimately turn out to be inconvenient to use, since it complicates the process of digging and extracting compost;
- the simplest version of a removable cover is a regular plywood sheet, which is attached to the rear wall of the structure with hinges. The compost matures best when the lid is closed, but you still need to open it sometimes to ventilate the fertilizer.
What is compostable and what should not be put in the pit
In order for the fertilizer to ripen in time and at the same time not to lose its beneficial properties for the soil, you should know exactly what is suitable for the compost pit.
You can put:
- raw vegetables, fruits, berries, cereals, straw, grass, hay, ash, foliage, needles, bark, branches, plant roots, sawdust, shredded paper, herbivore animal manure.

Do not put:
- bones, excrement of carnivorous domestic animals, tops from potatoes and tomatoes, any greens after treatment with pesticides, weed seeds, any synthetic waste, as well as tops of infected plants.
Correct compost pit

In order for compost to form successfully, it needs certain conditions:
- moisture;
- heat;
- oxygen.
To create a greenhouse effect, the still unripe compost must be watered (especially in hot and dry summers), and, if necessary, covered with foil. Oxygen is also needed for a good reaction, and oxygen is provided by loosening the waste with a fork.
If it is not possible to equip a pit, water it, and so on, then you can simply put organic waste in one place, where compost forms over time. This, of course, is not the best way from the point of view of aesthetics, but it has a right to exist.
- In order for such a heap to be equal in functionality to the compost pit, special preparations must be added to it.
- You will also need to periodically cover with dark material to speed up the maturation of the compost. In a covered pit, the compost will be processed within 3-4 months, but if you keep it open, the process will take about six months or a year.
- It is impossible to put polyethylene at the bottom of the pile, which will block the free access of water and oxygen. If the soil under the compost is covered with synthetic material, then moisture from the heap will evaporate very quickly, and will not be able to rise from the ground.
- When placing the compost contents on a heap, it is recommended to alternate manure, grass, waste and soil whenever possible. During extreme heat, you need to water the pile so that the right amount of moisture comes in and the composting processes are not disturbed.
- It is convenient to make two heaps side by side or one large one, but on two sides, this is a simplified version of a two-section box. When the compost is ready on one side and can be regularly laid out on the beds, waste is thrown out on the other side of the heap.
- When the compost heap reaches about one meter in height, it is advisable to use fertilizer. For this, several deep holes are made and the solution is poured into them. In the warm season, you can add Californian worms to replace them.

Correct location of the compost pit
Before you equip a compost pit in the country, you need to choose the right site for it:
- From sources of drinking water (wells, wells, etc.), the pit should be located at a distance of at least twenty-five meters;
- If the site is located on a slope, then the pit is equipped below the source of drinking water, this is necessary so that rotting runoff through the soil could not get into clean water;
- It is necessary to take into account the most frequent wind direction so as not to cause significant inconvenience to neighbors, especially if the pit is not covered with a lid and exudes strong unpleasant odors;
- There should always be free access to the pit, which will ensure convenient removal of garbage using buckets or removing humus with a wheelbarrow.

- The compost pit is made as far as possible from residential buildings. It should be in partial shade, since under the sun's rays all the processes taking place in it will slow down.
- The site for the location of such a pit must be flat.
- Water stagnation should not be allowed in it - this will interfere with the access of oxygen.
Plastic containers for compost

- This method is good for those who can allocate funds for its purchase and want the appearance of their site to be more presentable. It can be installed absolutely anywhere. But you have to take into account the presence of an unpleasant odor, because you will need to regularly open the lid to ventilate the contents of the container.
- The constant access of oxygen to the compost is provided by special holes also necessary to prevent excess moisture from stagnating.
- The peculiarity of using a plastic container for a compost heap is that it is necessary to use special preparations to speed up the composting process. Earthworms can provide replacement drugs if they are specially planted in this container.
To save money and benefit the site, a compost pit is an excellent fertilizer solution. It is very simple to equip and operate it, you just need to know a few rules. But at the same time, you will always have ready-made fertilizer for the soil on the site.
Photo of the compost pit


Compost pit Is a place for the disposal of organic waste. As a result of the activity of microorganisms, it decomposes garden waste, which becomes the basis for a highly effective organic fertilizer. In the article, we will consider options for making a compost pit with our own hands.
In one form or another, compost pits, in the form of the simplest heaps of garbage, are present on every personal plot. But correct designs in the form of modern composters or specially equipped boxes can increase the amount of valuable fertilizer and the speed of its creation.
The simplest compost pit can be made with your own hands from auxiliary building materials available in the country.
Compost pit construction principles
The main function of the compost pit is to create the most comfortable environment for the life of bacteria, microorganisms, earthworms, the quantity of which determines the speed of the process and the quality of the resulting compost. To do this, a fairly high temperature and humidity must be maintained inside the compost heap with a regular supply of oxygen.
For this, the compost container must have the following design features:

Compost boxes are made from any materials at hand. These can be boards, slate trimmings, corrugated board, metal construction mesh and even car tires. More capital structures are built of brick or concrete. There are also lightweight, portable utilizers in metal or plastic drums.
The main sanitary requirement for the construction of a compost pit is its distance of 20 meters from reservoirs and sources of drinking water. Rain streams should not drain from the compost heap towards wells, boreholes, pools.
Choosing a place on the site for a compost pit
The location of the composter on the site should not become a source of groundwater contamination, a threat to human and animal health. The compost pit should not be located in wetlands or in areas with standing water.

The external design of the compost pit can be absolutely anything. It can be decorated with beautifully painted shields, fenced off with plantings of loach and perennial, ornamental plants.
Making a compost pit with your own hands
In a garden or backyard, you can use the simplest tools to make a quality structure and turn a pile of garden waste and decomposable household waste into valuable fertilizer. There are many different types of compost heaps, from earth ditches to actual concrete structures.
Compost pit in the ground
To create a compost pit:
- In the ground, they select a site away from residential buildings.
- On an area 1.5 m wide and of arbitrary length, the top layer of sod and soil is removed.
- The bottom of the pit should be located at a depth of no more than 0.5 meters.
- The bottom is covered with a sand cushion to drain excess water.
The first layer acts as drainage and aerates the heap and consists of cut branches.
Layers are laid on them:
- cut grass;
- dry foliage;
- sawdust;
- household food waste;
- manure;
- weeds.
The layers are sprinkled with peat or garden soil, spilled with water. To speed up the decomposition process, it is advisable to grind all the ingredients before laying them by simply chopping with a shovel.
The total height of the heap should not exceed 1.5 meters. This means that it will rise 1 meter above the ground. The structure is protected from above with a covering material or a slate shield. In hot weather, the pile is watered with plain water.
Under natural conditions, microorganisms will be able to recycle such a waste dump in two summer seasons. This is the easiest and most economical way to produce compost.
Use EM drugs. Microorganisms need a temperature of + 4 ° C inside the compost heap to successfully process waste.
Making a compost pit from boards
For ease of use and acceleration of the disposal process, the compost container is made of boards. The optimal size of the compost bin is 1x1.5 meters.
Instructions for making a pit from boards:
Garbage is put into such a container through the top according to the general principle, starting with the branches. And you can rake out the finished compost from the bottom.
Photo: drawing of the compost box, diagram of the composter
Compost pit options made from planks
The slate is durable and will perfectly fit the walls of the compost bin. You can use both wave and flat sheet slate.
 Options for making a slate composter:
- At the location of the compost heap, markings are made and deepen the cut to size sheets. They can be secured with external, wooden or iron crate.
- Alternatively, metal pipes are buried in the ground.A frame made of bars is attached to them. Outside, it is sheathed with slate. The second design is more durable.
All wooden elements should be treated with an antiseptic to prevent decay. A pit cover is made of plywood or boards. The front wall of the pit is made lower, at a level of 40-50 cm above ground level. Rigid walls allow you to cover the pit with foil or garden cover material.
Compost pit made of corrugated board
When making a compost bin from corrugated board, choose a material with an anti-corrosion coating.
Work order:
- At the chosen place, a base is built from a metal or wooden bar.
- The size of the pit is selected for the length of the sheets, which allows you to make a compost bin with two or three compartments.
- The base is made, as for a wooden structure.
- Outside, the profile strips are fastened with self-tapping screws with gaps of 3-5 cm.
- It should be borne in mind that the metal surface gets very hot during hot summer periods.
- A cover of their plywood or boards is made from above. It is desirable to cover the frame with a protective compound.
Wire mesh compost bin
To make compost, you can make a cylindrical container from a metal mesh. In such a cylinder, the compost is well ventilated and does not rot.
How to make a compost bin:

To simplify, you can put a large-volume plastic bag (polyethylene) inside the basket, which is used for garbage. These baskets are easy to assemble and install anywhere. They are filled with waste like a compost pit. Also, compost can be made in special bags, which are sold in garden centers.
Concrete compost pit
A concrete compost pit has many benefits:
- Thick walls maintain a positive temperature for a long time.
- Such a pit is durable and reliable, not affected by adverse environmental conditions.
It is desirable to make it large, into two or even three compartments. In the first and second blocks, the compost of different seasons will mature. In the third, bags with ready-made compost are stored.
How to make a concrete compost pit:

When operating a concrete pit, it must be taken into account that the composting process is slowed down. To speed up the process, you need to manually add earthworms or commercially available special products to it.
Other compost pit material options
Compost pit from car tires
Car tires are quite suitable for arranging a compost heap:

Compost in an iron barrel
Old iron drums are great for composting:
- We cut both bottoms with a chisel and place them near the path.
- We put weeds, grass cuttings, kitchen waste into the barrel.
- To raise the temperature, you can paint the barrel black, pour the compost with a solution of ammonium nitrate (a matchbox on a bucket of water).
- We take out the finished compost from below. To do this, lift the barrel with a crowbar.
To improve the design:
- Using a grinder (angle grinder), you need to cut the barrel into two unequal parts and punch holes in the walls for air circulation.
- Then we put them on the priest and connect them with wire or rope. Cover with a lid on top.
- The advantages of this design are the easy accessibility of the contents of the barrel for worms and bacteria from below.
- To get ready-made compost, you just need to untie the rope, and you will receive two hundred liters of ready-made fertilizer.
Compost in a plastic barrel
 The ideal compost bin material is plastic... In conventional compost heaps, the compost takes two years to prepare. In plastic drums with a capacity of 150-200 liters, you can prepare liquid compost in two weeks.
For this:
- We fill the barrel with cut grass or weeds up to half, and fill it with water to the top.
- After about three days, the fermentation process will begin.
- After using the solution, you can add water to the barrel again and let it brew for one week.
- Having used up the liquid compost completely, the remaining grass is piled into a compost heap.
Compost pit made of brick
The brick compost pit is made in three walls. It can be done with or without cement mortar. On cement mortar, the compost pit is made no more than 1 meter high. Ventilation slots should be left between the bricks.
A compost pit made of bricks without a cement bond is convenient because it can be moved to another place if necessary.
In the compost pit, provide a place for throwing the compost mass. Make a lid from an available material. The front wall is made temporary so that it is convenient to take out the finished compost.
Compost pit made of concrete rings
In the inner cavity of the concrete ring, garden waste can be successfully stored and as a result compost can be obtained. For convenience the ring is partially buried in the ground, and after filling, cover with a lid or film material.
The disadvantages of the design include the absence of a lowered front wall. To unload the finished compost, you need to climb inside. Otherwise, very durable compost chambers are obtained from such reinforced concrete products.
Finnish compost pit
 If you don't want to make a compost pit, you can purchase a composter using Finnish technology. It is modern with two containers, with a capacity of 80 liters. Its contents are mixed with a layer of peat and sawdust. You can also recycle food.
When the container is full, take it out and insert another. Due to the high concentration, the finished compost is mixed with earth or sand and fertilized with plants. The freed container is washed and returned to its place.
A compost pit and a cesspool should not be confused. Organic matter from the garden plot is stored in containers for composting. The remains of protein foods should be disposed of in a sump.
What can and cannot be placed in the compost pit?
Composting reduces waste in landfills and provides our vegetable gardens and orchards with additional fertilization.
 In the compost pit, first of all, organic garden waste is laid, in the form of:
- branches;
- dry foliage;
- cut grass;
- weeds;
- straw.
Good ingredients for a compost heap are:
- food leftovers from vegetarian food;
- eggshell;
- onion peel.
You can transfer compost with manure and chicken droppings.
The prohibited ingredients of the compost heap are:
- construction and household waste with a high content of phenols;
- remnants of printing products;
- plastic.
Protein and oily food residues are not put into the compost, as they decompose slowly and attract mice and rats.
From plant residues, weeds with ripe seeds and roots that can take root well are not put into the compost, such as:
- sow thistle;
- wheatgrass;
- loach.
Drought-resistant plants must be dried before being placed in the compost heap so that they lose their ability to root. Sawdust can be used in moderation as it slowly decomposes and takes up nitrogen. And also do not use the feces of domestic animals and humans for composting.
Compost pit preparations
The main task of preparations containing biological activators is to accelerate the decomposition processes with the help of microorganisms.
The preparations do an excellent job with the processing of organic matter and do not allow pathogenic microflora to develop in the compost pit:
- Composting can be significantly accelerated by using "Baikal EM"... This preparation contains effective microorganisms (EM).
- The drug "Doctor Robik" significantly increases the number of effective microorganisms (EM) in compost. They are engaged in the processing of organic matter into humus, and also prevent the development of pathogenic microflora and destroy the larvae of harmful insects.
- The bioactivator has similar properties. The package of the Green Master bioactivator must be diluted in 20 liters of warm water, let it brew for 4 hours and water the compost heap. After 2 weeks, you need to turn the heap with a pitchfork. To prepare compost, one treatment with a bioactivator solution is enough.
- Good results are obtained by the drug "Compost Boost" for composting.
- Manufacturer Happy Summer Resident produces "Biocompostin" - a composting agent. Sanex Plus produces EcoCompost.
- The manufacturer Deson Bio K produces several types of drugs: "Green universal", "Compost of one season", "Compost for the next agricultural season", "Bioactivator for compost".
Using the preparations, you can significantly speed up microbiological processes and get compost in 2-3 months.


Compost bioactivators
Compost pit operating rules
After the construction of the compost bin and its filling, it remains to occasionally look inside and, depending on the changes taking place, correct the decomposition process.
Tips for using the composter:
- During dry periods it is necessary to water the compost with plain water, preventing it from overheating, which leads to a reduction in the population of some types of beneficial bacteria.
- Loosen the compost heap at least once every two weeks, thereby ensuring the flow of oxygen into all, even the lowest, layers.
- Add Effective Microorganisms to the compost content in the form of solutions and various additives.
- To speed up the processes, you can add ready-made compost substrate, which contains a full range of microbiological activators.
- If the pit structure does not have a top cover, then simply tighten the top with black garden cover material, which will increase the temperature and greenhouse effect inside the structure.
Summarizing
The creation of a compost pit does not require serious material investments. You can make it with your own hands from scrap materials, which are always enough on any personal plot.
Having spent a little time making a compost pit, in the future you will not have to solve the problems of disposal of garden and household waste.
For any gardener, compost is the best and most affordable fertilizer, because it can be prepared on your own using organic waste.
There are many options for preparing a compost heap, I must say that the imagination of our summer residents knows no bounds. A good friend of mine once said that she does not throw anything out of the plot, everything goes into action and feeds the earth.
Passing the plots, you can see a wide variety of examples of filling in a compost heap or pit, a variety of options are used, ranging from wooden boards, ending with parts from furniture, a fine mesh netting, slate and metal sheets.
In order to competently prepare high-quality compost, it is not enough to dump everything that comes to hand in one place, you need to know some rules, which we will get acquainted with in this article. Experienced gardeners shared their skills in composting, based on their experience this material was written.
We know that during the summer season, a large amount of waste material from organic waste accumulates, which includes food residues, and weeds and mown grass, which are constantly removed from the beds and lawns.
All this waste should be disposed of in one specific place, in a compost heap, which in two to three years will give you a high-quality product in the form of excellent fertilizer.
Along the way, this will help get rid of unnecessary plant materials, your site will be clean and tidy, the waste will not have to be taken far outside the garden.
The decomposition of plant waste naturally occurs for about 20 months, but if the process is artificially accelerated, then it is possible to achieve the result in three months.

What you need to know about compost
Nutrient fertilizer can reach its condition if it is warm and humid. Preparing the place of its "production", providing a bunch of all the necessary requirements - the main task of the gardener. Enough oxygen will not produce a stinking pile of waste, but a true universal fertilizer.
- You need to make sure that the main part of the heap is located above ground level. So the contents will be perfectly warmed up, provided with air. It will be convenient to water and loosen it. The depth of the pit should be no more than half a meter, and the surface part up to a meter. In width, the ideal parameters will be: 1.5X2 m.
- If there is a source from which water is used for drinking: a well, a well, a spring, a territorial gap of at least 20 m should be taken into account. For greater confidence, when the site slopes, make a hole lower.
- Close up a pile of waste should be away from the house or recreation area, since an unpleasant smell will spoil the air and mood not only for the owners of the site, but also for the neighbors. You need to approach this issue responsibly, and choose a place that would suit everyone.
- To prevent the pile from drying out, do not place it in a sunny area. It is good if it was in partial shade, then the moisture necessary for the decay process will not quickly evaporate.
- In no case should the pit be near fruit-bearing trees, this is fraught with their death.
Important! The bottom of the pit should not be made of any material: slate, iron, film. The compost heap should have an earthen bottom so moisture from the ground will rise up and the contents will not dry out. Any of the listed materials are suitable for the walls.
What can be added to the compost heap
A good, high-quality compost will be obtained by laying in a pile of the following components:
- fallen leaves, needles, plant roots and small branches and stems;
- cut grass and weeds;
- manure and droppings that are more than two years old;
- cleaning vegetables, fruits, berries, peels of any fruit;
- leftovers from food, coffee and tea;
- hay, straw, sawdust and other small waste from wood;
- wood ash;
- waste paper, cardboard.
Important! Grass, which is laid in large quantities, is best covered with soil.
What is contraindicated for a compost pit:
- any items of inorganic origin made of plastic, polyethylene, metal and synthetics;
- bones;
- stems from potatoes and tomatoes, due to late blight infection;
- large branches and ripe weed seeds.

Compost heap making options
There are a large number of options, and each gardener chooses the most acceptable and effective for himself.
A simple pile of layers of waste
First, decide on a place, and start laying organic matter in layers, alternating with manure and food waste. After the slide grows one meter, make depressions in it, into them you should pour a special liquid for the quickest maturation of the compost.
Such preparations are sold in horticultural centers and shops, they contain bacteria that, when they enter the organic environment, begin to work and process it.
If you do not forget to loosen the waste, then the maturation of the compost will come in three months. That is, having laid a heap in the spring, by the end of summer you will be with compost.
For those who do not want to build a permanent compost facility, this is ideal. It is desirable that there are several such places, then you can achieve constant replenishment of your site with fertilizer.

A hole dug in the ground
In this case, everything is also simple. A hole is dug in the soil, the size of which depends on your appetite. Branches, remnants of bark, straw, hay are placed on the bottom, then a layer consisting of remnants of food and plants is laid. Then a layer of manure, and a repetition of the vegetative layer.
In such a structure, the temperature will not reach high rates, so the pit is covered with a film. This option is suitable for those who are not in a hurry, since the compost will not mature soon. But there are also advantages - a simple device and a small area.
Box of bars, slate, boards or metal
This method is used by many gardeners, and pays off 100%. However, the preparation of the box will require small material costs and some effort to equip it.
- First of all, at the site of the future compost pit, soil is removed, about 50 cm.
- Bars or pegs should be driven in along the entire perimeter of the recess.
- Next, a fence is made, for which any material is suitable: boards, bars, boards, mesh, polycarbonate, metal sheets, slate of any shape. The main thing is that the material does not bend or break under the weight of waste.
- The height above the soil surface should correspond to one meter. This height will allow you to loosen and mix the contents without any problems.
- From above, the structure is closed with a film or plywood sheet.

Wooden box with door
For convenience, you can build a door in the box, at a distance of 50 cm from the ground. This option allows you to select the finished compost from the bottom, while the top layer settles.
Ease of use, as well as the ability to take the required amount of ready-made fertilizer - these are the main advantages of boxes in sliding or lifting doors.
A pit made of concrete or brick
This design is durable, it will require significant costs and labor. The area for the compost heap is marked out taking into account the impossibility of transferring to another place.
- The soil is selected to a depth of 70-80 cm;
- It is necessary to make formwork around the entire perimeter of the pit;
- After the concrete is mixed, it is poured into the formwork, 10-12 cm thick;
- Wooden formwork is removed as the concrete dries;
- The concrete pit is filled with waste and covered with a membrane or wooden board.
Important! It is very important to have two or more sections in each of the proposed structures. One will serve as a compartment for fresh waste, and the other will be intended for last year's compost. Thus, you will have a nutritious substrate for plants and soil every year.
Other compost heap options
The most advanced gardeners, who have funds that make their work much easier, purchase ready-made biocontainers for the production of compost. They use preparations with accelerated action for the processing of organic matter based on special bacteria: Baikal EM -1, Kompostin, Embionik.
Many gardeners add Californian worms, these creatures are extraordinarily efficient and each works like a mini-composting plant.

Remember, complete compost requires air, water, heat and clean organic matter. Only in the presence of these components will you receive high-quality and free fertilizer.