When planning the construction of a country cottage, the owner has to solve the difficult issue of choosing floors. Some contractors advise him to use reinforced concrete panels, others insist on using wooden beams as a ceiling.
We decided to help beginners get out of a difficult situation. In our article you will find an overview of the advantages and disadvantages of wooden floors.
Useful tips for their installation and important nuances of this work will also not be superfluous. We hope that the information received will be useful to you at the construction site and help you avoid serious mistakes.
There is a stereotype in the minds of citizens that precast concrete panels are the only possible solution for any building. It is not difficult to overcome it.
It is enough to list the advantages of wooden beam ceilings:
- Minimum cost (1 m3 of timber is several times cheaper than 1 m3 of hollow core panels);
- The load on the walls is 2-3 times less than from the panels. This allows you to significantly reduce the consumption of reinforcement and concrete when laying the foundation;
- On small spans (up to 4 meters), wooden beams can be laid manually using the simplest devices (winch or lifting block). Mounting heavy slabs without a powerful crane is an unrealistic task;
- Low labor intensity and high speed of work (compared to pouring a monolithic reinforced concrete floor);
- Environmental friendliness (granite gravel is used in concrete, the radiation background of which can significantly exceed the norm).
As you know, there are no advantages without disadvantages. There are few of them for wood floors:
- Increased deformability. It manifests itself in the effect of vibration when walking and the formation of cracks at the junction of plasterboard partitions;
- Low fire resistance (without special impregnation);
- Relatively small length (does not exceed 6 meters). For reinforced concrete panels, it reaches 7.2 meters.
Among the shortcomings of these designs, some authors of feature articles include the formation of cracks in the plaster of the ceiling and poor impact sound insulation. However, with a competent approach to installation, these two problems are solved simply and reliably. To do this, a number of less thick beams are laid below the load-bearing beams, specially designed for filing the ceiling (drywall, OSB, lining, board).

The hemming beam, like the main one, is placed on the wall, but lower, and the ceiling cladding is attached to it. This solution is not common, although it is competent and its history dates back more than one century, in addition to cutting off the structural noise of the second floor, this option eliminates cracks in the ceiling. They appear in the case when the beam serves as a support for the floor of the second floor and at the same time the ceiling of the first floor is hemmed to it. From vibration and shock load, cracks appear in the finish.
Applications and calculation of wooden floors
- in buildings built of wood (frame and chopped);
- in country houses designed for summer operation;
- in outbuildings (sheds, baths, workshops);
- in prefabricated prefabricated houses.
In addition to the listed options, wooden structures for interfloor ceilings can be used in cottages intended for year-round use. Only in this case, you need to use the two-row beam installation system, which we described above.
We do not recommend selecting the cross section of the timber according to the principle “the thicker the better”. There is a simple calculation method taken from building codes.
According to it, the height of the wooden beam should be at least 1/25 of the span to be covered.. For example, with a 4-meter distance between the walls, you need to buy a sawlog with a section height (H) of at least 400/25 = 16 cm with a thickness (S) of 12 cm. To create a margin of safety, the found parameters can be increased by 2-3 cm .
The second parameter that you need to choose correctly is the number of beams. It depends on their pitch (the distance between the central axes). Knowing the cross section of the beam and the size of the span, the step is determined from the table.

Table. Beam spacing selection
The calculated load of 350-400 kg / m2 indicated in the table is the maximum for the second floor. If it is not residential, then its value will not exceed 250 kg / m2.
When planning the layout of the beams, you need to take into account that the two extreme ones should recede from the end walls by at least 5 cm. The remaining beams are distributed evenly along the walls (in accordance with the selected step).
Stages and features of installation
Technologically, the device for overlapping wooden beams cannot be called complicated. The main attention should be paid to the alignment of the beams horizontally and the quality of embedding their ends into the wall array. You can’t just put the bars on the masonry and lay them with bricks. It is necessary to provide them with a reliable connection with the walls and qualitatively protect the wood from decay.
Options for sealing beams, depending on the material of the masonry, the type of wall structures (external, internal, chimney) and the methods of their fastening are shown in the figures.

The length of the supporting part of the beams in a brick and block wall should be at least 16 cm (in a wooden 7-8 cm). If paired boards placed on edge are used instead of timber, then they are embedded in the masonry by at least 10 cm.
The side parts of the beams in contact with the wall are wrapped with 2 layers of glassine or 1 layer of roofing felt. Experienced craftsmen cut the ends of the bars at an angle (60-70 °) and leave them uninsulated, while not forgetting to treat them with an antiseptic composition on a par with the rest. This ensures the "breathing" of wood wrapped with waterproofing.

When installing the ceiling on the sides of each beam, small gaps (3-5 cm) are left, filled with mineral wool or tow. A heat insulator is also placed in the space between the end of each beam and the wall. This eliminates the "cold bridge" that occurs by reducing the thickness of the masonry.
When constructing ceilings in walls made of aerated concrete and wood concrete blocks, it is recommended to use an open seal. In this case, the ends of the beams are also cut at an angle, antiseptic and pasted over with roofing paper on mastic, leaving the ends free.

The outer wall of the nest is insulated with felt or mineral wool and a box made from pieces of an antiseptic board is inserted into it. Its height is chosen such that an air gap (2-3 cm) is formed above the beam. Through it, water vapor accumulated in the wood will exit into the room in the plinth area. This solution protects the supporting part of the beam from decay.

In practice, developers most often use a simpler method of embedding without the use of insulation and a wooden box, closing the logs with block cuts or just a raster.
The floor bars are supported on, which is used to increase the spatial rigidity of the block masonry.

In the internal load-bearing walls, the beams are sealed in a closed way. To increase the rigidity of the overlap, they are connected to each other through three steel anchor plates.

The section of the beam adjacent to the smoke channel is insulated with asbestos or other non-combustible material. The main protection against fire here is brick cutting (thickening of the pipe masonry) 25 cm thick.

In wooden houses, the installation of beam ceilings is carried out in two ways:
- Cutting into log crowns;
- Through a steel shaped plate (high chair), fixed to the wall with threaded rods.

Installation of the ceiling by cutting into the walls

The option of installing beams on "chairs"
If the upper floor or attic is not residential (heated), then it is necessary to perform the insulation of wooden floors. To do this, a heater (mineral wool, ecowool) is laid in the space between the beams, having previously spread a layer of vapor barrier over the ceiling filing.
Styrofoam should not be used for this work for three reasons:
- It does not let water vapor through, and the wood under it rots;
- Does not isolate impact noise;
- It is problematic from an environmental point of view.
The design of the insulated floor is shown in the diagram.

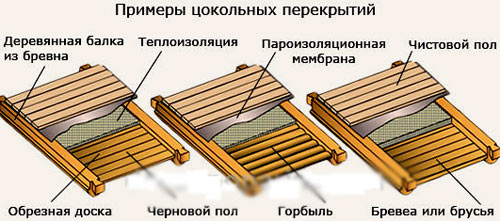
Similarly, the insulation of the floor of the first (basement) floor is performed. The difference between them is that it is quite difficult to hem beams from below from a shallow underground. In this case, the builders act differently. To the side faces of the beams, they knock out a cranial bar (5x5 cm). An antiseptic boardwalk is laid on it. It serves as a support for slab insulation, placed in the gaps between the bars. A vapor barrier is placed under the mineral wool. A vapor barrier is also laid on top of the beams. After that, logs are attached to them and a finishing floor is already mounted on them.
The mineral wool slab should be placed between the bars as tightly as possible to prevent blowing through the floor. For better insulation, all joints of the insulation are treated with mounting foam.

The control of the horizontal installation of the bars is carried out using a bubble level laid on a flat long board. For leveling use cutting boards, protected by bituminous mastic. They are placed under the ends of the bars.
Vapor barrier sheets should be laid with an overlap of at least 10 cm and all joints should be glued with construction tape.
To reduce impact noise, soundproofing tape 5 mm thick is laid on the beams before installation of the second floor floor joist. A waterproofing film under the logs is placed only if the second-level room is residential. It will protect the insulation from water ingress when washing the floor. The technology of its installation is similar to the installation of vapor barrier.
The final stage of the wooden floor device is the installation of a subfloor from boards, plywood or OSB boards using self-tapping screws. After the completion of this work, a fine coating of laminate, linoleum, parquet is laid and the ceiling is finished.
Private low-rise construction has become increasingly popular in recent years.
Do-it-yourself country houses and summer cottages occupy an increasing share in the total volume of housing being put into operation.
 The most demanded material in private construction is wood, due to its affordable cost and ease of processing. But not all individual developers have sufficient experience and knowledge to independently carry out the entire range of construction work. So, the question often arises of how to properly lay the floor of the second floor in compliance with all building codes and technologies.
Construction requirements for wooden floors
In order to mount a durable and safe wooden floor between the 1st and 2nd floors with your own hands, you must strictly comply with the technical requirements for them.
Thermal insulation layer
 Thermal insulation of the floor will improve the temperature in the room on the second floor
 If the wooden floor will separate the upper and lower rooms with a temperature difference between them of more than 10 ° C, it will be necessary to build a heat-insulating layer.
This is necessary, for example, when arranging ceilings between the first floor and the underground, basement or between the first / second floor and an uninsulated attic.
Beam strength
 Beams and ceilings must withstand up to 180 kg / sq.m of load
 When constructing the floor of the second floor on wooden beams, special attention should be paid to the strength of the supporting structures. The safety of the operation of the building depends on how durable the wooden beams of the floors are.
According to building codes for wooden low-rise buildings, the maximum load on the floors of the first floor should not exceed 210 kg per sq.m., the pressure on the wooden floor of the second floor should not exceed 180 kg / sq.m., and for attics and attics this figure should be less than 105 kg/sq.m.
Maximum deflection
In addition, building codes also impose requirements on the deflection of wooden floor beams. According to SNiP, this coefficient should not exceed 1 to 250. That is, the maximum deflection of wooden supporting structures during operation should be less than 4 mm per meter of beam length. 
According to this standard, the deflection of a beam structure 4 m long in the center should not be more than 1.6 cm (4 m: 250 = 0.016 m). If it is planned to place massive furniture and household appliances in the room, flooring as a floor covering of tiles, etc., then the requirements for structural rigidity increase to 1 to 400.
That is, the deflection should not exceed 2.5 mm per meter. For non-residential attics and attic spaces, a larger deflection coefficient is allowed - 1 to 200 (5 mm per 1 meter).
Soundproofing
 Fifty-millimeter mineral wool will not only insulate the floor, but will also become a good sound insulator
 According to building codes, the sound insulation threshold for interfloor floors of residential buildings should be 50 dB.
To ensure this requirement, it will be enough to lay the floor of the second floor under the finish coating with mineral wool 50 mm thick.
 The length of the beam should be no more than 5 m
 The maximum allowable length of the free sag of wooden beams should not exceed 5 m for interfloor and 6 m for attic floors. If the design length of the room is more than 5 m, it will be necessary to install an additional support under the bearing beam. The fact is that the optimal length of the supporting wooden structure is 4 m.
With a further increase in its length, the rigidity and strength of the supporting structure are sharply reduced and the requirements for the thickness of the beam section increase disproportionately. So, in order for the deflection indicators for an 8 m beam to “fit” into the SNiP standards, its thickness should be about 40 cm. For example: the same deflection indicator shows a 4 m beam with a cross section of only 15 x 15 cm.
Wood is a material quite vulnerable to external influences, primarily dampness and fire, therefore, before proceeding with the construction of load-bearing structures, all wooden elements must be treated with antiseptic materials and flame retardants.
Construction material
Before proceeding with the installation of the floor on the second floor on wooden beams, you should make a list of all the necessary materials. This will allow during operation to avoid unforeseen downtime and delays caused by the need to purchase some building materials.
beams
 A beam section of 15 x 15 will be enough
 The basis of the entire structure of interfloor wooden floors is beams. They play the role of load-bearing elements, and the strength of the structure depends on them. For them, a beam or carriage with a section of 15 x 15 cm, or 18 x 18 cm is usually taken.
This section is usually enough to provide sufficient rigidity for a specific load of 400 kg per sq.m. In this case, it is necessary to observe the parameters recommended by building codes: the span is 4 m, and the step between the beams is 60 cm. Based on these parameters, you can also calculate the required amount of timber.
| № | Span (mm) | Beam cross section (mm) |
|---|---|---|
| 1 | 2000 | 75×150 |
| 2 | 2500 | 100×150 |
| 3 | 3000 | 100×175 |
| 4 | 3500 | 125×175 |
| 5 | 4000 | 125×200 |
| 6 | 4500 | 150×200 |
| 7 | 5000 | 150×225 |
However, in the absence of a beam and small values of the expected loads on the floor, it is quite possible to use boards 50 or 40 mm thick, knocked together in pairs and placed on the edge. This option is suitable for flooring in the attic or in a small country house.
For the first floor of a residential building, this option is not suitable because of the low bearing capacity of the boards: to ensure the necessary rigidity, the step between the plank beams will have to be significantly reduced, which will lead to unjustified waste of material.
 The most commonly used material for beams is pine. This is the best option according to the "price-quality" criterion: its wood is quite affordable and at the same time has good technical characteristics.
Bars made of wood of stronger species (larch, oak) can rarely be found on free sale, and their price is incomparably higher, and pine wood after appropriate treatment with antiseptics will not be inferior in terms of durability to the same larch.
When buying a bar, you should choose a material with dry wood. Otherwise, after mounting the beams, their deformation during the drying process is possible - bending and twisting.
Flooring
 Wooden flooring laid on beams will be a rough base for flooring
 Usually, the flooring of interfloor ceilings is made in two tiers: from below there are rough floors, on which insulation is laid, and from above - pre-finishing flooring, mounted on top of the bearing beams. A decorative floor covering is laid directly on it.
To determine the nature and amount of material for flooring, you should clearly consider the design of the floors.
In the device of the subfloor, either 5 x 6 cm bars stuffed onto the supporting beams or grooves made in the beams can be used as a support for the floorboards. The latter option is quite laborious, so most often 5 x 6 cm bars are used to create a support.
 To calculate the required number of bars, it is enough to count the number of beams and multiply them by the length of each of them. The resulting footage (the total length of all beams) is multiplied by two more (since the bars will be stuffed on both sides of each beam).
A wide range of materials can be used for finishing flooring. It can be boardwalk, plywood, chipboard, MDF, OSB, etc. Each of these materials has its advantages and disadvantages, after reading which you can choose one of them. To calculate the required amount of material, it is enough to simply calculate the area of \u200b\u200bthe room.
When purchasing building material, you should always purchase it with a margin of 10 - 15%, since unforeseen material overruns are inevitable during construction.
This will save you from having to interrupt work and buy the missing part.
Impregnation
 Antiseptic will extend the life of the tree
 To maximize the service life of wooden structures, they must be treated with antiseptic materials.
It will also be useful to treat wood with fire retardants, which increase its fire safety.
To calculate the required amount of impregnation, you should read the instructions for its use - it always indicates the approximate consumption of the mixture per sq.m.
Waterproofing
 Since wood is afraid of moisture, waterproofing materials are always used in construction.
This can be rolled waterproofing used to create a water-repellent layer between wooden floor structures and the finish coat, or between wood and brick (stone, cinder block, etc.).
To protect the tree from moisture, you can also apply a coating waterproofing based on polymers or liquid bitumens.
Heat and sound insulation
If it is necessary to create a barrier to noise or cold, insulating materials are used in the construction of floors. Most often, for these purposes, use a minplate or foam. Their total number in area should be approximately equal to the area of \u200b\u200bthe room. For more information about floor insulation, see this video:
Expanded clay or ordinary slag mixed with sawdust can also be used as an insulating material.
Fastening materials
To fasten wooden floor elements, you should purchase self-tapping screws, nails, steel corners, anchor bolts and other consumables. When purchasing screws and nails, attention should be paid to their length.
According to the standards for a strong connection, the nail should be 2/3 longer than the thickness of the attached element (board, bar). For self-tapping screws and screws, this figure can be reduced to 50%.
Those. for reliable fastening to the beam of the “magpie” board, you will need 120 mm nails or 80 mm self-tapping screws.
After all the necessary materials have been purchased, and all preparations have been completed, you can proceed directly to the construction work. The construction of interfloor floors can be divided into several main stages. 
 The part of the beam inserted into the wall is wrapped with three layers of waterproofing material
 The installation of load-bearing beams is most often carried out at the stage of erecting the walls of the building. Before laying the bearing bars, their surface is treated with all the necessary impregnations.
Then their ends are cut at an angle of 60 ° and that part of them that will be walled up in the wall is wrapped in 2-3 layers of rolled waterproofing.
 The ends of the beams are usually also coated with waterproofing compounds, but some experts advise leaving them open to allow the moisture contained in the wood to freely escape.
The depth of the beams to the depth of the wall should be at least 15 cm. The step of laying the beams is usually taken at 0.6 m, but depending on the expected load on the floors, as well as on the thickness of the beam section, this indicator can be reduced or increased.
The choice of the interval between the beams is also influenced by the technical indicators of the material used for the finished floor.
If the top flooring is supposed to be made of inch boards, plywood or chipboard, then the distance between the beams should not exceed half a meter, otherwise the floors will sag when walking. For more information about the installation of beams, see this video:
 Floor joists must lie in the same plane
 Installation of load-bearing beams starts from the two extreme walls, while the beams should be located at a distance of 5 - 10 cm. After installing the two extreme beams, we mount the rest, observing the required interval.
When laying beams, special attention should be paid to the horizontal slope: all floor beams must lie in the same plane. To do this, a cutting board is placed on the edge between the two extreme bars, or the twine is pulled tightly.
If the base on which the bars are laid is uneven, then mortgages should be installed under the ends of the beams to level the horizontal level. For mortgages, material is used that is resistant to decay and physical stress - metal plates, pieces of tiles, etc.
It is not recommended to use wooden wedges to adjust the level of the beams, as they can quickly rot, which will cause the lowering of individual floor beams and the curvature of the floor line.
The bearing bars are attached to the wall with anchor bolts and steel corners.
Fastening of support bars
After all the floor beams are exposed, bars with a section of 5 x 6 cm are attached to them (the so-called "cranial" bars). They serve as a support for laying the subfloor and are attached along the entire length of the bearing beam, on both sides.
They should be nailed in such a way that their bottom is flush with the bottom of the beams.
 Most often, the draft floor is made from an inch board.
 For the device of the subfloor, edged boards are taken and laid across the beams on the support bars. Since the distance between the beams usually does not exceed 0.6 - 0.8 m, then an inch or thirty board is quite suitable for subfloors: the pressure on them will be limited only by the weight of the insulation.
Also for these purposes, you can use a cut slab. You can also combine the draft floors of the second floor with the finished ceilings of the first floor or basement. In this case, edged boards are hemmed from below, from the side of the first floor to the beams. For more information about the draft field, see this video:
Thermal insulation flooring
 After the installation of subfloors, compartments are formed between the beams, which, if necessary, can be filled with heat-insulating materials.
To do this, a hydro- or vapor barrier (roofing material, isospan, etc.) is laid on top of the subfloor boards, and then mineral wool, polystyrene, slag with sawdust, etc. are laid.
In this case, the entire space between the bars should be densely filled. We fill the gaps between the beams and foam sheets with sealant.
It is also desirable to lay waterproofing on top of the insulation, which will protect it from moisture leaks from above.
 The final stage will be the flooring of the finishing floors, which is mounted on top of the supporting beams with self-tapping screws or nails.
To do this, the material (boards, OSB, plywood) is cut in such a way that their joint falls in the middle of the beam. The finished floor is the basis for the finishing coating - laminate, linoleum, parquet.
Today, residential buildings made of wood are the most popular. At the very beginning of construction, each developer faces the task of what the floors in a wooden house should be like. After all, they are necessary to ensure the strength of the roof, the uniform distribution of the interfloor load, the stability of the walls of the entire low-rise building. This is the main purpose of overlapping structures.
In addition, their device largely provides effective insulation of the entire dwelling and, first of all, the ceiling.
In the construction business, the following overlaps are known:
Mounted between the living room and the attic. They must perform functions such as vapor barrier and insulation. For interfloor partitions, these qualities are not so important, for them the most significant factor is sound insulation. Basements are often not heated. Therefore, their overlapping devices must be made not only with increased strength, but also with high resistance to damp cold air. If the basement is built for a garage, then soundproofing will not interfere with its ceiling.
The most important components of the beam ceiling:

Primary requirements
The device of the bearing part according to the constructive solution can be beam or without the use of beams - monolithic. Beamless ceilings in a wooden private house are practically not used. Their advantage: high strength, resistance to moisture. For the entire period of operation, repairs may not even be needed. But soundproofing in such a dwelling is not at a high level. Already the appearance of a monolith dismisses the desire to make overlapping structures with your own hands. And the factory produces panels of standard sizes, which may not fit a specific span.
The developer usually does not hesitate to choose between a wooden beam and a monolithic floor. Concrete structures are unpopular not only because the house will not be provided with good interfloor sound insulation. In a few years, for old walls, they will be an excessive load.

Detailed scheme of soundproofing wooden floors
Installation of metal and concrete structures, as well as their repair, is impossible with your own hands. Here one cannot do without the use of machines and mechanisms, as well as without the involvement of specialists who manage these means. And all this will be reflected in the higher cost of building the entire house.
Beams are wooden, metal, concrete. But regardless of the material of manufacture, the same requirements are imposed on all of them:
- be strong, rigid, not bend between floors, withstand a uniform load in accordance with SP 20.1333 - Code of Practice of 2011 - not less than 200 kg per square meter;
- provide insulation, laying materials on which interfloor sound insulation depends;
- keep the layer of coating necessary to keep the heat on the floors;
- their installation with their own hands should be as reliable as possible.
Ways of fastening beams
So that the floor is not unsteady, the beams are not laid pointwise, but in grooves about 70 mm deep, cut into the walls.

Mounting option for floor beams
The number of bearing bars should be sufficient to ensure the strength of the entire interfloor structure. Between the recess and the end, you can put an insulating material that will eliminate the appearance of a squeak.
The beams of the upper floor can be attached to the wall using the so-called dovetail method. To do this, at their ends it is required to make a double-sided diagonal hem, which is inserted into a socket of the same shape. True, this reduces the cross section of the logs, and longitudinal cracks may also occur in the sawing area. The rigidity of the support decreases, the service life of the ceiling is reduced, which means that repair is approaching.
Wooden
Among future homeowners, wooden beam-based flooring is popular. It allows you to equip a fairly good home insulation. It has both advantages and disadvantages.

Scheme of the device of wooden floors for the house
Positive factors:
- pleasant appearance;
- relatively small weight;
- quick installation and subsequent repair;
- ecological cleanliness.
- it is flammable, special impregnation is required;
- from temperature changes, humidity can be deformed;
- the tree is subject to rotting, insects, fungi.
However, these shortcomings can be minimized, the repair can be postponed by using special fire-fighting solutions and antiseptics. To meet fire safety requirements, wooden parts are isolated from the chimney using asbestos. Between it and the nearest beam, a box is usually placed filled with non-combustible material, such as mineral wool.
Beam slats made of hardwood or softwood are more suitable.

Option for flooring in a log house
For the construction of residential premises, it is an environmentally friendly and relatively inexpensive building material. In addition, good sound insulation will be provided. Wood is easy to process and relatively inexpensive.
Installation of wooden floors on floors is possible in a short time and with your own hands, without the involvement of specialists and the use of lifting equipment.
Or do you need a more durable cover. If the beams are made of wood, then the distance between them must be made somewhat smaller. In this case, it is better if they are metal, and lay the wooden floor of the entire first floor on them. They are less susceptible to the adverse effects of the basement environment, so repairs will not be needed soon. When arranging a garage space, one should not forget about such factors as sound insulation and sufficiently effective insulation of the upper room.
Whole and glued
If the spans are not more than 5 m, then solid wooden beams are used, which are quite capable of ensuring the strength of the ceiling and equipping a reliable floor. But they can be glued, for which there are no restrictions on the length. They are superior to non-glued in the following parameters:
- high strength;
- long service life;
- lack of deformation;
- the ability to carry out the installation of ceilings in long spans.
In interfloor ceilings, they are often left open from the side of the ceiling. Their smooth surface with an attractive natural wood pattern enhances the design. It is also not closed by floors, as it gives a special appeal to the room. In the appropriate style, you need to arrange the floor. 
It should be made of wooden boards, in color in harmony with the design of the entire room.
I-beam
I-beam structures are widely used. Often they are chosen by the user who cares about the insulation of his house and interfloor soundproofing. I-beams are easy to make from ordinary glued beams. In shape, they resemble two letters "T", connected at the base. They replace the mass of load-bearing beam rails, reduce the time spent on laying floors, and, importantly, they can be used for installation in spans up to 15 m.
I-beams are not deformed from exposure to moisture, they will not need frequent repairs. With their use in a house with their own hands, excellent interfloor sound insulation and fairly effective insulation can be equipped. To eliminate the possibility of floor creaking, the so-called subfloor is nailed to them.

An example of I-beams in a wooden house
Their design is very convenient for laying communications on floors: electrical wiring, water and gas pipes, ventilation.
Boards instead of beams
In construction practice, a floor device is used, in which thick boards placed on the edge are used instead of load-bearing beams. It is preferable that they have a section of at least 60x200 mm. Their ends are cut into the full thickness of the wooden wall. They are strengthened one from the other at a distance two times less than the distance between the beams of glued laminated timber or logs. Installation of this design is possible with narrow spans. Then the floor will be very stable, and the arrangement of the ceiling will require conventional materials to provide insulation and create good sound insulation.

Example of installation of floor boards
During the construction of the roof, special attention is always paid to the design of the attic. After all, it is important that its overlap is done technologically correctly, does not exert excessive pressure on the walls and is able to withstand the load from things stored under the roof and sometimes a whole set of furniture.
Therefore, in this article we will deal with you in detail how the attic floor should be properly arranged on wooden beams: the features of its installation, calculation of loads and fastening. And our detailed illustrations will help you.
To begin with, we suggest that you watch a short video review of the attic floor device on wooden beams, and then we will analyze the details:
What is an attic floor?
Ceilings are horizontal load-bearing structures that separate the residential floor from the attic, and at the same time take on the load from the weight of everything that is under the roof.
In itself, the overlap is a necessary element of rigidity, which also provides stability to the entire structure. Among all the others, today we will single out the attic floor, namely, its specific type. Note that the general rules apply to all types, but there are still some technical features in the arrangement of the attic floor along the beams.
The first of these is rigidity and strength. Those. the cover should be:
- Able to withstand the design loads and at the same time not bend, not collapse. For example, the allowable deflection is only 1 to 250 of the span length.
- Secondly, the attic floor should not be flimsy, and in no case should it fluctuate when objects are moved on it or the movement of people.
- And finally, soundproofed to avoid unpleasant squeaks when someone goes up to the attic.
In private construction, two types of floors are mainly used: wooden and reinforced concrete. The former are lined up along solid wooden beams, and the latter - along beams, slabs and in a monolithic version. Also, the beams themselves can be steel if you have to cover large enough spans. But it is in private housing construction that the choice of floor material is most often influenced by the economic factor.
The cost of flooring is usually up to 20% of the estimate for the entire construction of a house, and labor costs as much as 25%. Therefore, the construction of a wooden attic floor is still quite popular - all thanks to its high performance and good sound insulation.
And one more important point: in the manufacture of wooden attic floors, you will not need heavy lifting equipment, especially a concrete pump.
Advantages and calculation of the beam ceiling
The whole structure consists of beams and boards, which are called rough. The beams themselves can be load-bearing, located just next to each other, or fixed in a special way, which is much more reliable. The standard dimensions of the beams are 20-40 centimeters high and 15 meters long, plus 8-20 centimeters wide.
Unlike reinforced concrete attic floors, wooden ones are mounted dry. By weight, it comes out much easier, so in private construction it is better to use just such an overlap. On the other hand, wooden floors are the most soundproof, so you will have to spend money on additional measures.
Beams are located at a distance of 60 centimeters to 1.5 meters. Of course, the more often you install them, the greater the load the attic will be able to withstand in the future, but the foundation of the house will also have to endure a greater load.
On a wooden attic floor, light partitions are usually mounted - most often frame partitions, to which the attic rafters are attached directly. They must be installed perpendicular to the beams or edge.
But if for some reason the inner walls of the attic have to be placed parallel to the ribs or beams, which is not at all according to the rules, then the structures in these places must be strengthened. Most often, fragments of boards are used as such elements, which are attached perpendicular to the edges of the floor.


Options for installing attic beams depending on its type
Many people ask themselves: where is the right place to install wooden floor beams? In walls, on walls, or even bring them outside a little? It depends on what kind of attic you will have and whether you will use it as a living space in the future. Attic today is very popular!
So, here is an economical option that allows you to convert the attic into an attic in the future without any problems. True, very close:

And therefore, if you have such plans and even now you are not sure if there is another place in the project for a personal office or a billiard room, then make the walls higher to install the floor beams lower.
What will it give? In such an attic there will be much more usable space, fewer sharp corners and it will be much warmer:

But if in your project the attic was originally planned as a separate and spacious room, as if built on top of the house, then the attic beams must be installed as strong as in the interfloor ceiling, and also fastened to anchors in the armored belt:

Here is an excellent step-by-step example of how such attics are built and how strong such an overlap should be:

Types of floor structures
In total, there are several types of attic floors on wooden beams. Each of them has its purpose and its pros and cons.
Platform: for a cold attic
As for frame houses, floors in them are recommended according to the "platform" system. That is, after the walls are installed, beams are laid and a platform is created, as it were, and a working base for the future attic floor at the same time. It is important here not to put too much pressure on the fragile walls, so the attic flooring will also not be designed for the piano in the corner.
In this case, the beams are installed on the strapping beam, which is used as a Mauerlat:

Rigid shield: for uniform shrinkage
But in a house with walls made of logs or timber, as an attic floor, according to the rules, a rigid shield is equipped, which, when the walls shrink, will smoothly fall along with them, and always evenly.
Economy flooring: to save time
As a separate type of attic floors, prefabricated wooden floors should be distinguished. Their main feature is the use of special fasteners, which are made of galvanized steel. Their thickness and quality is calculated depending on the level of future loads on the floor.
Standard attic floors on beams with timber and wooden joists appeared at the end of the 20th century, and after them wide board floors became more fashionable.
Finished farms: for a residential attic
Today, special ready-made companies for arranging attic floors are also in fashion. In fact, this is not a novelty of the construction market; such firms appeared at the end of the 16th century and found their second birth at the end of the 20th. Canadian construction companies developed special calculation programs for such firms and their exact forms with assembly lines.
Ribbed-beam ceiling: for private housing construction
In our country, new types of wooden floors are beginning to appear, which until that time were popular only abroad. These are light wooden floors. They are relevant for private construction, when a fairly light wooden frame is used as a system.
The essence of the overlap is that the "ribs" are installed every 30-60 centimeters, and they are covered with sheathing. Wooden beams are taken as "ribs" about 20 and 28 centimeters high, and 45 centimeters thick, and up to 5 meters long. They are made from natural wood and connected with special bundles of boards, covered with sheathing from chipboard or fiberboard.
Therefore, we single out the main advantages of a ribbed attic floor for quick and easy installation. Of the minuses: the need for flame retardant treatment, lower strength and low soundproofing properties. And, of course, such boards are more sensitive to sudden fluctuations in humidity and temperature. And also, if a fungus or some kind of insect decides to eat such an overlap in a few years, then it will eat it much faster than thick beams.
From below, this design is sewn up with a suspended ceiling made of plasterboard. Mineral wool is laid on top between the ribs. It is she who will provide fire resistance and sound insulation to the entire wooden floor.
Ribbed attic ceilings are much cheaper than beamed ones - this is quite reasonable and rational if you do not insulate non-residential premises and make a residential attic out of it. Then you can not worry about the bearing capacity of such a foundation. The only negative is that the beams are more familiar to Russian houses, and the ribbed ceiling almost does not differ in appearance from a monolithic one. Therefore, in Russian houses, ribbed-beam attic floors are more often arranged.
The beam for the device of such an attic floor must be taken in a rectangular shape, and strictly, and not in a rhombus. And be sure to take the most common school ruler with you when buying such a beam, because it often happens that many are going to build a floor from a 15x15 cm beam, and as a result they are built from a 14x14 cm beam. And then, on your site, be sure to prepare a storage space such timber and its processing.
By the way, today many even put an ordinary beam in a wooden floor on the edge. The fact is that even a ruler, no matter what material it is, easily bends along its entire length, but if you put it on an edge, it will be almost impossible to bend it:

And on the draft floor of the boards, already lay the finishing floor, and mount the suspended ceiling from below. But often the wooden floor of the attic is left without additional finishing on purpose, in view of the interior design concept, but then all its details are done very carefully and even with a decorative slope:


The suspended ceiling itself gives a certain rigidity to the ribbed ceiling.
How to cut attic beams into walls made of different materials?
Today, there are several ways to attach attic beams. Basically, it is necessary to install a perpendicular support beam, which is equal to the maximum length of the floor beams. If the project does not provide for additional stiffening beams, then the beams of the attic floor should lie along the axes of the racks of the bearing walls. According to the standards, floor beams should rest on the upper wall trim and be attached to it with two nails 3.5x100 millimeters on each side.
But often also in construction it is necessary to use special fastening methods, and in order for you to better understand them, we have prepared high-quality workshops for you.
It is necessary to design a wooden attic floor based on the loads that will affect it. But keep this in mind. Quite often, residential buildings are built with the expectation that they will be enough for the whole family. And such loads are divided into distributed and concentrated.

When designing an attic floor, you need to take into account distributed loads, and you can learn more about them from modern SNiPs. Concentrated loads should be taken into account only if you are definitely going to install some objects with a large mass in the attic.
For example, today it has become fashionable to arrange SPA-salons, a billiard room, dance floors and rooms for musical training under the roof. But in practice, it often turns out that even 10 rooms in a house are not enough. And under the roof - wonderful ventilation, beautiful space and quiet to equip your personal office there.
The need to use special fasteners depends on which technology for arranging the attic floor you have chosen in general. So the most reliable way is to support the beams on the bearing surfaces of the walls or on the floor beams. Then there is no need and no point at all to use metal elements - the beams are fastened with self-tapping screws or nails. In all other cases, it is imperative to fix the attic floor.
Therefore, we advise you to initially make such a strong attic floor that in a couple of years, with a clear conscience, rebuild it into an attic. And special calculations will help you to make our special tables and computer programs. Your task is to correctly select the optimal section of the beams and their step. Everything else is details.
Is a reinforced belt required?
First of all, decide if you need an armored belt to install attic floor beams. Armopoyas is a reinforced belt, which is a closed structure along the entire contour of the building. The task of such an element is the distribution of loads.
When installing wooden beams of the attic floor, it is necessary to install an armored belt only if:
- The walls of your house are built of gas block or foam block. After all, such material has a rather fragile structure, and the wooden beam ceiling at the same time has considerable weight. Due to its design, it always creates a point pressure on the blocks. And our task is to distribute this pressure and make it linear. So that the Mauerlat takes over the entire load.
- Also, whether there are FBS prefabricated blocks as the foundation for your house, or the foundation itself is shallow, it is also important to correctly distribute the load from the attic over the entire area of \u200b\u200bthe foundation of the house.
In all other cases, you can safely do without an armored belt.
Fastening beams to beams or log cabins
When floor beams are attached to a log house or logs, it is easiest to use the frying pan technology. In simple terms, simply insert the beams into the walls, as part of the designer.
Please note that the floor beams are fastened together with metal brackets:

Fastening to a metal I-beam
If you have to break the floor beams along the length, then their parts should be overlapped or with special overlays, and spacers will also be needed between the beams themselves.
And if we are talking about planning a large area, then it is better to use a steel I-beam or a particularly strong one made of glued wood as a support for the beams. In this case, be sure to leave a gap of 10 millimeters between the attic beams and the steel I-beam. It is important that the steel beam does not touch the ceiling lining. And so that in the future the floor beams do not creak, lay additional soundproofing material or make the ceiling crate quite dense:

If you use auxiliary beams, they do not have to be placed inside the floor at all. These can be easily built into the wall or even used on their own. And the beams themselves must be mounted on the so-called beam shoes:

The first step for such beams is to make a strapping. Moreover, it is not at all necessary to attach the harness itself to the walls of the first floor, as many people think.
The main thing is to properly prepare such beams for installation. And for this, they must be treated with an antiseptic (and at a temperature not lower than 5 degrees Celsius). Then leave them to soak for a day. Now cut and lay such boards and a supporting beam on a wooden Mauerlat, previously impregnated with its fire and biological protection. It remains only to fix all the floor beams on the shoes.
And, when the ceiling of the beams is ready, make a subfloor, at least to make it convenient to move around.
Fixing to brick walls
If we are talking about attaching a wooden beam to a brick wall, then it is necessary to create a nest in that one, and even at the stage of erecting the walls themselves. The nest should be 160 mm inside the wall (this is the minimum), and on a special board.
When inserting a beam into a wall, you need to fill it with cement mortar or leave it open - it all depends on the thickness of the wall:
- So, a closed version is necessary with a wall thickness of two bricks.
- Open - with a wall thickness of two and a half bricks.
In addition, the beam ceiling of the attic with brick walls must be reinforced with anchors in every third beam. Anchors should cover it from below and on the sides, and go into the wall by 30-50 millimeters. It is also possible to connect the beams to each other and on the internal walls.
Beams should be fixed to a brick wall using the following technology:

Fastening to fragile block walls
If you are fixing wooden beams in a block wall, then you need to build a reinforced concrete lintel. This is the same reinforced belt that we talked about earlier. You need to arrange it under the beam, specifically under the wooden box that goes into the wall. The beam itself will need to be installed on a reinforced belt in the wall, also at a minimum of 160 mm. And do not forget also about such an important point as the insulation on the side of the block and the gap on the side of the beam, which will ensure the release of moisture.
Therefore, in order for modern lightweight blocks to withstand the wooden beams of the attic floor, follow this pattern:

If the blocks are quite strong and are close to brick in their physical qualities, then use the following installation scheme:

Which beam is better to choose for overlapping?
If you are now smoothly approaching the issue of attic flooring, the first problem that you will have to face is finding good quality boards. It is very important that neither the beams nor the flooring have any flaw, are not weakened and certainly do not hurt any mold. Otherwise, such overlaps are life-threatening for the life of households.
Option # 1 - beams from ordinary boards
Let's separately note which beams should be used when constructing an attic floor. The best option is boards 20-30 centimeters wide. Pine or larch is taken as a material, which work well for deflection. It is this wood that is durable in terms of deformation and is less prone to cracks. According to official estimates, when using such material, it is possible to reduce the consumption of all wood by as much as 20%.

Option # 2 - beams from glued beams
As beams, glued beams are also often used today, the strength of which is several times higher than the strength of ordinary wood. The thing is that any glued wooden products are stronger. The whole secret is that the glue that is used gets into the pores of the two parts being glued and forms many strong threads between them - much stronger than the fibers of the wood itself. And therefore, glued laminated timber as beams is a completely normal option.
In appearance, they do not differ from solid wood, especially when, for the purpose of aesthetics, the best grade wood is used in the outer layers. Such beams are made from lamella boards, which are cleaned of defects and glued together. The main advantage of this method is that the total length of the beams can now be up to 12 meters, and it will be much stronger, just with a wooden beam at the same parameters.
To make strong beams from OSB boards, they are cut into strips of different widths and milled. Next, the blanks are glued together, and they form a long endless strip, from which templates of a certain length are made. The main advantage of using such beams for attic flooring is their low weight and excellent strength and bending resistance.

Option #4 - I-Beams
Another popular type of beams in Russia is I-beams. This is one of the most durable types of beams, and any flooring can be arranged on top of them, not just plywood. And drywall is hemmed from below. These beams are so strong that it makes more sense to install them as an intermediate floor for fully living rooms, not only for the attic, but even more so for the cold attic.
The so-called Canadian I-beams are also popular. They are manufactured in the factory from wooden blocks, OSB boards, special moisture-resistant boards, glued laminated timber or softwood.

Option # 5 - beams from finished trusses
For example, one of the most recent developments is ready-made attic trusses. Their height is 350 millimeters. They are made of dry wood with a section of 100x50 mm. In the factory, on a special press with metal plates, such elements are combined into one structure. Moreover, in the process of manufacturing such farms, engineering communications are even placed inside them.

Option #6 - LVL Beams
Separately, it is worth noting that a relatively new material on the domestic market is LVL beams. These are high-strength homogeneous materials that are made by gluing under special pressure. Several layers of veneer are taken into consumption, and in the process of manufacturing the beams, the fibers are arranged strictly parallel.
The characteristics of such beams are special. The main advantage is that which beams have a large selection of sizes. The material itself lends itself perfectly to processing with almost any cutting tools. But given the price of LVL timber, we advise you to purchase it only if your attic floor will be located over a large span and your priority is quality and safety.
Option #7 - HTS Beams
Another new type of attic beams is the German HTS. They are also an I-beam, where the top and bottom layers are made of wood, but the middle layer is made of OSB boards.
Between these layers, a profiled steel sheet with a thickness of 0.5 millimeters with a special polymer coating can also be inserted. At the same time, the steel itself has a wavy shape, due to which the beam has high load-bearing characteristics. And there may not even be one, but two such walls, which is even better for bending resistance. And so that the HTS-beam does not bend or twist, hidden transverse braces are installed between the layers with a certain step.


During the construction of private houses, wooden floors are arranged in the vast majority of cases, since they are lighter and cheaper than reinforced concrete, and you can handle their installation yourself. Such structures are erected at any level: above the basement, between residential floors, under the attic or attic. But depending on the position and purpose, they are subject to different requirements for strength and insulation. Having studied this issue, you will be able to design the floors yourself and control their manufacture.

Floor beams for the floor of the 1st floor Source coralz.ru
The choice of materials for the supporting structure
There are many requirements and restrictions associated with the material used for the installation of wooden floors, regarding the quality of wood, and ultimate loads, and installation methods.
Material requirements
Such ceilings are arranged on wooden beams, which take on the entire main load and are load-bearing elements, the strength of which determines the reliability of the entire structure. Therefore, floor beams must meet the following requirements:
- be made of larch, pine or other coniferous wood with high bending strength;
- have a moisture content not higher than 14%, which is achieved by chamber drying or in a dry, ventilated place within a year after manufacture;
- not have obvious defects in the form of large deep cracks, many knots, tortuosity, oblique layer and traces of rot.

Advice! Treatment with antiseptics will help protect the tree from damage and preserve its strength characteristics for a long time.
Determination of the optimal section
Beams or logs for floors are made of timber, logs or thick boards mounted on the edge. The bearing capacity of each beam directly depends on the cross-sectional area, and the entire structure - on the length of the spans without supports and the step between adjacent beams. All these quantities are interconnected. For example, the longer the span, the larger the section should be and the smaller the distance between the horizontal supports.
To determine these parameters, you need to know the total load, which consists of the weight of the floor itself, finishing materials, furniture installed on the floor and people living. Of course, it is impossible to accurately calculate it, therefore, when designing, they are guided by the values \u200b\u200bspecified in building codes and regulations (SNiP 2.01.07-85):
- basement and interfloor overlapping on wooden beams is calculated for a total load of 350-400 kg / sq.m;
- floors between the residential floor and the attic - by 250 kg / sq.m;
- attic floors - by 130-150 kg / sq.m.

In any case, the span should not exceed 6 meters. Otherwise, in the absence of supports in the form of load-bearing walls and partitions, support columns are installed under the logs.
The cross section of the beams in millimeters for independent calculations is selected according to the tables. For floors with a load of 400 kg/sq.m. The following minimum beam and log dimensions are recommended:
Bar section
| Step between timber beams, cm | |||||
| 200 | 300 | 400 | 500 | 600 | |
| 60 | 100x75 | 200x75 | 200x100 | 200x150 | 225x150 |
| 100 | 150x75 | 175x100 | 200x125 | 225x150 | 250x175 |
Log diameter
| Step between log beams, cm | Unsupported span length, cm | ||||
| 200 | 300 | 400 | 500 | 600 | |
| 60 | 110 | 140 | 170 | 200 | 230 |
| 100 | 130 | 170 | 210 | 240 | 270 |
Installation of load-bearing beams
Before making an interfloor or attic floor, it is necessary to correctly prepare the material for installation. Wood is a living material, and this must be taken into account. So that it does not rot, absorbing moisture from the supporting surface of the walls, the ends of the beams and their intersections with partitions are coated with bitumen and wrapped with waterproofing material (roofing material, sheet rubber). At the same time, the ends are left unprocessed and not closed so as not to prevent the evaporation of moisture.
Advice! To enhance moisture circulation, the ends can be cut at an angle of about 70 degrees, increasing the evaporation area.

But first, the beam is cut to length, which should be greater than the span by the value of the supporting part on both sides. As a rule, it is at least 10-15 cm, but depends on the thickness of the walls and cannot exceed 2/3 of this parameter.
The wooden floor between floors is mounted according to the same scheme, but there are nuances associated with the material of the load-bearing walls.
On wooden walls
Beams can be fastened in the traditional way, laying them in the grooves cut in those crowns, the level of which corresponds to the ceiling of the underlying floor. Or use perforated steel pads for their fixation, which allow for reliable butt fastening without grooves.
In this case, the following conditions are met:
- Having folded the walls to the desired level, the upper crown is marked in accordance with the lag step and the grooves for their installation are cut out in the marked places with an electric or chainsaw. In this case, the extreme beams should be located with an indent from the walls of at least 5 cm, which will subsequently be filled with insulation to cut off cold air from the outside.

- The first to lay the extreme beams, which serve as beacons for the intermediate ones, so they must be installed at the same level and strictly horizontally.
- In order to raise the ends of the timber on the support platform to the desired level, they are placed under them with pieces of lumber impregnated with bitumen or resin. To lower it, they deepen the groove, but do not cut the beam itself.
- The ends should not rest against the wall of the niche. A small gap is left between them for free evaporation of moisture, which can be filled with insulation.
- There is no need to rigidly fix all elements of the supporting structure, since it will subsequently be connected with a boardwalk. It is enough to fasten the elements every 2-3 rows. It is carried out with metal brackets, corners, anchor bolts or wooden dowels.
Video description
How to cut beams into a blank wall is shown in the video:
To obtain the desired section, it is allowed to use boards spliced along the length, fastened with studs, as well as I-beams from boards and OSB.
Note! In the case of wooden walls, waterproofing is not required.
On brick and concrete walls
Niches are created in stone walls during their laying or pouring, since it will be difficult to do this later. Their dimensions are made such that ventilation gaps of about 50 mm remain around the supporting part of the beam, excluding the formation of condensate and wetting of the wood. After installation is completed, they are filled with insulation.
The depth of the supporting niche should not exceed 2/3 of the wall thickness. Its bottom is covered with roofing felt or sheet rubber for additional waterproofing. The rest of the installation technology is similar to that described above.

On cellular concrete walls
Wooden floors between floors in a private house made of foam concrete or aerated concrete blocks cannot be mounted directly into the masonry, since these materials have a cellular structure and are not strong enough. They can collapse from a large point load. Therefore, before installation, perform the following measures:
- under the installation level of the load-bearing beams, instead of the next row of masonry, a concrete reinforced belt is poured, installing formwork or special U-shaped blocks on the upper end of the wall. Having connected the entire perimeter, it will become a strong support and allow you to distribute the load from the ceiling evenly over all walls;
- after the concrete has hardened, the next row is laid out, creating niches of the desired size with gaps for ventilation.
As in the previous examples, the extreme elements are first fixed, then the intermediate ones are aligned along them, observing the level, the parallelism of the lag and the equal distance between them.
Video description
This video tells about the device of the bearing part of wooden floors in houses made of aerated concrete:
Another mounting option is also possible - butt to the armo-belt by means of special metal plates. But in this case, the concrete belt is poured at the level of the ceiling, and not under it.
Floor installation
Having installed the supporting frame, it is sheathed from above and below, forming the floor of the upper floor and the ceiling of the lower one. Flooring designs can be different, and the technology of their construction depends on the type and purpose of the floors:
- Attic flooring on wooden beams requires mandatory insulation if the attic is non-residential, since up to 30% of the heat in the absence of such insulation leaves the house through it. In this case, the device of the floor is not necessary here.
- Thermal insulation is also needed for basement ceilings in the absence of a heated basement. Moreover, the insulation from below must be protected from moisture with a layer of waterproofing. If the basement or basement is heated, such an overlap is considered interfloor.
- Interfloor ceilings are more in need of sound insulation, floor and ceiling arrangement with a finish corresponding to the premises.
The simplest is the design of the interfloor ceiling, in which the beams act as a lag for flooring.

Insulation of the attic floor will require a thicker layer of thermal insulation, which may be greater than the height of the supporting beams. In this case, they are built up from above or logs are laid across them, and a second layer of insulation is laid between them.
It is very important to protect it from getting wet, isolating it from water vapor rising from living quarters and possible roof leaks. To do this, on the wooden flooring of the draft ceiling, nailed to the beams from below, a vapor barrier film is overlapped, then a heater, and on top of it a vapor-permeable membrane that does not allow water to pass through.
Video description
You can see how the attic floor is insulated on wooden beams in the video:
In addition to the almost weightless mineral wool, the insulation of the cold attic ceiling can also be carried out with other, cheaper, but heavy materials - expanded clay, clay coating, and even dry earth. The main thing is to take into account their weight when choosing a material for creating a flooring and ensure its reliable fastening.
If there is a desire not to hide the beams, but to use them as a ceiling decor, then cranial bars are hemmed to them along the entire length in the middle or flush with the upper edge, to which the ceiling filing is attached.
The cranial bars, fixed flush with the lower surface of the lag, make it possible to perform high-quality insulation of the floor of the first floor of the house without a heated basement. On them, between the beams, a roll of edged boards treated with an antiseptic is laid, then a layer of waterproofing, insulation, vapor barrier and flooring.

Floors can be sewn up with both boards and any sheet materials: OSB boards, chipboard, plywood.
Briefly about the main
Ceilings are not just floors and ceilings. This is a structure that gives the house additional rigidity, improves sound insulation between floors and reduces heat loss. Knowing how to select materials for it, mount load-bearing beams, insulate the attic and the floor above the basement, you can build a reliable and warm home for your family.