MDF panels are an excellent decorative finishing material, which is characterized by a high speed of installation and the absence of the need for “wet” work at all stages of finishing.
Panels also have their drawbacks (for example, MDF, like any wood, is afraid of water and high humidity, is less resistant to mechanical damage in comparison with synthetic materials, repairing damage on it is fraught with a number of difficulties, etc.).
The fixing of MDF panels depends on the type of substrate and the desired result. The most common type of fastening is mechanical (on the base, a frame is often equipped with wooden or metal guides, to which MDF panels are attached with nails, screws or clamps) and chemical - with the help of adhesives.
The latter method assumes an even monolithic base, since in this case there is no frame made of profiles or guides.
Adhesive for MDF - an overview of the best options
The most commonly used adhesives for MDF panels are:
- Liquid Nails . A universal adhesive characterized by high adhesion, corrosion and moisture resistance. Liquid nails do not react with substrates, unlike deep penetrating glue.
- Mounting (or construction) foam... It is characterized by various properties such as thermal insulation, sound insulation and high adhesion.
- Universal construction adhesive... A wide group of products, divided into many segments and areas of application. For MDF panels, it is necessary to use only those adhesives that ensure adhesion of the base materials (brick, concrete, drywall, tiles, etc.) and wood (MDF consists of small sawdust).
The most popular glue for MDF panels is liquid nails (TYTAN or TITEBOND Multi).
In addition to the economic effect when choosing an adhesive, it is necessary to take into account the specifics of working with it (time for initial fixation, time of final drying, method of application, service life, required tools and materials, etc.).
Installation of MDF panels on glue - instructions
Consider the technology of MDF installation using the above adhesives.
Liquid Nails(similarly— universal building adhesives). The thickness of the adhesive layer is only 3-5 mm, so the base on which the panels will be glued must be perfectly flat. Otherwise, the panels will repeat all the unevenness of the walls or peel off in places where they do not fit snugly.


Therefore, before gluing MDF panels to the wall, it must be leveled.
- Degrease the surface, remove all impurities, putty on crumbling areas.
- Before starting work, you need to make sure that there are no irregularities using a building rule, a long level or other tool.
- The adhesive is applied in a wave-like motion or in another way (for example, in dotted coarse drops) so that it is evenly distributed over the width and length of the panel. The pitch between the adhesive strips determines the strength with which the panel will adhere to the substrate. That is, for example, when installing in places of greatest stress, the frequency of application can be increased. Usually it is 10-15 cm. If the manufacturer determines the waiting time before gluing, it is necessary to maintain the required pause.
- With the help of a construction bubble or laser level, the start panel is installed at the desired angle (depending on the intended drawing and installation direction). The most commonly used vertical installation of panels. You should start from the corner.
- The glue on the first panel must have time to grasp the base before installing the subsequent ones (the same principle applies to other difficult junction points, for example, internal or external corners). The setting time depends on the type of adhesive (see instructions).
- Thanks to the tongue-and-groove connection, subsequent panels can be mounted without waiting (except for the waiting time before gluing).
The corners (internal or external), as well as horizontal and vertical abutments without a groove-comb connection, are closed with decorative moldings (universal MDF corners). Glue should be applied to the middle of each side of the decorative corner (so that when pressing down, excess glue does not come out).
The main thing is not to damage the decorative layer of the panels.
Option 2. Polyurethane foam.
The technology for installing MDF panels using construction foam is in many ways similar to the technology for installing using liquid nails or universal glue, with the only difference that the error of wall irregularities using foam can be higher due to a significant increase in foam in volume.
The waiting time before gluing the MDF panel to the substrate depends on the requirements of the foam manufacturer.
VIDEO INSTRUCTION
Basic installation errors
For liquid nails:
- Do not overexpose the glue before mounting the panel on the base. Otherwise, adhesion will be significantly lower.
- Improper application of glue - MDF panels will lose their attractive appearance if glue gets on the decorative front surface.
- Wiping off excess adhesive with a heavily damp cloth can cause the decorative coating to peel off.
For polyurethane foam:
- For gluing, foam with a low shrinkage coefficient and a professional tool should be used (high-quality guns for construction foam can smoothly and strictly dosed regulate its supply).
- If you do not wait for the setting time of the first panel, then during the movement of the subsequent ones, the foam may collapse and not fix on the base.
The question is why it is impossible to glue MDF on liquid nails
Glue "liquid nails" is distinguished by its versatility. It is suitable for mounting a wide variety of building materials. And if the list of materials to be glued includes "wood", then liquid nails are not only possible, but also must be used for gluing MDF panels.
Often, ordinary people can confuse glue "liquid nails" with sealants or silicones (they are applied using the same tool, the tube is very similar to the tube of liquid nails and in the store they can stand on the same shelf).
However, sealants for gluing MDF panels are not recommended, since their main purpose is to fix plumbing products and seal joints.
MDF panels for wall decoration are not only easy to install, but also very practical to use. MDF panels for dry wall cladding are still as popular as they were two decades ago. We have prepared for you instructions on how to properly decorate walls with MDF panels with your own hands.
What kind of editing do you prefer
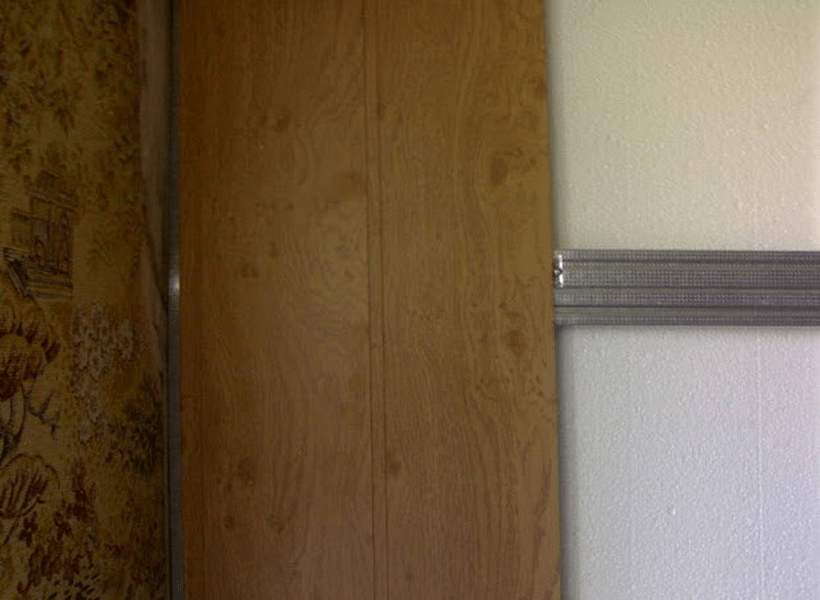
In general, it is recommended to fix the wall cladding to a galvanized or timber profile system. This avoids preliminary leveling of the wall surface and makes it possible to lay up to 50-70 mm of internal insulation or sound insulation. The choice between a wooden and a metal frame is determined by the specifics and conditions in the room, as well as for finishing the gypsum board. In the modern variation of such an installation, profiles and rails can be replaced or supplemented with plastic mounting strips, which provide for quick and easy installation with snap-on brackets.

A special case of the frame system is the device of a solid base as a rough preparation of the walls. The method is relevant in the case of using thin (5-6 mm) panels in rooms with a high operational load. In the presence of a sufficiently rigid substrate (OSB 6 mm, gypsum board), the panels will not be pressed through, and besides, their warpage is guaranteed to be excluded due to changes in humidity - a typical disease of cheap products. At the same time, the wall receives additional insulation and remains blown through.

Sheathing without a frame is carried out by gluing the panels to the walls after their preliminary leveling. This can be gypsum plaster, cement plaster, or a rough base from the method described above. The method is recommended for the installation of panels with a width of over 160 mm, fastening along the entire plane gives a plus to the durability of the coating, but excludes fragmentary repair and disassembly of the sheathing.
Frame system device
The principle of constructing a frame for finishing with panels is the same as for gypsum boards, but the installation scheme for profiles is completely different. Depending on the way the panels are attached, the configuration may vary.
In the most typical version, the panels are attached directly to the profile, respectively, the direction of the rack elements will be horizontal, this is the main difference from the GKL system. Remote cladding allows you to give the room the correct geometry, but for this you must follow the correct assembly sequence.

Start with long walls: fix the vertical sections of the 28 mm UD guide rail in the corners. The two planes of the frame must be strictly parallel, so that the wall to be sheathed first is taken as the base one. In the future, the distance for mounting profiles on the opposite wall will be postponed from it.
Insert pieces of 60 mm CD post profile between the guides. With a horizontal layout, you are likely to face a lack of length of the molding. In these cases, the crossbeams can be spliced by inserting two sections of the guide profile inside and additionally reinforcing with LM screws. Since the linearity of the frame is not critical, it is also not forbidden to fold the profiles with an overlap of 30 cm and fasten their adjacent shelves with self-tapping screws.

The installation step of the CD profile is 35-40 cm, the outer ones are installed 10 cm from the floor and ceiling. To support the frame in a staggered manner, straight suspensions are mounted with a step in one row of 60-80 cm, depending on the thickness of the panels, and hence the total weight of the cladding.
Installation of the frame on short walls is performed in exactly the same way, except that the guides are not attached to the pillar, but to the frame profiles of the long walls. For this reason, the first "pawns" should be placed no further than 10 cm from the corners to solidify them.
If you intend to use PVC mounting strips or conduct a rough preparation of the walls, the frame is made exactly as for the plasterboard sheathing. The distance between the CD racks can vary from 60 to 80 cm, direct hangers are installed after 80 cm. Such a frame can be reused at the next repair with the replacement of the finishing material with a clean gypsum board, while it is not allowed to attach heavy sheet materials to horizontal beams.

The installation of panels to the frame itself is extremely simple; for this, special plate brackets are used. They are inserted into the groove of the hidden fastening and are fixed to the frame with a self-tapping screw with a hat for a sweat. With the use of PVC mounting strips, the situation is even simpler: just snap the clips into the mounting groove and press the panel next. Rigid fastening of panels with self-tapping screws is carried out only for the first and last strip.

Frameless installation - pasting walls with panels
There is also an alternative method of installation, which involves the use of glue "liquid nails". The panels can be glued both to the frame and directly on the walls, if the irregularities on them do not exceed 2 mm / m. Often, this is the method chosen for facing unrefined brick or block masonry, it is only important to choose the right glue composition.

It is recommended to use quality products. The glue should remain plastic after drying, give preference to compounds based on rubber or polyurethane. For occasionally heated summer cottages, frost-resistant glue should be chosen, other features are determined by the material of the surface for pasting.
Do not forget about the correct preparation of the walls. Masonry and plaster must be thoroughly impregnated with primers to increase adhesion.
Corners and mates - we use a full range of fittings
The main charm of working with MDF panels is that the fittings for cashing corner joints are mounted superficially, that is, upon completion of the cladding installation. It is highly discouraged to use plastic fittings with grooves for PVC panels. The trimming of the panels should be carried out quite accurately, the gaps in the inner corners should not exceed 1.5-2 mm / linear. m, which is quite enough to compensate for temperature expansions.
The main element of the fittings is a universal corner profile. It consists of two thin MDF strips, fastened with laminated film, can be used to decorate both internal and external corners. For correct and beautiful mixing of the overlays at the corners, their edges are trimmed in the miter box at 45 ° with a general bevel outward. When finishing corners on slopes, the angle will not be correct, so on-site trimming is recommended. Installation is carried out on glue for wood products based on polyvinyl concentrate.

Another piece of hardware is a docking bar. It is used for splicing cladding sections with insufficient molding length or for combining panels of different colors in one plane. In the place of installation of the connecting element, a mortgage rail should be provided.
Installation of skirting boards
Skirting boards for MDF panels stand out separately. For the most part, they are used to cover corners between the wall and ceiling, or to decorate the upper end of wall panels. The plinth is installed in the same way as other fillets, the planting is carried out on transparent silicate glue.

The issue of fixing the floor plinth remained unresolved. Special problems will not arise if the lower frame guide is lowered to 10-15 mm from the floor. In the presence of a rough base or pasting with wall panels, fastening can also be carried out using standard means. It is a common practice to chemically attach skirting boards to liquid nails: the front surface of the panels has excellent adhesion.
How to fix MDF panels to the wall, and on what basis - the decision must be made taking into account the peculiarities of the wall geometry, the size of the room, the availability of communications and constant heating. Despite the immense popularity, MDF wall plates are quite picky about the operating conditions, so you should not fix it in the first way that comes to hand, so as not to re-lay the finish a second time.
Dimensions of MDF - panels
Often, consultants of trading companies present MDF - boards as a lightweight version of chipboard panels, especially if you decipher the English abbreviation. Accordingly, it is recommended to fasten them in the same way as in the case of using chipboard. In fact, MDF panels in structure and production method differ significantly from particle board, which allows the material to be fastened at a lower cost and greater speed.

There are only three main differences:
- Thin MDF boards are made from recycled cellulose fiber, which is practically free of polysaccharides - the main food for bacteria, fungi and rodents. Chipboard uses ordinary shavings filled with phenol-formaldehyde resin, so it is fixed with special dowels;
- Plates are made by pressing wood fiber pulp with the addition of hydrogen peroxide. At a temperature of 250 ° C, lignin and part of the cellulose are welded with the remains of caramelized polysaccharides into a dense fiber mass. In thick slabs, the MDF core is additionally impregnated with polymer resin, which makes it possible to fasten without the risk of material delamination;
- The flexural strength of the panel is only slightly inferior to plywood with greater ductility and resistance to moisture. Most brands of MDF can be wall-mounted even in rooms with low ventilation.
The difference, at first glance, is insignificant, but it is the strength and elasticity of the cellulose-fiber base of the MDF panel that makes it possible to fasten the cladding plates using end locks.
Even with a strong temperature difference, the MDF panel shows a level of expansion much less than that of plastic or ordinary wooden lining, so the material can be fixed with smaller gaps, which is especially important for plates of medium and large thickness.
What are the most popular sizes
Three size groups are used for wall cladding:
- Thin slabs, size group 5-9 mm thick, 153, 198, 200.325 and 2070 mm wide;
- Medium MDF panels, 10-18 mm thick, 2070 mm wide;
- Oversized slabs, thickness 19-38 mm, width 2070 mm.
There are no restrictions on the outer dimensions, and the maximum thickness of the slabs is limited by pressing capabilities up to 40 mm. Also available are two-layer MDF panels with a maximum thickness of up to 60 mm, used for the manufacture of reusable formwork and roof sheathing. But the quality of the outer surface of such slabs is rather low, so they are not used for wall decoration.
Installation of MDF panels
Pressed cellulose fibers retain heat and absorb noise much better than plastic or wood. In addition, the MDF panel has a certain anisotropy of properties, it can be cut and processed in almost any order. Fastening the panels is easy and quite possible even for a novice cladder.
For household purposes, panels can be fixed in three ways:
- Place the slabs on glue;
- Mount the cladding on a wooden or metal frame;
- Installation of MDF panels using the suspension method.
The latter case is used as an exceptional way of cladding walls in a house from a bar or rounded log. We have to fix the MDF slabs on a suspended ceiling profile with a small gap between the floor and the lower edge of the slab. The cladding is suspended on the profile, and as the walls shrink, the MDF sags along with the timber material.

It is clear that for a wooden house it will be more preferable to use narrow slabs, 190-200 mm wide, while it is better to fix MDF in the vertical direction. If it is not known for sure about the planned amount of wall shrinkage, then the decorative finish is best fixed with a gap increased by 2-3 cm. Firstly, this ensures that in case of excessive shrinkage, the floor will not tear the slabs off the walls, and secondly, the cracks will provide a normal level of ventilation and airflow in the space between the panels and the wall.

Mounting on a metal frame
The installation of panels on a supporting frame made of galvanized profiles is recognized by experts as the most rational and reliable way of fixing any cellulose-fiber materials. Even heavy slabs with a density of up to 1.5-1.8 g / cm 3 can be attached to the metal frame without any problems. The metal will not lead from condensation or blocking of walls as a result of pipe breaks, water leakage in an apartment on the floor above or a break in the roof.

The assembly of the frame begins with the installation of the starter profile and side strips. MDF panels are lightweight, so it is enough to install a number of vertical profiles No. 50 with a step of 40-50 cm. The use of a galvanized U-profile makes it possible to fix MDF on the walls of a room about two to three times faster than in any other way.
Two or three drops of silicone applied to the profile will even out the load on the wall and prevent the cladding from flapping in strong winds, if there is a ventilation gap behind the decorative MDF lamellas.
Installation on a wooden frame
The easiest way is to fix MDF panels on a wooden frame. There are two options for wall cladding using cellulose fiber panels. It all depends on the size of the room and the condition of the walls.

If the slight reduction in space due to the lathing is not critical, the timber frame is sewn onto the walls using metal hanger holders. For small and small rooms, most often it is necessary to partially cut and knock down a layer of plaster in order to level the surface along a vertical plumb line, to make it as even as possible.

In any case, the starting strip is initially laid on the floor and under the ceiling. Using a long building level on the wall, mark the installation points of the suspensions and determine the minimum required overhang of the side lobes of the fasteners.

In the event that it is planned to install horizontal MDF lamellas, the supporting strips are fixed vertically. For the installation of full-size panels over 200 mm wide, the walls are sewn up in both directions. Each wooden lathing strip is aligned with the starting guides and fixed with the suspension petals using self-tapping screws and a screwdriver.

For relatively flat and dry brick, concrete or block walls, the batten can be attached directly to the wall using dowels. In this case, work is added, since each bar has to be adjusted for a long time before fastening with washers in order to maintain a single vertical plane. But on the other hand, you can save 3-4 cm of internal space, which is very useful, for example, when decorating the walls of a small bathroom or corridor.
Installation on glue
The use of a batten or support frame always eats up an additional 3-7 cm of space on each wall. The use of a frame system is considered a good solution, but it is not at all necessary to fence the frame jungle if the walls of the room for the future MDF cladding are flat, without serious defects and deviations from the vertical.

In this case, it is enough to clean the walls, prime them with acrylic primer and apply a thin layer of insulating putty. The lime layer will help to further level the walls and improve the adherence of the MDF boards to the supporting surface.
Laying panels on walls using glue is carried out in two versions:
- Each MDF is glued to the wall with one lamella, from ceiling to floor, with fixation along the end edge using self-tapping screws and plastic plugs;
- The material is laid on the wall in horizontal stripes from corner to corner after assembly and gluing of corner and edge pieces.
If the lamellas are glued directly to the wall, then the end joints are not glued and are not treated with sealing materials. Most often, with the help of glue, rather large panels, 40-60 cm wide, are laid on the walls.This method is more advantageous from a technological point of view, since the load from the rather large weight of the MDF panel is distributed not over several clamps or staples, but over the entire surface of the plate and walls. What does it do? Greater reliability if the upper row of MDF lamellas breaks, the middle and lower rows will hold the entire structure.

Before fixing the mdf panels to the wall, cover the back side with small portions of glue. These can be dots, spirals, short stripes. The main thing is that the adhesive material is evenly distributed over the wall surface.
The best glue to use is automotive sealant, polyurethane adhesives, and homemade adhesives based on a mixture of acetone and foam. Acrylic and polyvinyl acetate adhesives hold MDF panels rather weakly.
For your information! The MDF sticker on the sealant provides the ability to cut and remove the panel from the wall if necessary without damaging the surface. Harder alkyd, polystyrene and acrylic adhesives can tear off some of the back surface.

Fastening MDF - panels to the wall
The process of installing cellulose fiber panels is relatively simple and straightforward even for a beginner. If a horizontal laying method is used, then the bottom panel or lamella is installed first, directly resting on the starting plate of the frame. It must be laid on glue, aligned to the building level and fixed with a stapler or self-tapping screw.
Before laying the next panel on the wall, it is necessary to install the corner or edge cladding elements, fix them on the wall, and only then proceed with the installation of the following MDF parts.
How to attach mdf panels to a bar or profile is selected in each case individually, based on the conditions of the fastener and the size of the material. Relatively thin, 6-9 mm lamellas are snapped in with groove-thorn locks, after which the free end is sewn to the timber with self-tapping brackets. If it is assumed that it will be possible to periodically remove the MDF cladding from the wall for revising communications or wiring laid behind the decorative trim, then the panels are placed on clamps.

Thick slabs are mounted directly on the walls using glue and dowels, sealed with acrylic filler and further gluing wallpaper or PVC foil.
A difficult option, how to mount MDF on walls with insulation
MDF boards are much easier and more convenient to handle than heavy drywall, plywood or plastic, while the strength of the panels is enough to build two or even three-layer cladding options from fiber composite with insulation as an intermediate layer.
For example, cold external walls made of profile, siding or concrete blocks are hemmed from the inside with HDF-class MDF plates, with a density of 800-1800 kg / m 3. The thickness of the slabs is 25-40 mm. The laid panels are sewn at the joints with oblique self-tapping screws and stapling staples, the seam itself is rubbed with polymer mastic.
The material is treated with impregnation, which provides good vapor transmission with high resistance to surface condensation. Plates are fixed to external walls "cold" - with the help of steel dowels and carpentry screws. From the inside of the slab sheathing, wooden or slats cut from the slabs are sewn.

A vapor membrane is pulled over the laid thermal insulation and clogged with horizontal slats with a section of 20x20 mm. The last step is to sew lightweight decorative MDF panels of the LDF class with the texture of wood, natural stone or veneered on the slatted lathing.
Due to the low density LDF, 200-600 kg / m 3, MDF panels perfectly let steam through, which is removed through the ventilation gap and the ceiling ventilation joint. In this way, walls are sheathed in summer kitchens, balconies, verandas, any rooms with frame-type walls.
Features of finishing MDF - panels
Most professional finishers prefer to work with MDF, since there is no dust and dirt, as in the case of drywall, installation is faster and there are much fewer problems.
Assembly and installation of MDF on walls is in many ways similar to laying laminate floors, with the only difference that there are more opportunities for choosing schemes for decorating a room and a much more complex arrangement of corner and slope wall sectors.
Slopes
The scheme for arranging door or window slopes is no different from plasterboard options. If the lamellas were laid vertically on the walls, then to design a window or door opening, it is enough to cut a panel of the required height and width and stick it on the slope plane with mounting foam or sealant.
If the walls in the protection room are horizontal panels, then the slopes will have to be recruited from sections on self-tapping screws and plastic plugs.

Corners and slots
There are always gaps and gaps between the installed additional elements and the main part of the cladding. They have to be removed with special decorative corner strips and decorative skirting boards.

All auxiliary decor is glued on "Titanium" or "Mounting moment for MDF", a small amount of glue is applied to the edge along the gap, after which a corner strip is installed on the joint. To prevent the decor from moving away, the corner is temporarily fixed with tape.
Sockets and switches
Every room has at least a couple of outlets and one switch. In order not to dismantle them during the installation of MDF, proceed as follows: measure the coordinates of the location of the socket on the wall, after which a hole of the appropriate shape and size is cut out with a circular drill or jigsaw. When installing the MDF panel, the size and position of the hole is specified and cut with a sharp knife.
It remains to install the panel, fix it on the wall, and close the remaining gap with a decorative frame.
Conclusion
The details of the process, how to fix the MDF panels to the wall, must be thought over and planned in advance, before starting work on the decorative finishing of the room. The process itself is not particularly difficult, but in any room there are many problem areas where the method of fastening has to be almost invented on its own. In this case, it is better to draw the details and the fixing method on the diagram so that you do not have to rack your brains and waste time in the process.
Wall decoration with MDF panels is a method that has many advantages over other types of construction work. The fact is that the technology allows installation in a fairly short time. A significant advantage is that there is no need to carry out additional processing of the coating. The cladding is carried out in different ways: glue and frame. It is the last method that is considered the most laborious.
This material has numerous advantages that make it indispensable for. These include the following indicators:
- Simplicity of installation work. Even if you use the longest frame method, the work will be much less than when laying drywall.
- Large selection of shades and textures. MDF wall panels allow you to choose an option that will appeal to any person, will be able to create a completely unique interior.
- The ability to get multiple results at once. Namely - to erect a crate that will hide numerous communications and serve as the basis for insulation, as well as create a smooth decorative surface.
- Durability and reliability. The density of the MDF board is superior to some types of natural wood, and the decorative surface is made in such a way that it is very difficult to damage it.
- Ease of care. Indeed, cleaning is done with a damp cloth. Any stain is removed with alcohol solutions (except for cosmetics).
 MDF panels allow you to create a unique interior design, besides, they are easy to care for
 On a note! The wood-fiber material is covered with a decorative layer by lamination or veneering. And often there is a problem that after removing stains with alcohol mixtures, numerous stains remain on the surface. Get rid of them by reapplying the solution. The main thing is to continue mashing until the liquid has completely evaporated.
Naturally, such positive properties indicate that MDF panels on the wall are an excellent option. But we must not forget about some of the disadvantages:
- Getting the perfect smooth finish is simply impossible. There will always be a small joint between adjacent elements. If desired, it can serve as an excellent decorative component.
- An improperly erected frame is a threat to human health safety. The resulting gap is a great breeding ground for mold and mildew. The glue method has the same disadvantage.
- A damp room poses a threat to the covering material and the frame. The risk of warpage is quite high.
Thus, we can conclude that it is advisable to finish MDF with panels when it is planned to comply with the laying technology.
 Despite the ease of installation, MDF panels have their drawbacks
 Preparation of tools and material
For quick and comfortable work, it is necessary to prepare the tool in advance and purchase materials. The event is performed using the following devices:
- Electric jigsaw with a set of saws, which must be selected specifically for the tree.
- Plumb line and level. The laser instrument has proven itself well.
- Pencil and tape measure. Better to have a flat rail or profile for accurate marking.
- Screwdriver. A drill is suitable, which can switch to low speed.
- Stapler. A simple option is used for homework.
- Hammer.
 Installation of MDF panels requires a special tool
 The frame method of attaching panels to walls requires more materials than glue, which requires only a special mixture and self-tapping screws (for mounting the first MDF element).
For cladding with the frame method, you will need:
- Wooden beam, pre-impregnated with an antiseptic. It is better to choose options with a section of 20 * 40 and 20 * 50. If possible, then a metal profile is used - they select the same one as for laying gypsum boards.
- Insulation that is glued directly to the wall. You can use options stacked in cells. They must be fixed in advance.
- Metal suspensions.
- Cleamers - for fixing panels.
- Dowel. The condition of the base must be taken into account.
- Panels and additional elements that are used to create beautiful corners and transitions.
- Consumables.
In principle, a limited amount of money will be required to install MDF panels. Of course, if you do not pay attention to products that are covered with fine wood veneer.

Surface preparation stages
Before sheathing the walls, you need to prepare the surface. It consists of several stages, each of which begins only after the previous one has been completed. The most important rule, the observance of which makes it possible to get the desired result, is a completely dry wall.
Work cannot be carried out in the following cases:
- Even slight damp areas are observed.
- The surface is covered with frost.
- There are traces of mold and mildew.
- The top layer is destroyed.
If there are no such troubles, then you can begin preliminary preparation. It is completely identical for all methods of installation of MDF wall panels.
Complete cleaning
One gross mistake is often made - wallpaper remains on the walls. This is absolutely not to be allowed. They serve as an excellent breeding ground for bacteria. And with the glue method, they will not give the opportunity to securely fix the elements.
 You should completely get rid of old wallpaper and whitewash
 A layer of whitewash is also removed, although many masters argue that such a procedure is not necessary. In fact, when the need arises to apply a primer, it is the old layer that will interfere with its absorption. Therefore, it is best to clean the wall completely.
Fighting mold and mildew
Unfortunately, this problem is widespread, especially in new buildings and old wooden houses. It is quite difficult to deal with it. There are recommendations that indicate that it is enough to treat the damaged areas with special solutions. Many manufacturers even produce them as a spray.
 After removing the old coating, it is necessary to remove the mildew and mold.
 It should be noted right away that you can defeat the fungus only by destroying its entire mycelium. Therefore, there is only one way out - removing the plaster to the base, thoroughly impregnating it with special solutions. Of course, the amount of work is increasing, but the likelihood of the complete elimination of the threat to health appears.
On a note! Fighting mold (mildew) is a very long undertaking. It is necessary to eliminate sources of constant penetration of moisture, as well as to treat all contaminated apartments in an apartment building. This will make it possible to produce high-quality MDF paneling.
This procedure is necessary even if the installation of the frame is planned. The fact is that any cracks can reduce the thermal insulation effect. The work is carried out using the following technology:
- A putty mixture is being prepared. It is better to choose plaster or acrylic compounds.
- Seams and cracks must first be widened. They are thoroughly cleaned from the remnants of the old solution.
- The site is well impregnated with primers.
- Further, when the soil dries up, the mixture is smeared. All the voids must be filled.
 Installation of MDF panels requires complete wall tightness
 Coating with a primer
This event allows you to increase the adhesion of materials, as well as to carry out the installation with your own hands in a better quality. For work, formulations are selected that have deep penetration. To further protect the surface, the mixture must contain antiseptics. The primer is applied in two layers, each of which dries well. Especially carefully impregnate the walls before installing the MDF panels with glue.
On a note! The processing of wooden surfaces should be carried out using a similar technology. But the mixture must contain fire retardants, which will give the lumber fire resistance.
 Surface priming is a mandatory stage of the preparatory work
 Frame erection
It is impossible to sheathe the walls with MDF panels without a well-built frame. It is necessary to create a reliable structure that will withstand the load. Installation is carried out in several stages.
Marking
Before starting the markup, you need to decide on the layout of the elements. They can be mounted horizontally, vertically and diagonally. All positions can be combined, but this requires the installation of dividing decorative elements. For the horizontal arrangement of the fragments, the crate is placed vertically on the wall with your own hands. Accordingly, for vertical cladding, the opposite is true.
The markup is performed according to the following principle:
- A plumb line is used to obtain vertical markings. According to its location, points are marked between which lines are drawn.
- If you need to perform horizontal marking, then the level is applied.
 To apply vertical markings, a construction plumb line is required
 Fastening the guides
Wall cladding with MDF panels for lathing is done in two ways. The choice of a particular method depends on the state of the substrate.
- The guides are laid directly on the wall:
- This option is suitable for a wooden beam, in which holes are drilled with a step of 30-40 cm.
- The guides are applied to the marking lines and the holes made are marked.
- Drilling and installation of dowels is in progress.
- The uprights are securely fixed with screws. Further, you can carry out the installation of MDF panels.
- The frame is erected using additional suspensions:
- The technology is used in cases where the surface has significant irregularities and differences.
- Suspensions are installed according to the existing markings. Fixing step 40-50 cm.
- The upper and lower guides are fixed along the perimeter.
- Racks are installed and fixed.
Installation of panels on the frame
Wall cladding with MDF panels begins after full preparation. The lathing is once again checked for strength, the joints are stretched. If necessary, communications are carried out, the locations of sockets and switches are immediately marked. The cable is laid in cable channels, which are corrugated hollow tubes. They are fixed to the walls with their own hands.
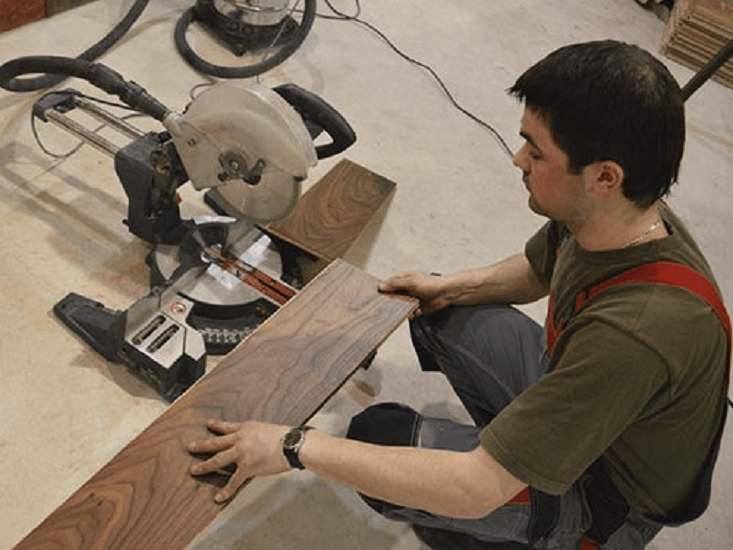
Cladding work begins with sawing the products. But if there is a significant curvature of the ceiling and flooring, which has not been previously corrected, then each element is cut off after careful measurement.
On a note! The facing material has a decorative front side, which can be significantly damaged when cutting off the excess. Therefore, the location of the teeth on the jigsaw file must be taken into account.
Installation of MDF panels on walls has the following technology:

- A ridge is cut from the first fragment, which is used for installation in the groove.
- The element is installed in the corner and screwed with self-tapping screws along the edge, which is located directly in the corner.
- Further, the installation of MDF is quick and easy. Clips are installed in the groove of the first part, which are fixed on the crate with a stapler or self-tapping screws (nails).
- The next piece fits exactly into the groove. If required, the location of the cleaimer is trimmed (on one or both sides), this is necessary in order for the fixation to be reliable.
- The last element is trimmed with a small gap to the wall. If this is not done, then it will be difficult to insert it. It is fastened with self-tapping screws.
- To cover the corners and locations of the screws, decorative elements are glued.
- Wall cladding with MDF elements requires the preparation of holes for sockets and switches. This boring is carried out before installing each part. For this, drill crowns are used.
From the above, we can conclude that laying material from MDF is not a laborious procedure, but it requires compliance with certain rules.
Today, one of the simplest and not time-consuming ways to implement a beautiful and even wall cladding is the installation of MDF panels. This material has won popularity due to its low cost and non-toxicity, as well as ease of attachment. All that is required to work is accuracy and precision.
Frame method for fixing panels
In practice, three methods are applied to the base: on a wooden frame, a crate made of metal profiles and on an adhesive composition.
Wall insulation
During the wall cladding with panels, it will not be superfluous to additionally insulate them by filling the sheathing chambers with heat-insulating material. In addition to insulation, protection against condensation in the space between the base and the cladding is provided.
In the summer, the heat inflow in the room will significantly decrease, and in the winter, the heat loss will accordingly decrease, thereby allowing significant savings in payment for heat energy consumption.
Installation of wooden lathing
The technology of mounting a frame made of wooden slats, in contrast to a metal lathing, is simpler. For its construction, fewer fasteners are used, however, the crate requires special antiseptic processing and the cost of wooden boards is higher than the cost of a metal profile.
The frame installation process consists of several stages:

- Marking the place of fixing the first lathing strip. It should be perpendicular to the length of the panel slats to be fixed. That is, if the slats of the panels are mounted horizontally, then the battens of the lathing should be placed vertically, and if the laths are mounted vertically, then the lattice should be placed horizontally.
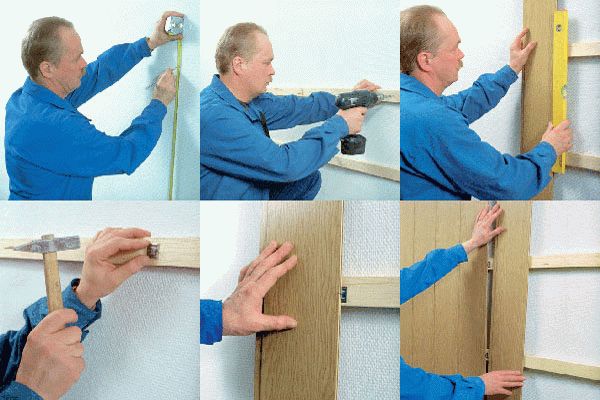
- Fastening the starting parts of the grill. A place is determined on the base with the largest protrusion; all other frame strips will be aligned with this beacon. The installation of the rails should begin with a row passing through the found ledge on the base. Holes for self-tapping screws are drilled on the bar in increments of 50-60 cm. It should be noted that the more bumpy the wall, the smaller the step should be. A rail is applied to the holes on the wall exactly horizontally and the locations of the holes for the dowels are marked (preferably using a level). Then the plank is removed from the wall and, using a punch, holes are drilled in the base and plastic dowels are placed. Subsequent strips of the frame row are attached in a similar way. To facilitate the alignment of the laths of the row, you can pull a bright thread along the initial plank, the ends of which are fixed with dowels in opposite corners of the room.
- Manufacturing of subsequent rows of lathing. The first plank of the next row should be in the same vertical plane as the plank of the previous row. For checking, you can use the level applied to the laths of the nearest rows. If necessary, you can correct the fastening of the bar by placing small wedges under it. Then the thread is pulled again, which acts as a beacon. In this sequence, all rows of the crate are performed. The distance of the laths between adjacent rows should not be less than half a meter. Installation of horizontal strips is carried out in the same sequence, with a step of 40-60 cm, in this way the skin will not bend. For the subsequent installation of ceiling and floor skirting boards, rows of planks should be placed along the line of the ceiling and flooring of the room.
- In all corners of the room, on each wall adjacent to one another, vertical slats are attached at right angles.
- Installation of wooden slats along the perimeter of openings for windows and doors.
Installation of a metal frame
For the installation of a metal lathing, a metal profile and connecting fasteners are used. Fixation of products to the base is carried out by means of self-tapping screws, their length depends on the strength of the base. For the frame, two types of metal profiles are used: narrow (UD) and wide (CD).
The metal frame is made in the same way as the wooden one: racks in corners and openings, as well as crossbeams.
The step of the frame is similar to that of a wooden lathing.
The technology for making a metal frame is as follows:
- Installation of narrow profiles in the corners, along the perimeter of door and window openings, as well as every three meters. This length corresponds to the length of the support leg. All intermediate components will be placed in these racks. Fixation should be carried out firmly in 15-25 cm increments.
- The horizontal posts are connected to the horizontal profile by means of longitudinal cd connectors.
- The key profiles are placed with their ends on the edge in the guide profiles and reinforced with self-tapping screws for strength.
- If the length of the base on which the cladding will be attached is more than two meters, then in order to avoid bending of the profiles from the load of their own weight, it is necessary to additionally fix the fastening brackets. The edges of the staples are bent at right angles and, as such, are placed in the place where the profile is installed. After fixing the profile in the guides, the brackets are fixed to it with bent parts, and their excess part is cut off. Before the final fixing of the horizontal racks, without fail, the horizontal is checked with a level. If there are any errors, then at this stage of installation they can be corrected.
Fastening panels
Installation of trim on the frame is much easier than preliminary work. The panels can be installed from any corner of the room.
Fastening of MDF coating is carried out in the following order:

- Layout and cutting of the launch panel. Using a tape measure, measure the required length of the panel by marking the appropriate mark on it. Using a jigsaw, saw off the excess part and a spike that runs along the entire length of the panel.
- Cutting holes in the casing for lighting fixtures.
- Attaching the original panel. The canvas is applied to the attachment point in such a way that the back side is adjacent to the crate close to the crate. The side adjacent to the corner at a distance of 1 cm from its edge is attached to all frame slats with self-tapping screws. From the side of the groove, the panel is fastened with metal clips (clamps) so that its protrusion fits into the groove of the panel, firmly fixing it. The clips are attached to the frame strips by means of nails.
- Installation of subsequent canvases. Cut off the required length of the cover, then place its spike in the groove of the previous panel and fasten it to the frame with clips. All subsequent panels installed to the opposite corner of the wall are attached in the same way. Often, the last canvas does not fit completely, so it is adjusted to the desired size. Only the segment that is on the side of the thorn is needed, therefore the segment of the canvas with the groove is cut off. Next, the spike is inserted into the groove of the previous panel, and part of the panel, which rests against the frame of the adjoining wall, is fixed with nails to the battens of the lathing. In this sequence, all walls of the room are finished with canvases.
- Installation of ceiling and floor skirting boards. The fixing of the skirting boards can be done in several ways: using fasteners, using self-tapping screws and using glue.
- The final stage of panel installation is the installation of a finishing corner, which covers all corner joints of the covering. To do this, a thin layer of glue mixture is applied to the measured length of the corner, applied to the corner of the walls and gently but firmly pressed it. To evenly distribute the glue, using a rag, you can walk along the length of the corner several times from the bottom up and back.
Installation on glue
This method of fastening is suitable when the surface of the walls does not have irregularities or the task is to carefully level them. Also, the installation of panels on glue is necessary when the surface of the walls is tiled.
Installation in this way does not require the arrangement of any frame.
First of all, let's decide on the type of glue that is suitable for this type of work. Any glue in this case will not work, you need a composition that has certain properties:

- plasticity not only during operation, but also after solidification (the composition must withstand temperature fluctuations);
- thick texture so that you can apply it not only with a thin, but also with a thick layer (in this case, construction glue - liquid nails is perfect).
Installation technology includes several stages:
- Cleaning the surface of the base from the old coating, dust, dirt and layers, followed by processing the primer mixture.
- While the primer layer dries, you can cut the panels to the required size.
- After the soil has dried, you can start installing the panels. To do this, glue is applied to it pointwise in a checkerboard pattern with large drops of glue. Then the canvas is pressed tightly against the wall, after which it is torn off, this is done in order to weather the glue, and also so that the sheathing does not lag behind the base under the weight of its weight. After 5-7 minutes, the canvases are applied to the wall and pressed tightly.
This mounting method has several disadvantages:
- from the effects of temperature changes when the seasons of the year change, the cladding can swell, in the worst case, peel off;
- when changing the finish, it will be necessary to clean the base from the remnants of glue, as well as the inability to reuse the dismantled panels.
- If the room in which MDF finishing is planned has traces of dampness, swelling or peeling of the putty, before cladding, it is imperative to remove the old coating to the main base.
- The lowest horizontal post of the batten should be on the floor to ensure that the skirting boards are firmly attached.
- Experts recommend attaching the cover to the frame, even though the profile reduces the space of the room. This is due to the fact that the cladding has additional ventilation and is less susceptible to seasonal fluctuations in temperature and humidity compared to the adhesive method.
- During the installation of the lathing, you can use two types of materials, building the base around the perimeter from a metal profile, and the transverse elements from wooden slats.
- Wooden slats for the frame must be well dried and even.
- Due to the fact that MDF is a highly flammable material, care should be taken that all external electrical wiring is removed in a corrugated cable pipe, and sockets and electrical switches in boxes.
- MDF cladding, in fact, is a thick pressed cardboard, and accordingly, it is susceptible to moisture. Therefore, prolonged exposure to moisture on the surface will lead to delamination and swelling of the coating.
- Professionals advise in the process of installing the lathing to transfer the location of the planks to the paper on the basis with exact observance of the coordinates. This will make it possible in the future to place any interior items on the wall exactly at the place where the rails are attached, and not on the cladding, on the surface of which it is strictly forbidden to attach anything.