Arranging the floor in the bathroom is perhaps the most difficult stage of apartment renovation. Communication pipes that need to be carefully hidden, high humidity of the room, which requires the use of special materials - all this only complicates the task. And if you decide to make repairs yourself, you probably wondered: how to make the floor in the bathroom correctly, so that it is both durable and beautiful, and not to flood the neighbors. In this article, we will try to answer this question as concisely as possible.
Do-it-yourself bathroom floor - a responsible task
In most cases, the installation of the floor in the bathroom differs only in the finishing flooring. Otherwise, the design is approximately the same, especially for apartment buildings, and is a kind of cake made of various materials with different purposes.
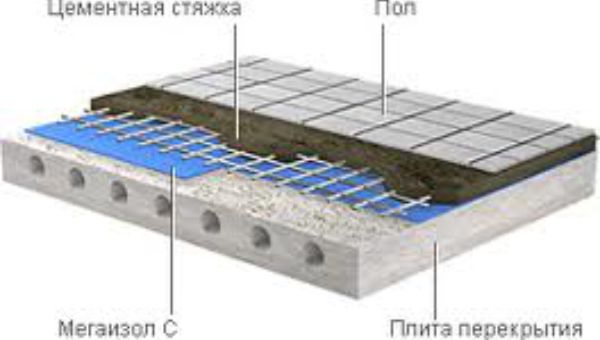
Bathroom floor plan
Most often, the floor device in the bathroom looks like this:
- Concrete floor slab;
- Waterproofing (built-up from bitumen or rolled);
- Cement-sand mixture screed with a thickness of about 50 mm;
- Waterproofing (coating or painting);
- Leveling screed (cement-sand or self-levelling);
- Floor covering (tile, linoleum, wood, laminate, self-leveling floor).
For additional heating of the bathroom and to keep the legs warm, they equip the “warm floor” system. It is mounted at the stage of the leveling screed, so it must be planned in advance.
How to equip the floor in the bathroom with your own hands
Having decided to do all the work yourself, be prepared for the fact that you will have to “tinker” with the bathroom. The arrangement of the floor will require a lot of effort, patience and care. Each stage of work can be delayed for a relatively long time. To make the design durable, the materials must gain their strength - dry. Therefore, you should not rush - we do not need a poor-quality floor.
The technology for arranging the floor in the bathroom is unified and consists of several stages. More details on each below.
Preparatory work
There are two scenarios for preparatory work, and they are determined by the state of the bathroom at the moment: “after the builders” or residential.
Repair in a residential apartment will require the removal of flooring and leveling screed. Most often, ceramic tiles were laid on the floor in bathrooms; a puncher is needed to remove them. Using it, we break the tile, then take out its remains. In the process of dismantling the tile, the leveling screed will most likely be broken. There will be holes, cracks and splits after the perforator. Therefore, we also remove the screed. In addition, if the apartment is old, it is unlikely that in Soviet times this screed was made with high quality, so you should not regret it. If linoleum was used as a floor covering, it must be carefully pry off with a sharp knife and torn off. If the floor was wooden, we saw off part of the boards and then dismantle the rest. Removing the leveling screed will also be needed in order to qualitatively waterproof the floor.
Preparatory work in the apartment "after the builders" will be much less. It is only necessary to sweep out all the garbage, if any.
Then it is desirable to vacuum the concrete base of the floor and. This applies to both residential apartments and new buildings. So that holes and cracks do not increase over time, we close them with tile adhesive. After it dries, you can proceed to the next step.
Floor waterproofing
For better adhesion of the waterproofing material to the floor surface, it must be primed. Therefore, we first treat the floor with a soil mixture and only then proceed to waterproofing.
There are several options for waterproofing the floor: welded, rolled, coated and painted. Each of them is good at its stage of arrangement.

Waterproofing the floor in the bathroom using welded materials is one of the most reliable
Fused waterproofing it is used for processing floor slabs, it is carried out with an overlap on the walls of at least 25 cm. A concrete floor is poured on top of it, on which you can also apply welded insulation, or you can use more modern materials.
Roll waterproofing useful for applying to walls in the junction of a shower or bath.
Painting method can be used for, but this option is short-lived. The average service life of paint waterproofing is 3-5 years. Although this method is the simplest and easiest: with a brush or roller, it is necessary to apply the solution to the floor with an overlap of 10 cm on the walls.
Coating waterproofing considered the most optimal and durable in this case.
For its implementation you will need:
- Prepare the mixture by pouring the dry component into water and stirring thoroughly. The ratio of components should be 1:1. It is necessary to knead thoroughly so that a homogeneous mass is obtained.
- Apply the mixture to the entire surface of the floor with a roller or brush. For hard-to-reach places, you can use a spatula or brush. The consumption of material per square meter is indicated on the packaging, try to take it into account.
- Stick the waterproofing tape on the joints of the floor with walls and other structures.
- Coat the tape and walls with the mixture 10 - 15 cm up, thus forming a "trough". This will protect against seepage of water through the cracks between the walls and the floor, as well as through the walls themselves. If suddenly there is a flood in the bathroom, the “trough” will be able to hold back some of the water so that it does not pour into the neighbors or adjacent rooms.
- The waterproofing mixture must be applied in two layers. After the first layer, take a break of 4-6 hours. Then apply a second layer.
- Wait for the waterproofing to dry completely. You can start subsequent work only after at least a day.
At this stage, you need to stop and think: will you make any significant changes in the bathroom. About what kind of changes, and how they affect the further stages of work, a little lower.
Structural changes in the bathroom
Since you have started the renovation anyway and are completely changing the floor in the bathroom, it is quite possible that you want to make structural changes in the arrangement of the room. Ennobling and increasing the comfort of the bathroom, you can install a "warm floor" system, equip a drain for water or move the toilet bowl to another place if the bathroom is shared. It is necessary to decide whether you will do any of the above at this stage, before pouring the concrete screed.

Electric "warm floor" in the bathroom is laid on top of the first layer of screed
Installation of the "warm floor" system significantly increase the comfort and convenience of being in the bathroom barefoot. After all, most often tiles are laid on the floor, and it is very cold to the touch. It is especially unpleasant to step on a tile in the morning, when you just woke up and got out of a warm bed. The bathroom can be installed electric "warm floor" and water. Contrary to popular doubts, the “warm floor” in the form of an electric heating cable can be safely installed in the bathroom. Moreover, it is very easy to install, and leaks are impossible. But there is one very significant drawback: the high cost of electricity. The so-called "water heated floor", consisting of pipes through which hot water flows, can be connected directly to heating pipes, hot water or heated towel rails.
Water drain equipment will protect the apartment and neighbors from accidental flooding. And in everyday life, water poured onto the floor will immediately go down the drain. In order to make a drain, the floor surface will have to be made with a slight slope towards it. In this case, the overall level of the floor will rise by at least 10 cm. It is necessary to mount the drain and the outlet pipe; in the course of further work, the neck of the drain must always protrude above the level of the screed. This should be constantly monitored, but for now it can be plugged with rags so as not to clog the pipe.
If required moving toilet to another location, you will also have to make a number of design changes. The toilet bowl must be connected with a pipe to the sewer, placing it at an angle for high-quality water flow. To hide this pipe, you will either have to raise the overall floor level by 15 - 20 cm, or equip a separate pedestal for the toilet. At this stage, it is necessary to dismantle the toilet and lay a pipe to a new place. You can not yet put the toilet in place so that it does not interfere.
Important! The low floor level in the bathroom in relation to the general level of the floor in other rooms helps to avoid flooding the entire apartment or house, as well as neighbors. If it is not possible to make such a floor, you can equip a high threshold. It will also hold back the flow of water up to a certain point.
Before pouring the floor in the bathroom, it is necessary to mount all additional communications and know exactly at what level the floor will be. Once everything is ready, you can proceed to the screed.
Floor screed in the bathroom
The smoother the base of the floor, the better it will be possible to lay the floor covering, the more durable the floor itself will be. Therefore, the floor screed must be approached with all responsibility.

You can level the floor in the bathroom with a cement-sand screed or self-leveling mixture.
The most common material for making a leveling screed is a cement-sand mixture. Self-leveling compound can be an alternative to it, but it will not work if the floor is too uneven or has significant flaws. In extreme cases, you can use it for the second leveling layer.
The procedure for performing a concrete screed looks something like this:
- On the walls it is necessary to outline the level to which the floor will be poured.
- Install beacons with an interval of 1 m. To fix them, you should lay out tubercles of cement-sand mortar on the floor, to which alabaster is added. Lighthouses are laid on them and leveled according to the level, guided by the marks on the wall. At the same time, they are slightly pressed into the solution.
- Prepare a mortar for the screed by mixing it thoroughly with a drill.
- Pour the solution up to the top edge of the beacons.
- For leveling, you can use a rule with a length of at least 20 - 30 cm more than the distance between the beacons. The rule is applied to the lighthouses and stretched towards itself, distributing the solution over the voids and removing the excess.
- It is very important to wait until the screed is completely dry. At the same time, observe the microclimate indicated on the packaging with the mixture, and avoid drafts.
To install an electric "warm floor", the screed must be poured in two stages. After pouring the first layer, you should wait for it to dry completely. Then lay out the thermal insulation and spread the "warm floor". Top with a second layer of mortar.
Bathroom flooring installation
The final stage of arranging the floor is laying the floor covering. There are many options for how to make the floor in the bathroom.
As an example, consider the technology of making a self-leveling floor:
1. Prepare the mixture by pouring the dry component into the water and stirring with a drill with a mixing nozzle. It is important to observe the proportions indicated on the package.
Important! In the process of filling the self-leveling floor in the room, the temperature should be +15 - + 25 ° C, humidity up to 80%.
2. Fill in the first strip, starting from the corner opposite the doorway.
3. Level with a squeegee or spatula, adjusting the layer thickness.

We roll the filled mixture with a spiked roller to remove air bubbles, you can walk on the floor in “paint shoes”
4. Remove air bubbles by rolling with a spiked roller.
5. Fill in the remaining strips according to the same algorithm.
You can use the floor after 6 - 12 hours, by this time it will already gain enough strength, but it will finally dry out within 3 days at least.
Important! If a "warm floor" system was installed in the bathroom, it can be turned on no earlier than a week after the floor is poured.
Floor coverings for the bathroom - which one to choose
There are several options for bathroom flooring. Determining which one to choose, it is necessary to take into account personal preferences, budget and operational features.

Cork floor in the bathroom - eco-friendly, pleasant to the touch and hypoallergenic
Recently, more and more often a cork is laid in the bathroom. She really has a lot of advantages: warm and pleasant to the touch, does not rot, springy, does not absorb water, fungi do not multiply on it. On a cork floor, it is almost impossible to slip, unlike a tile. Under the feet, the cork pleasantly springs, invariably returning to its original position. In addition, it is hypoallergenic and completely natural. But keep in mind that only cork array has the ability not to absorb moisture. This does not apply to HDF floors. Therefore, choose a cork array with a thickness of 4 - 6 mm, glued to the base.

Self-leveling floor in the bathroom will make your wildest dreams come true
One of the easiest to arrange is a self-leveling floor. He gained popularity recently. Its essential advantages are: ease of installation, waterproofing properties, a variety of patterns and shades. In addition, under it you can mount the "warm floor" system. At the same time, the self-leveling floor also has undeniable drawbacks: a freshly prepared mixture has a toxic composition and ignites easily, requires a perfectly even base, unnatural, which is felt good to the touch.

Ceramic tiles on the floor in the bathroom - a classic of the genre
Ceramic tiles are still the most common and sought-after flooring material in the bathroom. And, despite the relatively complex laying technology and the fragility of tiles, the variety of shapes and colors, as well as the naturalness of the material, incline buyers to choose tiles. It doesn’t even stop that if one tile is damaged during operation, the whole area will have to be changed. Because during the dismantling of the damaged tiles, the neighboring ones will certainly be damaged. Nevertheless, aesthetics and some traditionalism are more important.

Wooden floor in the bathroom - warm and cozy
Such a floor is a rarity today, because not every wood can withstand high levels of humidity. For a wooden floor, teak and larch are used, while providing additional waterproofing. This floor is very beautiful, healthy and warm.
Instead of wood, experts advise laying a moisture-resistant laminate.
Linoleum
As a finishing floor covering in the bathroom, you can lay linoleum. It will serve as an additional waterproofing, it is extremely easy to maintain and install. But it has a significant drawback: it quickly wipes off and becomes “unpresentable”. Therefore, linoleum is used only as a temporary cover or an economical option.
Whatever flooring you choose, you should know that the main task is the high-quality performance of all previous stages of work. Any coating will fall on a perfectly even screed. A properly made waterproofing will protect against flooding.
Before choosing a floor covering, you should pay attention to the various options. Today, there are a lot of options, but not everyone is suitable for the floor in the bathroom. We will consider the most successful flooring options in the following categories:
- The most durable flooring ever.
- The most durable bathroom flooring.
- Eco-friendly flooring options for the bathroom.
This means that all of the options mentioned are durable and strong. Every option, except perhaps cheap vinyl tile, can also be called an eco-friendly coating.
What is the best bathroom floor?
The flooring in the bathroom undergoes a lot in its lifetime - things fall, the room is constantly humid, sometimes the temperature goes off scale, the floor is often washed and disinfected with chemicals. That is why it is important to choose a quality coating that can last for a long time and will not lose its appearance in a year or two. What is the best flooring for a bathroom floor?
The bathroom floor must be durable, durable, able to withstand high humidity conditions and resist the threat of stains and fungus. If you are looking for a flooring that is the most resistant to these factors, as well as easy to maintain and environmentally friendly, here is the list for you.
- Ceramic tile.
This is probably the most durable coating option that can be used on the floor in the bathroom. Ceramic tiles are resistant to physical pressure. Bathroom ceramics are usually covered with glass glaze, which not only prevents moisture from penetrating into the porous structure of the material, but also makes the flooring more decorative. The icing can be any shade, often a pattern is printed on it.
When properly installed, good quality ceramic tiles will look great for decades without much maintenance and care. Of course, over time, scratches begin to appear on the glossy surface. If you opt for a tile with a pattern, small scratches will hardly be noticeable.
Caring for ceramic tiles on the floor in the bathroom will be as follows. You will need to seal the joints between tiles from time to time to prevent water from entering, which causes mold and mildew to grow. In some cases, you may need to remove the grout with a grout knife and then reapply it so that the floor looks brand new.
- glass mosaic.
Glass is probably not the first thing you think of when choosing bathroom flooring. And in vain! The glass used for flooring is fired and made very hard wearing and crack resistant. Moreover, glass is not afraid of moisture. And all the stains on it are easy to erase.

- rubber floor
Such a versatile material as rubber is becoming more and more popular in bathrooms. It has long been used for floors in commercial areas such as hospitals, gyms, nursing homes. The rubber floor is soft and safe. It is easy to keep clean. However, do not purchase recycled rubber bathroom tiles from unknown manufacturers, the smell from such rubber will disappear very soon. Rubber is afraid of some chemicals, contact with them may leave stains that cannot be removed.

In Western countries, rubber flooring is becoming more and more popular due to the fact that its use is considered environmentally friendly. Rubber flooring is often made from old car tires, which, instead of polluting the environment, once again serve the benefit of man. What's more, rubber flooring doesn't use much energy and is generally environmentally friendly.
- Concrete floor
Concrete flooring can only be chosen as an option for the bathroom if it is on the ground floor, as it is a very heavy material. To date, there are many technologies on how to make concrete flooring more decorative. In any case, the concrete flooring looks rather poor if it does not fit into the design of the bathroom. A skilled designer will make sure that the concrete floor will look amazing in the interior of the bathroom. Concrete is a cost-effective coating option.

The coating must be treated with a sealant before use, as it is very porous in its natural state. Concrete flooring is easy to clean and maintain.
The advantage of using a concrete floor, in addition to its budget, is its unconditional strength, but the disadvantage is its hardness, this can be dangerous for the elderly or young children who can fall and get hurt.
What floors should be avoided in the bathroom?
There are several popular types of flooring that are best avoided in the bathroom. And it's not even that they do a poor job and will not last long in conditions of humidity and temperature changes. The point is their gradually deteriorating sanitary condition, which sooner or later will make such floors a breeding ground for bacteria and fungi. These coatings include:
- Laminate
- Parquet
- All types of carpets,
- Wood (If you really want to, you can use bamboo flooring. Bamboo is more resistant to water than wood, but still susceptible to damage from splashes and moisture over time.)
- Linoleum
I hope this material helped to decide on the most successful flooring options for the bathroom.
Add site to bookmarks
- Kinds
- Choice
- Installation
- Finishing
- Repair
- Installation
- Device
- Cleaning
How to make the floor in the bathroom
One of the important and difficult stages of arranging an apartment or a private house is the bathroom, because in this room a large number of communication pipes are grouped, which should be carefully hidden, and constant humidity requires the use of special materials in the work. Given these important factors, many are wondering how to make a bathroom floor so that it is strong enough and at the same time looks aesthetically pleasing.
Finishing the bathroom with ceramic tiles is a very good choice, since the tile has the main quality required for a bathroom - water resistance.
Basically, all installation work related to the arrangement of the floor in the bathroom is carried out according to the same scheme as in other rooms of the apartment or house. And they are a kind of cake made of various building materials, each of which has its own specific purpose. The only significant difference is only in the top flooring.
What is a bathroom floor

There are two mandatory points that must be observed when choosing and installing a shower siphon in the floor: the design must be collapsible with a water seal at the drain.
- Concrete floor slab.
- A waterproofing layer, most often rolled or built-up bitumen is used here.
- Cement-sand screed with a thickness of about 50 mm.
- Waterproof coating or paint layer.
- Cement-sand leveling screed.
- Floor covering - tile, linoleum, laminate, wood or self-leveling floor.
Recently, for additional heating, both separately only for the bathroom, and for the entire apartment or private house, the underfloor heating system has increasingly been used. Such a system is mounted at the leveling screed stage, in connection with this, such work should be planned in advance and thoroughly prepared for it.
In order to carry out all the installation work correctly in a room such as a bath, a lot of effort, patience and certain accuracy are required, because all the work steps can drag on for quite a long time. Such time is required so that in the end the structure turns out to be durable, and the materials used can finally dry out and reach maximum strength.
Back to index
Preparatory work

The arrangement of the premises, as well as the preparatory work, completely depends on which house or apartment the flooring will be carried out in: in a new, newly built, or residential and in need of repair premises. When repairing a residential building, you will need to spend more time and effort. First, the complete removal of the floor covering should be done, after which the subsequent alignment of the screed is required. It will be much easier to carry out preparatory work in a newly built residential building. The only thing that is needed here is to sweep all the garbage out of the room
After this room is fully prepared for subsequent work, it is recommended that both in the new and in the renovated bathroom, vacuum the floor and close up all visible cracks. So that in the future these cracks and other holes do not increase, it is recommended that all work be done on the basis of the use of tile adhesive. After it is completely dry, you can proceed to the next step.
Back to index
Waterproofing works

First, the entire floor surface is treated with a soil mixture. After its complete drying, one of the possible waterproofing options is selected: rolled, welded, painted or coated. Each of these options is effective, but the most durable, optimal, and therefore the most popular is the coating version of waterproofing.
For this you will need:
- Pour the dry coating mixture into water at the rate of 1:1. Mix everything thoroughly until a homogeneous mass is formed.
- Apply the finished mixture to the floor surface with a roller.
- Glue waterproofing tape at the junction of the floor with the walls.
- Apply the coating mixture to the waterproofing tape and walls, while the height from the floor should be at least 15 cm.
- Allow the first waterproofing layer to dry completely, and then apply another one.
After the waterproofing layer is completely dry, which takes about a day, you can proceed to the next stage of work. But here it should be finally decided whether it is planned to carry out any changes in this room, because this may affect the process of all further work related to the installation of the flooring.
Back to index
Possible changes
In connection with the arrangement and repair of the bathroom, it is quite acceptable to make structural changes in this room, for example, to equip a water drain, install a floor heating system or move the toilet to another location. These and other changes must be carried out at this stage, that is, before the start of pouring the concrete screed.
- Water drainage equipment provides an excellent opportunity to avoid accidental flooding. To do this, the floor will have to be made at a slight slope towards the drain and a drain pipe should be installed in the corner to drain the water.
- The presence of a warm floor in the bathroom increases comfort and provides certain amenities. Such an installation is quite safe for people, is easy to install and eliminates leaks in the future.
- To transfer the toilet bowl to another place, it should be connected to the sewer. In this case, the connecting pipe must have a certain angle of inclination, which during finishing work will need to be hidden from prying eyes.
Back to index
Floor screed in the bathroom

The floor screed should be approached with all responsibility. The smoother the base is made, the better it will be to lay the flooring later. To perform a leveling screed, a cement-sand mixture is most often used, which is able to qualitatively level any surface, even with the most significant and obvious flaws.
The procedure for performing a concrete screed:
- On the walls, by means of a level, it is necessary to outline the boundaries to which the floor will be poured.
- Focusing on the marked boundaries, place the beacons at a distance of 1 m from each other.
- Using a drill with a mixing nozzle, prepare a thoroughly mixed cement-sand mortar.
- To the upper edge of the beacons, pour the solution and level it with the rule.
At the end of work, it is important to observe the microclimate rule and avoid drafts until the screed dries. When installing a warm floor, after the first pouring and complete drying of the screed, you should first lay a heat-insulating layer, and then proceed with the installation of a warm floor. Upon completion of these works, it is necessary to carry out another pouring of the second layer of cement-sand mortar.
Do-it-yourself bathroom floor repair is one of the most complex technological processes in arranging an apartment. At this stage, all communications are closed, a screed and waterproofing are made. Repairs are made taking into account the high humidity of the room, which further complicates the work. Here we will figure out how to quickly, efficiently and technologically correctly make the floor in the bathroom with your own hands.
Qualitative characteristics
To begin with, let's decide what requirements the new bathroom floor should meet. Based on this, we will be able to choose the right coating for finishing the floor.
- Non-slip and safe;
- Easy to wash;
- Waterproof;
- Warm;
- Nice;
- Wear resistant.
Choosing the right flooring isn't everything. It is important to observe the technology of laying the selected material. And then the floor will serve you for many years.
Types of flooring
Practicality, moisture resistance and a combination with your chosen interior are the main requirements for any bathroom flooring. Consider the most popular, interesting and noteworthy options.
Ceramic tile
A great finishing option is do-it-yourself tile on the floor in the bathroom. Today it is the most popular finishing option. Ceramic tiles do not deform over time, they are easy to clean and almost impossible to spoil with chemicals. In order to keep your bathroom floor non-slip, we recommend that you avoid tiles with a glossy finish.

Linoleum
Linoleum is one of the cheapest flooring options. For the bathroom, you need to purchase linoleum on a moisture-resistant base. The rough surface is another plus in favor of such a coating.

self-leveling floor
Today, this option is becoming more and more popular. The self-leveling floor is a polymer that, in a liquid state, evenly spreads over the floor, and then solidifies. Such a floor is absolutely moisture resistant and durable. Do-it-yourself water-heated floor in the bathroom is often combined with a self-leveling coating. Its main advantage is an absolutely smooth non-slip surface, and the disadvantage is its high cost.

Laminate
Laminate is not the best flooring for a bathroom. If water remains on this material for some time, it will last only a few years. Therefore, even a moisture-resistant laminate you will have to wipe dry after each shower or bath.

A rock
Natural stone is well suited for bathroom floors and walls in terms of its durability and moisture resistance. However, the stone is very slippery and cold, so walking on it with bare feet is simply not safe, which, you see, is not very convenient.
Tree
The wooden floor in the bathroom, made by hand, looks very stylish, beautiful and noble, but, unfortunately, the moisture-resistant qualities of wood leave much to be desired. Such a floor is not the most practical or profitable option, but it has a right to exist.

Repair work
Repair work on replacing the floor in the bathroom can be divided into four main components:
- Floor preparation
- Waterproofing
- Screed
- Floor finish
Floor preparation
Usually the bathroom already has a screed. Therefore, during the repair of the floor, we first of all remove all old finishing materials. In order for your repair to last for many years, this step must be performed as carefully as possible: remove all paint, putty and other dirt from the floor. Carefully walk through the areas where the screed is adjacent to the walls. If you hear an empty sound when you knock on the old floor screed in the bathroom, this means that there are cavities in the floor, such a screed must be completely changed. If the past screed is in good condition, then cover all cracks and irregularities with tile adhesive and leveling compound, and then proceed with the repair after they have completely dried.
The last stage of preparing the floor for repair is the treatment of the entire surface with a primer.
Waterproofing
The waterproofing layer is made in several ways and with different building materials. Here are the three most common and noteworthy:
- pasting
This option is suitable for a bathroom where waterproofing is required not only for the floor, but also for vertical surfaces. With this method of waterproofing, the final work will look like a bowl up to 1.5 m deep. Suitable for non-professionals and beginners in the world of repair.
- Bitumen
Bitumen, or rather bituminous mixture is applied to the floor with a soft roller or brush. This is a cheap option, but the service life of such waterproofing usually does not exceed five years.
- Coating
The coating material makes the ideal waterproofing of the floor, which is why it is so successful. Before applying it to the joints, you need to lay a waterproofing tape. Then the waterproofing itself is applied, resembling batter in consistency. It is convenient to spread it over the surface with a dense roller or construction spatula. As in the case of pasting, walls can be covered with such waterproofing, but to a height of no more than 10 cm.

Screed
First you need to decide on the height of the floor screed in the bathroom. For this purpose, a building level is suitable - laser or water. A straight line is outlined along the perimeter of the room being repaired, along which the screed will be made. Do-it-yourself warm floor in the bathroom is installed at this stage.

After that, slats and rope beacons are installed.
Then the cement mortar for the screed is poured into the space between the slats and aligned with the beacons.

Remember: The screed should dry itself, in a natural way. The underfloor heating system will need to be turned off during the curing of the screed.
Tiles in the bathroom
In our article on how to make a bathroom floor with your own hands, we will not talk in detail about the methods of laying all the finishing materials. Let us dwell only on the most common - floor tiles.
Do-it-yourself tile on the floor in the bathroom is both a practical, durable option and an affordable solution to an urgent issue.
For self-repair you will need:
- Building level;
- Putty knife;
- Container for the mixture;
- Divider crosses.
Before you start laying tiles on the floor, you need to decide in which direction you will lay it, whether it will need to be cut and how to maintain symmetry in the pattern.

Tile adhesive is applied to the tile or floor. In the course of work, plastic crosses are used to maintain an even width of the joints between the tiles.
The final step is grouting the seams. It is made after removing all contaminants from the tile, including excess glue. The grout is applied with a rubber spatula or cloth.
Video
In the video you can see how to make the floor in the bathroom with your own hands:
When repairing a bathroom, the importance of proper floor screeding is not always taken into account. Often, careful conduct of this stage is observed only during the arrangement of an apartment in a new building. However, in old houses, it is sometimes simply impossible to perform a quality renovation of the premises without laying a new subfloor.
The screed contributes to the correct distribution of the load on the floor from furniture and household appliances, and will also reduce the negative consequences of small leaks in the bathroom. It is important to know the technology of such work and their features. Let's take a closer look at how to make a floor screed in the bathroom.
It should be noted that the process of arranging the base screed is quite laborious. Of course, it is necessary to start with the dismantling of the old floor.
Dismantling the floor during the repair
After the old screed is removed, you will have to tinker with cleaning the room. As a rule, you need to collect and take out a large amount of construction debris, clean and prepare the surface well.
Before you make the floor in the bathroom, thorough preparation is recommended. Laying a new screed is accompanied by a lot of additional work that necessarily precedes installation.
Bathroom floor waterproofing
This is the first thing you need to take care of when finishing the floor in the bathroom. It should be noted that standard polyethylene as a waterproofing material is not the best choice. The cement screed corrodes it and a few years after the repair of the insulating flooring simply will not be.
In the bathroom, you can not do without reliable waterproofing. If even a slight flooding occurs, you can fill the ceilings in the apartment from below. This will incur large repair costs for neighbors. Therefore, the materials for laying on the floor should be chosen the most durable. It is better to purchase bituminous mastic or special material in rolls for insulation.

Bituminous mastic for insulation
A layer of bitumen is applied to the prepared clean floor surface. Then a waterproofing layer is made on top. It is better to choose rubberized in rolls. The material is heated with a gas burner and glued to the base with bituminous mastic.
Do not forget to waterproof also sections of the walls from below at a height of about 150 - 200 millimeters.
It is also desirable to cover with insulating material those areas of the floor in which the risers are placed.
Screed and floor insulation
Doing repairs to the floor in the bathroom with your own hands, you need to take care of thermal insulation. Insulation of the screed itself is an important stage of work, but the effect of this procedure will seem insignificant if you do not additionally provide for a floor heating system. By equipping your bathroom with underfloor heating, you can immediately feel all the advantages of these modern designs.

Warm floor in the bathroom
Underfloor heating systems save energy costs, create a cozy and comfortable atmosphere in the room. Warm floors allow you to walk barefoot on tiles without fear of catching a cold.
Today, a wide range of different underfloor heating systems is on sale. Some of them consume very little electricity, so this design will not "eat up" the entire family budget. There are cable models that need only 500 watts to heat the floor in a small bathroom. If you make a choice in favor of a water-heated floor, you will save even more.
In order to properly insulate the floor screed, a foam sheet with a thickness of about 50 millimeters is laid on the waterproofing. A special screen is placed on top of it, which will conduct heat into the room from heating appliances.

Floor insulation with foam
The next stage involves the laying of a reinforcing steel mesh with a cellular structure. The size of the holes in it is 100X100 millimeters, and the thickness of the wire is 2 - 3 millimeters.
In the case of installing a floor with a water circuit, the pipeline must be laid out after the grid. The electric underfloor heating is laid differently - the heating elements of the structure are installed on the finished screed.
Filling the screed with the installation of beacons
Since standard bathrooms and toilets are relatively small, the process of working on a screed or pouring the floor in the bathroom with your own hands is easier and faster. The small area of the room also makes it easier to install beacons.

The process of pouring the floor on beacons
In the work it is necessary to use a long rack level (about two meters). Beacons are laid on hills of cement mortar, laid out in a line with intervals between them equal to 0.5 m. The function of beacons is performed by guide profiles for drywall ud. They are inserted into the solution, and then the position of the beacon is checked using a level. Then, having measured the desired width from the first, the second beacon is set.
Now the level must be installed on two beacons at once, but the general principle of installation remains the same. You need to remember to check for a clear horizontal when installing guides. You need to pay attention to the second lighthouse itself, and to the distance between the first and second. Then, following the technique described above, arrange the remaining profiles for the screed.

Pouring the base on the lighthouses
In cases where the floor is poured on top of the foam, it must be cut off at the installation points of the beacons. These are places with located "mounds" of cement. If the foam is left, the beacons may move. Before you pour the floor in the bathroom with your own hands under the tiles, you must definitely take into account this nuance. "Playing" beacons will make the screed uneven, and this, in turn, will complicate the process of finishing the tiles and require a large amount of tile adhesive.
The floor screed in the bathroom under the tiles should not be too thin. Otherwise, cracks may appear in it. The thickness of the fill is usually at least 50 mm. This is important to remember when installing beacons. To install them, the height is marked from the floor itself or from the foam sheet.
The sequence of laying the screed in the bathroom
First of all, in order to make high-quality floors in the bathroom with your own hands, you need to properly prepare the solution. Prepare cement and sand.

Preparation of cement slurry
It is important to determine the proportions. The answer to the question of what mixture to fill the floor in the bathroom with depends on the type of base for pouring. If you need to immediately pour a concrete base, a solution in a ratio of 1: 4 is suitable. This is 1 part cement and 4 parts sand. Styrofoam screed involves using a mixture in a ratio of 1: 3. In this case, you need to take three parts of sand.
The mixed composition for pouring is poured onto the floor surface between the beacons and leveled using the building rule. The tool is placed with both ends on beacons located next to each other.

Leveling a cement screed floor with a rule
Thus, the entire screed in the bathroom is gradually poured. During operation, it is necessary to ensure that the mortar is laid strictly according to the level of the beacons.
After a day, the filling will harden a little. Then you can remove the guides, and cover the recesses left from them with cement.
The next step is to level the surface, smooth out all the protrusions and bumps. This is done with the pointed end of the rule. After that, the rough filler floor in the bathroom is covered with a thin plastic film and left to dry.

The finished screed must dry
Polyethylene reduces water evaporation and makes the concrete screed more durable.
Types of mixtures for floor screed
As a rule, leveling mortars for floors are made from gypsum or cement. The latter for bathrooms and bathrooms is preferable. Filling mixtures are produced in special paper bags with a polyethylene backing. It protects the material from moisture penetration.

Mix for dry floor screed
Water must not be allowed to enter the package, since damp solutions are absolutely not suitable for creating a strong and even screed.
It is also important to check the expiration date of products. Each mixture is designed for a certain period of use. Stale material can degrade the quality of the finished flooring solution.
Often, manufacturers include various modifying components in the composition of leveling mixtures. Such additives can make the coating better, as well as make the finished solution more plastic, which is important in the repair process.
For example, special synthetic fibers reduce the likelihood of cracking when the screed hardens. A screed made on the basis of a solution with such substances can even be used as a floor finish.
There are such types of mixtures:

The first type of solutions is used as an external surface finish. They allow you to get rid of defects and protrusions of the coating. The mixture must be applied in a thick layer, which makes it possible to end up with a smooth base.
The screed itself is also classified in a certain way according to the property and condition of the material:
- Dry screeds.
- Semi-dry.
- Wet.
So, a wet screed is considered the easiest to perform. It is made up of concrete and sand. The composition prepared in this way is poured onto the subfloor and distributed over its surface.

Pouring screed mixture
However, this filling takes a long time to dry.
Wet screed is made on thermal insulation or waterproofing material. The heat-insulating layer is used for decoration in country houses and in apartments on the first floors of buildings. A wet screed with two leveling layers is also used. This option is necessary if you plan to finish with linoleum or parquet. The so-called knitted screed is suitable for living quarters.
Semi-dry screed also includes sand and cement. However, unlike wet pouring, plasticizers and other components are added to these mixtures. Due to the presence of these additives, a semi-dry screed dries faster and with its help you can easily level the base by removing all bumps and protrusions.

Leveling the base with a semi-dry mixture
In addition, less water is required to knead such a solution. This will make the floor structure lighter and more durable.
A dry type of screed is a composite product of several layers. Crushed stone or expanded clay is placed at the lower level, and gypsum fiber is placed on top. Laying such a floor is not difficult, and there is not much dirt left. However, the dry finish of the base has a significant drawback: it is not able to withstand a large load.
Principles of work with mixtures for screed
When performing repair work, it is necessary that the air temperature in the room where the floor is poured does not fall below +5 degrees and does not exceed +25. Humidity should be no more than 90%.
Drafts should be avoided during operation, as they impair the quality of the screed. It is necessary to calculate in advance the time for the poured base to dry, sometimes with a margin, since some types of compounds will “set” for a long time.
When preparing a mixture for pouring, it is necessary to follow the proportions and all the instructions that manufacturers list in the instructions on the package.
Some time after the completion of work, while the floor is still freshly poured, it is better not to walk on it. Especially this advice should be heeded by those owners who decide to make a foam base screed. To remove beacons, you can put wide sheets of OSB on the surface after processing. Such protection will prevent damage on a new, recently poured floor.

After the screed dries, remove the beacons
The floor level must be taken into account during the installation of beacons. The floor in the bathroom should be slightly lower than in the rest of the apartment. This threshold helps to avoid flooding.
Thus, the process of self-filling the floor in the bathroom is a type of repair work that is quite accessible to every owner. It is only necessary to use high-quality materials for the screed and follow the technology and all stages of filling.