Specialization: facade finishing, interior finishing, construction of dachas, garages. The experience of an amateur gardener and horticulturist. He also has experience repairing cars and motorcycles. Hobbies: playing the guitar and much more, for which there is not enough time :)
Is it worth it to putty the walls before wallpapering, what material should be used for this and how to properly finish the rough finish? For those who are looking for answers to these questions, I want to talk about all the nuances associated with wall puttying under wallpaper. I am sure that this information will help you to qualitatively repair your home.
What you need to know about wall putty
Do I need to putty the base
Many beginners are interested in - is it necessary to putty the walls at all? To answer this question, it should be understood that putty allows you to solve the following problems:
- Provides a uniform light surface. If you stick thin, for example, paper wallpapers on cement plaster or concrete, then gray spots will appear under them;
- Levels the surface. Wallpaper cannot hide significant differences and irregularities in the base, therefore, if there are flaws, they must be eliminated with putty;
- Improves adhesion. If you are going to glue wallpaper on wood, OSB or concrete, then putty will improve the adhesion of the adhesive to the base;

- Allows you to remove old canvases without damaging the base. This property is relevant for drywall walls. If they are not puttied, then later you can tear off the old wallpaper only with a layer of cardboard.
From this we can conclude that it is possible to do without putty only if the walls are plastered with light plaster - gypsum or lime, and have a flat surface. In other cases, it is highly desirable to apply an additional leveling layer.

What putty to use
As you know, putty is divided into two types:
- Home. Designed to eliminate large differences (up to 1 cm);
- Finishing. Allows you to give the surface smoothness, applied in a layer up to 1 mm.
I must say right away that the finishing putty in our case is completely unnecessary. Firstly, it is not visible under them which surface is smooth or rough. And secondly, finishing putty will only worsen adhesion.
Therefore, the wallpaper should be glued on the starting putty or universal, and the finishing one is needed to prepare the surface for painting, since the paint does not hide defects, but more often, on the contrary, it reveals them.
Putty technology
The filling process can be divided into four stages:

Preparation of materials
First of all, let's look at what you need to putty the walls. So, you will need:
- White starter putty, gypsum mix is best, as it is inexpensive and easy to work with;
- Acrylic universal primer (if the base is loose, a deep penetration primer should be used, if the surface, on the contrary, with poor adhesion, an adhesive primer should be used);

- Mesh-abrasive P80-P120;
- A set of spatulas;
- Paint roller with a cuvette;
- Clean plastic bucket;
- Electric drill and a special nozzle-mixer.
It is also desirable to have a long rule to control variations in wall surfaces.
Foundation preparation
Before plastering the walls, it is necessary to prepare them as follows:
| Illustrations | Actions |
 |
Dirt cleaning. The surface must be cleaned of dust and dirt, if any. To do this, the walls can be vacuumed or wiped with a damp cloth. |
 |
Padding:
|
 |
Joint reinforcement:
|
Now you can start patching.
Puttying
The putty technology is as follows:
| Illustrations | Actions |
 |
Putty preparation:
|
 |
Puttying seams:
|
 |
Wall puttying:
|
This completes the spatula. Many beginners are interested in how many layers of putty should be applied in order to properly prepare the surface? It all depends on the condition of the base and the putty itself. If, for example, the differences are a centimeter, and the composition can be applied with a layer no thicker than 7 mm, then, accordingly, two layers will be needed.
If the differences exceed 10 mm, then plaster should be used to level the walls.
Therefore, you need to inspect the walls in advance and apply a rule in order to know how many times they will have to putty.
Sanding and preparation for gluing
Now the final stage remains - grinding and preparing for wallpapering. This work is done in the following way:
| Illustrations | Actions |
 |
Grinding.
|
 |
Padding. Before gluing wallpaper after putty, be sure to prime the surface of the walls. |
Often, beginners doubt whether it is necessary to prime the putty before wallpapering. The primer will improve adhesion, ensure uniform absorption of the adhesive and somewhat reduce its consumption.
Therefore, it is highly desirable to apply a primer on putty walls. After they dry, you can start gluing wallpaper.
Conclusion
Now you know how to choose a putty and properly prepare the walls for wallpapering. If there are any difficulties in the process of work, write comments, and I will be happy to help you.
Before starting repairs at home on their own, a person must solve a number of questions for himself. They can concern not only what I would like to change in the interior of the house, but also the repair technology itself. After all, people always strive to do repairs correctly, so as not to regret later.
After you have removed the old wallpaper, the question arises: is it necessary to putty and prime the walls before sticking? It is safe to say that this treatment will help to achieve an excellent result and protect the walls from the harmful effects of external factors.

The days of plastering walls and using newspapers are long gone. Nowadays, people are increasingly treating surfaces using new technologies using drywall, primer and putty.
Getting Started
- The primer is an excellent material for protecting the wall of the house from mold and fungus. In addition, it has antiseptic properties and helps finishing materials cling well to the surface. Walls must be primed if there is a desire to make them even and remove all roughness.
- It should be noted that the application of putty is carried out only after priming the walls.(and after it it will be necessary to prime the surface again). First of all, puttying the walls is necessary in order to level the surface and give it a solid white color. This action helps to avoid translucence of dark concrete through the wallpaper coating, especially when the wallpaper itself is quite thin. To obtain a sufficiently even surface of the wall, it is advisable to apply putty in no less than two layers.
Detailed material on surface preparation for wallpapering.
Drywall needs to be puttied completely!
Sometimes, people think, is it worth it to putty plasterboard, because it is already perfectly even? And that's right, you can only putty the seams and start gluing. However, it should be borne in mind that the wallpaper in this case will stick tightly. And when the time comes to change the wallpaper, it will be necessary to glue them on top of the old ones, since they can only be torn off together with pieces of drywall. To avoid such an unpleasant situation, it is advisable to pre-putty drywall.
As you can see, finishing works not only help to achieve perfect alignment of the walls, but also give them additional protection from external factors. Priming procedures are not so difficult. Everyone can perform them, armed with only the necessary tools. Wallpapering will certainly please the owner of the house with its result, if all the rules for preparing for it have been strictly observed.
(No ratings yet)
Discussion:
It is a must to spat! No other way! Plus priming. We prime the drywall, then putty, sand it. We remove all the imperfections, where we need to putty (we remove all the shells, scuffs, scratches from the spatula), where we need to sand again. Next, primer, wait for the finished surface to dry. And glue the wallpaper!
For pasting heavy wallpaper, you need to pick up putty, which is designed for heavy wallpaper. Usually on the packaging of putty, it is indicated where to apply and on which walls. Good luck!Hello! Tell me please? If heavy (dense) vinyl wallpaper on a non-woven or paper basis (duplex) is glued onto drywall, is it necessary to putty the entire surface of the drywall? After all, such wallpapers can only be removed the first layer, and the second (white interlining or paper), on the contrary, is recommended to be left to strengthen the wall and stick new wallpaper?
We have such a problem doing repairs in the village, where the putty dries for a very long time ... and there is no time to sit there for a couple of days .. Please tell me whether it is necessary to putty the walls (we have drywall) before gluing the wallpaper
We have a small old apartment with stove heating where there wasn’t even a soul, that is, a very small toilet, my husband solved this problem, but then his hands dropped. The wall began to crumble in the toilet. Soon you will see the neighbors.
During the repair, we completely puttied - it's not even that after the wallpaper will be torn off along with pieces of drywall, but also that after sticking the wallpaper, dark places are visible - where there is no putty, and light, where there was putty - the joints of drywall sheets. Therefore, of course, it is better not to be lazy and putty.
As for whether it is necessary to putty drywall, I also wondered this question. Then it turned out that the wallpaper would be removed along with the drywall paper. Another point is that drywall does not always create a perfect plane.
Hello Valentine! It is possible to prime in advance, but so that the walls do not have time to become dusty (so it is not worth doing a primer a week before the start of the repair).
It is best to prime the surfaces a day before the start of work, although nothing bad will happen for a period of 2-3 days. Moreover, many people who glue wallpaper on their own do not even know about the need to prime the walls. And nothing, somehow the wallpaper is holding!hello! We have a question. The walls in the new house are prepared - you need to glue the wallpaper, but before that they say they need to be primed. Can we prime the walls in advance or should this be done immediately before pasting on the same day?
By clicking the "Add comment" button, I agree to the site.
After leveling large defects, wall blockages and significant irregularities, they proceed to the final stage - leveling and strengthening the walls. With the help of putty, small scratches, transitions of plaster layers, chips and cracks, and all minor flaws in the rough finish are repaired. The puttied surface becomes completely suitable for wallpapering or painting.
Why putty walls after plaster

Special polymer and stabilizing additives are introduced into the composition of putty mixtures based on gypsum or cement-sand compositions, making the solution more plastic and slowing down its setting. Thanks to this, the putty is applied in a very thin layer, creating a perfectly even and smooth surface.
After the plaster has dried, it is not necessary to putty the walls just before laying tiles or sticking thick wallpapers. Small defects under them will simply not be visible, so the surface is only primed. In other cases, especially when painting or finishing with thin wallpaper, plaster is indispensable. After all, it is able not only to even out the smallest cracks, but also:
- prevent peeling of plaster over time;
- significantly improve the adhesion (adhesion) of walls with wallpaper and other finishing materials, they will hold on more firmly and will not peel off;
- reduce the consumption of wallpaper glue and paint.
After what time can putty be applied
 Cement-sand leveling mixtures fully gain strength for quite a long time - 4 weeks. But it is not necessary to withstand such a time after plastering. Cement gains 70% of its strength in a week. This is quite enough for applying putty and subsequent finishing, including heavy tiles. For example, Knauf Unterputz cement facade plaster 20 mm thick dries within 7-10 days.
Gypsum compositions set in 40-60 minutes, and dry completely in about a week.. For example, the popular Knauf Rotband, applied to the walls with a layer of 15-20 mm, can be puttied after 7 days. In a humid room or low temperatures, the drying time may increase up to 10-14 days.
Drying time also depends on the thickness of the layer, as well as the temperature and humidity in the room. The use of building hair dryers or the creation of drafts to speed up the process is not desirable - significant cracks may form on the surface during uneven drying, and over time the plaster will begin to peel off.
After drying, before puttying, the plaster must be sanded - using a special grater with a fine mesh or sandpaper, the wall is treated in a circular motion. In this way, small influxes of the dried mixture, traces of a spatula, and places where layers are applied are removed.
Do walls need to be primed?
Many people think that pre-priming walls is just a waste of money. However, if you want the future decorative coating to look perfect and last as long as possible, then the walls must be primed before puttying.
Primer that penetrates deeply into the pores:
- protects the surface from peeling;
- contributes to a more uniform penetration of putty, adhesives and dyes.
 Priming solutions are also an excellent antiseptic that protects walls from fungus. In addition, they do not allow moisture, which contributes to its development, to penetrate too deep into the walls.
The choice of primers is quite large in the construction market, and manufacturers offer special types for each type of surface. To cover the walls after plastering, it is better to use acrylic, polystyrene or perchlorovinyl mixtures of deep penetration or universal compositions of medium porosity.
The walls must first be treated with a wet sponge to remove the smallest dust particles. You can primer both with a roller and with a brush - the roller distributes the mixture more evenly, and it is more convenient to apply it with a brush in hard-to-reach places. Also, for convenience and speed, manual sprayers are used.
Puttying is started only after the primer has dried. The time for its complete fixing is always indicated on the package and can vary from 5 to 15 hours.
What is better to putty?
The main requirements for compositions for interior decoration:
- high plasticity;
- ease of application;
- ideal smoothness of the created surface;
- affordable price.
Gypsum-based compositions - ideal for puttying inside the house. A feature of gypsum materials is their quick setting (40-60 minutes), ease of application and subsequent grouting.
Often, when repairing an apartment with your own hands, the question arises, is it possible to glue wallpaper on concrete or plasterboard walls without putty? To find the answer, you need to figure out in what cases this can be done and how to properly prepare the surface before gluing.
The durability of the finishing coating and the aesthetic appearance of the room depend on the competent preparation of the walls. Wallpapering without wall putty requires careful preparation, but allows you to save on other materials (plaster, tools, etc.). Experienced craftsmen advise beginners to carefully read the possible difficulties that arise when working with different types of plaster.
What wallpaper can be glued without puttying the walls? Masters recommend giving preference to denser non-woven and vinyl models. Fashionable liquid wallpaper today is one of the types of material that perfectly adheres to any surface, including a wall treated with plaster. Before applying them, it is necessary to carry out preparatory work, as for other types of finishing materials.
Why and how to prime the walls under the wallpaper?
Priming the surface for gluing the canvas is a necessary step in the repair. Many mistakenly believe that it can be skipped, because the material is already holding up so well. Experts think otherwise, and here's why:
- Applying a primer to plaster increases the adhesion of the surface. The adhesion of the wall and the material will be stronger, which means that the repair will last longer for the owner.
- The primer is selected for each room individually. There are moisture resistant and heat resistant primers. The durability of the repair depends on the correct choice of material.
- Proper priming of the surface also affects the quality of the repair work.
How to apply a primer on a plastered wall? With a wide brush or roller, the solution is carefully applied to the entire surface. Only after completion of work and complete drying of the soil, you can start wallpapering.
Surface preparation
How to do without wall putty for wallpapering? In order for the repair to be of high quality and last for many years, it is necessary to prepare the surface for applying the material. To work, you will need the following tools:
- bucket for glue;
- sandpaper;
- measuring tape;
- roller and brushes;
- plumb and level;
- scissors and knife;
- spray bottle with water.
When pasting wallpaper to replace the old one, the latter must be removed from the wall. Removing them is pretty easy. Old paper sheets are moistened with water and carefully removed with a spatula. If it was not possible to remove all the material, then the surface is cleaned of irregularities and paper residues with sandpaper.

After cleaning, the walls are washed with water and dried. Pits, cracks and other serious defects will have to be leveled with putty. To do this, you can use starter mixes. Nails and self-tapping screws must be removed or drowned in the wall and also puttied.
Uneven walls will have to be brought to the ideal starting putty. Especially if the finishing material is very thin. Liquid wallpaper on a concrete wall can be applied without putty.
When the walls are leveled with drywall, the joints are treated with putty. After it dries, they are cleaned with a sandpaper. GKL also needs additional processing. Without a primer, when wallpapering on drywall, all the moisture from the glue will be absorbed into the surface, which will lead to flaking of the canvas and soaking of the base.
Wallpapering without pre-plastering the walls (video)
Adhesive selection
Not only the preparation of the surface for wallpapering affects the final result. Success also depends on the selected adhesive composition for the material. The type of glue is selected strictly based on the selected type of canvas. For conventional paper materials, the standard methylcellulose-based option is suitable. For gluing heavier wallpapers, you should choose an adhesive composition with the inclusion of PVA. Glass fiber is attached using a special type of adhesive that increases adhesion to the surface.
Modern adhesives are supplied as a dry mix, which is diluted with water before use, following the instructions. Manufacturers add certain substances to the glue that reduce the drying rate and provide protection against mold and mildew.

Stages of gluing wallpaper on plaster
Before gluing, you need to make sure that the surface is flat and smooth, without joints or cracks. After preliminary preparation and priming, you can start working with the canvas. In a separate clean bucket, the adhesive is mixed. To improve the properties, he needs to be allowed to stand for 5-10 minutes. With a thick brush, a thin layer of glue is applied to the wall and wallpaper. After application, the canvas is folded in half, with glue inside and let it “rest” for about 5 minutes. This trick will increase the hold of the wallpaper on the wall.
Then the canvas is unfolded and glued to the wall, starting from the corner. Flatness is checked with a plumb bob. First, the canvas is pressed in the middle and, with movements from the center to the edges, is smoothed out. It is necessary to get rid of air bubbles under the wallpaper as much as possible. If this did not work out, then the canvas will have to be re-glued.
Liquid wallpaper is applied to the entire wall at a time. The layer should be as thin as possible. They dry from 1 to 3 days, depending on the thickness.
Wallpapering on plaster, without puttying, is quite possible. If you strictly adhere to the application technology, then the result will please the novice master for many years. How to glue wallpaper on concrete walls is described step by step in the video below.
Wall priming, plastering, puttying are basic operations in the process of bringing surfaces to the stage of readiness for further painting or wallpapering. A simplified scheme of work is as follows: plastering, priming after plastering, puttying, grinding, coating with paintwork material or applying wallpaper. Puttying the walls after plastering is considered a finishing preparatory operation.
Even due to the fact that today plastering is provided with a wide choice of materials for interior and exterior decoration, and having done the work, you can achieve an ideal plane (there is no question whether it is possible to putty the walls, for example, after finishing with gypsum plaster - the procedure is not necessarily included in the order repair work) - the financial costs of such plastering work are extremely high.
The classification of putty materials was carried out according to several criteria. The sequence of grouping is determined by key factors and properties of putty, combining mixtures into the following classes:
- Oil-glue. If you need the cheapest mixture - the group is suitable. It is not known whether oil solutions will continue to have a future, because they are already considered the last century. The main disadvantage is the manifestation of yellow spots through the paint layer and wallpaper.
- Gypsum cement. Materials are much more expensive. Are intended for a full complex of finishing operations of the general orientation. In domestic products, most often, they contain more cement than gypsum. According to the cement and gypsum base, the main purpose of the powder was determined for the masters - having covered a layer of plaster with soil, you most likely putty the walls with the composition for further wallpapering.

- Water-dispersion. Also from the category of gypsum cement, however, they are necessarily produced in a batch with an aqueous polymer emulsion, respectively, the container is a bucket. The advantage is that you do not need to study on the packaging what to do and in what proportion to dilute the putty - the products are already ready for use.

- Acrylic. After puttying with a similar composition, all the advantages of the above groups (except for oil) will appear.

Workflow steps
Surface cleaning
When puttying the walls after the old plaster is done, the obsolete wallpaper and layers of paint must be removed. A special wash helps to eliminate the remnants of unnecessary material. After the manipulations, the walls should dry out - they are left for about a day.
Drying is followed by a thorough visual check: missed small parts are cleaned with a mounting knife or a thin spatula.

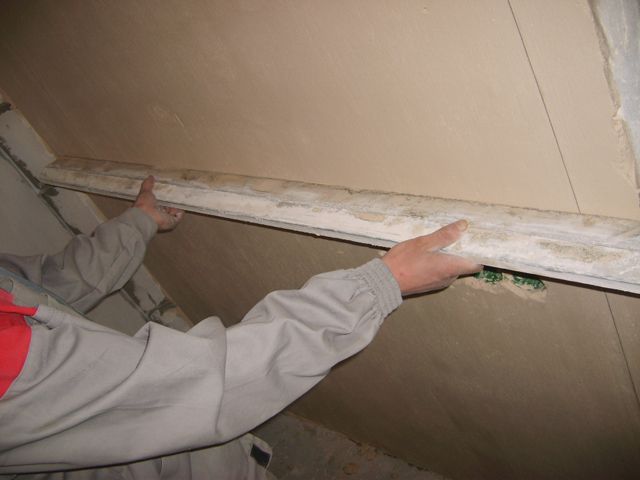
Relief inspection
The relief plane is examined with a flashlight, wielding the building rule: it is applied to the surface, the flashlight shines along the wall. The smallest depressions and protrusions are obvious. Rough bumps should be beaten off on the spot with a planer or a sharp spatula, and the notches should be marked along the contour with a simple pencil.
Related article: Features of fiberglass wallpaper for painting

Instrument preparation
Before starting the repair process, the entire set of tools is scrupulously wiped with a rag from dust, washed with dishwashing detergent and dried with a thick cloth that does not leave fibers on the wiped objects. It is worth carefully making sure that there are no residues of solutions from previous batches on the mixer from a drill and a mixing container - lumps of old solutions need to be picked out.

Preparation of putty mixture
The process of preparing the solution is not complicated:
- Running water is drawn into the container (the construction bucket is filled by a quarter, the usual one by a third).
- Gradually fall asleep dry powder until the tip of the "iceberg" is above the water.
- Wait up to 30 seconds until the powder absorbs water and sags: no dry formations should remain.
- With a quick, measured movement, using a nozzle on a drill, kneading is carried out for 2 minutes. (a drill is preferred, but hand-drilling is also acceptable).
- Expect 30-60 sec.
- Re-mixing is done. The consistency is brought to the ideal - the solution is ready.

Under no circumstances should the finished solution be diluted with additional water or dry powder. We'll have to work with what we've got. In case of shortcomings, the putty composition will tolerate excess liquid, after solidification, it is always possible to walk around the area with an abrasive and do homework where necessary.

Do not forget about the shelf life of the finished solution after kneading: it is better to knead in several portions. Each portion is placed on a wide spatula with a smaller one, calculating the amount that will be needed for one stroke.
Relief leveling
Small recesses and cracks are covered with a medium or wide spatula, based on the size of the defect. Grouting is carried out with wide movements crosswise with the same effort to a flat surface without sags and burrs.

A common mistake among inexperienced craftsmen is to slowly, pressing, stretch the spatula. Putty of any brand is endowed with a thixotropic characteristic, which leads to a quick correct dispersal with periodic identical force exposure from several sides.
On the video: the process of puttying the wall with your own hands.
Hardening of the putty layer
When hardening putty, it is necessary to use all precautions, as for hardening plaster: through air currents, direct sunlight, heat waves from a fan heater or hair dryer are absolutely contraindicated. Cracks in the wall as a result of drying are already unpleasant, but the putty layer damaged by improper drying can warp, which will only appear at the stage of wallpapering or painting.
Indoor air circulation should be adjusted, without drafts and temperature fluctuations. More specifically, you can open the room door, but leave the balcony door closed. For the corridor - to allow air to circulate from the living rooms, tightly shutting the doors to the street, kitchen and bathroom.
The instructions for use most often indicate the drying time of the coating up to 16 hours, in fact - 10-12 hours. However, it is advisable to grind the layer not earlier than a day has passed: the putty will dry out reliably, harden, and subsequent operations will be easier.

Puttying under the wallpaper
For the purpose of further wallpapering, the putty is initially carried out with a wide spatula, overlapping with each next layer up to ¼ of the previous one. The resulting "sausages" do not grind. Holding the spatula at an angle of 21-30 o, constant pressure should be observed, which will help to distribute the material in an even layer of 2 to 4 mm. The smaller the angle of inclination, the more it leads to the formation of a thick layer, the more - to a thin one. However, the dependence is typical for variations in the specified degree interval; when it goes beyond its limits, bumps and discontinuities form on the surface.

The next step is to dry the layer, remove the sags with a jointer with an abrasive and check the smoothness with the help of a building rule and a lantern. The resulting defects are eliminated: protrusions - with an abrasive, recesses - with additional lubrication. It is possible that an inexperienced master can approach the wall up to 5 times until the surface becomes perfect.
At the end of the manipulations and a long solidification, a jointer with a mesh of size range 80-120 is passed along the wall (with an increase in the number, the abrasive grain decreases). Initially, the entire surface is worked out in circular strokes, after which, loosening the grip, with crosswise movements in order to remove the contours of circular manipulations.
Then the wall is again aligned with the building rule with a lantern. If there are no lingering reflections from under the rule, the surface is ready, after a day the walls are primed and you can start gluing.
Puttying followed by painting
The technological process is different from puttying followed by wallpapering in one operation: after the final leveling and rubbing with abrasive material, the wall is covered with finishing plaster. Particular attention is paid to the wall, if it will be painted with enamel, in particular acrylic, then the finishing mixture must be white, durable and specially designed for this purpose.
Grouting occurs with an abrasive with a fine grain of at least 150.

For mirror painting, the wall is polished with everything else with a grinding trowel with suede material (felt and felt pieces are not suitable). A used suede cover will not cope with the task - it will have to be replaced with a new one. Also, for painting, the wall must be primed in accordance with the instructions indicated on the packaging of the material.
Related article: The technology of puttying concrete and plasterboard ceilings
The nuances of puttying corners and slopes
Inexperienced craftsmen are often advised to apply more than the required norm to the corners of the material, followed by rubbing with an abrasive product. But when, before puttying, it is planned to ask to skim any area with a gun, physical costs can be reduced, while at the same time increasing the efficiency of the result.

Work plan:
- When the silicone is used up, the tube must be unwound, the remnants removed and wiped with a rag soaked in vinegar solution.
- During puttying, the corner is bypassed, leaving it empty.
- The wall has dried up - the tube must be filled with putty and slowly squeezed out into the slot of the corner. It is recommended, if possible, to do the procedure from the bottom up in one approach.
- Then they work out with an angular spatula, leaning on the surface, similarly to plastering on beacons.
- After drying, the protrusions will need to be removed with an abrasive mesh.
Instead of a silicone tube, you can use a syringe used when baking cakes. With rubber or foam pads and tape fixation, the confectionery syringe is fixed in the gun like a glove.
At the corners of the slopes, the master works with an angled trowel to choose from any of the methods known to him, knocks down the protrusions with an abrasive mesh, and checks the smoothness with the building rule. There is no significant difference in the process of laying the putty layer on the walls and in the corners, but the corners are difficult to bring to the ideal - a professional will need to step up to two times.
Puttying tips (2 videos)
What you may need (25 photos)


