To live in a more spacious and comfortable house, you do not need to build a new one, it is enough to make an extension to the existing one. Of all the construction technologies, the simplest and most affordable is frame construction. It is ideal not only for frame builders, but also for other buildings. It is realistic to make an extension to a frame house with your own hands if there is a step-by-step instruction. To do this, it is enough to have minimal carpentry skills and the right tool.
Options for frame extensions to the house
So that during the construction process you do not have to change plans, you must immediately decide what functions the frame extension to the wooden house or brick structure will perform. Purposes of use may vary.
Another living room. Building an extra room is not easy. It is necessary to do all the actions as in the construction of a full-fledged frame house: prepare the foundation, build a frame, insulate it. If this is not done, the use of the room will be inefficient, since the heat loss will be large. It is also important to make waterproofing so that there is no mold and dampness.

Additional bathroom or kitchen. Before you start attaching this structure, you will need to carry out the appropriate engineering communications, and only then pour the foundation. All places where sewer and water pipes pass through the foundation must be insulated. And it is better to do all this during construction, and not later.
Frame veranda. Today, frame houses with a veranda are very popular. They can be both open and fenced glass structures. Verandas are useful for relaxing in the summer. This extension is much simpler than a room, since it does not need to be insulated and communications should be carried out there. For the construction of the veranda, flooring is made, walls and a roof are erected. You should consider the dimensions of the structure so that the frame house with a terrace or veranda looks harmonious.

How to make a foundation
There are built-in and attached verandas.
- Built-in veranda is being built along with the house, so it is being built on a common foundation.
- For an attached veranda do separate foundation, maintaining a gap of 40 mm from the wall. If this is not taken into account, when the new base shrinks, it will collapse.
Base type selection
When planning the foundation, the seismicity of the soil, the total weight of the structure and other parameters are also taken into account. If mistakes are made at the planning stage, the extension may move away from the common house.
To build a foundation, you can use the following materials:
- wooden, metal or concrete piles;
- concrete;
- stone;
- brick.

To build a frame extension to the house with your own hands, you can choose one of the following types of foundation:
- slab;
- tape;
- pile;
- columnar.
Usually for verandas in private houses they use strip and column foundations.
Strip foundation
If the additional extension is heavy, you need to choose from concrete. Do it like this:
- With twine mark the area where the trench will be dug, and fix it in a tense position with pegs.
- They begin to dig a trench, its bottom is covered with sand, then a little rubble is laid, which is rammed.
Make a formwork, the height of which is equal to base height. Waterproofing is laid inside along the perimeter, and reinforcement prepared in advance is placed directly on the rubble. - Prepare a concrete solution at the rate of 1:3:6 for cement, sand and gravel, respectively.
- The resulting mixture fills a third of the formwork and waits for solidification. Next, fill in the remaining volume. A vibrator is used to compact concrete, which removes residual air. You can also periodically knock on the formwork with a hammer.
- To make the upper part even, it is poured in level, after which it is covered with a film. Periodically, the surface must be moistened to avoid possible cracks.

If you build a frame extension to the house with your own hands as light veranda, you can save on the foundation and choose the columnar option. Not only concrete is suitable for it, but also brick, rubble stone, or a combination of both.

The algorithm of work is the following:
- They dig deep holes for the pillars, the distance between which is 60 cm. The shape of the holes is square, the size is 50x50 cm.
- The bottom is covered with sand.
- A small layer of concrete is poured onto the sand, waiting for it to set.
- Then brick columns are erected. The masonry must be perfectly even, so it is checked by level.
- Concrete supports are made in the same way as a strip foundation, but only in the form of pillars.
- When the structure is completely hardened, the formwork is dismantled, and then waterproofing, for example, roofing material.
- If there are any voids left in the pits, they are covered with rubble and soil, and they are also tightly tamped.
The optimal height of the columns is considered to be one that provides a distance from the ground to the finished floor of 30 cm.
Which floor to choose for the extension
If the foundation is of a strip type, you can choose any floor (wooden, concrete) for the frame extension. If it is columnar, then only wooden.

Let's consider both cases:
- Concrete. After pouring the foundation inside the concrete rectangle, soil is selected by 30-35 cm. Next, sand is poured into this mini-pit, and crushed stone or expanded clay is poured on top. The layer thickness is 20 cm. A reinforced grating is installed on top of this pillow and a full-fledged screed is poured. They achieve an absolutely flat surface, after which they lay tiles, laminate or wood on top.
- Wooden. Install massive floor beams on top of the waterproofing, connecting them to the foundation with anchors or other fasteners. Next, logs are stuffed onto the beams, they are insulated, and a floor covering is laid on top.
Construction of frame walls
For the construction of the walls of the frame extension, a beam is used. From it make vertical racks and beams. First, the main frame of the walls is assembled in a horizontal position, and then it is erected vertically.

Installation rules:
- The lower strapping bars are determined and a cut-out for vertical bars is made on them every 50 cm.
- They are installed in the grooves of the rack and fixed with special screws and corners.
- Collect the upper beams for strapping.
- Fasten the veranda together with the house, using vertical bars for this.
- Anchor bolts are used to fix the veranda racks to the house.
- The resulting frame of the veranda is immediately sheathed on the outside with boards, plywood or OSB to increase the rigidity of the structure.
- Next, the frame is insulated, the roof is built and fixed, after which doors and windows are inserted.


Roof construction
The best option for a frame extension - pitched roof, it is combined with any main roof.

Mount it as follows:
- First, the rafters are fixed on one side under the slope of the existing building, and on the other - on the wall of the veranda. Metal corners with a pre-calculated angle of inclination are used as fasteners.
- They make sure that the protrusion of the rafter legs behind the wall is not less than 30 cm. Thanks to such a canopy, the veranda will be maximally protected from getting wet by sewage.
- The selection of the roof is carried out in advance. The best option would be the same material as for the roof of the house. Slate can be installed directly on the rafters or on the crate, and soft roofing can only be installed on OSB sheets or plywood.
- The truss structure is sheathed with a layer of waterproofing, depending on the type of roofing.
- All roofing materials are installed from the bottom up.
- To insulate the roof, it is best to use mineral wool.
Insulation of an attached building
In order for the frame extension to the house to be habitable, it must be insulated. The best insulation is ordinary mineral wool. It can be cut into the desired squares and laid between the sections of the frame. If the wool is laid in several layers, it is necessary to shift the plates among themselves so that there are no butt joints.
Outside and inside, the insulation is sheathed with a vapor barrier film so that moisture does not collect inside and does not spoil the material. After that, make a decorative finish. From the inside of the extension, frame walls can be sheathed with wood, drywall, chipboard, and outside - with siding, other decorative materials.
In total, it looks like this:
- vapor barrier layer;
Floor insulation in a frame extension they do it in a similar way. Mineral wool is laid in the gap between the lags of the subfloor, and the boards are covered with a layer of waterproofing film. When the insulation is installed, waterproofing is again placed on top of it, and then the floor is sheathed with plywood and the final coating is installed.
If you plan to attach an additional room to the house using frame technology, it is extremely important to follow all safety measures. This means that you should not save on personal protective equipment, it is better to purchase a quality tool that will not let you down in a responsible situation. Then the construction will be a successful event.
Video: construction stages
The veranda attached to the house allows you to expand the habitable area, get a place for a comfortable stay. Closed (glazed), it still reduces the heat loss of the house. The best part is that you can make it yourself. And there are options that require solid costs, there are inexpensive ones. There are a lot of varieties both in structure and in the materials used, you can decorate in any style.
What are
According to the method of arrangement, the veranda attached to the house can be closed - with glazing - or open. The open ones are used mainly in the warm period, the closed ones can serve as a place for recreation all year round. The veranda attached to the house can be of two types at once: part can be glazed (closed), part can be open.
There are also walkways - this is when in order to get into the house you pass through it. Such extensions are located from the front of the house, sometimes from the side of the courtyard, if there are two exits from the house. Entrance to impassable only from the house. It is impossible to get outside from such a veranda.
An extension can cover one, two or more sides of the house. If it covers two adjacent parts of the house, it is called a corner. Some of them occupy only part of the wall.
The forms are different. More often it is a rectangle, less often - a hexagon, a semicircle, other non-standard shapes (it is more difficult to build such ones). In short, these are all types of verandas attached to the house, but without taking into account materials.

An addition around the perimeter gives the house an extravagant look.
What materials are they made from
Most often in our area they make wooden verandas. It is easier to work with wood, and it is not as expensive as in other countries. In areas where wood is very expensive, the structural elements are made of metal, and the sheathing is selected to your liking. It can be glass (double-glazed windows), polycarbonate.
They build the walls of the veranda from brick, shell rock, rubble stone, building blocks. Just like a house, they are then finished or not, depending on the design of the main building. They can just make a fence, as in the photo above.

If the tree is expensive, or reluctant to regularly work with its processing, the frame of the veranda is assembled from metal. For this, a profile pipe, corners or channel is most often used - it depends on the material and size of the extension. It is easier to attach glass packs to metal, you can make not glazing, but use polycarbonate. This material can be of different colors and different degrees of transparency. Despite the apparent fragility, there is a fairly durable material that is used to build greenhouses. And if so, then in the veranda, if it is closed, it will keep warm well.

Veranda attached to the house: construction stages
First of all, you need to decide on the type - open / closed, from what material, choose the type of foundation. You also need to decide what size it will have, where and how to be located. All this is desirable to draw on the plan. Even better - order a project. Construction according to the project is rather an exception for us, but at least a plan with dimensions and an indication of the location, binding to paths, etc. you should have.
Do-it-yourself construction of a veranda to the house follows the following plan (we build it from wood):
- With the help of pegs and twine, mark the contours.
- Remove the sod and fertile layer. If this is not done, the vegetation under the deck will rot, spreading aromas.
- Lay out the foundation. At this stage, questions may arise: how high should it be. If you make the foundation incoherent and “floating”, the level of the veranda flooring should be 5-10 cm below the floor level. This is necessary so that even when raised, the extension does not block the front door. If you do not want the floor to be lower, you will have to make a high threshold in the front door: to guarantee the freedom of opening the door. The height of the support beam depends on the height at which the floor of the extension will be located. It is nailed to the wall of the house, floor beams are attached to it. The height of the foundation is beaten along its lower edge (these are the next two steps).
- Nail a support beam to the wall, along the lower edge of which the height of the foundation is beaten off.

How to mark the extension: nail the support beam at the required level, beat off the height of the foundation along its lower edge
- Build a foundation.
- While the concrete is gaining at least half the strength, you complete the preparation of the site. If at the bottom of the pit (the fertile layer was removed) the soil passes water well (sandy, sandy loam), crushed stone is poured to the bottom. It can be compacted, but you can do without it. If there is loam or clay under the fertile layer, you will have to fill the pit with either the same soil (but not fertile) or pure clay. It must be well compacted so that voids are not created in which water will accumulate (it is better to lay layers soaked to a paste state).
- A layer of waterproofing is laid on the finished foundation.
- Support racks under the roof are exposed and fixed.
- They make the strapping of the racks: they nail a timber 100 * 150 mm thick around the perimeter. It can be nailed outside the racks or between them. Sometimes the racks are nailed after the floor has been laid. This is not the best option: the floor will quickly become unusable. With such a structure, in order to replace it, you will have to disassemble everything, up to the roof. If you first set the racks, and then the floor, it can be repaired without problems.

This is how the assembled frame of the veranda attached to the house looks like. Intermediate racks are needed only if the width of the veranda is more than 3 meters.
- Floor beams (beam 100 * 150 mm) are attached to the foundation and the supporting beam. The step of their installation corresponds to the step of installing piles or posts.
- Assemble the truss system.
- Side railings (for open) or walls (for glazed) are installed. At this stage, the general technology ends. Further, for the covered ones, it is longer, the open veranda is easier to attach to the house:
- For open beams, floor boards are nailed.
- For glazed make insulated floor. A draft floor is nailed to the beams. Above - logs, between them - a heater, on top - a finishing floor.
- Roof laying.
- Wall decoration inside and outside.
These are just general steps. To have a better idea of how to make a veranda to the house, then we will consider the most problematic moments of construction in more detail.
Perhaps you are interested in building a gazebo?
Foundation
If the veranda is attached to the house, the foundations are very rarely made connected. Firstly, the house has already settled, the shrinkage has passed. If a “fresh” building is rigidly attached to it, problems will inevitably arise. If it is possible to tie them, then only on stable, reliable soils, on which there are no movements. Secondly, heavy foundations are rarely made for extensions of this type. The building itself turns out to be light - especially open from wood or frame - and the bearing capacity is enough.
In general, they put verandas on the same foundations as at home. Another thing is that most of them stand on columnar bases: the costs are small, it takes a little time. And although all architects and designers claim that it is much more difficult to put up the correct columnar foundation than (although the tape one is much more expensive), people put the pillars.
Column and pile foundation
If you decide to attach a veranda to a wooden house, you can put a columnar foundation. To make it yourself, you need to find out at what depth and at what distance the supports are placed. The distance between the posts depends on the material from which the extension will be built. If these are light materials - wood or light frame construction - you can set them in increments of 1.5 meters. For heavier ones, the distance should be from 1 meter.

Columnar foundation for the veranda - the columns are made of bricks. This open veranda is attached to a wooden house. The house stands on a strip foundation. The foundations of the extension and the house are not connected
When choosing the depth of columns, there are two approaches:
- Bury below freezing depth. This is done on water-saturated soils prone to heaving. In this case, the veranda will stand on the same level, without changing its position, regardless of the heaving forces. For a columnar foundation, this only makes sense if the freezing depth is not more than 1.2 meters. At great depths, it is easier to make a pile foundation (better -). Pile holes are not very difficult to make even if you need to drill 2 meters. For the construction of columns for each of them, digging a pit of the same depth is difficult and time-consuming.
- Make a shallow foundation: 20-30 cm below the fertile layer. In this case, get a floating veranda, which will be understood and lowered during frost heaving. It is much easier to build such a structure, but every spring you will have to deal with the consequences of heaving. Different pillars will “walk” in different ways and you will have to somehow rectify the situation. But this is on heaving soils (clay, loam). On stable soils that are not prone to heaving, there will be no such problems.
What is good about this option for a foundation for a veranda to a house? Quickly built, the cost of work and building materials is small.

The veranda is attached to a brick house on a strip foundation. They put it on . It differs from the columnar one in that the piles are either screwed in / hammered ready, or poured into the formwork and turn out to be monolithic
Disadvantages: It is difficult to predict its behavior. And both deep and shallow. With a shallow foundation, everything depends on the winter and the degree of saturation of the soil with water, which is impossible to foresee and calculate. With deep laying, there is also a problem: it is not known what is under each of the piles. After all, you cannot do a geological survey at all points. And in those areas where the soil has a complex layered structure, it is quite possible to get into some kind of pocket, because of which the pile will not behave as expected. Also in the case of piles or deep-buried columns, it is necessary to remember the lateral heaving forces. They may well break long and thin piles or poles. Therefore, on problematic soils for piles, a strong formwork (metal, asbestos) is taken and they are also reinforced: in the manufacture of pillars, a steel pipe coated with a primer is inserted inside, around which masonry is carried out. It is also possible to lay reinforcing belts. In the manufacture of bored piles, three or four reinforcement bars are necessarily inserted inside, which add strength to them. Attaching a veranda with your own hands on a pile foundation can be quick and inexpensive, but the risks on heaving soils are high.
Monolithic: tape and slab
If you are going to build a veranda from brick, rubble or other similar heavy materials, and even with heavy cladding, you need a monolithic foundation. You will either have to pour the tape, or make a plate. They are made according to all the rules without any exceptions: with formwork, reinforcement, vibration, etc. Fully tech.
When building such a foundation, it can already be connected with the main one: you will have to make it to the same depth and, most likely, it will behave stably.
Advantages: high reliability and stability. Disadvantages: significant cost and duration of the construction process.
bedding
If the house is located on dry soils or in a region where frost heaving is just a scary tale, if it does not have a plinth, a veranda attached to the house can do without a foundation. In this case, the fertile layer is removed along with the vegetation, the bottom of the pit is rammed, then crushed stone is poured, rammed, then sand, which is also compacted. Flooring can already be laid on this base: wooden, paving slabs or slabs.

The veranda attached to the house can be without a foundation
One “but” of the racks on which the roof will rest still needs to be strengthened in some way. For them, small piles are made or columns are folded (from about the same depth where they started laying rubble under the flooring).
How thick should the bedding be? It depends, firstly, on the thickness of the fertile layer, and secondly, on the choice of floor covering. If these are wooden boards (as in the photo), you need to choose the layers so that they lie flush with the ground. If you plan to lay paving slabs, you will have to consider its thickness. Although, it can be slightly raised above ground level to separate it from the yard. But then a curb is placed along the edge.

In this photo, an open veranda is attached to the house without a foundation - it is rather a summer canopy with a polycarbonate roof and an open wooden fence
How to attach the rack and bottom harness
Work on the construction of the veranda frame begins after the foundation concrete (if used) has gained some strength. Enough 50% of the calculated, and this at a temperature of + 20 ° C, will occur in 4-5 days. Then, on top of the concrete, in those places where the racks or strapping will be attached, waterproofing is laid in two layers. It can be roofing material, roofing felt, folded twice. You can double coat with bituminous mastic or use other modern materials.
Then there are two ways:
- fix the racks and then the strapping;
- first strapping, racks to them.
If the first option is chosen, special holders are inserted into the foundation for racks during pouring. These can be different devices (see photo), but the most convenient is a metal plate in the form of an inverted letter "P", to the bottom of which a stud is welded, which is walled up in the foundation. A rack is inserted into this plate (the end must be treated with an antiseptic), its level is verified, fixed with bolts or nails.

How to fix the racks to the foundation
After all the racks are exposed and fixed, strapping bars are nailed between them.
In the second option, the situation is different: the racks will have to be attached to the harness. The strapping bar is attached first. It is more convenient to do this if studs are embedded in concrete with some step. Then holes are made in the beam in the right places, it is put on studs and fixed with bolts. Then, using one of the methods suggested in the photo, racks are installed.

Options for attaching racks to the strapping beam
Any of these methods does not exclude the use of metal corners. They make the mount more reliable, which is very important in this case. After all, the roof will be held on the racks, and the walls or the fence.
Fastening the lag to the harness
They can be mounted on top of the harness, or on the same level with its upper edge. It is necessary to decide exactly how you will do this at the very beginning of the work: it will depend on what level it will be necessary to attach the support burs to the wall of the house (the height of the lag is taken into account or not). Methods for fixing the floor lag are shown in the photo below.

How to attach the floor logs to the strapping
Veranda roof connection
The veranda attached to the house is usually covered with the same type of roofing as scrap. There may be several options and the organization of the adjoining of the roof depends on how and to which wall you attach it. If the roof will be a continuation of the roof slope of the house, you need to splice two truss systems. In this case, they say that the roof of the veranda adjoins the roof of the house.
Then the procedure is:
- Top trims are attached to the veranda posts.
- Transverse ceiling beams are nailed to the strapping. The ceiling is then hemmed to them.
- The long rafter legs of the house are shortened. They should not protrude beyond the wall.
- The rafters of the veranda are made from a planed board, which are cut off at an angle from the side of the roof so that they adjoin the existing ones (see the photo below). To make it easier to work, you can make a template, according to which you can then prepare the rafters on the ground. Rafter legs are attached to the system of the house through nails, you can put metal reinforcing plates on the side.
- To increase the rigidity of the structure, spacers (anti-snow supports) are installed between the rafters of the house and the extension. They are shown in the photo explaining the design.

If the width of the veranda is more than 2 meters or heavy roofing material will be used, spacers are installed so that the support beam does not sag. It is better not to nail them on the side, namely, to insert them by surprise between the ceiling beam and the rafter leg.

In order to prevent sagging of the roof, spacers are installed between the ceiling beams and rafters.
More often it turns out that the roof of the veranda attached to the house adjoins the wall. In this case, a strobe is made in the wall, a special wall profile is laid into it, which is laid on the roofing with the second side. The place where it adjoins the wall is sealed with sealant.

The second option differs only in the shape of the wall profile: it can be made independently from a sheet of roofing iron. This design is distinguished by the presence of a beam, which allows you to move the bend away from the wall of the house and cover up possible errors when laying the roofing material at the junction. Also, in this embodiment, the apron is not attached directly to the wall material, but to a beam with a beveled edge mounted in a strobe.

The second option for adjoining the roof of the extension to the wall of the house
Some questions may arise on how to attach the rafters to the outer upper harness, because its dimensions do not allow making cuts, as on a Mauerlat. The usual solution: with the help of corners (see photo). Instead of corners, small cross-section bars can be used.

Maybe not the most elegant solution, but reliable. After everything is covered with roofing from above, the lining will be lined from below, they will not be visible.
A spacious and cozy veranda made of timber, which can be attached to the house, is a great place for both privacy and relaxation with the family.
At the same time, a well-designed and erected terrace can also become an excellent decoration of the facade, transforming the appearance of the house.
Self-construction of a veranda
The clarification on the choice of building material, timber, only says that the terrace will be built adjacent to the timber house, since most builders and construction specialists recommend using the same material for verandas and outbuildings from which the house itself was built.
Location
The classic or, in other words, the most common designs of log houses with a veranda suggest that the terrace is always built in front of the main entrance, from the facade, so as to be noticeable and remarkable.
Nevertheless, it is possible to build an extension from the side of the house, because the construction should be based on the principle of convenience, and a normal passage from the veranda to the interior of the house.

Calculations
From the point of view of calculations during the construction of an extension, it is possible to take as a basis not only the parameters of the terrace itself, but also the amount of material needed. To do this, all calculations will be carried out using the example of a house, the length of which will protrude and a long terrace, and the width of the veranda will be 2.5 meters.
The length of the facade wall is up to 8 meters. The veranda itself will be closed, that is, glazed.
Thus, the veranda will be 8x2.5, that is, the total area of 20 meters. Next, you need to calculate the area of \u200b\u200bthe walls, regardless of the window and door openings so far.
The height of the walls of the extension is always slightly lower than the walls of the first floor of the house, this is necessary to give the roof a slight slope. Therefore, with a standard wall height of 3 meters, the height of the walls of the extension is at the level of 2.5 meters.
Part of the terrace is the wall of the house, so the veranda to the house from the timber is considered to be three walls. And that turns out 2 walls of 2.5x2.5 each, which is 12.5 meters squared, and the long wall is 8x2.5 \u003d 20. A total of 32.5 squares, this is the area of \u200b\u200bthe walls.
For this, the following work is carried out:
- Site preparation. Here it is always necessary not only to remove the grass, but also to attend to the moment of supplying communications and free access to the construction site.
- Further, the extension of the veranda to the house from the timber requires marking.
- Earthworks consist of simple excavation. The trench should be 1.2 meters deep and 30 cm wide.
- The trench is covered with sand and compacted.
- Rebar laying. You can use simple rectangular structures made of reinforcement with a 10 mm cross section.
- Formwork device. The formwork rises slightly above ground level.
- Pouring concrete.

Frame stage
After a few days, usually 5-7, the formwork can be removed, the concrete has already hardened enough to build a terrace on it.
Here you can also bring everything to some step-by-step instructions:
- Waterproofing concrete base. This is a mandatory action that can be performed either by applying mastic to concrete, or by laying roofing material. By the way, the option with waterproofing will also be required if a bathhouse is being built from a bar with a veranda, so this is a universal moment in construction.

- Next, the bottom trim is arranged. Here you can use the principle of fastening the Mauerlat, that is, the beam is placed on concrete and fastened with an anchor bolt, in steps of 60-80 cm.
- The corners are connected with a direct lock. This is quite simple to do and does not require special tools. The connection itself can be additionally fastened with a screw or nails.
- Logs are also installed here, on which you will later have to lay the floor. Logs can be fastened with additional staples, this will give them rigidity.
- Vertical posts are installed. In the corners and with a step of 1.2 meters. It all depends on what projects of wooden houses from a bar with a veranda the developer chooses. If there should be a lot of windows, then the installation of vertical racks is adjusted according to this parameter.

- After the vertical bars are installed, the top is tied. Here the strapping is necessarily done using screws or nails.

Important!
In general, when working with wood, for the most durable fastening, it is best to use screws.
They perfectly tighten parts of the structure, and at the same time do not lose strength throughout the entire service life.
Roof
Once the frame is ready, the roof can be installed. The calculation here is exactly the same as in the construction of the roof of the house. Rafters are installed in increments of 60-70 cm.
Then an OSB sheet is attached to the bottom. To do this, you will need several assistants, it is difficult to fasten the sheet on your own, and with the help of screws, fastening is carried out over the entire area of \u200b\u200bthe ceiling.

Such a roofing arrangement implies that a kind of crate has been obtained, in which mineral wool and a film can be laid. From above, everything is covered with moisture-resistant plywood, attached to the rafters with screws. Then roofing material and shingles are laid.
It is this instruction that is most simple for implementing the project on its own. Bituminous tiles and plywood sheets with OSB simplify the installation process quite significantly.
Important!
In the roofing device, you should always leave several ventilation holes on the sides so that there is free air circulation.
No matter how the wood is processed, but without ventilation, it can still begin to rot.
Walls
First of all, it is necessary to recall the strong fastening that should be done with the walls of the main building. There are several ways to properly fasten the frame of the veranda from a bar, and for independent work, fastening to special anchors with spacers is suitable. In addition, it will be possible to additionally fasten everything with brackets.
Now the main thing, because the main area of \u200b\u200bthe veranda, as a rule, is intended for windows, which means that either plywood or a board in size can be used to sheathe the remaining areas. The easiest option is plywood.
To do this, you will need a minimum set of tools:
- Roulette.
- Electric jigsaw.
- Screwdriver.
Sheets of plywood are cut to size and attached to vertical posts. First, one side is sheathed, mineral wool and a vapor barrier film are inserted into the gap between the posts, then the second side is sewn up.

On the one hand, this is a very simple version of the rough decking of the terrace, but on the other hand, it is quite warm and functional.
Advice!
Here it is worth mentioning that expanded clay can be poured and compacted under the floor.
This is an ideal heat-insulating material for constructing a subfloor, and at the same time, as the extension walls are made of, a do-it-yourself porch from a bar can be a cozy room in the winter.
But with regard to windows, here you still need to turn to specialists. The easiest option is to order PVC-U windows, and under them, during the construction process, bring window openings.
Of course, the price of such a veranda will increase somewhat, windows are always an expensive pleasure, but the functionality of the room will also increase. In addition, it is not necessary to order all windows with opening sashes, most can be just a solid window.
Output
It is possible to build an extension on your own, like a house from a bar with a veranda, because the construction technology itself implies both simplicity of work and high functionality of the building. The main thing is to carry out all the stages step by step and do not forget that the structure is made of wood, which means that special attention must be paid to waterproofing.
Proper construction of extensions for various purposes can not only expand the residential part of the house, but also improve its appearance and protect it from wear and tear. The construction of a veranda adjacent to the house, regardless of the type of building, requires careful project development, with the definition of materials and construction technology.
Proper execution and approval of project documentation in state institutions will not only insure against problems with the law, but also help to draw up a plan and estimate for the building.

Design
A typical veranda is a roofed frame structure erected on a strip or column foundation, with glass or half glass walls. The statement that the veranda should be built from the same materials as the main building, with the emergence of new styles and fashion trends in architecture, has lost its relevance.


In the photos below - ready-made solutions for verandas attached to the house, with different principles of compatibility. In some cases, the new extension is made of the same materials and is completely combined with the house, in others the new one is combined with the preservation of common elements - the roof, beams, etc.

There are also projects in which the original design of the extension brings a new architectural touch, updating the exterior.

When choosing materials and construction technologies, one should also take into account the parameters of proper ventilation, moisture resistance and thermal insulation. With full glazing, it is necessary to provide opening segments for ventilation.

If an open veranda is being built, or, as it is also called, a summer terrace, you need to take care of the frost-resistant lining and tilt the floor towards the site.

Designs with removable frames are optimal for year-round use. The installation of large sliding doors will also allow the building to be used in a two-mode version.

In a typical project, the area of \u200b\u200bthe veranda is rectangular and ranges from 10 to 15 sq.m. With smaller areas it will be too crowded, with large areas, additional reinforcement for the roof will be required. Polygonal and semi-circular foundations are also possible.

According to its location, the veranda can be corner, end or front. An original solution can be considered the construction of a terrace around the entire perimeter of the house, which can have glazed, open and closed areas for various purposes: they can accommodate an entrance hall, a recreation area, and a large pantry.


Foundation
The foundation of terraces and verandas attached to the house should fit snugly against the main building, but at the same time have independent supports.

The strip foundation is suitable for large and heavy structures; in all other cases, a columnar foundation can be erected. When pouring concrete, you need to leave a gap of 3-4 cm with the main wall, which will subsequently be filled with waterproofing foam.

At the first stage of preparation for construction, the soil is cleared and compacted. Then, corner holes are dug for the pillars along the depth of the foundation of the house (about 1 m on average), a pillow is made of crushed stone, gravel and sand, on which concrete is poured.

After setting, supports are inserted from asbestos or metal pipes. Concrete poles or bricks may also be used. The same method is used to lay high piles for buildings adjacent to the level of the second floor.

Depending on the area and weight of the terrace, intermediate posts may be needed, installed every half a meter.

For a tape-type foundation, a trench of 30-50 cm breaks through, the formwork is laid 15-20 cm higher. Metal reinforcement bars or reinforcing mesh are embedded in the soil. Concrete is poured onto a layer of crushed stone and sand.


Wooden frame
The frame is mounted from beams or logs with a width of at least 12 cm, which are covered with a waterproofing layer. For the strength of horizontal knitting, experts recommend using fasteners in the foot, while the connection surface will be at an angle. Vertical racks are fixed with diagonal interceptions.


At the final stage, the wooden frame is covered with rafters for the roof. For cladding, you can use plywood panels, chipboard boards, etc.

The construction of a wooden veranda is the best budget solution for the prices of materials, but when choosing this type of building, you need a professional approach and knowledge of the nuances of building from a wooden beam.

Other materials for verandas

The construction of foam blocks is being built on a strip foundation. It is easy to make such a masonry yourself. Laying is carried out with the help of special glue, with dressing of seams for strength.

When finishing, an internal and external waterproofing layer is provided, finishing with drywall, wooden panels, moisture-resistant wallpaper and paints. The outer surface can be lined with ventilated facades.


Polycarbonate structure construction, modern and attractive option. This material is well combined in buildings with a wooden and brick frame.

For a building that consists entirely of bicarbonate shields, no foundation is needed. The earth can simply be compacted and covered with paving slabs.


The design is created using aluminum profiles, it is necessary to provide for the possibility of ventilation and water drainage. Polycarbonate panels and frames of various types can be customized for specific needs for lighting and thermal insulation.

Before you attach a veranda to the house, you need to decide on the functions that it will perform. In addition to the drainage and ventilation systems necessary in any case, the correct connection to the capital structure and the roof structure, the schedule for using this part of the house is important.

The design and construction of summer verandas differs from the requirements for premises with year-round operation. It is also important to note that any extension will require the same care and renovation as permanent buildings.


Photo of the veranda attached to the house


Country rest in the country is, first of all, the opportunity to breathe the fresh air of a garden or forest twenty hours a day. It is impossible to relax and at the same time be in a stuffy box of a country house, therefore, a summer resident who values his health sooner or later equips a full-fledged summer terrace with an awning or a roof at the dacha with his own hands. Building a terrace with your own hands is much simpler than a gazebo or veranda, so arranging a special platform for a table and garden furniture, as a rule, will not require large investments, despite the fact that the effect will be quite impressive.
What is the secret of the terrace
Despite a certain external similarity between the veranda and the terrace, the purpose of these buildings is different, as, in fact, the sizes and designs differ. A veranda is a part of a house with closed walls, windows and a full roof. The terrace is a landscaped outdoor area for relaxing on a sunny day with a canopy, awning or awning. The difference is easier to understand if you look at a photo or drawing of a classic terrace.

When choosing a place and a way to build a terrace with your own hands, you can use the classic techniques for arranging a recreation area:
- In close proximity to the house, using the platform and steps as a porch and platform in front of the entrance to the house;
- Take it out as a separate platform and place it in a cozy, sunny and less ventilated place in the summer cottage. At the same time, a prerequisite is the arrangement of a path, stairs or steps, with which you can quickly get inside the house;
- To build a special type of roof or ceiling for a terrace with your own hands, on which a recreation area will be located.
Important! It is clear that verandas and gazebos are not built this way, so any drawings and recommendations for the construction of terraces can be creatively processed, changing the dimensions according to your wishes. The main thing is that the design is comfortable, durable and safe to use.
The dimensions of terraced areas, as a rule, can be several times larger than the size of gazebos, and even more so, verandas. Almost always, the base of the site is built of wood or composite, raising the structure above the ground so that moisture and dampness do not affect the condition of the boardwalk.

Choose a device, design and dimensions
The terrace is the only building of its kind, designed not to create a shadow, but rather, aimed at providing the possibility of a comfortable and safe stay in the sun. Therefore, when choosing a project and a site for the construction of a terrace with your own hands, drawings and dimensions, it is necessary to take into account the following features:
- In the construction of a site of any size, raised above the ground by more than 18-20 cm, there must be a fence and a railing for the terrace. For buildings that include several platforms located at different heights, intermediate steps and handrails are provided;
- Floors, railings and railings should be made of wood or a similar material, such as a polymer composite. The drawing must necessarily indicate the quality of wood processing and the type of coating applied - varnish or protective composition based on epoxy resins;
- In the presence of a canopy or awning, one edge of the roof must be attached to the main wall of the house, the second rests on stationary supports embedded in the ground to a depth of at least 40 cm with pouring a concrete blind area.
Important! Before choosing a diagram of how to make a terrace, it is important to choose the right material that best matches the design in the drawing.
The easiest way is to build a terrace at the corner junction of two walls of the house, as in the photo. In this case, we build a terrace and automatically get a platform in front of the entrance to the house.
Corner terrace design
The simplest option for a terrace would be to build a platform of wood on a primitive foundation of concrete blocks or slabs, as in the drawing. The corner arrangement provides protection of the terrace area from wind and rain from both sides, so there is no need for wind protection with polycarbonate sheets or wooden shields.
If necessary, you can install a fabric awning, curtain or canopy over the terrace, the dimensions of which will be limited only by the dimensions of the walls of the house. The disadvantages of the design include the fact that with an incorrect slope, a wooden platform can affect the distribution of rainwater, so the calculation and size of the slope of 3-4 ° must be immediately fixed on the terrace drawing. The size of the foundation supports for the flooring must be calculated according to the sketch or drawing, according to the measurements of the entrance opening above the ground level.

For a light frame structure of a terraced area, it will be enough to lay 12-15 concrete blocks or several dozen clinker tiles as a foundation. First you need to remove the top layer of soil, sprinkle with fine gravel, tamp and lay a sand cushion. The most difficult thing will be to withstand the size and thickness of the sand base so that the height of the foundation column or tile supports does not exceed the calculated value according to the drawing.
Geotextiles can be laid on the sand, which well prevents the growth of weeds and grass. To fill the floor of the terrace, experts recommend pre-tying the supports with a bar with laying log beams made of wood. But in this case, it is necessary to increase the vertical size of the terrace in height by 20-30 cm, which is not always convenient. In the simplest case, a beam measuring 60x60 mm is laid directly on the tile and fixed with pieces of reinforcement, hammering it directly into the ground.
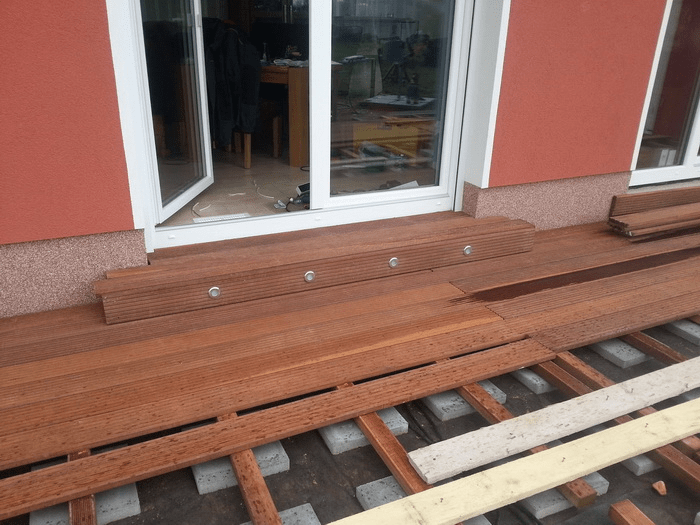
The most difficult stage in the assembly of a budget terrace structure will be the sheathing of the flooring with boards. An oak or special deck board made of polypropylene and sawdust, 200x30 mm in size, is best suited.
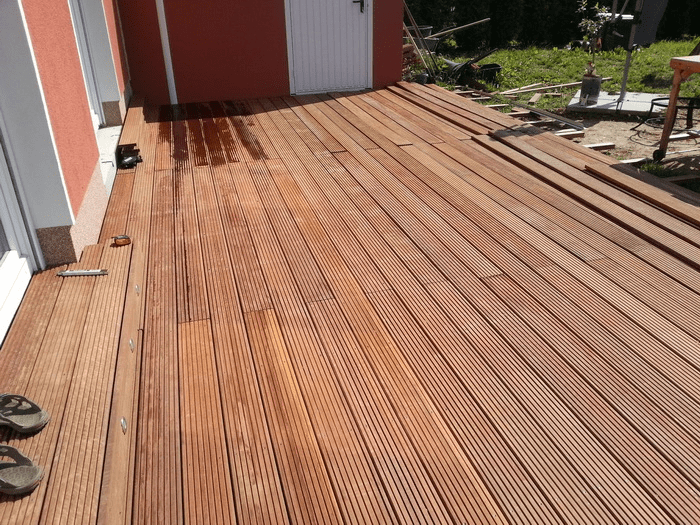
For your information! The appearance and dimensions of the composite material practically do not differ from the processed natural board. High resistance to moisture and absolute insensitivity to insects and pathogens make decking an excellent substitute for expensive oak wood.
When sheathing the frame of the site, it is necessary to carefully follow the recommendations for the installation of the decking given in the drawing. In a similar way, flooring can be made from ordinary boards pre-treated with an antiseptic.
Building a simple terrace on your own
The average size of the site is 4x2 m. We will install the wooden structure on wooden supports in a swinging pattern. Part of the terrace area will rest on pillars made of twin beams 120 cm long and 100x100 mm in size, the second part of the terrace will rest on the plank wall of the country house. Under the installation of the timber, we drill holes in the soil with a diameter of 90 mm and hammer the supports with a sledgehammer.

Further, the supports hammered into the ground must be tied with a flat board or a sheet of thick plywood, with a section size of 350x40 mm. When attaching the boards, it is necessary to additionally control the horizontal position of the strapping sheet.

We fasten the side strapping boards directly to the walls of a wooden house, in the supports you will need to wash down for the installation of a longitudinal strapping board.
After assembling the strapping, transverse log beams are installed, 2.5 m in size with a section of 100x40 mm, which will increase the rigidity of the base of the terrace area and at the same time serve as a support for the flooring of the floorboards.

At the next stage, the terrace fence is assembled. Grooves are cut along the outer contour of the site in the floorboards, after which, as in the drawing, supports are nailed under the railing. A vertical bar or board measuring 100x50 mm, 120 cm high is attached to the bottom strapping board using self-tapping screws. A groove for the crossbars is sawn from the inside of the uprights, after which the lower bar and handrails of the terrace area are installed.

Diagonal struts are stuffed between the posts, increasing the strength of the entire fence structure.
Conclusion
The above terrace design is simple and affordable for do-it-yourself construction. If desired, a small fabric awning or a full-fledged canopy made of polycarbonate or light ondulin can be installed above the terrace area. A wooden structure must be treated with protective antiseptics, and the floor should be periodically treated with wax or paraffin mastics.