Among the various designs of gates installed in the garage, the leaf of the lifting gate that leaves under the ceiling is especially convenient. This is a reliable design, completely unwieldy, in the open state only the lower end of the gate is visible at the upper edge of the opening. Everything is good, but expensive, to make it cheaper, they make garage doors (lifting) with their own hands.
In this case, we get the same qualities as the factory models: strength, burglary protection, thermal protection and ease of use. That is, all requirements for the design of garage doors are met, but without the high cost characteristic of industrial products.
There are two types of overhead garage doors.
1. Overhead sectional doors have a composite leaf, from a number of panels, about half a meter high. When the gate opens, such a canvas is “pulled” under the ceiling and then falls back down vertically. The panels themselves can be wooden, plastic or made of steel.
The inner space of the door leaf is filled with polyurethane foam insulation, which provides effective thermal insulation of the gate.
In such gates, the panels are connected using articulated hinges. In them, couplings, rollers and other moving parts are made of plastic or steel, guide rails are made of corrosion-resistant materials. The advantages of this design of lifting gates are simplicity and safety of operation and good strength. The disadvantage is the low resistance to burglary, and it is almost impossible to make such gates on your own.
Here you have only one opportunity to save money: buy a kit ready for assembly, and install the overhead sectional door yourself.
2. An up-and-over gate is a design in which the entire sash rises to the ceiling when opened. The sash movement is provided by a hinged-lever mechanism. Such gates, due to their high strength, perfectly protect the garage from intruders.

Another important plus is the noiselessness of operation when the web moves, since rollers and guides are not used in the design. But the most important thing: it is quite possible to make a swing-up gate for your garage yourself, without the need for narrow technical knowledge and spend much less money.
Choosing an economical option for lifting gates
If we are talking about overhead sectional doors, which are characterized by a complex design, then the only way to save money without compromising the design is to do the installation of a ready-made complete set of the door mechanism with your own hands. Any other option involves a "sacrifice":
- If you leave the manual drive and abandon the mechanical drive, you can reduce costs by 4 thousand rubles, but lose the convenience of operation;
- You can reduce the size of the opening by adjusting the height and width to the minimum number of panels;
You can “put under the knife” beauty: do not use color or panels with decorations, but take plain coloring from inexpensive material, which will make it possible to reduce the cost by 10 percent. From 14 to 18 thousand savings will ensure the rejection of the door in the gate and another 4 thousand less you can pay if you do not take panels with glazing.

There are many more opportunities to reduce costs if a swing-up door type is chosen. Since such a design, in its complexity, is quite feasible on its own. There are the least costs, if you do everything yourself, then the costs will be only for materials. If the owner does not decide to do the lifting garage doors with his own hands, then he can only save on installation if he mounts the finished structure he bought himself. Then the budget for the gate will be equal to the cost of the kit, will be from 40,000 to 60,000 rubles.
Lift-and-turn gate device
Lift-and-turn gates are a three-element structure: a frame, a lifting sash and a mechanism that opens it. The frame, made of steel or wooden beams, is the basis of the structure, which is mounted in the opening. Profiles are installed in the door frame, which are guides; garage doors move along them when raised and lowered under the influence of the opening mechanism.


The up-and-over gates have a one-piece door leaf, such a design has much better (compared to a leaf of sections) protection against destruction or breaking and is an essential advantage of this type of gate. The shield can be made of different materials: wood panel, sandwich panel, board shield covered with metal sheet.

The option of a solid wooden leaf has a rather poor cost-benefit ratio for such a gate design. Solid wood itself is an expensive pleasure, but at the same time, it is a heavy material and the canvas will weigh a lot, and the wooden canvas is also vulnerable to climatic factors.

The experience of "gate builders" says that the best option is a plank fabric treated with special compounds that protect against moisture and increase resistance to temperature extremes and mechanical stress. The plank board from above is upholstered with sheet galvanized iron and painted.
To make it warmer in the garage, the door leaf can be pasted over with pressed foam, insulated with polystyrene foam or other heat insulators. And to make the gate more beautiful, they can be lined with plastic or wooden panels.
Lifting garage doors - do-it-yourself
If you want complete freedom in the design of the gate, ease of opening and determining functionality, then the most affordable way in terms of finances is to make and put homemade gates in the garage opening. But first you need to decide which opening mechanism to use:

The hinged lever mechanism is very popular. This is a reliable and simple design that guarantees a simple movement of the sash and is protected from blocking the shield. However, such a mechanism needs accuracy when installing guide profiles and carefully adjusting the spring tension. Be sure to prevent the shield from jamming, you need to set the guides strictly in a vertical position and certainly both in parallel.

The counterweight mechanism is a design in which the cable is attached to the corners of the frame at the bottom, passed through the block and goes to the winch pulley, and at the end there is a counterweight. The greater the weight of the gate shield, the greater should be the mass of the counterweight. With this design, the frame and the gate frame are subjected to a large load. Usually this mechanism is used in the case of heavy, massive gates.
Next, you need to design future gates, take dimensions from the opening and make a sketch (or pick up something from ready-made drawings). When the project and drawings are ready, you need to buy materials and prepare a tool. You will need:
- Wooden bars, for the box - with a section of 12 by 8 cm and ceiling - 10 by 10 cm;
- Metal pins;
- Corner for rails, section 40 x 40 x 4 mm and for the frame -3.5x3.5x0.4 cm;
- Channel bracket 8 x 4.3 x 0.5 centimeters;
- Spring, 3 cm diameter;
- Metal rod 8 mm in diameter (needed for a voltage regulator).
- Now you can start making garage doors:
We assemble a box from two vertical and one transverse bars, we connect the bars with steel plates or squares. The bottom of the box must be buried two centimeters into the floor screed.
We fix the box in the opening with steel pins.
We assemble the frame of the gate leaf and sheathe it with a shield, cover it with sheet iron from the outside;
From the corner we make a support for the mechanism, in one of the shelves we drill one hole for fastening to the racks, and in the other shelf there are 3 holes for attaching the spring bracket. It is better to make a support for the spring from a channel bracket. To fix it, you need to drill 3 holes in one of the shelves.

We make an adjusting plate from an iron strip, with which we connect the spring and the bracket. At the spring, the extreme turns must be bent in the form of hooks, at the bottom, attach a voltage regulator made of a bar.
We make a hinged corner for the bottom from a corner, drill an 8.5 mm hole and weld it to the frame so as to step back from the bottom rib to the middle of the hole. This is necessary to mount the lift arm on a 12cm swivel. Next, you need to attach a plate under the voltage regulator to the end of the lever by welding.
From two corners we make rails for moving the gate. To do this, we compose and weld two corners along one edge, controlling the distance inside between the tops of the corners, it should be 5 centimeters.

Now the rail should be welded to the plate with holes, an 8 cm gap should be left between the lower edge of the cross member and the axis of the guide. To the other end of the rail, weld a piece of channel, with an indent of 12 - 15 centimeters. Next, the channel must be bolted to the ceiling bar.
When installing the gate, it is important to carefully check the horizontalness of the rails. Additionally, the canvas can be improved with locking systems, special security devices and burglary protection mechanisms.
To increase the amount of light in the garage, inserts of translucent material can be installed in the canvas. It will also be useful to stick rubber edging and compensating pads, which together will additionally give stability to the structure, as well as provide the gate stop with protection against corrosion or oxidation.
So, you have seen for yourself that it is quite possible to build a Garage gate (lifting) with your own hands, albeit difficult. This is a serious design, and for the whole mechanism to work properly, precision in the manufacture of parts and care in the installation of the entire structure are necessary. But you will make yourself an excellent lifting gate in your garage and save a tangible amount.
Video: do-it-yourself garage doors (lifting)
This option and type of gate will be optimal for self-production. This does not require much time, or any specialized skills. In fact, to make a gate with your own hands, you will need:
- welding machine;
- metallic profile;
- videos;
- the gate shield.
Basics of work
To begin with, you should finish any work inside the garage. The design feature implies that dust entering the guides, or on the rollers, can interfere with normal functioning, malfunctions. Again, the floor should be finished after the installation of the gate, since they (the frame) should go deep by at least 2 cm. The walls, the garage opening should be even so that the guides can be easily installed.
The next step is to measure the opening. This is how you can determine how high the guides are needed, what sizes the shield will be. On fig. 1 is an example of what sizes you will need.

Frame manufacturing
The next action to be taken is the manufacture of the frame, the base of the gate. Here are a few options for you to use:
- steel structure can be used;
- you can use wooden blocks.
The final choice is yours, but still, the metal will be more reliable. Once the frame is welded, it should be tried on in the opening to eliminate various errors or miscalculations. If the frame is level, you checked its position both horizontally and vertically, it should be fixed at least on anchors. Your frame should look like this:

If you have gaps between the wall and the frame, the gaps should be blown out with building foam, and then fix the horizontal rails, which should be under your ceiling.
After you install the frame, you should weld the brackets for the rollers to the guides and install the rollers themselves. Top brackets with rollers should be installed a little further forward. This will ensure normal operation - the gate will not cling.
The image below gives you a closer look at what your frame should look like from the side.

Choosing and creating a shield for the gate
Since it will be located on the street, the shield should be made the most resistant to various climatic conditions. A shield is made from any improvised materials. It can be:
- wooden bars, upholstered with metal from the outside;
- you can use a solid sheet of metal;
- you can make a frame from several steel profiles, with minimal distances from each other, and then sheathe with pieces of metal.
Again, no one forbids you to use, say, plastic as a finishing material. In this case, the appearance of your gate will be aesthetic. Moreover, the color of plastic is offered in the widest range.
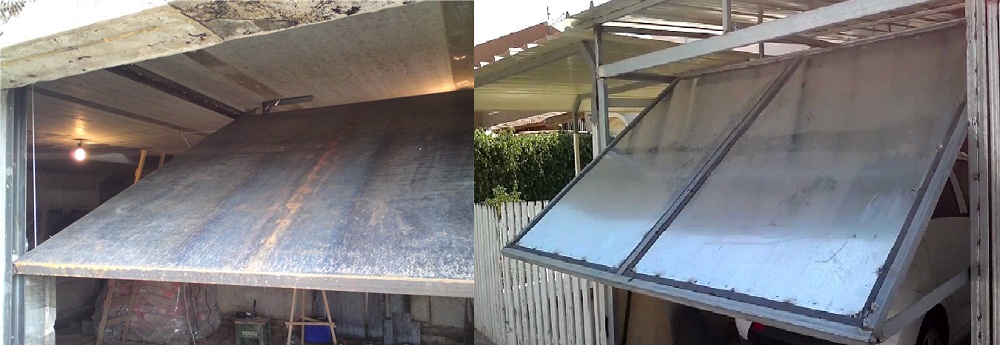
In the picture below, you can see the finished options. In the first case, a solid metal sheet is used, in the second, a shield sheathed with metal is presented.
When making a shield, there are a few little tricks that will be relevant for any owner.
Firstly, you can upholster your gates with special materials that will help keep the room warm even in cold weather. It will be quite easy to find such materials. And it will not be difficult to beat the gate with them and will not take time.
Secondly, it is worth giving one more useful advice. In order not to use the entire gate structure once again, not to open them completely, a gate can be made in the shield through which the owner can enter. The figure below shows an example of such a solution.
Many make windows in the gates. In this case, you also have two solutions. You can cut a hole in the canvas and seal it yourself with glass or plastic, or you can buy a ready-made gate window in a specialized store.
After completing all the work, the finished shield should be placed in the skids and the operability of the structure should be checked. Next, install (weld) the springs. It is they who will ensure the smooth opening / closing of the gate, in addition, will facilitate this process.
In the photo below you can see the finished structure, how it should look outside the garage and inside.

Installing additional parts
These include:
- opening handles;
- heck for fixing the gate;
- locks and arches.
Handles should be done at the bottom of the canvas, both from the inside and from the outside. This approach will allow you to easily close and open the gate, not to cling to the edges with your fingers. And in the cold season it will be very problematic.
Heck should be installed on the inside of the canvas. So, if you made a gate, it will be possible to open the gate only from the inside. This will completely secure your garage. If the garage is attached to the house, there is an entrance to the garage from the residential part, then the purchase and installation of heck and valves can also be called the best solution.
If the garage is a separate building, then it should be closed with special locks. Or, you can buy ordinary, hinged ones, having previously made bows on the canvas and on the vertical frame (on its side facing the street, out).
In fact, this will be the final stage of self-assembly and the creation of a do-it-yourself up-and-over gate. All you have to do is paint the frame and the shield in the desired color, or, as mentioned above, upholster the shield with heat-insulating or sound-proof materials.
But, this is not all the work that can be done. There are alternative options in the mechanism, as well as modification of existing gates.
In particular, you can install a system of counterweights. To do this, you will need a winch and cables. In this case, you can achieve greater smoothness, and this also opens up great opportunities for modifications.
Basis for safe operation
In the process of working on the gate, having finished the main thing, having checked the operability of the structure, it is worth taking care of safety. It is necessary to make stoppers that will not allow the canvas to leave the guides. This is a very important point that can save you from injury.
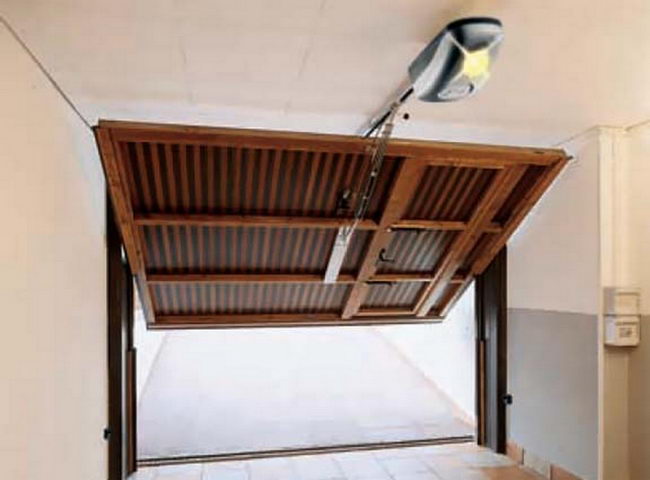
Gate automation
In most cases, do-it-yourself overhead gates are opened and closed by hand. It's simple and reliable. But, the modern market offers a wide range of various drives that can be installed on your gate. In this case, the gate can only be opened or closed by pressing the appropriate button.
Installing such a system will also be quite simple. The drive, together with the necessary components, is sold in any store specializing in the sale and installation of gates.
Again, you can make your gate open remotely. It's very simple. On almost all drives you can find a control panel, and in the instructions you will find the sawing of contacts. Connecting everything correctly will not be a problem - it will be difficult to give an example here, as different manufacturers use their own standards. But in any case, such information can be found in the instructions for the drive.
By installing a drive, you will get a gate that is in no way inferior to factory doors, with the possibility of remote opening, with all the advantages and features, but much cheaper. The final version of the appearance of the gate, made by hand, can be seen below.
By following this guide, you will surely be able to create your own gate easily and simply. And you can see the results of the work of other people who also set out to create a lifting gate with their own hands, you can watch the video below.
Video - Do-it-yourself lifting gate drawings and assembly features
Do-it-yourself up-and-over garage door installation
Up-and-over gates are the most convenient, reliable, practical, but rather expensive type of enclosing structure for a garage. In the open position, they take a horizontal position and move forward a little, forming a small visor over the entrance.
Their pros and cons, as well as self-installation will be discussed in this article.
Advantages and disadvantages of this type of gate
The up-and-over design has several distinct advantages over other types of garage doors:
- durable one-piece canvas provides reliable protection against foreign penetration and hacking;
- characterized by high resistance to corrosion and other negative effects of the external environment (subject to the manufacturing technology and recommendations for the choice of materials);
- does not require a place to open;
- in the open state does not take up useful space;
- involves finishing with different facing materials, allows decoration with any inserts and panels;
- can be insulated with special polystyrene foam panels;
- can be opened manually or equipped with an automatic opening system;
- suitable for installation in single and double garages.

The disadvantages of up-and-over doors are mainly related to some limitations and features of the design itself, which are expressed as follows:
- it can only be installed in rectangular openings;
- in the open state reduces the height of the opening (approximately 20 cm).
- a solid door leaf makes it impossible to repair individual sections - in case of damage, a complete replacement of the entire element is required;
- the gates are equipped with a spring mechanism, which is designed for a certain mass of the structure, therefore, when performing thermal insulation, the weight of the insulation should be taken into account: if the mass of the insulated gates increases significantly, it is necessary to install counterweights;
- there may be gaps between the leaf and the frame, which are eliminated with a rubber seal, but it is recommended to install such gates only in unheated garages.
The principle of operation of the gate
The design of up-and-over (panel) gates is characterized by a rather simple device. It consists of frames, canvases and guides along which it rotates around its axis, moving from vertical to horizontal position and vice versa.
The basis is a steel frame, which is fixed in the opening of the garage or behind it and is the leading part when the gate moves. For its manufacture, pipes of rectangular section are usually used.
When opening the gate, the roller mechanism and lifting levers are activated, with the help of which the gate leaf moves along the guides, and then it is fixed under the garage ceiling. The lower part of the canvas rises and forms a canopy over the opening of the garage. Compensating springs in the closed position of the gate are stretched, and when the gate is open they remain free.

Gate in open position
The mechanism for opening this type of gate is of two types:
- Hinged-lever- a simple, reliable and most popular mechanism that provides a simple movement of the shield and prevents it from blocking. Mandatory requirements: careful adjustment of the tension of the springs and high accuracy of mounting the guides.
- On counterweights- this mechanism consists of a cable attached to the lower corners of the frame and passing through the block, as well as a counterweight mounted on the opposite edge of the winch. This mechanism is recommended to be used for massive gates with a large weight.
The control of shield garage doors can be manual or using an electric drive (usually remote control).
Material selection
Materials for up-and-over garage doors should be selected depending on the mechanism and leaf leaf used. For the simplest gates that you can make yourself, you will need (all measurements are given in centimeters):
- wooden bars: for a box with a section of 12x8, ceiling - 10x10;
- metal pins;
- corner: for the frame - 3.5x3.5x0.4, for the rail - 4x4x0.4 cm;
- channel bracket 8x4.3x0.5;
- spring with an inner diameter of 3 cm;
- a metal rod with a cross section of 0.8 (for a tension regulator);
- electric drive (if gate automation is provided);
- canvas.
As a canvas, you can use a shield made of boards upholstered with metal, a solid canvas or a sandwich panel.
For self-made gates, the best option is a board shield upholstered with galvanized iron and coated with a protective compound. For thermal insulation, you can use expanded polystyrene, polystyrene or insulation in mats, and to improve the appearance - veneer the finished gate with wooden panels or plastic.

Self assembled gate
Necessary tools for the job
For self-installation of up-and-over garage doors, you will need a traditional set of tools:
- level;
- a hammer;
- pencil;
- drill;
- spanners;
- screwdrivers;
- drill;
- Bulgarian;
- welding machine.
The first step in installing a gate is designing it. For this it is necessary measure the opening and independently draw up a sketch or select a finished drawing.
Up-and-over door drawing
After that, materials, tools are purchased and direct work on the manufacture of the gate begins:
- A box is assembled from bars, which are fastened together with squares or metal plates.
- The box is fixed in the opening and fastened with pins, the bottom is deepened by about 2 cm into the floor screed.
- The door leaf is assembled: the frame is sheathed with a shield and closed with sheet metal.
- The mechanism support is made from the corner, two holes with a diameter of 1 cm are drilled in one shelf for fixing to the longitudinal posts, in the other - three more for fastening the spring bracket. To fasten the channel bracket used as a support for the spring, 3 holes are drilled in one of the shelves.
- The bracket and the spring are connected using an adjusting plate made from a strip of iron. The extreme coils of the spring are used as hooks, and a tension regulator from a bar is attached to the bottom. On one side, a ring is obtained, on the other, a thread is cut.
- The hinge assembly from the bottom is made from a corner with a hole (0.85 cm) and is welded to the frame between the bottom rib and the middle of the hole for the lever of the lifting mechanism at a distance of 12 cm.
- A plate with a hole for the tensioner is welded to the end of the lever.
- Rails are made for the movement of the shield: 2 corners are made, and the edges of their shelves are welded in such a way that the internal space between their tops is 5 cm.
- One end of such a rail is welded to a plate with holes. There should be a gap of 8 cm between the center line of the guide and the lower edge of the crossbar. Pieces of the channel are welded to the other edges of the rail at a distance of 14-15 cm. The channel is attached to the ceiling bar with a bolt.
After the assembly is completed, the structure is painted to give it an aesthetic appearance; it is recommended to paint hard-to-reach places before assembly.

- it is recommended to use welding to assemble parts, which will reduce the need for fasteners and drilling holes;
- the height of the gate opening should not be less than 2.2 meters, and the distance from the top of the opening to the ceiling - 0.35-0.5 meters;
- if the rise is low, the drum should be placed at the back;
- in the lower profile of the web there should be a groove into which the seal is installed;
- web weight is a very important parameter, its optimal value is 100 kg;
- as a drive, you can install a reversible self-locking winch (220 V, 350 W, pulling force - 125 kg);
- for arranging automation, you can use a car alarm.
For ease of use, the canvas can be made with inserts of translucent materials, which will increase the amount of light, as well as equipped with locking devices and security systems that protect against pinching or preventing hacking.
Homemade up-and-over gates are the most economical way to close the garage opening without limiting the functionality, ease of use and originality of their design.
On the video - a detailed story about the independent manufacture of up-and-over garage doors:
Comfortable opening and closing of the garage is provided by various types of gates. One of the most popular and most convenient varieties is the lifting mechanism. This design, along with aesthetics, can significantly save space, which is especially beneficial in confined spaces. Lifting garage doors can be equipped with several types of drive mechanisms, however, the principle of their operation remains the same in all cases.
Design characteristics
It is customary to distinguish two groups that differ in the formation of the web:
- sectional gates, made or purchased with your own hands (based on several fragments connected by movable hinges);
- garage doors are lifting (they have a solid plane that rotates about a horizontal axis and is led away by mechanisms under the ceiling).
Through the use of roller devices and guide beams, it is possible to achieve silent operation.
Pros and cons - what to look for when installing
Along with the noiselessness of the mechanism, there are the following advantages of do-it-yourself lifting gates to the garage:
- monolithic canvas serves as a quality barrier against unwanted guests getting inside, having increased resistance to burglary, unlike folding models

This design is a reliable protection against thieves.
- to perform opening / closing maneuvers, almost no space is required;
- the materials used during the manufacture of homemade lifting gates have a high degree of resistance to corrosion processes;
- when the passage is fully opened, the sash does not take up additional space;
- the outer and inner surface can be treated with almost any type of decor or panels;
- it is allowed to insulate the lifting gates to the garage with your own hands using polystyrene foam plates;
- home-made garage doors are equipped with an electric drive and a manual drive to ensure opening in all cases;
- a drawing of a garage door with a lift will be relevant for both single and double garages.
Do not forget about the design flaws:
- do-it-yourself garage doors are mounted exclusively in rectangular cavities;
- easily moving under the ceiling, the plate lowers the height of the ceilings by 150-250 mm;
- in case of possible damage to individual sections of the solid leaf, it is impossible to replace part of it, you will have to change the entire surface of the gate with your own hands;
- due to the fact that a spring mechanism is often present in the design, it must be taken into account that it has limit values for the load that increases during the installation of a heater or decor, and in such cases, a counterweight will be required;
Due to the loose connection of the outer frame of the overhead-folding gate to the inner perimeter of the opening, rather large gaps can form. To eliminate them, you can use rubber seals, which during the period of cold weather it is advisable to rub with silicone so as not to tear when opening.
Principle of operation

The scheme of how exactly the canvas is raised
Do-it-yourself folding gates made by themselves are distinguished by a fairly understandable design and operation. They are based on the following elements:
- frame, sheathed with canvases on both sides;
- guides along which the roller mechanism moves, transferring the plate from a vertical position to a horizontal one;
- working drive using a spring or rod mechanism.
The frame is formed from a steel square or rectangular construction profile. It must be both strong to support its own weight and not be overly heavy.
When opened, the upper part of the canvas moves under the ceiling, while the lower part remains outside in the form of a visor. The springs are stretched when the door is closed, and when the gate is open, they are set in a free position. There are two types of mechanisms:
- Design with built-in counterweights, in which there is a cable fixed in the lower zone of the frame and thrown over a rotating block. A counterweight is installed on the opposite side of the winch. A similar scheme is relevant for a heavy canvas.
- Drive for lifting gates with hinged-lever mechanisms. It is distinguished by its reliability and ease of implementation. This requires competent adjustment of the spring preload and maximum accuracy when installing the guides.
For an electric drive, switching on using a remote control is often used.
Installation
.jpg)
Do-it-yourself measurements are preliminarily carried out under the lifting garage doors, the drawings are formed based on the actual flight conditions. Assembly is carried out in a certain sequence:
- The frame is being prepared for the opening. If it is made of wood, then squares and metal plates are used for fixing. In the case of using a steel profile, a welding machine and a flat platform for welding will be in demand.
- The frame-box is mounted in the opening. The bottom needs to be deepened into the floor to get rid of the step.
- A leaf is formed for the gate leaf. To make the gate warmer with your own hands, stone or basalt wool insulation is placed in the frame cavity. The outer sides are sheathed with a profile or sheet iron
.jpg)
- With the help of a corner form a support. A pair of holes with a diameter of 10 mm is made in one of the shelves to fix the longitudinal racks. In the second - three holes to mount the spring bracket. The channel bracket is used as a support for the spring.
- We mount together the spring and the bracket through the adjusting plates, which are made from cut metal strips. For the end coils of the spring we carry out the engagement. At the bottom, a rod tensioner is used. In it, one side has a thread, and the second has a hook from the ring.
- A hinge assembly is mounted below. It requires a corner with a hole of 8-9 mm in diameter. The part must be welded to the frame structure above the lower rib and below the hole for the lifting mechanism handle.
- To the end of the lever you will need to weld a plate with holes for adjusting the tensioner.
- Guides for rollers are formed. For them, a channel profile or an I-beam is used with an internal distance between surfaces of 50 mm, and you can also independently weld two corners into a U-shaped profile.
- One side is welded to a plate with holes. It is necessary to leave a gap between the lower platform and the transverse axis of the guide.
- On the other side of the rails, prepared pieces of the channel are welded. It is attached to the ceiling with reliable bolted connections.

Movement Assembly
The assembly is completed by rubbing the welds, after which the gate is primed and the entire finished structure is covered with paint. It is recommended to use an airbrush for these purposes so that the paint is light and even.
It is important to ensure that the height of the opening is at least 2.2 m from the floor to the surface of the open gate. Transparent inserts can be made into the canvas so that sunlight penetrates more inside. You can also mount a garage door in the plane.
Special attention should be paid to the insulation of the gate, since the heat loss area is quite large. There is no fundamental difference between the insulation of swing and lift-and-turn - you can also use mineral wool boards, polyurethane or foam. The only thing you should pay attention to is the method of attachment. If a penoplex (blowing insulation) is used, then the gate area is divided into small fragments that are blown out. It is advisable to fix polyurethane foam or mineral wool boards with decorative panels.
You should not use glass wool for door insulation - with the same thermal insulation coefficient as mineral wool, it is more dangerous in operation due to the high degree of flammability.
VIDEO: How to make a do-it-yourself lifting gate
When buying a car, every owner thinks about how and where to store it. The ideal place has always been and remains the garage. Its convenience determines the quality of life, no worse than other rooms in the house. The arrangement of garage doors is becoming more convenient and practical every day due to the fact that the industry does not stand still. Classic swing gates fade into the background. Practical overhead garage doors are becoming more and more popular today. Creating them yourself is not difficult if you have minimal skills to perform such construction work. To learn how to properly, quickly and efficiently arrange them, check out this article.
To make a homemade lifting garage door, first determine the appropriate design option.
According to this principle, the following types are distinguished:

Features of sectional structures
The most common garage door option at the moment is a sectional garage door. They are made in the form of panels 40-60 cm high. 
Panels are made from several types of materials:
- plastic;
- metal;
- wood.
Important! They determine the choice of a specific type of material to create the design of a lifting gate for a garage, the size of the car, the estimated number of cars, as well as the features of the design idea for the design of both the garage itself and the architectural ensemble on the site as a whole.
To maximize the quality of thermal insulation, such panels are filled with polyurethane, and the surface is protected with a special coating. Between themselves, the individual elements are fastened with hinged loops. All moving parts, such as clutches and rollers, are made of reinforced plastic combined with steel components, and the guide rails are made from materials that do not corrode. 
The mechanism of operation of garage sectional doors is quite simple - they are pulled along the runners under the ceiling when opened and fall vertically down when closed.
Advantages
The main advantages of such gates include the following features:

disadvantages
In addition to the advantages, sectional doors of the lifting type also have a couple of disadvantages:

Distinctive characteristics of lift-and-swivel one-piece mechanisms
Determining the features of such structures, it is certainly worth noting the following nuances:

Advantages
The one-piece panel type of garage doors has a lot of advantages:

disadvantages

Important! The main difference between these two designs is that sectional garage doors need to be installed only as a set, while all elements of up-and-over doors can be prepared and assembled by hand.

Video
Watch the video review of the up-and-over gate to more clearly understand the principle of their operation and device.
Garage door mounting tools
To install any type of garage door, you will need the following tools:

Installation Rules for Overhead Sectional Garage Doors
To properly install a sectional overhead garage door, follow these steps in exact order:
Video
The video below will help you quickly cope with the task of creating a lifting garage door. Check it out carefully.
Up-and-over gate installation technology
Considering the fact that the design of this type of gate has to be completely done independently, we will single out the main stages of work in more detail. 
Which type of swivel mechanism to choose?
Homemade garage doors are the most economical option for filling a garage opening without restrictions in convenience, functionality and design solutions. 
Before starting work, decide on the choice of mechanism by which the gate opens directly:

How to make a project?
To properly design a garage door, do the following:

What materials to prepare?
As soon as you draw up or select a sketch, purchase the following materials and tools for work:

Mounting order

Additional equipment
If you want to increase the attractiveness and reliability, equip the door leaf with the following additions:

Additional Gain
If necessary, strengthen the structure itself in one of the appropriate ways:

How to save money when installing garage doors?
The only thing you can do to save money when choosing an overhead sectional garage door is to install such a mechanism yourself. All other items, when trying to save money, will still require sacrificing certain benefits, although some options are quite acceptable. It all depends on your personal vision of the design of the garage and the regularity of its operation.
Check out some of the most popular garage door cost reduction solutions:

Conclusion
Garage lifting gates are a modern way to protect your garage from hacking with a convenient and beautiful shield. Entrust you installation and installation to specialists or do the work yourself - it's up to you. The main requirement for further convenient operation is the correct choice of the appropriate type of garage device, its competent internal layout and compliance with all the conditions of the assembly instructions.