Shelves in the interior have always been and will be a pleasant and functional addition to the overall design of the room. A business office, an educational institution, a store, a library, a residential apartment, a private house - there are shelves everywhere. Such popularity of these furniture products has definitely influenced their variety.
The 21st century dictates its requirements and tastes in all spheres of life, including new design approaches, modern styles. The shelf today is not only intended for placing objects on it, it is part of a whole design idea, a small element of one large picture.
What are the shelves
All shelves that are used in the interior can be grouped:
- wall-mounted;
- built-in;
- corner;
- outdoor;
- suspended;
- shelf module;
- folding;
- shelving.
Wall shelves are attached directly to the wall using brackets. These are the most versatile, traditional, reliable furniture products. Today you can find an unusual design of shelves on the wall, especially since design work is more popular than an ordinary wooden board.
The latter, for example, can be designed using glass as a front wall.
Depending on the material, the shelves are:
- wooden;
- glass;
- ceramic;
- metal;
- plastic;
- from chipboard, fiberboard;
- combined (using several materials);
- stone;
- wicker wicker;
- from drywall.
The last three types are not used very often, but they are very original and unusual. You can do it yourself from drywall, having thought over the design.
If you focus on design, then the shelves are:
- standard;
- modern.
Modern types are made with an orientation towards a certain interior style, given that the furniture must be combined with each other.
Bookshelves should be made of durable materials, well secured, and designed for heavy loads. Kitchen - should be made of easily washable material.

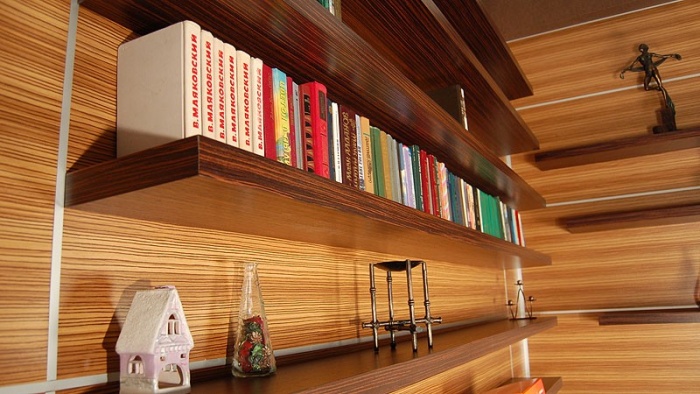
Wall shelves in the interior
Classic wall shelves in the interior are one of the simple and standard options for decorating your home in a practical, cost-effective and fast manner. By turning on your imagination, you can come up with an interesting decor.
Wall-mounted shelves in the interior are sure to be a beautiful and practical addition to your home.
 Long hanging shelves in the living room for flowers and paintings
 Wall-mounted shelves, regardless of shape and taste, should preferably be made in the same style as the rest of the furniture in the apartment, house, office, etc. By adhering to one design, you create the integrity, comfort and harmony of the room.

Wall shelves in the interior can be arranged in different ways, independently develop a design, or arrange shelves on the wall in original forms:
- tree or branch;
- the sun;
- house;
- honeycomb;
- letters, words;
- symbols;
- animals;
- abstraction;
- cars;
- items, etc.
The illuminated wall shelves are a modern solution, they look sophisticated and are an additional source of light. It is quite possible to use, for example, a glass shelf with lighting for a bathroom.
A simple, ordinary shelf will look beautiful with stylish, well-chosen decor. Interesting accessories, flowers, books arranged by color will be the main focus of this tandem. After all, a shelf, even the most unusual, is far from everything, but only the basis.
- It is necessary to take into account the general decoration of the room. For example, for rooms furnished in a classic style, it is not appropriate to use large, wide shelves. Most often, neat shelves made of high-quality wood are placed there.
- When choosing a material, you need to evaluate the load on the furniture product. And also choose the right mounts.
- When installing a shelf, it is imperative to analyze where it will be safer to do this. Consider electrical lines, pipes, etc. If there are small children, it is not appropriate to make such furniture floor-standing, set it too low, use low-quality fixtures.
- For small rooms, you can use corner, wall or folding shelves.
- Shelving is most suitable for large rooms. Practical and at the same time will look very gorgeous.
- Economy option is shelves made of glass, drywall, chipboard and other materials.
- For a bath, shelves made of wood and its derivatives are not advised, as they absorb moisture. Better to design, for example, glass, plastic or ceramic.
- Corner shelves can work well for a balcony.
- It is better to buy a shelf with all the furniture at once during the renovation, so that the whole room has the same interior style, a certain color scheme. If you only need a shelf, then we take into account the already existing interior.
- If there is an opportunity and desire, it is better to resort to the advice of a designer who knows all the nuances in this matter.
Showing your imagination, you can make a shelf yourself, or just choose by contacting the store. But all this should be enjoyable and create comfort, beauty, coziness at home or serve for practical purposes. Ultimately, each person is guided by their own taste.
Wooden shelves are the best way to take up space in a house, apartment and decorate their decoration. They are distinguished by convenience, functionality, original forms. Wooden shelves, racks help to make the room cozy. In addition to wood, unusual shelves can be independently made from plywood, tin, glass, fiberboard. But wooden shelves, made by hand, are the most popular, because wood is convenient, it is easy to handle.
Choice of wood and necessary tools
A good craftsman knows how to make wooden shelves of various fancy and simple shapes: closed, open, horizontal, vertical, corner. A reference version is taken as a sample of any such product, which is complemented by other parts and takes on a fantastic look. Every craftsman wants his product to last as long as possible. The choice of wood in this case plays a significant role. For work, smooth dry boards are selected that do not have cracks, mold, voids. To process wood, you will need the following tools:
- The first assistant is a hacksaw.
- You can't do without a drill.
- For accuracy, you need a building level.
- Boards 16 mm thick are considered ideal for work.
- The sander will give the wood smoothness.
- You can fasten the boards with self-tapping screws, dowels, brackets.
- A jigsaw will help to give originality to the shelf.
- The final touch will help to apply wood stain, varnish for wood.
Types of wooden shelves
The most popular are wall shelves. Hinged products, especially made in the Art Nouveau style, are not inferior to them in operation. Floor shelves are used for children's rooms or for shoes. It is very convenient for kids to place their toys on them. In small rooms, wooden shelves under the ceiling are sometimes used. Often books are kept in them. Pendant models are very convenient for indoor flowers. The easiest way to make a shelf is to be invisible. Quite a lot of things can be accommodated by whatnots, racks. A secret shelf is a great space saving device.

What are the shelves attached to?
Shelf supports for wooden shelves can be different. Wall-mounted products are often fastened with pins, ropes, perforated rails. Secret cabinets or doors are hinged or hinged. The upside-down bookshelf can be attached to the brackets. Wooden shelves on the wall for books or flowers can be fixed on belts, strong threads, clips.
For floor shelves, a very original method of fastening with ordinary glass bottles fits. In libraries, sometimes wooden shelves are placed on posts made of decorative bricks. Very often, metal parts, such as pipes, are inserted into the structure of wooden shelves.
Example of a simple rectangular shelf
A novice craftsman should first learn how to make an ordinary rectangular product. How to make a wooden shelf that looks like a drawer? First you need to make a drawing. For this, the height of the side walls, the thickness of the boards are taken into account. After accurate markings, you should start sawing the boards. The jigsaw does it with jewelry and precision. For such a creation, you will need 4 blanks: 2 short and 2 long.
Before assembling the craft, every detail is amenable to grinding, then covered with stain and varnish. If the master decided to paint his masterpiece, then the workpiece must first be covered with an antiseptic primer. Such a product will last longer and the paint will lie flat.
Assembling a simple shelf
You need to start assembly from the bottom board. To begin with, it is laid on a flat surface. At the ends of this workpiece, several centimeters recede on each side and draw a parallel line. Then on these two strips 2 points are marked for self-tapping screws for attaching side blanks. Do the same with the top board. In the marked places, holes are drilled for self-tapping screws.
When the holes are made, the side parts are placed on the lower workpiece and fastened with self-tapping screws. Then the top board is fixed to the side walls. Brackets are attached to the walls from the end. If you wish, you can close the shelf behind with plywood, and insert glass in front.
It remains only to hang this craft. For this, holes are drilled in the wall under the dowels. The screws from the dowels should protrude 5 mm. Everything is ready, it remains only to attach the brackets.
Extraordinary solution
Such a shelf can be given a more original look if one of the sides is replaced with a stump of a branch (you can use birch with bark). The log should be 8-10 cm in diameter. It is only necessary to measure the chunk of the required length, cut it off, treat it with a primer, dry it and varnish it. When the workpiece is dry, it is inserted between two boards and screwed on with self-tapping screws.

Original shelves for books of non-standard shapes
Wooden shelves, made by hand, can be of non-standard shapes. Such models are in great demand. An example is the maze-shaped bookshelf. To make such a shelf, you need to prepare the following material: edged board, miter box, hacksaw, grinding machine, level. Also, when assembling such a product, you will need wood glue, self-tapping screws, screws for furniture, special shelf holders.
First you need to make markings on the board of the desired size for the cuts. End blanks need to be cut at an angle of 45 or 90 degrees. In this case, it is better to use a miter box. After the ends are cut at an angle, it is necessary to spread them with glue, squeeze and fix them with furniture screws (1-2 pieces). Using a level on the wall, mark the points where the shelf will be attached. After the brackets are screwed to it, you can safely hang it on the wall. Pelican designs are excellent shelf supports.
Such a non-standard, but easy-to-use shelf can serve not only for storing books. On it you can beautifully arrange framed photos, boxes, discs and other decor items.

Wooden shoe racks
In a furniture store, shoe racks are not cheap. To save your budget, wooden shoe racks can be made at home. No special carpentry skills are required for this. It's never too late to tackle your hallway and build an original shoe rack. For such work, the master uses the following devices: a chisel, an electric drill, a hacksaw for wood, a grinding machine, a screwdriver. You will need a ruler and pencil to make a drawing or marks on wood.
Before starting work, you need to take into account the design of the future craft, its dimensions and functionality. Corner and round designs are the most popular. Most often they use ready-made elements purchased in the store, "raw" wood is used less and less. In addition to the above tools, you will also need wood glue, metal corners, sandpaper, varnish or paint, self-tapping screws.
First, the side walls of the required height are cut out of the boards for verticals. Then the bars for the supports and the transverse blanks are prepared. Four shoe racks (elements) are immediately cut out. All workpieces are processed with sandpaper. Bars are attached to the side walls with self-tapping screws. Metal corners are attached from the end of the product. In turn, each shelf is applied to these bars. When the product is assembled, it is coated with varnish or paint of the desired color.
Wooden shoe rack can also serve as a comfortable ottoman. To do this, the upper part of the shelf is covered with a layer of foam rubber, which is fixed with a dense cloth or leatherette.

Shelving for every taste
Wooden shelving is suitable for a garage, shop, house. You can put books, flowers, unnecessary things, decor items on it. A rack with light, clean lines and modern design is suitable for the interior of any room. Such a useful wardrobe is the credo of many outstanding architects, as it has a beautiful shape and excellent functionality.
To properly fix the shelves of such a product, you need strong stands. No special decoration is required for the shelving, but the back can be closed if desired. The design of shelving racks is quite simple, so do not be afraid to start such work.
For strength, the racks are tied internally with long threaded rods. The convenience of making such a product is that you do not need to cut out any corners or grooves. It is better to process every detail before assembly. Both hardwood and laminated plywood are suitable for the manufacture of shelving.
For work you will need: a plane, a jointer, a drill, a drilling machine. Each master sets the dimensions of the rack himself. All work begins with measurements and drawing. This design can be made for the entire wall. Some even manage to make a shelving unit around the window to fit the entire library there. Shelves of any size are suitable for such a cabinet. It can be small, medium or very large. There are many drawings that can be used to assemble a structure of any size.
We store spices beautifully
The spice shelf (wooden) will greatly decorate the interior of the kitchen. So that various jars, cups, cones do not spoil the beauty and neatness of the kitchen, their storage must be given an orderly look. The most convenient and functional option is a special shelf. To securely fix it on the wall, there are special limiters.
A wooden spice shelf will radiate a special energy in the kitchen and create coziness and tranquility. In addition to wood, you can use chipboard or drywall. A wonderful neat jar shelf can be made from narrow boards. Use a piece of plywood for the back wall. To give this product an aesthetic look, it can be painted in the desired color and with neat labels designate one or another seasoning on the jars.
It is very easy to make wooden shelves on the wall (for spices). First you need to decide on the location of the future product. Then the master makes a drawing. For an open shelf, you need to take into account the presence of a small border so that the containers do not fall out. After measurements with a jigsaw, the elements of the craft are cut out and their ends are ground. It is advisable to use a furniture edge for gluing the cuts. The necessary markings are made for the fasteners on the wall. It remains only to fix the structure.

Corner products
To save space, they sometimes resort to corner shelves in the room. They can be fixed to both inner and outer corners. Corner shelf (wall, wooden) is performed as follows. After measuring and cutting the boards of the required length, the ends of the upper workpiece are coated with glue and clamped with clamps. The same is done with the bottom board.
After the glue has dried, the halves must be primed and stained. Attachment points are marked on the bottom and top boards and holes are drilled. Then the sides are inserted, which are fixed with self-tapping screws. Now brackets are screwed to the adjacent walls, on which the shelf is fixed.
Suspended construction on belts
Shelf supports for wooden shelves can be different. Small items can be placed on a decorative shelf. It is attached to belts. The simplest option is a regular board suspended from straps. To make such a structure, you will need 2 small boards, 4 belts of the required length, 4 dowels and self-tapping screws, a drill.
First, the belts are prepared: they are folded in half and, stepping back from the edge of 2-3 cm, a hole is drilled into them, on which the shelf will be attached. The belts folded in half are fixed to the wall with screws. So four large loops should hang on the wall: two on top, two below them below. The sanded boards are pushed into these hinges and aligned horizontally.
On such a shelf, you can put a vase of flowers, a houseplant, a casket, or fold disks for a computer. Simple and fast!

Each housewife is trying to transform her room with bright violets, geraniums or begonias. This gives an aesthetic and fresh look. It is best to place the pots on showy shelves. Shelves can be made of wood in several tiers. They can be both floor-standing and wall-mounted. Wooden parts for shelves can be painted, varnished or pasted over with a special film. You can turn on your imagination and make products in different colors or round the corners.
An important point in the design of any interior is the correct placement of accents. This ratio is achieved through the use of various items and accessories. But to place them, you have to use various elements of furniture, fasteners, especially if the question concerns walls. One of the best solutions in this case is wooden shelves, which even an inexperienced home craftsman can make. About what they are, how they are combined with the interior, what is necessary to create a holistic composition will be discussed further.
Shelf types
From the point of view of the furniture industry, technology in general, shelves are a product that is designed to accommodate, store items and interior accessories. Most often, it does not have a front, and sometimes rear, side wooden walls. It is made from a variety of materials, including scrap materials. But since the subject of the article covers traditional wooden shelves on the wall, we will consider their classification in terms of form, method of fastening:
By the method of fastening, all such wooden products can be divided into two large groups:
- Wall mounted. As the name suggests, the shelves are attached directly to the wall surface or to the ceiling using special elements and fittings. All three previously mentioned classes may belong to this group;
- Outdoor. These wooden pieces of furniture usually have hardware legs. Installed on the floor close to the wall. This category includes only classic or corner shelves, due to their design features.

In addition, if in the manufacture of wooden compositions, elements are used that limit free access to the contents, then all shelves can be divided into open and closed. In the latter case, for example, glass or polymer doors for shelves can be used.
Possible fastening options
Whether it is a floor shelf or a classic wall shelf, you can install and fix it in place in different ways:

In general, if you analyze these options, then they can be divided into open and hidden. The choice in favor of this or that is justified by the interior design of the room.
Required tools
Making wooden shelves with your own hands is not as difficult as it might seem at first glance. You should not treat this event as a simple scratching of the back of your head. A little savvy is needed here, but without tools, it won't help materialize ideas. Most often useful for creating shelves:
- Hardware. Depending on how complex the wooden structures will be, self-tapping screws, screws, nails and, of course, dowels for mounting on the wall may be needed;
- Fittings. In fact, this is nothing more than fasteners, due to which the shelves will be hung on the wall or installed on the floor (hinges, brackets, shelf supports, cables, racks);
- Consumable material. These are wooden boards - the main part of any shelf;
- A tool for working with hardware. Here you can use a manual (screwdriver), automated tool (drills, screwdrivers), to which you will have to pick up drills, heads (bits) for wooden surfaces;
- Cutting tool. Here, again, you can use manual (saws, hacksaws, abrasives) and battery options (jigsaws, milling cutters, grinders);
- Measuring and auxiliary tool. The rule of "measure seven times, cut once" applies here in full. For this, tape measures, rulers, squares, levels, clamps, construction pencils are most often used.

With the tools and materials collected, it's time to start the process of making the shelves.
Preparation for work
This is the initial stage, which includes the selection and initial processing of wooden blanks for the shelves. Selected planks, usually pine or spruce, should be as perfectly flat as possible. They should be free from cracks, voids, knotty, focal mold lesions and other defects that may affect the integrity of the future shelf.
Humidity should also be minimal. Otherwise, the board will continue to dry out already in the finished structure, which will affect the shape, structure, strength. The drying process is more efficient if the wood pieces are stacked in piles with intermediate layers.

Shelf boards that are selected for work are pre-sanded. It is carried out in stages, using different abrasives. As a rule, the initial processing occurs with sandpaper No. 40. If the roughness is insufficient, use smaller standard sizes No. 80 ... 120.
Important ! This operation along the way allows you to determine the degree of moisture content of the board: the faster the sandpaper clogs, the higher the water content in the wood.
If during the sanding process small and medium defects are found, they can be repaired with a special putty for wooden surfaces.
Markup and processing
The ground blanks for the shelves are marked with a measuring tool. Initially, dimensional parts are cut in accordance with the drawings. It is best to use jigsaws for this purpose, since the cut surface is flat and smooth.

After that, the marking and processing of places for future fasteners takes place. To do this, you will need to use a drill or screwdriver with the appropriate set of drills. You may have to use a router or a specific cutting tool for this, but it all depends on what method of fastening, such as the shelf composition itself.
The choice of sizes is determined by the functions of the shelf and the dimensions of the items and accessories placed on it. The thickness of each board is selected taking into account the expected load. For example, wooden furniture is one of the most popular furniture items in the hallway of any house or apartment. Usually this is a multi-tiered structure, the dimensions of which are selected according to the following principle:
- Depth - taking into account the maximum length of the shoe that will stand on the shelf, and the allowance (on average from 25 to 30 cm);
- Height - in this case, we mean the vertical distance between adjacent shelves, which, taking into account the allowance, should reflect the height of the shoes used (usually about 20 ... 25 cm);
- Width - the size of the board is determined taking into account the free placement of several pairs of shoes next to each other, or rather, the width of an individual pair. Usually, the shelf size is tied to the standard furniture (600, 800, 1000, etc.).

After all the wooden parts are cut to size, and their geometry is brought to the corresponding drawings or the designer's idea, the shelves should be treated with protective and dyeing compounds.
Assembly features on a kitchen example
As in the previous sections, we have to state that the process of assembling finished products depends on what design, fastening is chosen and what is the purpose of the shelf in general. Based on the operating conditions, wooden kitchen shelves are usually used to place various dishes and containers with food, usually bulk, on them. In the example, consider a simple L-shaped shelf that will simultaneously serve as a holder for cans and a "hanger" for mugs.

Obviously, the whole structure consists of two wooden planks: the horizontal one will hold cans with food, and the vertical one will have loops for hanging mugs and fastening holes. The sizes are selected in the first case, taking into account the diameter of the cans and their total weight, and in the second, based on the size of the lugs of the mugs.
After cutting to size, holes are drilled in the vertical plank for pegs and for connection with a horizontal shelf (you will have to use a special corner jig). After that, both boards are connected to each other using screws.

Prepared wooden pegs are driven into the holes. Glue (PVA) is pre-applied inside. With its help, decorative circular stops are attached. They can be screwed on, but in this case you will have to use a decorative plug.
Fast navigation through the article
The shelves in the children's room are an additional place for storing books, toys, photo frames, souvenirs and other little things. They are good in that they allow not to hide all the most necessary and beautiful, but, on the contrary, to expose for easy access and interior decoration.
- And shelves can be easily and inexpensively made with your own hands in just 1 evening. In this case, you will have the opportunity to come up with an "exclusive design" that will appeal to the baby and fit perfectly into the interior of the nursery.
For creative parents, we have prepared a large selection of ideas and inspiring photos, as well as a master class on making a homemade shelf in 7 steps.
6 homemade shelf design ideas
Idea 1. Shaped shelves
Shaped shelves, though not the most practical and functional, are definitely the most beautiful and fun. They are done quickly and easily. The main thing here is to show imagination and ... have a jigsaw.
- We will tell you more about the manufacture of such a shelf in the step-by-step instructions at the end of the article.
- You can search for ready-made curly shelves on Etsy.com or the Craftsmen's Fair.


And here are the original and easily feasible ideas for a homemade floor shelf for books and toys.

A video tutorial from the Do-Sam channel, where a craftsman makes a shelf in the shape of a lamb with several sections, will help you to make a similar floor or wall children's shelf for books.
Idea 2. Hanging houses for toys
Wooden toy houses have long been a hit in modern children's interiors. You can make them out of thin plywood yourself or order them from craftswomen on Instagram or on Etsy.com.

However, toys can live not only in houses, but also in such sections and cells as in the photo below.

Idea 3. Hanging shelves for toys and decor
Another fashion trend is planks or boxes suspended from ropes or ropes from hooks. As you can see, the design of the hanging shelves is simple and done very quickly.


Idea 4. We use materials at hand
Shelves can be made not only from plywood, chipboard, MDF or wood, but also from pallets, boxes, cardboard boxes, old chests, skateboards and other scrap materials. Examples of such shelves are presented in the next photo collection.


How to make a shelf from a pallet with your own hands can be seen in this video master class:
Idea 4. Shelves with hooks
Shelves with hooks for hanging clothes are a more functional and practical solution. Such a shelf will be especially relevant, because it can be installed above / near, then all the most necessary things will always be at the mother's hand. A hanger shelf can be made by hand by simply screwing hooks to the board on the back of the board.


Idea 5. Using corners
To make the most of a small space, choose corner shelves for storing books and toys. You can make them with your own hands from a triangle or a quarter of a circle (from the selected material) and a pair of brackets or form an angle from two adjacent shelves.

Idea 6. Narrow planks for a children's library
Want to instill an interest in reading in your child? Narrow bars will help you with this, on which you can put books not end-to-end, but covers first. Then a bright library will always attract the attention of a young reader and at the same time decorate the walls of a children's room.
- It is not difficult to make such a ledge for books with your own hands, for this you need to construct it from three narrow boards - a support, the shelf itself and the side. To make the plank more beautiful, you can decorate it with a ceiling molding. By the way, some types of moldings themselves may well become shelves after a simple alteration.

However, the slats are intended not only for books, but also for storing icons, decor, paintings or photo frames.


Master class - how to make and hang a children's shelf

To work you will need:
- Plywood at least 15 mm thick or soft wood planks such as pine.
- Brackets, for example, from untreated wood, which are sold in Ikea or any hardware store. When buying brackets, be sure to check the permissible load weight for them.
- Also prepare screws with dowels, a drill or hammer drill with a drill (the tool must fit the wall), a building level, clamps, a pencil, and paint and varnish with a brush.
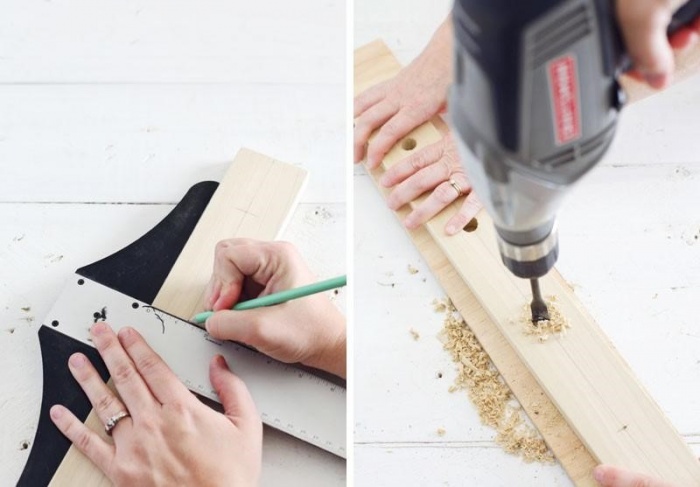
Step 1. We draw the silhouette of the mountains on one board, and on the other we make markings for cutting.
Step 2. Fix the boards on the table with clamps. To avoid leaving clamps on the wood between the board and the clamp, you can use a cloth. Then we cut out our "mountains" with a jigsaw exactly along the outlined lines, and also cut out the shelf itself.

Step 3. Carefully process the material with sandpaper at the ends and, if necessary, over the entire surface.
Step 4. The next stage is the assembly of the structure. We attach the "mountains" to the shelf (on the back side) with nails, self-tapping screws or screws. It is advisable to do this so that the attachment points can later be hidden by brackets.
Step 5. Now you need to paint it with two layers of paint or cover it with matte acrylic varnish.
Step 6. In the meantime, while the workpiece dries, you can start attaching the brackets. To do this, you must first make sure that the electrical wiring does not pass in the desired place, then you need to draw a markup on the wall using a building level and mark the places of fasteners.
- Be sure to place a rag or newspaper on the floor before starting to work to avoid soiling the floor. Better yet, use a special dust collector for a perforator or just stick a bag on masking tape under the drilling site.
Then we take the following steps:
- With a punch, we punch a hole at the attachment point as shown in the photo below. This is necessary so that the drill is held exactly in the center when starting drilling and does not move.

- Using a puncher, we drill holes in the wall to a depth of slightly more than the length of the dowel (taking into account the dust that will remain in the hole). Keep in mind that the thickness of the drill should be slightly larger than the diameter of the dowel, and the dowel itself should be selected based on the expected load on the future shelf (a consultant in the store will definitely help you choose the appropriate option). You need to drill the wall strictly horizontally or slightly from top to bottom.
- Insert dowels into the resulting holes. Next, keeping the brackets in place, fasten the screws.
Step 7. Hooray, almost done! It remains only to fix our workpiece (with already completely dried paint / varnish) to the bracket. To do this, simply place it on the corners and screw it onto the screws from below. Of course, they must be of such length that they do not come out on the front side of the product. Well, that's all, we check our shelf for reliability and evenness and hurry to put something on it.

Bulky, cabinet furniture is gradually losing its popularity. It is being replaced by light and graceful shelves on the wall, made by hand from scrap materials or ready-made blocks. The interesting and original design of wall shelves allows them to successfully compete with many interior and decor items made in country, high-tech or modern style.
A wide selection of materials and ideas for the manufacture of such products makes it possible to use them in almost any utility, utility and residential premises.
We invite you to adopt the most interesting sketches in order to free up space from things and old furniture scattered everywhere and make your home more cozy and comfortable.
Features of wall shelves
 Do-it-yourself wall shelf will be appropriate in absolutely any interior:

The main types of wall shelves
 The method of fastening, the material for manufacture and the items that will be stored on the shelf determine the workload on the entire structure and on the wall to which it is mounted. It is quite natural that the method for fixing it on a vertical surface largely depends on the type of product.
A variety of shelves on the wall of the photo, which are presented below, can be used to place pots, flowerpots and pots with.  In this case, you should take care of the safety of family members, since due to the earth, which is filled, the structure is exposed to increased loads.
  For this reason, a secure mount should be used to accommodate such shelves.

Taking into account the design features of wall shelves, they can be conditionally divided into the following groups:
- closed and open (with or without doors);
- straight and angular;
- console type;
- with and without side restraints;
- through or closed back wall;
- in the form of one plane or rectangular;
- single-tiered and multi-tiered;
- fancy shape - diamond-shaped, inclined.
 Among the most popular types of wall shelves are:

In order to make transparent shelves on the wall with your own hands, you need to order a set of glasses of the same shape in a special workshop. For safe use, the ends of the glasses are plastered, after which the workpieces are fixed in a free corner using brackets.
Glass shelves are suitable for storing books, dear souvenirs, cosmetics, shampoos and personal care items.
Materials for wall shelves
Everyone who thinks about how to make a shelf on the wall with their own hands knows that a variety of materials can be used to make this piece of furniture. Of course, the simplest and most affordable option is a regular wooden board nailed to the wall. But this will not be enough to create a modern and original interior design. The choice of materials for even such simple products is very wide.
Wood
 Do-it-yourself wooden shelves are a good old classic. You can diversify a wooden structure using complex shapes and non-standard fasteners. For loft and minimalist interiors, a beautiful and unusual wooden shelf will be an appropriate solution. For classic design projects, the product can be decorated with carvings, while all structural elements must be carefully processed.
 For those who want to save on the source material, we recommend using chipboard, MDF or plywood in their work, which can be purchased at any hardware store for quite affordable money.
Metal
 Do-it-yourself metal shelves, photo options that you will find below, can perfectly complement the interiors of rooms in the style of minimalism, hi-tech and fusion. Installation of such products is impossible without special skills and tools. Among the advantages of metal structures are their strength, reliability and durability. Special surface treatment will protect the finished shelf from corrosion and give it additional attractiveness.
Plastic
 Currently, plastic is considered an ideal material for the production of various interior items and decor. Practical, lightweight, cheap, it can look simple and luxurious, mimicking the appearance of natural materials and at the same time eliminating their disadvantages. For rooms with high air humidity, a plastic shelf can be an ideal option.
Glass or mirror
 A glass or mirrored shelf is a real decoration of any room. Graceful and glamorous glass and mirror designs can add elegance and lightness to the room. However, such products have one serious disadvantage - increased fragility. An accidentally dropped object or a sharp blow can lead to very sad consequences.
Shelf attachment types
When choosing one or another mounting method for a future wall shelf, you should remember that the mobility and reliability of the entire structure largely depends on your decision. Experts distinguish between the following mounting methods for shelves and shelves:

 Hanging shelves that are suspended from walls or ceilings look interesting and unusual. The following can be used as a flexible basis:
- braided plaits;
- belts made of genuine or artificial leather;
- twisted macrame weaving;
- decorative ropes, etc.
With the right approach, the mount can perform not only a utilitarian function, but also become an interesting and unusual decoration. So, for example, forged sidewalls can be used as a reinforced fastening for wooden or metal structures and at the same time will become a harmonious addition to a Provence or country style room.
Wall Shelf Design Ideas - Video
 When choosing a shelf on the wall, consider the following nuances:

Having trouble choosing a shelf? If possible, we recommend that you contact professional designers with this question, who will help you choose the perfect piece of furniture in all respects.
How to make shelves on the wall with your own hands?
 The algorithm for constructing a wall shelf with your own hands is extremely simple and straightforward.
- decide on the idea of \u200b\u200ba future wall shelf;
- make a pencil sketch and decide on the size and dimensions of the future product;
- make a sketch of the structure with reference to a specific place in the room;
- depending on the idea being implemented, select the material and type of fastening.
- assess the working load on the wall and structures., depending on the load, decide whether to use reinforced or conventional fasteners;
- on the wall, at the place of installation of the structure, make a markup;
- cut out blanks;
- collect individual elements into a finished structure;
- tinting brackets or hinges;
- in order for the shelf to look beautiful and neat, its surface can be covered with a special coating, the ends and joints can be processed by grinding or trimming;
- hang the shelf on the prepared mounts, check their reliability and safety;
- adjust the horizontal of the product;
- arrange decor items, books and other things that will be stored on the shelf.
If you love everything interesting and unusual and at the same time decorate your home interior yourself, we recommend that you pay attention to any materials at hand. Sometimes even the most unexpected things can be used for these purposes.
Going for a walk in the park? Pay attention to unusual branches, rhizomes and hemp - with the right approach, in the right hands, they can serve as the basis for an exclusive design of a shelf structure.
You can endlessly talk about the advantages of using wall shelves in modern interiors of apartments and country houses. However, we recommend not to waste time in vain and choose for yourself several interesting specimens that will transform the interior space of your home and at the same time add practicality and functionality to the room. With this simple trick, you can effectively expand the internal areas. Use corner options, asymmetric, single-tier and multi-tier shelves of various sizes, thereby hiding the flaws of the interior, and emphasizing its advantages.
We make a shelf with our own hands - video
Shelf for the kitchen - video