People began to decorate and decorate their houses with fabric for a very, very long time. They were used to decorate walls, close windows and drape ceilings. Such decoration of the walls or ceiling surface gives the room coziness, creates an atmosphere of relaxation and tranquility. At the same time, draping the ceiling with a cloth can be an excellent alternative to all traditional methods of decoration, and you can do everything yourself, without the involvement of outside specialists.
Types of draperies
The textile covering can be fixed to the floor in different ways. The general mood, as well as compliance with the rest of the interior, will depend on the chosen method of fixation. Therefore, it is worth exploring all possible methods in order to choose the most suitable one.
Tent
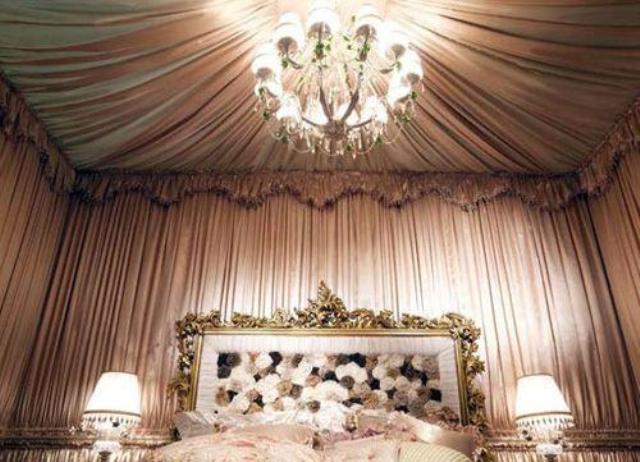
Such a ceiling drapery with a fabric, as in the photo above, can be used without decorating the walls in the same way. It will also work well on its own. It should be borne in mind that with this design, the height of the room around the perimeter is significantly reduced, so that such a finish is not suitable for every room.
Waves

It is not too difficult to make a wavy surface. You will need to fix several suspension elements and fix the material on them, forming waves of the desired size. Any material is suitable, but, best of all, its translucent and not too heavy varieties look.
From the walls to the center

In this method of fastening, there are many different variations. You can have a soft covering with sagging, you can pull it harder, creating many flat folds - there are a huge number of options. The method differs from the “tent” scheme in that the coating does not drop down so much along the edges. This allows you to use a similar drapery in rooms with not the highest ceilings.

It is very convenient to place a chandelier in the center of such a composition. It will become a semantic center and can act as an additional part of it. In addition, using a decorative rosette, you can hide the place of attachment of the material.
Decorative insert

An equally effective method of using textiles in decoration is decorative inserts in the ceiling surface. You can vary both the size of the inserts and the materials from which they are made. This design detail looks very interesting, and the very minimum of materials is required.

Particularly interesting is the look of the insert with the lighting fixture located behind the cover. If you use translucent materials, you can make it look like a large built-in lamp.
What kind of fabric can be used
For such a finish, almost any of the available ones is suitable. Here it is worth being guided only by the practicality of the solution - some types of materials very strongly "collect" all the pollution. Such types of textiles should not be used. To make the selection process easier, you need to take into account several basic requirements that the material intended for such a finish must meet:
- Withstand exposure to sunlight and will not fade.
- It is good to tolerate repeated washing without losing its appearance.
- It is advisable to choose those types that do not wrinkle too much.
- The selected fabric must be elastic
If the textile fabric, which was chosen for decoration, nevertheless collects dust, then you can use special antistatic agents that are used for clothing. It is best to choose those varieties that are sold in an aerosol can. From a balloon, you can apply the product directly to the fixed drapery without removing it for processing. After this procedure, the ceilings will not attract dust.
How to fix the drapery
When draping the ceiling with a cloth is done by hand, you need to know how to fix it on the floor plane. The most curious thing about this is that you can fix such a finish as you like. That is, of course, there are several main ways of fixing, but if none of them suits you, you can come up with your own fixing option. As a rule, all independently invented options are a modification of the most popular fastening methods.
- Frame
With this mounting option, the material will be pulled over the structure, which must be assembled first. Usually, the frame is made of timber or plastic. The material is stretched over the pre-assembled base and attached to the ceiling at the desired height.
In this way, you can assemble not only flat structures, but also compositions in which the coating sags a little.
- Clip option
This method differs from others in that to fix the canvas, you first need to fix special baguettes in those places where it will be attached to the floor surface. The coating itself is wound over the edges of the attached baguette and fixed.
This fixation method is more suitable for creating voluminous and airy compositions.
- Velcro
The easiest mounting method. All that is required is a few meters of textile Velcro. One of the parts is glued or fixed in another way in the places where the covering should touch the ceiling surface. The second, counterpart, is sewn directly onto the fabric itself. Both fixing and removing the canvas, fixed in this way, will be very easy.
The method is only suitable for fairly light compositions. More heavy types of textiles, Velcro may not withstand.
- Glue method
In this case, fastening the canvas over the entire area of the ceiling with an adhesive. Before starting work, you need to make sure that the selected composition is suitable for fabrics. The surface of the ceiling is smeared with glue and the selected textile coating is applied over the entire area, after which it is smoothed with a roller or rubber spatula.
The modern market offers many interesting solutions for apartment owners who are not satisfied with the appearance of the ceiling. With your own hands, you can make a drywall structure, install or stretch ceiling. Recently, fabric drapery has become especially popular. The widespread use of fabric ceilings is due to the ease of installation and relative cheapness, not to mention its aesthetic qualities. Today you will understand that making a fabric ceiling with your own hands is as easy as shelling pears.
Benefits of draping a ceiling with a cloth
Many professional builders and self-taught installers prefer fabric ceilings for a number of reasons. The main advantage is ease of installation. You will spend much less time than installing complex structures, for example. Drapery is quick and allows you to hide all the unevenness of the surface, moreover, for this you do not need to study yourself.
The fabric finishing method looks aesthetically pleasing in most rooms. Ceiling drapery is not only beautiful, but also serves a practical function - it helps to keep warm. Due to its elasticity, the material withstands mechanical stress well. The use of draperies emphasizes the taste of the apartment owners and creates an atmosphere of luxury and romance even in the old "panel".
The fabric ceiling looks better in rooms with a classic design. The drapery can be used in a dining room style or in a beautiful one. This design solution can decorate even rooms with a modern interior. As you can see, this is a rather multifunctional type of ceiling decoration. Since we have discussed its benefits, it is worth talking about the fabrics and colors that can be used in the drapery of the ceiling.
Choosing a material for draping the ceiling
It is difficult to imagine a more environmentally friendly material than linen. Natural and slightly rough fabric looks beautiful and adds chic to the interior. It is easy to attach and does not sag or stretch after a long period of use. A great advantage is that dust does not accumulate on the flax. Chiffon is an excellent choice for a decorator who wants to decorate a room with a light fabric. Like linen, this material will not become a dust magnet and is well attached to the ceiling. In addition, it creates the effect of delicate clouds on the surface.
If you are thinking of creating a luxurious room in the room, you can install a structure on the ceiling using brocade, which is usually rich in patterns. This fabric is an indispensable element of any oriental palace. The use of such material is not a cheap pleasure. The fact is that there are silver and gold threads in its structure. In addition, due to the weight of this material, heavier structures must be used.
The draped ceiling should be cleaned at least twice a year using a vacuum cleaner, a soft brush attachment and a cloth cover on it.
Finally, velvet can be used in the ceiling drapery. Like brocade, it is one of the heaviest materials to decorate a ceiling surface. This fabric is perfect for connoisseurs of Victorian decor. Velvet looks especially impressive in the bedroom.
The color of the canvas is of no less importance. Yellow has a beneficial effect on the nervous system and is good for the eyes. Green fabrics soothe and relax. Using a blue material will improve your performance, while purple can be tedious. Finally, red improves mood and vitality.
Choosing an installation method for finishing the ceiling with a cloth
Today, there are several ways to mount fabrics on the ceiling surface. You can put the fabric on a special glue. To do this, you need to do the following. First, the surface is cleaned of dust and washed with a soda solution. The painted ceiling must be sanded down to roughen it up.
If the overlap is uneven, it is required. It is better to paint over dark spots. It is recommended to apply a coat of primer. Then the ceiling is covered with special glue and dries up a little. After that, the canvas is glued from the center to the edges. If there is a pattern on the fabric, you need to take care that it does not get lost.
The more popular method is rack and pinion. It involves fastening slats with cross-sectional dimensions of 2 by 3 cm around the perimeter of the room. The edges of the web are attached to the slats with a stapler. The staples must be placed close to each other, so it is better to use an electrical appliance. First, the canvas is nailed along one wall and gradually pushed to the corners, evenly pulling the fabric.
After it is fixed in the same way on a parallel wall. The canvas is mounted to the remaining walls from the middle. To hide the staples, it is recommended to glue the braid to them. Also, the use of a ceiling plinth along the walls is not excluded. It is recommended to choose polyurethane foam or foam.
If there are irregularities, it is good to use a striped pattern, because it hides overlapping defects.
The frame method of fastening is in many ways similar to the rack and pinion. First, a wooden frame is created from slats with a section of 2 by 3 cm. First of all, the fabric is installed on it, and only then it is attached to the ceiling. Please note that this structure can be mounted on decorative chains. This allows you to adjust the height of the suspension. In this case, the fabric is easy to install and repair if necessary.
An example of finishing the ceiling with a cloth (Video)
It is even easier to drape a room using inexpensive meter tapes - Velcro. Part of the tape is fixed to the ceiling with glue, and the other is sewn to the canvas. It is good to use this method if you have to wash the fabric frequently or replace it if it is damaged. If you are going to glue the fabric, it must be done with a margin of at least a meter in length. In the case of using folds in width for one meter of the surface, you need to calculate approximately three meters of the width of the fabric.
conclusions
As you can see, draping a room with a cloth is a completely uncomplicated process that anyone can handle. All that is needed from you is diligence, time and small financial investments. If you follow our instructions, you will be able to make even those premises even more interesting, which, as it seems to you, cannot be decorated with anything.
What modern types of ceiling finishes do we know? There are not so many of them: tension, suspended plasterboard, in the form of plaster, painted or pasted over with wallpaper - there are enough options. But one of the most original is the use of fabric on the ceiling, as seen in the photo. This solution allows you to get a high-quality and environmentally friendly interior that will harmoniously look with different styles of room decoration.

Advantages
thermal insulation;
aesthetics;
environmental friendliness;
quick and easy installation;
it is not necessary to prepare the surface in advance;
flaws in the rough ceiling are easily eliminated;
flexibility with respect to mechanical influences;
easy to dismantle, so the fabric can be removed and cleaned or redesigned and replaced.
Choosing a material


If earlier silk was a more relevant material, now the assortment has expanded significantly:
canvas;
You can choose any material, even focusing on the photo. To do this, you should focus on your taste or the look of a professional, as well as the purchase budget.


Of course, natural materials have a priority, since they are environmentally friendly, hypoallergenic, have good heat and sound insulation. If you can't do without seams, then they should be hidden in the darkest corner of the room. For decoration, it is better to use light colors of the fabric.
How is a fabric ceiling made
There are options:
Velcro can hold fabric. One sticky part is attached to the inside of the fabric and the other is attached to the ceiling.
Wireframe option. The base can be a metal profile or slats, which are nailed along the perimeter, taking into account the horizontal level. Fastening is possible with staples or clips. The use of the frame allows you to implement original ideas: a multi-level structure, space zoning, a dome, combined options, and so on.
With glue. Before the procedure, the fabric must be stretched, the glue is applied to the ceiling, and then the canvas is smoothed in the same way as for leveling wallpaper. As a result, the rough ceiling will have to be leveled.
Preparation of materials and tools
Tool
screwdriver;
upholstery cord;
threads and sewing machine - workshop for sewing fabrics.
scissors, including for metal;
Materials (edit)
glue when mounting with glue and Velcro when using it;
masking tape;
the fabric itself;
ceiling plinth;
screws and dowels;
hook with thread for a chandelier;
metal profile or slats;
cable channels for wiring protection.
Installation of fasteners
For clarity, all described operations are supplemented with understandable photos. First, we determine the level of the ceiling and make marks with a cord for upholstery or a marker. Lowering the ceiling can be calculated using a simple formula:
c = a + b,
a - the thickness of the timber, b - the caliber of the cable channels, c - the height of the structure.
Therefore, when using a beam of 30x30 mm and cable channels of 18 mm, we get a ceiling of 48 mm.
The cable channels can be fixed to the bars with a step of 0.5 meters.
It is worth taking care of the chandelier in advance. To do this, you need to fix a piece of timber to which we fasten the hook. The calculation should be done so that the hook is 2 cm below the level of the ceiling to be erected. To determine this distance, it is necessary to stretch two diagonals using a rope.
Features of stretching the canvas


The procedure is best performed not alone, but together. The edge of the fabric must be thrown over a plastic tube, which is inserted with the fabric and snapped into the lock of the cable duct. The fastening of all sides of the canvas is carried out in the same way.
Stretching should be carried out from the center of the wall, gradually moving towards the corners. It is necessary to pull with strong force, but so that the tubes do not jump out of the groove.
Before the final fixing of the material, a hole should be made for the cable and the hook of the chandelier. It can be scissors, a knife, or even a lighter.
It should be noted that for a more reliable fastening, fasteners should be made on plastic tubes, which are pasted over with masking tape in advance. Moreover, an increase in the number of folds will only benefit.
After creating the hole for the hook and cable, carefully pass these elements through it. The hole will then be covered with a chandelier cap. It is not recommended to make a hole in advance, otherwise, taking into account the stretching of the material, it is very difficult to guess its location.
How to mask fasteners
The fixings can be hidden using the skirting board. Installation is carried out using special glue or liquid nails.
Additionally, baguettes can be painted. This should be done after installation or before.
The fabric on the ceiling is beautiful and practical


The use of fabric ceilings is an excellent modern alternative to many other options. As a result, you can get a particularly comfortable space with an attractive appearance. And you can do all this with your own hands, which is especially valuable.
Over time, the same interior of a room gets boring, there is a desire to change the design and make it not only beautiful and stylish, but also unusual, causing surprise and admiration. One of the possible ways of such an extraordinary change in the familiar interior is to decorate the ceiling, the most expressive and interesting option of which is to decorate the ceiling made of fabric with your own hands.
Traditional types of ceiling decoration, from ancient whitewashing, painting it with enamels, wallpapering and ending with modern stretch and suspended ceilings, have already become familiar and do not cause much interest. Currently, there are a lot of different design solutions for finishing the ceiling with modern materials with a wide variety of colors, stylish designs and interesting shapes. The latest trend in ceiling decoration was the multi-level backlit ceiling. Stretch ceilings are also very popular.
Fabric stretch ceilings
Stretch ceiling has established itself as the most optimal option for finishing the ceiling, the result of which is the achievement of a stylish cozy interior. The main advantage of this type of finish is a fairly reasonable price for the entire scope of work, ease and speed of installation. Not the least role is played by the absence of the need to clean the surface and prepare for the installation of the ceiling. Therefore, the room remains clean during the installation process, there is no dust and dirt, as when dismantling the ceiling and cleaning it from whitewash or wallpaper. In addition to all this, the building materials market offers a huge selection of textures and colors for stretch ceilings. If you want to change the design of the room, it is possible to easily remove the existing stretch fabric, replacing it with another desired one. The advantages of this type of ceiling finish include the following:
- easy care, it washes well and does not accumulate dust
- the absence of cracks on it with possible deformation or shrinkage of the house
- not afraid of moisture, flooding from the upper floors by neighbors
- does not emit extraneous odors, absolutely environmentally friendly
- completely fireproof, since non-combustible materials are used in its production
- preservation of the shade when exposed to sunlight
- durability and practicality
One of the types of stretch ceiling is a fabric ceiling, which today has become one of the new trends in fashionable design solutions for ceiling decoration. Finishing the ceiling with fabric can radically change the decoration of a room.

The fabric ceiling is a porous base impregnated with a polystyrene composition. As a result, the material is very durable, and the ceiling itself looks beautiful and aesthetically pleasing. Such stretch ceilings do not have seams, since the canvas can be up to 5 meters wide and there is no need to use welding. Complete absence of seams and gives an aesthetic appearance to the upper surface of the room.
The material can be both natural fabric and fiberglass or artificial. With the use of fiberglass, ceilings become more durable as a result of increased performance properties, which are able to experience and withstand exposure to all temperatures, both low and high.
In general, the installation of a stretch ceiling on a fabric basis is no different from the installation of its PVC analogue, therefore, about the details of its installation.
Advantages of fabric ceilings
The fabric material is environmentally friendly and has different density and weight, is able to resist bacteria of various types, deterioration, mold. These properties allow it to be used in many types of buildings, up to street structures. High-quality fabrics allow you to expand the possibilities of designers, look great in almost all places in quality:
- suspended ceilings in sports facilities - swimming pools, health centers, recreation centers
- false ceilings in commercial buildings - supermarkets, shops, restaurants, nightclubs, beauty salons
- finishing of ceilings in industrial buildings; at airports, train stations
- sun-protection ceilings in car dealerships, game complexes, entertainment centers

The use of fabric for finishing the ceiling is due to the following properties:
- light weight and flexibility of the material
- the ability to apply images to it using photo printing
- the possibility of the necessary ventilation
- the possibility of fixing light devices in the fabric itself, as well as their installation above it
Applying various techniques of decorating art, you can achieve interesting and stunning effects - to express the play of light and shade in the numerous folds of the drapery, to emphasize it favorably. Using the difference in textures, different types of draperies, you can create an unusual and unique design of the ceiling, which brings a special flavor to the decoration of the room. The use of leather and beautiful materials for curtains will also be a good design.
DIY fabric ceiling decoration
The unusual and the new are always interesting. Human fantasy is truly limitless. Imagine a room with amazing red-burgundy roses on the white ceiling, you just can't take your eyes off! And it is quite easy to build such beauty; it will take 2-3 meters to decorate the ceiling with fabric, depending on the size of the ceiling of the room, high-quality fabric, for example, a German curtain.
Preparing the ceiling for fabric finishing
For gluing the fabric and constructing a fabric ceiling, the following steps must be followed:
- Plaster well and level the surface to achieve perfect surface smoothness.
- Stretch tight, like a canvas on a stretcher. As a result, the existing irregularities can be hidden.
To complete these steps, you first need to clean the ceiling surface from any dirt, remove all cracks, crevices, seal them with putty and dry them. After that, sand with sandpaper, remove roughness.
There should not be any stains that can show through the fabric; they should be covered with a layer of nitro enamel or covered with a thin aluminum foil.
If there is oil paint on the surface, it should first be washed with water, to which soda has been added, and then thoroughly dry the surface. Then clean with sandpaper.

Ceiling installation: method 1
To install the fabric, you need to prepare a profile, one of its best types is aluminum, it is more durable and reliable. We fix the fabric in the middle in the profile, while leaving a margin - 5-6 centimeters of the fabric should protrude beyond the edges of the profile. With a small step we tighten the fabric, trying to align it as much as possible. The movement should start from the middle of the room to its corners, the direction of movement of the canvas should be in both directions. In the direction of travel, we fix the canvas in the baguette, at the end we fix it in the corners of the profile.
If there are folds on the fabric, you can easily remove them using a construction hairdryer. Warm up these places with smooth circular movements, while holding the hair dryer at a distance of 20 cm from the canvas, set the temperature to 180 degrees. After the installation is complete, we remove the pieces protruding from the edges of the profile, after which it remains only to install the decorative plugs.
Ceiling installation: method 2
Another interesting option for building a fabric stretch ceiling with your own hands is the following method. Prepare beams from wood, having a cross section of each corner of 2x3, any construction workshop can quickly make them. Order the length of the timber by 50 centimeters more than is necessary according to measurements, since the corners of them are subsequently filed. Use Penatex to treat the beams and obtain the desired shade. You will also need Velcro (available at sewing stores) and 8 metal corners.
We are constructing a frame that will be suspended from the ceiling. We attach the hard side of the tape with a special stapler to the part of the bar that protrudes, having previously glued it to liquid nails. The back of the tape must be sewn along the perimeter to the front of the curtain.

The finished frame will be under the lamp, if it is not transparent, it is necessary to provide a high-power lamp, a flat 6-lamp will do. When choosing a thin or transparent fabric, normal lighting is sufficient.
It remains only to hang the resulting structure from the ceiling. It will look unusual if you use chains and hang the frame on them from the ceiling, and you can attach it to the ceiling using pipe holders. After screwing the hooks into the frame and installing it, the stretch ceiling is ready and looks just a real feast for the eyes! This design is very reliable and practical. In the event of distortions along the walls, an important point in the process of installing the frame on the chains is to adjust the suspension to the chain link in order to achieve parallelism in all corners.