When constructing a roof, special attention is always paid to the construction of the attic. After all, it is important that its overlap is done technologically correctly, does not exert excessive pressure on the walls and be able to bear the load from the things stored under the roof and sometimes a whole set of furniture.
Therefore, in this article, we will figure out in detail how the attic floor should be arranged correctly on wooden beams: the features of its installation, calculation of loads and fastening. And our detailed illustrations will help you.
To begin with, we suggest you watch a small video review of the attic floor device on wooden beams, and then we will analyze the details:
What is an attic ceiling?
The slab is a horizontal structural structure that separates the residential floor from the attic, and at the same time takes on the load from the weight of everything that is under the roof.
The floor itself is a necessary stiffening element, which also provides stability to the entire structure. Among all the others, today we will single out the attic floor, namely, its specific appearance. Note that the general rules apply to all types, but there are still some technical features in arranging the attic floor over beams.
The first is rigidity and strength. Those. the overlap should be:
- Able to withstand the design loads and at the same time not bend, will not collapse. For example, the allowable deflection is only 1 in 250 of the span length.
- Secondly, the attic floor should not be flimsy, and in no case should it fluctuate when moving objects on it or the movement of people.
- And finally, soundproofed to avoid unpleasant squeaks when someone climbs into the attic.
In private construction, two types of floors are mainly used: wooden and reinforced concrete. The first ones are built on solid wooden beams, and the second ones - on beams, slabs and in a monolithic version. Also, the beams themselves can be steel if you have to bridge large enough spans. But it is in private housing construction that the choice of floor material is most often influenced by the economic factor.
The cost of overlapping is usually up to 20% of the estimate of the entire construction of a house, and labor costs as much as 25%. Therefore, the construction of a wooden attic floor is still quite popular - all thanks to its high performance and good sound insulation.
And one more important point: in the manufacture of wooden attic floors, you do not need heavy lifting equipment, especially a concrete pump.
Benefits and calculation of beam floors
The whole structure consists of beams and boards, which are called rough. The beams themselves can be load-bearing, located just side by side, or fixed in a special way, which is much more reliable. The standard dimensions of the beams are 20-40 centimeters high and 15 meters long, plus 8-20 centimeters wide.
Unlike reinforced concrete attic floors, wooden ones are dry-mounted. By weight, it comes out much lighter, therefore in private construction it is better to use just such an overlap. On the other hand, wooden floors are the most soundproof, so you will have to spend money on additional measures.
Beams are located at a distance of 60 centimeters to 1.5 meters. Of course, the more often you install them, the greater the load the attic will be able to withstand in the future, but the foundation of the house will have to endure a greater load.
On a wooden attic floor, lightweight partitions are usually mounted - most often frame ones, to which the attic rafters are attached directly. They need to be installed perpendicular to the beams or an edge.
But if for some reason the inner walls of the attic have to be placed parallel to the ribs or beams, which is not at all according to the rules, then the structures in these places must be strengthened. Most often, fragments of boards are used as such elements, which are fastened perpendicular to the edges of the floor.


Installation options for attic beams, depending on its type
Many people ask the question: where to install wooden floor beams correctly? Into the walls, on the walls, or even bring them out a little? It depends on what kind of attic you will have and whether you will use it as a living space in the future. The attic is very popular today!
So, here is an economical option that allows you to convert an attic into an attic in the future without any problems. True, very close:

And therefore, if you have such plans and you are not even now sure whether there will be another place in the project for a personal account or a billiard room, then make the walls higher in order to install the floor beams lower.
What will it give? In such an attic there will be much more usable space, fewer sharp corners and it will be much warmer:

But if in your project the attic was originally planned as a separate and spacious room, as if built on over the house, then the attic beams need to be installed as strong as in the interfloor overlap, and they must also be fastened to the anchors in the armored belt:

Here is a great step-by-step example of how such attics are built and how strong such an overlap should be:

Types of floor structures
In total, there are several types of attic floors on wooden beams. Each of them has its own purpose and its pros and cons.
Platform: for cold attic
As for frame houses, the floors in them are recommended according to the "platform" system. That is, after the walls are installed, beams are laid and a platform is created, as it were, and a working base for the future attic floor at the same time. It is important here not to put too much pressure on fragile walls, so the attic floor will also not be designed for a piano in the corner.
In this case, the beams are installed on a strapping beam, which is used as a Mauerlat:

Rigid shield: for uniform shrinkage
But in a house with walls made of a log or a bar, a rigid shield is set up as an attic floor according to the rules, which, when the walls shrink, will smoothly descend with them, and necessarily evenly.
Economy flooring: to save time
Pre-fabricated wooden floors should be distinguished as a separate type of attic floors. Their main feature is the use of special fasteners, which are made of galvanized steel. Their thickness and quality are calculated depending on the level of future floor loads.
Standard attic floors on beams with beams and wooden joists appeared at the end of the 20th century, and after them wide board ceilings became more fashionable.
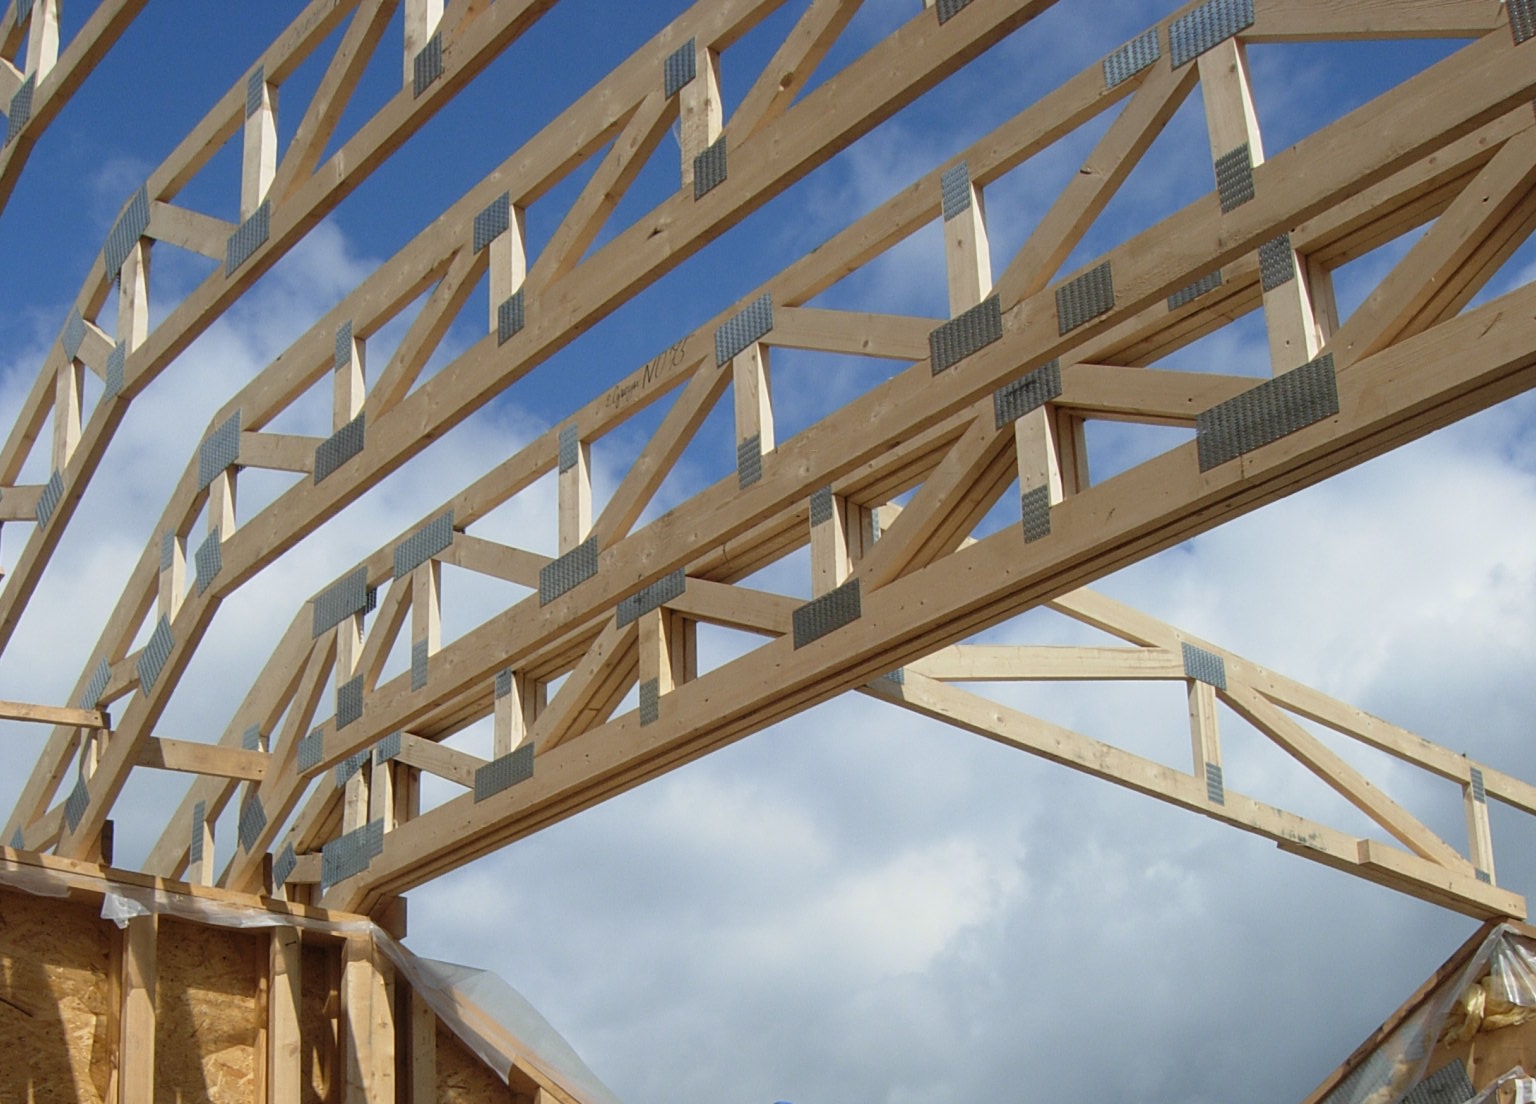
Ready-made trusses: for residential attic
Today, special ready-made companies for arranging the attic floor are also in fashion. In fact, this is not a novelty in the construction market, such firms appeared at the end of the 16th century and found their rebirth at the end of the 20th century. Canadian construction companies have developed special calculation programs for such firms and their exact shapes with assembly lines.
Ribbed-girder flooring: for private housing construction
In our country, new types of wooden floors are beginning to appear, which until that time were popular only abroad. These are lightweight hardwood floors. They are relevant for private construction, when a fairly light wooden frame is used as a system.
The essence of the overlap is that the "ribs" are installed every 30-60 centimeters, and they are covered with cladding. Wooden beams with a height of about 20 and 28 centimeters, and 45 centimeters thick, and up to 5 meters long are taken as "ribs". They are made from natural wood and connected with special bundles from boards, covering with sheathing of chipboard or fiberboard.
Therefore, we will single out from the main advantages of the ribbed attic floor, quick and easy installation. Of the minuses: the need for processing with a fire retardant, lower strength and low sound insulation properties. And, of course, such boards are more sensitive to sudden fluctuations in humidity and temperature. And also, if a fungus or some insect decides to eat such an overlap in a few years, then it will eat it much faster than thick beams.
From below, such a structure is sewn up with a suspended ceiling made of plasterboard boards. Mineral wool is laid between the ribs on top. It is she who will provide fire resistance and sound insulation to the entire wood floor.
Ribbed attic floors are much cheaper than beamed ones - this is quite reasonable and rational if you do not insulate a non-residential premises and make a residential attic out of it. Then you don't have to worry about the bearing capacity of such a foundation. The only drawback is that beams are more familiar for Russian houses, and the ribbed flooring is almost the same in appearance from the monolithic one. Therefore, in Russian houses, ribbed-beam attic floors are more often arranged.
A beam for the device of such an attic floor must be taken in a rectangular shape, and strictly, and not a diamond. And be sure to take with you the most ordinary school ruler when buying such a bar, because it often happens that many are going to build a ceiling from a 15x15 cm bar, and in the end they are built from a 14x14 cm bar.And then, on your site, be sure to prepare a storage space such a bar and its processing.
By the way, today many people even put an ordinary beam in a wooden floor on the edge. The fact is that even a ruler, no matter what material it is, bends easily along its entire length, but if you put it on the edge, it will be almost impossible to bend it:

And on the subfloor from the planks, already lay the final floor, and mount a suspended ceiling from below. But often the wooden ceiling of the attic is left without additional finishing on purpose, in view of the concept of interior design, but then all its details are done very carefully and even with a decorative slope:


The suspended ceiling itself gives a certain rigidity to the ribbed ceiling.
How to embed attic beams into walls of different materials?
Today, there are several ways to attach attic beams. Basically, it is necessary to install a perpendicular support beam, which is equal to the maximum length of the floor beams. If the project does not provide for additional stiffening beams, then the beams of the attic floor should lie along the axes of the racks of the load-bearing walls. By standards, the floor beams should rest on the upper wall trim and fasten to it with two nails 3.5x100 mm on each side.
But often, in construction, you also have to use special fastening methods, and in order for you to better deal with them, we have prepared high-quality master classes for you.
It is necessary to design a wooden attic floor based on the loads that will affect it. But consider this moment. Quite often, residential buildings are built with the expectation that there will be enough for the whole family. And such loads are divided into distributed and concentrated.

When designing an attic floor, you need to take into account distributed loads, and you can learn more about them from modern SNiPs. Concentrated loads need to be taken into account only if you are definitely going to install some objects with a large mass in the attic.
For example, today it has become fashionable to arrange SPA salons, billiard rooms, dance floors and rooms for music training under the roof. But in practice, it often turns out that 10 rooms in a house is not enough. And under the roof there is wonderful ventilation, a beautiful space and quiet to equip your personal office there.
The need to use special fasteners depends on which technology for arranging the attic floor you chose in general. So the most reliable way is to support the beams on the bearing surfaces of the walls or on the floor beams. Then there is no need and no sense at all to use metal elements - the beams are fastened with screws or nails. In all other cases, it is imperative to fix the attic floor.
Therefore, we advise you to initially make such a strong attic floor, so that in a couple of years with a clear conscience, rebuild it into an attic. And our special tables and computer programs will help you to make special calculations. Your task is to choose the right optimal cross-section of the beams and their pitch. The rest are details.
Is a reinforced belt required?
First of all, decide whether you need an armored belt to install the attic floor beams. Armopoyas is a reinforced belt, which is a closed structure along the entire contour of the building. The task of such an element is to distribute the loads.
When installing wooden beams of an attic floor, it is necessary to install an armored belt only if:
- The walls of your house are built from aerated concrete or foam block. After all, such a material has a rather fragile structure, and a timber beam floor at the same time has a considerable weight. Due to its design, it always creates a point pressure on the blocks. And our task is to distribute this pressure and make it linear. So that the Mauerlat takes over the entire load.
- Also, whether there are prefabricated FBS blocks as a foundation for your house, or the base itself is shallow, it is also important to correctly distribute the load from the attic over the entire area of the base of the house.
In all other cases, you can safely do without an armored belt.
Fastening beams to beams or frame
When the floor beams are attached to a log house or rounded logs, the easiest way is to use the frying pan technology. In simple terms, simply insert the beams into the walls as part of a constructor.
Please note that the floor beams are fastened together with metal brackets:

Fastening to metal I-beam
If you have to break the floor beams along the length, then their parts should be overlapped or with the help of special overlays, and between the beams themselves you will also need spacers.
And if we are talking about planning a large area, then it is better to use a steel I-beam or an especially strong one made of glued wood as a support for the beams. In this case, leave a gap of 10 millimeters between the attic beams and the steel I-beam. It is important that the steel beam does not touch the ceiling sheathing. And, so that in the future the floor beams do not creak, lay additional sound-insulating material or make the ceiling lath rather dense:

If you are using construction beams, they do not need to be placed inside the slab. These can be easily built into the wall or even used independently. And the beams themselves must be fastened to the so-called beam shoes:

The first step for such beams is to make a strapping. Moreover, it is not at all necessary to fasten the strapping itself to the walls of the first floor, as many think.
The main thing is to properly prepare such beams for installation. And for this they must be treated with an antiseptic (and at a temperature of at least 5 degrees Celsius). Then leave them to soak for a day. Now cut and lay such boards and the supporting beam on a wooden Mauerlat, previously impregnated with its fire-retardant protection. It remains only to fix all the floor beams on the shoes.
And, when the overlapping of the beams is ready, make a rough floor, at least so that it is convenient to move on it.
Fastening to brick walls
If we are talking about attaching a wooden beam to a brick wall, then a nest must be created in that, and even at the stage of erecting the walls themselves. The nest should be 160 mm inside the wall (this is the minimum), and on a special board.
When inserting a beam into a wall, you need to fill it with cement mortar or leave it open - it all depends on the thickness of the wall:
- So, a closed version is necessary with a wall thickness of two bricks.
- Open - with a wall thickness of two and a half bricks.
In addition, the beam ceiling of the attic with brick walls must be reinforced with anchors in every third beam. The anchors should cover it from below and on the sides, and they themselves should go into the wall by 30-50 millimeters. It is also possible to connect the beams to each other and on the interior walls.
Beams should be fastened to a brick wall using the following technology:

Fastening to fragile block walls
If you are fixing wooden beams in a block wall, then you need to build a reinforced concrete lintel. This is the same reinforced belt that we talked about earlier. You need to arrange it under a beam, specifically under a wooden box that goes into the wall. The beam itself will need to be installed on a reinforced belt in the wall, also for a minimum of 160 mm. And do not forget also about such an important point as the insulation on the side of the block and the gap on the side of the beam, which will ensure the release of moisture.
Therefore, in order for modern lightweight blocks to withstand the wooden beams of the attic floor, follow this pattern:

If the blocks are quite strong and are close to brick in their physical qualities, then use the following installation scheme:

Which timber is better to choose for overlap?
If you have now smoothly approached the issue of attic flooring, the first problem you will have to face is finding boards of good quality. It is very important that neither the beams nor the flooring are flawed, weakened and certainly not sore with any mold. Otherwise, such overlaps are life-threatening to the life of household members.
Option # 1 - beams from ordinary boards
Let's separately note which beams you need to use when arranging the attic floor. The best option is boards 20-30 centimeters wide. Pine or larch is taken as a material, which work well for deflection. It is such wood that is strong in terms of deformation and less prone to cracks. According to official estimates, when using such a material, it turns out to reduce the consumption of all wood by as much as 20%.

Option # 2 - laminated veneer lumber beams
Today, glued laminated timber is also often used as beams, the strength of which is several times higher than the strength of ordinary wood. The thing is that any glued wood products are stronger. The whole secret is that the glue that is used gets into the pores of the two parts to be glued and forms many strong threads between them - much stronger than the fibers of the wood itself. And therefore, glued laminated timber as beams is a completely normal option.
In appearance, they do not differ from solid wood, especially when for the purpose of aesthetics, they use wood of the best grade in the outer layers. Such beams are made from lamella boards, which are cleaned of defects and glued together. The main advantage of this method is that the total length of the beams can now be up to 12 meters, and it will be much stronger, just with a wooden beam with the same parameters.
To make strong beams from OSB boards, they are cut into strips of different widths and milled. Next, the blanks are glued together, and they form a long endless strip, from which templates of a certain length are made. The main advantage of using such beams for attic flooring is low weight and excellent strength and bending resistance.

Option # 4 - I-beams
Another type of beams that are popular in Russia are I-beams. This is one of the most durable types of beams, and you can arrange any kind of flooring on top of them, not just plywood. And plasterboard is sewn from below. These beams are so strong that it is more advisable to install them as an interfloor for fully living rooms, but not only for the attic, and even more so for a cold attic.
The so-called Canadian I-beams are also popular. They are made in the factory from wooden blocks, OSB boards, special moisture-resistant boards, laminated veneer lumber or softwood.

Option # 5 - beams from ready-made trusses
For example, one of the most recent developments is turnkey loft trusses. Their height is 350 millimeters. They are made of dry wood with a section of 100x50 mm. In the factory, on a special press with metal plates, such elements are combined into one structure. Moreover, in the process of manufacturing such farms, engineering communications are even placed inside them.

Option # 6 - LVL beams
Separately, it should be noted that a relatively new material on the domestic market is LVL beams. These are high-strength homogeneous materials that are made by gluing under special pressure. Several layers of veneer are taken into account, and in the process of manufacturing the beams, the fibers are located strictly parallel.
The characteristics of such beams are special. The main advantage is that which beams have a large selection of sizes. The material itself lends itself well to processing with almost any cutting tools. But considering the price of LVL timber, we advise you to purchase it only if your attic floor is located above a large span and your priority is quality and safety.
Option # 7 - HTS beams
Another new type of attic beams is the German HTS. They also represent an I-beam, where the upper and lower layers are made of wood, while the middle layer is made of OSB boards.
Between these layers, a profiled steel sheet 0.5 mm thick with a special polymer coating can also be inserted. At the same time, the steel itself has a wavy shape, due to which the beam has high bearing characteristics. And there may not even be one such walls, but two, which is even better for bending resistance. And so that the HTS-beam does not bend or twist, hidden cross-links are installed between the layers with a certain step.

Overlappings between floors, basements or attic are constructively arranged according to two schemes - a non-girder floor (based on the use of a monolithic slab), and a beam floor (wooden floor beams are used). Overlaps are made to separate the interfloor rooms, as well as to separate the rooms from the basement and attic. Beams can be made from a variety of materials, such as wood, monolithic reinforced concrete or metal purlins.
Installation of wooden floor beams allows you to solve the following tasks:
- achieve the required strength and stiffness of the floor;
- ensure that sound insulation and heat transfer resistance are consistent with the level required for energy saving;
- maintain compliance with the established standards for vapor and air permeability indicators.
The choice of beams for interfloor floors:
By type and type:
- Floor beams from a bar... Most often, a rectangular bar is chosen for the manufacture of beams. The height of the timber should be in the range of 140-240 mm, and the thickness should be 50-160 mm. In this case, the rule is observed: the thickness of the beam is at least 1/24 of its length. Professionals note that great strength is inherent in a wooden beam with an aspect ratio of 7: 5.
- Log floor beams... More cost effective solution. The log has a high resistance to stress, but also a low resistance to bending. A log is suitable for use only if it has been aged in dry conditions for at least one year.
- Floor beams from boards... The use of a board leads to a decrease in the amount of lumber consumed for the overlap device. But, it is worth noting that in this case, the resistance of the floor to fire, durability and sound insulation decreases. Usually the board is used in the construction of an attic floor. To strengthen the boards, you can use the technique - splice together two boards along the length. Then the total section will correspond to the load level. Such a structure can withstand a load 2 times greater than beams or two boards laid close to each other. In this case, the fastening is carried out with self-tapping screws or nails, fixed in a checkerboard pattern with a step of 20 cm.
2. Purchase of a bar, log or sawn timber and its treatment with an antiseptic, fire-fighting, antifungal solution and biological protection.
3. The choice of the type of fastening of the beam to the wall.
Fastening of wooden floor beams to the load-bearing wall is carried out in two ways:
- wall mount. The beam is embedded in the load-bearing wall to a depth of 150-200 mm.

With this installation method, the end of the beam must be cut at an angle of 60 °. To protect the ends of the beam, they need to be wrapped in two or three layers of roofing material. In this case, the end of the beam remains open, and it should not rest against the wall. The presence of a gap of 20-25 mm. will allow for free air exchange. And the resulting niche (gap) is filled with mineral wool.
- hanging method. In this case, the beams are fixed to the wall by means of metal plates.

4. Laying wooden floor beams
At this stage, beams of the required length are prepared. The length depends on the installation method. If the beam is inserted into the wall, then it is calculated as follows: the length of the room plus 300-400 mm. for wall mounting. If attached to a wall, the length of the beam is equal to the length of the room.
The installation of wooden floor beams starts from the outer beams. Each beam is checked with a building level. After that, the beams are fixed in the nests of the wall using dry crushed stone.
When the beams are installed exactly in level and the horizontal is checked, they can be concreted in the seats.
Conclusion
The overlapping with wooden beams made using this technology will reliably serve you for several decades. However, in order to extend its life, it is necessary to process the wood and carry out periodic inspections to monitor their condition. In the presence of defects, carry out repairs (partial or complete replacement of damaged elements).
The use of timber beams and floor trusses
The installation of wooden beams in the floors of houses is not uncommon. Their main purpose is to evenly distribute the load on the walls and foundation of the building. In order for the beam structure to perform its functions, it is necessary to choose the right material for it, to carry out calculations of the length and section.
Varieties of timber beams
All timber beams are divided among themselves according to the purpose and type of material from which they are made. By appointment, they can be: interfloor, attic, basement and basement. By the type of material, beams can be made of solid wood or glued.
wooden floors in aerated concrete house
The spans must be strong and reliable. Sound and vapor barrier fillers are placed in the internal volume between the ceiling and the floor. The ceiling is sewn up with the necessary material, the floor is laid on top.
 Interfloor span
 The attic floor can be installed as a roof element, being part of its rafter structure. Can be installed as a separate independent element. In order to preserve heat, it must be equipped with steam and heat insulation.
 Attic floor
 The overlap of the basement and basement floor must be of great strength and withstand high loads. These spans are equipped with heat and vapor barrier to prevent cold penetration from the basement.
 Basement hardwood floors
 Beams differ in types, which have their own advantages and disadvantages.Solid wood is used to make solid beams. A significant disadvantage of solid wood beams is the length limitation, which cannot exceed 5 meters.
 Solid wood beams
 Glued timber beams combine high strength and aesthetics. Their use significantly increases the maximum length, which can be up to 20 meters. Considering that glued floors look beautiful, they are often not covered with a ceiling and they serve as a design element.

They have several more significant advantages, which include:
- the ability to cover large spans;
- ease of installation;
- small weight;
- long period of operation;
- high level of fire safety;
- do not give in to deformation.
The wooden parts of the floor beams can have a rectangular cross-section, which is typical for a bar or board, or a round one, made of a log.

Requirements for wooden floor beams
The installation of timber joists entails a number of requirements that must be taken into account. They are as follows:
- Beam products should be made of softwood, which have a high margin of safety. At the same time, the moisture content of the wood should be no more than 14 percent, otherwise the logs under load will have a large deflection.
- It is forbidden to use wood that is susceptible to fungal diseases or damaged by insects for the manufacture of beams.
- Before installation, the beam elements must be treated with an antiseptic.
- To prevent the ceiling or floor from sagging even under load, a building lift must be performed. The ceiling of the lower floor will receive a slight rise in the center, which will become even under load.
- If the beams are planned to be laid with a high frequency, then instead of them, you can use boards that must be installed on the edges.
 Timber floor plan with split beams
 The procedure for calculating wooden beams
Before carrying out the installation of a wooden floor, it is necessary to carry out calculations in which to determine the number and dimensions of the beams. This requires:
- determine the length of the span to which they will be installed;
- calculate the possible load that they will carry after installation;
- having the specified data, calculate the cross-section of the beams and the step with which they will be installed. For this, special tables and programs are used.
 Extension of timber floor beams
 Beam length consists of the length of the span, which must be covered, and the stock of the beam, which will be built into the wall. The span can be recognized using any measuring device. The stock of beams that will be mounted in the wall depends on the material from which the wall is made.
Important!
If the building is built of brick, then the stock for beams from a board should be at least 10 cm and at least 15 cm for beams made of timber. In wooden buildings, special grooves are made, with a depth of 7 cm and more, for laying beams. If the beams serve as the basis for the roof rafters, then they are made 4-6 cm longer than the span.
The most used span, which is covered with beams, is 2.5 to 4 meters. The maximum length of beams made of timber or boards cannot exceed 6 meters. If the span exceeds this dimension, it is recommended to install glued laminated timber beams. In addition, a wooden truss can be installed to cover spans that are more than 6 meters.
 Roof trusses
 Load A wooden beam carries a mass of details of the span (beams, interior filling, ceiling and floor cladding) and a mass of temporary elements (furniture, household appliances, people present in the room).


Accurate calculations of the bearing capacity of beams are usually performed by specialized organizations. When performing the calculation yourself, the following system is used:
- An attic floor with a filing, in which the insulation is mineral wool, bears a constant self-load of 50 kg per square meter. With such a load, according to SNiP standards, the standard load will be 70 kg per square meter with a safety factor of 1.3. It is not difficult to find out the total load: 1.3x70 + 50 = 130 kilograms per square meter;
- if a heavier material than cotton wool is used as a heater, or thick boards were used as a filing, then the standard load will be 150 kg per square meter. And the total load will have a different value: 150x1.3 + 50 = 245 kg per square meter;
- if the calculation is carried out for an attic room, then the weight of the material from which the floor is laid and the objects in the attic are taken into account. The load in this case will be 350 kg per square meter;
- in the case when the beams perform the function of interfloor spans, the design load is 400 kg per square meter.
Calculation of wooden floor beams
Determination of the section and pitch of wooden beams
Having calculated the load and the length of the beams, you can determine their step and section dimensions or diameter.
These indicators are interrelated and are calculated according to the established rules:
- The width and height of the beams should be in a ratio of 1: 1., 4. At the same time, the width of the beams should be in the range from 4 to 20 cm, and the height from 10 to 30 cm, taking into account the thickness of the insulation material. Floor logs should have a diameter in the range of 11 to 30 cm.
- The installation step should be in the range from 30 to 120 cm, taking into account the insulation and hemming materials, which will be in the space between the girders. If the structure is frame, then the step must correspond to the distance between the frames.
- Determination of the section of beams made of wood is carried out according to the developed tables or using certain programs. When calculating the sections, it is necessary to take into account that the maximum bending of the attic beams should not exceed 1/200, and the interfloor beams 1/350.

The use of wooden trusses, advantages and disadvantages
Floor trusses made of wood look like two parallel logs or bars located one above the other, which are interconnected by supports located at an angle or vertically in relation to these logs or bars. The main task that the trusses solve is the overlap of long spans, if the installation of additional support posts is not possible.

For the manufacture of trusses, the developed tables and programs are used, which take into account the type of connections, the installation step, the section of the structural parts and its overall dimensions. Often, trusses are manufactured industrially using high-precision equipment. Along with this, you can make a farm with your own hands.
 Wooden roof trusses
 By comparing timber beams and floor trusses, you can determine the advantages and disadvantages that trusses have. The benefits include:
- the ability to cover a significant span without additional support legs;
- insignificant mass, which entails a small load on the load-bearing elements of the building;
- high strength and resistance to deflection, which entails long-term operation of the hemming and floor materials;
- ease of installation on any supporting elements of the building, regardless of the material from which they are made;
- the ability to change the width of the step of laying the truss;
- the ability to install internal communication lines;
- excellent sound insulation;
- beautifully made trusses can not be sewn up and used as a decorative element.
 Wooden trusses can serve as an original decorative element
 In addition to the advantages, farms have some disadvantages, which include the following:
- due to design features, the thickness of the interfloor floors is significantly increased;
- significant labor costs when making a farm with your own hands, the need for special equipment;
- high price for the finished structure.
Design of wooden trusses
In addition to the author-expert, he is also the director of the enterprise "Factory of stairs on a metal frame" in Moscow. The plant is engaged in the production of staircase structures.An example of an attic floor with wooden beams
Overlapping on wooden beams is a load-bearing structure that separates adjacent rooms: floors, attic, underground. When erecting it, factors such as load-bearing capacity, sound and heat insulation, earthquake resistance and heat resistance are taken into account. This structure is regularly subjected to stress and atmospheric influences, therefore, it must meet the criteria for strength and wear resistance. By purpose, the floors are classified into basements, interfloor and attic.

Design work includes planning of the supporting structure as well as calculation and selection of materials. For various floors, beams of the corresponding type are used. Most often, wooden beams are typed according to their external characteristics: section, composition and bearing capacity:
- board- a simple structural material used in the construction of the battens and subfloors;
- I-beam- a structural material with a cross-section in the form of the letter N. The I-beam allows to reduce the total weight of the structure without loss of bearing capacity;
- LVL-beam- a beam of glued veneer made by gluing peeled conifers: pine, spruce, larch. Differs in high indicators of strength under horizontal load. Used in the construction of rafter legs, floor beams, as well as ridge beams;
- combined beam- glued laminated timber, which includes veneer from several types of wood;
- four-edged bar- lumber of a quadrangular shape, having 4 processed sides, The most popular in the construction of floors of any type;
- two-edged beam(carriage) - lumber with 2 machined sides opposite to each other. Despite the relatively low strength indicators, the carriage is often used in the construction of interfloor floors;
- rounded log- milled lumber from a single piece of wood, characterized by the highest load-bearing capacity. Maximum load per 1 sq. m. of this type of beams is 500 kg. However, due to the rounded shape, rounded logs are more often used in the construction of attic, rather than interfloor floors.
When harvesting beams, preference is given to conifers due to their increased strength and resistance to putrefactive processes. An analogue of spruce, larch and pine can also be acacia, oak or maple. These types of wood are characterized by low moisture content (from 12% to 14%). Over the years, the strength of beamed ceilings increases due to the evaporation of moisture from their surface. After 5 years of shrinkage, the strength of the timber approaches the strength of metal beams.
There are several types of horizontal supporting structures:
- interfloor overlap on wooden beams;
- attic floor;
- basement floor.
After the type and material of the beams are determined, the builders begin to calculate the potential section. The choice of bars with a particular section directly depends on indicators such as:
for 1 sq. m. is the estimated mass that will have a permanent / temporary effect on the supporting structure. You can calculate the load yourself using one of the online calculators;| MON | 150 | 250 | 350 | 450 |
| 2 m | 50 × 100 | 50 × 100 | 50 × 100 | 50 × 120 |
| 2.5 m | 50 × 100 | 50 × 120 | 50 × 130 | 100 × 100 |
| 3m | 50 × 120 | 50 × 140 | 50 × 160 | 100 × 120 |
| 3.5 m | 50 × 140 | 50 × 160 | 50 × 180 | 100 × 160 |
| 4 m | 50 × 160 | 50 × 180 | 100 × 160 | 100 × 180 |
| 4.5 m | 50 × 180 | 100 × 160 | 100 × 180 | 100 × 200 |
| 5 m | 100 × 160 | 100 × 190 | 100 × 210 | 100 × 190 |
| 5.5 m | 100 × 180 | 100 × 190 | 100 × 200 | 100 × 220 |
| 6 m | 100 × 200 | 100 × 200 | 100 × 250 | 100 × 220 |
Tab. 1 - Section of beams with a step of 0.5 meters
| MON | 150 | 250 | 350 |
| 2 m | 100 × 100 | 100 × 110 | 100 × 120 |
| 2.5 m | 100 × 110 | 100 × 120 | 100 × 130 |
| 3m | 100 × 120 | 100 × 130 | 100 × 150 |
| 3.5 m | 100 × 140 | 100 × 160 | 100 × 180 |
| 4 m | 100 × 160 | 100 × 190 | 100 × 200 |
| 4.5 m | 100 × 180 | 100 × 200 | 100 × 220 |
| 5 m | 100 × 190 | 100 × 210 | 100 × 230 |
| 5.5 m | 100 × 200 | 100 × 220 | 100 × 240 |
| 6 m | 100 × 220 | 120 × 230 | 120 × 250 |
Tab. 2 - Section of beams with a step of 1 meter.
The calculation of the number of beams for the floor is made according to the following formula:
KB = DP / W, where:
- KB - the number of beams of the specified section;
- DP - span length;
- Ш - step.
The total number of beams depends on the number of spans.
Floor slab technology on wooden beams
The maximum bearing load on the floor in residential premises is about 400 kg per 1 m 2. On the basis of this value, beams of the corresponding section are purchased.

In outbuildings, baths, garages and other non-residential premises, the load varies from 100 to 300 kg. per m2. On the basis of these indicators, beams with a smaller section are selected (see Tables 1 and 2).
It is worth noting that each beam must have a 30 cm allowance to the main length. This is necessary for mounting the timber into the wall. So, for example, for spans of 3 meters, beams with a length of 3.3 meters are used.
Beam mounting technology has a number of features, among which the following are distinguished:
- The step depends on the type of building. In wooden buildings, the beams are laid parallel to each other at a distance of 1 meter, in frame houses - at a distance of 50-60 cm;
- The height of the beam should not be less than 1/24 of its length. Smaller values reduce the strength of the structure;
- The optimal width of the timber is equal to its height, or half the height.
- The distance from the nearest beams to the stove should be more than 30 cm.
Basement floors are assembled according to the "pie" principle. The supporting structure consists of the following layers:
- rough floor;
- waterproofing;
- insulation;
- bearing beams;
- lags;
- floorboards.

Floor slab construction on timber beams
Floor arrangement technologies differ only in the type of beams fastening. When installing floor beams, hinged and recessed fastening methods are used. In the first case, metal canopies are mounted on opposite walls at an equal distance from each other - the supports of the timber. After all the supports have been placed, the floor beams snap into them. This type of fastener is suitable for premises with strip foundations, brickwork, as well as in aerated concrete structures. The canopy will provide the timber with maximum fixation in the groove.

With recessed mounting methods, a hole for the beams is cut at the base of the walls. Before installing the timber, this recess is laid with tow. In this case, the ends of the beams can be processed like a lock. For example, a thorn and a hole are often grinded down to a trapezoidal shape and fastened according to the dovetail principle.

This method is considered the most difficult and effective.
Basement floor installation technology consists of several stages:
- Marking and construction of nests. With the help of a building level and a measuring tape, the step of the beams is set along the first beam (order) from the foundation. After that, at the marks, nests are drilled or cut through with a section of 5-6 cm larger than the beam and a depth of 10 to 15 cm. The nests are laid with insulation.
- Installation of a bar. The logs are mounted in recesses. The first and last joists fit snugly against the adjacent wall. The cracks between the nest and the beams are caulked with tow or other insulation. If necessary, fixing canopies are attached to the bars and the wall. In cases where it is impossible to drill the nests, the ceilings are installed only on awnings (brickwork), or they are attached using side rails (wooden walls).
- Floor screed. Boards are lined on the beams. The end of the first plank is pressed tightly against the adjacent wall. The nails are driven in at a 45 degree angle. The end of the second board is pressed against the end of the first and attached to the beams using the same technology. Depending on the length of the span, 1 plank can take from 4 to 10 nails. For floors in living quarters, a five-board and nails No. 12 are optimal.
After installation of the basement floor, facing material is lined on the subfloor: fiberboard, laminate, linoleum and others.
Arrangement of interfloor ceilings on wooden beams

Overlapping the second floor with wooden beams is carried out using the same technology as the installation of basement structures. The main difference between the interfloor flooring and the floor flooring is the presence of a double sub-floor. In this case, the lower rough floor is the ceiling of the 1st floor and is made of boards with a smaller section.
The construction of attic and interfloor floors is carried out using the following technology:
- Bearing beams are installed in the landing nests.
- From below, using a construction stapler, a windproof film is attached.
- The subfloor is attached below.
- Insulation is lined in the niches between the beams. It can be mineral wool, expanded polystyrene, or ecowool based on split paper.
- Boards are laid on top of the insulation and the screed of the upper sub-floor is carried out.
Methods for strengthening wooden floor beams
Conventionally, beam reinforcement technologies can be divided into several types:
- restoration;
- reconstruction.
Restoration . This category includes methods such as reinforcement with wooden pads, metal plates, carbon fiber wrapping, prosthetics. Let's consider each of the options in more detail.
Wooden lining

Damaged beams (decayed, broken, potentially weak) can be reinforced with wooden overlays. To do this, the beam itself is cleaned with sandpaper, or with a plane and treated with an antifungal drug. A bar with a smaller section is laid out on both sides. The structure is pulled together with cords and stitched with through bolts.
Metal plates

The bearing capacity of broken logs is restored using metal prostheses according to the technology described above. The hardware is applied to the cleaned and processed beam and tightened onto a series of through bolts.
Carbon fiber wrapping

Carbon fiber glued to the damaged timber.
The technology for refurbishing floors using carbon fiber is simple and lightweight. For this, the damaged area is glued with several layers of carbon material.
Prosthetics

Prosthetics is used to increase the strength and wear resistance of the joints between the timber and the wall. This is where, due to the maximum pressure, the effects of corrosion and wear are most often manifested. Preventive measures are taken at the stage of the initial installation of the structure. The metal plates are sewn with bolts to the bar spike. The reinforced structure is installed in the socket. An analogue of onlays is a metal prosthesis. It is drilled into the body of the beam and installed in a small hole in the wall.
- installation of supports (columns, vertical beams);
- installation of additional beams.
Installation of supports

With insufficient load-bearing capacity of the timber, it is often reinforced with vertical supports. The installation of the pile allows the pressure to be redistributed from the beam to the support. This technology is most popular in attics and underfloor renovations.
Additional beams

With a meter step, you can increase the bearing capacity of wooden floor beams with the help of additional beams. For this, the floor is completely dismantled and the timber is installed with a step of 50 cm.
Video instruction
When erecting a wooden floor on beams, each of the stages of work is important: from calculations to commissioning. The videos below clearly demonstrate the technology for the design and construction of roof structures.
1. Calculation of materials for wooden floors.
2. Construction of a basement floor on wooden beams
3. Construction of interfloor overlap on wooden beams.
4. Construction of the attic floor.
5. Methods for strengthening wooden logs.
6. Installation of sub-floor slabs.
Traditionally, boards, beams and rolled metal are used as floor beams. These materials, in addition to their advantages, have significant disadvantages: high weight and high cost, complexity of installation. In America, since the mid-fifties, wooden I-beams have been used to create interfloor and attic floors, and recently in our country this technology has begun to enjoy success. What are I-beams, what are their real physical and operational characteristics?
Unlike traditional wooden beams, I-beams are composed of several elements, which gives certain advantages.

I-beam prices
I-beams
Due to the fact that the shelves are spaced far from each other, the I-beam has a very large moment of inertia. If we use traditional square beams and I-beams with the same cross-section under the beams, then the latter holds seven times greater bending forces, and its deformation is thirty times less. Conclusion - the use of loaded elements of buildings during assembly instead of I-beams allows at least seven times to reduce the consumption of expensive lumber, houses are much cheaper and, at the same time, are much superior in strength to traditional ones.

The main advantages include the following characteristics.
- Bending strength along the axis. We specifically paid attention to the direction of the bending force, the strength indicators of the I-beam are very different. I-beams can withstand the maximum force only at a certain direction of the bending moment, this must always be remembered and taken into account during installation. As soon as the position of the element is violated or the direction of the force changes, the structure abruptly loses its initial strength. Correctly positioned, the upper flange of the I-beam should be in compression and the lower flange in tension. The wall holds only minor alternating voltages.

- Dimensional stability. A wooden I-beam is made of slats and OSB boards, these materials are connected in such a way that changes in dimensions as a result of fluctuations in humidity are impossible. OSB-3 boards are moisture resistant and do not react to moisture hanging. This allows them to compensate for minor fluctuations in the parameters of natural wood slats. More expensive wooden I-beams are made of glued wood, which excludes even the theoretical possibility of deformation. Another advantage of I-beams is explained by the laws of strength of materials. Such sections are thirty times more stable than square ones, which makes it possible for structures not to change geometry during operation.

- Optimal weight-to-strength ratio. The geometric profile of I-beams allows them to withstand high bending loads with minimal weight. The cross-sectional area of the beam is about seven times less than the cross-sectional area of a square that can withstand the same loads. Due to this, the installation work of the floors is facilitated, the amount of expensive lumber required is reduced. One more plus can be called - a decrease in loads on load-bearing walls and foundations, but it is so insignificant that it is ignored during calculations.

The use of I-beams reduces the load on the walls and foundation of the structure
- Manufacturability of use. There is no need to use lifting mechanisms and equipment for the installation of I-beams. The beams can span spans up to six meters long, with no additional support required and the deflection not exceeding permissible values.

Types of beams
The domestic classification differs from the generally accepted European only in names, the linear and physical parameters are almost the same.
Table. Varieties of I-beams
| Beam series | Short description |
|---|---|
| European standard, 10 mm thick OSB board. The total height of the I-beam is 302 mm or 241 mm, the shelves are 38 × 64 mm. | |
| The size of the shelves is 64 × 38 mm, the stand is made of OSB 3 with a thickness of 10 mm. Due to the fact that the width of the shelf is twice the thickness, it is possible to increase the area for driving hardware when fixing various additional floor elements. These shelves can be used to facilitate the installation of insulation and engineering systems: electrical wiring, cables, etc. | |
| The height of the beam is 302 mm or 241 mm, the thickness of the OSB board is 10 mm. It has enlarged shelves measuring 89 × 38 mm, due to which the actual resistance to bending forces increases. The I-beam is manufactured according to European standards. | |
| Shelves 38 × 64 mm, I-beam height 302 mm and 241 mm. It is recommended to be used for overlapping small spans in length, often used as additional lintels to increase the rigidity of the structure and reduce the size of unfilled spans. Analogue of the European NJ series. Differences - the wrong adhesives are used in the manufacture, the physical characteristics of the OSB do not fully meet the regulatory enactments. | |
| The linear dimensions are similar to the European NJH beams, the size of the shelves is 64 × 38 mm. The beam heights can be 241 mm, 302 mm, 356 mm and 406 mm. The height is selected taking into account the initial data on the loads and the type of insulation materials. | |
| Shelves 38 × 64 mm, height 140. Rack made of OSB 10 mm thick. Beams with a low height are recommended for the construction of internal interior partitions. | |
| Height 241 mm, 302 mm, 256 mm, 406 mm, 457 mm, shelves 89 × 38 mm. They can be used not only during the construction of private houses, but also during the construction of commercial or industrial premises. | |
| Shelves 89 × 38 mm, height 140 mm. The light series, more often used as a vertical strut, can withstand significant compressive forces. |
What parameters to pay attention to when calculating
Each I-beam floor can carry a certain maximum load. During the design, an additional margin of safety is specially provided within the range of 40-50% - this makes it possible to completely eliminate the likelihood of emergencies due to gross violations of construction technology. What initial data are needed for calculations?

The spacing of I-beams is taken as a standard 60 cm and is consistent with the dimensions of mineral wool. From a special table, architects use the axial and static moment of inertia for calculations, and the radius of inertia is taken into account to determine the distance between the beams. The deflection is calculated based on the standard and design load, floor length and design resistance. At the same time, a prerequisite is observed that the deflection of a wooden I-beam floor cannot exceed 1/250 of its length.

How to make an I-beam with your own hands
We immediately warn you that to perform such work, you need to have electrical woodworking tools and solid experience of a carpenter. I-beams are load-bearing elements of increased responsibility, any deviations between the calculated and actual parameters cause a very serious situation - a violation of stability. We will consider the simplest option for manufacturing elements that can only be used on various outbuildings.

Prepare your workplace in advance. You will need a long table, its dimensions should correspond to the parameters of the beams being made. Make the table from scrap materials, the main thing is that the surface is as flat as possible. Then special boards are nailed to it to connect the beam elements into a single structure.
Step 1. Count the amount and purchase the required lumber. For the beam, you must have a bar with dimensions corresponding to the I-beam series, an OSB 3 slab, wood glue and small nails or special staples. In a simplified version, glue is not used, but experienced builders strongly recommend not to skip this important production stage. This has a very negative effect on the strength of the timber.

Step 2. Prepare the slats. A groove should be cut exactly in the middle with a depth of about 10 mm and a width corresponding to the thickness of the board. Industrial production provides for a complex groove profile, the same look is given to the edges of the OSB board. Due to this, the adhesion force of the shelves with the rack is significantly increased. If you do not have such equipment and a set of cutters, then the groove can be made rectangular. Accordingly, the edges of the board are not milled either. The length of the rails should correspond to the dimensions of the span, the width and height are selected depending on the expected loads.

Practical advice. Due to the fact that handicraft I-beams can have significant deviations in bending strength, increase their dimensions by at least 50%. It is better to let the consumption of lumber increase slightly than to eliminate the complex consequences of the collapse of the floor later.
Step 3. Apply a generous amount of wood glue to the groove. You can use PVA, it has shown good properties in practice, it is easy to work with it. In addition, in terms of cost, this material does not have a big impact on the total price of self-made I-beams.

Step 4. Insert the prepared piece of OSB board into the groove. It should enter with a slight tension, this can be achieved by reducing the width of the groove. If you have a 10 mm thick slab, use a cutter no more than 9 mm wide to cut the groove. The fact is that non-professional machines cannot be precisely adjusted, they will always have a beating. As a result, a 9mm cutter will produce a groove 9.5-10mm wide. In our case, this is not a problem - the plate will be firmly held in the groove.

Drive the board through a small piece of board, otherwise the edge will begin to crumble. Make sure that the OSB enters the entire length until it stops, the planes must be strictly parallel. If the length of the OSB is insufficient, then two pieces of the board must be used. At the junction, knock them into the end until they are tightly joined.

Step 5. Place the second top rail in place. The technology is no different from the one described above.

Step 6. Flip the I-beam on its side and secure it in the prepared templates on the table. The distance between the boards must exactly match the height of the I-beam, nail them exactly along the line. If the I-beam does not fit a little, then this means that the slats have not fully entered the plates, correct their position, finish off the elements with a hammer.

Step 7. Fasten the slats and plates with brackets, the distance between the fasteners is approximately 20-25 cm.

Step 8. Turn the I-beam upside down, fix it between the boards and again fasten the elements with staples. The I-beam is assembled, now it must be carefully laid on a flat area for the glue to dry completely. It is advisable to store the beams under a canopy.

If the laying of communications is planned in the ceilings, holes of the corresponding diameter are pre-drilled in the beams. After the installation of the I-beams, it will be difficult to do this, moreover, there is a risk of disrupting the structure.

OSB (Oriented Strand Board) prices
OSB (oriented strand board)
Rules for fixing I-beams on floors
We have already mentioned that violations of the manufacturing technology and installation of jumpers always have very unpleasant consequences, so there is no need to experiment, follow the time-tested rules. Floor beams can be fixed in several ways.

Check the quality of I-beams carefully, these are very important elements. When the load is exceeded, a simple bar will first bend, and only then it will crack. This allows you to notice and fix the problem in time. An I-beam in such situations does not bend, but immediately collapses, the consequences of an accident can be tragic. What should you look out for first?

Prices for various types of timber
Conclusion
Do not be afraid to use modern construction technologies, they make it possible to build durable and comfortable houses with a significant reduction in the estimated cost. I-beams can be used not only for overlapping - they are also used in the construction of a rafter system, load-bearing frames of wooden buildings for various purposes, etc.
Video - Wooden I-beams
Unfortunately, the domestic construction industry and technologies are several decades behind foreign ones. What has been used in developed countries for a long time is considered a novelty for us. You briefly learned about the physical characteristics of I-beams, got acquainted with the technology of their manufacture and use. Now you should put your knowledge into practice, start with calculating the rafter system, replace the beams with I-beams. How the calculations are made can be found in the article.