The very first thing to do before starting renovation in any room is to understand what we want to achieve as a result.
Ask yourself a few questions:
- What should the room look like after renovation?
- What would you like to leave unchanged?
- What does not suit you in the first place and requires changes?
- What preferences do the people who will use the room have about the type of room (for example, other family members)?
- Do you need a major overhaul or is cosmetic enough?
You can think over the appearance of the room yourself. If this is difficult, you will have to contact a professional designer. This stage should not be postponed until later, they say, we will start repairs, and then we'll see what happens. Much depends on how we want to see the room - from the choice of materials to the performance of a very different type of work. It is better to think over everything in advance than to redo it later.
Preparation phase
So, the future look of the room has been thought out. Before starting any manipulations in the room, you need to take the following steps.
- Describe the sequence of repair work in as much detail as possible.
- Study the information about the materials that you plan to use and all types of work that you are going to do yourself.
- Select the start and end date of the repair, allocate a period for preparation. This is necessary so that the goal is clearly defined, and the renovation does not drag on for many months.
- Calculate the amount of required building and finishing materials.
- Select and buy all the building materials and tools that you will need throughout your renovation.
- Decide who will carry out the repair. Think about whether you will do everything yourself, find yourself assistants, or still entrust certain types of work.
- Order windows and doors in advance so that you don't delay work due to the fact that you have to wait for their production.
- Think about how and where the garbage will be taken out. There will be a lot of it in any case.
- Draw a new location for switches and sockets.
Advice: building materials should always be bought with a small margin.
Consider the option of a major overhaul in the living room, which involves not only changing the wallpaper, baseboards, renewing the paint on the ceiling and walls, but also replacing windows, doors, electrical wiring and other large-scale events.
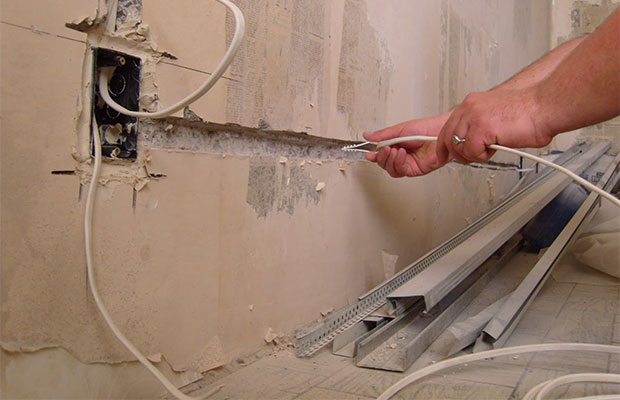
- The electrician is changing. The old wiring has already been removed, the channels for the new one are being grooved. Then the cable is laid, and the channels.
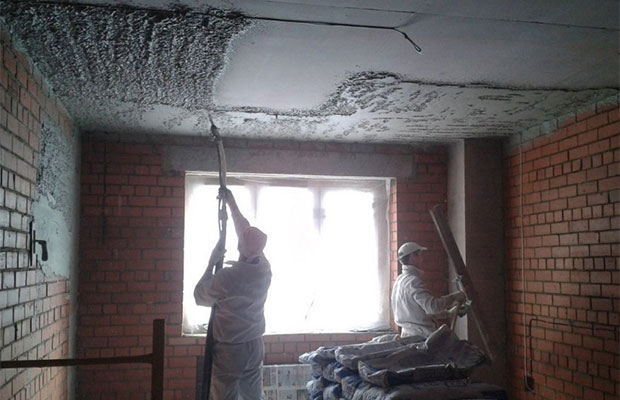
- The ceiling and walls are leveled, a rough preparation of the floor is carried out (insulation).
- A complete ceiling finish is carried out, up to and including gluing the baguette.
- The finishing of the walls and door slopes begins.
- and switches.
- If chosen as a floor covering, it is laid after gluing the wallpaper. Block parquet is laid earlier, cycled and covered with the first layer of varnish. Then you need to glue the wallpaper, and only after that the parquet is covered with subsequent layers of varnish.
- New doors are being installed. You can change windows and window sills not only at the very beginning, but also at this stage.
Repair in an apartment raises a lot of questions, especially for those who first decided to do such a responsible job, relying on their own strength. Our recommendations will help you plan your work correctly so that you do not correct the mistakes later.
Renovation preparation - planning and design selection
Correctly chosen sequence of repairs in the apartment will help to do it in a short time, without unnecessary worries. Initially, you should decide what kind of repair is to be done. Perhaps it will be cosmetic: it will be limited to changing wallpaper, painting and other separate operations. If a major overhaul is needed, planning is essential. After all, it may touch windows, doors, walls, floor and ceiling. Maybe you want to do the redevelopment of the premises, remove the partitions.
The planning and design of the premises requires careful thought. For each room, think over what material will be needed for walls, ceilings, floors. Perhaps you will change windows or want to rearrange furniture. It is impossible to keep everything in your head, so you need to make a plan. We measure all the rooms and make drawings on separate sheets. Each room will need six of them: one for the floor and ceilings, four for each wall separately. On the plan, indicate the location of windows, doors, sockets, switches, lamps.
On each sheet, write down what materials will be used. For example, the floor in the kitchen: linoleum with insulation - 12 m 2, brown. Ceiling: 12 m 2, water-based paint, white. First wall: 6.1 m 2, align - starting, finishing, priming satengips. Painting: water emulsion, peach color, colorex, primer. Replace the door with a new one, leave the finish. It is advisable to indicate how much of what material will be needed, based on the consumption rates, it would be good to indicate the price. If you do not undertake any work, you will attract a specialist, indicate this in the plan. This is only approximate planning, you can fix whatever you think is necessary. A start has been made - the work has been planned.
Continuation of preparation - furniture is moved, unnecessary elements are dismantled
Ideal if it is possible to completely free the apartment from furniture and interior elements for repairs. But, most likely, it will have to be moved to one of the rooms so as not to interfere with work. We put it compactly, pack it with stretch film. The renovation starts with other rooms. When at least one room is ready, the furniture is transferred there, placing it as the rooms are ready.
The next step is to dismantle the elements to be replaced. If the repair is cosmetic, remove the layer of old linoleum, remove the wallpaper. During major repairs, it may be necessary to remove interior doors, remove partitions, change door installation locations, create special niches in the walls, remove plumbing, etc. If you are not going to change the floor, but only renew it, do not forget to cover it with plastic, so as not to damage it.
Time to dismantle old windows if you are going to install new ones. After installing the windows, do not remove the protective film from them. Let it remain during the repair and protect the glass from scratches, dirt, dust, which are inevitable during repairs. If a redevelopment is planned, there is a desire to start from scratch, we demolish non-load-bearing partitions.
Water, heating, electricity - we repair, install a new one
After finishing dismantling, step by step. We start with communication systems. The overhaul time is the most suitable for replacing electrical wiring, heating radiators, pipes, installing an exhaust hood, an air conditioner. Communications should be planned in advance, especially wiring. If you are going to build new partitions, the work should be done before laying the wiring, pipes, so that you do not have to break and redo them later. In a frame house, wiring, pipes are better hidden in the walls. On the walls of a different material, strobes are made, where the wiring is hidden.
Residents of panel houses should keep in mind that the walls in such houses can only be channeled in the vertical direction. We spread the wiring under the ceiling or in the place where the walls and floor meet. We hide the wires under or behind the skirting board. Do not forget to lay cables for the Internet, television, intercom along with the wiring. We do not install switches, sockets, lamps immediately, we only prepare places for them. Installation of devices is carried out after the end of all work.
We are engaged in plumbing: we install pipes for supplying water to the washing machine and output to the sewer. We also make leads to mixers, bathroom, shower, dishwasher, toilet. Already now it is important to know the dimensions of the bathroom and shower, the places of water and sewerage connections. It's good when they are already purchased, but you can also find out the technical specifications at the store where you are going to buy the equipment.
Finishing work - space for a flight of imagination
We carry out finishing, starting from the top - from ceilings to walls and floors. This sequence eliminates damage to repaired parts when working with others. Stretch ceilings are an exception: they are made last. If you want to make a floor, we start by leveling with a screed. We use an economical method - a cement-sand mixture. Whenever possible, we use self-leveling floors. They are more expensive, but the result is worth it. If you are going to install a floor heating system - it's time.
Let's start leveling the walls. The duration of work, the amount of material depends on the condition of the surfaces. You may need several layers, or you can get by with one. The walls are aligned mainly with their own hands. The use of machine leveling in an ordinary apartment is impractical. Manual alignment is performed in two ways: visual and by beacons. We align the walls that are being prepared for painting with beacons, which ensures the best quality.
Having finished the plastering, we proceed to the final work - putty. Putty should be carefully to close up all irregularities, communication wiring. Finally, we prepare the surface for finishing. The choice of a primer is important - a high-quality one will avoid problems with puttying, painting, pasting. If you are going to install decorative items such as stucco, do so now.
Then we proceed to the wall tiles. It is important to plan which tiles on which wall we will use. If possible, we make an installation diagram on a computer or draw on paper. So we will find out exactly how many tiles are needed, how many will have to be cut in order to reasonably plan the purchase of stock. The variety of colors, patterns, finishing materials allows you to make the apartment unique. In addition to ceramic tiles, decorative mosaics, bamboo tiles, 3D elements and much more are used at this stage.
Close to the finish line - final important touches
We install the plumbing - all the carts were completed earlier - and proceed to laying the flooring or decorating the walls. Most builders prefer this order: first, start laying the final floor: laminate, parquet, linoleum. Then we are engaged in the installation of interior doors. We select the door in advance in order to prepare, if necessary, doorways of the required height and width. We install boxes, we hang the door leaf. We cover the clean floor with a film and deal with the walls. Options at your discretion: painting, wallpaper.
It is not necessary to fix the platbands right away, it is better to do this after we paint the walls or paste with wallpaper.
We complete the process by installing lamps, switches, sockets, fixing the baseboards.
Summing up - sequence of actions
So, summing up all the tips, we will outline the sequence of repair work in the apartment:
- 1. We consider what kind of repair is needed: cosmetic or major, we choose a design. We draw drawings, indicate materials.
- 2. We take out, take out furniture and everything that will interfere with the repair, dismantle unnecessary elements on the floor and walls.
- 3. We are engaged in dusty work: we remove old windows, install new ones, demolish partitions and install new ones. We bring communications - electrical wiring, pipes for connecting household appliances and plumbing.
- 4. Finishing works:, we plaster the walls, we make a rough floor. We putty, primer, lay the tiles. We make a clean floor, decorate the walls.
- 5. We install plumbing and appliances, hang the door. We fix skirting boards, platbands.
We start repairs from the most distant room so that debris and dirt are not applied to the repaired premises. We repair the corridor last. Garbage, building materials are carried through it and there is a great risk that walls, floor, ceiling will be accidentally damaged. We close the repaired room, hang the door with construction film. In this way, we will protect the ingress of dust, debris, building materials from premises in which repairs are ongoing.
So, the main question that you will have to answer if you are planning to renovate an apartment is where to start? This article is devoted to this issue and reveals it in full. We will help you build a plan for your repair, calculate all costs and find out in what order to carry out major or cosmetic repairs.
To begin with, it is best to start repairs in late spring. It's already warm enough outside the window, the masters, if you want to call them, are not yet so busy. In contrast to the end of summer, after all, it is then that many repairmen start "rush work" Let's take a closer look at the issue of apartment renovation together.
Getting ready for repair
Imagine your apartment after renovation
If you come to our site, then you have conceived a renovation, the beginning will not be easy: you need to make sketches of exactly how your house will look after the renovation is completed, where the furniture will be, what kind of chandelier will be in the hall or bedroom, where you will be or tiles where they won't be at all, etc.
One of the ways that will help you determine the location of furniture sounds like this: take a centimeter, measure all the corners of your apartment thoroughly and draw in a reduced size on a sheet of Whatman paper (do not forget about doors and windows). And then - on a separate sheet of furniture, observing its approximate sizes and shapes, using the same scale as in the case of an apartment. Then you cut out your "paper" furniture and move it along the sheet of whatman paper, thereby determining its location.
What are you planning to remodel in your apartment
Continuing the topic of where to start the repair, I would like to advise you to clearly define what exactly you would like to remake in your apartment: doors, re-glue wallpaper, carpet or linoleum, replace skirting boards, stick or toilet, etc. Do not forget to decide on the location of future outlets.
Estimating repairs
In order to avoid unexpected costs, you should clearly draw up a cost estimate for the renovation of your apartment.

And for this you need, as written above, to decide what exactly you will be repairing. So, let's say you want to glue the wallpaper in the hall, lay the bathroom, and also glue the tiles on the ceiling in the bedroom.
We take in hand such a useful object as a tape measure, and we begin to measure the area of \u200b\u200bthe walls in the hall, the floor in the bathroom and the ceiling of the bedroom. Knowing the area and approximate prices for 1 square meter of the required material, you can calculate how much money will need to be invested in apartment renovation. Do not forget that in order to glue the tiles you will need to use special glue. And if there is an uneven wall under your wallpaper, then you will also need putty ("primary", "secondary", etc.).
Do not forget that you can not do all types of repair work. Some part of this work should be entrusted to professionals in their field. For example, hardly everyone knows how to smoothly fill a wall or lay parquet on the floor. What can we say about replacing windows and doors? Thus, find yourself people who will do this or that work, find out the price for it and add it to your cost estimate. Remember that repairs are done for a long time, so you need to save on it, but do not overdo it too much, so as not to regret it later.
Preparation of all instruments
This is also an important part of the preparation before renovating an apartment.

Depending on what you plan to do, you should prepare a toolbox. If you are going to glue the wallpaper, and before that level the walls, then do not forget to get some kind of even rail (there are, of course, more professional devices based on lasers), spatulas, and, in the end, a broom. The meaning, I think, is clear to you.
Time to repair
As mentioned above, it is important not only the time spent on repairs, but also the time of the year at which it is planned. Spring is considered ideal, when the temperature outside is warm enough to ventilate the rooms and the repair crews are not so overwhelmed. At the end of summer, repairmen have a rush: it is very difficult to call them at home, you have to wait for weeks, and the prices for the work are too high.
Repair sequence
Having started repairing the entire apartment, you should carefully consider in which room it will start, where it will continue and where it will be completed.

We start renovating the apartment
Room preparation
Of course, deciding to start repairing one room, all questions related to the move will be immediately discarded. If you need to repair the whole apartment, then decide - either you live in this apartment, where you are going to make repairs throughout the entire time and move from room to room, or you move to your mother (sister, brother, etc.) and make repairs in all rooms in parallel, which, firstly, will save your time, and secondly, you will not have to rest in the mud.
Let's figure out why. Everything is very simple, if you have gone through the first stage of preparation (you know what exactly you will do in the room, calculated your future expenses, prepared the toolkit, bought materials), then you will need to clear the room of everything that is in it. Take the furniture to the next room, remove all the paintings, chandeliers, etc. Despite the fact that this room is about to be very dirty, before repairing it should be vacuumed (swept) and washed from dust.
First of all - the "dirtiest" work
As the name suggests, the dirtiest jobs need to be done first. First of all, if you are going to change windows and doors, take care of them, including window slopes. The door and the windows themselves can be omitted, it is enough to put the frames and the door frame. Leave all other actions at the end of the repair.

In the event of a major overhaul, you should start stripping off wallpaper, old parquet or linoleum, etc. When all this is done, then start putty and other work from the ceiling, then go on to putty on the walls, and if no dirty work is planned on the floor ( let's say you just have to lay linoleum), then you can glue the wallpaper on the walls. At the very end, the skirting boards should be hammered. Before filling the walls, we advise you to once again remember where exactly the sockets will be located, whether there is a socket for the Internet. You may need to run wire through the room that you can hide in your walls. Of course, if the wire goes down, then it can be removed into the baseboard.
Wall repair
All walls, no matter how smooth, should be leveled a little. Measure them with a corner (rail). If the irregularities are small, they are detected only with the help of a special device, then they are not catastrophic. Then just get some plaster or putty. In the case when the walls have strong irregularities, indentations, then use a cement mixture.

Floor repair
Everything, the size of your budget - whether or not to make a new screed, or do without it, immediately laying a new covering in the form of linoleum, carpet or parquet. Here you make a decision, or resort to the service of masters.
Ceiling repair
The best we can advise you is the installation of stretch ceilings. They have built-in lighting devices, you don't have to hang any chandeliers!
Repair of windows and doors
Apartment windows should be plastic with improved thermal insulation. All old-style windows should be replaced with new ones!

Kitchen or toilet renovation
It is best to start repairing the listed rooms by replacing the plumbing! Old rusty pipes, though not on the outside, but on the inside, must be replaced with new plastic ones. The riser pipe should also be replaced. To do this, however, you have to negotiate with your neighbors from below and from above. Why change pipes? Imagine that you have invested a lot of time and your efforts on repairs, spent a rather large amount of money, and the pipe took and burst, flooding half of the kitchen. It's a shame. But also the neighbors from below will suffer and you will also have to pay for repairs.
Video on how to start repairing an apartment
Conclusion
We hope we managed to reveal the whole essence of the topic of starting repairs in an apartment. Now you must easily cope with all the difficulties that await you in the process of apartment renovation. If you have additional questions, before proceeding with the renovation of the apartment, ask them below!
Although the repair belongs to a natural disaster in terms of the level of its mental impact, physical wear and tear and money, you need to approach it dispassionately, armed with plans, sketches and calculators. As for any process, there are detailed step-by-step instructions describing the sequence of apartment renovation, based on the centuries-old, long-suffering experience of more than one generation of home repairmen.
Repair stages should not be performed spontaneously, but in strict sequence
The sequence of apartment renovation: step by step instructions
Each point of this instruction is watered with sweat and blood:
falling bricks, fingers corroded by cement or broken off with a hammer, flying saw disks - that's about what can await daredevils who decide to master the science of repair.
Much will not work out right away, and a number of completed works will have to be redone later.
But it's a shame that most of the alterations occur due to the fact that people make repairs completely in the wrong sequence.... If it were not for this, home renovation would have been several times faster.
What is the sequence of apartment renovation?
We will divide all work into several stages:
 Before starting the repair, a sketch of the future interior of the apartment is drawn up
 - This is very convenient for those who are in no hurry to do everything by an emergency method and are limited in funds.
- The purchase of everything you need can be done before each stage
- It is better to take a break from work exactly between stages.
- We start with the realization of what we want to get in the end:
- Cosmetic option or capital
- With what levels of comfort:
- unassuming (ordinary-type conveniences, nothing flows, doesn't blow from anywhere)
- superior comfort (luxury plumbing, climate control, sound insulation, etc.)
- We draw up a layout with a choice of interior items and their arrangement.
There may be several options:- We contact a professional designer
- We use simple standard 3 D repair programs, for example, Sweet home 3D or Ikea
- We draw a sketch ourselves using a graphic editor or on a regular sheet
- We make calculations of working surfaces
- We make a detailed list of everything you need to buy:
The list includes items of communications and furnishings, rough and finishing materials and construction tools.
You can't save on tools:
So, the presence of a construction mixer will speed up floor screeds and plastering of walls and ceilings at times. - In order not to miss anything, we get acquainted in detail with the technological process of each stage
- We make purchases of materials and tools
Rough repair work
- Dismantling and installation of walls and partitions
This work is usually carried out by those who are not satisfied with the standard layouts, with the goals of:- increase the living space (by connecting the loggia with the hall or kitchen, removing niches, etc.)
- make a shared bathroom
- show off with some unusually beautiful arches, passages, etc.
It's only a shame that, making such dismantling, fans of capital demolition of buildings inadvertently demolish the load-bearing walls, as a result of which they create a danger of the building collapsing during earthquakes or explosions
- Shtrobing walls and piping communications:
- Holes are made in the walls for water and sewer pipes, grooves for electric wires
- Electric wires are pulled throughout the apartment to the designated outlets, switches, ceiling lighting and are led out to the general corridor electrical panel
- At the same stage, cables for air conditioning, television and the Internet are laid.
You can, of course, lay it later, but again you will have to chop the passages in the walls, or run the wires over, so that then you will always get confused in them and stumble - Do not forget that high power electrical appliances (electric furnaces, boilers, air conditioners are connected with three-core power cables
- Sewerage pipes are being laid from the common riser to the kitchen, bathroom, toilet
This is a very important point. Make sure again that- the location of the kitchen sink on your layout you will not change
- will install a bathroom, not a shower
- the type of toilet you choose is final
(The connection of floor-standing and wall-mounted toilets is different)
The toilet can generally be purchased in advance and immediately connected. This eliminates the inconvenience of repair . Then, when the time comes to work in the toilet, it can be dismantled again for the period of laying the tiles.
When renovating at the initial stage, a so-called rough toilet is used, which changes at the end.If the plumbing has not yet been purchased, then put plugs on the pipes to avoid leaks and odors from the riser
- Water pipes are connected in the following sequence: first hot, then cold.
If hot water is not provided for by the project, then the connection of hot water must be postponed until the repair of the room where the boiler will be installed is completed.
And only now we start plastering
- Plastering works
 Plastering the walls
 - Plastering walls and grouting ceilings (leveling walls and ceilings
Plaster can be replaced with drywall - If soundproofing of a room is done, then sound-absorbing material is applied beforehand
- Leveling door and window slopes
- Plastering walls and grouting ceilings (leveling walls and ceilings
- Connecting central heating pipes to the radiator
- Pipe priming
- Internal carpentry
- Manufacturing of built-in wardrobes and shelves
- Primer
- Installation of interior door frames
- Bathroom and toilet work
- Waterproofing and floor screed
- Floor and wall cladding
- Installation of a bathroom (if the bathroom is adjacent to the wall, then its installation is carried out after the wall is tiled)
- Floor screed in other rooms
- If the floors are insulated, the insulation is filled in before the screed
- In addition to the concrete screed, dry ones based on expanded clay and Knauf are also used
Fine finishing works

The final stage
- Installation of switches, sockets, lamps, plumbing
- Assembly of kitchen furniture
- Installation of skirting boards
- Installation of interior doors.
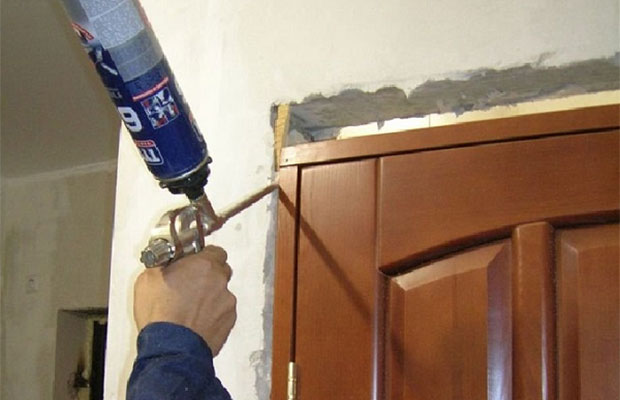
Often, during repairs, they make a mistake by installing doors at the very beginning.:
Doors prevent large items from being brought in, so they are often scratched and damaged
But the door jamb (box) is installed at the beginning, since the space between the box and the wall will need to be plastered.
 Lighting connection, installation of skirting boards and interior doors takes place at the final stage
 This step-by-step guide contains a list of possible jobs if you get a practically bare apartment.
In practice, much of this list may not be useful to you, since communications in new buildings, even in a draft version, are usually carried out.
Residents also do not always install soundproofing and floor insulation, but living in a multi-apartment panel building often makes them regret some omissions that had to be done at the very initial stage.
You can determine the sequence of apartment renovation yourself, guided by expediency, planning, timing and financial capabilities.
Main condition:
Any subsequent step should not lead to corrections of what was already done in the previous step.
If this condition is not met, then the repair sequence was selected incorrectly.
Video: Stages of renovation
When you mention apartment renovation, is your thought limited to the picture of demolishing partitions and replacing windows? No problem. Today you will be able to get a short battle plan called “ Stages of repairing an apartment purchased in the secondary housing market". After reading our tips, you will definitely not torment yourself with the question of where to start renovating an apartment with your own hands or with the help of professionals. Our website dedicated to self-repair of an apartment will help you with the first option. So, let's take a look at the tips.
Where to start the first stage of apartment renovation - ceiling
Ceiling repair is the most urgent topic for many tenants who have purchased an apartment on the secondary market. After all, most of the new owners have to face a number of "ceiling problems" every day, from crumbling plaster to cracks in the ceiling.
Where to begin? To carry out the operation to level the walls, putty and plaster will be required. Each toolkit is selected individually depending on the scale of the disaster: if the irregularities (small dimples, cracks and dents) do not reach a depth of more than 5 mm, then puttying can be dispensed with; if the depth of defects is more than 5 mm, use plaster.
Well, the finishing touch in such a complex operation is painting and. Paper, textile, vinyl, metallized, cork, non-woven, for the nursery - all that remains is to choose a new look for your cozy nest.
Repair cost, approximate cost estimate for apartment work
Average cost of construction work in an apartment
| Name of works | Unit rev. | Price, rubles | |
| 1. Floors | |||
| 1 | Removal of linoleum, carpet (without preservation) 1 layer | m² | 100 |
| 2 | Removal of hardboard, plywood (without preservation) 1 layer | m² | 90 |
| 3 | Dismantling wooden / plastic skirting boards (without saving) | n.m | 40 |
| 4 | Removal of parquet / laminate that has been installed in a floating way (without preservation) | m² | 165 |
| 5 | Removal of parquet / laminate that is laid on glue and nails (no preservation) | m² | 215 |
| 6 | Dismantling the screed (up to 50 mm) | m² | 240 |
| 7 | Dismantling the screed (up to 100 mm) | m² | 300 |
| 8 | Dismantling the lag | m² | 120 |
| 9 | Dismantling the wooden floor (without saving) | m² | 275 |
| 10 | Removing tiles | m² | 120 |
| 11 | Dismantling of reinforced concrete plinth | n.m | 100 |
| 12 | Dismantling of floor granite slabs (without saving) | m² | 360 |
| 13 | Ceramic stitching. tiles | m² | 100 |
| 14 | Installing beacons on the floor | n.m | 70 |
| 15 | Backfilling expanded clay under the screed | m² | 100 |
| 16 | Floor insulation with expanded polystyrene | m² | 165 |
| 17 | Installation of cement-sand screed up to 50 mm | m² | 420 |
| 18 | Installation of cement-sand screed from 50 mm to 100 mm | m² | 650 |
| 19 | Reinforcement of the screed with a metal mesh | m² | 60 |
| 20 | Finishing screed device with self-leveling mixture | m² | 295 |
| 21 | Floor waterproofing device (mastic) | m² | 190 |
| 22 | Floor waterproofing device (roll) | m² | 290 |
| 23 | Priming of cement-sand screed with concrete contact | m² | 60 |
| 24 | Priming of cement-sand screed with acrylic primer | m² | 30 |
| 25 | Plywood flooring and cutting with glue | m² | 230 |
| 26 | Plywood flooring and cutting for bituminous mastic | m² | 240 |
| 27 | Plywood sanding | m² | 130 |
| 28 | Laying the substrate on a heat / sound / waterproofing base | m² | 50 |
| 29 | Laying wooden logs | n.m | 100 |
| 30 | Laying commercial linoleum | m² | 300 |
| 31 | Processed seams in commercial linoleum | n.m | 60 |
| 32 | Laying linoleum | m² | 200 |
| 33 | Carpet flooring | m² | 190 |
| 34 | Laying cork flooring | m² | 360 |
| 35 | Laminate flooring | m² | 350 |
| 36 | Parquet scraping | m² | 300 |
| 37 | Parquet putty | m² | 90 |
| 38 | Floating parquet flooring | m² | 400 |
| 39 | Flooring parquet boards with glue | m² | 500 |
| 40 | Block parquet laying (with a break, herringbone) | m² | 900 |
| 41 | Floating solid planks | m² | 600 |
| 42 | Planking solid boards with glue | m² | 700 |
| 43 | Adjustable floors | m² | 500 |
| 44 | Floor painting | m² | 160 |
| 45 | Floor varnishing | m² | 200 |
| 46 | Installation of skirting boards (wood or PVC) | n.m | 150 |
| 47 | Varnishing wooden skirting boards | n.m | 50 |
| 48 | Ceram masonry. standard size tiles (20 × 30, 40) | m² | 840 |
| 49 | Ceram masonry. standard size tiles diagonally | m² | 900 |
| 50 | Ceram masonry. tiles less than (20 × 30, 40) | m² | 960 |
| 51 | Ceram masonry. tiles less than (20 × 30, 40) diagonally | m² | 990 |
| 52 | Porcelain stoneware masonry | m² | 1 500 |
| 53 | Laying mosaic tiles or complex patterns (price from) | m² | 1 300 |
| 54 | Grouting (mosaic) | m² | 250 |
| 55 | Ceramic grouting. tiles / porcelain stoneware | m² | 180 |
| 56 | Washed down tiles at 45 degrees | n.m | 495 |
| 57 | Facing of steps with ceram. tiles | m² | 1 050 |
| 58 | Ceram masonry. border, plinth, ornament | n.m | 240 |
| 59 | Installation of a metal nut | n.m | 120 |
| 60 | Shelter floor | m² | 80 |
| 2. Walls | |||
| 61 | m² | 70 | |
| 62 | Cleaning walls from water paints | m² | 170 |
| 63 | Cleaning walls from non-aqueous paints | m² | 200 |
| 64 | Removing tiles | m² | 150 |
| 65 | Cleaning walls from putty | m² | 180 |
| 66 | Removing the ventilation grill | units | 100 |
| 67 | Dismantling plaster | m² | 235 |
| 68 | Dismantling brick walls (1/2 brick) | m² | 285 |
| 69 | Dismantling of brick walls (1 brick) | m² | 495 |
| 70 | Dismantling of partitions made of reinforced concrete of thicknesses. up to 8 cm | m² | 2 420 |
| 71 | Dismantling of partitions made of reinforced concrete of thicknesses. up to 16 cm | m² | 3 795 |
| 72 | Dismantling of walls made of foam blocks, drywall, wood | m² | 350 |
| 73 | Dismantling of gypsum concrete partitions | m² | 450 |
| 74 | Wall masonry from foam blocks | m² | 540 |
| 75 | Laying of curved partitions from foam blocks | m² | 740 |
| 76 | Brick wall masonry (1/2 brick) | m² | 665 |
| 77 | Bricklaying walls | m² | 970 |
| 78 | Bricklaying of complex partitions made of bricks | m² | 1 150 |
| 79 | Concrete wall opening | m² | 4 235 |
| 80 | Opening in a brick wall (1/2 brick) | m² | 2 365 |
| 81 | Opening a brick wall | m² | 3 025 |
| 82 | The device of an opening in the wall from foam blocks | m² | 1 540 |
| 83 | Waterproofing walls (mastic) | m² | 190 |
| 84 | Installation of plasterboard partitions in 1 layer | m² | 540 |
| 85 | Installation of plasterboard partitions in 2 layers | m² | 670 |
| 86 | Wall cladding with plasterboard in 1 layer on a metal frame with installation of shumanet | m² | 420 |
| 87 | Wall cladding with plasterboard in 2 layers on a metal frame with installation of shumanet | m² | 490 |
| 88 | n.m | 550 | |
| 89 | Bonding joints with serpyanka | n.m | 45 |
| 90 | Wall cladding with clapboard on the frame | m² | 500 |
| 91 | Wall cladding with plastic panels on the frame | m² | 430 |
| 92 | Thermal insulation of walls with mineral plates, foam | m² | 150 |
| 93 | Wall soundproofing device | m² | 550 |
| 94 | Painting net installation | m² | 90 |
| 95 | Gluing walls with fiberglass | m² | 150 |
| 96 | Priming walls with concrete contact | m² | 75 |
| 97 | Installation of plaster beacons | n.m | 80 |
| 98 | m² | 120 | |
| 99 | Plastering walls up to 20 mm | m² | 600 |
| 100 | Plastering of walls from 20 mm to 50 mm | m² | 650 |
| 101 | Priming walls with acrylic primer 3 cycles | m² | 135 |
| 102 | Priming walls with acrylic primer 4 cycles | m² | 180 |
| 103 | Installation of painting corners | n.m | 60 |
| 104 | Plastered walls 1 cycle | m² | 295 |
| 105 | Plastered walls 2 cycles | m² | 450 |
| 106 | Wall grinding 1 cycle | m² | 70 |
| 107 | Wall sanding 2 cycles | m² | 140 |
| 108 | Gluing walls with fiberglass | m² | 230 |
| 109 | Finishing wall putty 1 cycle | m² | 210 |
| 110 | Finishing wall putty 2 cycles | m² | 350 |
| 111 | Wall painting (2 layers) | m² | 245 |
| 112 | Decorative plastering | m² | 1 100 |
| 113 | Sticking walls with vinyl wallpaper without selecting a pattern | m² | 220 |
| 114 | Wall gluing with vinyl wallpaper with pattern selection | m² | 280 |
| 115 | Sticking walls with non-woven wallpaper without selecting a pattern | m² | 300 |
| 116 | Sticking walls with non-woven wallpaper with pattern selection | m² | 350 |
| 117 | Sticking walls with textile wallpaper | m² | 750 |
| 118 | Sticking walls with linkrusty | m² | 1 000 |
| 119 | Pasting a wallpaper border | n.m | 130 |
| 120 | Wall cladding with ceramic tiles of one pattern 100 × 100 | m² | 970 |
| 121 | Wall cladding with ceramic tiles of one pattern 200 × 200 | m² | 850 |
| 122 | Wall cladding with ceramic tiles of one pattern 200 × 300 | m² | 825 |
| 123 | Ceramic wall cladding. tiles of the same pattern in different sizes | m² | 1 000 |
| 124 | Laying the mosaic on the finished surface (price from) | m² | 1 300 |
| 125 | Laying tiles on the wall | m² | 1 500 |
| 126 | Washed down tiles at 45 degrees | n.m | 495 |
| 127 | Installing a ceramic border | n.m | 250 |
| 128 | Installation of decorative corners | r.m | 100 |
| 129 | Decorative stone gluing | m² | 825 |
| 130 | Grouting (mosaic) | m² | 250 |
| 131 | Ceramic grouting. tiles | m² | 180 |
| 132 | Priming of slopes with concrete contact | n.m | 75 |
| 133 | Plastering of slopes | n.m | 540 |
| 134 | Slope priming 3 cycles | n.m | 120 |
| 135 | Slope priming 4 cycles | n.m | 160 |
| 136 | Slope putty | n.m | 300 |
| 137 | Grinding slopes | n.m | 70 |
| 138 | Gluing slopes with fiberglass | n.m | 230 |
| 139 | Finishing slope putty 2 cycles | n.m | 350 |
| 140 | Slope painting (2 layers) | n.m | 260 |
| 141 | Ventilation grille installation | units | 250 |
| 3. Ceilings | |||
| 142 | Removing old wallpaper 1st layer | m² | 90 |
| 143 | Cleaning the ceiling from water paints | m² | 190 |
| 144 | Cleaning the ceiling from non-aqueous paints | m² | 310 |
| 145 | Cleaning the ceiling from putty | m² | 190 |
| 146 | Cleaning the ceiling from foam tiles | m² | 250 |
| 147 | Dismantling the slatted ceiling in the bathroom | m² | 250 |
| 148 | Dismantling of stucco molding and ceiling cornices | n.m | 250 |
| 149 | Dismantling of PVC ceiling cornices | n.m | 150 |
| 150 | Dismantling plaster | m² | 240 |
| 151 | Dismantling the ceiling from gypsum plasterboard in 1 level | m² | 140 |
| 152 | Dismantling the ceiling from gypsum board in 2 levels | m² | 210 |
| 153 | Joining and cracking | n.m | 120 |
| 154 | Ceiling waterproofing device (mastic) | m² | 250 |
| 155 | Plasterboard box device | n.m | 750 |
| 156 | Plasterboard suspended ceiling in one layer | m² | 445 |
| 157 | Arrangement of a suspended ceiling in two layers of plasterboard | m² | 550 |
| 158 | Installation of a multilevel ceiling made of gypsum plasterboard | m² | 660 |
| 159 | Arrangement of 2 levels of the ceiling of a complex geometer shape | m² | 750 |
| 160 | 2-level ceiling device with built-in interior lighting | m² | 825 |
| 161 | The device of the 2 level ceiling is a simple geometer. shape | m² | 660 |
| 162 | Bonding joints with serpyanka | r.m | 45 |
| 163 | Installation of a mirrored false ceiling from 10 m². | m² | 725 |
| 164 | Installation of a slatted ceiling in the bathroom | m² | 880 |
| 165 | Arrangement of a false ceiling of the "Armstrong" type | m² | 250 |
| 166 | Insulation of the ceiling with mineral plates, foam | m² | 200 |
| 167 | Sheathing of the ceiling with clapboard on the frame | m² | 545 |
| 168 | Ceiling cladding with plastic panels on the frame | m² | 460 |
| 169 | Installation of turnkey stretch ceiling (price from) | m² | 650 |
| 170 | Installation of plaster beacons | n.m | 95 |
| 171 | Metal reinforcing mesh device | m² | 110 |
| 172 | Ceiling priming with concrete contact | m² | 75 |
| 173 | Ceiling plastering up to 20 mm | m² | 630 |
| 174 | Ceiling plastering from 20 mm to 50 mm | m² | 670 |
| 175 | Ceiling primer with acrylic primer 3 cycles | m² | 135 |
| 176 | Ceiling primer with acrylic primer 4 cycles | m² | 180 |
| 177 | Installation of painting corners | n.m | 75 |
| 178 | Ceiling putty 1 cycle | m² | 360 |
| 179 | Ceiling putty 2 cycles | m² | 500 |
| 180 | Ceiling grinding 1 cycle | m² | 90 |
| 181 | Ceiling sanding 2 cycles | m² | 180 |
| 182 | Gluing the ceiling with fiberglass | m² | 280 |
| 183 | Ceiling finishing putty 2 cycles | m² | 380 |
| 184 | Putty, grinding curved ceiling elements | n.m | 620 |
| 185 | Fiberglass gluing of curved ceiling elements | n.m | 250 |
| 186 | Ceiling painting (2 layers) | m² | 280 |
| 187 | Gluing the ceiling with vinyl wallpaper without selecting a pattern | m² | 280 |
| 188 | Pasting the ceiling with wallpaper for painting | m² | 300 |
| 189 | Sticking the ceiling with vinyl wallpaper with pattern selection | m² | 360 |
| 190 | Bonding the ceiling with non-woven wallpaper without selecting a pattern | m² | 370 |
| 191 | Ceiling gluing with non-woven wallpaper with pattern selection | m² | 420 |
| 192 | Bonding the ceiling with textile wallpaper | m² | 900 |
| 193 | Installation, pulling and plastering of plaster moldings around the perimeter (price from) | n.m | 500 |
| 194 | Installation, putty of polyurethane foam ceiling cornices | n.m | 290 |
| 195 | Painting of polyurethane foam ceiling cornices 2 cycles | n.m | 100 |
| 4. Electrical work | |||
| 196 | Dismantling electrical wiring | n.m | 40 |
| 197 | Dismantling of spotlights, sockets, switches | units | 60 |
| 198 | Plugs for sockets, switches | units | 170 |
| 199 | Dismantling the chandelier (price from) | units | 150 |
| 200 | Dismantling the power shield | units | 420 |
| 201 | Slitting concrete for electrical wiring 20x40 mm | n.m | 240 |
| 202 | Slitting bricks for electrical wiring 20x40 mm | n.m | 180 |
| 203 | Slitting plaster for electrical wiring 20x40 mm | n.m | 120 |
| 204 | Sealing the strobe | n.m | 170 |
| 205 | Holes in concrete 25 mm | units | 240 |
| 206 | Holes in brick 25 mm | units | 120 |
| 207 | Power cable routing up to 6 mm² | n.m | 90 |
| 208 | Low-voltage cable laying | n.m | 45 |
| 209 | Junction box installation | units | 180 |
| 210 | Installing a transformer (12V) | units | 240 |
| 211 | Installation of trays | n.m | 320 |
| 212 | Installation of an electric box with a cross section up to 50x50 mm | n.m | 100 |
| 213 | Installation of an electric box with a section up to 200x50 mm | n.m | 200 |
| 214 | Installation of an internal flap for 24 modules (concrete) | units | 4 235 |
| 215 | Installation of an internal shield for 24 modules (brick) | units | 3 025 |
| 216 | Installing a low-current shield | units | 1 210 |
| 217 | Assembling the power shield (price from) | units | 5 000 |
| 218 | Installing the outer shield | units | 1 815 |
| 219 | Laying underfloor heating element | m² | 800 |
| 220 | Connection and installation of a rheostat for a warm floor | units | 400 |
| 221 | Installation of socket outlets in concrete | units | 230 |
| 222 | Installation of socket outlets in brick, plaster | units | 180 |
| 223 | Installing an electrical outlet, switch | units | 380 |
| 224 | Ring setting | units | 350 |
| 225 | Installation of video intercom | units | 550 |
| 226 | Connecting an electric heated towel rail | units | 1 870 |
| 227 | Fan connection and installation | units | 485 |
| 228 | Installation of spotlights | units | 370 |
| 229 | Installation of sconces | units | 450 |
| 230 | Ceiling light installation | units | 550 |
| 231 | Installing the hook under the chandelier / lamp | units | 180 |
| 232 | Installation of a chandelier 3-arm diameter up to 50 cm | units | 500 |
| 233 | Chandelier installation 3-arm diameter from 50 cm | units | 700 |
| 234 | Installation of chandelier 5-arm diameter up to 50 cm | units | 650 |
| 235 | Chandelier installation 5-arm diameter from 50 cm | units | 850 |
| 5. Plumbing work | |||
| 236 | Dismantling of PVC pipes | n.m | 130 |
| 237 | Dismantling of cast iron pipes | n.m | 150 |
| 238 | Dismantling water pipes | n.m | 130 |
| 239 | Dismantling the bath | units | 1 700 |
| 240 | Dismantling the kitchen sink | units | 420 |
| 241 | Dismantling the sink | units | 620 |
| 242 | Dismantling the heated towel rail | units | 480 |
| 243 | Dismantling the washing machine | units | 300 |
| 244 | Dismantling "moidodyr" | units | 330 |
| 245 | Dismantling the shower | units | 900 |
| 246 | Dismantling the toilet bowl, bidet | units | 550 |
| 247 | Removing the radiator | units | 330 |
| 248 | Dismantling the mixer | units | 190 |
| 249 | Dismantling the crane, filter, reducer | units | 165 |
| 250 | Slitting bricks for communications 50x70 | n.m | 650 |
| 251 | Slitting concrete for communications 50x70 | n.m | 1 400 |
| 252 | Sealing the strobe | n.m | 170 |
| 253 | PVC sewer pipe laying | n.m | 210 |
| 254 | Laying of metal-plastic pipes with a diameter of up to 32 mm | n.m | 290 |
| 255 | Polypropylene pipe laying | n.m | 230 |
| 256 | Copper pipe laying | n.m | 400 |
| 257 | Brazing copper pipes | pC. | 600 |
| 258 | Installation of copper fittings (angle, tee, cross, coupling, etc.) | pC. | 350 |
| 259 | Installing the comb | units | 960 |
| 260 | Installation of filter, reducer | units | 960 |
| 261 | Installation of bathtubs cast iron / steel / acrylic | units | 2 200 |
| 262 | Installation of a shower cabin with a connection | units | 5 445 |
| 263 | Installation of "moidodyr" | units | 1 650 |
| 264 | Installing a shell, tulip | units | 1 450 |
| 265 | Installing the shower bar | units | 400 |
| 266 | Installation installation | units | 2 420 |
| 267 | Installing a toilet or bidet | units | 2 145 |
| 268 | Installing a heating radiator in a regular place | units | 650 |
| 269 | Installing a new heating radiator | units | 3 000 |
| 270 | Installation of a heating radiator with a tie-in into a riser | units | 5 445 |
| 271 | Installing a heated towel rail | units | 2 500 |
| 272 | Installation of a storage type water heater | units | 2 300 |
| 273 | Installation of a flowing water heater | units | 1 650 |
| 274 | Installing accessories | units | 250 |
| 275 | Washing machine connection | units | 1 400 |
| 276 | Heating pipes painting 2 cycles | n.m | 70 |
| 6. Carpentry work | |||
| 277 | Dismantling the door leaf | units | 100 |
| 278 | Dismantling the door block | units | 275 |
| 279 | Installation of a swing door block | units | 1 900 |
| 280 | Installation of a swing door with hinges inset, locks with door frame installation, with platbands and extensions | set | 3 000 |
| 281 | Installation of platbands | set | 990 |
| 282 | Installation of extensions | set | 1 100 |
| 283 | Installation of a sliding door block | units | 2 100 |
| 284 | Installation of a double-leaf sliding door block | units | 2 700 |
| 285 | Installation of a double swing door | units | 2 200 |
| 286 | Insert door hinges, locks with handles | set | 600 |
| 287 | Painting windows | m² | 360 |
| 288 | Door painting | m² | 420 |
| 7. Transport costs | |||
| 289 | Removal of construction waste bags | units | 80 |
| 290 | Removal of bags of construction waste (floors without an elevator) | units floor | 40 |
| 291 | Skidding of building materials | t | 1 500 |
| 292 | Skidding of building materials (floors without an elevator) | t floor | 750 |
| 293 | Removal of construction waste in 8m3 containers (with a container weight of up to 5 tons) | cont. | 6 000 |
| 294 | Removal of construction waste in 20m3 containers (with a container weight of up to 15 tons) | cont. | 14 000 |
| 295 | Removal of construction waste in 27m3 containers (with a container weight of up to 26 tons) | cont. | 18 000 |
| 296 | Removal of construction waste in 32m3 containers (with a container weight of up to 26 tons) | cont. | 20 000 |
| 297 | Delivery of building materials | t | 1 700 |