Seal on plastic windows serves for many years. Does it need care? How to lubricate it? And is it necessary to change the seal for plastic windows at all? Where to buy it and how much does it cost? Read on for more details.
Why change the seal on plastic windows?
First, let's talk about how people come to the idea of \u200b\u200breplacing a window seal.
First. Begins to blow somewhere. A person turns to the Internet and, oh my God, finds a solution - to change the seal.
Second. Clients call a repairman for plastic windows, and he, instead of the simplest one, begins to breed to replace fittings and a seal.
Third. Recently, many small window repair firms have sprung up, the managers of which call people and offer their services. Moreover, the call of the master is free. As a result, we get the following. The master, having examined the windows, comes to the conclusion that the replacement of the seal is required, motivating this replacement by the fact that the new seal is better than the old one.
So, I believe that the replacement of the seal on plastic windows should be done in extreme cases. Typically, blowing problems are resolved through other actions. Well, however, this is the client's business. If there is a comprehensive repair of the window with the replacement of the glass unit and fittings, with adjustment, with the replacement of the assembly seam, with the alteration of the slopes, then it makes sense to replace the sealant.
Maintenance of the sealant on plastic windows
What can happen to a seal over time?
It can shrink, shrink and take a flattened shape. All this happens due to improper care or, more precisely, due to lack of care for the seal on plastic windows. Therefore, it is customary to lubricate the seal twice a year with either silicone grease or a pencil grease from a special set for the care of plastic windows. There, by the way, also includes lubricant for fittings and white milk for rubbing scratches.

Silicone grease is sold in automotive products, and a care kit can be purchased where accessories for plastic windows are. More details
Replacing the seal on plastic windows
If you nevertheless decide to replace the seal, this can be done in two ways:
- On my own
- Through
When replacing yourself, you need to know some important points.
The seal can be changed both on the sash and on the frame. For convenience, it is better to remove the sash by pulling the pin out of the upper hinge. But you can not shoot. When removing the old seal, remember how it stood.

When inserting a new seal, you need to make sure that it is not stretched, but rather compressed a little. This moment is especially important in the corners.

Also in the corners, it is better to glue the seal onto the super-glue to the plastic. The ends of the seal are also glued together. Do not lubricate the new seal. It's already greased.
On the sash, to get the seal under the upper hinge, this hinge must be removed.
How much does a seal for plastic windows cost and where to buy it?
It is known that there are several types of seals. They differ in shape depending on the PVC profile. Therefore, before looking for the required seal, you need to know the name of your window profile. It must be said that there are universal seals that fit most popular profiles.
Also, the seal is different in color. It is usually black. But, recently, gray color is gaining popularity. But, it is more expensive.
Where to buy a seal for plastic windows? The easiest way to buy is to contact the same company where the windows were purchased or any window company. But, in window companies, the seal will be more expensive than in online stores, but they will cut off as many meters as you need.
Therefore, you can search the Internet. Here are a few stores:
- inookno.ru
The cost of a sealant for plastic windows is about 20 rubles per square meter. And finally, the video, though not very good quality. But, the person in this video knows what he is talking about. See for yourself.
Good day, everyone! I have a childhood friend with whom we played the ball in the yard. We still communicate.
He works as a consultant at a construction mall and often tells funny stories about shoppers.
One of the hot topics is the purchase of window seals. Usually people, coming for them, first of all focus on color.
Although the quality of seals for plastic windows varies greatly, which causes bewilderment for my friend.
Replacing the seal on plastic windows is not difficult at all and every owner can do it.
But before proceeding directly to the installation, you need to choose the seal itself, and after installation it is necessary to take care of it periodically. If done correctly, your seal will not need to be replaced for a long time.
The seal is an elastic rubber tube that runs along the entire perimeter of the window profile. It serves for better fit of the sash to the profile, prevents the penetration of cold air into the room.
When the seal is deformed, the heat-shielding properties of the window are reduced, and condensation may appear on the glass.
The seal can be of three types: EPDM, TPE and VMQ. These markings are used for the international designation of the seal material. How to understand that it is necessary to replace the gasket (rubber band) on the windows? The seals should be changed at least once every 5-7 years.
You can find out that they need replacement by the following signs:
- Obvious damage is visible.
- Drafts appeared in the apartment.
- Street noise has become much more noticeable.
- Condensation on glass.
- The joints between the window and the window opening began to freeze.
How to choose a seal?
As already mentioned, window seals can be of three types: EPDM, TPE and VMQ. TPE gaskets are not resistant to severe frost, and VMQ is too expensive, therefore EPDM-marked gaskets are most often used.
It is resistant to strong temperature changes, retains its elasticity after long-term use, and is not affected by most types of alkalis and acids.
In order to speed up the process of replacing the window seal, many purchase a product with an adhesive side.
By the principle of its action, such a sealant resembles an ordinary scotch tape. It is used only for additional sealing of the joint between the window opening and the profile and is not suitable for sealing the sash.
The standard seal consists only of rubber and completely follows the shape of the grooves (grooves for the seal around the profile perimeter). In order to choose a high-quality sealant, you need to adhere to the following rules:
- Choose a seal from the brand recommended by the window manufacturers themselves.
- Buy the product in large hardware stores, not in the markets.
- Check the seal for elasticity before purchasing.
Note!
A quality seal should be soft, bend at any angle and at the same time not lose its shape.
The main stages of replacement:
- Removing the old seal: To remove the old seal, just take it in the middle and pull. The seal is most often inserted into the groove without glue, so it will not be difficult to remove it.
- Surface treatment. Processing the profile and grooves The entire profile and especially the groove is washed with soapy water and then wiped with alcohol or any other degreasing liquid. This is necessary in order to completely remove all possible contamination.
- Bonding corners. If you are using an adhesive strip seal, this step is optional. In the case of a conventional seal, this measure is necessary for a strong attachment to the profile. Construction, PVA or silicone glue is applied to the corners of the profile, while it dries up, you can start preparing the seal itself.
- Measurement of the seal. If you are using a TPE and VMQ seal, you will have to cut several cuts for each side. The EPDM seal can be bent at the corners of the profile without the fear of losing its properties, so you only need one strip.
- Installation of the seal itself. Then the seal is inserted into the grooves. This can be done by hand, but much faster if you use special tools. Installation of the seal in the grooves At this stage, the replacement of the seal (rubber band) in plastic windows is completed.
How to care for the seal?
Improper care and operation reduces the service life of the seal and the window itself several times. In order to avoid this, you need to adhere to the following recommendations:
- Periodically wash the profile and the seal with a non-abrasive detergent (no hard particles).
- Do not allow alcohol, paints and varnishes, acids and alkalis to come into contact with the seal.
- Monitor the humidity in the room and near the window itself, to prevent freezing.
- Periodically treat the seal with protective agents (you can read more about this in the article "How to lubricate the seal of a plastic window").
source: http://osteklenie.tv
The main role in the sound and heat insulation of plastic windows belongs to the seals, which run along the entire perimeter of the window.
Even with proper care, sealing rubber can dry out and crack, as its service life is usually 3-4 years. Replacing the seal allows you to solve the problem of sound and heat insulation.
When is it necessary to replace the seal?
Owners of plastic windows often forget about preventive maintenance of window structures, which leads to a decrease in their performance.
Replacing the seals helps to solve problems such as:
Condensation
Sometimes condensation on windows is associated with a poorly closed window.
The seal wears out over time, the sash does not fit tightly to the window, as a result of which the temperature of the inner glass is lower than it should be, which leads to the formation of condensation in a limited area.
Freezing
During severe frosts, plastic windows can freeze, ice forms on the inner surface of the PVC profile. The problem can be caused by partial or complete wear of the sealing rubber. Replacing the seal allows you to get rid of window freezing.
Blowing
Draft walking around the room can often be caused by the fact that the window is not closed tightly, and this, in turn, is a consequence of the deterioration of the seal. By replacing the sealing rubber, you will restore the windows to their original thermal insulation properties.
How much does a seal replacement cost?
It is difficult to answer this question unequivocally. The fact is that many factors affect the cost of replacement. Window construction and perimeter, type of sealing rubber, etc.
At the same time, we can say for sure that replacing the seals of plastic windows will not cause serious damage to your wallet. By contacting the company's specialists, you can easily, simply and inexpensively return the original performance characteristics to your windows.
Self-replacement of the seal - is it possible?
It is quite difficult to replace the seal on the plastic window yourself. It is not only necessary to have special skills, but also to understand the types of sealing rubber.
The fact is that currently there are many types of seals on the market, each of which is intended for a particular window system, so the choice of rubber can be problematic for an unprepared person.
Replacing the seal directly is also a rather difficult process for a layman.
If you do not have special knowledge and skills, we recommend that you contact a service center specialist who will not only quickly and efficiently perform the work, but also provide a guarantee for it.
Otherwise, you risk damaging a glass unit or a plastic profile, and their repair will be much more expensive. You can order the production and installation of plastic windows of any design, as well as all types of repair work.
Replacing the seal, adjusting the window, repairing fittings, and many other types of work are carried out within one day. A specialist will arrive at your place at a convenient time for you and will restore your plastic window as soon as possible.
source: http://www.help-okno.ru/
Reasons for replacing seals
Technical rubber, from which gum for plastic windows is produced, is designed for 10 annual cycles. But in fact, they serve less due to incorrect adjustment of the window frame clamping device.
- Natural aging under the influence of temperature fluctuations and sunlight;
- Low quality initial installation;
- Deformation as a result of a rubber band falling out of a special groove;
- Poor processing of window corners;
- Hardening of poor quality technical rubber.
Helpful advice!
At least once a year, usually after winter, it is necessary to wipe technical rubber with a special solution.
Replacement of seals on plastic windows:
- Purchase of the exact brand of sealant that fits the profile of a particular window;
- Practice on the old seal;
- You need to start inserting the seal from the side of the window that is on the curtains;
- The "beginning" is best glued to the plastic;
- Insulation is inserted without tension, only a slight tension is given at the corner, so that the rubber does not "jam" during the opening-closing process;
- The "end" of the seal fits tightly to the "beginning" and is also glued.
source: http://plswindow.ru

To determine the condition of the sealing rubber of your window, you can either call a specialist or assess its condition yourself.
To do this, you just need to visually inspect the seal around the perimeter of the entire window.
If you notice that in some places it has become dry), strongly deformed and cracked, then most likely your window needs replacement of the sealing rubber.
In order to avoid such defects in the window seal in the future and significantly delay its replacement, it is recommended to follow several rules when operating a window:
- try to avoid heavy contamination of the sealing rubber;
- periodically (preferably 2 times a year) clean and lubricate it;
- do not wipe the window seal with liquids containing alcohol or acetone (most often this mistake is made when window glass is wiped with such liquids).
Cleaning the window seal
The degree of contamination should be checked both on the surface and inside (between the petals). The inner cavity of the window seal must also be cleaned of dirt and then lubricated. Follow these simple rules and your windows will serve you much longer!
Why is it better to entrust the replacement of a window seal to specialists. If you do not have experience in replacing the window seal and do not have special tools required for this procedure, then we strongly do not recommend trying to do it yourself!
And that's why:
First of all, for a window, you need to be able to choose a similar seal, and then also find it (which is not so easy to do due to the fact that sealing rubber for windows is almost never sold at retail).
Secondly, when removing the old sealing rubber and replacing it with a new one, you will need to disassemble the window (remove the sashes and unscrew some parts of the fittings).
Thirdlyif you don't have a special tool at hand, you risk losing not only a lot of time and energy, but also damage the window.
Types of window seals
The main materials from which the window seal is made:
- Synthetic rubber (EPDM). the most common material for seals. It is a porous rubber with high elasticity and mechanical "memory". Withstands temperature drops from -50º to + 100ºC.
Thermoplastic elastomer (TPE). - Silicone rubber. Seals made from this material are softer and have the longest service life. Working temperature from -60º to + 150ºC.
- Vinyl-polyurethane. It is an open cell material. Vinyl-polyurethane insulation very well protects window blocks from dust and dirt, but they do not last long.
source: http://www.helpwindows.ru/
From the life of sealing gum
Plastic windows are a single mechanism, all the details of which are important and carry their functional load. Window seals are used to seal the sash, protect the house from noise, moisture and cold air. Old, cracked gum can cause blowing.
Note!
Regardless of the quality of the window profile and the fitted window fittings, poor quality or deteriorated from time to time, the window seal can negate all efforts to adjust the window for blowing.
The photo taken with an infrared camera shows that the coldest places of the window are the corners of the sashes. In this case, “bumps” appeared in the places where the seal was folded - the consequences of the stretched sealing gum.
First of all, the external window seal fails, as it is subject to external atmospheric influences. But there are exceptions, for example - repairs were made in the room.
Construction dust, all kinds of paint vapors, varnish, solvents, etc., lead to the drying out of the seal and the loss of its elasticity, which, in turn, leads to the loss of the tightness of the window.
However, both sealing circuits (frame and sash) must be changed. If you replace only the outer contour of the seal, the pressure of the inner one will be significantly weakened.
The need to replace the seal can be caused by the following factors:
- poor quality factory installation of the window seal;
- untreated seat for the seal in the turning points (in the corners);
- the laying roller, stretching the window seal, sometimes leads to the formation of "bumps" at the turning points
- window seal;
- lack of proper care;
- deformation of window hinges;
- a cheap analogue of a rubber band (in this case, problems will arise after 5 years of operation).
Large volumes of work, initially low quality of windows and repair and finishing work in the room - all this leads to the fact that sometimes at the time of transfer of the apartment by the developer, the replacement of the window seal is already required.
An experienced foreman of our organization will replace the plastic window seal by hand, without stretching the elastic, having pre-processed the seats, which eliminates the formation of "bumps" on the window seal.
How to understand that the window seal has become unusable?
A suitable seal is rich in color, soft and flexible. If you see that the gum has dried out, cracked or "bumps" have appeared on the corners - it's time to replace the seal.
A modern seal for plastic windows made of EPDM synthetic rubber is designed for 9-11 years of operation. However, this figure is given taking into account the correct factory installation, average load and timely maintenance.
Therefore, twice a year, the surface of the window seal should be wiped with a damp cloth and treated with silicone grease, which forms a highly elastic film on elastomers (APKT, EPDM) and is water-repellent.
With regular maintenance, the replacement of the plastic window seal can be delayed by 5-6 years. In addition to the service of replacing the seal, you can order from us a set for the care of windows made of solid white PVC, which includes a lubricant.
Myths about seals
- Life time. The life span of the sealing gum varies from 1 to 25 years. The manufacturer claims 10 years of operation. Such a golden mean.
- Thicker. Some window repair companies advise replacing the plastic window seal with a thicker one, supposedly the pressure will increase and the blowing will disappear. In fact, the thickened sealing contour will only aggravate the situation, increasing the load on the hinge group and the locking window fittings.
- Universal seal. There is no universal seal for plastic windows. The gap for sealing in PVC windows varies from 2 to 7 mm.
- Self-replacement of the seal. Like, for what money, five minutes of work, etc. To replace the sealant for plastic windows, you need: materials, tools, skill and free time.
For example, in order to remove the sash, you will need a special key, and the elastic band is sold in buffers from 300 to 500 meters. In addition, the seller will try to sell you a Polish or Russian seal, the quality of which, to put it mildly, leaves much to be desired.
source: http://remokdok.ru/
Replacing the seal on the windows
The rapid and widespread distribution of plastic windows in our country is understandable. They provide excellent thermal insulation, are very easy to maintain, and have a long service life. After heavy wooden frames, washing a plastic window is a pleasure.
In winter, the flaps fit very tightly to the frame; they do not need to be insulated. However, this miracle of modern life also needs care. Plastic windows need not only be washed, like all other windows. It is necessary to monitor both the condition of the fittings and the rubber seal.
Helpful advice!
To prevent the sealant from drying out and cracking (namely, it is responsible for the tightness of the window), it must be cleaned of dust and dirt and lubricated twice a year with silicone grease. If you do not, then sooner or later you will have to replace the seal on the windows.
Do-it-yourself window repair is quite simple. To replace the seal on the windows, you only need the simplest tool, which is in every apartment.

You will need:
- rubber compressor
- scissors
We purchased the gasket at a factory where plastic windows are produced. The glue needs to be quick-drying. You can buy silicone grease at auto parts stores.
Seal replacement technology
- We calculate the required amount of sealant. To do this, take into account that there are two sealing contours on the window: external (on the frame) and internal (on the sash).
- We measure both circuits and calculate the required amount. We purchase the required number of running meters of the sealant.
- Further, the actual work. We open the window, remove the old seal.
- Carefully wipe off dirt and dust, let dry.
- Insert the rubber into the groove for the seal and press it a little.
- Please note that you need to insert the seal from the top, from its middle.
- The seal fits easily, with little or no effort. Difficulties can arise in the corners - you need to carefully make a turn, and in the place where the upper hinge is attached to the sash.
- It is not necessary to tighten the seal, just insert it carefully.
- When the whole circle is completely passed, the seal is cut off with scissors, and the joints are glued together. We glued with instant superglue.
The replacement of the seal is complete. It makes sense to do this in late summer - early autumn, before we close the windows for the winter. In the spring, you will need to lubricate the seal with silicone grease, repeat the procedure in the fall.
Many people think that the seal does not need to be changed, and if necessary, then only with a major replacement of the entire window. This is not true. When it comes to replacing the seal, it is important to understand that you can do it yourself or with the help of a master.
Plastic windows are at the peak of their popularity. They help to create comfortable living conditions, serve for more than a dozen years and are affordable. However, sooner or later, even the most durable structures and parts fall into disrepair. Most often, problems arise precisely with seals - sealing elements necessary for reliable isolation of a room from the street.
Reasons for replacing seals
The seal is a long cord made of rubber or other material. The section depends on the profile of the structure and can be shaped or pipe section.
The seals should be changed if:
- In cold months, the windows begin to freeze and frost and condensation appear on the inner surface of the glass.
- In the summer, you regularly have to wipe dust from the windowsill, while the window may not open at all.
- Drafts are clearly felt.
- Street noise when the window is closed increases from year to year.
- Traces of damage are clearly visible on the seal: cuts, tears. It gradually flattens and loses its shape. The pads are very dry, crack when stretched, and may show traces of mold or mildew.
REFERENCE! It also happens that the matter is in the lost setting, and not in the seal. Examine the windows carefully: if the inserts look intact, try adjusting the plastic window. Remember that the adjustment must be done 2 times a year (for the winter and for the summer). If this does not help, lubricate the seals with silicone-based grease. This will help to hide inconspicuous cracks and protect the gasket from the effects of low temperatures and moisture (albeit for a short time). Putty can only be applied from the sides of the room and only at positive temperatures. Use a piece of cotton cloth or rags while working.
IMPORTANT! Window grease must be free of chemical solvents and alkalis. One of the most popular is "silicone grease" from a car store.
How to check tightness of closing
If the sealing is no longer good enough, you can feel the draft just by standing next to it. Or do the following:
- Light a candle and run it along the doors. If the light fluctuates from side to side, then the tightness is broken.
- Put a piece of paper in the open window, then close the window and try to pull it out. If the system is functioning properly, you won't be able to pull the paper out. If the sheet pulls out easily, consider replacing the seal.
Types of window seals
Seals differ not only in materials, but also in appearance. It will be ideal if you purchase exactly the same cord as originally. The gaskets of different companies, although they are similar at first glance, differ significantly, and the choice of an unsuitable option does not guarantee that the window will have the required degree of tightness.
A gasket that is too thick will increase the load on the hinge group and the locking fittings, will deform, which will shorten the service life, and too thin will not fit as necessary. Take the worn-out part with you to the store - this way you eliminate a mistake when choosing.
Read also: What is needed for the ebb of a concrete window sill
REFERENCE! It is not difficult to purchase a high-quality sealant if a profile from well-known manufacturers is installed in your home. But, since many little-known companies copy their products, many elements can be used in both the first and second cases. For example, elements of such brands as Novotex, Proplex, Vitrage can be used in the structures of KBE manufacturers, the REHAU gasket is perfectly used in the modifications from Brusbox and Montblank.
Rubber types

Products made from synthetic rubber are quite effective and are purchased more often than others. They tolerate both low and high temperature conditions at the proper level, are elastic and can withstand deformation for a long time without compromising their performance characteristics. With good care, rubber seals last 20-30 years. Affordable and safe for human health.
Various additives are added to products of this type to improve quality characteristics. For example, rubber based on copolymers (which contains diene, propylene, ethylene, catalysts) withstands aggressive chemical compounds, oils, water and ultraviolet radiation, a wide temperature range (from -50 to +140 degrees). It has a high strength threshold and is not damaged when stretched by 300% or more. Products based on organic peroxides are becoming more widespread.
IMPORTANT! You should not buy samples with the addition of sulfur - they are not so durable and, over time, leave ugly brown marks on the white surface of window frames.
Silicone varieties
Silicone seals are the most expensive of all existing types, but also the most durable. With proper use and careful handling, they can last 40 years or more. The advantages of silicone: high elasticity (even at -60), withstand the aggressive effects of chemical compounds and the environment, not afraid of ozone radiation. But the resistance to mechanical damage is small, they can easily break during installation.
Polymer EPDM types
In the production of these seals, organic peroxides act as a vulcanizing agent. The warranty period given by the manufacturer is 20 years. It can withstand both very high and low temperatures, is resistant to sudden changes, and is not afraid of ultraviolet radiation and direct sunlight. But such gaskets have a strong unpleasant odor, and during installation it is allowed to use only glue, and welding is prohibited. And the financial side has a "minus": colored seals are two to three times more expensive than black ones.
Thermoplastic elastomers (tep) varieties
Thermoplastic elastomer is most often found in finished insulating glass units. Previously, this PVC was used only in regions with a mild climate, since it could not withstand low temperatures and piercing winds in more severe places.
Now on the market there are new modifications with rubber and polyethylene, which are more resistant to negative temperatures and have improved operational characteristics: they can be installed in rooms with an increased risk of fire, they are safe for people and are much cheaper than EPDM.
Read also: Adjustment of plastic windows for winter and summer
In addition, a large selection of colors allows you to choose the material for any color combination. During installation, the seal can be welded or glued to your choice.
Disadvantages: easily deformed and quickly breaks down with frequent mechanical stress; the level of elasticity is low; softens under the influence of high temperatures.
PVC and foam types

Foam rubber is lightweight and has excellent thermal insulation properties, but you should not count on strength here: such a seal will last no more than 3 years. PVC can only be used in rooms with good heating.
REFERENCE! Seals from the following companies have gained particular popularity: Rehau, Veka, KBE, Schlegel (foreign) and SibrTech, Gasket LLC, Obninskgazpolimer (domestic). The quality of the products of these manufacturers is at a high level, they have quite positive reviews, and Russian seals are not inferior to foreign ones.
Seal replacement technology
Preparatory work
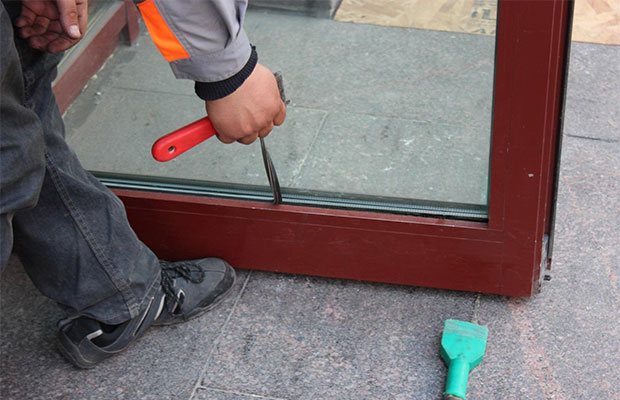
The first step is to remove the old seal and clean the grooves. Dismantling is very simple: lock the window, remove the protective covers from the hinges with a chisel, knock out the pin from the upper canopy with a hammer. Then, holding the sash, open the window and remove the sash from the frame. Remove the old seal, and clean the grooves of dirt and dust with a cotton swab soaked in soapy water and wipe with a degreasing agent (for example, alcohol). The last stage of the preparatory work is wiping dry.
The seal is easy to remove using a narrow construction trowel - just gently pry the cord around the edges. Prepare a cotton rag or small soft sponge to remove dust. It does not hurt to take a picture of the frame - you can check with it during work.
Installation of the seal
Replacing the seal
The installation steps depend on the type of rubber bands fastening.
If the master uses a self-adhesive sealant, he does not need to select an additional fixing compound. The protective strip is removed from the new cord, the window sash is laid horizontally and the seal is inserted into the groove. Installation is done with a protrusion in a groove passing along the perimeter of the frame and window sash. The cord must be pressed and held for a few seconds. Then put the sash in place.
Installing a conventional seal requires a little more effort.
- Pour special glue into the prepared groove. It can be difficult for a beginner to choose a fastener. Therefore, consult with the seller about the composition required for this or that material. Most often, craftsmen give preference to superglue "88" and "Cyanoplast", but you can choose other brands of silicone or construction glue. The main thing is that they do not harm the frame and the seal, and have good resistance to moisture. A little more is poured into the corners of the glue than around the entire perimeter - if a gap remains at the junction, it will gradually increase and the sealing will be broken.
- Insert the seal. It cannot be inserted in pieces - only with a continuous line. Without practical skills, this is not easy to do the first time, so take your time and make sure that the cord lies evenly around the entire perimeter. With EPDM gaskets, this is easy to do - when bent, it does not lose its properties and does not deform. With the rest, you need to be careful not to stretch or squeeze too much.
- Cut off the ends with scissors and secure the joint with glue.
- Replace the sash and check its functionality.
If your plastic, aluminum or wooden windows are more than ten years old, then your diagnosis "change the rubber bands on the windows" is very useful. It is commendable that you yourself have determined that it is time to "change the rubber bands on the windows." After all, you typed in the search engine to "change the rubber bands on the windows" and now you are reading this unique article. And now I will tell you what will happen if you do not change the tires on the windows in time.
First of all , these are drafts. Vile drafts! Sometimes just evil is not enough for them ... Only you will heal, get rid of a cold, as again - “FUCKED!” Half-trouble if adults are sick. But when little children get sick, we are doubly sick as adults!
"It's always cold at home in winter." "At night you wake up from the cold ...", "During the day you walk around the apartment almost in felt boots ..." These are just a few complaints from my clients.
I talk about this problem in more detail in my video, and if YOU REALLY want to have windproof windows,
Then take five minutes of your time. You will not regret!
Secondly ... If the rubber seal is bad, then the audibility of street noise is simply terrifying. HEARD - EVERYTHING! As if the window was ajar. The rumble of the street does not allow us to fully rest. At night, some loud sounds constantly wake up.
Thirdly ... Due to poor tightness, all the filth from the street flies indoors. Black dust, or rather soot, accumulates on the windowsill, inside the profile, and that's just what is visible. We breathe the rest of the invisible dust and exhaust gases. not noticing it ...
Now tell me : "What the hell do you need plastic windows that don't save us from all this nightmare?" Sorry for being rude,
But it's true! There is NO sense in such windows!
But then another question arises: "What to do? Is it possible to change plastic windows every ten years?"
ANSWER: You don't need to change windows - IT IS NECESSARY TO CHANGE THE RUBBER ON THE WINDOWS, AND EVERYTHING!
Sealing rubber is the only weak link in all PVC windows. It is recommended to change it every 5-7 years. Everything else is in plastic windows: fittings, double-glazed windows, the profile itself will serve for decades!
The only condition is to install a really QUALITY rubber seal. So that in a couple of winters you do not have to tape your plastic windows with tape again and put old blankets back in.
Do not think that "An elastic band is also an elastic band in Africa!"
Do you want to see what is the difference between normal rubber and worthless.
I have been dealing with blowing problem for twenty one years. And take my word for it, I had time to choose the best of the best.
In my work, I use a German-made rubber seal that has been tested in practice in our
Climate. This is evidenced only by the positive feedback from my grateful clients. Because the problem is guaranteed to be solved: THE BLOWING STOPS and GETS QUIET! And, by the way, I give a guarantee for my work for THREE YEARS!
Now how much does it cost to "change the rubber band on the windows":
150 rubles / rm cost of sealing rubber + 800 rubles. work to replace it. Both contours of the rubber seal are changed. A standard sash with work is about 1900 rubles.
Attention! This work includes free of charge maintenance of fittings: cleaning, lubrication, adjustment. I dare say that this service separately costs at least 600 rubles. That is, your benefit will already be 600 rubles + the sash works like new!
Sooner or later, the seals installed on a plastic window by its manufacturer become unusable, which inevitably leads to the fact that the glazing loses one of its main advantages - high tightness. There is only one way out in this case - to replace the worn-out sealing inserts. Do not put, in fact, a new window. It is better to entrust this work to specialists, or you can try to do it yourself - if you do everything carefully, without haste and in strict accordance with the instructions, then it should turn out no worse than that of a hired pro.
Signs indicating the need to replace the insert
The tightness of the shutters in the closed position and the glass unit of the plastic window depends on the seals.
Signs indicating that the gaskets have ceased to perform this function or are simply worn out, and it is time to change them, are the following points:
- in winter the window freezes - frost appears on the inside of the glass;
- in summer, dust regularly settles on the windowsill of a permanently closed window;
- in winter, with a temperature comparable to last year's outdoor temperature and heating parameters, the room is much cooler;
- increasing the degree of audibility of street noise;
- more frequent indoor drafts, especially in winter;
- obvious damage to the seal: cuts, tears, clearly visible cracks, falling out or squeezing out of the grooves;
- the appearance of mold or mildew on any parts of the window;
- excessive dryness of the gaskets and the appearance of microcracks on them, noticeable with a slight stretching of the rubber.
Alternative ways to solve the problem - is it the seal?
Before changing the sealing inserts, you need to make sure that it really is in them. First, we carefully examine them. If there are no obvious signs of damage to the seal, and outwardly it looks completely intact, even no cracks are visible, then it is necessary. Often, the reason for the broken sealing of PVC glazing is precisely in the lost setting. So, for example, it is necessary and back - for the summer.

If the adjustment does not help, then you can try to lubricate the seals with silicone grease. This measure will eliminate microcracks on the sealing insert, if they have formed. It is possible that after this the tightness of the window will be restored for some time. In addition, silicone grease protects the gasket from premature drying and exposure to low temperatures and moisture, thereby significantly extending its life. However, it must be applied at positive temperatures, that is, in winter - only from the side of the room. Application method - using any ordinary rags or cloth.
Where to start - the rules for the selection of material
If you cannot do without replacing the seals, then first you should, if possible, find out on which part of the window you need to change them. You can, of course, just change everything all at once. But it may happen that some gaskets do not need this yet and would have served for a long time. As a result, the "extra" work will be done and money that could have been saved will be spent. The most frequent and fastest wear is the sealing inserts on the frame. The second on the list of "weak points" are the gaskets on the window sashes. The inserts between the glass unit and the frame beads usually last the longest.
To replace the seals on plastic windows as smoothly as possible, we recommend that you carefully do all the steps suggested below with your own hands. Before starting work, you need to take a close-up photo of several places in the part of the window on which the gasket is located, which needs to be replaced. This is necessary so that when installing a new material, you can, referring to the photo, correctly put it in place. This can be especially useful when laying the insert in the corners.

Then you need to purchase the required seal. Not just suitable, but preferably exactly the same as standing . Different manufacturers have different profiles for the gaskets. And the use of a product of a different shape may make it impossible to install it correctly and does not guarantee the proper degree of tightness of the window.
The thickness of the material is also important. If you take a gasket thinner than it was, then it will not be tight enough either. And a thicker product will be subject to deformation, which will significantly reduce its service life. In addition, such a gasket will exert additional stress on the hinges and locking fittings or glazing beads and a glass unit, which ultimately will not have the best effect on its durability.
Therefore, we recommend that you remove your worn seal and take it with you to the store. When you have a sample of your sealant with you, an error with the choice of material is excluded. It is necessary to purchase a gasket with only one whole segment. Split inserts of 2 or more pieces will not provide proper tightness. And at the same time, along with the material, you must purchase a special glue.
Replacing the frame seal is the most frequent and easy job
The old sealing insert must be removed first. Usually, it is enough to simply pull the gasket, grasping its protruding part with your fingers. If it doesn't work, you need to pry the gasket with something thin and sharp. After that, the seal can be easily removed. Then carefully remove dirt and dust from the groove and adjacent surfaces. If a damp cloth was used, then we also dry it.
We start laying the new rubber insert from one of the corners of the groove. We bring a new seal to it, and then insert it, pressing it with our fingers. It will take some effort, which, with the correct selection of material, will not be extra large. And then we continue to lay the elastic band, pressing down with our fingers, along the entire perimeter of the groove. At the same time, she should lie down in her place in a free, not tense state. Do not pull or squeeze it.
The hardest part is in the corners. Here you will need to especially try, since laying the gasket evenly so that it does not stretch or wrinkle will be difficult, especially if there is no experience in replacing the seals. It is allowed, if it is not possible to fit the insert well at the corners, grease the groove on them with glue in order to properly fix the new material. The place where the glue is applied must first be degreased.
When the gasket is laid around the entire perimeter, it must be cut as close as possible to the beginning of the installation so that the gap at the joint is minimal. Cut with sharp scissors or a knife. Then we set the cut end of the sealant into the groove, and glue the joint with good special glue (the brand depends on the material from which the insert is made). As soon as the adhesive sets, you must immediately check that the new insert is correctly installed. The assessment is made according to the following criteria:
- whether the sash opens and closes easily;
- whether the replacement gave an effect - the drafts disappeared or not;
- whether the gasket remains in the groove when opening and closing the sash.
If the answer is yes to all points, then everything worked out. Then immediately it is necessary to treat the insert with silicone grease applied to the fabric. This will improve the performance of the new seal and extend its life.
What to do with rubber bands on window sashes
If it is necessary to change the external seal, then the sash can be left on. But it won't be very convenient to work. Replacement is carried out in the same way as described above for the frame inserts. When you need to change the inner gasket - the one that goes under the hinges, the sash will have to be removed. This part of the work is best done with an assistant who will insure. After all, the sash has a solid weight, and much more than it seems. This is done like this:
- 1. Remove the decorative caps from the hinges. To do this, the upper ones need to be pushed or pulled up, and the lower ones - down. Sometimes it happens - that for yourself.
- 2. With our left hand we grasp the bottom of the sash and prepare with this hand to securely hold the released sash, since almost the entire mass of the latter will fall on it.
- 3. Take out the metal rod from the upper hinge (it protrudes a few millimeters at the top). To do this, take a flat screwdriver (not a Phillips screwdriver) and press it on top of the pin. It should protrude a few millimeters below. We insert a screwdriver into the formed gap and squeeze the bar even lower with it. Then we grab it with our fingers (pliers) and, twisting, pull it down. We pull only to the stop (resistance will be felt). You do not need to pull out completely.
- 4. Remove the sash from the lower hinge rod. To do this, we take with our right hand the upper corner of the window sash, then with the left, which should be at the bottom, raise it a little, while simultaneously feeding it slightly towards ourselves.

Now we change the inner seal in the same way as described in the previous chapter for the frame inserts. Before installing the sash in place, clean the lower hinge rod from dirt and old grease, and then lubricate. We put the sash in the reverse order of removal:
- 1. We put on the lower loop rod.
- 2. We set it vertically, at the same time aligning the parts of the upper hinge installed on the sash and frame.
- 3. Using your finger or a screwdriver, press down on the pin of the upper hinge until it comes out from above.
The most difficult operation is working with seals of a double-glazed window
It is better to entrust this work to specialists, since at its final stage (when installing the internal gasket and glazing beads in place), serious difficulties may arise. And the replacement process itself is as follows.
Close the sash tightly, and then remove the glass unit. This is done in the same way as when performing. It is held in place by thin plastic strips (glazing beads) installed on the inside of the window. That is, from the side of the room. To remove the glass unit, the glazing beads must be removed. There are 4 of them on each sash - 2 short horizontal and 2 long vertical. We start with the latter. To dismantle the glazing beads, you need to take a spatula with rounded corners or an old blunt knife with a thick blade. Another similar tool will do. Dismantle long vertical glazing beads as follows:
- 1. Carefully insert the tool at an angle into the gap between the sash frame and glazing bead.
- 2. Turning (shaking) the blade slightly to the left and to the right, disconnect the glazing bead in this place from the frame. It is fixed with its latch in the groove of the sash and, when pressed from it, is quite easily separated from the frame.
- 3. We draw the tool inside the slot up and down, separating the bar at its greater length.
- 4. We take the glazing bead with our hand and separate it from the frame. It should come off easily.
In the same way, we dismantle the horizontal strips, but first the lower one to prevent the glass unit from falling out. And, of course, in the third paragraph of the above instructions, we draw the tool inside the slot from right to left. Removing the upper glazing bead last, be sure to lightly hold the glass unit with your hand. We take into account that he has a solid mass. Then, pulling a little on the upper part of the glass unit towards ourselves, we remove it from the frame.
Then we change the external seal (from the street side) in the same way as described in the 4th chapter for the frame inserts. We remove the inner gaskets from the glazing beads. Then we cut the new material at an angle of 45 ° according to the size of the glazing beads, and then install them on them - on each separately. After that, we proceed to the installation of the double-glazed window in the reverse order of its dismantling:
- 1. First, you need to set up spacers that soften the contact of the glass unit with the frame. These are such wide rubber plates.
- 2. Insert the glass unit into place, aligning it with the center of the frame opening - the gaps on the left and right should be the same.
- 3. Install the glazing beads in their place: first - the upper, then - the lower, and the side ones - last.
The order of installation of glazing beads is as follows: we put it in a groove on one corner of the opening, and then on the other, after which we knock the overlay with our palm from some end to the middle and further. When you hear a click, and the gap between the glazing bead and the frame will again become almost invisible, it means that it has fallen into place.
How to extend the life of parts - mandatory care measures
In order for the gaskets to last as long as possible and during the entire service life of their characteristics practically did not change, they need to provide some care. First, these are measures of a "hygienic" nature:
- 1. It is necessary to thoroughly wash at least twice a year, and then wipe dry the windows, including the sealing inserts, both inside and outside the room.
- 2. Do not use greasy detergents for cleaning windows. The pads themselves are best cleaned using a special kit such as Edelweiss, containing all the necessary means and tools, or wipe with a sponge or cloth dampened in a universal solution LOC.
- 3. It is necessary 1-2 times a year (not more often) to remove dust and dirt accumulated under the seal (between it and the window surface). To do this, use only non-metallic soft but elastic objects, otherwise the gasket may be damaged.
- 4. Repair and other work, in which the concentration of dust in the room increases, should be carried out with tightly closed window sashes so that dust and dirt particles do not settle on the seal.
And secondly, a preventive measure is also needed to protect the sealing inserts from high humidity, dust and dirt settling on them, as well as from premature drying. It consists in the fact that after washing the window or only the gaskets themselves, one of the following lubricants is applied to their clean surface. It is best to lubricate the seals 2 times a year - in spring and autumn. It is not recommended to lubricate the inserts in cold weather (winter).
Lubricants:
- The best and most expensive option is a professional set designed to care for all window fittings. It has compounds for gaskets.
- The best option is silicone grease.
- Suitable option is aerosol preparation WD-40.