How to restore a bathtub at home? Probably, many wondered this question. So how do you give your bathroom a second life? Buying and changing a bath is a rather difficult task, but everyone can transform an old one. To do this, it is enough to purchase the materials necessary for the restoration and study all the available information on this issue. It is also worth paying attention to the variety of bathrooms, because not every restoration option is suitable for one type or another.
Baths are divided into several types:
cast iron;
acrylic.
For each of the varieties, there are restoration options that anyone can handle.
Do-it-yourself cast-iron bath restoration
Do-it-yourself cast-iron bath restoration is a rather lengthy task, but worth it. Cast-iron bathtubs began to be produced since Soviet times, according to GOST, these bathtubs were given a guarantee for about 2 years, but time has shown that their use reaches 10 years, so before throwing the bathtub into the trash, try to give it another chance. There are several options for restoring a cast iron bathtub at home:
coating with a layer of enamel;
insert of a special insert;
bath coating using the bulk method.
Let's consider each of the options in particular.
Bathtub restoration by covering it with new enamel
Coating a cast iron bathtub with enamel is one of the most economical options for restoration. Its main advantage is the absence of the need for dismantling and the need to disconnect the bath from the sewer.
At the beginning of the restoration, the surface of the bath must be prepared in advance. This action is one of the most necessary. This is done like this:
A special powder for cleaning baths is taken, in which there is no chlorine, it is applied to the surface.
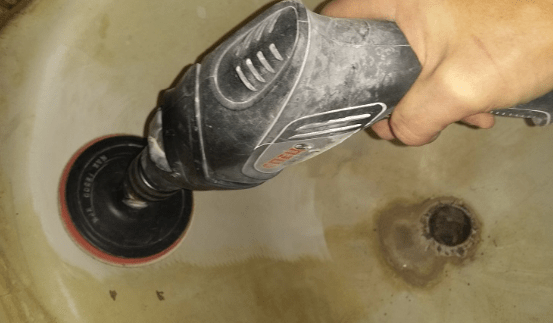
Then the surface is cleaned using sandpaper. You can also use a drill with a grinding wheel.
The resulting abrasive grit must be washed off with water.
Take a full bath of hot water and leave for 10 minutes.
Drain the water and wipe dry with a towel.
Now it's time to apply new enamel to the surface. This stage also has its own special moments:
It is necessary to apply the enamel without the formation of streaks and swelling.
It is necessary to apply several layers of enamel. The interval between them should be about half an hour.
After work, the enamelled cast iron bath must be left to dry for at least 6 days.
Insert custom liner
This option is slightly more expensive than enamel. In addition, it will not do without outside interference, because a special insert is produced at an industrial enterprise. This version of the restoration has another name - "bath in the bathroom".
The essence of this option:
The liner is custom-made and then simply inserted into the old tub.
The finished insert is trimmed at the tile level and the joints are blown out with silicone.
The dimensions of the drains are docked and then attached with an adhesive base previously applied to each of the surfaces.
The restoration process takes about 3 hours. Only a specially trained person can cope with this method, so you should not risk it. After work, a day later, you can already use the bathroom. The refurbished bathtub will serve you for about 6 more years.

Bulk bath
This option, like the previous one, is capable of making an acrylic bath from a cast-iron bathroom. The whole point of this option lies in the arbitrary pouring of liquid acrylic, which is an enamel consisting of several components.
The workflow is based on multiple activities:
First, you need to clean the old enamel, as in the first option, and then degrease.
It is necessary to distribute acrylic from the upper edge, leveling the areas that are adjacent to the tile with a spatula. Next, you need to pour acrylic around the edges in a thick layer so that it can randomly flow into the bathroom. After the bathroom is completely covered with acrylic, a second coat must be applied. This time the acrylic should be applied from the middle of the bathroom. The bottom of the bathroom is leveled with a spatula.
After finishing the bathroom coating, it must be left for 5 days until it dries completely.
Acrylic bath restoration
Acrylic bathtubs are very beautiful, but, unfortunately, over time, like any plumbing, they lose their original shine. Chips and rust can form on their surface.
There are several ways to solve this problem.:
Purchase of a newer model.
Using the services of professionals for restoration.
Do-it-yourself bath restoration.
It is best to use the first method if the bathroom is many years old and it is not a pity to throw it away, but if there are only a few scratches on the bathroom, do not throw it away.
The second option is suitable for those people who do not have time to do this, but this method has one big drawback - the high cost! Such restoration will cost a pretty penny. It remains to use the third method.
Before starting work, you need to select the material for the acrylic bathtub. The composition of the new material must be the same as that of the base of the bathroom, otherwise, as a result, all the work done will go down the drain. In addition, the material must have a high level of adhesion so that it does not eventually begin to exfoliate. Once the material has been selected, you can proceed to the direct restoration.
In order to get rid of damage to the acrylic bathtub, you need to do the following:
Sand the surface with sandpaper.
Polish the entire bathtub with bath polish.
If the damage is large enough, then a simple cleanup will not help here. First, you need to fill in liquid acrylic, and only then begin to clean the surface.
To eliminate cracks, it is necessary to carry out the following procedures:
Sand the crack with sandpaper.
Drill a hole about 1 mm in diameter on each side.
Clean the surface from dust and crumbs. Wash thoroughly with a solution of ordinary soap.
Mix liquid acrylic with hardener.
With the resulting mass, cover the holes and crack.
Leave the applied composition for a day, and then sand to a smooth surface.
To restore the bath from chips, you must perform the following activities:
The bathroom is covered with a coarse putty. This type of putty is subject to peeling.
The dried layer is sanded with ordinary sandpaper.
The bathroom surface needs to be polished.
Thus, it becomes clear that any type of bath can be restored with your own hands at home, if you wish. Plus, it will significantly save your budget.

Dear visitor, in this article we talk about the existing methods of bathtub restoration, compare technologies, advantages and disadvantages of methods.
If you have already decided on the choice of the bath restoration method and you are interested in prices, then you can find them on the page "Bath restoration price"
We will not describe the reasons why your bath has lost its whiteness and shine, whether it is due to poor water or aggressive detergents, or the enamel is worn out or covered with cracks.
Let's just put ourselves before the fact that the bath in this state does not suit you and "you have to do something about it" :).
Renovating a bath or buying a new one?
And it would seem. Here is a bathtub that has been in the house for 30-40 years. Why not collect some money and buy a new one, the same. You look at it for another dozen years and will stand ...
This is usually the very first idea that comes to people faced with this situation.
And when we are asked about this over the phone, we usually explain why this seemingly good option is not for most people.
And the point here is not at all in the price of a new bathtub (it is usually more expensive than the restoration of a bathtub, see "prices"), but in the fact that such bathtubs were made using the technologies and the fact that in the country "USSR". You won't find it in any store. They have not been released for 10 years already. They have not been released from the word "absolutely".

And the durability of the enamel in modern bathtubs is so dubious that you often wonder whether it is worth overpaying. We are ordered to restore the bathtubs that were bought less than 4 years ago, the enamel in which has already been "eaten away" to the cast-iron frame.
Well, if we talk about the price. It is worth considering that when purchasing a new bathtub, in addition to the "hassle" with assembly and disassembly, you will receive in its pure form only a renewed white layer of enamel.
Well, since it's only a matter of the enamel layer, so maybe it's worth "changing" only it?

And also consider only those methods that can be done at home.
So, the restoration of a bath, iron or cast iron, to begin with, we list all the methods: - (when the enamel is applied with a brush, roller, spray gun.) - (aka the "Bath in a bath" method) - (aka: filling the bath with liquid acrylic, glass, bulk enamel. "Bulk bath") - (The method is extremely specific and not particularly practical, but worth mentioning)
Let's consider the methods in more detail, compare prices and draw some conclusions for ourselves:
Enamel bath restoration method.
 Bath enamel or classic enamel is the oldest restoration method. In those Soviet times, when new bathtubs were "not available" and I didn't want to swim in a rough bathtub, the first thing that came to mind of those savvy people was "why don't we just paint the old bathtub ???". And so they did. Of course, paint and paint differ, and not every paint is suitable for enameling a bath, but in principle, the process technology is similar to a banal painting of any surface. Depending on the quality and manufacturer of bath enamel, a bath restored in this way will last from 1 to 5 years on average.
Disadvantages of enameling
- Turns yellow - Epoxy enamels tend to turn yellow over time
- The appearance of cracks - "Hard" enamel is very sensitive to impacts, chipping is possible over time.
- Long drying time - (You can only use the bathroom after 5-7 days)
- Copies the factory casting - The enamel does not hide the factory irregularities of the bath, any bulges or depressions can stand out
 The cost of this method usually depends on the enamel used with which this bath is covered and usually ranges from 3000 (the cheapest paints) to 4900 (good, foreign).
Since the main criterion of this method is "cheap", then usually no additional payments are provided, the only thing is that if you have previously enameled your bathtub, then the masters take a surcharge for this, for cleaning the old layer (400 - 500 rubles ).
What you should pay attention to:
- It is important to use enamel designed specifically for baths. Only they are safe for humans. Almost all others, upon contact with hot water, release toxic enzymes.
- The bath should be covered with at least 2 layers, ideally 4.
- You should take your time and withstand the full drying period set by the enamel manufacturer.

Acrylic insert, "Bath in a bath", Acrylic insert - many names, displays one meaning. This is the process of restoration, when a new plastic trough is inserted into its inner surface of the bathtub, repeating its shape. This trough is glued on a special foam to your bathtub and, according to the intention of the manufacturers and craftsmen, installing them should last about 15 years.
Advantages:
- Acrylic, in contrast to enamel, is much more plastic and not as susceptible to chips as enamel.
- Always White - Plastic will not yellow over time.
- Perfectly flat surface.
- Voids between the liner and the cast-iron bath, into which water can enter and begin to rot there.
- It is forbidden to install in steel baths.
- Obligatory dismantling of the old drain siphon.
- The liner is held in the bath on a special adhesive foam. And it tends to come off over time.
- Requires gaps between the wall and the bathroom (minimum 3cm).
 At first glance, the cost of installing an acrylic liner does not seem high. Usually, installers announce the price in the range of 4000 - 4700 rubles. But it is worth noting that often these prices are indicated only for delivery, lifting and installation of the liner. You should be prepared for additional spending, "the arrival of a measurer-consultant" - (usually 500 rubles). You may also have to pay extra for dismantling the old drain siphon and installing a new one (from 600 - 1200 rubles). Well, if the bathtub is embedded in a tile, then you will also have to pay extra for dismantling it (usually 300 - 600 rubles per wall).
On specialized forums, there are rumors that some unscrupulous installers are dismantling the drain siphon, deliberately damaging the sewer pipe. Thus, increasing the cost of work at times.
It takes a long time to describe the positive properties of acrylic (as a material), and, in principle, the idea of \u200b\u200binstalling an insert in the bath is not a bad thing. But as time has shown, this method has a drawback that reduces the service life of such a bath to 3-5 years. This is the glue with which the liner is attached to the bathtub and the not perfectly flat bathtub surface.
How is this disadvantage expressed? The moment you step on the bottom of the bathtub, in which the insert is installed, its surface microbending occurs, but when you leave the bathtub, it bends in the opposite direction. In those places where the bathtub is in contact with the liner, these bends are minimal, in the same places where there is a factory unevenness the amplitude of the deflection is greater.
Polyurethane foam, which is applied to the inner surface, is designed to keep the liner inside and in the first or second year it successfully copes with this. But time goes by and from the constant "trampling" on the bottom of the bath, it begins to peel off and voids appear in the cavities, into which water begins to fall. What happens next, I think it makes no sense to tell, the water in the voids rots over time, and the smell is incredible.
Such problems with liners appear regularly, and the manufacturers - inventors, having thought about it, decided to somehow get rid of the weak connecting link, the glue. This is how a new method of bathtub restoration with liquid acrylic was invented. About the method below ...
Method of restoration Liquid acrylic.

This method of restoration is also called Acrylic Enamel. And knowing how the classical method is made, one can understand this one too.
In a nutshell, this is about the same material from which acrylic liners are made, it is very similar to plastic, but it is produced in a liquid state. In "raw"; looks like "condensed milk". Well, it is applied to the bathtub by the "pouring" method, if you look at the pink picture on the left, it roughly reflects this procedure.
Advantages:
- Drying time - Can usually be used after 36 hours
- There is no glue between the bathtub and the acrylic. This makes the coating stronger.
- Liquid acrylic inherits the good qualities of an acrylic liner, it also does not turn yellow over time, it also retains heat well in the bath and is resistant to acid detergents.
- Both cast iron and iron baths can be restored.
disadvantages
- It is advisable to remove the drain siphon.
- Bulk acrylic, completely copies the curves of the bath, and if there are factory irregularities on the bath, they may be noticeable.
The cost of the method for the restoration of baths with liquid, bulk acrylic (the bulk bath method) is usually 3500 - 4100 rubles. Depending on the size of the bath, on the used bulk acrylic. Usually, the prices for this type of restoration are predictable, the only thing is that, as with enameling, if you enameled the bath before, you will need an additional payment (400 - 500 rubles) and if you need to dismantle the old drain siphon, then the masters also take an additional payment for this work (400 - 700 rubles )
Liquid acrylic is a relatively new material. Manufacturers often change their formulations, as they say "to improve quality" but in reality this is not always the case. Unfortunately, the quality of liquid acrylic must be monitored regularly. It has already been noticed several times that after the eminent manufacturer renews the composition of its acrylics, their quality has dropped. Moreover, the manufacturer himself never recognizes such a jamb. So our advice to masters, so as not to listen to bad words from customers, check each batch of the material you buy.
Over time, during operation, the bathtub fails. This is especially true for Soviet-made cast iron baths. But what to do? Buy a new one or repair a cast-iron bath yourself? Of course, it's up to you to decide, but it is worth noting that buying a new bathtub is quite an expensive pleasure, therefore we recommend doing the repairs. But before that you need to study all its features.
Ways to repair a cast-iron bathroom
Considering the options for fixing the bath, there are only two:
- Enamel application. Which in turn can be divided into enamel device and liquid acrylic application.
- Acrylic liner device.
Each of these options has features that must be taken into account when carrying out work. Let's look at each repair method in more detail.
Enameling
The first way becomes. Note that it is available for use only when the bath itself is intact, and you are confused only by its appearance (which has deteriorated considerably over many years of operation).
Restoration work of this type is divided into several stages:
- Enamel selection.
- Bath surface preparation.
- Coating.
In order to perform all the work efficiently, it is necessary to study the features of each of the stages.
The choice of enamel for the bath
The first, and very important, becomes the choice of the enamel, which will be further applied to the surface. Accordingly, for the choice, you need to know several features:
- The coating can be applied in several ways: using a brush or roller, or as an aerosol. Note that aerosol application is not suitable for a full-fledged restoration.
- Also, the enamel for the bath should be supplied with all the components necessary for the work.
- For two-component formulations, a hardener is required, which is selected in accordance with the shade.
And let's look at the most suitable formulations for such a job:

Any of the presented types, which are most popular today, are suitable for work.
Now that the material is selected, you can go directly to the work.
Foundation preparation
Before you start directly applying the composition to the surface of the bath, you must carefully prepare it. The preparation itself is carried out as follows:
Upon completion of the preparation, you can go directly to the application of the enamel, and it will differ depending on the choice made. Namely, ordinary enamel and liquid acrylic are applied in different ways. We will analyze each of them in more detail.
Enamel application
Upon completion of the preparation, we proceed to repair the bath using enameling, which is done as follows:
When finished, let the bathroom dry completely. It is recommended to use it no earlier than 2-3 days after applying the composition
- The process of restoration or repair of a cast-iron bath using this method takes about 4 hours. It begins after the enamel has been replaced.
- The method is the application of an additional (fourth) layer of enamel on the surface of the bathroom.
- If a new coating has been applied before, then it must dry completely, after which an additional layer is applied.
When strengthening, it is worth considering some features:
- After applying the last layer, the enamel should dry well.
- The bathroom cannot be used for three days.
- Such a repair of a cast-iron bath can be carried out independently, taking into account the detailed instructions for the jar with enamel.
- You can also use the services of a restoration company. However, there are some nuances here.
- You should take into account that such enamel has a service life of one and a half years.
- This bathroom should be used carefully. Since the enamel is scratched, you only need to wash it with a soft cloth and gels.
- After a year and a half, new repairs will be required.
But nevertheless, although the method is short-term, it is not expensive. Thus, you can maintain an attractive appearance of the bathroom for many years, and not let it rust and completely deteriorate.
Liquid acrylic
And the second way to restore cast iron plumbing is to apply liquid acrylic. The whole process is carried out in accordance with the technology:

Acrylic liner
Another way to repair a cast iron bath is
- When the base of the bathtub is in poor condition, and it is impossible to do simply by replacing the enamel.
- In cases where there is a desire to give a new look to the old plumbing.
- In addition, it is actively used for the "reconstruction" of the bath. As you know, the metal transmits and takes heat very well. And usually in any metal and cast-iron products, the water cools very quickly, preventing enjoyment. That's when the acrylic liner device comes to the rescue.
In addition, it is worth noting a number of advantages of such a solution:
- The liner is resistant to wear.
- Quite durable.
- During operation, it does not change color and its properties.
- Possesses sufficient moisture resistance.
- Easy to care for and use.
- It also has a smooth finish that repels dirt.
- Impervious to household dyes, as well as household chemicals.
- Heats up quite quickly and cools slowly at the same time.
But let's look directly at how the repair process itself goes:
Important! When buying an acrylic liner, be sure to ask for a quality certificate for it. In addition, check its integrity at the point of purchase.
Conclusion
As you may have noticed, there are not so many ways to restore and repair a cast-iron bathtub, and at the same time they are as simple as possible, therefore it is possible to independently perform all the work (even without someone's help). We also recommend that you watch several videos that will clearly show all the repair methods, and you will once again see how simple it is to do everything yourself.
Despite the emergence and active use of modern materials for the manufacture of plumbing equipment, the popularity of cast iron baths still remains at a fairly high level. These heavy, unwieldy products easily bypass the more varied shapes and colors of acrylic and steel models due to their performance characteristics.
In addition to their low thermal conductivity, high strength and durability, they are renowned for their maintainability, which makes it easy to update an old cast iron bath with affordable materials. In this article, we will tell you how to restore a cast iron bathtub, without any extra hassle, returning it to its original cleanliness, smoothness and shine.
Features of the restoration of cast-iron baths
A cast iron bathtub is a practical and durable sanitary fixture with a long service life, good strength properties and a significant weight, which, depending on the model size, can reach 500-600 kg. Cast iron itself is black, while enamel gives the product a white color, on the surface of which minor damage, cracks, and color changes occur during operation.

The restoration of a cast iron bath has the following features:
- The thickness of the walls of the cast iron washing container is 0.6-0.8 cm, so models made of this material are considered more maintainable in comparison with thin-walled steel products. The restoration of a cast-iron bath is possible even with sufficiently deep damage.
- The service life of high-quality cast iron plumbing equipment exceeds 50 years, but the enamel coating on the inner surface of the bowl wears out much earlier. If you restore the enamel, then the restored device will be almost like new, therefore, the restoration of a cast-iron bath with your own hands is cost-effective.
Note! High-quality cast-iron models of bathtubs are quite expensive, for a spacious product with a length of 160-170 cm you will have to pay at least 20 thousand, and corner bowls cost several times more. Therefore, do not rush to throw away the old bathtub, it is better to return its attractive appearance with the help of restoration.
Common damage
Before restoring a bathtub, you need to figure out what damage is characteristic of cast-iron models, and also why they occur. Every experienced craftsman will say that the most vulnerable point of cast iron products is enamel, which loses its original appearance over time. The most common damage to cast iron wash containers is:

Please note that before restoring a cast-iron bath, you must carefully assess its condition, note all existing defects, and then choose the best method and material with which it is best to restore it. will fail if there are through damage on it.
Re-enameling
When people are wondering how to restore a cast iron bathtub at home, the first thing that comes to mind is to re-enamel the container from the inside. This is a rather complicated, time-consuming and painstaking process that allows you to update the product without serious costs. For re-enameling, a moisture-resistant epoxy enamel is used, which gives a stable, long-term result, subject to the technology of use:

Important! Full polymerization and hardening of epoxy enamel occurs within 5-7 days, during which you cannot use the bathroom. In addition, during the restoration of the washing container in this way, a sharp, chemical odor is emitted, so you can only work in a respirator.
Restoration with liquid acrylic
You can quickly and effectively repair a cast-iron bathtub at home using liquid acrylic. Thanks to the unique texture and consistency of this modern polymer, the restoration of the enamel layer is faster and easier than with epoxy enamel. Acrylic compounds consist of 2 components - acrylic itself and a hardener. The ingredients of the mixture are combined and then thoroughly mixed until a fluid, plastic mass is obtained. The restoration of cast iron products is as follows:

Important! In order for the restored cast iron plumbing fixture to last longer, it is necessary to observe the acrylic drying technology. Polymerization of this polymer takes 36-48 hours, during which time contact of the coating with water or dust should be limited.
Repair with an acrylic liner
If the surface of the cast iron washing container is in disrepair, if most of the enamel surface is covered with damage, it is problematic to properly repair it with epoxy enamel or liquid acrylic. To restore the appearance of severely damaged products, a more radical method is used - the installation of an acrylic liner. In this case, the restoration takes place as follows:

Remember that the cost of an acrylic cast iron bath liner is higher than restoring an old cast iron bowl with liquid acrylic or epoxy enamel. But the use of the inlay allows you to repair products with through holes, with a severely damaged surface.
Video instruction
Any thing or object in the world around us tends to grow old both morally and physically. Over time, the bathtub, from a sparkling, smooth, pleasant to the touch attribute of a sanitary room, smoothly turns into a dull, rough, spotty, and even cracked surface. It is physically unpleasant to be in it, and the visual perception is clearly far from the best. So the question arises what to do in this case - just send the bath to a landfill or maybe try to restore it.
There are only two possible options:
1. radical - installation of a new bathroom;
2. budgetary - restoration of its inner surface.
The second option, of course, is less expensive, because purchasing a new bathtub, delivering it to the required floor, dismantling and taking out the old bathtub, as well as installing a new bathtub requires significant costs and considerable physical effort. It should be noted that you will have to remove and then restore the tiles laid on the walls. Inevitably, the siphon will be replaced, which, most likely, will not dock with the new bathroom. However, if there are continuous cracks and holes, large deformations or chips of the bath enamel, then it cannot be repaired.
Any old bathtub can be restored in one of the following ways:
acrylic liner;
enamel;
by the filling bath method.
Acrylic liner
 The acrylic liner is the easiest solution to the problem. A finished product is placed inside the old bathtub, perfectly repeating the surface of the inner bowl of the bathtub. The insert has excellent technical parameters - it does not rust or yellow. It can be of any color in harmony with the interior of the bathroom. It should be noted that the thickness of the acrylic liner is only 4mm, of course, the volume of the useful area of \u200b\u200bthe bath will decrease slightly, but not so much to cause discomfort.
A significant drawback of the acrylic liner is the use of polyurethane sealant when installing it - over time it sags, as a result of which cracks appear on the surface of the liner. As a rule, the service life of the liner does not exceed 2-3 years.
Applying new enamel
 In the case when the purchase of an acrylic liner creates a financial problem for you associated with the mandatory repair of the entire plumbing room, the surface should be restored using special materials - this material is. In any hardware store or market in a very wide assortment, a variety of enamels are presented, produced by both domestic and foreign manufacturers. They are of two types - aerosol and canned. For good atomization, the aerosol pack contains a significant portion of the solvent, which reduces the life of the enamel layer, therefore it is not suitable for bath restoration.
The packaging itself contains a detailed description of the coating restoration process, but there are also certain nuances. So, you need to decide that it is absolutely useless to restore the bath with alkyd, oil or nitro paints. It is pointless to use car enamels. A clear choice must be made in favor of a two-pack epoxy paint to restore the enamel of the bath. You will need to remove the siphon - the drain and overflow holes must be free of pipe connections.
The process of enamel restoration is described quite well by the manufacturer on the packaging container and consists of several stages. This time-consuming process will require you to remove the old enamel, prepare the surface, and only then apply a new coat.
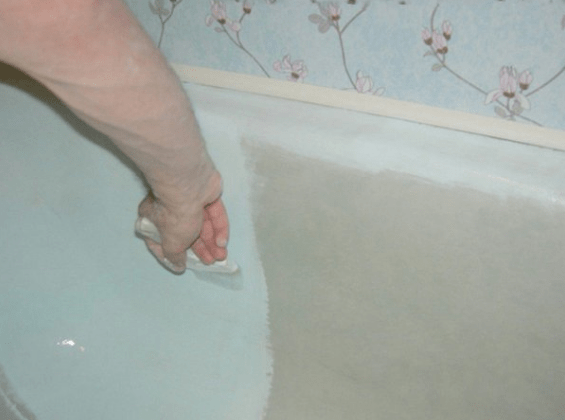
On the surface of the old enamel, apply a layer of cleaning powder that does not contain bleach. We remove the existing enamel mechanically with an abrasive stone fixed to a drill, or with waterproof sandpaper. It is necessary to thoroughly remove old enamel in places of chips and rust. We clean the rest of the bath until the surface becomes dull. This procedure depends only on you, the better the cleaning is done, the longer the service life of the new coating. After that, we wash off the resulting gruel from water and old paint, and to complete the cleaning process, fill the bath with hot water, and after 8-10 minutes we drain. If the quality of the treated surface satisfies us, we degrease it with a solvent and wait for it to dry completely.
 If there are any rust defects or poor cleaning, the cleaning procedure must be repeated. You should get a smooth, matte, uniform even and dry bath. In the presence of deep chips, they must be restored with epoxy compositions.
The next stage of applying the primer should be approached according to the recommendations of the enamel manufacturer. In the case of aerosol primers, there is no problem at all, it is easy to apply. If primed with a mixture of enamel and hardener, you should not allow bubbles to appear on the finished surface, because then enamel will peel off in these places. After finishing applying the primer all over the bath, let it dry.
Before proceeding to the final stage of applying the enamel, the bath must be covered with a primer. It is advisable to carry out the enameling procedure with a mohair roller - it is better to refuse the brush, since its fibers can fall off and remain on the surface of the bath. In addition, the roller applies the enamel more evenly. For high-quality fixing of enamel on the walls of the bath, the first layer of coating must be literally rubbed into the surface. At least three layers of new enamel should be applied, and so that each of the applied layers dries for at least 25-30 minutes.
 The enamel will become hard the next day. But this does not mean that it is completely dry. To do this, you should wait up to seven days, while the temperature in the bathroom should be kept within 20 ° C. At the same time, it is necessary to exclude any access of foreign objects and liquids to the new surface. Only after that, a brand new, snow-white, shiny bath that beckons to take a dip is ready to embrace you.
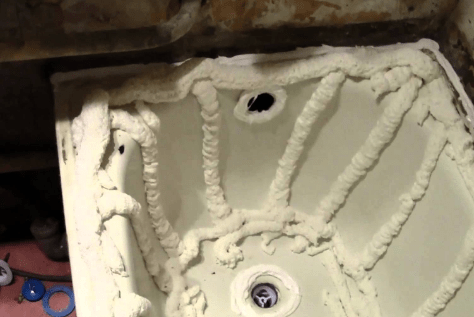
Bulk bath
 The pouring bath is the latest development in the creation of a new surface over an existing cast iron or steel bath. A pouring bath is the application of a liquid, impact-resistant plastic based on cast acrylic, to which a ceramic hardener is added. Bath preparation is carried out in the same way as when applying new enamel.
To restore the bath in this way, 4 kg of liquid plastic is enough - it is poured directly onto the bath. The thickness of the new acrylic coating reaches 6mm on the walls and up to 10mm on the bottom of the tub. If there are small drips or defects during filling, they can be easily removed with a spatula. Drying takes place at room temperature for up to four days. After this time, the bath looks like new, the surface is perfectly glossy, resistant to damage, bacteria and most importantly safe and non-slippery.
Was this article helpful? Subscribe to site updates to receive the latest articles on renovation and interior design before anyone else!