Autumn brings us not only cool weather, rains and slush. Her arrival is usually accompanied by rich, bright colors, in which nature dresses. Heaps of bright leaves underfoot just ask: "Take us, put us in bouquets, take a piece of autumn with you to your house."
Let's not resist their call. But instead of banal bouquets of leaves, let's try to decorate the interior of the apartment in an autumn style in a new way. And for this we use flowers that will delight the eye for three long months, and, if desired, even longer. Let's make roses out of
What is needed for such an unusual bouquet?
Naturally, first of all, you should go to the park and collect more bright ones. You can collect everything, but if you want to make the bouquet more interesting, try to find purple or crimson ones that will become the buds of future roses. Well, besides that, you need to prepare a spool of strong thread and a vase. So we don't need any unusual adaptations.

Before making roses from maple leaves, they need to be sorted out and washed - often dust, soil particles and other street dirt settle on them. Rinse them under running water and place on a terrycloth towel to dry.
How to make roses from maple leaves?
We select 5-6 pieces of medium-sized leaves for one flower. One of them will become the base of our rose, and the rest will be its petals. As you know, each leaf has a front and back side. The first is brighter and smoother, and the veins are better visible on the reverse. We fold our leaf horizontally in half. Tightly twist the resulting workpiece with a roll. The core of the bud is ready.
Next, we move on to winding the petals. We take the next sheet, we also fold it in half, but this time so that when applied to the core, the bend is slightly higher than it. The front side of the sheet should be outside. Bend the part protruding above the core slightly outward, and then wrap the edges around our bud. Then we take the next sheet and do the same operation, but this time on the other side of the core. The first two petals are ready. So we continue to wind the next leaves until the bud becomes the desired size and splendor.
Now we proceed to the final stage. We wrap the finished bud at the base with a thread and firmly fix it. We make roses from leaves by the same method further. After that, we collect them together, wrap them around the perimeter with large maple leaves - this time they will be the border of the bouquet, and also mask the protruding cuttings at the base of the roses. We tie the resulting flower with threads and put it in a vase without water.

These roses will be a beautiful addition to the interior decor. In addition to the simplicity of manufacture, they are also attractive for the brightness of the colors. You can make monochromatic - lemon yellow, orange, red - buds and combine them with the same thematic bouquets. And you can combine different leaves in one flower - you get very funny variegated roses. In addition, ready-made flowers can be sprayed on top of the most common hairspray for greater durability. And if it is also with sparkles, the buds will acquire a pleasant shimmer. Well, if you have a spray can of silver or gold paint in your house, you can make futuristic roses in these shades. Such flowers can be used as Christmas tree decorations, if you carefully cut the cuttings of the leaves and attach a thread loop to the rose.
Conclusion
Now you know how to make Such crafts can be a great gift for friends and family. If you are asked how to make roses from maple leaves, be sure to share your skills.
In the fall, many feel depressed and discouraged. However, at this wonderful time, you can occupy yourself with interesting things, for example, create a bouquet using flowers from leaves. There is no need to buy fabrics, transfer a huge amount of paper, because the street is full of free and unique working material. One has only to collect a few maple leaves, read a master class - and you can get to work. This simple activity will allow you to spend your free time with the benefit of the whole family, as well as to interest the children.
Preparation of natural material
To make flowers from leaves with your own hands, you should choose even, clean copies without spots. The color of the herbarium does not matter, the main thing is that they are monochromatic. For example, you can make a rose from red maple leaves.
To make it easier to create flowers from leaves with your own hands, and at the same time the buds come out uniform and do not crumble, it is worth taking material of different sizes. Then the finished product will hold better, and it will become much easier to fix it on the branch. Wide maple leaves are the best option for bouquets.
If you make a flower from raw natural material, such a product will only last for a few months.
To prolong its life, the starting material should be treated with a glycerin solution.
To do this, you need to dilute 300 ml. pure glycerin in 600 ml. water, pour the resulting liquid into a tight bag and evenly spread the herbarium in it. Be sure to ensure that the maple leaves are not crumpled or torn. Next, you should seal the bag hermetically and leave for several days in a dark, cool place. Glycerin will make the leaves more elastic, tear-resistant, shiny. After 3-4 days, the workpiece is taken out of the bag and allowed to dry. The material is ready for work. Do-it-yourself products made from processed tree leaves can be stored for many years and retain their original appearance.

Making a rose
Many admire such products, but not everyone knows how to make flowers from leaves on their own. To do this, you should follow the instructions step by step, and in an hour a beautiful rose will decorate the apartment.
A master class on making a flower includes several stages. First of all, you need to take a small processed leaf, put it face down on the table. Fold in half so that the top covers the spine. Then roll the workpiece into a small tube. This will be the middle of the future flower.
Next, you need to take the next sheet, do the same manipulation with it. Attach the resulting tube to the middle of the future rose and wrap it carefully around it. Using this technology, prepare all the leaves and also wrap around the center of the flower. It should not be forgotten that the blanks must be taken, given their size: first small leaves, then large
For a voluminous rose, you need about 7-10 leaves. Each subsequent rose petal must be shifted slightly lower than the previous one. Then a rose from maple leaves will come out open and large.
When the product is ready, the roots of the blanks must be tied with threads or wrapped with tape. Then the master needs to attach the flower to a previously prepared branch, decorate it with a green cloth. You can prepare 5 of these roses from maple leaves, and then place them in a beautiful vase; decorate the overall composition with dried birch buds.

How to make a bud?
The remaining maple leaves can be used to make rosebuds. So, a master class on making a bud.
The method of work is not very different from the previous one, the only secret is that the workpiece needs to be rolled up a little differently. Fold the processed material in half, then make a triangle out of it, tucking the edges towards the center. Then fold all subsequent blanks in the same way. Attach the triangles one by one so that you get a rosebud that did not have time to open. Secure its lower part with tape or tape. Buds can be made from multi-colored maple leaves, their appearance will be much more original.
The next master class will reveal the secret of how to make flowers from tree leaves with your own hands. To do this, you need to take 12 maple leaves. Make the middle of the flower in the same way as in the first case (fold in half and twist into a loose tube). Attach the next blank with the front side to the middle, with the spine down. Bend the upper edge back, while pressing lightly on it. Using this technology, large and bulky workpieces can be obtained. Each petal must be secured with 1 turn of the thread. The master must obtain beautiful and lush flowers from the autumn leaves.
The most extraordinary products
The original flowers are obtained from corn. Ask how to make a flower? We offer the simplest and most affordable master class:
- First you need to find and dry 15-20 corn leaves. This can be done with an iron (iron it several times through the fabric) or in the oven.
- Make the core of the flower. Take a small piece of corn leaf and fold it into several balls.
- Prepare the base - a circle with a diameter of 15-20 cm. Next, cut out the layout of the future petal from cardboard. Transfer it to harvesting corn and cut out 25 pieces.
- Lay the core on the base, spread the petals around it. Carefully glue the resulting product, lifting the edges with your fingers. The result will be a beautiful lily that can be used to decorate New Year's gifts.
So, having studied a master class on making products, you can learn how to make chic bouquets and crafts. Fall leaves will be even more beautiful when coated with glitter hairspray. No one will guess that these flowers are made from maple or corn leaves.

Such crafts will not emit toxic substances, so even a small child can play with them. They can also decorate a family photo, creating a wonderful autumn composition - family and friends will gladly accept such a gift.
Autumn leaves are an original and accessible material for creativity, including for collaboration with children. They can be used to make not only traditional panels and appliques, but also voluminous crafts. A bouquet of flowers made of bright and fresh foliage looks very stylish and original. Let's consider step by step how a rose can be made from the most ordinary maple leaves quickly and easily with our own hands, and we will try to make an unusual bouquet.
How to make a rose from maple leaves with your own hands in MK
Required materials and equipment:- fresh maple leaves and leaves of other trees;
- rowan twigs, maple fruits, dried flowers;
- reinforced thread or thin wire of brown or green color;
- scissors;
- wooden twigs;
- spray paint (if desired);
- fixer varnish;
- paper, ribbons or other decor for decorating a bouquet.
Leaves should be chosen clean, bright, without mechanical damage. You can choose foliage of the same color or choose multi-colored natural materials. If necessary, they should be rinsed and dried thoroughly before use, remove dry areas and irregularities. Leaves can be pretreated with glycerin to add shine, elasticity and durability. In addition, glycerin will help preserve the color of the bouquet if no coloring is applied.
Operating procedure.The given master class is suitable for beginner needlewomen and children. Select a small leaf and carefully roll it up into a tube with the right side out to form the middle of the future rose. Fold the next sheet of slightly larger size in half and wrap it tightly around the first blank. We try not to break the sheet, but make the bend as rounded as possible. For this reason, dried natural materials should not be taken.

We do the same with other maple leaves. Each next sheet should be slightly larger than the previous one. We make sure that the glossy and bright front side of the sheet is always outside. To enhance the decorative effect, the leaves can be slightly twisted, forming beautiful folds and flounces. Some leaves may not be bent, allowing the sharp edges to stick out. These flowers look more natural and natural. If necessary, carefully cut off the excess parts of the leaves with scissors.
Having made a rose of the required size, we fix it with threads, wrapping them several times around the bottom of the bud. Large flowers can be stitched several times for reliability. To make a long stemmed rose, attach it to a twig. This can be done at the initial stage of making a flower, or you can discreetly attach a ready-made rose to the stem.
To make a bud, you need to fold the leaves as tightly as possible to each other and form a workpiece as rounded as possible. Some of the outer leaves can be slightly bent outward, taking care not to damage the workpiece. The middle should not stand out too much above the rest of the layers of the rose, it is better if it is slightly recessed in the bud.

The thicker and larger the bud, the more difficult it is to wrap around and fix the leaves. For additional fixation, you can use a stationery stapler. To do this, you need to carefully fix a few leaves in the middle of the bud with a bracket, trying to place it closer to the upper edge of the flower, but so that the bracket is not visible. Additionally, we fix the buds with reinforced threads, wrapping the blanks as tightly as possible in the lower part and along the entire length of the branches.

Roses and buds can be made in different shapes and sizes, wrapping the leaves tightly or more loosely. Having made several flowers and buds, we collect them in a bouquet. Place the leaves of various trees, dried flowers, maple fruits or other natural materials between the roses. If the stems of the roses are expected to be visible, they can be wrapped with ribbons, thread or green elastic duct tape.
So that the bouquet does not darken over time and retains its bright saturated color, it should be treated in 1-2 layers with a fixative varnish and allowed to dry. You can use parquet or building varnish. Hairspray with glitter will give an unusual effect. Flowers and leaves can be spray-painted if desired. It is advisable to make several layers of paint with intermediate drying. Cracks and folds in the leaves can be left unstained or carefully painted over with a thin brush.
Cut off a piece of wrapping paper or decorative flower net and wrap it around the bouquet, forming beautiful folds and flounces. We fix the bouquet with a ribbon or thread and put it in a vase without water.

An unusual bouquet of roses is ready! It can be presented as a gift or surprise guests by decorating their room. In order for maple roses to delight you as long as possible, you should not expose them to bright sunlight and mechanical damage.
Video selection on the topic of the article
Maple leaf bouquets will give you a wonderful mood and will be an excellent reminder of outdoor recreation. To make roses and bouquets from natural materials, we suggest watching the video tutorials below with a step-by-step description of the manufacturing process.
author Raud Y., photo by author
A new autumn has come, and our golden autumn bouquet of roses made from leaves is becoming relevant again. It’s just a miracle! The reality of unreality is to fold rose petals from a maple leaf!
The author of the idea of \u200b\u200bmaking roses from autumn leaves is my colleague, elementary school teacher Natalya Yakubova. Unfortunately, her lesson - how to make a rose from maple leaves - was copied from us by many sites without attribution of these materials ...
We are happy to share this art with the readers of the site.
So, a virtual lesson from Natalia: the sequence of making such a wonderful bouquet of roses from leaves, with my photos and comments.
At the end of the article - advice from our readers who have learned how to make a bouquet of roses from leaves.
Making a rose from maple leaves step by step
We collect suitable leaves (too small, dry, diseased, torn leaves are NOT suitable for us) of various colors. To make one flower, it is better to choose leaves of the same color.
We fold the first sheet in half, across the central vein - so that the front side of the sheet is outside.
And now we roll this folded sheet into a tight roll. This roll will be the "heart" of the rose.

Now around this "core" of the flower, we begin to lay "petals". To begin with, we take a leaf, and in its center we place the "core" (note that the front side of the leaf is inside the future flower!).
We bend this sheet outward in half. The edge of the bend of the "petal" is located above the "core" by a centimeter and a half. Smooth the fold of the sheet.
And now we also bend this protruding edge of the sheet outward, but we no longer smooth the fold ...

We wrap the lateral edges of this double-folded sheet on both sides around the "core".
We pinch the lower edges of the leaf at the very base of the flower.
Take a new leaf for the next "petal" and repeat the operation just performed. Only this petal is now located on the side opposite to the first sheet.

Next, we do several similar operations, adding new leaves - now the petals are collected in a bud. Add leaves until you feel like it is enough to complete the flower.
When the bud is ready, we tie its base with threads to secure the flower.
How many flowers there will be in your bouquet is up to you. For this "photo session" we needed three ...

Making a bouquet
Now let's take care of the "greenery" of the bouquet that frames our roses. The most beautiful and variegated leaves are suitable here.
To prevent these leaves from curling up into a tube the next day when they dry, it is better to first iron them with an iron between the sheets of newspaper. After this procedure, they will become more fragile, but with careful handling, they will not be damaged.
Place the prepared leaves evenly in a circle, placing them under the buds in your hand. Then we fix the now finished bouquet at its base with the same threads.
By the way, it will be possible to wrap this knot with yellow paper tape (masking tape) over the threads. The ribbon will hide the threads and make the bouquet look neater and more complete.
Here is our autumn bouquet of maple leaves and you're done!
I'll tell you a secret that I rolled one of the three roses of this bouquet :)

But what advice came to us from the users of the forum site www.eva.ru:
“In order for a bouquet of roses from leaves to last longer, it is necessary to grease the already twisted roses with vegetable oil (with a brush). The oil is absorbed in two days. The leaves become soft, do not dry out, do not lose color and do not shrink "
Tips from our readers:
“Indeed, flowers from the leaves oiled with sunflower oil last much longer. Checked: our rosette has been standing for a year, and still the same beauty :)
By the way, you can add a couple of drops of essential oil to sunflower oil. I added pine - I really liked the result. Or you can take an orange one - it is proven that it improves mood. Experiment! "
“Sunflower oil will dry out over time and turn into a sticky" drying oil ".
Florists for use.
If twigs or leaves are placed in a mixture of glycerin and water (3: 1, hot water), they will not dry out, but remain soft. The only thing is a possible unpredictable change in the color of the leaves.
Probably, you can grease the autumn leaves with pure glycerin for softness. Or liquid silicone. "
"You can go to the flower department and ask to pour over all this beauty with a special varnish, which is used when and when not necessary to process cut flowers."
“You can process the finished bouquet of roses with regular hairspray :)))
I watched how they make a passepartout from autumn leaves - they are covered with some kind of special glue, which makes the entire texture of the leaf clear. Then all its veins become very distinct, and the color of the leaf plays. "
“At home I have a can of varnish for flowers (well, so that the glossy leaves of indoor plants shine better). So we covered our bouquet of 11 roses with this varnish, and it turned out very cool! "
“I was able to fix such a stunning bouquet of autumn leaves with melted wax. Roses and individual leaves after such treatment have not lost their color and are delighting us for the second year already! "
“We sprinkled our made roses with sparkles, and it turned out to be generally gorgeous!”.
“Last fall, I painted the roses made from leaves with gold paint, and in the winter I decorated the tree with them.”
Here's what happened:

"And we in Israel made roses from sycamore leaves."
“We don't have red-leaved maples in the area. I had to use wonderful crimson-red leaves both for making miniature roses and for framing the bouquet. "
“Maple leaves are essential for making roses. Moreover, if the size of the leaves is different, then you need to start with smaller ones, because the growing volume of the rose needs a larger leaf every time. "
Yuri Raud, labor teacher (Narva, Estonia)
www.lobzik.pri.ee
On site site
on site site
|
|
Weekly Free Site Digest Site
Every week, for 10 years, for our 100,000 subscribers, an excellent selection of relevant materials about flowers and the garden, as well as other useful information.
Subscribe and receive!
You can make a gorgeous bouquet from such a natural material as maple leaves. They have a beautiful soft color and can easily take a given shape.
To those who love roses and crafts from natural materials tips for creating artificial bouquets of maple leaves... Their shape and structure lends itself well to work. In addition, the leaves are completely free of charge. gather in the park together with children - it is interesting and useful for spending time together.
Useful for work, how about fallen yellowed and still green leaves. From them you can twist such a beautiful bouquet that with its beauty it can outshine the most real roses. Besides, a bouquet of leaves is durable... We can safely say that such a craft breathes a "second life" into dry foliage.
Maple foliage is ideal for creating bouquets
Work step by step:
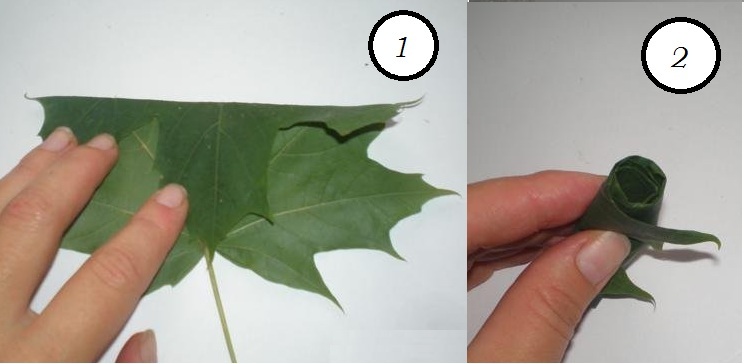
- Take a beautiful, even and clean sheet, lay it in front of you and fold it in half. (see photo # 1)
- Roll half of the leaf into a tube. You should not do this too tightly, because the flower needs to be lush and voluminous. (see photo # 2)
After the core of the flower is ready, you need to start creating petals from other leaves.
Work step by step:
- Take a second maple leaf
- Place the core inside the sheet
- Wrap the sharp edges of the leaf one by one so that when folded, you get petals (see photo # 1)
- After you have completely rolled the sheet, you can secure it with thread. (see photo # 2)
- In order for you to get a voluminous and lush rose, you will need to roll about five or six maple leaves into one flower. (see photo # 3)
- Fasten each new twisted sheet with ordinary sewing thread, make several flowers for the bouquet. (see photo No. 4)
 Step-by-step rolling of roses from maple leaves
 To make packaging for the flowers, wrap the bouquet in a few maple leaves so that their sharp edges stick out in a circle.
 Tube (wrapper) for a bouquet of roses from maple leaves
  Bouquet with three roses from maple leaves
 How to make a bouquet of roses from maple leaves with your own hands?
Maple leaves in the autumn season are distinguished by a variety of rich color shades:
- green
- yellow
- orange
- brick
- burgundy
- red
- brown
- brown
The more colorful foliage you use in creating a bouquet, the brighter and more beautiful your bouquet will turn out.
You can stick to one shade of foliage to get. For example, only yellow or red roses. But, it is much more interesting to work with completely different marbled leaves.
Maple leaf yellow roses:
- Take a small leaf and fold it in half
- Gently roll the sheet into a tight tube
- Take a large maple leaf and place a curled leaf in its center.
- Turn the big sheet back
- Begin to fold the leaf so that voluminous petals grow around the core.
- Secure the product with a thread
- Roll a large number of roses into a bouquet
- Wrap the entire bouquet with wedge foliage for a splendid piece.

 Step 1: rolling the center of the bud
  Step 2: folding the sheets around the core
 Step 3: rolling the petals
  Step 4: add volume to the flower
 Step 5: securing the rose with thread
 Step 6: create roses for the bouquet
 Step 7: flatter the bouquet
 How to make flowers from maple leaves with your own hands?
The soft maple leaf lends itself well to rolling. You can make a lush rose or a thin bud from it.
Creative ideas for folding maple leaves:

 Roses from maple leaves, option number 1
 Large round roses from maple leaves, option number 2
  Red roses with a green stem of maple leaves, option No. 3
  Multicolored roses made from colorful maple leaves
 How to make a bouquet of flowers from maple leaves with your own hands?
The secret of the bouncy maple leaf flower is soft sheetswhich have not yet dried so much as to break and burst. A fresh green leaf also folds very well.
For crafts, those maple leaves that are harvested in November are good - high humidity and frequent precipitation do not allow the leaf to dry out.
Each leaf you roll to make rose petals should be anchor... This is done by the usual thin sewing thread or tape... Just pull it tight without tying it into a knot. How to save maple leaves for crafts?
The well-known way to preserve the maple leaf by putting it in a bookunfortunately not suitable for preparing material for making flowers. In this way, the leaf is overdried and makes it quite brittle.
There are other ways to preserve maple leaves:
- Leaves can wax... To do this, melt the wax of one candle on the stove or in the microwave. After that, the sheet is alternately dipped into hot wax from both sides.
- The paraffin wax sheet should be left on newsprint to dry out and absorb excess wax.
- The leaf may darken, but it will retain its softness, which is very useful for crafts.
- The same sheet can be "Bathe" in a glycerin solution. To do this, dissolve half a glass of glycerin in a glass of water.
- The leaves are completely dipped and then tied and hung to dry. The leaf should be dried for about four days.
Video: "Master class: roses from leaves"