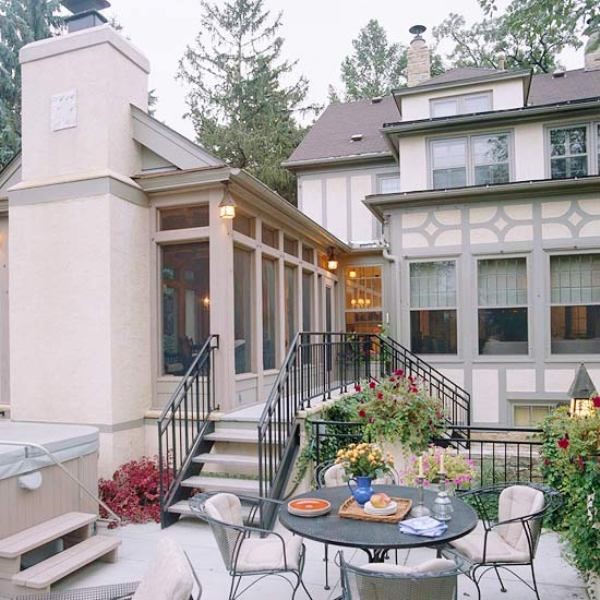
Most often, speaking of a veranda, we mean an open or closed extension to one of the walls of the house, where it is convenient to spend time relaxing or having dinner. But the terrace, being one of the varieties of an extension to the house, differs from it, although their concepts are somewhat similar. A terrace is a structure that has supports on pillars, a roof, adjacent to the house on one of the sides. On this side is the exit to the terrace from the house. The rest of the sides are open, the effect of unity with nature, which the terrace gives, is very strong. Even a heavy rain that can be observed under the roof of the terrace, fully feel its dampness, humidity, hear all the sounds, will not soak the one who is on the open area on three sides. And a cup of tea before going to bed, in an armchair in the fresh air, is a luxury not available to many.
As for the veranda, this building is located both on the first floor and on the second. Cottages with such a structure on the second floor look quite stylish and impressive. Therefore, great attention is paid to the decoration of the closed veranda on the second floor - this testifies to the status of the owner, to his taste. This room also has a roof that can be made in the traditional way, or it can be made of glass, which will allow a lot of daylight to be in the room during the day.
Decorating an open veranda in the country (from the photo you can see that it can be stylized for anything) requires a special creative attitude. You can decorate it with evergreen cypress seedlings around the perimeter, then it will turn into a structure in the Greek style. You can decorate the veranda inside in the form of a winter garden or a stone palace.
A carefully thought-out interior will give this structure a special look, make your own corner of creativity and imagination out of an ordinary house. Decorating the veranda pillars with wood carvings or decorating them with curly ivy or vines will add a charming look to your terrace design.
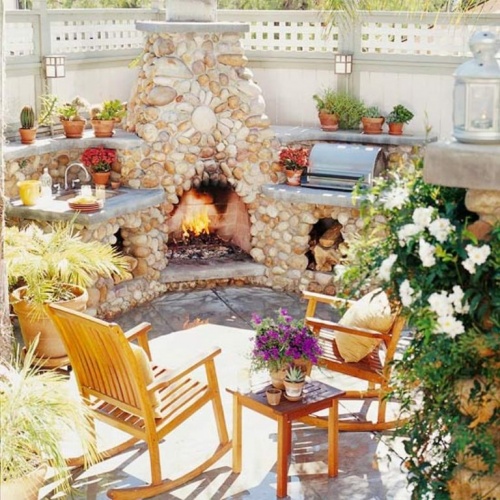
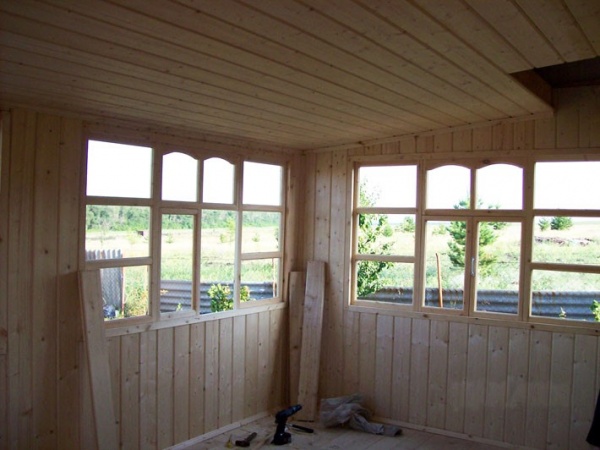
Such a structure is built both on one side of the house (open or closed type) and around the house. If it is built in length along the perimeter of the house, the structure looks like a gallery, but if it is a rectangular extension, it looks like a pavilion. For the summer period, the structure is built without insulation and glazing. Wall decoration on the veranda can be done in different materials. And for the winter, the living space turns into one where the windows are double glazed. Finishing a closed veranda in a private house (see photo) even allows the installation of a fireplace (biofireplace or false fireplace) to create a cozy atmosphere in which it will be comfortable.
How to finish the veranda in the country, photos, ideas
Verandas are of different types, depending on how the design of the house is conceived, they choose open (terrace) or closed (glazed) types. Different cladding options will create a different impression when creating a design.
It is also important what the veranda will be finished, because the main purpose of this extension is in the comfort of those who spend their leisure time here. Guided by your own taste in the finishing process, do not forget about some rules in order to get the desired result.
If the decoration of the veranda in a private house (pictured) suggests that it will be open, you need to make sure that the building materials that you will use for decoration are resistant to atmospheric precipitation and dampness, and withstand high humidity.
Among such materials, plastic panels, perforated sheet, tiles, stone have proven themselves well. Wood in the decoration of the veranda inside with your own hands provides for a mandatory preliminary impregnation with an antiseptic, such a step will avoid not only premature deformation of wooden elements, but also protect the walls, floor, and pillars from rodents.
Finishing an open veranda in a private house, photo
If a private house in which it is planned to build a terrace is located on the sea coast or on the shore of a reservoir, it will be an interesting decision to decorate the veranda with polycarbonate - transparent walls will protect you from dampness on cool evenings, but will not interfere with the wonderful views that open from there.
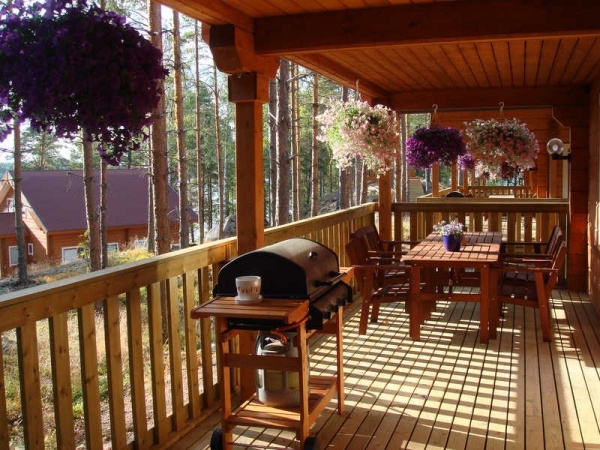
Usually, summer rooms do not need glazing, it is used only in the warm season, this seasonality does not provide for monolithic buildings or stationary cabinet furniture. Light plastic models of chairs, tables, or transforming furniture are more suitable here. Wicker chairs, tables, rocking chairs, fresh flowers, suspended in pots around the perimeter of the terrace, perfectly create themed interior.
Materials for the construction of the veranda
One of the fashionable solutions in construction today is the choice of a frame veranda. For the construction of such a structure, it will be necessary to lay the foundation, erect the frame of the building. The options for finishing the veranda are a matter of taste and possibilities, but the principle of creating a structure is almost identical.

You will need concrete concrete pillars (to build a foundation), a wooden beam for building a frame, a perimeter lathing for its lower part and finishing materials for interior decoration of the veranda walls (stone finish in the photo):
- wooden or plastic lining (pvc),
- polystyrene tiles,
- MDF panels,
- composites, stone, perforated sheet, metal, etc.
If you buy brackets, corners, screws, anchors, tools, you can make a veranda with your own hands.
As a roof, wood, metal, profile sheet, metal tiles, glass, etc. are used at will. When finishing a closed veranda inside (a wooden roof in the photo), you need to take into account the degree of natural light, because the only communication that is needed here is electricity.
The floor will need waterproofing, and depending on the style chosen, the type of surface, floor slabs or stone are used, beautiful high-quality linoleum can be laid. You should not rely on the fact that a plank floor or laminate will be used, remaining as spectacular, beautiful - if the option is open, summer, the interior decoration of the veranda in a private house (see photo) for the floor is also subject to dampness and moisture. Therefore, it is better to give preference to those materials that do not absorb moisture.

A perforated sheet for finishing the veranda inside will help divide the room into zones (for example, a dining area and a seating area), showing imagination, you can perfectly decorate the ceiling with it.
It is important to correctly calculate the lighting in the interior decoration of the veranda.
Wall decoration on the veranda inside
One of the popular ways to make a closed-type terrace not only beautiful, but also warm is to decorate the veranda with plastic panels (you can see this option in the photo).
By itself, it is a lightweight structure, therefore, the interior decoration of the veranda in the country (the photo illustrates one of the options), the ability to make windows without using a double-glazed window. It will be much more effective to take care of the insulation of the floor and walls. As a decoration inside the veranda in the country, moisture-resistant gypsum plasterboards are suitable; first, you should hydrophobize the walls of the structure on both sides: from the inside and outside. To insulate the walls, you can use mineral wool or extruded polystyrene foam. The interior decoration of the veranda (photo) is a lining of insulation, which is carefully sandwiched with a vapor barrier film, and sheets of MDF, drywall are applied on top, reinforced with PVC panels or clapboard.
Advice ! When choosing mineral wool as insulation, remember about its moisture absorption, so that soon the insulation does not crumble into dust, provide waterproofing to the walls!
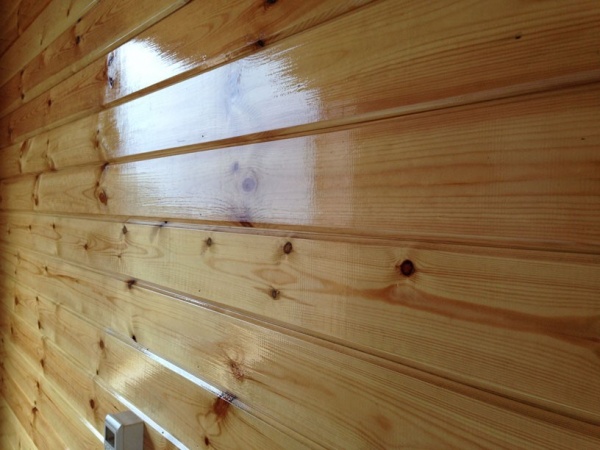
Wall panels for interior decoration for the veranda can be made of any material, even painted with decorative plaster. Wooden panels will look very impressive and respectable, but you need to remember that they need to be cared for. It is cheaper and more practical to finish the veranda with an imitation of a bar (photo), even on an open structure, this type is preferable due to its durability.

Lining is one of the simplest materials, characterized by wear resistance, good qualities for damp rooms, and undemanding to maintenance.
The advantages of finishing the veranda with clapboard include the following qualities:
- The lining is easy to install, allows you to create a smooth, even wall due to its own texture,
- It is an excellent sound insulating material,
- Differs in durability and convenience of replacing damaged areas if necessary.
Decorating the veranda with clapboard inside (photo) gives great prospects in terms of the choice of colors, neat and easy installation, but the lack of lining in fragility, especially in the cold season.

Glazing of the winter veranda
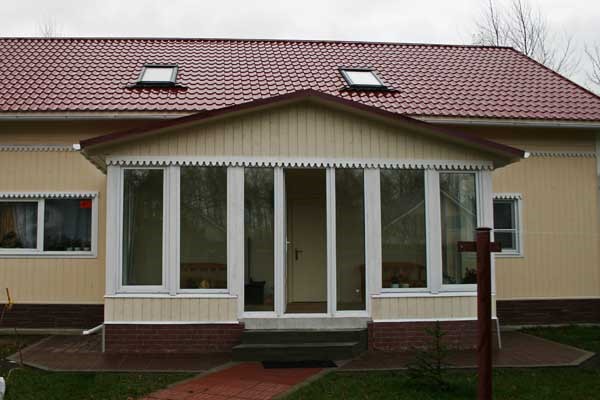
Today it is fashionable to use extraordinary solutions in glazing, one of the ways to make your home aristocratic and refined is the French veranda decoration (photo). It is an installation of metal-plastic windows in various shapes and large sizes. If it is permissible, the stained-glass windows built into the French finish look good in the interior.

Decorating the veranda and porch inside, the design of which involves the use of natural materials, looks beautiful in stone or wood.
Finishing the veranda outside
A beautiful exterior for a veranda is the image of the owner of the house. Stone, wood are classic options; carved wood in decoration looks especially beautiful and impressive. Cheaper, more practical, easier to maintain, finishing the veranda with siding (photo illustrates this option).
Among the advantages of vinyl siding are high performance, a wide range of colors, ease of installation, affordable price. Horizontal panels make the building very aesthetic.
After the veranda is attached to the house, it is time to do the interior finishing work. Given that this room connects the street and living quarters, is a kind of communication gateway between them, preference should be given to practical finishing materials that are resistant to temperature extremes, since most often the veranda is not heated, to moisture, to mechanical stress.
Materials should be easy to maintain and use. About what can be the decoration of the veranda in a private house - our today's publication.

The choice of finishing materials primarily depends on the design of the veranda and its purpose - whether it is open or closed, it will be used as an outdoor room in which you can walk in street shoes, or as an indoor one.

Before going to the store for materials, it is recommended to complete a draft design of the veranda interior design - this will help to correctly calculate the required amount, choose the right color scheme and think over every little detail to create an organic space that will be combined with the look of the house.

By design, materials can be floor, wall, ceiling. There are a large number of finishing materials that are universal in their performance properties, which can be used both for open and for.

Materials for wall decoration

A wide range of finishing materials for walls allows you to choose a finish that will have not only excellent performance characteristics, but also an attractive appearance.

Important! When choosing a material, take into account the special conditions on an unheated veranda. So, ordinary paper wallpaper will burn out very quickly and become unusable. It is better to choose glass wallpaper or other varieties that are resistant to ultraviolet radiation, temperature extremes and moisture.
Decorating the walls of the veranda with clapboard

The use of lining for covering the walls of the veranda allows not only to create a warm atmosphere in the interior, but also to insulate the room with high quality.
- The lining is a slats of small width (from 5 to 10 cm). It can be wooden or plastic.
- Wooden lining looks natural, it has all the useful properties of natural wood and requires periodic treatment with antiseptic compounds.
- The shade of the wooden lining is determined not only by the type of wood from which it is made, but also by the way the wood is processed - with wood stain, oil-wax, varnish.

- The plastic lining looks neat and tidy, it is easy to care for it, it does not require additional processing. The material is resistant to moisture and temperature extremes.
- Outwardly, it can imitate any kind of wood, but it will never look as noble and beautiful as natural wood.
- Reliable fixing of the strips to each other is provided by the thorn-groove locking system. This makes wall cladding quick and easy.

The planks differ from each other by the profile of the groove and the method of processing the edges, which affects the optical effect that is obtained after fixing the lining to the wall.
A profile happens:
- Standard having beveled edges, due to which noticeable transitions between the lamellas are formed;
- "Calm", which has smooth transitions due to the fact that the corners are less grinded during the formation of the profile;
- Euro profile, which forms a special pattern after the installation of the coating.

Conventionally, the lining, according to the fastening method, is divided into "American", which imitates overlapping laying, and "European" with additional ridges on the front side, covering the joints. Wooden lining is made of solid wood and MDF.
The first is the most whimsical to maintain and, after mounting on the wall, can shrink. MDF lining does not shrink, but when the humidity in the room rises, it can absorb moisture, which negatively affects the operational properties of the material.
Wall decoration with decorative plaster

Decorative plaster is a versatile finishing material, equally suitable for both indoor and outdoor use. The material is applied to the wall in the form of a plastic mixture, which, when dried, creates a durable, monolithic coating with high performance and decorative properties. When using colored and textured plasters, additional wall finishing is not required.

Of all the diversity, one can single out:
- Colored plaster with a wide range of shades;
- Stone plaster imitating the surface of natural stone;
- Venetian plaster imitating marble pattern;
- Silk plaster (liquid wallpaper) with natural or synthetic fibers in the composition.
Important! It is recommended to use liquid wallpaper only on the territory of heated verandas. To protect it from moisture, the coating is treated with transparent varnish. If the veranda is very sunny, then it is better to use a composition with silk fibers - such a coating does not fade and turns out to be quite durable.
How the coating will look after drying is influenced by the method of applying the composition - various visual effects are created due to the type of application technique, the direction of the strokes.
Wall decoration with PVC panels

PVC panels are classified as budget materials.
Of their main features, the following can be noted:
- Panels can take any shape and color, they can imitate a pattern of any material, have a realistic image on their surface or an ornament;
- The coating is resistant to high temperatures;
- The panels are lightweight, therefore they do not exert a load on the supporting structures;
- The coating is absolutely not afraid of moisture, it is easy to care for it;
- PVC panels are inexpensive.

Externally, PVC panels exceed the width of the lining, but they are attached in the same way - using clamps and screws. The panels can be glued to a flat base. When fixing the finish on the crate or frame, it is possible to hide communications and lay insulation.
Mechanical fragility of PVC panels occurs when the air temperature drops to -15 degrees.

MDF is a medium-density fibreboard, in the manufacture of which wood shavings of various species are used, compressed under high pressure.
The panels have the following properties:
- They are environmentally friendly;
- They have sound and heat insulation properties;
- Easy to handle and install;
- They are not afraid of high and low temperatures;
- A wide range of decorative topcoats.
Among the shortcomings, we can note the vulnerability to moisture, under the influence of which the plates eventually lose their integrity and collapse.
Ceiling finishing materials

The same requirements are imposed on the ceiling material as for the walls - resistance to moisture, temperature extremes and low weight. Ceiling trim should allow for the safe and efficient placement of artificial lighting sources.
It is worth remembering that in addition to the material for lining the ceiling, skirting boards will be required, which are installed around the perimeter of the room. They will complement the renovation and allow you to hide the technological gap between the ceiling and the wall.
Clapboard ceiling decoration

The method of mounting the lining on the ceiling is no different from mounting it on the wall. Such decoration gives the room a noble look, creates a cozy, homely atmosphere, gives a sense of harmony and closeness to nature.

One of the advantages of the lining is that by using the direction of the lamellae, you can create the necessary optical effect and visually make the room higher or wider - the planks are placed horizontally, vertically or diagonally. Herringbone styling has a special chic - it looks stylish both on the walls and on the ceiling.
When laying lamellas at different angles, you can even create an original pattern on the ceiling. For lining the ceiling, a special type of lining is used - it is lighter and has a thickness of 7 mm.
Important! When installing the lining on the ceiling along the perimeter of the room, a gap is left between the coating and the wall in case of its mobility when the wood expands. The gap is closed with a decorative plinth.
Plasterboard ceiling

Suspended gypsum plasterboard structures can be used as a material for decorating the ceiling on a closed veranda, provided that the roof of the building is well insulated. It is recommended to use moisture resistant drywall.
The advantage of this material is:
- In the possibility of choosing the height of the ceiling;
- Disguises communication;
- Installation of built-in lamps;
- Creation of a perfectly smooth surface.

The decorative finish of such a ceiling has many options, but you need to choose those that will withstand special operating conditions. If the veranda is insulated and heated in winter, then the finish can be of any kind.
Advice. On an unheated closed veranda, it is quite possible to use a stretch fabric ceiling. In addition to all the qualities of the suspended structure, it is also characterized by its fast installation. The downside is the high cost of coverage.
Ceiling decoration with PVC panels

Installation of PVC panels on the ceiling is justified by their low weight and excellent performance properties of the material, which can be combined with other wall finishes.
The main advantage is that the installation takes place on a metal frame, so the base does not require careful preparation, and the height of the ceiling can be chosen at your discretion. This allows for hidden installation of communications and electrical wiring located under the ceiling, as well as the installation of built-in lamps.

PVC ceiling panels are thinner than wall panels, but they are also equipped with air chambers between the stiffeners, which guarantees the strength of the material, its rigidity and thermal insulation properties. The width of the planks is chosen depending on the desired visual effect and the area of the room.

To make the veranda seem more spacious and lighter, preference is given to light PVC panels with a glossy sheen.
Polycarbonate ceiling

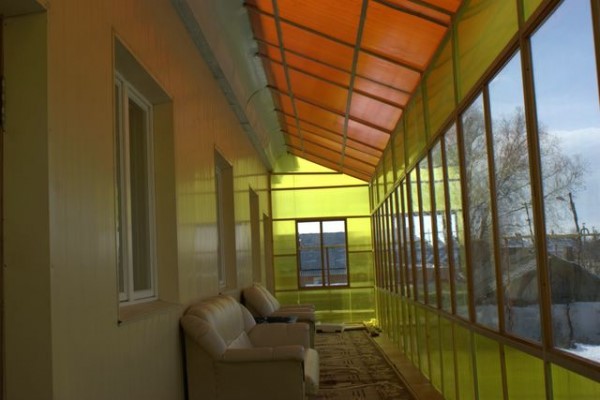
The material of the veranda roof structure sometimes does not require additional finishing - for example, if it is made of polycarbonate. This material transmits light, so the room will always be bright.
Polycarbonate can be monolithic and cellular. For the roof, you can choose a transparent material that imitates clear or tinted glass, or colored polycarbonate - then the veranda will take on a special look.

Installation of a polycarbonate roof is simple. It is carried out on a frame, which can have a semicircular shape - cellular polycarbonate is quite flexible and easy to process.
Veranda flooring

The floor covering for the veranda is selected based on the operating conditions and the type of room - whether it is open or closed, whether they will walk on it in shoes, how often the floor will have to be washed, whether it will experience serious stress. So, if there is a summer kitchen on the veranda, then all surfaces must be moisture resistant, easy to clean, resistant to dirt and high temperatures.
Floor tiles

Floor tiles are the most practical material, although their installation requires considerable effort and time.
Of the features of such a coating, the following can be noted:
- It is shockproof;
- Easy to care for;
- Resistant to temperature extremes;
- Resistant to moisture;
- A variety of color options and textures.

With tiles, you can lay out a geometric pattern using a combination of tile shapes and patterns on its surface. The laying process requires preliminary preparation of the base - leveling and screed. This will provide an even, stable surface.

For laying the tiles, a special tile adhesive is used, which is applied to the back of the product and to the surface of the base. The tile is slightly pressed down and, tapping with a rubber hammer, adjust the height of its location in accordance with the level and markings on the wall.
The distance between the tiles is formed using spacer plastic crosses, which are subsequently removed, the seams are cleaned of excess glue and covered with a special grout compound. The tile can be used on open and closed verandas.
Decking floor board

Decking is one of the popular materials for veranda flooring. Decking is a special type of three-layer lumber. Ventilation grooves are located in the lower layer, the middle layer provides for the presence of cavities for expansion of the material, the front layer is smooth, decorative.

The advantages of the material include the following:
- The terrace board is easy to install;
- The coating is strong and durable;
- The surface of the deck retains heat well;
- The material is environmentally friendly and safe;
- If necessary, you can quickly make repairs by replacing the damaged element without disassembling the entire coating;
- The surface of the decking board can withstand high and low temperatures;
- The service life of the coating is 20-25 years;
- The board has the correct geometric parameters, which greatly facilitates installation;
- The material is not exposed to insects, microorganisms, fungus and mold;
- The coating is not afraid of water;
- Such a floor has mechanical strength, wear resistance, the material is able to withstand a point load.

Such a coating naturally blends into the environment and is combined with trees and green plants, many natural materials.
Linoleum

Linoleum belongs to the category of budgetary floor materials of artificial origin:
- Among the advantages of such a coating are moisture resistance, solidity, impact resistance, simple installation and maintenance, low cost and availability.
- Linoleum can imitate a large number of materials, their textures and shades, but it is impossible to hide its unnaturalness.
- Use linoleum on the floor in enclosed spaces.

- Among the disadvantages of linoleum, one can note its vulnerability to point loads from heavy furniture, and the impossibility of repairing the coating if its integrity is damaged.

Rubber coating

The rubber covering on the veranda can be installed in the form of tiles or rolls.
- This unique flooring material has high impact resistance, it is absolutely waterproof, is not afraid of temperature extremes, does not slip, has high strength and wear resistance.
- Stays on a flat surface.

- It is recommended to give preference to a modular covering, which has a special collapsible locking system.
- The damaged element can be easily replaced.
- There are cheaper rubber tiles that are glued butt-mounted. When laying roll material, the joint between the canvases will need to be welded using a special soldering iron, a hair dryer or polymer glue.

At first glance, the concrete floor on the veranda seems to be the simplest option, but it has a lot of weight, therefore, it requires a reliable, monolithic foundation or concrete slab floors.
The advantage of such a coating is its shock resistance, water resistance, it is resistant to temperature extremes and does not need careful maintenance. In order for the concrete surface to have a neat appearance, it must be sanded and polished.
Finishing options for the veranda in a private house are shown in the video.
When they talk about a veranda, they usually mean an annex, which is adjacent to any side of the main structure of the house. The veranda is usually operated only in the summer, that is, there are no heating devices here.
The design of such premises can be different - open (when the veranda is under the roof), closed. There are both glazed and non-glazed verandas. Finishing work completely depends on this factor.
What is also important is that this annex and its exterior decoration should fit into the overall exterior of a country house as naturally as possible.
The purpose of this room is not only decorative functions, the practical side of the matter is also present here. A well-lit room, where there is no extra furniture, but there are an abundance of indoor plants - all this best contributes to a pleasant summer vacation. That is why many are wondering how to decorate the veranda.
Some facts about verandas:
- The extension can be combined with the main entrance to the house. Sometimes the exit to the veranda is done in a room - in this situation, the exit to the street is not done. These features are thought out even at the stage of construction of the main house;
- If initially there was no veranda in the project of your house at all, you can always attach it - even later. But, so that it is not necessary to punch a doorway in some load-bearing wall, this is done directly on the main facade - usually right in front of the entrance doors. Engineering communications are usually not carried out on the verandas, so you can carry out the construction on your own;
- The basic rule is that a new extension should complement the structure of the house. The main task is to make a good foundation for the veranda; It is best to do this business in the warm season, otherwise, when thawing occurs, the soil will sag - that is, the veranda will move away from the wall of the house in such a situation. Thoroughly think over all the nuances - what are you going to build the veranda from, how to decorate the veranda from the outside so that the exterior of the building is not damaged;
- As practice shows, a columnar foundation is usually equipped for verandas. It is quite enough to withstand the weight of the sheathing and the frame itself. The pillars of the foundation are made of bricks, they are installed in pits (for them, a depth of 100 cm is sufficient). This applies to every corner post. If the length of the future veranda is more than 150 cm, intermediate posts must be installed.

Watch a video on how a columnar foundation is made, which is ideal for building a veranda. In fact, the work is quite simple, but many make mistakes - because they approach this issue without proper attention.
Preparing the pits for the foundation looks like this:
- When a hole is dug, a sand pillow is first made in it - up to 200 mm. Fine gravel is usually poured over this sand, after which a liquid solution is poured onto it;
- To prevent water from the solution from being absorbed by sand in the future, roofing material is often laid on it before filling crushed stone. Bend must be performed along the walls of the pit - up to 100 mm;
- The concrete cushion, which was obtained as a result of the above work, will serve as a support for brick posts. Before spreading it, it is customary to coat concrete with bitumen (if there is liquid glass at hand, it is used). However, other waterproofing compounds can also be used here. The height of the posts should be calculated so that the floor mark is somewhere 250 mm lower than in the main house;
- When the masonry is completed, the inner cavity of the columnar foundation should be filled with stones, gravel, here you will also find use for broken brick - a variety of materials at hand can be used. The outer surface of the posts also needs some form of waterproofing;
- Our foundation posts for the veranda in the future are support for logs (wooden beams). Before laying these beams, they must be treated with some kind of antiseptic.

Antiseptic treatment of wood is necessary in order to provide protection in the future: not only from rotting and moisture saturation, but also from rodents and insects.
We have considered one of the most popular options for arranging the foundation for a veranda. The design may be completely different - depending on the dimensions of the future room, on its walls - if the design suggests it. It is best to have instructions for each specific case, even better - a full-fledged project.
How to decorate the walls of the veranda
If the structure of the house to which you are going to attach a veranda is made of timber or logs, or it is a frame-panel structure, the most effective option is wooden walls for an extension. However, to complete the frame, you can always use a metal profile, and then perform clapboard facing.

The option with a metal profile is especially good if glazing of the veranda is planned in the future.
Thus:
- If the plans include glazing, stained-glass windows made of aluminum are suitable for arranging the walls - they are placed directly on the basement. The use of such elements contributes to solving two problems at once - both the construction of walls and their subsequent decoration. More precisely, finishing is not even required here - you just need to periodically wash the glass. You just need to be puzzled by the question of decorating the intermediate posts and the profile itself. A stone or facing brick is perfect for this;
- Glass blocks are another way to decorate a veranda even at the stage of wall construction. This material is good because it is not only decorative, but also very constructive;
- The modern building materials market offers its consumers an impressive assortment of a wide variety of blocks: if you want to eat with frosted glass, finding with colored glass is also not a problem, as well as with corrugated glass. There are even varieties of blocks with special decorative applications - they are made in the inner cavity. It looks really beautiful - whoever has seen, he knows;
- Different variations of glass blocks can be combined with each other as you wish. There is a desire - make up some kind of panel. There is a possibility - accompany all this with spectacular lighting. Of course, the cost of such a veranda will be much more than that of a structure with plastic or plywood walls, but beauty requires costs, and the end result is worth all these investments;
- If the wall is made of glass blocks, you don't have to worry about light transmission. The room will always be bright, even if you install small windows.

An interesting option is to equip window openings directly on the roof of the veranda (as a result, something like dormers will come out). In any case, during construction, you can skillfully combine both options - let one wall be made of glass blocks, and the rest - from stained-glass windows.
The fourth wall of the veranda is the load-bearing wall of your house. Its decor will be completed when the interior of the veranda is finished.
The use of wood in the decoration of the veranda
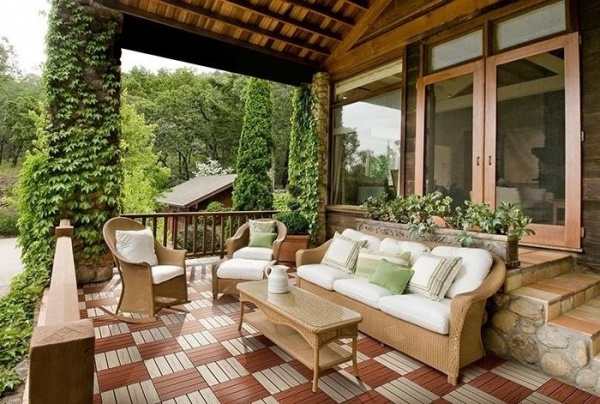
If you have an open veranda, then the concepts of interior and exterior decoration of a room are mixed here. As a rule, it is customary to make such structures from wood: this applies to both decorative and structural elements.

And now in more detail:
- Compared to other materials that can be used for the construction and decoration of the veranda, wood is ideal - it will create a very favorable atmosphere for relaxing here. The air will be saturated with a woody scent all the time;
- The elements that support the roof of the veranda (pillars) can be made of a bar with a section of 150 to 150 mm or from rounded logs. In the simplest case, the floor on the veranda can be obtained using a simple edged board - for this, the material does not even need to be painted;
- The ceiling can be hemmed with ordinary clapboard, the parapet can be made of bars, which are usually used to create lathing;
- Many homeowners do not want to save money when it comes to finishing the veranda - they prefer to decorate this place with high quality, solid, after all, here in the future there will be a place to relax. For such situations, manufacturers find different solutions;
- For example, it is a very popular option, which is nowadays actively used for facing the veranda. This material is also known as decking. It is also customary to include a deck board, garden parquet here;
- For the manufacture of deck boards, not solid wood is used, but composite. That is, in addition to wood, the material also contains polymer additives. Due to this, the characteristics of the products are improved - they acquire impressive strength, they are also no longer afraid of moisture. All this benefits not only open but also closed verandas. Even an unheated structure can be clad with such a material;
- Planken made of larch (or ash) is also a high-quality, fairly expensive wood, with which you can make an outdoor veranda finish. Planken is called a planed facade board, which is made from solid wood massifs. What is the difference between a planken and a simple planed board? Here it's all about the shape of the section - the planken's chamfers are rounded, while beveled. There are no connecting grooves, like the lining, - due to this, the installation is not done end-to-end, but with gaps;
- A wooden veranda is good because it can be attached to a variety of structures - stone, brick, wood. The bottom line is that the color scheme of the facade finish is fully consistent with the finish of the veranda. Wood is often not just painted, but decorated with carvings.
A very worthy solution is to decorate the veranda design with carvings. Twisted pillars and a beautiful carved parapet will look great here. The last element, for example, can be colored in contrast to other structures. Arched hinged elements will also look appropriate if a lace pattern is applied to them. There are many options - everything is limited only by your imagination.
How to decorate a glazed veranda inside

Decorating an interior in a glazed veranda is about the same task as decorating a loggia. But the veranda is usually a more spacious room, therefore, there are more possibilities for design here.
Let's figure it out in more detail:
- The veranda is a construction that is considered summer. But nothing will stop you from making heaters here and using the space throughout the year, not only in the summer. In this case, you can safely use a variety of finishing materials here;
- A great example of how you can organize the interior design of the veranda. Stained-glass windows have been installed, the roof of the structure is made of glass - due to this, the room will always be flooded with the sun.

Many people refuse glass roofs just because they are afraid of direct sunlight and their negative influence. In fact, it is very easy to protect yourself from this - it is enough to use acrylic frosted glass.
- A worthy addition to the interior decoration of the veranda is curtains of some original color or unusual blinds. Of course, the design of the ceiling on the veranda depends entirely on how the roof is made;
- In addition to wood, in the decoration of the veranda ceiling, you can safely use MDF, plastic, make filing with plasterboard, paint. Many decide on facing the veranda with polystyrene tiles. False ceilings and much more will look worthy here.
See more on how to decorate the veranda in the video. This material will be useful for both experienced decorators and novice builders, who just want to improve their veranda.
The decor of the walls on the veranda can be done in different ways, but most often they make a choice in favor of light colors. The floor in such a room can be done by anyone - at least use parquet, at least lay tiles. If you want, for example, you can cover the floor with carpet under the baseboard - right around the entire perimeter of the room.

Upholstered furniture on the veranda, if it is properly finished, will also never be superfluous. After all, a comfortable stay is hardly possible if there is no comfortable chair or comfortable sofa at hand.
The most important advantage of a country house in the age of urbanization is the ability to breathe in clean air deeply. Alas, in overcrowded metropolitan areas, many have simply forgotten not only what a real forest looks like, but also a clear sky. Of particular envy among the owners of private cottages are houses with open or closed verandas, where the whole family can gather in the morning and in the evening.
The scent of summer or falling leaves in autumn cannot be compared with anything, and if you still have a mug of hot tea in your hands, then it seems that all desires in this life have come true. It's nice, admit it, during the first thunderstorm of the year on the open veranda to feel the sweetness of ozone, as well as hear the rustle of green foliage under streams of rain.
All this is possible only under one condition - the interior of the veranda will not repel from it, but rather attract. If you are lucky and you have a closed version of such a room, you can place a dining room here, which, by the way, will be in the summer. However, in order to prolong the impression of the view from the window, we need a high-quality interior decoration of the veranda.

Choosing materials
Before answering the question - how to decorate the veranda inside, it should be said that they should carry not only aesthetic, but also practical orientation. It should be borne in mind that the veranda is usually not heated and has similar elements with the gazebo, which is attached to the main house.
In this situation, the corresponding requirements are imposed on the decor:
- the beauty;
- resistance to high humidity;
- not afraid of temperature changes.
Wood processing and insulation
Most often, wood is used for the construction of verandas in private houses; probably no building material can compare with it. But, due to its naturalness, it can cause a lot of trouble. Therefore, before finishing, it is necessary to treat the wood with antiseptic compounds.
If, however, you have it with carrying out thermal insulation work for walls under windows, as well as ceiling structures. Try not to rush and do everything carefully so that you can use the room almost until frost.

To insulate the ceiling, you can use those materials with which it is easiest for you to work, for example, with mineral wool, foam or expanded polystyrene, professional teams will be able to process the surface with liquid polyurethane foam.
The price of the latter, taking into account the work, is high; it is best to take EPS boards and mats or rolls of mineral wool.
- Secure the waterproofing to the walls and ceiling using a waterproof film.
- Glue the joints between the sheets with metallized tape.
- Install a wooden batten. The cross-section of the timber must match the height of the insulation, the sheathing cell must correspond to the width of the heat insulator.
- Insert insulation between the beams.
Advice: before installing mineral wool, it must be wrapped in a waterproof material so that it does not get damp and does not deteriorate after a few years.
- Install foil-clad insulation on top of the insulation (with foil inside the veranda). Tape the seams between the sheets with metallized tape.
- Insulate the ceiling in the same way.
Finishing the veranda
Do-it-yourself veranda interior decoration is done only after the completion of all preparatory work. There are two ways here - trust your feelings and invite a professional designer. Usually they choose the first method, since there are plenty of options to transform the inside of the veranda today.
PVC panels
An inexpensive decoration method that will help turn an ordinary room into an interesting and cozy one. The material is not afraid of high humidity and does not deform with sudden changes in temperature.
Installation is easy and without any intricacies. Thanks to the different colors of the panels and their texture, you can get a pretty decent room that you are not ashamed to show your friends.
Of the shortcomings, the fragility of the material should be noted, although today you can buy "armored" types, the cost of which is 2 times more expensive than conventional options. Therefore, you should be careful when pushing back chairs or leaning on it.
Tip: a construction trick will help solve the problem - the 1st lathing bar is set at knee level, the second at the pelvis, and the 3rd at the shoulder.
The instructions below will tell you how to do everything with minimal cost:
- Prepare wooden slats for the frame with a section of 20x30 or 10x30 mm, you can also use a profile for plasterboard sheets. Wood material should be pre-treated with an antiseptic.

Tip: Use wooden battens on the wall facing the street. In this way, the formation of "cold bridges" can be avoided. For walls that are too uneven, it is better to use a profile on hangers.
- Attach the battens perpendicularly. For example, for vertically installed plastic, they should be placed horizontally in increments of up to 500 mm.
Tip: decorate panels with a pattern from left to right, monochromatic - on either side.
- Attach a starting corner to the finished crate with self-tapping screws, if you will be finishing the wall with another material next to it, or a fastening corner for joining the panels to each other. On the ceiling, install a fixing strip under the skirting board.
- Install the first panel into the guide profile, with the tongue in the direction of installation. Screw it to the crate with a self-tapping screw with a press washer.

Tip: do not fasten the plastic tightly so that it does not deform from this.
- Insert the tenon of the next panel firmly into the groove of the previous one, secure it and continue to install the rest on the wall and ceiling as well.
Tip: at the bottom and top of the wall, leave a thermal gap for the material within 20-30 mm and cover it with a skirting board.
MDF
An alternative to plastic is MDF panels, which are also popular among lovers of self-decoration. You need to know that, although they are ahead of him in strength, they are very sensitive to moisture. Install them only on closed verandas.
The installation process resembles the previous one, only the fasteners are carried out with the help of clamps, special metal devices. They can be secured with a construction stapler or small nails, doing this through a guide, so as not to damage the edge of the material.
Wooden lining
The most traditional finishing option for the veranda is considered to be wooden lining. It is a cladding board in which special grooves are cut to facilitate installation, material thickness up to 22 mm.
It is used for open and closed veranda. Treatment with antiseptic compounds increases the service life up to 20 years. So far, no artificial material can compare with natural wood.
How to choose
There are two types of lining - solid and spliced, when the best pieces are connected together in a special way. While the latter looks perfect, it cannot be used to decorate a veranda. An increase in moisture can cause cracks to appear at the bonding points, which will greatly ruin the interior.
There are also 4 classes of material:
- "Premium" - the most expensive, but almost always spliced;
- classes "A", "B" and "C" - from solid wood, differ in the number of knots per 1 running meter. and defects. Often they are treated with putty at the production stage.
Tip: when buying material in a pack, be sure to unpack it and look at it so that you do not come across low-grade or defective trims.
- Drive a galvanized nail into the center of the board, then drown its head with a dabber.
- Self-tapping screws. Pre-drill a hole in the board from the side of the thorn to a depth of about 10 mm, and select the diameter of the drill according to the diameter of the screw head. Screw the lining to the lathing, inserting a self-tapping screw into the hole, close it with a dowel and grind it.
- Use a mechanical or pneumatic stapler to drive the mounting brackets into the board.
- Kleimer installation. Similar to MDF panels.
At the last stage of installation, close the joints and corners near windows and doors with a corner and treat the boards with wood stain or varnish. Start the process with the ceiling and end with the walls.Output
The work on finishing the veranda is not difficult, more like a creative one. Take some time for yourself on the weekend, prepare the material in advance and update its interior, so that everyone will be pleasant and comfortable to be in it. In the video presented in this article, you will find additional information on this topic.

The veranda is not just a non-residential building. This is the "face" of the house, where in the summer you can have breakfast, enjoying the morning coolness. And if the veranda is insulated, it can become a full-fledged recreation area even in winter. Full finishing of the veranda will help in this.
General requirements for materials
There are quite strict requirements for the materials that are used for finishing work:
- Resistant to temperature fluctuations. Regardless of the type of veranda (open or closed), usually the indoor and outdoor temperatures are almost identical, provided that the building is not heated.
- Moisture resistance. High humidity is another problem that the finishing material must deal with. This is especially true for the open type of veranda.
- Resistant to fading. Usually, verandas are rooms where there is a lot of light, which is why the finish can fade in bright sunlight, losing its aesthetic qualities.
- Security.
- Price.
These qualities relate to materials that will be used both inside and outside the veranda.
From this video you will learn some useful tips for decorating your veranda yourself:
Work outside
When choosing how to sheathe the veranda outside, you need to focus on the appearance of the house, otherwise the room will be out of the picture. Versatile materials can be combined with almost anything. They are called universal:
- wood;
- plastic;
- stone and brick.
Wood
Wood is difficult to work with. This material deteriorates quickly without proper care. Its positive aspects include the following features:
- Attractive appearance, which is achieved due to the variety of textures.
- Thanks to the tree, you can implement veranda projects in any style. From old Russian, decorating the corners of the room with carved pillars, to modern Art Nouveau with little processed wood surface. It looks great with glass, stone, brick, wood and wrought iron.
- Environmental friendliness.
The disadvantages include:
- High susceptibility to atmospheric phenomena. Various impregnations and coatings protect against environmental influences, but do not guarantee complete protection of the veranda. In addition, procedures to protect the tree will have to be done regularly, which takes time and effort.
- Wood is a fire hazardous material.
- Financial component. The tree is expensive. Add to that the cost of regularly maintaining your boards and you get a pretty hefty amount.
Bricks and stones
Usually, not the entire veranda is made of stone or brick, but only the foundation and several pillars that support the roof of the structure.
Consider the positive aspects:
Cons of material:
- Stone and brick are expensive materials.
- They do not go together with wooden houses, which can be a problem if you are building a veranda in the country.
- Labor intensity of construction.
Plastic
Plastic is one of the most popular materials. Its pluses include:
- Low price.
- Ease of operation and installation of cladding.
- Durability and weather resistance. High-quality plastic can withstand extreme heat and frost.
- High sound absorption and excellent thermal insulation properties.
- The material is able to withstand high loads.
- Under the influence of the sun and temperature changes, the material loses its decorative properties over time.
- This is an artificial material.
Interior arrangement of walls
The interior decoration of the veranda is carried out with the following materials:
- lining;
- decorative plaster;
- PVC panels;
- MDF panels.
They all have their own installation specifics.
Lining
Interior decoration of the veranda with clapboard is a classic design option.
For the veranda, a standard thin lining of 5-10mm is usually used. Typically, this is a board made of wood, wood products, or plastic. There are differences depending on the profile. Distinguish:
- Standard profile. The variant features beveled edges that create noticeable gaps between the panels.
- Calm. Differs in relatively soft transitions, due to the small corner of the seam of the edges.
- Europrofile. After the coating is assembled, it forms a certain pattern.
The boards are connected using a special system consisting of tenons and a groove. But keep in mind that working with the clapboard is very difficult. Wooden panels shrink or swell, and plastic ones are not so whimsical.
The following tools are required for installation:
- screwdriver;
- cleats (special metal latches).
The lining can be located horizontally or vertically. You can also try to install it at an angle. It depends on your skill, imagination and the characteristics of the room. And one more tip - do not try to squeeze the spikes into the grooves all the way.
 Lining - one of the types of veranda finishes
 Decorative plaster
To decorate the veranda from the inside, plaster is often used. This is a mixture that, after being applied to the wall, turns into a finished coating. There is a huge variety of different coatings:
- plaster, which contains colors to give the walls the desired color;
- plaster imitating stone;
- Venetian, which repeats the texture of marble.
The appearance of the veranda also depends on the technique of applying the material. You can achieve different results simply by using a little more plaster or by making different types of strokes. In addition, with the help of plaster, you can create sgraffito - stucco paintings on the walls.
MDF and PVC panels
MDF-panels (Medium Density Fibreboard) - wood fibers, which were obtained in the process of processing solid wood blocks. After that, the chips are pressed under high pressure and temperature. The veranda can be sheathed with slabs up to 10 millimeters thick. The finished block has the following qualities:
- has high sound absorption rates;
- tolerates high and low temperatures;
- easy to use.
But the material also has a minus - it reacts poorly to moisture (swells and disintegrates). If condensation often appears in the veranda, MDF panels will not work.
For the convenience of work, several formats of MDF panels are made:
- separate sheets;
- lining, etc.
It is enough to fix them to the wall with screws.
PVC panels are a material that is made of polyvinyl chloride. It's very comfortable. Since the panels are plastic, they can be bent to fit any room shape.
PVC panels have the following positive aspects:
- light weight;
- high indicators of stability in contact with water;
- resistance to high temperatures;
- low cost.
But there is also a minus - in the cold, the material cracks. So if the winters are harsh and the temperature often reaches -15, it is better not to use PVC panels in an unheated veranda.
If you will do all the work yourself, it is advisable to choose a material with pins and grooves for quick installation. The process is as simple as with MDF.
For installation, special fasteners are involved. And you need to screw the panels with a screwdriver. To avoid damaging the material, do the operation at low power. If you bought a kit ready for installation, then here you can do without a screwdriver at all, doing only with clamps and screws.
Beautification of ceilings
The ceiling is the part of the structure that carries the greatest load. It is constantly exposed to moisture due to seasonal rainfall, and in winter it must also support the weight of snow. Finding the right material is not easy. It must be at the same time: durable, lightweight, moisture resistant.
Two materials meet these parameters:
- polycarbonate;
- weaving.
They are easy to install and require little maintenance.
 The ceiling is one of the heavy elements
 Polycarbonate
Polycarbonate is a transparent modern material. It is very similar to glass, but spared its disadvantages. In particular, polycarbonate is durable and very lightweight.
It has several types:
- Monolithic. It is a solid material produced in the form of plates. It looks like glass. It can withstand loads stably, therefore it is better suited for the roof.
- Cellular. Inside, this polymer has a honeycomb division. It is less transparent, but has the same high light transmittance. Such polycarbonate retains heat noticeably better and is much lighter than its monolithic counterpart.
Polycarbonate can be transparent or colored. It is easy to fix the material. To do this, create a frame on which you want to install the sheets. They are fastened with galvanized self-tapping screws with thermal washers to prevent leakage.
Weaving
If you want an original ceiling on the veranda, then the wicker option can be the cheapest alternative to design solutions. Outwardly, it looks like the walls of a basket, but it looks stylish. Usually they use for weaving:
- thin moisture resistant plywood;
- veneer.
The installation procedure in the house is quite simple:
- Saw the sheet into several even strips. To do this, you can use a machine so that the cuts are neat, otherwise the weaving may be fragile.
- Weave the fabric on a flat surface. Weave in a checkerboard pattern, using a rubber mallet to tap the protruding edges.
- Hide the "tails" of the stripes from the seamy side of the weave.
- Since the structure is quite heavy, it is impossible for one person to lift it. To make it easier to work, use the ropes brought along the edges. It is better to lift from the side of the doors.
- You can fasten the material with slate nails.
Install skirting boards to hide the joints. For greater aesthetics, cover it with varnish.
Flooring
The final chord in the design of the veranda is the choice of flooring. The options can be as follows:
- terrace board;
- tile;
- rubber;
- linoleum;
- cement.
To finally make a choice, think about whether you will walk barefoot or in shoes on the veranda. In addition, carpet or carpet can be laid on the floor in the veranda.
Terrace board
Decking is essentially processed lumber. This is a three-layer construction:
- Bottom layer. This is a cover with ventilation slots.
- Middle layer. There are cavities here that allow the wood to expand without deforming the overall structure.
- Upper. This is the face of the board, so it is smooth.
This material has many advantages:
- the board is easy to mount;
- the floor is not much different from wood;
- the coating is durable and heat-absorbing.
So that the floor does not deteriorate, it is better to give preference to boards that are varnished. Installation must be done on a frame with lag transmission. Moreover, the logs must be placed perpendicularly with an interval of 40-60 cm. After that, the board can be fixed. It is better to use nails or screws as a retainer.
Tile
The slab is a difficult material to install. But the difficulties justify themselves, since the tile has the following positive qualities:
- it is shockproof;
- easy to clean and withstands rainfall;
- differs in a variety of design.
Tile installation is carried out according to the following steps:
- First, the surface needs to be leveled.
- Then the screed is carried out.
- Preparation of materials. You will need special tile adhesive.
- The tile is leveled. Between the corners, you need to install special crosses in order to align the dimensions of the seams.
- Then mask the joints with a special grout. If grout gets on the tiles, don't worry. It will be washed off the surface, but will remain in the gaps.
But there is one difficulty - cutting. This must be done if the room has non-standard dimensions. This operation is almost impossible to do without a tile cutter, although you can try to replace it with a grinder.
Linoleum
If the classic wall decoration in the veranda is clapboard, then for the floor - linoleum. The coating is made of polyvinyl chloride in combination with polymers. The advantages of the material include:
- waterproof (but only if attached in one piece);
- impact resistance and wear resistance;
- ease of installation and maintenance;
- huge assortment;
- low cost.
Even a non-professional can do the editing of the material. The main thing is that the floor surface is sufficiently flat. Next, you need to roll out the roll, align it and fix it near the baseboard. If the linoleum has been cut, individual sections can be held together using a special strip. But due to the fact that the material passes cold, you need to use insulation.
Rubber
The rubber covering is the rubber used to cover the floor. On the market, it is represented by slabs or monolithic blocks. Of the positive aspects of the material, one can single out:
- impact resistance;
- absolute waterproofness;
- resistance to temperature changes;
- phenomenal durability;
- a wide range of design solutions.
It is important here that the floor is level. To connect the plates together, you need polymer glue.
The installation procedure is similar to working with ordinary tiles. But in this case, crosses are not needed, because the plates fit more tightly. If rolled rubber is used, the joints are sealed with a soldering iron or a hot air gun.
 Rubber has its own nuances
 Cement mixtures
You can decorate the floor in the veranda in a standard way using cement. Despite the banality, the option remains the most labor-intensive. At the same time, such a floor can be laid even on a monolithic foundation. As a result, you will get coverage that is different:
- shock resistance;
- waterproof;
- resistance to temperature changes.
It does not require careful maintenance. True, after the cement mixture is installed, it must be polished to a shine with a special machine.
There are many other versions of finishing materials such as OSB slabs or self-leveling floors, but all of them are in less demand among consumers.