One of the main attributes of the bright holiday of Easter is beautifully decorated eggs. They symbolize the rebirth and renewal of life. Not a single Easter table is complete without eggs, they are used to decorate the interior, and are also presented as a gift to relatives and friends. There has long been a very interesting tradition - to leave Easter eggs in the house until next Easter. In this case, they will become a kind of amulet and will protect the home from various troubles and hardships. Today we will talk about how to make DIY Easter eggs using different techniques and techniques.
Easter eggs from beads
Easter eggs made of cotton threads
These Easter decorations look very nice - they can be folded into a deep vase, put in a basket or hung around the house. For the manufacture of such eggs, it is best to use ready-made wooden or  foam blanks. If there are none, you can take an ordinary egg, make two holes in it - below and above, and then blow out its contents. This will create an empty shell. The shell can be used as it is. But it is better to fill it with gypsum, melted wax, polyurethane foam or fine grains for greater strength. In addition to the blank, you will need a beautiful nylon or cotton thread and various decorative elements - artificial leaves and flowers, ribbons, ribbons, etc.
Ready-made thread eggs can be decorated with ribbons, rhinestones, etc. If you cut a hole in such a craft, you get a "house" for a chicken or a rabbit.
Decoupage Easter eggs
Decoupage is a technique that allows you to turn anything into a real piece of art, eggs are no exception. Everyone can make decoupage of eggs for Easter, for this you only need napkins with beautiful images, glue and a little patience.
The most interesting options for decorating eggs for Easter
There is a very interesting home decoration idea that comes from Europe. It is there, on the Easter holiday, that eggs are hung on bushes or trees.
To do this, you should prepare:
- food coloring
- a few eggs
- PVA glue
- artificial flowers, pins, ribbons and pearls

Step by step execution:
1. Get rid of the "filling" of the egg, and then paint it with a dye in the desired color
2. Take lace, ribbons and glue. Clip them onto our testicle.
3. Glue the pearl on the cap with pins. Then you need to put the artificial flower on a pin so that the pearl is in the center of the flower.
4. The final touches remain: insert a pin into the hole of the egg, attach with glue and glue the tape on the opposite side of the egg so that our egg can be hung. All is ready.
You can also make rabbits with your own hands, which will serve as an excellent souvenir presented for Easter. And if you add inscriptions on each "eared", then they will also become personalized.

To do them you need to:
- chicken eggs
- corrugated or colored thick paper
- felt-tip pen
- glue
- pompom for the nose and baskets
Step by step description:
1. You need to take the paper described above, cut out the ears for the rabbit.
2. Remove the "insides" from the egg by making a hole in it in the center. Then wash and dry.
3. Glue the ears to the egg, and use a felt-tip pen to highlight the eyes and eyebrows.
4. Fasten the pompom on the hole made in the egg - this is our nose.
5. Cut the green grass out of the same paper using scissors and put it in the baskets.
6. At the end, all rabbits individually should sit in this grass.
It is best to use raw eggs.
What is needed for this:
- empty eggs
- herbal leaves or twigs
- brushes
- tweezers
- vinegar
- scissors
- a tablespoon
- paper towels
- liquid food colors
- nylon stocking

Step by step description:
1. As usual we make the egg empty, wash and dry.
2. Using a small brush, apply the egg white to the opposite side of the branch or leaf. Take a pair of tweezers and place the sheet in the middle of the egg and press down very gently with your fingers.
3. Cut a 7.5 cm piece from the stocking. And wrap each testicle in it.
4. Now we make a solution to paint the eggs. To do this, mix half a glass of water with 2 tablespoons of vinegar and one teaspoon of liquid food coloring of the desired color.
5. Place the testicle in the resulting mixture and press down a little with a spoon to make it all colored. Keep it on for six minutes and make sure it is all covered with dye.
6. Remove the egg from the dye and pat dry with a paper towel.
7. Cut the nylon and discard the egg. Discard the leaves carefully. Blot with a paper towel and blow off with a fan to remove unnecessary moisture.
8. Spread paper towels and place eggs on them to dry completely.
What is needed for this:
- eggs
- waterproof adhesive tape
- stencils
- food coloring
- small cups
- paper towels

Work description:
1. Take a stencil and apply the image to the water-permeable adhesive tape, and then cut out the shapes. They can be absolutely anything: initials, patterns or geometric shapes.
2. Glue the resulting shapes onto the egg. Iron it thoroughly so that there are no “creases” to avoid paint getting under the sticker.
3. Place the egg in the dye and wait until it turns into the desired color.
4. Lay out the egg and pat dry with a paper towel. Leave it on for ten minutes. Peel off the sticker. All is ready.
In this case, dark chocolate is taken, but you can use any other - milk or white.

Description:
1. Pierce the egg and remove the filling. The output should be 12 pieces.
2. Pour cold water into a large bowl, add a tablespoon of vinegar, wait until it boils, and then sterilize the egg for ten minutes, removing the scale that appears.
3. After removing the eggs, place them on a towel and leave to dry for three days.
4. Before you paint them, you need to make a dye. In a deep glass dish or enamel bowl, combine 4 tablespoons of vinegar, 12 drops of blue food coloring, and two mugs of plain water. Pour vinegar into a separate bowl. Take a plastic spoon and dip the egg in vinegar and then in dye for three minutes. Spread paper towels and place eggs on top of them until dry.
5. Chop three kilograms of chocolate with a special knife. Place the chocolate in a non-heatable dish.
6. Place it in a water bath. Wait until the chocolate becomes liquid, stirring occasionally, the temperature should show 131 degrees. Remove the chocolate from the stove and chill to 82 degrees, then reheat to 88 degrees.
7. From whatever material is suitable for this, make a funnel in order to pour chocolate into our eggs. Pour them over and wait about 4 hours for the chocolate to harden.
8. Such sweets are perfectly stored in the refrigerator or other cool place.
Important information: a certain temperature is used for the type of chocolate - milk chocolate must be heated to 119 degrees, cooled to 80, and then heated to 87 degrees. Heat white chocolate to 119, cool to 78 and heat to 85 degrees.

1. The egg must be pierced and the contents removed. Then wash thoroughly and embroider the egg. Using a white pencil, write inscriptions, any information, abbreviated names. Then paint the eggs with food coloring and wait until they are dry.
2. Use scissors to cut 1 inch ribbons, fold in half, step back about four centimeters from the top and tie a knot.
3.Use a needle to pull the tape through the egg and secure with a bead and knot. If unnecessary ends are formed, simply cut them off with scissors. The pendants are ready.

To make original cows and a calf, you will need quail eggs, yarn, colored paper and wire with a pile. Use a black marker to highlight the spots. Take colored paper and cut out the ears, horns for the cow, and then glue them onto the egg. With the help of a wire with a pile, you will get wonderful legs, and from yarn - a cow's tail. Everything is ready, it turns out simply and very quickly.

To make them, it is enough to have at hand gold and gilded leaves, glue, mother-of-pearl paint. In any creative store, you can find and purchase everything you need. It is not necessary to paint chicken, you can take turkey and goose eggs.
Such eggs are very popular among Ukrainians; they have been painting eggs with wax for many years. First, wax is applied to it, and then they put it in the dye of the color they want to get. And then the wax is melted and the egg becomes decorated with beautiful figures.

What is needed for this:
- eggs
- food coloring
- a candle to melt the wax
- paper towels
- wax paper
Phased execution:
1.Use a pencil to draw an image on a raw or boiled egg
2. In a jar, melt the wax. Using a small and thin brush, paint over the image with wax
3. Dip the eggs in the dye for two minutes, remove them and wait until they dry completely.
4. Put eggs on a baking sheet one by one, after washing it with baking paper, and put it in an oven preheated to 260 degrees. Then wait five minutes.
5. After this period, remove them from the oven and use a paper towel to carefully wipe the egg from the wax, which should become liquid. The original egg is ready.
Easter is the lightest, quietest and most comfortable holiday. There are no noisy incendiary parties on Easter, you need to spend it at home, with your family, next to your loved ones. And in order to create the mood of a bright holiday and to please loved ones, especially children, it is customary for Easter to prepare special Easter dishes and paint eggs. Decorating Easter eggs with your own hands is a great way to have fun. the site offers you original fresh bright ideas for decorating Easter eggs with your own hands. Let your family have a beautiful holiday!
Paints are the first thing that comes to mind when we want to decorate Easter eggs. Not everyone has artistic talent, but with a little trick, anyone can get great results. For example, if you add a little vegetable oil to a regular coloring solution, then the paint will fall unevenly, with intricate marble patterns. You can repeat this trick several times from light to dark and get a very interesting texture.
Decorating Easter eggs with your own hands from different shades of the same color is always beautiful and elegant. Dilute one paint in different containers of different saturation and depict shapes on the eggs: stripes, polka dots, flowers. Several eggs can be dyed completely and added some accents of a different color, such as a bright butterfly or flower.

If you don't want to mess around with dyes, you can get by with a single marker or felt-tip pen. With a firm hand, draw simple shapes on the white carefully washed eggs: stars, drops, flowers. It will turn out to be restrained and stylish.

Minimalism is not necessarily strict. If you use a bright red color, then even the simplest pattern will be bright and cheerful: with white dots - fly agarics, with black - ladybugs.

The following methods of decorating Easter eggs are suitable for needlewomen who have a supply of various materials for needlework at home: fabric, ribbons, felt, quilling paper and other interesting things.
By cutting the ears out of paper or felt, Easter eggs can be turned into cute hares.

And in order for the eggs to turn into chickens, in addition to felt or paper, you will need thick colored threads or braid, which you can simply wrap around eggs smeared with glue.

You can make decorative eggs or cute bags-covers for real eggs from colored felt or thick fabric. It will be a great activity for children and a lovely gift for grandmothers.

If time is running out, a small piece of colored fabric will be enough to decorate eggs for Easter: hearts, flowers or stars can be cut out of it and glued onto brown unpainted eggs.

Quilling is a handicraft that transforms strips of paper into masterpieces. It is very difficult to decorate the entire surface of an egg using the quilling technique, but anyone can make a few simple curls or flowers.

In the decoupage technique, boxes and other wooden crafts are usually decorated, but it is also suitable for Easter eggs. Decoupage eggs are a great way to make your Easter basket original. You will need special napkins with a small pattern, which must be fixed on the surface of the egg with water, and then covered with paste and dried.

Decorating Easter eggs with your own hands gives children an unforgettable experience and helps develop creativity. Plus, self-decorated eggs are a versatile, inexpensive gift.
With the approaching bright holiday of Easter, people think not only about how to decorate the festive table - home decoration is also of great importance. Try to make artificial eggs for Easter with your own hands - they can be used not only for interior decoration, but also as a pleasant present for family and friends.
Blank for craft
Real eggs are not suitable for DIY Easter crafts - they quickly deteriorate and start to smell bad, so it's best to leave them for the dinner table. Instead, try to make a dummy that you can safely decorate without fear of its useful life.
From the shell
An interesting paradox: to make artificial eggs for Easter with your own hands, you need real ones - give preference to large chicken or duck eggs.
Since eggshells are an excellent material for decorating their natural shape, you will now learn how to peel the insides and prepare them for decoration. Rinse all testicles thoroughly beforehand.
- In the centers of the top and bottom points of the testicle, make small marks with a simple pencil. Using a sharp knife or needle, carefully make holes in place of the marks - on the wide side, the hole should be larger than on the narrow one.
- Place a small, deep container under the egg and start blowing into the smaller hole so that the contents begin to flow out of the larger one. Sometimes the substance stops pouring - the film shells inside can interfere. Simply insert the sharp end of the needle deep inside and move it there.

Don't throw away the raw contents - you can cook them!
- Even after blowing, a little film remains inside the shell, which may start to smell bad. To get rid of it, take a thin knitting needle, heat it red hot, push it through a wider hole and gently walk along the walls from the inside.

- Submerge the workpieces in water and press down slightly with your hand so that they are completely filled with water. Sometimes after that, the water pours out on its own, and sometimes it also needs to be blown out - rinse the products 1-2 times to completely clean them of the insides.

- The last step is to dry the eggs for Easter. Just leave them in a dry, ventilated area for about half a day. If you need to speed up the process, put them on a knitting needle with a curved end and heat them over the burner at a short distance from the fire, otherwise it may crack and burn.

Ready-made shells can be decorated in any convenient way - for example, many craftsmen now like the technique of diamond painting.

The original style of performance will surely surprise your friends.
From plaster
Unfortunately, eggshells are quite fragile: they often break, so only professionals can work with them - not to say about joint needlework with children. Do-it-yourself gypsum blanks for Easter will help to correct this situation.
All you need: the same eggshell with a slightly wider opening at the bottom, or any other mold (plastic toys, kinder surprise packages, etc.).
- Dissolve the gypsum with water to a medium-thick sour cream consistency.
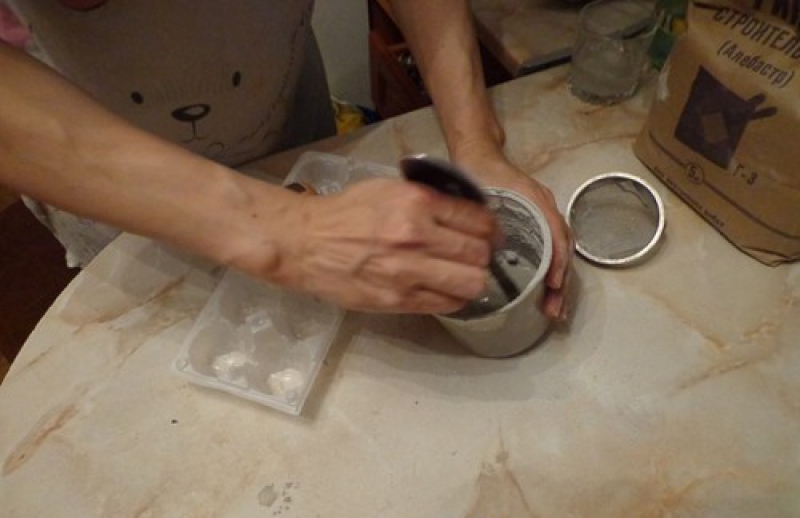
- Pour the solution into molds and leave to dry completely - depending on the consistency of the mixture and the type of gypsum, it will take from an hour to a day.

- Peel the blanks from the shell.

- Scrape off the bumps and fill in excess cracks with plaster, smoothing the surface.

- Prime the gypsum with acrylic paint on top.
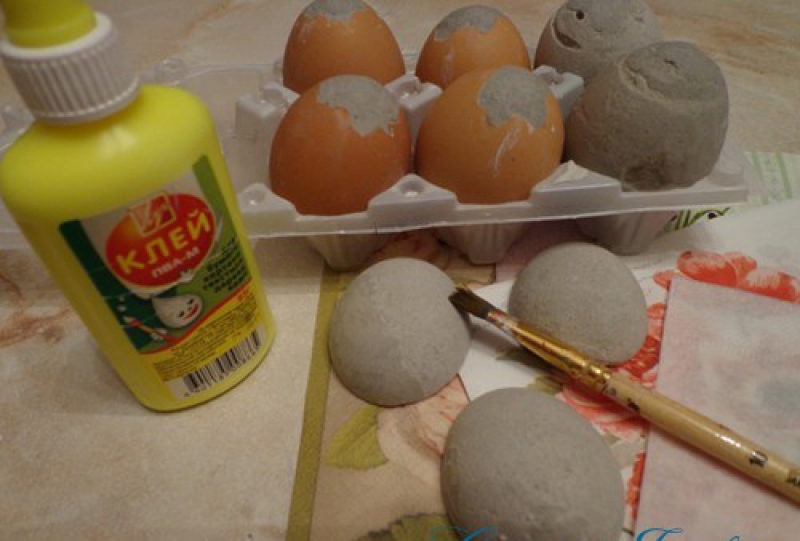
Now the fake eggs for Easter are ready, and you can decorate them with your own hands.
Decorating eggs with paper
Artificial eggs for Easter can be made from almost any material in the technique that you like. For example, below is a master class on creating and decorating Easter eggs with your own hands using the papier-mâché technique.
You will need: a solid oval-shaped blank (you can use a plaster of paris, but it is better to take a plastic testicle consisting of 2 halves), an old newspaper, a special papier-mâché paste (it can be easily replaced with PVA glue).
- Coat the oval blank with hand cream, petroleum jelly or plain water so that the paper layer does not stick to it, and then it will be easier to remove.
- Gently stick the first layer of small pieces of newspaper on top.
- The second layer must be added, carefully smearing each piece of paper with paste. Paste over the product until it becomes dense enough.
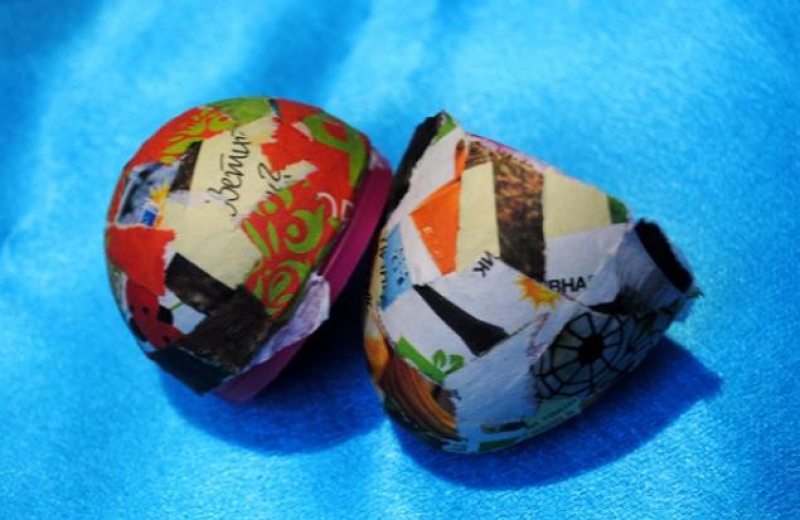
- Leave the workpieces to dry completely in a well-ventilated place. Remove dry paper halves from plastic ones and prime with white paint.
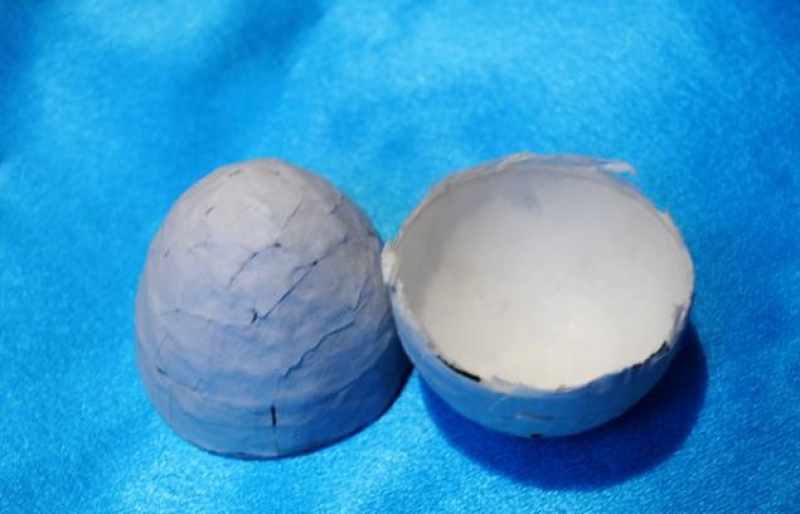
The secret of this craft is that a cavity is formed inside which you can put a small surprise for the recipient of the gift: a coin, hairpin or candy.

- Connect the halves by gluing them together with paper, while masking the joint.

Leave the work to dry again. The product is ready! The easiest way to decorate it is to cover it with acrylic paints or gouache and secure with clear varnish.

However, do not stop there - decorate the paper Easter eggs with coasters made of the same material with your own hands.
- Cut the pressed cardboard egg holder, on which they are sold in stores, into cups, depending on how many Easter eggs you made out of paper.
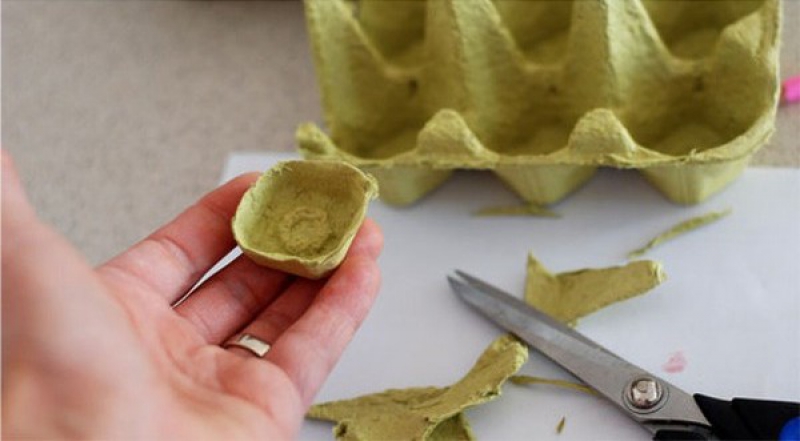
- On a white A4 sheet of paper, draw or print blanks in the form of parts of the body of an animal and cut it into pieces.

- Color the parts and cups as you like, then glue the desired parts to the eggs and coasters.

- Place the Easter items in the coasters.

Your wonderful Easter crafts are ready! This master class is very simple to perform, so you can attract children to work - they will surely like to decorate holiday gifts with their own hands.
How to make eggs from thread
Another idea for how to make eggs for Easter with your own hands is to create beautiful large transparent crafts from threads. They will be a wonderful decoration for your home and festive table.
There are several ways to make Easter eggs out of string - just choose the most convenient one and start creating!
On the air balloon
It is very easy to make decorations for Easter from threads based on a balloon, because then it is easy to get the blank out of the finished work.
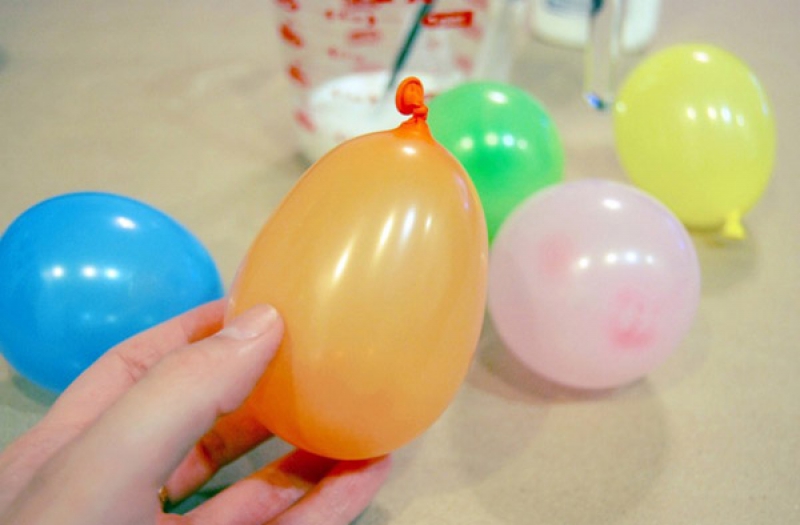
- Inflate the balloon tightly and tie.
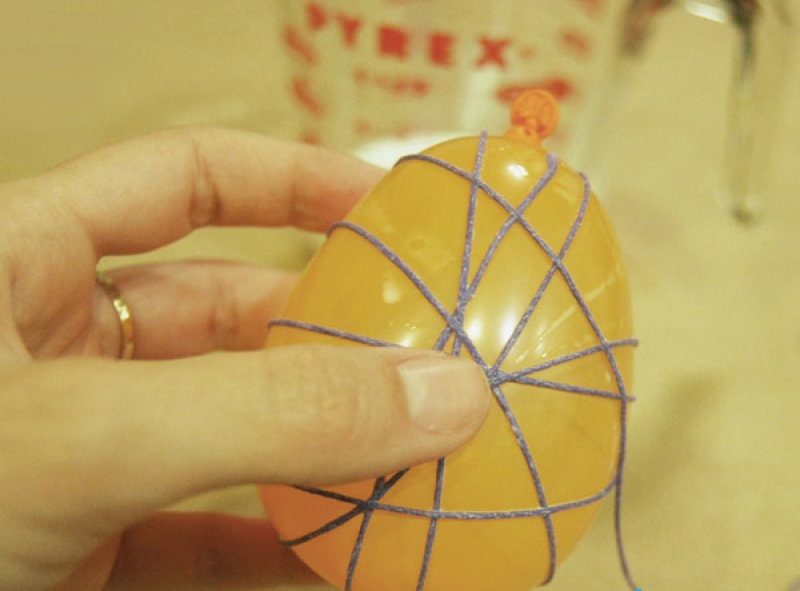
- Pour PVA glue into a deep bowl and immerse a skein of multi-colored thread in it.

- Wind the threads randomly around the ball.
- Leave the workpiece hanging until completely dry.

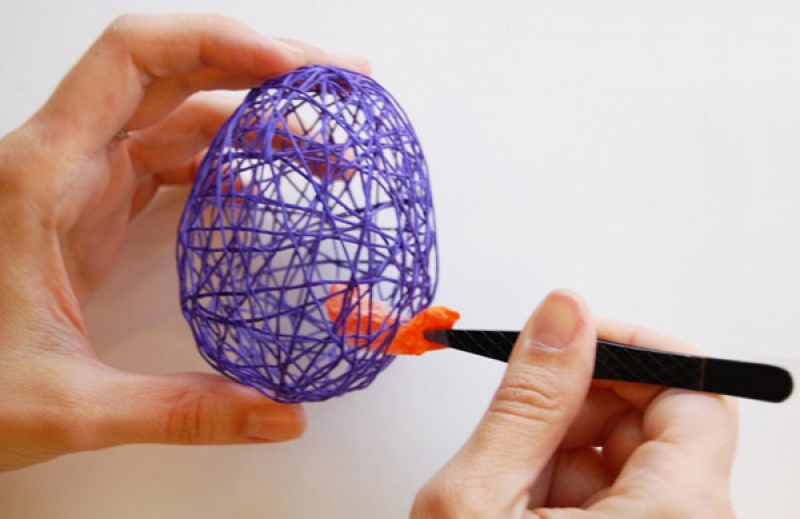
- When the product is dry, pierce the balloon, and gently pull the remains out with tweezers through one of the holes.
Lay Easter eggs from threads next to each other, gather in a wreath or garland.
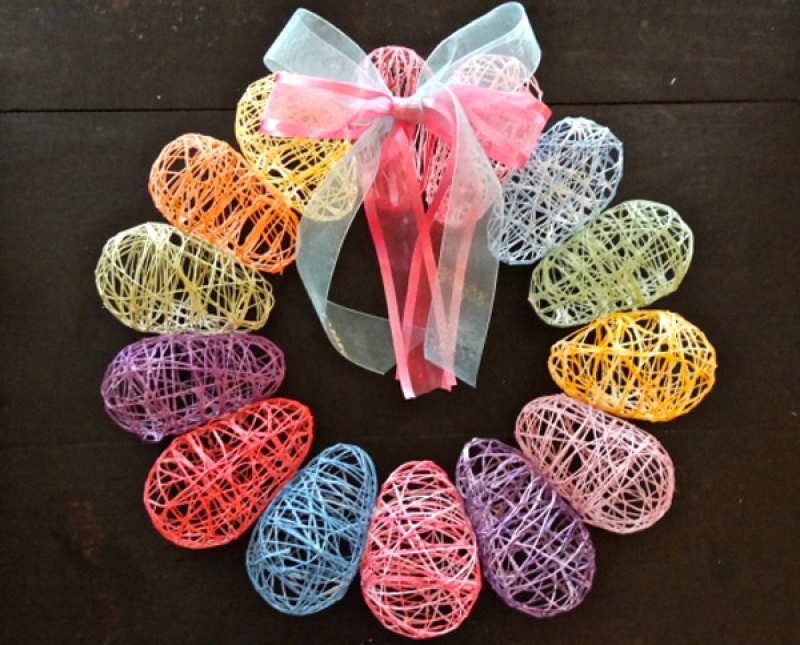
No matter how you lay the thread crafts with your own hands, they will look very beautiful.
On foam
This option is a little more complicated than the previous one, but it allows you to get beautiful carved holes in the product.
- Buy a ready-made oval foam blank - you can also cut it yourself.
- Wrap the base in plastic and stick sewing pins in a circle, dividing the craft into 2 halves. On one of the halves, use the same pins to draw the shape of the future hole (in the master class, this is the sun).
- Wrap the pins soaked in glue tightly, leaving the hole free.
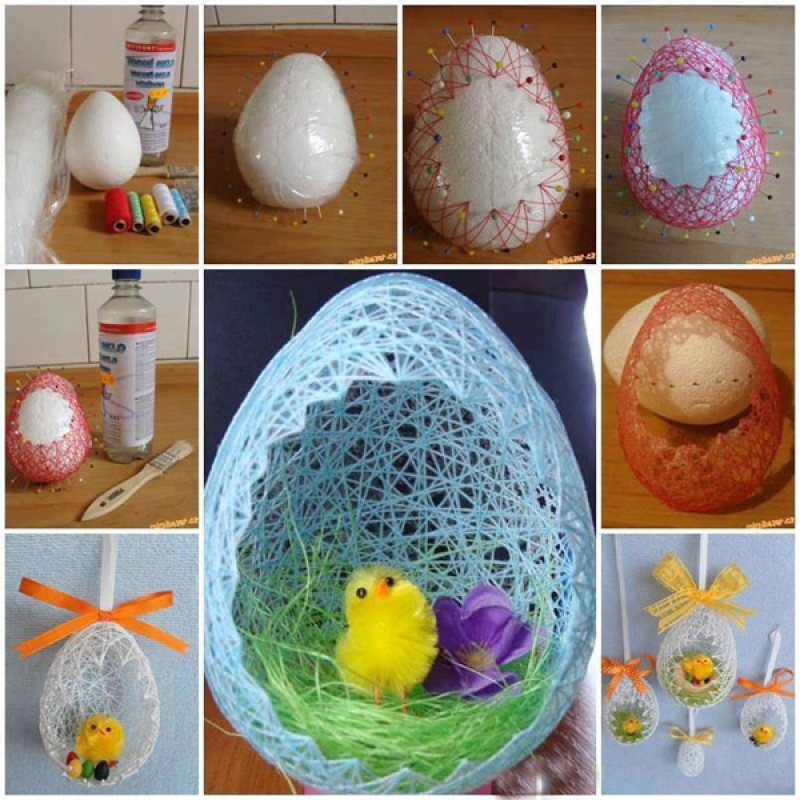
- When the workpiece is dry, carefully remove the pins and remove the workpiece - you have the front half of the egg.
Now again outline half of the shape with pins and make the second part of the product in the same way. But already without a hole. When both halves are ready, simply glue them together.
You can put sweets, gifts and toys in these Easter eggs made of threads.
Another option, how to make deliciously beautiful eggs for Easter with your own hands using the kanzashi technique, you can spy on in the following video tutorial:
Take it for yourself, tell your friends!
Read also on our website:
show more
Useful Tips
Easter crafts from different materialsEaster is one of the most important and beautiful church holidays, which is loved very much not only by believers. This year, Orthodox Easter is celebrated quite late - 5 May... This means that you will have more time to prepare for it, to do interesting crafts-gifts and decorations for family and friends.
Most popular the symbol of Easter and the rebirth of a new life is the egg... Chicken eggs are painted in all sorts of colors, decorated with drawings and patterns and given to each other as edible gifts. You can read more about Easter eggs and how to paint them. But you can make eggs yourself.
DIY Easter eggs
Making a DIY Easter egg is not so difficult. To do this, you do not need to be a famous Faberge master or have unique artistic abilities. You just need to attach a little patience and imagination.

For work we need:
Plaster of paris (alabaster)
A saucepan to dilute the solution
Measuring cup
Funnel
Spoon and knife
A plastic egg made up of 2 halves, or regular chicken eggs

Let's get to work:
1) On the blunt side of the egg, make a hole for casting plaster using knife or scissors... If your plastic egg has sharp holes, cover them with tape. You can also use as a form the shell of a regular egg from which to pour the contents.

2) Dilute gypsum with water at the rate 5 heaped tablespoons of gypsum in 180 ml of water... You should have the consistency of liquid sour cream without lumps so that the liquid can be poured into the egg.


3) Pour plaster of Paris into the hole of the egg and leave it to dry for an hour, then remove the plastic halves or peel the shell.

4) As a result, you should get perfectly shaped gypsum egg which is ready for further processing and any possible embellishments.

DIY Easter eggs (Video)
How to make Easter eggs from string?
One of the easiest ways to get an original DIY Easter egg is braid the shape with threads with glue... The form is usually used balloon, which can be easily removed, leaving the braided frame. You can also vary the size of the egg itself by inflating the balloon more or less.

For work we need:
Balloon
PVA glue or starch with water
Drying stand
Details for jewelry
Let's get to work:
1) Inflate the balloon of the desired size and pull it well with a string to keep air out.

2) While wetting the threads with glue, wrap them around the ball so that there are holes.

3) When the ball is completely wrapped, place it on the stand and let the glue dry during the day.

4) After drying, pierce the ball with a needle and pull it out through the holes. The thread frame will retain its shape.

5) To decorate the resulting egg from threads, you can use multi-colored ribbons, buttons, beads, toys and much more.

6) With your imagination, you can get these original Easter crafts:

Easter eggs from beads
Beading may seem like a daunting task to some, requiring a lot of time and patience. But with the help of small beads, you can decorate an artificial or natural Easter egg in just a couple of minutes without complicated techniques.

For work we need:
Beads or decorative sprinkling in the form of balls
Glue and brush
Capacity
Drying stand
Details for jewelry

Let's get to work:
Cover natural or artificial eggs with glue and roll well in beads or sprinkles.

Sprinkles are commonly found in shops, baking decorations, and are often found on Easter cakes and other sweets.

If you have very small beads, you can roll the testicle in them, however, for this purpose you are better off using artificial eggs - wooden or plaster so that they serve as decoration for a long time.

If you still want to learn how to weave beaded jewelry, you can use the following video tutorials on beading:
Easter eggs from beads master classes (video):
Easter pasta eggs
There are a lot of decorations for Easter eggs, but we would like to offer the most simple and original decorations that are easy to do at home.

For work we need:
Wooden eggs or shells without contents
PVA glue and brush
Drying stand
Small starter pasta
Dry glitter

Let's get to work:
1) Apply glue to the wooden egg and glue to it in even rows raw pasta stars... However, they can be arranged in any order you wish. Let the glue dry well.

2) Paint the eggs along with the stars with paint, decorate with sparkles... In order for the glitter to hold well, apply glue to the egg in the right places, sprinkle with glitter, and in 15 minutes shake off the excess.

3) As a result, you should get an original bright craft:

4) Eggs can be placed in an Easter basket decorated with feathers.

Easter egg stand
The simplest stand for Easter eggs you can make with your children from the simplest materials: cardboard, lace, corrugated paper.
For work we need:
Not too thick cardboard or base from a toilet paper roll
PVA glue and brush
Lace
Needle and thread
Scissors
Details for decoration
Let's get to work:
To make the first version of the stand, take base from a roll of toilet paper and cut it into several pieces so that the stand is not too high.
From corrugated paper cut out a wide strip and glue it to the cardboard in the form of a skirt.
Top decorate soft wire or organza pieces... You can also add vibrant details in the form of fake paper flowers. You can read about how to make corrugated flowers.

In the second option, you replace the corrugated paper lace, which with the help of a thread with a needle must be made in the form of the same skirt. As additional decorations were used string of pearl beads.

Easter wreath
A simple Easter wreath can be made with your own hands from egg cartons as well as corrugated paper, ribbons, artificial flowers and other decorations.

For work we need:
Empty carton boxes for eggs
PVA glue and brush
Scissors
Details for decoration
Let's get to work:
1) Carefully cut the core out of the cardboard packaging and cut it with scissors so that it turns out something like flowers with petals.

2) You should have enough of these "flowers" to put them one into the other and get a wreath.

3) Use corrugated paper thread to make leaves and stems. Also use ready-made paper flowers. Flowers can be easily made by yourself or bought ready-made. Place the cardboard "flowers" one into the other, rearranging them with paper flowers and leaves, fixing well with glue.

Easter wreath It will look great on a festive table, or it can be hung on a door or wall as a decoration.

Easter or Easter napkin for the festive table
This unusual napkin not only serves as a decoration for the holiday, it can be presented as a gift to loved ones, filled with Easter eggs and sweets.

For work we need:
Colored cotton fabric
Lace
Scissors
Ruler and chalk
Sewing machine
Non-woven
Safety pins
Let's get to work:
1) Prepare 6 identical circles from fabric diameter 40 centimeters... Each circle must be glued with non-woven so that the resulting product keeps its shape well even after you wash it. If you do not find non-woven fabric, you can do without it, but use denser fabric.

2) Fold in two circles with the wrong sides of the crochets facing each other and sew over the edges with lace. In the end, you should get three rather dense round rag blanks.

3) Fold the three pieces together and secure them with pins. Then, using a ruler and chalk, draw four straight lines, thus dividing the circle. in 8 equal parts... Use a saucer to outline the center with chalk.

4) Stitch along the chalk lines, stitching all three circles together.

5) Using a needle and thread, make wide stitches around the core by capturing the top two layers. Then, pull off the thread and tie it in a knot. On the diagram, it will look like this:

It is necessary to tighten the thread so that the upper layers straighten a little and rise:

6) In the egg cavities, place colored eggs, and on top you can put Easter cakes, cookies, candies or any other sweets. You can add a couple of details from lace trimmings.

DIY Easter basket for eggs
This simple basket can be made with thick scraps of paper. Even children will help you with this.

For work we need:
Colored paper (thick)
Stapler
Scissors
Ruler and pencil
Let's get to work:
1) For the base of the basket, cut 5 strips of paper 25 cm long and 3 cm wide... Fold them vertically side by side, and at the top using glue and a stapler, attach a horizontal strip-rim of a different color, the size of which should be 30 by 2 centimeters... There should be 2 more such strips.

2) Fold the headband into a circle and secure it with a stapler on the opposite side.