The split system makes life easier on summer days, but such a pleasure costs a lot of money. This situation pushes people to install air conditioners on their own. To avoid damage to the material and other possible problems, you should know the basic principles of installation, understand each stage of installation and follow the instructions. So how to properly install a split system?
How to choose an installation location
Determining the location is a fundamental stage in the installation of a split system, which is regulated by manufacturers.
With regard to location, you should know the following requirements:
- The indoor unit should be placed at a distance of 20 cm from the ceiling;
- The indoor unit should be placed at a distance of 30 cm from another wall;
- The distance between the outdoor and indoor units must be at least 1.5 m.
It should be noted that the maximum distance between the units of the split system is not limited. Installers try not to exceed 6 meters, because if additional refueling with freon is required, additional costs will only aggravate the situation. The ideal distance is 3 meters.
The outdoor unit is often placed on open balconies or in the window area. In multi-storey buildings, they are guided by the following principle: up to the 5th floor, the outdoor unit of the split system is installed above the window and at a certain distance from it; if the air conditioner is installed on the 9th floor, for example, then the outdoor unit is mounted at or below the window level.
In private houses, the choice of location depends on the strength of the walls and suitable conditions. Installation is carried out on a load-bearing wall using brackets or hung on the basement of the house itself.
What is required for self-installation
The main thing that will be required for self-installation of a split system is tools and materials. Experts do not just set a high cost for the installation of an air conditioner, because the equipment is expensive. Do not forget about the need to reinforce it.
Installation tools
Equipment for the installation of a split system:
- Perforator (a tool for creating a hole in the wall through which communications are laid and the blocks of the split system are connected);
- Drill and drills of different diameters, which will be needed to install the base (fasteners) for the air conditioner;
- Copper pipe flare machine, with the help of which the pipe is deformed to the required diameter;
- Pipe cutter, with which copper pipes are cut;
- A rimmer or regular file, which is needed for pipe stripping and deburring.

Materials (edit)
The list of materials for installing a split with your own hands is larger and includes the following objects:
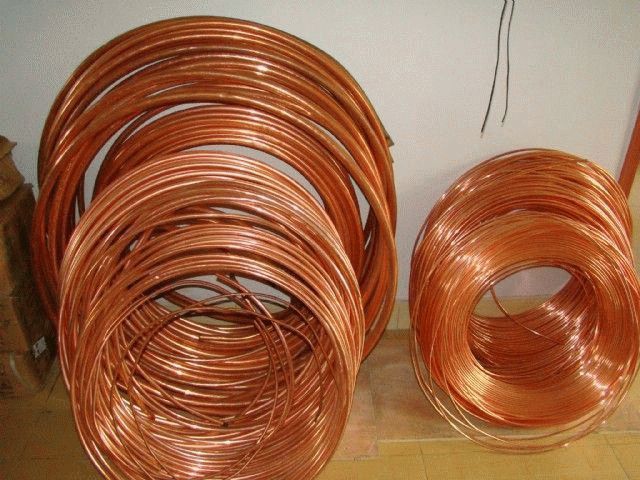
- Copper seamless pipes exclusively for air conditioners. There is a difference between such and water pipes. For split systems, soft pipes are used, which successfully allow you to create a good seal. By diameter, this material is divided into large and medium sizes. The required length should be 20 cm longer than the length of the communication;
- Split-system units connection cable. Often, a 4-core wire with a cross-sectional thickness of 2-2.5 square millimeters is used. The length of the cable should correspond to the length of the communication or be slightly longer;
- Drainage tube - spiral-shaped plastic hose;
- Insulation for rubber pipes;
- Brackets for fixing the outdoor unit. The dimensions depend on the dimensions of the block and the bearing capacity of the wall;
- Fasteners (dowels, anchors, bolts, screws, etc.);
- Plastic box to hide communications at the end of the split system installation.
Installation procedure and features of work
Do-it-yourself installation of a split system consists of installing blocks and laying all the necessary communications. It is important to adhere to the instructions from the equipment manufacturer, because each model has its own characteristics that affect the method and location of installation.
Indoor and outdoor unit installation
Indoor unit installation begins with choosing a location. Make sure that there are no electrical communications and water pipes at the attachment points.
First of all, a plate is attached, on which the block itself is then put on. It is necessary to fulfill a prerequisite, the horizontal level of the split-system plate must be ideal.
After working with the level, mark the holes. It is important to fix well the lower part of the plate, where the latches for the case of the indoor unit of the split system are located.
After successful installation of the plate, the indoor unit is put on from above and goes into the grooves, which allows it to be rigidly held on the wall.
The hole for communications should be at such a height that the drainage pipe runs downhill towards the outdoor unit (slope - 1 cm per 1 m). The diameter of the hole should be at least 5 cm. It is better to make two holes - for wires with copper pipes and separately for a drain tube.
To mark the fastening of the outdoor unit, remember that again you need to observe the level and the fact that the drain pipe must go downhill. Accordingly, the level of the outdoor unit is lower than the level of the indoor unit of the split system.

Brackets are installed first. Each hole in them must be used for its intended purpose. The more anchors hold the base, the more chances that the block will not fall. Installation of the unit itself on the brackets is carried out using bolts.
Laying of communications
The first step is to lay copper pipes. Having decided on the length, they are cut with a special tool, which was indicated above. The edges must be carefully filed.
Insulating pipes are put on top of the pipes, which serve to maintain the temperature. There should be no insulation joints. From above, everything is tightly glued with reinforced tape. Important! When pulling pipes through the hole, it is necessary to block the access to the inside to avoid the ingress of dirt and debris.
The cable is easy enough to run. Stripped wires of the correct size are pulled through the hole and connect the blocks of the split system.
To find where to connect the wires, you need to open the cover that is located above the copper pipe mounts on the blocks. It is recommended that you examine the wire fixings before installing the system so that there are no problems during the process.
Connecting blocks
To connect the blocks, it is necessary to observe the correct connection of the cable colors. There shouldn't be any big problems with this.
Drainage
Or . On the indoor unit there is a tube with a plastic tip, where the corrugated pipe is put on and crimped with a clamp. It is advisable to bring it to a distance of 1 meter from the wall.
At the bottom of the outdoor unit, a corrugated pipe is rarely used and everything is left as it is. The water just drips to the ground.
Freon circulation system
Connecting copper pipes requires responsibility and good preparation. Before that, it is better to carefully read the instructions and study the connection points. Copper pipes should not bend too much and run evenly with the rest of the communication.
The indoor unit has two ports for connecting two pipes. First you need to twist the nuts. If something hisses during this, it's not scary, it is nitrogen that was previously pumped into the block comes out.

After cutting the pipe, the ends are carefully checked for burrs and other roughness. For 5-7 cm, the pipe should be perfectly flat. Rolling is carried out to fit the size of the port fitting. It is very important that the tube fits tightly on the fitting - this will exclude unnecessary loss of freon and ensure normal sealing.
If everything is dressing well, the tube is connected to the port by screwing on the nut. In this case, there is no need to use gaskets or other devices. Such operations are performed on all ends of the two copper tubes.
Evacuation for what and how to do
Evacuation is necessary in order to clean the copper pipes from air and moisture that gets inside during installation. If it is not removed, a large load will be created, and the compressor, accordingly, will overheat.

There are two ways to pump out a split system.
Zilch method
If you look at the port where the copper pipes are connected, you can see two plugs, in addition to a nut with a union. Both plugs are unscrewed.
Work is done with a port with a larger diameter. Inside there is a special socket for a hex key. The size is selected locally, and can also be found in the instructions.
For 1 second, turn the valve 90 degrees with a key, then release it. This means that a little freon was released into the system, which led to excessive pressure. On the same port there is a spool, which must be pressed with a finger to start the release of a mixture of freon and residual gases. The operation is performed 1-2 seconds 2-3 times.
After all, a plug is put on the spool, and the hex port is completely unscrewed to start freon into the system. It is important to make sure that all plugs are tightly tightened, you can lubricate the threads with soap for a better seal.
Vacuum pump
The vacuum pump is connected to the spool for 20-30 minutes. During this time, he must completely evacuate the system. Then the pump is turned off, but the tube remains in the spool for 15 minutes. This is necessary in order to observe the pressure with a pressure gauge. If the arrow is frozen and stands still, then everything is fine. Chaotic movement of the arrow indicates an air or moisture leak, therefore, the pump must be turned on again.
Before disconnecting the pump, it is necessary to let the freon into the system using a hex wrench. A characteristic sound in the system indicates a successful start. After that, you must quickly disconnect the pump.
To ensure the smooth operation of the air conditioner, it is very important to correctly install it. We want to tell you about the procedure and methods for installing wall-mounted climate systems with our own hands and talk about the tools necessary for this.
Can I install a wall split system myself? It is possible, however, you need to stock up on the necessary tools, understand the general rules and carefully study the installation instructions that are attached to the technical documentation of the air conditioner.

Tools and materials for mounting a wall split system
It is impractical to purchase a tool for one installation, since you will need not only general construction and metalwork, but also special equipment. It is good if it is already on the farm or you can borrow it, rent it.
 Professional set of split system installers
So, an approximate list of what you may need when installing an air conditioner.
Building tools:
- puncher;
- drills, augers (Ø 45-65 mm, at least 0.5 m long) and drills (for metal and concrete);
- screwdriver;
- construction level;
- roulette.
Technological tools:
- example - for deburring a copper tube before flaring;
- device for expanding copper pipes;
- pipe cutter;
- vacuum gauge - measurements during evacuation of the refrigerant line;
- vacuum pump - for evacuating the refrigerant line;
- if the route is long and refrigerant charging is required, control and charging hoses, a charging cylinder are needed.

Locksmith tools:
- screwdrivers: Phillips and slotted;
- hammer;
- hex wrench;
- adjustable wrench;
- torque wrench;
- pliers;
Materials required for installation: screws, dowels, heat-insulating and electrical insulating tape, protective decorative boxes for electrical wiring and refrigerant lines.
If the work is to be carried out at height, safety equipment and experience of working at height will be required.
 Remember insurance
Determining the installation location of the indoor unit
The location of the indoor evaporating unit should be such as to create the most comfortable microclimate for people, excluding directed flows of cold air into the head of a sleeping child or on the owner's favorite chair.
 Indoor unit placement and airflow direction
In addition, there are rules for the placement of climatic equipment, which must be adhered to. Make sure the location is correct before attaching the mounting plate to the wall.
Fundamental rules:
- The ventilation holes in the walls must not be blocked.
- The difference in height between the outdoor and indoor units cannot be more than 5 m.
- It is better to mount the indoor unit on a load-bearing wall. A thin interior partition may not support the weight of the structure.
- It is necessary to provide easy access to the filter.
- It is advisable to place the evaporating unit at a height of at least 2.3 m above the floor level.
- Do not install the wall system too close to the ceiling. For various models, this distance is at least 7-25 cm.
- Install next to an electrical outlet. If it is necessary to lengthen the cord, do not extend the cable, but replace it with a wire of the required length. When installing powerful air conditioners (more than 4.5 kW), the wiring must include a residual current device.
- It is advisable that direct sunlight does not fall on the indoor unit. Do not place it under fluorescent lights either - this will damage the plastic of the case.
- When installing in a kitchen, make sure the distance to the microwave is at least 1 m.
- The units are not installed in laundries, bathrooms.

Determining the place for mounting the outdoor unit
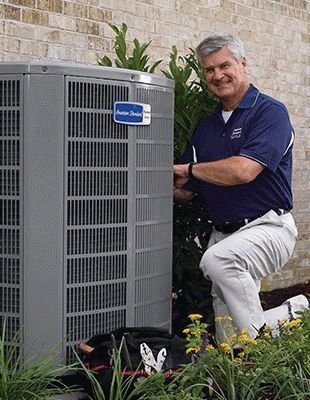
The outdoor compressor unit must be mounted on strong, sturdy brackets that can support its weight. Do not take too thin metal. Outdoor units are often mounted between window openings or under a sill.
When choosing a location for the unit, make sure that in the event of repairs, specialists will have access to it. The installation location should not be selected near the gas pipe where leakage is possible. The unit should be protected from rain and midday sun by a canopy and well ventilated. Therefore, it is necessary to maintain the manufacturer's recommended distances from the block to other surfaces.

If the air conditioner is installed on the ground floor, it makes sense to consider an anti-vandal box for placing the outdoor unit.
Stages of installation of a two-block system
For the system to work without problems, you need to correctly complete all the installation steps.
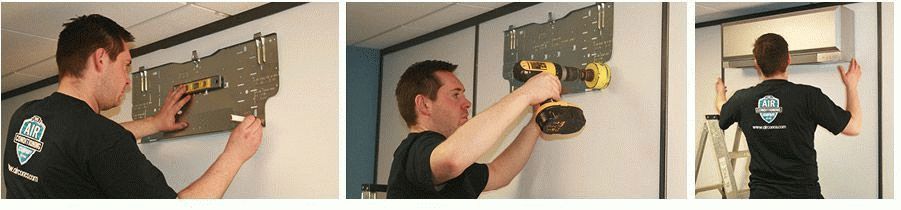
1. Begin the installation with a marking for the mounting panel of the indoor unit of the split system. To the designated conditional rectangle - the landing site of the indoor unit, you need to attach a mounting plate or mounting panel, align them with a level and mark the drilling sites. After that, drill holes with a Ø 8 mm drill with a depth of at least 32 mm, hammer in dowels, attach the mounting panel to the wall, check the correct installation with a level again and fix the metal base with self-tapping screws with a press washer.

2. Based on the connection diagram, find the place where the freon comes out and mark the place for drilling the channel to the outdoor unit with a slight slope towards the street for the unimpeded release of condensate. At the point of drilling with a knife, remove the wallpaper circle at the place of the future channel. This will create a neat hole when drilling. Secure the garbage bag with masking tape under the future hole. So there will be much less debris and dust in the room, especially if you do not have an industrial vacuum cleaner.

The length of the drill is taken depending on the thickness of the walls, the diameter of the drill (~ 45 mm) must correspond to the section for the passage of communications. Drill a hole and insert a flexible tube to protect walls and pipes.
3. Next, take care of the safety belts: the work goes to the outer wall. You need to fix the brackets to install the outdoor unit. To do this, mark the fasteners and drill holes for bolts with a length of at least 100 mm with a dowel for a drill Ø 12 mm. Attach the brackets to the mounting location and bolt them.

After installing the outdoor unit on the brackets, fix it with bolts Ø 8-10 mm with nut and washer.

4. Measure the length of the freon line. To do this, we apply a tape measure to the indoor unit and pass it through the formed communication channel to the connection point on the external unit, leaving a margin of at least 10 cm.Cut a copper tube of the required length with a pipe cutter, process it from burrs with a reamer, install a flare nut and fold it at the very edge.

The edges of the pipes must be sealed with electrical tape up to the connection itself.

5. After snapping off the front cover of the indoor unit of the air conditioner, unscrew the plug for connecting the cable connecting the indoor and outdoor units. Having fed the cable through the mounting hole, connect the wires to the individual terminals according to the diagram shown next to the terminal box (or in the air conditioner passport). Collect everything in reverse order.

Attention! Dust and dirt must not get inside: this can provoke a short circuit and fire.
6. Connect the air conditioner drain hose with the mounting tape to the 16 mm Ø reinforced plastic pipe, which will act as a drain. Very carefully, so as not to damage the copper pipes, connect them to the indoor unit of the air conditioner using an adjustable and torque wrench, screwing the conical nut until it clicks. Before using the wrenches, make sure the nut can be tightened unhindered by hand. Slip rubber tubing over the copper tube.

Wrap the line with vinyl insulation.
Guide the merged line through the hole in the wall. Try not to bend the tubes too much or too often. A drainage pipe is laid under the connecting line in such a way that there is no stagnation of condensate or reverse flow - the direction is "only down". Install the indoor unit on the mounting panel on the wall. Make sure that the unit is firmly and securely seated on the mount and is horizontally aligned.

Connect the trunk and electric cable to the outdoor unit of the air conditioner in the same way.

7. Using a vacuum pump, fill the freon line within 15 minutes. To do this, connect the service pump to the vacuum pump with a flexible hose using a four-way valve, from which you need to remove the cover.

When the preset vacuum values are reached, turn off the vacuum pump, open the valve by 1/4 for 10 s and check the line for leaks using a soap solution at the joints. Disconnect the vacuum pump hose from the system.

If the length of the line exceeds 7 m, you will have to refill the circuit with freon.
Attention! Make sure that all elements are connected securely, otherwise liquid leakage is possible!
8. Isolate all communications outside with vinyl tape, securing with plastic ties. Using a hex wrench, open the service taps on the outdoor unit of the air conditioner and run freon into the line. Install the cover of the outdoor unit of the air conditioner by fixing it with screws. Align the drain tube with a downward slope and secure it to the bracket with plastic clips.

Attention! In reversible models, the drain pipe is inserted into the outdoor unit through the hole in the bottom panel, and then connected to the condensate drain line.

Seal the hole in the wall, fix and close all communications indoors and outdoors with a decorative box and plug the air conditioner into a power outlet. Check how the remote works, listen to the noise. If everything is ok, you have installed your air conditioner.

Today we will discuss how to install an air conditioner with our own hands, it concerns the outdoor unit. Wait a moment to call the climber, let's try not to fall out of the window. In fact, the air conditioner is being started using the stock accumulated by the system. Freon is initially accumulated by the external unit, after docking the refrigerant is released. It is advisable to measure the temperature difference between the boiling point and the vapor of the low pressure side of the air conditioner compressor. The collector contains a scale for different brands of freons, supplied with the necessary information (the first parameter). The second is measured with your own hands ... Let's see how to install the air conditioner yourself.
Sequence of actions when installing the air conditioner
The critical part is determined by the location of the outdoor unit. Enthusiasts suggest equipping balconies with a box. Avoid installing the air conditioner, forgetting to assess the future performance. The length of the air conditioner lines is fixed. Mount copper pipes as much as the kit gives. From the difference, the channel pressure will slightly change, leading to the air conditioner going beyond the permissible modes:
- Too low freon pressure does not withstand operating temperatures. The cooling process of the air conditioning compressor will be disrupted, causing increased wear on the unit.
- Excessively high pressure raises the boiling point of freon. Part of the liquid phase will enter the air conditioner compressor, causing breakdown.
Wizards monitor the freon pressure of the air conditioner circuit sometimes on a barometer scale, a more accurate temperature method. A collector is connected to the inlet of the external block on the low pressure side (thick tube), the boiling point is found on the scale with risks. It is enough to measure the vapor temperature (tube temperature), concluding that the freon mass is excessive / insufficient. Professional craftsmen cut the tubes with a tool, roll the ends, after putting on the nuts, carry out installation in place. If necessary, the copper wiring is extended by soldering.
Couplings are used - pipes of a larger diameter. A flaring tool is available to a specific length. The tube is put on the other with the finished end.
The solder seam comes out alone, doubling the strength of the connection. It is clear that without a tool, it will not work to flare the tube, the method of couplings is more suitable for ordinary people. Before soldering, the ends are cleaned, leveled to avoid foreign bodies entering the inside, which impede the operation of the compressor (the equipment will simply break if a solid gets inside).
The tubes begin to lead with the inner block in the direction of the outer, punching walls in places. The points of the joints isolate (as well as the path of movement of freon). The drain tube, the power wire of the external unit (through the internal one) go in one bundle. Copper pipes are simply screwed in with a predetermined tightness, drainage pipes are overlapped, wrapped with plumbing tape (fumilent, fumlent). The electrical wire is mounted in place, by the lugs-terminals. The device is powerful, it is not recommended to plug the air conditioner into a typical outlet. They lay the wire of the 230 volt network distribution panel, carry out the installation using standard techniques. On the block. Try to avoid twists.
Copper pipes are connected to the external unit with nuts according to the thickness. The high pressure side is thinner. Find the service port on the low pressure side by looking for a thick tube. Let's take a closer look at the joint. In the lower part of the left side of the external block, there are a pair of L-shaped pipes. At the end of each there is a cover (hex key) that hides the bronze fittings (faucet). In the initial state, both branch pipes are closed; freon is collected inside the external block.

Vacuum tool
Evacuate the system before refueling. The step frees the freon tract from moisture and air. Evacuation is carried out by a compressor (vacuum pump) until the pressure drops to zero. Then the device will work for a while (5 minutes), guaranteed to remove condensate, if it is stuck in the evaporator. Then it is necessary to turn off the manifold tap. It's time to carefully release the freon. The valve of the thin tube of the outdoor unit opens first, then the valve of the thick one. The pressure should gradually equalize, we start the compressor. An assessment is made of the sufficiency of the amount of freon. The difference between the boiling point and the vapor temperature is within the range of 5-8 degrees Celsius. The difference is less than acceptable - there is too much refrigerant. Exceeding 8 degrees requires adding the required amount from the cylinder, controlling the temperature.
In a two-position manifold, a container with freon is connected to the place of the pump. Moreover, it is necessary to bleed the air of the connecting tube by opening the right manifold valve for a second. Then start refueling. Rosenberger mechanics say: it is useful to turn the cylinder upside down, unless the freon is R22. Soldering is carried out with a silver alloy of at least 5% content, with another suitable flux. Tin with copper, any other metal, form an electrochemical pair, while operating, avoid water ingress.

Filling the air conditioner with freon
As in a water heater tank - the corrosion process will begin. Therefore, leaks will be possible. Not dangerous, as in the gas industry, you just have to call the service group to refuel. Some freons are poisonous, others destroy the ozone layer. If there is a leak, the concentration does not reach explosive.
Installation of the outdoor unit of the air conditioner
Throwing aside the climbers, the lone heroes, it will be difficult for an ordinary layman to install an air conditioner on a wall. Let's take a look. A typical outdoor unit enters in the middle of typical high-rise windows, from any frame it is 30 cm to the bracket. A short distance by the standards of an adult. Without effort, a man will be able to pierce the wall with a puncher, hammer in anchors. Difficulty can be caused by chemical anchors, under which it is necessary to thoroughly clean the hole, preceding the laying of the adhesive.
However, the techniques are rarely used. Traditional steel anchors in quantities of four or more are more commonly used. The bracket is uncomplicated, reminiscent of the letter G. On the shelves of two parts, the external unit of the air conditioner is attached with four bolts - two on each side. It is important to get the fasteners, then the fears have the right to be discarded. Similarly, the process of docking and starting the system is carried out from the left window. Better than bending over with the key, kissing the windowsill, risking falling out.

Outdoor unit installation type
The now standard installation under the window has one significant advantage: it is relatively easy to mount the external unit of the air conditioner. It is difficult to tighten the bolts (stretch far), opening / closing the valves is a problem. Consequently, removing rusted fasteners is not easy. Leaning out without insurance is dangerous. In the case of installation between windows, the first place in complexity is occupied by the process of installing the external unit on the brackets. Residents want to cool the apartment in the summer, a stack of external blocks is piled on top.
It is easier to install an air conditioner on the balcony, nowhere in the legislation can you find a prohibition. There are rumors - because the authorities were too lazy to create an information and legal portal - it is forbidden to put an external block on a heated loggia! There are three windows, one right in front of the equipment, it seems like you can put it. We apologize for the legal confusion. Apparently, the authorities think that since ignorance of the law does not absolve one from responsibility, there is absolutely no need to educate the people. Maybe a fool will break it - it will be possible to file an administrative case. Don't believe me? Try to find in a search engine the number of the law governing the installation, excluding the general words about the need for approval (on the facade). The authors dropped out after half an hour of research.
There was definitely a law, there are rumors: the text was canceled in 2013, members of the forum are wondering what would be non-compliant. It is useless to ask lawyers, lawyers shrug their shoulders. The regulatory framework of the city of Moscow is more pleasing: there are documents, but the first edition. Understanding, following the amendments, where to add new lines, it is incredibly difficult to read a fragment. Therefore, let's say: in 2007, residents were obliged to coordinate the installation of any engineering equipment on the facades, God knows what next. Therefore, the question of how to install an air conditioner with your own hands would start with a regulatory framework, then go through the options. Note: the installer is not interested at all, the owner of the home is responsible.
We hope we have clarified how to install the air conditioner yourself. We recommend that the most zealous readers visit the mosopen.ru website on their own. The confusion and confusion in the interpretation of legal terms makes one wonder that legitimacy exists.
Step-by-step video of installing the air conditioner
The cost of installing an air conditioner is high. Grows parallel to power. The question was discussed in detail, how the purpose of the mysterious letters that dotted the tables of the installation firms, today we will see what the workers are doing, that installing the air conditioner with their own hands becomes a complicated matter, difficult from a financial point of view. There is a difference between the models of different firms, but insignificant. That is why the installation of the Mitsubishi air conditioner is not much different from the Samsung. It is clear that Koreans are now promoting inverter quiet, durable motors, you should first look at the warranty. Today, washing machines and refrigerators are equipped with a 10-year warranty card. Long term, for our reasons, a good air conditioner cools longer: more is paid, the cost of installation bites.

Car air conditioner
We will decide where to install the air conditioner. As the first step, Samsung experts recommend ... to check the marking of the outdoor, outdoor units, boxes for coincidence. If the wrong unit was placed by mistake, the installation of the air conditioner cannot be started. The indoor unit is mounted on a special oversized plate. However, there were some nuances here:
- Floor-standing indoor units are deprived of the right to bear the name, because they are hanging. The distance to the parquet should not exceed 15 cm. The mounting plate (bracket attachment) changes its appearance, from a solid size of a steel substrate it becomes a strip. Mainly the upper edge of the indoor unit of the air conditioner is attached.
- Cassette indoor units of air conditioners are popular due to their ability to be embedded in a false ceiling. It is necessary to calculate the strength of the overlap so as not to kill employees, to provide the necessary indents, an aesthetic appearance. Fastening is carried out with four threaded pins, driven deeper into the concrete on the nuts through shock-absorbing washers. If the dampers are removed, allow the upper wall of the indoor unit of the air conditioner to come into contact with the ceiling, the level of vibration, noise will increase, adversely affecting the working, living atmosphere, it is simply forbidden by laws and standards to make a lot of noise. The topic of fan damping devices was raised, those who wish will study the required section.
The indoor unit hangs over your head. Calculating the height of the air conditioner is useless. The only thing is to maintain the distance indicated by the instructions from the walls, ceiling. When installing the base plate, a building level is used to correctly maintain the corners. It is especially important to strengthen the pins of the cassette unit, to place the unit strictly horizontally. Fixation in the latter case is carried out with locknuts. The installation process of the wall-mounted indoor unit does not cause any problems. The body is simply hung on the prepared bracket.
Air conditioner communications
Indoor, outdoor units are connected by a bundle of communications, including:


The cable is pulled from the panel of the external unit to the panel of the internal one, which has located the labeled terminals. Each eyelet is put on phase, ground, neutral. The cable is used for outdoor use, it is more expensive than the usual PVA. There is one earthing conductor. It was explained that the neutral wire, the ground are different things, avoid confusion, change places, close your eyes would be the wrong tactic. When conducting three phases, purchase a 5 core cable. The output currents are added, the nuance is taken into account when choosing a wire. If one core is thicker, zero (not earth) was found. We take into account the nuances when choosing a circuit breaker, typical fuses will prevent an accident.
As for the electrics of air conditioners, typical ears are used. If it is necessary to install a wire of non-standard length, we will increase it ourselves. The copper tube comes complete, the ends are cut off, the chamfer is removed from the inside with a suitable tool. Fastening is carried out with nuts. To flare the end, a special tool is used to bend the tube outward with a cone. After the nuts are screwed in coaxially, tightened with a wrench. Use the handy tool. Take an adjustable wrench, avoid gas wrenches. A typical installation of an air conditioner does not provide any seals, the tightening force is indicated by the manual. Each tube is jacketed to prevent heat transfer, both are coiled together with the wire, drain tube. Copper tubes of unequal diameter, simplifying installation.
On the reverse side of the indoor unit there are nozzles, each of its own diameter, closed with plugs. Please note: when pulling communications through the walls, the nuts dressed on flared tubes are closed with plastic inserts so that the plaster does not cram inside. The drainage tube is simply joined in tension, wrapped on top with insulating tape. Do-it-yourself installation of the air conditioner continues outside, where a bulky unit sometimes has to be erected on a support high above the ground. Please note: although there is a manual, installation will require a project. The work is carried out to make sure that the walls will withstand the load, in theory. In practice, the designer just cuts the loot.
The distance between the indoor and outdoor unit along the communications does not exceed 5 meters. Departure from the rule translates the editing into the category of non-standard, adding cost. The maximum length of communications is indicated by the passport. As planned, the drainage goes down to the ground, copper pipes reach the outdoor unit. In practice, they forget to do it, so the condensate irrigates the underlying objects.
Refueling the air conditioner
There are rumors: sometimes there is freon inside the outdoor unit ... I wanted more confidence, the installation manual gives an exhaustive answer, the taps are tightly closed ...
The procedure for refueling the air conditioner:
- First, inspect for correct installation. Both branch pipes have taps hidden under the screw caps; avoid touching the fittings. One connector (usually the thick one) has an inlet for the refueling manifold. We attach the left hose, crown the central one with a vacuum pump.
- Opening the left valve, pump out the air, wait until the arrow shows 0, continue for 15 minutes. Let's close the tap. Instead of a pump, we connect a freon cylinder to fill the air conditioner.
- It is time to remove the end valve covers of the outdoor unit. Under them there are nests, often of a hexagonal shape, unscrewed with a special key (reminiscent of the fittings of a folding bicycle made in the USSR). To install the air conditioner yourself, turn the taps to the maximum. Keeping the position, we will operate, carefully return the covers.
- Open the left manifold valve, filling bottle valve. Refueling is carried out, guided by the mass. Although there are schemes (mentioned above) that measure the temperature difference by releasing freon from the external unit into the circuit.
Refueling is over, the calculation of the capacity of the air conditioner was conducted by the portal. A representative of a small class of devices that demonstrate an efficiency higher than 1 (much).
GOST 26963
Get started with permission. The devices that stick around the wall of the house are coordinated with numerous organizations. First of all, the owner. A person has the right to sell an apartment, not an apartment building; many people live. Before installing the air conditioner, you will need to obtain a permit, (before approval) take care of the project to get a certified organization. Works without documentation are illegal. Do you like the layout? A horror story went around some regions: the brigades authorized by the administration iron the streets, dismantling the illegally installed equipment. If the air conditioner is installed secretly, a tower will arrive and the product will be removed. We find it difficult to describe the procedure for returning, try hard lawyers. In the country, some people are more equal than others, so avoid looking up to your neighbors ...
According to GOST 26963, the installation of the air conditioner is limited by the scope of the instruction manual. Simple, isn't it? You take it, you put it on, but a bunch of regulations prohibiting the installation of an air conditioner (equally other equipment) are hushed up:
- if the house is an architectural monument;
- if the building decorates the main street with a facade;
- if there is an artistic value of the building ...
The list of restrictions is long, we are ashamed to describe the difficulties, we recommend that you simply puzzle the local administration. It is required to spoil the wall of a high-rise building - it will be enough to obtain permission from the HOA. For example, an antenna requires the consent of 100% of the inhabitants of the house ... just. You cannot do without permission on someone else's property. In practice, few people pay attention.
Now power. You know, in the firms involved in the installation, the value is marked with numbers in the range 07-30. Moreover, an increase in the number raises the cost of work to the heavens. Why people are interested in installing the air conditioner on their own. For example, for new owners of 30 models, the installer's service will be 20,000 rubles. It is clear that a rare dude wants to pay the amount, or wants to know the direction of money flowing away. First, the power. Most bite their elbows powerlessly, trying to calculate the parameter correctly.

Fitter 90 lvl
There are online calculators, ready-made Excel programs that allow you to get the desired figure by entering a couple of numbers. The size of the room, the number of printers, copiers, and other household appliances. The beauty of Excel is the ability to embellish the calculations with custom values by setting the cardinality. Readers have guessed: the cooling capacity of the air conditioner is designed to recoup the excess heat generated by the technology.
How much power is required from the air conditioner
In light of the above, before installing the air conditioner, try to assess the needs of the cold production. The programs for calculating the boiler output can help. The results can be used to calculate heating, air conditioning. Heat loss goes in the direction of lowering the temperature through the walls. Moreover, the value is proportional to the difference, the resistance of building structures. Procedure:

Please note that the calculation is carried out if they failed by searching for the program for calculating air conditioners. The desired figure is immediately given in BTU / 1000 (gradated in the range 07-20 and above). The marking contains the necessary parameter, which is so interesting to buyers and installers. Convert BTU / 1000 to kW. You need to multiply BTU by 0.2931, you get the desired figure. Heating boilers are calculated in kW. We will also mention BTU - British Thermal Unit, in English sounds British Thermal Unit.
Now readers know, "seven" is equivalent to 2.0 kW, "nine" - 2.5 kW. We emphasize that the figure has an indirect connection with energy consumption. Every good air conditioner will produce more cold than it will consume electricity from the mains. This is the basis of the idea of heat pumps, however, regular readers of the portal should know and advise the authors. Clarified the calculation procedure. We hope the readers will help each other with links to online resources ... Visit the section on boilers, heaters, giving the necessary addresses along with explanations of the process of using calculators.
I have never seen programs that take into account the presence of people. If the room is filled with a group, for each person we add 100 watts of air conditioner power, how many BTU will be, count! For gyms, we will increase the figure to 300 W, people are engaged in physical labor, which means that the air conditioner will have to sweat more. 80% of the energy expended by an athlete is generated by heat.

Varieties of air conditioner installation
We want to say right away: the installation of an air conditioner can be standard, non-standard. The contents of the prices are attributed to the first case. As for additional options, you will have to find out, along the way overcoming the resistance of the firm's TP. Suppose we want to put a "dvenashka", the freon circuit needs to be increased by several meters relative to the prescribed ones. Prepare to pay extra. The companies' tariffs are different, find out the specific prices.
Why it happens. A typical air conditioner may contain Freon in an outdoor unit. The valves are tightly closed. Craftsmen choose a place to install the air conditioner, start drilling, hammering, pulling, twisting. The inlet and outlet tracts are tied, the drainage pipe is thrown. Before installing the outdoor unit of the air conditioner, the craftsmen discovered that the length was exceeded.
Freon pressure is below normal, you will have to refuel - some troubles. After assembly, the technician will evacuate the air with a vacuum pump, then simply open the valve, allowing the refrigerant to fill the system. A certain system pressure must be maintained. It loses its importance in air conditioners, there are no negative temperatures on the evaporator, it is not critical, get a little steam inside.
The sufficiency of the amount of freon is measured with a thermometer. The master opens the tap, looks at the meter readings. Refueling. With non-standard installation, freon may sometimes be needed. Volume is consumed along the length of the pipes. The air conditioner has a limitation on the length of the freon line, the issue is discussed before buying. The situation in the country is interesting. It seems to be written - air conditioners are installed according to the operating manual, on the other hand, you cannot install any engineering systems at home without a project of an organization that has a license (it seems possible to execute the project, for more details, see government decrees listing the types of activities that require a license).
Therefore, in any case, you need to go somewhere. The designer will want to install it. By the way, you can clarify whether there is a practice of installing devices on the loggia. At first glance, it seems silly, in winter, when heating is required, the operating conditions of the compressor will become softer. Thus, we have no doubt: most readers can install the air conditioner correctly. However, the law needs a draft, even if the drawing is redrawn from the product manual. Traditionally, they forget the water that sprinkles the heads of passers-by. Craftsmen who cut the money are too lazy to watch foreign methods of solving problems. The right path will be found by pedestrians bypassing the pouring streams of semi-rubbish.
Install the indoor unit of the air conditioner before starting other operations. The box is fastened with dowel-nails, other fasteners. In standard models, the power supply reaches the external unit, bypassing the internal one. In the west, there are often structures where the power cables run separately, the compressor is turned on by a relay controlled by a signal with an amplitude of 25 volts. Installing an air conditioner in an apartment is definitely worth it, devoid of the habit of heat. We remind you that the equipment does not in any way replace ventilation, therefore it is necessary to take a power reserve for air circulation. Before installing the air conditioner, take the trouble to do the calculation. Save money.
Installation of air conditioners by foreign companies
Installation of an air conditioner by a foreign master
The first difference: business class houses are equipped with air conditioners. Lost videos showing slums. There are excellent conditions for installing an external air conditioner unit. According to thematic forums, in America, construction and installation work is done under licenses. There is one professional on the installation of air conditioners on the brigade. He is not obliged to work, he will come, look, leave, without a license, permission, work is not worth a penny. An interesting example of construction.
The external unit of the air conditioner is installed in two ways:
- Trampling racks a foot above the ground.
- Not high on the wall, two tough guys who bought a ladder or a pickup truck can easily get the outdoor unit of the air conditioner.
The Russian problem of resolving state organizations disappears. The problem of cities disappears. We assume the roofs are equipped with HVAC. The difference between split systems is small. We direct those interested to read the early reviews of the VashTechnik portal. The first eye-catching is communications. American is used everywhere, the USA puts it in a more original way:
- The short pipes of the indoor unit pierce the wall.
- An additional package is mounted outside, exactly up to the external block.
- Further, see RF.
Let us remind you that Koreans cannot stand nuts.
The operator missed the rolling, we assume the tubes are cut in place. The ends are equipped with nuts with a special tool. The communications are covered by a protective shell that prevents heat exchange with the environment. The drain hose reaches the drainage system: culturally, does not water the heads of passers-by.
From the side of the indoor unit, it is possible to change the sidewall, from where the condensate will drain. It is difficult to say why it is being done. Apparently, it is more convenient to start drainage after reaching the sewer. To change the sidewall of the drain, remove the outer cover; hose, plug are swapped. Electrical wiring is carried out with a 4-wire cable thicker than 16 gauge.
Note. The USA has adopted a cable sizing system, with a larger number corresponding to the thinnest cores. It has developed historically, mainly in the United States. The cable was rolled with a machine, passing through increasingly small holes. Accordingly, the 16 gauge went through the operation 16 times.
The wire supplies power, transmits control signals. A color-braided cable is taken, making the markings clear: the wiring of the indoor unit corresponds to the external one. Ground (GND), digits 1-3 (phases). To carry out the installation, the shield is removed. On the inner block, a small cover is screwed on with screws, on the right side, on the outside there is a steel ledge on the right side of the case. Power is supplied bypassing the indoor unit. We see no differences.

The USA demonstrates two differences against Chaliapin's homeland:
- The location of the external block, which is neatly placed, removed, horrible methods are not invented, such as pulling off the box with a car pull by means of a cable to the ground. Sometimes the hull is supported at all by four sturdy uprights protruding about a foot from the soil.
- The drain hose is led down the drain. By the way, the measure concerns the bypass valves of water heaters.
Air conditioner installation sequence
Begins to the racks, the installation process the cameraman cut out. We assume typical screw piles, the rest takes too long. Concrete gains strength for 28 days. Although in this situation, such an exact adherence to the standards may not be necessary. By the way, country houses are placed on top of the pile-screw foundation. It is important during installation to avoid damage to the corrosion-resistant metal layer. Otherwise, rust will eat up the pile reinforcement, and the outer block will fall. When assembling houses, they observe the subtleties of calculating the soil, wind load, we believe that the arguments are unimportant to the mass of 25 kg, represented by the air conditioner box. If only moles, rats stopped digging the soil.
The indoor unit is hung on a mounting plate, which must first be removed from the back wall. In the USA, houses are made of sandwich panels, screws are screwed into the walls without effort. A through hole is made under the communications with a thin drill in a place where there is no wiring. Then with a Forstner drill, the diameter is brought to the desired one. So that both copper pipes, cable and drain hose pass through.

The launch process is painfully familiar to our regular readers. The technological map is indicated in the instructions:

We add that split systems with several indoor units are common in America. A bunch of parallel pipes sticks out of the right side of the outdoor unit, a pair for each point in the evaporator room. The startup process is not much different. Is it evacuation, nitriding will last longer. We see: air conditioners harmoniously simplify the life of Americans who have settled in cottages, disfigure the streets of Russian cities, where citizens put 2-3 ingots. Figuratively speaking, the technique was introduced by Asia. In England we will also find something similar, in New York on the central streets there will be no swarm formed by myriads of ugly boxes.
The United States uses a variety of air conditioners called HVACs. The fundamental difference is that the fan takes air from all sides of the cubic external unit, blowing it out through the mesh cover. As a result, it becomes possible to install an air conditioner on the roof. The approach deprives the streets of large cities of ugly boxes that clung to the walls. At the same time, human needs are met. It is clear that the length of communications is increasing. Most of the overseas homes are planned with a forced ventilation scheme. The roofs are dotted with shafts where the blades operate.
In our reality, every tyrant, too lazy to come up with an option is better than installing an air conditioner for show. They explain it by health, other reasons, avoid buying a monoblock, which allows you to plug the window with a hose. Some of the owners think to decorate the balcony space with air conditioning. Good yield if you follow the instructions.
By the way, before you install the air conditioner yourself, determine the location. Facade installation will require approval. It is not easy with balconies, the owner must fulfill certain conditions. Earlier in 2007, the laws required to independently install the air conditioner according to the instructions. Recently, a bunch of organizations have been recommended to go through. There were rumors in the spring of 2013: the law will be canceled, exactly people are at a loss to sum up the normative background. The system of rules is confusing. Think several times before installing the air conditioner yourself anywhere.
Do-it-yourself air conditioner installation should start with choosing a place for installation. In fact, everything is not easy. It is necessary to consider:
So you have to solve a complex problem, trying to satisfy all the requirements and recommendations. Only in this case, the installation of the air conditioner with your own hands will be successful.
Let's start with the simplest: choosing a location for ease of use. The indoor unit must be placed so that the cooled air spreads throughout the room, but does not directly hit the bed, desk, chair. In principle, it is possible to redirect the flow using movable blinds, but it is much better to think about it first.

The most correct solution in this case is to place the air conditioner above the head of the bed, above or to the side of the table. In this case, the flow of cold air will "flow" around the place of rest or work, which is much more comfortable and less hazardous to health.
In addition, there are technical issues that must be foreseen before starting the installation of the air conditioner with your own hands. The indoor unit is connected to the outdoor unit using a copper pipe route and a control cable. The track connections are on the right (when looking at the unit from the front), but they can be bent so that they are on the left or below. These outlets are 30 cm long copper tubes.

Outputs from the outdoor unit of the split system (rear view)
The track is connected to them (by soldering or flaring), and the junction must be accessible for maintenance. Therefore, this section of the route is not hidden in the wall (in the gate), but covered with a decorative box. In this case, the track can be positioned in different ways - depending on which wall the indoor unit was hung on and where the outdoor unit is located in relation to it.
Block to the left of the outer wall
If the indoor block is located to the left of the outer wall, and the route goes straight, the minimum distance from the wall to the block is 500 mm (1 picture in the photo). It can be reduced to 100 mm if the track is wrapped on an adjacent wall, but its total length should not be less than 500 mm. If this is not possible, you can remove the bends on the left and lay the pipes in the groove (figure on the right). In this case, this is possible, since the junction of the leads and the route is obtained under the housing cover, so that it is accessible for repair and maintenance.

If cables, pipes, etc. cannot be pulled along the outer walls of the building. (in order not to spoil the appearance), you will have to lay the entire route indoors. A less expensive option is to hold it in the corner, covering it with special boxes. This arrangement is convenient, since then you can close the box with curtains.

The second option is more labor-intensive (it is more difficult for the strobe to be made), but from the aesthetic point of view, it is more advantageous - this is to transfer the output to the left side panel and put everything in the made recess.
On the wall to the right of the outside
This option can be called typical - it is a standard solution when choosing such a location. most often the route in the box is led directly into the wall, but if necessary, it can be lowered in the corner (also closed with the box).

If necessary, you can put it in a groove (the connection point is in the body). If the route cannot be drawn outside the building, it can be laid in a gutter indoors. The track may look like the last two photos in the previous chapter.
Where to identify the outdoor unit
In fact, it is not an easy task to choose a place for an outdoor unit. Not all buildings are allowed to place them on the walls. In this case, there are only two exits: install the outdoor unit of the split system in a specially designated place - air conditioning. If there is no such room, only a balcony or loggia remains. In such buildings, they are usually glazed, therefore, the placement of the block does not affect the appearance.
But in this case, it is necessary to provide for a system for cooling the equipment and removing exhaust air. If the balcony is spacious enough, for the entire time of its operation, windows are opened for ventilation or by providing fresh air in some other way. The solution is simple and straightforward, but it leads to overheating of the equipment, and this is fraught with breakdowns and frequent replacement of the damaged outdoor unit.

Balcony mounting is sometimes the only way out
Installing fans for more active air exchange can correct the situation a little. It is correct to fence off a small room, make it effective ventilation, separate ventilation ducts for the removal and supply of air. Moreover, they must be separate. This is done with the help of air ducts, which are removed instead of part of the glazing. In general, in this case, installing an air conditioner with your own hands is a problematic task precisely in terms of ensuring normal operating conditions for the equipment.
On the balcony or loggia
If there are no prohibitions on the placement of foreign devices on the walls of the building, usually the outdoor unit of the air conditioner is hung on the balcony railing (side or frontal) or on the wall, but so that it can be reached for maintenance - wash, clean, check, repair.
If the balcony is glazed, there should be an opening sash above it. Otherwise, it will be very difficult to service it. To protect against precipitation and objects that may fall out of the window, a visor is placed over the block. The choice of materials is something similar to a balcony trim or a white plastic visor, but only corpulent. It is better not to use hollow and metal (including corrugated board and metal roofing), since during rain they turn into a drum, and during hail they can generally deafen.

If the block is placed on a loggia, of all the above options, only the one in the picture on the right remains. it is inconvenient to place it next to the wall, except under the window, but this already refers to another section.
Another point: how to route the track - on the ceiling or on the floor? You will have to gouge in either case, but in the case of the floor, you may be making it from boards, then the pipes and cables connecting the outdoor and indoor units can be laid over the surface, but better - in a box.
Under or next to a window
In those rooms where there is no balcony or loggia, the outer part of the split system is hung on the outside wall. It is more convenient if it is located under the window or to the side of it. Moreover, under or next to the opening part. In this case, service is possible without calling a climber.

When installing the outdoor unit of the air conditioner with your own hands on the wall next to the window, consider the height of its installation. You can position the top surface of the block flush with the top edge of the window. In this case, leaning out of the window and insured, it will be possible to carry out work on the windowsill. The second option is to align the lower edge with the lower edge of the window opening. Here you can lie on your stomach on the windowsill, but you will not be able to reach the outlet of the pipes. That is, you still have to call industrial climbers.
What is required to install an air conditioner with your own hands
Those who install and connect the split systems professionally take about three hours to work on average. The cost of this service is considerable, and it is explained by the need to use expensive equipment. Good devices really cost a lot, but many of them can be replaced with simpler ones or rented. The only thing that will be difficult to find is a vacuum pump. This is really expensive specialized equipment, but there is technology to do without it. This is exactly what some installers do, who simply do not have such equipment - they simply bleed off some of the freon, cleaning the pipes. This method can be used for self-installation of a split system.

Necessary equipment and what can be used to replace it
What is necessary for a successful DIY installation of an air conditioner? First of all, you will need a certain set of tools. With their help, things will go faster. But if there is no special toolkit, it can be replaced with simpler devices. It will take longer to work with them, but if you try, this will not affect the quality. So, what is needed to install a split system:
- Powerful rotary hammer. A through hole must be made in the outer wall of a house or building through which copper pipes and cables connecting the indoor and outdoor units are led out. Also, through this hole, a drainage tube is brought out to drain condensate and excess moisture when the humidity is normalized. A hammer drill is not such a rarity, the only thing that can cause difficulties is the selection of the right nozzles. But this is already a matter of technology.
- A pipe cutter with a sharp blade. Split system blocks are interconnected with copper pipes. They are sold in bays, so they will have to be cut into pieces of the required length. If the pipe cutter blade is dull, the pipe edges will wrinkle or be jagged or jagged. This will have to be corrected with a file and a rimmer (special deburring device). The pipe cutter can be replaced with a hacksaw with a metal blade, and the edges can be leveled and deburred with a file (file), finally processing the edge to smoothness with sandpaper. Only when working, make sure that the hole to be machined is directed downward. This will prevent copper dust from getting inside the pipe (it can damage the inside of the air conditioner, so this is very important).
- Pipe bender or spring. To give the copper pipes the desired shape.
- Drill with drills of different diameters. It is needed in order to make holes for the mounting plate of the indoor unit and corners for installing the outdoor one.
- Flare tool and calibrator for copper pipes. This device is, of course, specific, but it costs little.
- Wall chaser. When laying a route in a groove (groove in the wall), this device significantly speeds up and simplifies the work. But you can get by with a regular chisel and a hammer / sledgehammer.
Well, as they said before, a vacuum pump is needed for a high-quality start of the system. There is nothing to replace it with, the only possibility is to release part of the freon on routes up to 6 meters long ("zilch" method).
In addition, you will need screwdrivers, hex keys, a level, a hammer, perhaps some other tools, but they are usually available on the farm or they are not difficult to find.
Materials and consumables
In addition to the tools for installing the air conditioner with your own hands, you will need a certain amount of materials. Many of them are indispensable.

As you can see, installing an air conditioner with your own hands requires serious preparation. You need not only a special tool, but also specific materials.
Installation of blocks
If you want to do everything right, do-it-yourself air conditioner installation should begin with a careful study of the instructions. Most of them are similar, but allowances, requirements for cable cross-section, route length, etc. may differ. Another plus from reading the manual is that you will definitely imagine in what order to perform the work. In general, here's what to do:

This completes the first stage of self-assembly of the air conditioner. Then we will lay the route.
Connecting blocks
The outdoor and indoor units of the split system are connected by two copper pipes and a cable. A drainage tube is also led out. All these communications can be laid on top of the wall, and then they fit into a special box. The second option is in the groove and then you need to make a groove that will connect the two blocks. But first of all, you need to drill a hole in the wall. This is done after the block fasteners have been installed. And only after that do-it-yourself installation of the air conditioner continues.

When stacked in a plastic box, all communications are tied into one bundle. This can be done with screeds, but more often they are wound with metallized tape - in order to further reduce the transfer of heat from copper pipes.
Connecting copper pipes
We have already connected the cable earlier, and the installation of the air conditioner with our own hands is being completed by connecting copper pipes, drainage. Drainage is easier. There is an outlet at the bottom of the indoor unit, so we insert a hose or pipe there. The junction can be additionally sealed using plumbing fum tape. You can also use silicone sealant for sealing.
Next, we connect the copper pipes. We start at the indoor unit. On the side wall there are two ports - one with larger diameter fittings, the other with smaller ones. Which one to start with is not important. The procedure is as follows:

Actually, everything is already connected, but you still need to vacuum or simply remove moisture and air from the working parts of the air conditioner.
Evacuation
Why carry out this procedure? During installation, air has entered the system, and argon residues are also contained there. This mixture must be removed, otherwise it will significantly reduce the working life of the equipment. Naturally, it is better if you have special equipment. But, in extreme cases, you can do without it.
With a vacuum pump
If there is a vacuum pump, everything is somewhat simpler. Two pressure gauges (low and high pressure) usually come with it; they can be used to track the pressure drop in the system, that is, to identify leaks. The vacuum pump is connected to the outlet on the external block with a spool (filling port), it turns on for 15-20 minutes. During this time, it removes the remaining air and nitrogen from the system.

After this time, the pump is turned off, but not disconnected, but left connected for another 20-30 minutes. All this time it is necessary to observe the readings of the manometers. If they have changed, there is a leak in the system. Most likely - this is the place where copper pipes are connected and they need to be repaired. If the readings of the pressure gauges are stable, without turning off the pump, fully open the valve located below. Freon begins to come out of the block, filling the system (noise is heard). We put on gloves and quickly unscrew the vacuum pump hose (freon can damage the skin). After disconnecting the equipment, open the valve on the track at the top (outlets with a smaller diameter). Now the installation of the air conditioner with your own hands is over. You can turn it on.
Without vacuum pump
If the length of the route is up to 5 meters, the air conditioner can be installed without a vacuum pump. To clean the equipment, you will have to release a certain amount of freon, but there is no other way. The procedure is as follows:

And in this case, the installation of the air conditioner with your own hands is completed and the equipment is ready to work. But in this case, the tightness of the system has not been verified by anything and the freon can slowly evaporate, and there is still some air and argon left in the system. In general, the solution is not perfect.
The technical name of the air conditioner is split-system (from the English word “to divide”). It consists of an external unit forcing air and an evaporative internal unit. To cool the air in the room, you need to perform not only installation work, but also connect the air conditioner to the electrical network. The features of this process depend on the power of the device.
The electrical circuit of an air conditioner for consumer services differs from the connection of a three-phase device, which is used in large offices for various purposes, business centers, and supermarkets.
It must be remembered that electrical installation is carried out in accordance with the Rules for the Installation of Installations and the relevant regulations.
Carefully prepare for connecting the units to the mains. To do this, you should:
- carefully read the diagrams and specifications for the components and materials of the device;
- inspect the existing power supply system, including the location and cross-section of incoming cables;
- test the intended route with a detector for the absence of internal wiring and metal elements of building structures;
- analyze the composition of the walls, on the surface or inside which electrical work will be performed.
Connecting the air conditioning system is impossible if there is old aluminum wiring in the house and there is no grounding.
Direct cable routing must comply with the following requirements:
- a junction box, a switch, a socket for a household air conditioner are located in an accessible place;
- the socket is installed at a distance of at least 50 cm from the floor and grounded metal elements (batteries, water and heat supply pipes);
- the wire is laid only horizontally and vertically;
- when laying horizontally, retreat:
- from the cornice 5-10 cm,
- from the ceiling - 15 cm,
- from the plinth - 15-20 cm;
- there must be at least 10 cm between the vertically stretched wire and the corners, as well as window and door openings;
- laying parallel to gas pipes is carried out at a distance of 1 m from them;
- the electric wire is protected from heating pipes with insulation.
In addition, the following rules for connecting devices to the mains must be observed:
- It is strictly forbidden to connect the wires by twisting. Build-up is done using terminal blocks or bolts;
- it is not allowed to connect a wire made of aluminum and copper due to their different electrical conductivity (for a copper cable, this figure is one and a half times more).
External wiring
If the method of laying on the wall surface is chosen, then the cables are fixed every 50-60 cm with plastic clamps, which in turn are fixed on the wall with screws. When using boxes in which the wire is laid, they are fixed with glue or screws.
Internal wiring
Cables hidden in the wall are laid in plastic corrugated pipes, after making a recess (groove) of the required length. Usually the corrugated pipe is fixed inside the wall with clamps. If the depth of the groove is 2 cm or more, then it is allowed to perform work without a corrugated pipe.
It is forbidden to lay wires in bundles and at a distance of less than 3 mm from each other.
Do-it-yourself connection and connection of interconnect cables of the air conditioner
After installing the air conditioner, it is necessary to lay the interconnect cable from the indoor unit to the outdoor unit, and the other wire should be pulled from the indoor unit to the terminals of the electrical system. An interconnect cable is mainly used with 4-5 conductors of different colors to prevent errors in the connection of both units. The section is selected 2.5 mm 2.
The essence of the connection, in general terms, is as follows:
- remove the front panel and the protective cover of the unit;
- stretch the cable and place it on the side of the module;
- strip the ends of the wires, insert into the terminals and tighten with screws;
- fix the cable at the exit from the block;
- close the module with a cover.
After connecting both units, carefully check the correctness of the work performed. Next comes the testing of the assembled circuit and a short-term start-up of the system.
Otherwise, the connection diagram of the air conditioner to the household electrical network is individual for each model, as well as in the case of powerful three-phase split systems. In this regard, the details of the connection should be specified in the attached instructions.
How to connect the air conditioner to the mains
There are two common ways to connect the air conditioner to the mains supply:
- through a socket for single-phase household appliances;
- from a separate line mainly for industrial devices.
With socket
Powering the split system using a plug and socket is the simplest way that does not need preparatory electrical work. This option is chosen for air conditioners built into the window, low power systems up to 4 kW, as well as for temporary use. It must be remembered that the socket for a household air conditioner must be strictly individual.
Connection can be made only if you have experience in electrical work with household appliances. The algorithm of actions will be as follows:
- prepare materials and tools;
- study the diagrams in the instructions;
- lay and connect interconnect cables (it was written about it above);
- install an outlet.
Before a test run of the split system, you need to check the circuit for correct connection.
The socket must be with copper wires and connected to the shield in accordance with all electrical safety rules.
Direct network connection
A separate power line is best suited for a powerful split system. In this case, you need to make sure whether it is possible to connect additional equipment to the electrical panel (necessarily grounded). The option of direct connection to the network does not load the operating lines of the network: power is supplied directly to the indoor unit of the air conditioner.
The cable is laid along a prepared groove in the wall or in a box along the wall surface. The cable is pulled to the shield through the machine with the calculated power, which will be discussed in detail in the next subsection. The cross-section of the wire will depend on the power of the device and the distance of its location from the shield.
The connection instruction for the rest repeats the first method. This method allows you to install the air conditioner anywhere in the house.
What cable is needed to connect a split system
The wire for the air conditioner must be made of electrical copper and three-core (phase, zero, protection). For low-power split systems less than 3 kW, a cross section of 1.5 mm 2 is sufficient, with a power of 3-5 kW, a cross section of 2.5 mm 2 is required. Air conditioning devices up to 8 kW are connected with a 4 mm cable.
Reliable power cable of VVG brand with standard PVC insulation is widespread. Its service life reaches 30 years. The marking is read by special conventions. The first two letters "B" stand for external and internal insulation made of polyvinyl chloride. "G" means no armor.
The VVG cable for the air conditioner must be laid in such a way that not only safety, but also aesthetics is ensured. For communications hidden in the wall, flat cable VVG-P is convenient. In the walls covered with plasterboard, the wire is laid in a corrugated pipe. In this case, it is better to use VVG ng, which ensures a stable incombustibility of the shell.
Do I need a circuit breaker or RCD
Protection of electrical communications in buildings from short circuits and overloads is carried out by automatic switches. Safety for human health and life from possible current leakage is provided by a residual current device (RCD). This low-voltage device is not protected against overcurrents, therefore it is installed in conjunction with the machine. There are also differential circuit breakers, which include an RCD and an automatic device.
What is more rational to install: a difavtomat or an RCD with a machine? So, the differential switch will take two module-places on the dashboard (the more expensive ones will take one), and the RCD and the automatic device will take three. To save space on the switchboard, a circuit breaker is definitely preferred.
As for the electrical work, the difavtomat is somewhat easier to install than to link a pair of RCDs plus an automatic machine.
It is more convenient to diagnose malfunctions in electrical networks if there is an RCD. In this case, each of the devices is triggered independently of each other. The differential switch will not be able to identify the specific cause of the failure, since it shows a diagnosis without triggering the modules. Here you have to analyze each diagnosis separately.
If we talk about repairs, then in a pair of RCDs and a circuit breaker, one failed element is replaced. This is much more economical than changing the difavtomat completely.
Installing an RCD with an automatic device will be cheaper by 1000 rubles than a differential circuit breaker. However, experts advise choosing the second option when laying one line, which, along with reliability, saves space on the shield. The socket for a medium-power household air conditioner is also installed with an automatic machine.
When connecting several air conditioners or other household appliances - the advantage is on the side of the RCD, which serves simultaneously on 2-3 lines.
The connection of the split system to the network must be carried out carefully and accurately. If you are not confident in your knowledge of electrical engineering and sufficient experience, then you should seek the help of professionals.