- the procedure is troublesome and time-consuming. But with minimal woodworking skills and the necessary tools, you can still cope with the installation.
Not only aesthetics, but also the strength of the structure depend on whether the door frame was installed correctly. But before starting work, you should familiarize yourself with the main parameters that you need to pay attention to during installation.


Construction schemes

There are two schemes for fastening the door frame, which differ in the execution of cuts:
- sawing at an angle of 90ᵒ requires a saw with fine teeth, accuracy and minimal knowledge of woodworking technology;
- for an angle of 45ᵒ you will need a miter box or a miter saw.
The second mounting scheme is described below, since it is simpler in execution. Now - directly to the installation.
Stage 1. Elements of the door frame

First you need to purchase the necessary construction details. Here is a list of all accessories:
- door leaf;
- self-tapping screws with dowels;
- a pair of vertical bars 2 m long;
- one horizontal bar;
- wooden platbands;
- anchor bolts of the appropriate size;
- iron hanging bars;
- platbands;
- wedges with a size corresponding to the width of the opening between the bar and the wall surface;
- mounting foam;
- foam gun.
Stage 2. Equipment

Installation requires a lot of tools and materials. Every owner should have some of them, the rest need to be bought or rented. So, for work you need to prepare:

Stage 3. Dismantling the old box
Preparation for installation often begins with the dismantling of the old door. This must be done in this order.
Step 1. First of all, the platbands are removed and the design of the door frame is disassembled. All this must be done very carefully so as not to damage the wall.


Step 2. Anchor bolts and other fasteners are unscrewed or, in extreme cases, cut off.
Step 3. The wall is checked for strength and, if required, further strengthened.
Note! Do not neglect the strength of the wall, because the reliability and durability of the box directly depends on this. If it is necessary to strengthen, it is better to make reinforcement and finish the “problem” areas with cement mortar.
Stage 3. Installing the door frame

Before starting, it is advisable to lay out all the components on the floor at a single level, after placing cardboard or other soft material. Also, the design can be placed on two tables or four stools.

Step 1. Upon completion of dismantling, measurements of the formed doorway are carried out. It is important that the width and height of the structure be at least 5 cm less than the opening - this will allow the installation of spacer wedges.
Note! The wedges should be 0.5 cm larger than the gaps, otherwise the mount will not be strong enough.
Step 2. The ends of the bars are sawn off with a miter box at an angle of 45ᵒ.
Step 3 Holes are made at the joints of the bars. The bars are tightened with self-tapping screws. When tightening, you need to be extremely careful, because if you overdo it, the tree can crack.

The lower bars in modern designs are not provided.
Step 4. It is determined on which side the door hinges will be attached, after which their outlines are outlined. The door leaf is tried on, the presence of a small gap between the floor and the frame is checked. With the help of a chisel, places for fixing door hinges are prepared. The hinges are screwed with self-tapping screws to the canvas and bar.
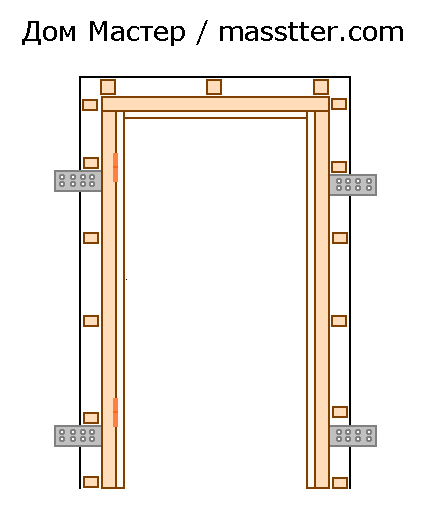
Step 5. Where the box will be adjacent to the wall, hanging strips are attached with self-tapping screws. The plank of each of the frames is equal to the width of the wall, and the tendrils extend 5-7 cm to the inner and outer sides. Horizontally there should be two such strips, vertically - three.

Next, the door frame (only without a leaf) is installed in the opening. Using a level and a plumb line, the horizontal / vertical structure of the structure is checked. From below, a spacer frame of the same size is installed with a bar located on top.

The frame for the doorway is almost ready.
Step 6

Step 7. It remains only to fix the box with anchors. Through the entire perimeter of the beam, through holes are made with equal pitch, points for drilling the wall are marked in parallel. Then the wall is drilled with a puncher, anchor bolts recessed into the bar are inserted into the holes obtained. Fasteners are tightened with a wrench.

Step 8. At the end, the door leaf is hung, after which the axes are checked. If everything is done correctly, the door will open and close easily. All cracks are filled with mounting foam.

Note! The amount of foam must be controlled, because an insufficient amount will reduce the strength of the structure, and an excess can cause the box to deform.
After that, platbands with pre-sawn corners are installed. For fixing, small nails without hats are taken, all joints are smeared with wax-based mastic.
Video - Assembling the door frame
Box fixing methods
If the width of the opening is greater than the width of the box, then instead of wood, you can use jambs made of MDF - a building material that has been very popular in recent years. In this case, the mounting technology is almost the same as described above.
Various additional elements are used to increase the distance from the bar. Such elements can be bought ready-made in the store or pre-cut at the preparation stage. In most cases, MDF is used with a special slat located in the center. This bar is removed, and in the groove below it, the required number of holes for the anchors is made. Then the groove is closed with a bar and a reliable and aesthetic design is obtained.
Door frame in a wooden house

Wood is an excellent building material, the main disadvantage of which is subsidence after construction. For this reason, you need to know how to make a door frame in this case.
In this case, there are only two options.
- If the width of the opening corresponds to the size specified in the project, then grooves are made at the ends and a beam is hammered into them. A box is nailed to the beam (it is better not to nail it directly to the walls, because the notorious subsidence will continue).
- With an unformed opening, the hole must be made slightly smaller than that specified in the project. The beam in this case is made with a groove.
The sequence of actions should be as follows.
Step 1. First, the outline of the future opening is marked, using the building level and plumb line.
Step 2. Then the opening is sawn out, the upper and lower parts are cut off.
Step 3. The diameter of the log house is measured and the dimensions of the jambs of the door frame are determined from the resulting figure. Jambs are made from decks.
Step 4. The decks are split into blocks and hewn.
Note! It is not at all necessary that the profile of the jambs be rectangular - it can be, for example, trapezoidal.
Video - Door frame made of wood and MDF
And the last. During repair work, the humidity in the room usually rises, which is very important, especially when assembling the door frame. After some time, the door, previously sitting tightly, begins to loosen. At the same time, many masters also prefer to save on fittings. This is not necessary, because a weak fastening usually causes the fragility of the door.
To the wall is an important task. Do not neglect its reliable performance. It should be done as well as possible, with high quality.
Keep in mind that if you install the door correctly, you will forget about many problems. It will open and close freely. The effect will last not for a couple of months, but for several years.
The most important thing is the correct adjustment of the gaps that are located between the door frame and the leaf itself. They should be the same both on top and on the side.
You can say: “What's the big deal if the box bulges a couple of millimeters? It won't be noticeable at all!" Yes, we agree with you. The appearance will not deteriorate. But after a while, the door will stop closing. And if it does not stop, then it will be very difficult to do so. That is why fastenings must be made at the highest level.
Neglecting our advice means subsequently changing the entire block. And this is both troublesome and expensive. And in general - it is not necessary.
Because of what the jambs bend: all the reasons
You know that door frames are made of wood. And, as you know, the tree perfectly absorbs moisture. Of course, the jambs are varnished on the outside. And this, in theory, should protect the material from water. But the fact is that the varnish perfectly passes moisture.
The result is the following diagram. By absorbing moisture, the tree increases in size. And when it gives it away, its size decreases. The process is natural - but unpleasant.
Jamb installation
Since wood has a heterogeneous structure, it both increases and decreases inhomogeneously. As a result, the shoals bend.
Here it is the main, the only and main cause of the problem. And how to solve it? Yes Easy! Jambs should be well fixed. Then they will remain in their place in any case, even under the influence of external factors.
Experts give a number of tips:
- first step: insert the frame into the opening. It must be made of metal. And then foam it;
- the mechanical fastening of the jamb must be made at five points. If you neglect at least one of them, then subsequently the door will become difficult to close. Or there will be other, not the best consequences;
- if the door is double-leaf, then it should be fixed at six points;
- if flexible plates are inserted into the opening, then they should wrap around the wall.
Errors that prevent high-quality fastening
There are mistakes that lead to poor fastening. Be aware of them and try not to commit:
- you can not mount the block only on mounting foam because it is unreliable. Foam is an elastic substance, and it cannot prevent the occurrence of bends;
- Foam itself can be a problem. It may cause bending. Everything is very simple - if somewhere it lay unevenly, this provides a fold.
Even professional installers often attach blocks to three points, and not to five, as we advise. This is bad, because then the entire lower part of the jamb will be loose, so the fasteners bend. So listen to us and don't make mistakes.
Double-leaf doors often lack fasteners between the hinges. This is a mistake that should not be allowed. Be sure to add another fastener between the loops.
The flexible plate must be fixed to two walls. If it is attached only on one side, nothing good will come of it. There is no security in such a door. Not only will the jamb bend, it can also twist with a “screw”.
Four basic mounting methods
We have already described the methods of fastening the door frame above. Now let's select them properly:
- on mounting foam. Doing so is not worth it - in the end, the door may simply fall out of the opening;
- at three points. The most common approach. This is a quick and easy way, which is relatively reliable. Suitable for and for those passages where there is no high traffic;
- at six points. This technique is recommended even by GOST. It is considered optimal. The only negative is the plugs because they can spoil the appearance of the door;
- using plates. Ideal for expensive doors that you don’t want to spoil with plugs. The plates are attached from the back.
Now let's look at mounting options at six points and with the help of plates in more detail.
The traditional way
The algorithm of actions is as follows:

Installation according to GOST: an affordable method and important recommendations
We will not argue about how to properly fix the blocks. There are 4 ways to do this, and everyone has the right to choose what he likes best. We will just tell you how to work with the most proven methods. One we have already detailed above.
Now let's talk about something else. So the instruction:

Now let's give you a little advice. If you need to lay flooring afterwards, place a shim under the jamb that is equal in thickness to the flooring. After that, you just need to remove the gasket and lay the floor covering. And that's it - no problem.
- the next step is to insert the box into the opening. Be sure to use the level! We fix it with good self-tapping screws;
- hanging the canvas in place. We check the gaps. Next, you need to adjust the gaps. We have already written about this above, in a different way. This is done by tightening the screws or vice versa, loosening them;
- then the second rack is attached. Spacers are not required here, which means that you do not need to wait until the foam dries. The door in this case is ready for operation immediately after the foam is applied;
- put on plastic caps. They will close the mounts;
- The last step is to foam the entire box.
That's all! The work is done. Judging by the reviews of people, this method is really good, and GOST was not mistaken.
The main signs of a well-established joint are:

Door frame in place
- the lock, wattle fences and other fittings must be carefully and accurately inserted into the canvas. The main thing is that nothing is skewed;
- all elements of the door frame must be carefully docked together. Docking can be done independently, it is not difficult;
- the loopback jamb should be made vertical. It is very important! Then the door, no matter how it is opened, will not be let down;
- the gaps should be the same everywhere, from top to bottom. For a single door, the gaps on the handle side should be slightly smaller than the gaps on the hinge side;
- great attention should be paid to the vestibule of the canvas, because it must be precisely and clearly adjusted. When this is done, with the door closed, on the side of the door handle, not a single gap will be visible, no gap, regardless of whether there is a seal on the jamb on that side or not.
What should be the result?
Please note that the handle in the door should turn without the slightest effort when opening. However, she must return to her place as soon as she is released.
The door should close very easily. It happens that when closing, the hinges pull slightly, this should not be.
The lock on the door should close easily. And at the same time, it must be tight, reliable, otherwise it will be very easy to open the door.
Attaching to the wall is important, no matter how you look at it. We have already said that this is important so that the door does not deform, no one wants to see an ugly door in their house. Moreover, from an aesthetic point of view, this is unacceptable.
Any kink in the box can cause the door to be difficult to open or close. Moreover, the door may eventually stop opening and closing altogether! And then you have to change the entire block at once. And this is expensive, and troublesome, and it will take a lot of time. Therefore, it is better to do the job right now than to redo it later.
But that's not all! The fact is that due to the bend, the door can simply fall out. But this is not the worst. The worst thing is that a poorly, unreliably installed jamb can lead to the fact that the door will simply be opened. It is enough to push such a door with a hand or foot to knock it out along with the jamb. And then - complete freedom of action. You can simply take and take out all the property from the apartment. Thieves and robbers use this method very often.
Therefore, we strongly recommend that everyone listen to us. Do not install the jamb only on the foam, but use the techniques and methods that we have already described above. Then the jambs will be reliable, the door will become impregnable. And you, the owners of the apartment, will be calm.
Fastening the door frame is one of the important points in the installation of an interior door. It is how it will be fixed that determines the prosperous life of the door block as a whole.
Since door frames can be made of different materials, the methods of their fastening can be different, let's look at them.
There is a certain general condition that is used for all types of boxes, since, often, one person installs, the box should first be temporarily fixed in the opening, and then the main fastener should be taken care of.
For preliminary fastening (installation), metal plates are excellent - suspensions, which are used to fasten metal structures for drywall.

At least four of them are required, and that is, we will use them for fastening (mounting) any kind of door frames. They are fastened one on top, and one at the bottom of the standing box from the side facing the doorway.
Then the box is leveled and fixed with plates, and adjusted, and wedged with bars - wedges (adjustment is made with a hung door leaf).
Please note that if you are going to leave the plates after installing the box, then the part where they will go to the outer wall (the place where the platbands are subsequently installed) will need to be made under them to hide them under the plaster.
Door frame fixing. Video explanation
Wooden door frame
A wooden box may or may not have already been varnished. Depending on this, we choose how to fix the box in the doorway.
I’ll make a reservation right away that the tree can forgive you many mistakes, or rather, it (the tree) will make it easy to correct them.

If the box is for painting, that is, it has not yet been painted, we install it and pre-fasten it with the help of plates, then we wedge the upper cross-section from two edges, then the standing ones, hang the door and check the catch.
If the cross or standing door is curved towards the opening, then this is solved by wedging the curved place towards the door leaf until the gap we need (3 mm) is formed.
If the bend is towards the canvas, then we can install another hanging plate in this place and use it to pull the standing or cross-section towards the opening.
And we can drill the base of the box and, using a self-tapping screw of the length we need, as an anchor, and pull the box to the distance we need, remembering to drill out the pot to sink the head of the screw into the box, so that later it can be hidden with putty or acrylic sealant, the most suitable color.
When painting, all this will be hidden, without betraying the place of our anchor.
In principle, even if the box is already painted, then we can also use the method described above, but only if we are sure that later we can hide the anchor landing site well. To do this, all the same colored putty for our type of wood or colored sealant will be used, and the paintwork that matches the color will complete the work.
MDF box
MDF boxes have different profiles, and the method of additional fastening in the form of an anchor depends on the design of the box.

If the elements of the MDF box have a solid structure, then fasteners are made in the same way as a wooden painted box.
The only difference is that anchors in the form of self-tapping screws can be installed there only in three places, namely, in places and, there they are also placed in a secret and closed with loops and a bar.
Well, that's just in theory. I personally have never done this myself, since such fasteners are close to the edge of the opening and there is a risk of chipping, and then everything is down the drain. But there is such information on the network, and maybe this method will suit you, it's up to you.
Therefore, with such a box (solid), only the option with hanging bars and wedges remains.
Allows free use of anchors for fastening in a doorway. The anchors are drowned in a sweat and closed with a feigned bar.


In this regard, such a box is very convenient, because even after installation, if you need to adjust the gaps, you can carefully remove the slat and use the anchors to make adjustments.

Here, in principle, are the main methods for attaching an interior door frame. Naturally, in the course of work, you will eventually develop your own algorithms for this process. Therefore, the purpose of this article is to show the basics of this action.
The only thing I want to add in conclusion, do not neglect the installation of wedges, since even professional foam recently (at least I came across one) not only expands, pushing the box towards the door leaf, but also begins to shrink at the last moment of solidification, pulling the box towards the doorway.
So ideally the door block should be exposed and configured as if you are not going to use foam, then the foam will be your ally, and not vice versa.


On the sim, I traditionally wish you a successful installation.
Possible options for fixing doors in the opening
- Working with mounting foam
- New mounting options
Each master is faced with the problem of how and on what to fix the assembled doors. To install the finished door block, it is possible to use various installation methods. Knowing these installation options, you can easily choose the right one for yourself. You will need a small set of tools such as a drill, hammer, level, screwdriver and hammer. Also, to directly fix the box in the opening, you need fasteners and mounting foam. Depending on where you need to fix the door block, you may need self-tapping screws, dowels, anchors.
The main stages of installing a door block
At the very beginning, the old door frame is dismantled. It can be carried out using a nail puller (crowbar), having previously made cuts on both sides of each vertical bar, in order to then squeeze this structure from the opening. If anchor bolts were used during the installation of the old box, nails that cannot be unscrewed can be cut off using a grinder.
Before installing the interior door frame, it is necessary to check the verticals of the sen and take into account the differences in the level of the walls and floor. The door frame must be positioned so that if there are irregularities, the wall box does not deepen in the opening. This is necessary to fit the door trim. In order to correctly position the door frame, you should use the building level and take into account all the opening errors.
First of installation, the assembled door block is rigidly fixed in the opening in order to achieve the initial level of rigidity, wedges are used. After completing the fixing work, it is worth re-checking the correct location of the level so that the box is level with the door.
Working with mounting foam
It is important to know that the foam that is designed for the gun is much better and more convenient to use due to the fact that it is more dosed and has a small expansion coefficient, it freezes much faster. Foam, which is fed with a straw in a large amount, it will expand longer. Before starting work, it is better to cover the door leaf with masking tape and film, because the foam is difficult to wash. It is important to know that you need to start foaming with the fixation of individual small sections. After 30 minutes, you can already go through the entire perimeter. All cracks are filled with foam (50% of the total volume). Do not fill with a large amount of foam, because during expansion the foam will squeeze the box inside. We recommend using professional foams.
Since the tree shrinks and expands precisely because of the increased humidity, the consequence of the expansion is the deformation of the door block. The door simply stops closing for this reason.
on possible ways of mounting doors
There are several ways to fasten the door frame in the opening, each of which involves the use of a special type of fastening. Various fastening options provide a certain level of reliability and strength of the fixed structure. We hope that the videos on the options for installing wooden door frames will help you.
: Mounting a door frame made of wood and MDF in the opening
Hidden way to install doors on foam
The door frame is fixed in the opening, wooden wedges are used for fixing, and the correct location is checked by the building level. Foaming with mounting foam should be done little by little, in sections and with interruptions to avoid deformation. The door frame is kept almost thanks to the foam alone.
To keep the gap between the frame and the door itself, use small 3mm spacers that are inserted between the door and the frame. They can be removed only when the foam dries. Usually the door is left overnight.
This method is convenient if you do not need to go into the room, it is fast and does not require much effort. It is important not to overdo it with foam so that you can open the door.
Installing doors with clamps or spacers
The principle of installation lies in the fact that we use inside for temporary fastening of the door block in the opening of the spacer. It can be both ordinary wooden rivers and special adjustable devices.
Both of these methods are very good for light and small doors.
: Template for installing door frames.
Fastening doors with Knauf hangers
For these purposes, Knauf's direct suspensions, which are used in suspended ceilings, are the best fit.
- First you need to screw the plates to the box;
- Insert the door into the opening;
- We adjust the level;
- We mark the places for the recess in the wall;
- We make a selection for the plate:

After that, we set according to the level and fix the plates. For adjustment, we use wedging with wooden bars.
It is also necessary to take into account that with this method of mounting the box on the outer part of the wall, the place of the recess will definitely need to be hidden under a layer of plaster. That is why, this method is only good when there is no fine finish.
: Installation of an interroom deaf door from the Senator company
New mounting options
This will let you know how to fix the door frame in the opening. This type of fastening is the installation of an interior door frame by putting the box on the screwed-in heads of self-tapping screws that are located at the ends of the opening. This happens with the help of metal plates with a hole, which are screwed on the outside of the box.
To achieve the final fixation of the frame in the doorway, the usual means of adjustment are used.
With this method, the racks of the door block move freely in the opening.
A clear advantage of this method is the full possibility of adjustment and, at the same time, rigid fixation while maintaining the original appearance of the box and the exterior finish of the wall. 
: New technology for quick installation of interior doors
Concealed installation, fastening under hinges
As a rule, for the rigidity of the structure, screws or anchors are used, which are hidden under the hinges. To do this, a hole is made between the screws in the loop and fastened through it to the wall. From the side of the lock, another mount is attached under the decorative plate. As a result, we get 3 fixation points.
After fixing directly, we put a spacer at the bottom of the doors, since the bottom is not fixed and fill all the gaps with foam.
A: Foaming the door frame and a few tips.
Through-hole fastening on anchors or screws
This is the most common standard installation option for interior doors. For this mounting option, first holes are drilled for anchors in the right places of the racks, then the door is fixed in the opening.
- Marking 4 anchors on each side;
- Drilling with a pen 14mm to a depth of 10mm (place for a plug);
- We drill a through hole with a 10mm pen (a place for fixing with an anchor):
After that, the box is exposed and the concrete under the anchor is drilled with a 10mm drill. When the box rests on its anchors, it holds securely and does not require any spacers. The attachment points can be hidden by installing decorative caps of the desired color, size (14mm). Instead of anchors, screws can be used, this will reduce the diameter of the plugs. The use of this option is the most reliable for heavy doors. With it, you can align (stretch) a curved rail. Doors can be used almost immediately. It is possible to adjust the gap. The downside is the presence of stubs. 

: Door frame installation method with end caps
Tricks when installing door extensions
: Milling a quarter on the door frame / How to install an extension if there is nowhere to put it
There are many options for installing an interior door frame, but you should choose the one that is the easiest, most convenient and reliable, or the fastest. The choice can be made according to any method of door installation, but these methods can be affected by which opening the installation takes place, take into account the intensity and other factors.
New Section Entries
Ideas for using glass doors in an apartmentHow to choose an office front door
For installation, you will need a tool and basic building skills. The quality of the work performed depends on accurate measurements. The slightest distortions will lead to jamming of the sash, the formation of cracks. Door units are sold assembled or disassembled. In the second case, the installation will be more difficult due to the need for self-assembly of the boat.
The installation of doors begins with the preparation of the tool. For installation work you will need:
- To put the door evenly, you need a plumb line and a level. For measurements, as well as marking, use a tape measure with a pencil.
- The process of assembly and installation of interior doors includes the final finishing with platbands, and, if necessary, extensions. For cutting planks, a hacksaw with fine teeth, a miter box is useful.
- From a power tool, you need a drill with a set of drills for concrete and wood, as well as a screwdriver.
- It is easier to make selections for fittings with a cutter, but in the absence of a tool, you can get by with a chisel with a hammer.
Of the materials, self-tapping screws, mounting foam, as well as many wooden wedges of different thicknesses for spacers are used. Immediately you need to decide how to put the interior doors so that the fasteners are not visible.
If preference is given to flush mounting, additional suspensions are purchased. You can fix the boat with anchors. Drown the hats in hidden holes, putty, and paint over the top.
How to install an interior door with your own hands?
With the ability to use the tool, the installation of doors can be done independently. It is important to initially make all accurate measurements in order to avoid distortions. In general terms, the procedure for installing an interior door consists of the following processes:
- If the frame is sold disassembled, it will have to be assembled. This work increases the installation time of the interior door, and also complicates the process.
- All elements of the door unit are equipped with fittings: handles, locks, heck. On a system consisting of rollers and guide rails. When installing a swing door, the canvas is attached to the boat with hinges.
- After assembling the structure, the installation of doors in the apartment begins with. In the opening, the frame is fixed with anchors or suspensions, and the gaps are blown with foam.
- A sash is hung on the installed boat, adjusted, set with.

To perform the correct installation of an interior door with your own hands, even before buying a door block for sure. The dimensions of the frame must be smaller from the passage, otherwise it will have to. It is optimal to withstand the gaps when installing an interior door between the boat and the wall - from 10 to 40 mm.
Mandatory, but needed if the depth of the opening exceeds the size of the frame. The protruding sections of the wall are hidden under decorative strips. Step-by-step instructions will help you better understand the installation process.
Box assembly
The installation of the interior door begins with unpacking the purchased unit, inspecting all the components. The door frame can be sold assembled or disassembled into individual elements with mounting grooves.
If a boat is purchased with ready-made fasteners, it only needs to be assembled. The frame is sold from elements sawn to size. There can be three of them: a feigned and hinged rack, as well as a ceiling top bar. If a threshold is provided, then the fourth element is included in the kit.
To assemble the frame, plugs are knocked out from the ends of the racks along with the connecting pins. The edges of the vertical and horizontal frame elements are joined so that the mounting holes coincide. The connecting pins are hammered with a hammer, and the holes are closed with plugs.
During the knocking out of the plugs, blows are applied through wooden linings to prevent the destruction of the decorative coating.
Much more difficult, sold in the form of blanks from figured lined timber. You will need a woodworking tool, as well as basic knowledge of carpentry. consists of the following steps:
- First measure the sash. The length of the frame elements is calculated so that a gap of 3 mm is formed between the inside of the boat and the canvas along the entire perimeter. If it is planned to install a sealing gum, the size of the gap is calculated taking into account its thickness.

- The blanks are marked, then sawn with a hacksaw on wood with fine teeth at an angle of 45 or 90 degrees. Direct docking is easier. To properly saw off the corner, the workpiece is placed in the miter box. Connect the prepared elements of the box with long self-tapping screws, having previously drilled holes.

- It is easier for an inexperienced person to install doors without a threshold, since only three elements will have to be connected. The shape of the box is made in the form of the letter "P". The edges of the upper jumper are laid on the ends of the racks. Each joint is fixed with two self-tapping screws.

- The sash is placed in the finished frame. Measure the gaps between the door and the frame on three sides, adhering to the desired 3 mm. Racks from below will rest on the floor. The length is calculated so that a gap of 8–15 mm is obtained between the floor covering and the lower end of the sash.
- To install the threshold of an interior door, the box is assembled from four elements. The lower jumper is inserted between the uprights, then fixed with self-tapping screws. The gap between the threshold and the end of the sash is 3 mm.

After the box is made, the door leaf is laid. Stepping back from above and below 25 cm, on the hinge stand, as well as the end of the sash, mark the places for mounting the hinges. So that the mounting plates do not protrude, recesses are chosen in the wood with a chisel or cutter.
Two ways to install the box
open way provides anchors. The frame is inserted into the opening. Exposed vertically and horizontally. All measurements are carried out with a level, as well as a plumb line. Observing a gap of 10 to 40 mm, wooden wedges are driven in between the box and the walls. By knocking or loosening the spacers, the frame is perfectly even.

On the inside of the box, in 50-60 cm increments, through holes are drilled with hidden selections. Holes are made in the wall with a concrete drill. The anchor is screwed in so that the hat is hidden inside the hidden sample. After a level check, the gap between the wall and the frame is blown out with foam. Hidden holes are puttied and then painted over.
Second closed way installation of the box involves the use of suspensions used in the manufacture of a frame for drywall, or a special mounting system. The metal bar is screwed with self-tapping screws to the wrong side of the frame. The box is inserted into the interior opening, wedged with wooden wedges, the suspension petals are bent onto the wall, fixed with self-tapping screws with plastic dowels.

Dobor installation
When installing the door unit in a deep interior opening, the frame is not able to close the entire wall. If the width of the box is not enough, then use. Decorative strips are installed on the longitudinal groove of the frame, having previously lubricated the lock with glue. If the door frame does not provide for a lock for extensions, the slats are fixed through hidden holes with self-tapping screws. The optimal fastening step is 60 cm.

Door leaf installation
Before installing the door, the canvas is equipped with fittings. There are different types and colors of awnings on the market. The place for their fastening is determined even before the installation of the box. For an interior sash, it is popular to install butterfly awnings that do not require a tie-in.

Two hinges are installed on a light sash, stepping back 25 cm from above and below. A heavy canvas is reinforced in the center with a third canopy. With the open method of fixing the box, the anchors are positioned so that they do not interfere with screwing the hinges with self-tapping screws. If the installation of interior doors was carried out in a hidden way on suspensions, the problem with the location of the fasteners disappears.
The gap between the end face of the sash and the hinge post of the frame must be 6 mm. First, mark the place for fastening at the end of the sash. A notch is selected under the mounting plate of the loop with a chisel. Canopies are screwed with self-tapping screws.

The door leaf, together with the hinges, is inserted into the box. The sash is bursting with wedges so that gaps form around the perimeter. Places for sampling recesses are marked on the hinge stand. The canvas is removed from the frame, a recess is selected with a chisel, then the second halves of the canopies are screwed with screws.
The handle with a lock is installed at a height of 90 cm from the floor. The body of the locking fittings is applied to the sash at a measured height. With a pencil, mark the location of the handle, outline the boundaries of the castle. At the end of the canvas, a recess is chosen with drills or a chisel. A hole is drilled for the handle. The nest is treated with varnish, a lock is installed, the body is fixed with self-tapping screws, and then the handles are inserted. On the rack of the box opposite the lock, a selection is made, a counter plate of the locking fittings is placed.

To install the doors with your own hands without defects, the process of hanging the sash is carried out after the mounting foam has completely hardened.
Trim fastening
The final installation of the door block is. Decorative strips are placed on both sides of the interior opening. sell wooden, plastic or MDF. The shape is simple flat, with a bevel or curly. to the end of the interior box with a lock connection, screwed with screws or nailed. Planks can be glued, but the adjacent wall must be perfectly flat, finished with a durable cladding.

To perform a simple installation of the door trim, first fix the horizontal bar in level. The edges are pre-cut at an angle of 45o. Vertical strips are installed from the floor. From above mark the cut line at the same angle. The joint is made as tight as possible. In case of crack formation, putty is used. After hardening, the flaws are painted over.

Platbands can be joined at right angles. The top bar is inserted between the vertical elements or laid on top of the end.
Stop setting
The hinged interior door, which opens on the run by children, hits the wall with handles. Decorative finishes deteriorate and even plaster crumbles. It helps to install a door stopper that prevents the canvas from opening completely.
The stop is a barrel with a rubber nozzle. The limiter is installed after the installation of the door block and all finishing work. The interior sash is opened to the desired position. On the floor mark the location of the stop. A hole is drilled with an electric drill, a fixing screw is driven in and the limiter is clamped.
How to change the canvas?
Often, during repairs, only the replacement of the door leaf is required. The procedure is much easier than installing an interior door from scratch.
- The old canvas is removed from the hinges. Canopies usually consist of two detachable halves. To remove the interior sash, it is enough to pry it open from the bottom with a mount. If in hinges the axial rod is inserted from above, the canvas will not be removed. First, a screwdriver is inserted under the cap of the rod, then it is knocked out of the socket with hammer blows. Dismantling starts from the bottom loop. After removing the rods, the sash can be easily removed.
- Two canvases are compared in size, stacked on top of each other. If the new fold is larger than the old one, mark the boundaries with a pencil. Excess sections are cut off with a hand circular saw. Slices are adjusted with a planer, processed with a grinder.
- The door leaf fitted to the size is equipped with hinges, a lock, a handle.
- Hanging on the loops occurs in the reverse order.
If the new canvas was adjusted, the cut points must be masked. The paintwork material is selected close in color or the entire canvas is completely repainted.