Features of the processes taking place in the bathroom dictate certain requirements for all structures and finishing materials used in this room. The most troublesome device is the floor, since with a high probability a small amount of water will systematically get here. When arranging a bathroom floor in a private house or in a country house, there may be several design options, depending on whether the flooring is laid on a concrete or wooden base. It is especially important to correctly perform all work on the second floor in a private house in order to reliably protect the lower rooms from flooding. If you decide to make the floor with your own hands, then the photo and video at the end of the article, as well as our recommendations, will help you.
bathroom floor requirements

Regardless of what floor you will make in the bathroom (concrete or wood), you need to know what are the requirements for the surface in this room:
- The entire structure of the floor in the bathroom must be reliably protected from moisture, since the risk of spilling some water is not ruled out. This is especially important if the bathroom is located on the second floor in a private house or cottage.
- Due to the constant high humidity, finishing materials must have excellent moisture resistance, which guarantees the durability of the coating.
- Since a lot of engineering communications are laid in the bathroom, they need to be hidden in the floor structure, and the place of laying through the floor slabs should be well isolated from moisture. And this equally applies to concrete and wooden floors.
- The weight of the sanitary equipment is rather big, in addition to it, the floor in the bathroom must withstand vibration loads from the washing machine.
- The level of the finish coat in this room should be slightly lower than the floor mark on the floor. This will allow water not to spill out of the bathroom when flooded.
- In a private house or country house, it makes sense to make the floor in the bathroom on the first or second floor with a slope towards the ladder, which goes into the sewer riser. This will save you from many problems when a large amount of water gets on the floor. Note that this can only be done in a country house, cottage or country house, in an apartment in a multi-storey building this is not feasible.
- Floors on the first floor in a house without a basement must be carefully insulated to increase the comfort of the room. In addition, on any of the floors you can arrange floor heating in the bathroom.
Preparatory work

- First, you need to take out all the furniture from the bathroom and remove the sanitary equipment.
- Next, the old coating is completely dismantled. In this case, it is worth not only removing the old finishing layer, but also dismantling the old screed or other layers to a wooden or concrete base.
- Next, the surface of the base is cleaned of debris and inspected. If there are any cracks, chips, holes or crevices on the concrete surface, they are all carefully sealed with a repair compound. How to prepare a wooden base, we will describe further in our article.
- Next, the concrete surface must be primed. For these purposes, it is better to use antiseptic penetrating mixtures that will protect against fungus and mold.
Waterproofing

Primary waterproofing can be done by hand using the following materials:
- Roll insulation is carried out using modern roofing material on a self-adhesive or mastic basis. It is better to choose products with a rubber layer. Before installation, the floor in the bathroom is covered with bituminous mastic, which is also smeared on the lower part of the walls (to a height of 20 cm). After that, strips of roofing material are laid. At the same time, it is necessary to overlap adjacent strips by 10-15 cm. The roofing material also starts on the walls.
- Coating waterproofing. These ready-made compositions are applied to the walls of the room with a roller or brush. The joints of the walls and the floor must be glued with a special sealing tape, which is pressed tightly into the coating composition previously applied to the joints. After that, the entire surface of the floor and the tape are covered. After 6-8 hours, the treatment is repeated. A day later, further work can begin.
Tip: you should not use plastic film instead of roofing material, because over time it can change its characteristics due to contact with concrete.
Screed
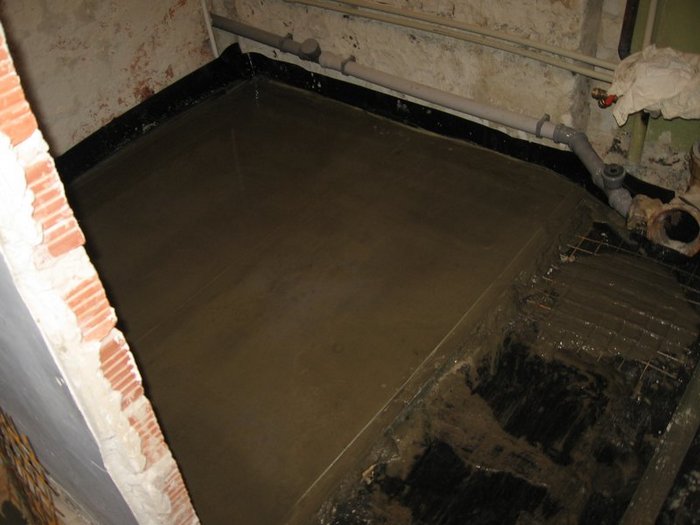
After waterproofing the bathroom, you can proceed to the screed device. From the photo on the network, the sequence of actions is quite difficult to understand, especially if you do the work yourself, so we offer a step-by-step guide:
- First you need to determine the height of the screed. Do not forget that the level of the finished floor should be lower than the rest of the floor. After that, we draw a zero level line on the walls of the room.
- If the height of the screed is within 5-7 cm, then it is better to provide reinforcement. It can be made using a steel bar or a special reinforcing fiberglass mesh. A screed with a height of less than 3 cm will not be very strong.
- For the installation of beacons, you can use a steel plaster profile. From the walls, the profiles are installed no closer than 30 cm. The step of the beacons among themselves is determined by the length of the rule. We fix the beacons on mortar piles so as not to damage the waterproofing. All profiles are set by level.
- After the solution has solidified under the beacons, you can proceed to the implementation of the screed. For these purposes, you can use a cement-sand mortar prepared in a ratio of 1 to 3 or ready-made dry mixes.
- We lay the solution between the beacons and level the rule over their surface.
- After pouring, the screed is covered with a plastic film for maturation and periodically moistened with water. After three days, the film can be removed.
- When the screed is completely dry, you can proceed to laying the selected floor covering.
Floor on wooden base

Floor beams are usually used in a wooden house or in a country house, so tiling in the bathroom has to be done on a wooden rough base. When doing do-it-yourself work at the preparatory stage, it is very important to carefully examine the base and draw conclusions about their bearing capacity and durability. To conduct an audit more carefully, it is necessary to remove the boardwalk and inspect the logs:
- Rotting or cracked logs must be replaced.
- So that the floorboards do not sag under the weight of ceramic tiles, the lag step should not be more than 50 cm. Otherwise, you will have to install additional elements to reduce the step.
- All beams must be aligned in the same horizontal plane.
- We lay waterproofing material on top of the lag.
- The hardwood floor needs to be repaired as well. We replace shabby and cracked boards, we strengthen the creaking elements more firmly.
Tip: to protect all structural elements from moisture, the rough flooring boards and logs must be treated with antiseptic and moisture-repellent compounds.
- If the laying of tiles will not be carried out on a leveling layer of GVL or plywood, but directly on the boards, then they must be thoroughly cleaned of old paints and varnishes.
- At the preparatory stage, additional floor insulation can be provided. To do this, expanded clay, mineral wool or polystyrene foam boards can be laid between the lags.
- To ensure ventilation of the wooden floor under the floor covering (regardless of whether you will lay the tiles on GVL sheets, plywood or directly on the subfloor boards), it is worth setting the gap between the floorboards. We also leave a ventilation gap 1 cm wide along all walls.
Ways of laying on a wooden base

So that you do not have to look for photos or videos on the net on how to lay tiles on a wooden floor, we will describe several ways. Our step-by-step guides will help you do everything yourself.
Laying on boards
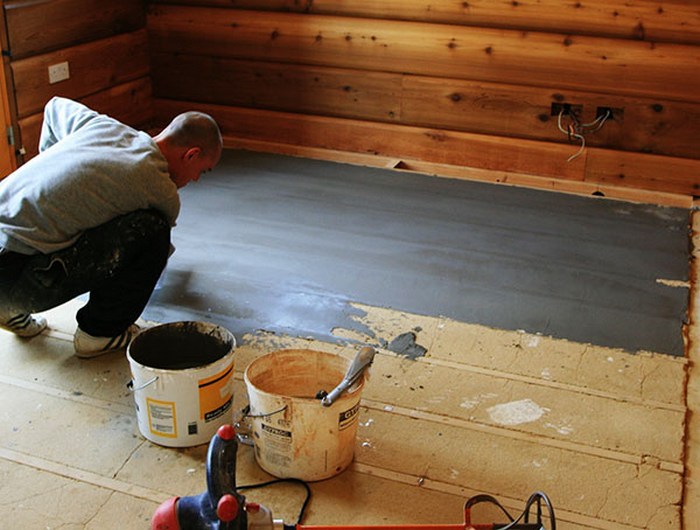
- After preparing the boardwalk, a thin waterproofing layer must be applied. To do this, the surface is treated with latex impregnation. After the composition has been applied to the floor with a wide brush, it is covered with a fine-mesh fiberglass mesh. After the composition has dried, the mesh is additionally attached to the floor with self-tapping screws. So we get not only a waterproofing layer, but also a reinforcing layer.
- To improve the adhesion of tile adhesive to the prepared surface, a composition is prepared from coarse sand, silicate adhesive and water in a ratio of 2: 2: 1. This composition needs to process the surface of the floor. After drying, floor tiles are laid on this rough monolithic surface.
Thin screed

- The stage of waterproofing the floorboards is carried out in the same way as described in the previous method.
- Now we attach a damper tape around the perimeter of the room along the walls. It will protect the thin screed from deformation damage.
- For reinforcement, you can use a thin fiberglass or metal mesh. We put it on the floor.
- We carry out the installation of beacons on the basis that the height of the screed will be about 30 mm.
- For work, it is better to use ready-made dry mixes with fiber reinforcement. They are easier to prepare and lay, and the layer will be more durable.
- We treat the matured screed with a primer, after which it is ready for laying the top coat.
GVL base

On the network you can find many photos showing how to do alignment using GVL. To make it clearer, we give the sequence of this method:
- The plank base is treated with antiseptic impregnation and covered with waterproofing material. For these purposes, you can use plastic wrap, glassine or other roll materials.
- GVL sheets are laid in a run. Since they have a tongue-and-groove connection, adjacent sheets are glued along the lock part and additionally reinforced with self-tapping screws. It is not necessary to fix the GVL with self-tapping screws in the center and around the perimeter to a wooden base.
- To make the base under the tile especially durable, GVL sheets can be laid in two layers. In this case, the seams in the layers should not match.
- After that, the GVL surface is treated with a primer. After it dries, you can lay the floor covering.
Laying tiles on plywood, OSB or chipboard

- The rough boardwalk is subjected to antiseptic treatment. After it dries, the floor is covered with waterproofing material. You can use the same materials as described in the method above.
- Sheets of plywood or other wood products are stacked in a run. At the same time, a gap of 5-10 mm must be left between them. The same distance must be retreated by slabs from the walls. This will allow the material to expand and contract freely due to moisture changes.
- Wood boards are fastened to the floor with self-tapping screws in increments of 15-20 cm. They are screwed along the edges and in the central part of the sheet. The caps of the fasteners are recessed into the thickness of the plate.
- We fill all expansion gaps with mounting foam or sealant. Cut off excess after drying.
- Next, we make a waterproofing and reinforcing layer. To do this, we treat the floor with latex impregnation, lay a reinforcing mesh on it. After the composition has dried, we treat the entire surface of the floor with a silicate-sand mixture.
- After the mixture has completely dried, the base for laying floor tiles is completely ready.
Video instructions for installing a floor screed in the bathroom.
The bathroom is one of the most difficult rooms in terms of decoration. The main problem is that the materials used for finishing should not only be beautiful and durable, but also suitable for rooms with high humidity. Even if you do not plan to spill anything on the floor, but instead of using a bathroom, you will not be able to get rid of the moisture.
Condensation that accumulates on walls, ceilings and floors is an inevitable consequence of taking a shower or bath. And the contact of ordinary finishing materials, not intended for use in rooms with high humidity, with water will soon cause deformation, deterioration in appearance and, as a result, the need for repair.
Do not forget that the numerous pipes located in the bathroom can leak, which will invariably lead to a deterioration in the quality of the non-moisture resistant coating.
The choice of finishing materials for the bathroom is a complex process, as there are many materials on the market from traditional and inexpensive to exotic and designed for a large budget. Undoubtedly, it is worth choosing the material for finishing, taking into account the premises and the style of the interior.
Linoleum flooring in the bathroom
It is very rare to meet this material in the bathroom, since the advantages of such a coating largely overlap with its shortcomings.
Pros of using linoleum in the bathroom
The main "plus" of linoleum as a material for finishing the bathroom is its low price, as well as ease of installation. You only need glue and linoleum itself, and you can lay it yourself without resorting to the help of specialists.
The disadvantages of this material are much more:
- it is very slippery;
- mold and fungus form under linoleum;
- in places of stagnant water there is an unpleasant "musty" smell;
- it is easily squeezed.

You can avoid such problems by choosing the right material. So, for example, you can purchase linoleum not with a smooth, but with a corrugated surface, it will significantly reduce the risk of falling and damage to health. However, a grooved surface will make cleaning more difficult, as dirt will clog in the recesses.
To prevent linoleum from being squeezed under heavy objects, for example, a washing machine, it is necessary to purchase a special thickened coating. You should also take care that the material is moisture resistant, then it will last longer.
Another requirement concerns installation - when laying, it is necessary to wind the floor covering on the wall so that water accumulating in the corners does not come into contact with the edge of the flooring. You should also purchase a special waterproof glue.
Bathroom floor tiles

Tile is undoubtedly the most popular among all bathroom finishing materials. It has not only a number of important advantages, but also the widest range. Another "plus" of this choice can be called the durability of floor tiles, with proper care, they can last more than 20 years.
The undoubted advantage is moisture resistance, the tile is not afraid of contact with either moist air or water. In the event of a pipe break, you do not have to change the floors in the bathroom.

The only (but very significant) drawback is poor thermal insulation, the tile transmits the cold of the concrete located under it. This applies to both tiled and ceramic-granite tiles. You can fix the problem by installing a "warm floor" in the bathroom, but this way out of the situation is associated with additional costs.
You can choose such a coating and avoid additional heating costs with the help of vinyl tiles (PVC tiles), which has collected all the advantages of previous materials, but is completely free from their shortcomings. For example, we looked at such a tile in the ViniPol store and we immediately liked it. The good thermal insulation of vinyl tiles allows you to use this flooring in comfort without additional floor heating.
In addition, vinyl tiles are less exposed to the environment, in the event of heavy objects falling, the risk of damage is much less than that of porcelain tiles and tile.
Finishing the floor in the bathroom with laminate

The use of laminate flooring in a bathroom can come as a surprise to many people as it seems completely unsuitable for high humidity areas. Laminate resembles wood, which is known to rot. However, modern technologies make it possible to protect the lamellas from water penetration. To finish the bathroom, it is recommended to use a laminate with high moisture resistance.

This material has a lot of "pluses": a wide price range, ease of installation (and dismantling if necessary), strength, wear resistance, good thermal insulation. The main disadvantage, however, is of considerable importance - it is almost impossible to avoid the penetration of moisture into the cracks. Optically, the gaps may not be noticeable, but water can accumulate in them, so there is a high risk of decay of this material.
Finishing the floor in the bathroom with natural stone

This material can be attributed to the elite, the creation of such a floor for the bathroom is possible only with a very large repair budget. The most commonly used natural marble. In addition to the undoubted beauty and sophistication of the material, one can also note its wear resistance, strength and safety (the porous surface prevents slipping).

The most significant drawback is the high price. We also advise you to pay attention to the tone and pattern of each tile, the natural material cannot be identical, the tile must be selected. The ideal option for decorating a bathroom with marble is a consultation with a specialist who can make a beautiful composition from individual tiles. In addition, professionals should also lay natural stone, so the cost of finishing will consist not only of the cost of the materials themselves, but also the cost of the work of specialists.
Finishing the floor in the bathroom will not take you much time if you can decide on what characteristics the coating should have. In this situation, it is much easier to choose the right material, taking into account all its advantages and disadvantages.
Before choosing a floor covering, you should pay attention to the various options. Today, there are a lot of options, but not everyone is suitable for the floor in the bathroom. We will consider the most successful flooring options in the following categories:
- The most durable flooring ever.
- The most durable bathroom flooring.
- Eco-friendly flooring options for the bathroom.
This means that all of the options mentioned are durable and strong. Every option, except perhaps cheap vinyl tile, can also be called an eco-friendly coating.
What is the best bathroom floor?
The flooring in the bathroom undergoes a lot in its lifetime - things fall, the room is constantly humid, sometimes the temperature goes off scale, the floor is often washed and disinfected with chemicals. That is why it is important to choose a quality coating that can last for a long time and will not lose its appearance in a year or two. What is the best flooring for a bathroom floor?
The bathroom floor must be durable, durable, able to withstand high humidity conditions and resist the threat of stains and fungus. If you are looking for a flooring that is the most resistant to these factors, as well as easy to maintain and environmentally friendly, here is the list for you.
- Ceramic tile.
This is probably the most durable coating option that can be used on the floor in the bathroom. Ceramic tiles are resistant to physical pressure. Bathroom ceramics are usually covered with a glass glaze, which not only prevents moisture from penetrating into the porous structure of the material, but also makes the flooring more decorative. The icing can be any shade, often a pattern is printed on it.
If properly installed, good quality ceramic tiles will look great for decades without much maintenance and care. Of course, over time, scratches begin to appear on the glossy surface. If you opt for a tile with a pattern, small scratches will hardly be noticeable.
Caring for ceramic tiles on the floor in the bathroom will be as follows. You will need to seal the joints between tiles from time to time to prevent water from entering, which causes mold and mildew to grow. In some cases, you may need to remove the grout with a grout knife and then reapply it so that the floor looks brand new.
- glass mosaic.
Glass is probably not the first thing you think of when choosing bathroom flooring. And in vain! The glass used for flooring is fired and made very hard wearing and crack resistant. Moreover, glass is not afraid of moisture. And all the stains on it are easy to erase.

- rubber floor
Such a versatile material as rubber is becoming more and more popular in bathrooms. It has long been used for floors in commercial areas such as hospitals, gyms, nursing homes. The rubber floor is soft and safe. It is easy to keep clean. However, do not purchase recycled rubber bathroom tiles from unknown manufacturers, the smell from such rubber will disappear very soon. Rubber is afraid of some chemicals, contact with them may leave stains that cannot be removed.

In Western countries, rubber flooring is becoming more and more popular due to the fact that its use is considered environmentally friendly. Rubber flooring is often made from old car tires, which, instead of polluting the environment, once again serve the benefit of man. What's more, rubber flooring doesn't use much energy and is generally environmentally friendly.
- Concrete floor
Concrete flooring can only be chosen as an option for the bathroom if it is on the ground floor, as it is a very heavy material. To date, there are many technologies on how to make concrete flooring more decorative. In any case, the concrete flooring looks rather poor if it does not fit into the design of the bathroom. A skilled designer will make sure that the concrete floor will look amazing in the interior of the bathroom. Concrete is a cost-effective coating option.

The coating must be treated with a sealant before use, as it is very porous in its natural state. Concrete flooring is easy to clean and maintain.
The advantage of using a concrete floor, in addition to its budget, is its unconditional strength, but the disadvantage is its hardness, this can be dangerous for the elderly or young children who can fall and get hurt.
What floors should be avoided in the bathroom?
There are several popular types of flooring that are best avoided in the bathroom. And it's not even that they do a poor job and will not last long in conditions of humidity and temperature changes. The point is their gradually deteriorating sanitary condition, which sooner or later will make such floors a breeding ground for bacteria and fungi. These coatings include:
- Laminate
- Parquet
- All types of carpets,
- Wood (If you really want to, you can use bamboo flooring. Bamboo is more resistant to water than wood, but still susceptible to damage from splashes and moisture over time.)
- Linoleum
I hope this material helped to decide on the most successful flooring options for the bathroom.
Have you decided to renovate your bathroom? Do you have building skills and want to spend most of your renovation budget on quality plumbing and finishes? Then it makes sense to carry out repairs yourself. It's not as difficult as it might seem, and the benefits are many. You will definitely be sure that the work was carried out with high quality, the materials fully comply with the requirements, and all technologies are fully observed. In this article, we will tell you how to properly arrange the floor in the bathroom, dwell on the technology, warn you against possible mistakes and give you some useful tips.

Technology
The technology for installing floors in the bathroom depends on the initial foundation. In apartments, as a rule, the base of the floor is concrete. In this case, the technological chain of floor arrangement will be as follows:
- dismantling of old plumbing, finishes and screeds;
- subfloor preparation and primer;
- hydro- and thermal insulation works;
- floor screed;
- sealing the screed and an additional layer of waterproofing;
- finishing decorative finish.

For bathrooms in private houses and cottages with wooden floors, the technology will be slightly different. You can learn more about the technology of flooring in such houses in our article about wooden floors in the bathroom.

Preparatory stage of the subfloor
It is necessary to carefully prepare the concrete base for pouring the screed. If you are not doing repairs in a new building, then, first of all, dismantle the plumbing, decorative coating, waterproofing layer and the old screed. The easiest way to carry out dismantling work is with a puncher; when working, be sure to use safety glasses and a respirator. Then sweep away debris, dust, and leftover building materials. Make a thick cement mixture or use tile adhesive and cover any damage, cracks or holes in the surface with it. Pay attention to this step, because in the future you risk the quality of the entire flooring process. In poorly sealed cracks or potholes, the waterproofing layer and screed can quickly become unusable.

Prepare a primer and apply it to the concrete base. Use a roller for this. After the first layer has dried, if necessary, apply a second one. If the concrete base is very uneven, with large differences, then before pouring the screed, it is better to fill the base with a ten-centimeter layer of sand or expanded clay. This will make the structure lighter by reducing the pressure on the floor.

Waterproofing: options
Waterproofing plays an important role in any bathroom design. There are several options for high-quality waterproofing of the floor in the bathroom. First of all, the choice of waterproofing technology depends on which place in the bathroom should be isolated. If you are planning to build a shower cabin with your own hands, and in addition to the floor you need to waterproof the walls, then the simplest and most effective solution would be to choose waterproofing.


Okleyechnaya
The most popular are rolled welded materials. They are durable, do not rot, do not pass moisture and have a fairly long service life. They are made on a polyester or fiberglass basis, or they are fiberglass.
Sheets of waterproofing material must be laid against the wall and on top of each other. The overlap should be 15-20 cm.
The heating technology is not suitable for enclosed spaces, so waterproofing materials are glued with a special adhesive using a notched trowel. This method is reliable and durable, but rather laborious and experience and skills are required for such work. It has one drawback - the surface to be treated must be flat. Roughnesses no more than 2 mm are admissible.

Coating
For this method, mastics or special mixtures are used.
Coating technology is not complicated:
- We coat the corners between the floor and walls around the entire perimeter of the room with the selected material. After all joints are processed, we apply the first layer to the entire floor. The applied coating must dry completely.
- After drying, stick a special waterproofing rubber tape on the joints between the floor and the walls.
- Apply another coat with a thick brush or roller. The entire surface must be carefully coated. Moreover, do not forget to coat the walls, about twenty centimeters, creating a semblance of a waterproofing container. The second layer should dry for about six hours. After that, the third last layer is applied, which should dry for about a day.


Painting shop
This is the simplest, but short-lived method of waterproofing. He usually serves no more than three years. The technology completely repeats the coating method. Acrylic water-based paint is used as a consumable material, so the time it takes for the layers of waterproofing to dry is much less.


Thermal insulation and underfloor heating
The waterproofing layer must be followed by a heat-insulating layer. It consists of foam plastic about 0.5 cm thick, a heat-reflecting fabric is laid on top, which returns the heat emanating from batteries and heaters. The next step is to reinforce the structure. For reinforcement, a steel wire mesh with cells measuring 10 by 10 cm is used. If a heated floor is planned in the bathroom, then a heat-reflecting coating and heating elements must be laid on top of the mesh.
Depending on your preferences, you can choose a warm floor:
- electric heating;
- water heating;
- infrared.

You can learn all about the features and technologies of underfloor heating in our article "Warm floor in the bathroom".


Screed
The classification of floor screeds in the bathroom is as follows:
- depending on the state of the material: wet, semi-dry, - dry;
- depending on the design: solid, prefabricated;
- depending on the method of adhesion of the base and the mortar: floating, bonded, separating.

Consider first the types of screeds according to the state of the material.
Wet screed is based on a cement mixture. The finished liquid solution simply needs to be poured onto the prepared base and leveled with a rule, spatula or grater. Before the mixture dries completely, a lot of time must pass, and this is the main disadvantage of this method. If the cement screed is poured in the bathroom, then a waterproofing material should be laid on the floor before that. If linoleum or waterproof laminate will be used as a floor covering, then another leveling layer must be applied on top of the main screed.
As a basis for semi-dry screed cement or concrete mortar is used. The mixture contains less water, but more substances that give plasticity, so it hardens faster and weighs less. The concrete screed contains light fillers, such as expanded clay, which makes it very convenient for raising the height of the floor.
Dry screed flooring is done in two stages. Expanded clay or crushed stone is laid in the first layer, followed by gypsum fiber. This method is the easiest to perform and, moreover, the least messy. However, such a design does not always withstand a lot of weight, so in the bathroom it must be used with caution, having previously calculated everything.


Now let's talk about the types of floor screed, depending on their designs.
Solid screed produced on a cement or gypsum base. The composition of the mixture may also include polymers. The mixture can be poured in one stage, or alternately applied in several layers. Gypsum-based mixtures are faster drying, but they pass moisture well, so they are not used for flooring in the bathroom.
prefabricated screed consists of several components. As a rule, these are: a waterproofing component, a dry mix, a substrate, gypsum fiber sheets and an edge tape.
Linked screed poured directly onto the base. This method provides a good "carrying capacity" of the screed, but as a result, the screed may crack.
Separating screed usually made in bathrooms, as it involves the presence of an additional waterproofing layer.
floating screed nothing is attached to the base. It is an independent structure on a substrate made of materials that isolate heat and moisture. The minimum height of such a screed is 5 cm, so it can not be used in every case.

Pouring technology
- In order for the screed to lie as evenly as possible, it is necessary to install beacons indicating the desired level before pouring it. Internal profiles for gypsum kapton or long rack levels usually act as beacons.
- First you need to outline the height of the future screed. To do this, using a building laser level, markings are applied to the wall at a height of about half a meter.
- From this height, the distance is measured down to a point that will correspond to the height of the floor. This point is projected onto all other walls.
- The points on the walls must be connected with a straight line. This line is the border of the future screed.
- If you plan to leave the beacons in place after the repair is completed, then pre-soak them with a protective solution, which should be chosen depending on the material. Metal beacons must be protected from corrosion, and wooden beacons from decay.
- Lighthouses are installed on small piles formed from a thick cement mortar. Heaps are stacked in rows at a distance of several centimeters from each other. The distance between the rows should be equal to the length of the rule, which is usually 0.3-0.4 m. You should also try to keep a small indent from the wall - about 0.2 m.
- Beacons are laid on top of the cement tubercles and pressed a little.
- After the cement has hardened, you can proceed to pouring the screed.

Mixture preparation
In order to prepare a concrete solution, you will need several components: water, sand, cement and crushed stone. For one kilogram of cement, there are three kilograms of the remaining dry ingredients, and for one kilogram of a three-component dry mixture - half a liter of water. The result should be a homogeneous gray mixture, without interspersed with other colors. The consistency of the solution should resemble sour cream: pour well, but not be too liquid. Water can be added as needed to achieve desired consistency. In order to knead concrete by hand, special tools are used, but you can do it with any means at hand, for example, with a small spatula. If you are too lazy to mess with it, then you can rent a concrete mixer, however, only owners of private houses can afford it.
Do-it-yourself bathroom floor repair is one of the most difficult technological processes in arranging an apartment. At this stage, all communications are closed, a screed and waterproofing are made. Repairs are made taking into account the high humidity of the room, which further complicates the work. Here we will figure out how to quickly, efficiently and technologically correctly make the floor in the bathroom with your own hands.
Qualitative characteristics
To begin with, let's decide what requirements the new bathroom floor should meet. Based on this, we will be able to choose the right coating for finishing the floor.
- Non-slip and safe;
- Easy to wash;
- Waterproof;
- Warm;
- Beautiful;
- Wear resistant.
Choosing the right flooring isn't everything. It is important to observe the technology of laying the selected material. And then the floor will serve you for many years.
Types of flooring
Practicality, moisture resistance and a combination with your chosen interior are the main requirements for any bathroom flooring. Consider the most popular, interesting and noteworthy options.
Ceramic tile
A great finishing option is do-it-yourself tile on the floor in the bathroom. Today it is the most popular finishing option. Ceramic tiles do not deform over time, they are easy to clean and almost impossible to spoil with chemicals. In order to keep your bathroom floor non-slip, we recommend that you avoid tiles with a glossy finish.

Linoleum
Linoleum is one of the cheapest flooring options. For the bathroom, you need to purchase linoleum on a moisture-resistant base. The rough surface is another plus in favor of such a coating.

self-leveling floor
Today, this option is becoming more and more popular. The self-leveling floor is a polymer, which in a liquid state evenly spreads over the floor, and then solidifies. Such a floor is absolutely moisture resistant and durable. Do-it-yourself water-heated floor in the bathroom is often combined with a self-leveling coating. Its main advantage is an absolutely smooth non-slip surface, and the disadvantage is its high cost.

Laminate
Laminate is not the best flooring for a bathroom. If water remains on this material for some time, it will last only a few years. Therefore, even a moisture-resistant laminate you will have to wipe dry after each shower or bath.

A rock
Natural stone is well suited for bathroom floors and walls in terms of its durability and moisture resistance. However, the stone is very slippery and cold, so walking on it with bare feet is simply not safe, which, you see, is not very convenient.
Wood
The wooden floor in the bathroom, made by hand, looks very stylish, beautiful and noble, but, unfortunately, the moisture-resistant qualities of wood leave much to be desired. Such a floor is not the most practical or profitable option, but it has a right to exist.

Repair work
Repair work on replacing the floor in the bathroom can be divided into four main components:
- Floor preparation
- Waterproofing
- Screed
- Floor finish
Floor preparation
Usually the bathroom already has a screed. Therefore, during the repair of the floor, we first of all remove all old finishing materials. In order for your repair to last for many years, this step must be performed as carefully as possible: remove all paint, putty and other dirt from the floor. Carefully walk through the areas where the screed is adjacent to the walls. If you hear an empty sound when you knock on the old floor screed in the bathroom, this means that there are cavities in the floor, such a screed must be completely changed. If the past screed is in good condition, then cover all cracks and irregularities with tile adhesive and leveling compound, and then proceed with the repair after they have completely dried.
The last stage of preparing the floor for repair is the treatment of the entire surface with a primer.
Waterproofing
The waterproofing layer is made in several ways and with different building materials. Here are the three most common and noteworthy:
- pasting
This option is suitable for a bathroom where waterproofing is needed not only for the floor, but also for vertical surfaces. With this method of waterproofing, the final work will look like a bowl up to 1.5 m deep. Suitable for non-professionals and beginners in the world of repair.
- Bitumen
Bitumen, or rather bituminous mixture is applied to the floor with a soft roller or brush. This is a cheap option, but the service life of such waterproofing usually does not exceed five years.
- Coating
The coating material makes the ideal waterproofing of the floor, which is why it is so successful. Before applying it to the joints, you need to lay a waterproofing tape. Then the waterproofing itself is applied, resembling batter in consistency. It is convenient to spread it over the surface with a dense roller or construction spatula. As in the case of pasting, walls can be covered with such waterproofing, but to a height of no more than 10 cm.

Screed
First you need to decide on the height of the floor screed in the bathroom. For this purpose, a building level is suitable - laser or water. A straight line is outlined along the perimeter of the room being repaired, along which the screed will be made. Do-it-yourself warm floor in the bathroom is installed at this stage.

After that, slats and rope beacons are installed.
Then the cement mortar for the screed is poured into the space between the slats and aligned with the beacons.

Remember: The screed should dry itself, in a natural way. The underfloor heating system will need to be turned off during the curing of the screed.
Tiles in the bathroom
In our article on how to make a bathroom floor with your own hands, we will not talk in detail about the methods of laying all the finishing materials. Let us dwell only on the most common - floor tiles.
Do-it-yourself tile on the floor in the bathroom is both a practical, durable option and an affordable solution to an urgent issue.
For self-repair you will need:
- Building level;
- Putty knife;
- Container for the mixture;
- Divider crosses.
Before you start laying tiles on the floor, you need to decide in which direction you will lay it, whether it will need to be cut and how to maintain symmetry in the pattern.

Tile adhesive is applied to the tile or floor. In the course of work, plastic crosses are used to maintain an even width of the joints between the tiles.
The final step is grouting the seams. It is made after removing all contaminants from the tile, including excess glue. The grout is applied with a rubber spatula or cloth.
Video
In the video you can see how to make the floor in the bathroom with your own hands: