Summer and autumn delight gardeners with abundant harvests. Unfortunately, it is impossible to store the crop at home for a long time. To process it, you need a juicer. You can buy it, or you can make it yourself from your used washing machine. To do this, you need to have the skills of plumbing and welding.
The principle of operation of the juicer
The way the juicer works is very simple: it breaks the integrity of apples, grapes, apricots, etc., dividing them into a liquid fraction - juice and dehydrated fiber - cake. The main components of the juicer are as follows:
- A bunker into which fruits or berries are loaded
- A crusher that destroys the peel and structure of the fruit. Rotating knives or a drum grater are used.
- Juice extractor. It can be a press or centrifugal force that occurs in a rotating drum.
- The filter separating the liquid fraction and cake.
- Stand for bottles or containers for collecting juice
The simplest juicer is a construction mixer clamped in a high-speed drill chuck.
Materials and tools
More difficult to manufacture, but also giving better products, the design of a do-it-yourself juicer is built on the basis of a front-loading washer that has served its purpose.
At the first stage, you need to remove the nodes that are no longer useful:
- pump;
- water heating system;
- control system;
- pipelines and valves for water supply and drain;
- back wall and bottom.
General view of the device
From the materials you will need:
- Two springs for cushioning the drum. They are designed to balance the increased horizontal centrifugal force, since the device will be operated with the hatch up.
- Two strips of metal mesh 300*60 mm.
- Juice storage container.
- Drain pipe.
- Plugs.
- Fasteners.
Of the tools needed:
- high-speed screwdriver or drill;
- Angle Grinder;
- welding machine;
- set of hand tools.
You will also need a workbench with a vise.
Washing machine juicer
For dismantling, the machine must be placed on the back wall and secured. On the frame should remain:
- loading hatch;
- sealing cuff;
- drum;
- electric motor and drive.
- remove the belt rotating the drum from the pulleys;
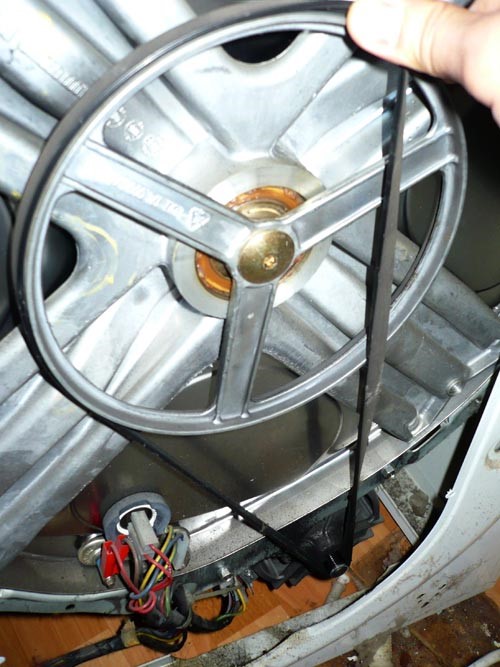
Removing the pulley
- remove shock-absorbing springs and other parts that interfere with the removal of the tank;
- remove the sealing collar;

Removing the cuff
- remove the drum and tank;

Removing the drum and tank
- clean them from dirt, rinse with vinegar.
Remove heating elements, sensors and other equipment from the tank and plug the remaining openings with rubber plugs.
Now comes the stage of finalizing parts and assemblies:
- Assemble the tank and fix it in place.
- Install sealing collar.
- Weld holes in the drum.
- Remove the ribs inside the drum. Fasteners do not need to be removed.
- Drill 100-200 holes in it with a diameter of 1 - 1.5 mm.
- Inside the drum, fasten the mesh strips between the rib attachment points with self-tapping screws.
- Attach shock absorber springs.
- Connect the electric motor to the network through the switch. Engine power should be at least 1-1.5 kilowatts.
- Finally fix the device on a horizontal base with the hatch up.
A test run should be carried out without downloading. The drum during rotation should not touch the walls of the tank. If everything is in order, you need to substitute a container for juice to the drain pipe.
The fruits placed in the drum will break into a pulp, hitting the nets, rib attachments and each other. Centrifugal force will squeeze the juice through the holes into the tank, from where it will drain into the storage tank.
How to make a loading hopper and a pusher
For dosed loading of fruits, you will need to make a bunker. It can be made from a piece of plastic pipe with a diameter of 100 mm. It is fixed obliquely so that the fruits roll onto the edge of the grater. The hopper is attached to the body of the device with aluminum or steel corners bolted

Pipe for the manufacture of the bunker
The pusher can be made from a birch cutting for a shovel. A circle of plywood with a diameter of 5 mm less than the diameter of the pipe is attached to the lower edge. A transverse limiter is installed on the top.
Grain grinder from a washing machine
Grain crusher industrial production is not cheap. If a home foreman knows the skills of plumbing, electrical and welding work, and there is a failed activator-type washing machine in the pantry, then it is quite possible to convert it into a grain crusher, or, as they say, a grain grinder.

Grain grinder from a washing machine
Required materials, tools and construction
For the manufacture of a grain crusher you will need
- washing machine Oka - 1 pc.;
- knives for crushing grain -3 pcs.;
- lattice with a cell of 2-3 mm;
- tin and rubber for gaskets;
- sleeve;
- flange.
- piece of plastic pipe with a diameter of 100-150 mm
Of the tools and equipment you will need:
- drill or high-speed screwdriver;
- a set of manual metalwork tools;
- angle grinder, or grinder.
The changes made to the design of the machine come down to replacing the activator with flat knives with curved ends. The grain is poured into the hopper (2), which is the tank of the washing machine. Rotating, the knives (4) crush the grain and throw it onto the calibration grate (7). Grain particles smaller than the grid cell pass through it and fall into the funnel (8) and further into the storage tank. Particles that have not passed through the grate are returned to the knives by the flow of grain and crushed again.
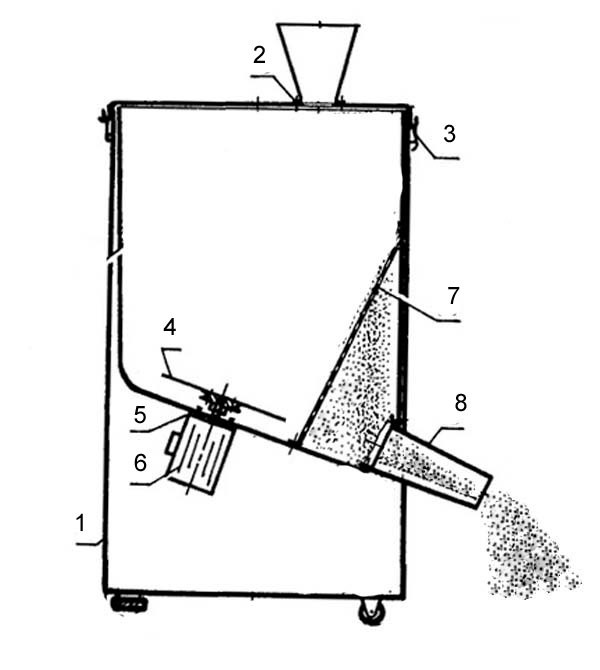
Grain crusher device
During preparation, you will need to remove the plastic cover of the activator. The knives are made of a steel strip 3-4 mm thick, their ends must be bent in opposite directions so that they do not touch the walls of the tank. The hole for mounting on the shaft must be drilled exactly in the middle of the strip, otherwise it will be poorly balanced and cause beats during rotation. The flange on one side of the side is put on the pulley, on the other side it has a threaded stud for attaching knives. A rubber gasket and a square tin patch should also be prepared to prevent grain from entering the drive.
Device Assembly

Grain Crusher - Top View
Assembly begins with mounting the chopper blades on the flange. Next, the sleeve, passing through the gaskets, is attached to the pulley. The patch should be attached to the tank body in such a way that the knives do not touch it during rotation.
The next stage is the device of a funnel for collecting and removing crushed grain. The drain located at the very bottom of the tank will not be converted. The sequence of operations is as follows:
- With a chisel or grinder, bring the drain hole to a diameter of 120-150 mm.
- Insert a piece of pipe into the hole and secure it.
- Move the pipe to the side and direct it into a storage container.
The next step is to install the grate-separator. For this you need:
- Mark the installation line on the bottom of the tank so that it is 1-2 cm away from the blade rotation zone.
- Cut the grid from the mesh so that it is placed perpendicular to the bottom of the tank and fits snugly to both the bottom and the side walls.
- Fix the grate with self-tapping screws to the surface of the tank. For reliability, you can use clamping strips from thin strips cut from a sheet of metal.
- The gaps should be sealed with a cold weld compound or silicone sealant.
Before a test run, the device must be securely fastened to prevent it from tipping over or falling. A trial run is carried out without grain. During this process, you need to make sure that
- knives do not touch the bottom of the tank and the sealing gasket;
- the knives are well fixed on the sleeve, and the sleeve is on the flange;
- there is no runout of knives due to imbalance.
If a runout is detected, balancing is carried out by balancing the knife along the line of the hole. Small holes are drilled in the lowered part until the parts are balanced.
After a successful test run, you need to make sure that there is a storage tank under the outlet pipe. Then you can pour about 5-7 liters of grain into the tank, close the tank with a lid and turn on the machine at maximum speed. To reduce dust, a blanket can be thrown over the lid.
The new life of the washing machine as a grain grinder has begun. Bon appetit to your pets.
Other ways to make juicers
If the skills of a home craftsman do not allow you to make a juicer from a washing machine, or if such a machine is simply not at hand, you can process the crop in another way.
For grinding fruits, a construction mixer is suitable, which mixes mortars or paint. Several holes are drilled in its lower part, bolts protruding by 10-15 mm are screwed into them. The fruits are crushed in a bucket, then the mass is placed in a woven bag and placed in a press.

Grinding apples with a mixer
For the manufacture of the press, a large non-enamelled pan is suitable. Drill holes in the bottom of the pan at the same frequency as in the colander.
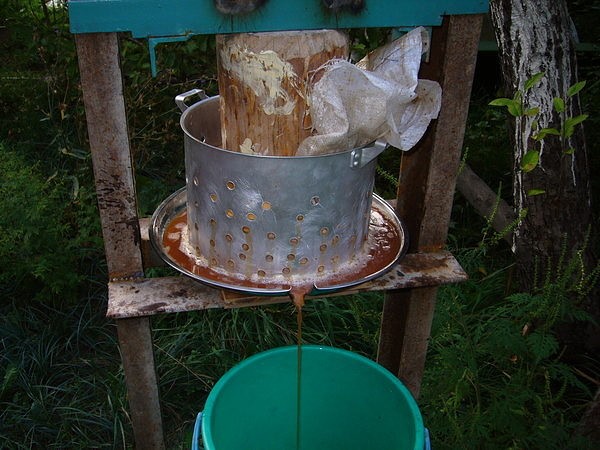
Pot juicer
The bag is placed in a modified pan and placed under oppression. Apple or pear juice flows out through the holes, the pulp remains in the bag. Instead of oppression, you can use a hydraulic jack.

Using a juicer
This method provides a lower productivity and depth of processing of raw materials than the manufacture of a full-fledged home-made juicer used for processing apples.
A do-it-yourself high-performance juicer is useful for gardeners who have to process large volumes of fruits and berries during harvest. In domestic conditions, factory devices are used that provide the need for small portions of a freshly squeezed drink.
Device types
Before you make a juicer with your own hands according to your own drawing, you need to study the principle of operation of the device. Depending on the design possibilities, the squeezing processes can be carried out in a certain sequence of work stages or simultaneously.
Centrifugal juicers process fruits to a pulp state. They work according to a scheme in which, after grinding with a centrifuge, pressing is carried out using a press. A screw juicer allows you to extract juice from fruits during processing.
The selection of the necessary structural elements is carried out depending on the type of device for squeezing juice. To simplify the processing process, the fruit is crushed, for example, using a manual beet cutter. Complex designs involve the use of a mechanical drive for grinding.
Screw devices in design and appearance are close relatives of a home meat grinder. With their help, you can simultaneously grind and squeeze the juice, they require more time to manufacture.
To prepare homemade fruit drinks, household appliances are often used that can handle a small volume. To process a bountiful harvest, the way out of the situation is a homemade juicer for apples and other fruits.
A simple old-fashioned method for extracting juice from fruits involves the stage of grinding and squeezing liquid from the resulting mass. The apples, peeled from the core and spoiled parts, were poured into a wooden trough. With the help of a special knife for chopping, the fruits were processed into a homogeneous mass.
The prepared slurry was packed in gauze and placed under pressure in a wooden tub. In order to collect apple juice in a container, a hole was provided in the design to drain the liquid in the lower part of the device. The role of the press could be performed by heavy objects (stones).

The screw version of the press was equipped with:
- the frame on which the device is mounted;
- screw with a fixed or removable handle;
- a support board, round in shape, corresponding to the diameter of the inside of the container.
How to create a screw press for apples of high productivity can be seen in the video. Do-it-yourself apple juicer is assembled from prepared parts.
To create a structure, you need to prepare 2 pipes, on which a metal profile is fixed from above by welding. A hole is made in the upper part of the profile, into which a threaded head is inserted.
At the bottom of the screw, the design provides an emphasis for wringing. A rotation handle is fixed at the top, and clamps or a support structure for fastening are permanently welded from below. The technical capabilities of the press depend on the volume of the tub, in which the crushed raw materials are placed for pressing.
During operation, such a device is labor-intensive due to the performance of a significant part of the manual work.
hydraulic device
You can reduce labor costs for making juice using a jack design. For its manufacture you will need:
- rolled metal (corner, channel);
- perforated basket;
- board;
- screws for fastening;
- short log.

The component parts of the frame are measured and welded into the structure. Holes are drilled in the pan.
Chopped apples are placed in a container. A wooden circle, cut from a board, is installed on top, equal to the diameter of the perforated basket. A piece of wood is placed on top. The hydraulic juicer is driven by a jack.
Automated design
The juicer from the washing machine is considered a popular option for squeezing juice. For the manufacture of the device, the following parts are used:
- centrifuge;
- ball bearings;
- attachment points.
All composite structures must be cleaned of powder residues and scale before use. All openings in the tank are closed with rubber stoppers, leaving only one for draining the juice. Above the drain outlet, it is useful to install a grid to filter the juice.
For grinding fruits, a regular centrifuge requires additional refinement. You can solve the problem with the help of a steel lining, in which holes are drilled and teeth are stuffed.
The stack installed on the walls of the centrifuge can grind raw materials. The preparation of the working surface of the drum provides for an increase in regular holes and the installation of notches with a sharp part inward with a direction opposite to the rotation of the drum.
The made grater is mounted in the tank using ball bearings and fasteners. The design is located in a vertical case, the lid of which is closed with latches. A bin for receiving fruit is placed in the upper part of the hole.
When operating the device, the main thing is to ensure stability from vibration. It is recommended to fix the body on a rigid base, and provide a limiter for the hopper. The engine of the device is borrowed from the washing machine. It can be mounted inside and outside the structure.
A screw juicer is a more labor intensive option. Most of the parts are custom made. These include:
- frame;
- screw;
- tray for receiving juice;
- bunker;
- engine.
The design is assembled and mounted on a stand made of a metal frame with an installed engine. The rotation of the auger is provided by a belt drive from the motor to the pulley.
Grape processing
Before the advent of devices for making juice, manual labor was used. Along with the technology of winemaking from ancient times came the tradition of crushing grapes with your feet.
At home, it is used for small crops. Special presses help to process a significant amount of fruit.
Presses come in a variety of designs. They can be equipped with an automatic or mechanical drive, set in motion with a screw or a jack. The operation of the devices consists in loading grapes into a container that looks like a barrel.
Under the action of a force that moves in a downward direction, the grapes are crushed. The resulting juice flows out through the holes.
A do-it-yourself grape crusher works on the same principle as a washing machine. Therefore, in the manufacture of home-made structures for processing berries, parts of old machines are used.
Reading time ≈ 7 minutes
As the owner of a large garden, in the season you have to think about where to put the crop. Indeed, in a short time it will not be possible to eat everything, and if the fruits are ripe, then they will not last long on the tree - they will begin to fall and deteriorate. However, there is a way out of the situation and it consists in a home-made device. Consider how to make an apple press from a washing machine and do-it-yourself tools. With the help of such a device, juice can be squeezed out of apples and other fruit crops, which will be much easier to process.
Advantages of a homemade juicer
If your household has an old unused washing machine, automatic or activator, you can make a useful device for squeezing juice out of it. The bottom line is to install a grater inside the machine. Raw materials are poured through a large hole, after which it is crushed and juice is squeezed out. The advantage of this design is the ability to make juice in large volumes, which most household juicers cannot provide.
In addition, in a home-made device, the capacity for loading raw materials is much larger. Equipping such a juicer with a powerful motor will allow you to get about 20 liters of juice per hour. This indicator is quite enough to process apples from your garden and also help your neighbor.
Juicer from an activator washing machine
To make such a juicer, you will need an Oka or Siberia machine. You can use other options equipped with a wringer and an activator on the bottom of the tank. Consider the step-by-step manufacturing of the device:

So that the work of a do-it-yourself garden juicer from a washing machine is not limited by the time of the relay, the latter must simply be disconnected.
How to squeeze juice
The process of obtaining juice is quite simple. To do this, you need to wash apples or other fruits, and load them in a small amount into the washing machine tank. The device turns on, and with the help of knives, the product is crushed. The duration of processing depends on the specific variety of apples and ripeness. After grinding, we get the mixture in the form of mashed potatoes and load it into a centrifuge by about 3 liters. Turn on the device and squeeze the juice. After a few minutes, you can remove the mesh and shake out the cake.

How good is this juicer?
The main advantages of the considered design are as follows:
- productivity - about 12 liters per hour;
- apples and other fruits do not need to be peeled and cut;
- You do not need to be constantly near the device.
The presence of pulp in the juice will directly depend on the raw materials used and the duration of its grinding.
If you want to get pure juice, it is enough to pass it through a filter, for example, a thick cloth. You can also let the juice stand for a while.
Juicer from the front washing machine
Making a juicer from a front washer is somewhat more complicated and will take more time. To build the device you will need:
- front loading machine with belt drive;
- a pair of metal meshes 300x60 mm in size;
- fasteners from bolts and nuts with a diameter of 3 mm;
- juice container;
- rubber plugs;
- drain pipe;
- a set of screwdrivers and socket wrenches;
- metal scissors;
- Bulgarian;
- electric drill;
- hammer and pliers.

Preparatory work
All unnecessary elements (pump, sensors, filter, valve, control device) are removed from the washing machine, after which it is placed with its back side on the bars and fixed well. Then perform the following steps:

Manufacturing process
After the preparatory activities, it remains to do the following:
- The mesh is fixed inside the drum by means of screws. It can be easily dismantled for cleaning.
- In order for the raw material to be crushed, the ribs must be sharpened.
- A pipe is fixed to the drain hole.
- Mount the electric motor.
The principle of operation of the juicer
Before starting the assembled structure, you need to make sure that it is stable, as well as that the drum rotates evenly without jamming. After that, the fruits are washed and loaded into the machine.
No need to fill the device with fruit to the top. Otherwise, the machine will not grind and may break.
If hard apples are loaded, the drum should be half full. Soft raw materials can be put in larger quantities. A bucket or pot for juice is installed under the drain pipe. It remains to start the engine in spin mode. During the rotation of the drum, the apples will beat, and juice will flow out of the resulting mixture. As with the previous design, there is no need to cut the raw material into pieces. The performance of such a juicer is approximately the same as in the embodiment described above.

Washing machine drum press
From a washing machine, you can make not only a juicer, but also a press, using separate parts from it. The design is quite simple as there is no electric motor, no need for electricity, and no complex structural elements. From the washing machine, we only need a centrifuge made of stainless steel. Since the part has holes, this allows it to be used for the purposes in question. The manufacturing process consists of the following steps:

As the owner of a large garden, in the season you have to think about where to put the crop. Indeed, in a short time it will not be possible to eat everything, and if the fruits are ripe, then they will not last long on the tree - they will begin to fall and deteriorate. However, there is a way out of the situation and it consists in a home-made device. Consider how to make an apple press from a washing machine and do-it-yourself tools. With the help of such a device, juice can be squeezed out of apples and other fruit crops, which will be much easier to process.
Advantages of a homemade juicer
If your household has an old unused washing machine, automatic or activator, you can make a useful device for squeezing juice out of it. The bottom line is to install a grater inside the machine. Raw materials are poured through a large hole, after which it is crushed and juice is squeezed out. The advantage of this design is the ability to make juice in large volumes, which most household juicers cannot provide.
In addition, in a home-made device, the capacity for loading raw materials is much larger. Equipping such a juicer with a powerful motor will allow you to get about 20 liters of juice per hour. This indicator is quite enough to process apples from your garden and also help your neighbor.
Juicer from an activator washing machine
To make such a juicer, you will need an Oka or Siberia machine. You can use other options equipped with a wringer and an activator on the bottom of the tank. Consider the step-by-step manufacturing of the device:
So that the work of a do-it-yourself garden juicer from a washing machine is not limited by the time of the relay, the latter must simply be disconnected.
How to squeeze juice
The process of obtaining juice is quite simple. To do this, you need to wash apples or other fruits, and load them in a small amount into the washing machine tank. The device turns on and with the help of knives the product is crushed. The duration of processing depends on the specific variety of apples and ripeness. After grinding, we get the mixture in the form of mashed potatoes and load it into a centrifuge, approximately 3 liters each. Turn on the device and squeeze the juice. After a few minutes, you can remove the mesh and shake out the cake.
Read also: Device for picking apples from a tree
How good is this juicer?
The main advantages of the considered design are as follows:
- productivity is about 12 liters per hour;
- apples and other fruits do not need to be peeled and cut;
- You do not need to be constantly near the device.
The presence of pulp in the juice will directly depend on the raw materials used and the duration of its grinding.
If you want to get pure juice, it is enough to pass it through a filter, for example, a thick cloth. You can also let the juice stand for a while.
Juicer from the front washing machine
Making a juicer from a front washer is somewhat more complicated and will take more time. To build the device you will need:
- front loading machine with belt drive;
- a pair of metal meshes 300 * 60 mm in size;
- fasteners from bolts and nuts with a diameter of 3 mm;
- juice container;
- plug out of rubber;
- drain pipe;
- a set of screwdrivers and socket wrenches;
- metal scissors;
- Bulgarian;
- electric drill;
- hammer and pliers.
Preparatory work
All unnecessary elements (pump, sensors, filter, valve, control device) are removed from the washing machine, after which it is placed with its back side on the bars and fixed well. Then perform the following steps:
Manufacturing process
After the preparatory activities, it remains to do the following:
- The mesh is fixed inside the drum by means of screws. It can be easily dismantled for cleaning.
- In order for the raw material to be crushed, the ribs must be sharpened.
- A pipe is fixed to the drain hole.
- Mount the electric motor.
The principle of operation of the juicer
Before starting the assembled structure, you need to make sure that it is stable, as well as that the drum rotates evenly without jamming. After that, the fruits are washed and loaded into the machine.
No need to fill the device with fruit to the top. Otherwise, the machine will not grind and may break.
If hard apples are loaded, the drum should be half full. Soft raw materials can be put in larger quantities. A bucket or pot for juice is installed under the drain pipe. It remains to start the engine in spin mode. During the rotation of the ram, the apples will beat, and juice will flow out of the resulting mixture. As with the previous design, there is no need to cut the raw material into pieces. The performance of such a juicer is approximately the same as in the embodiment described above.
Washing machine drum press
From a washing machine, you can make not only a juicer, but also a press, using separate parts from it. The design is quite simple as there is no electric motor, no need for electricity, and no complex structural elements. From the washing machine, we only need a centrifuge made of stainless steel. Since the part has holes, this allows it to be used for the purposes in question. The manufacturing process consists of the following steps:
The hot summer and the first days of autumn delight us with the fragrant fragrance of ripe fruits. Piquant taste of grapes and apple charge of vitamins, unique taste of pear and healthy tomato juice - the table at this time of the year is filled with a lot of fruits and vegetables.
To diversify the menu and regularly delight yourself with a refreshing fresh juice, you can make a juicer at home. Such an invention is an alternative to bulky, loud and expensive devices.
In contact with
Classmates
Equipment and sequence of actions
To make a homemade centrifugal juicer, we need an old washing machine (always with a working centrifuge).
The resulting semi-automatic device will perform a number of tasks:
- grind raw materials;
- squeeze and filter juice;
- flush the internal installation yourself.
A mandatory requirement for the selected model of the washing machine is the existing activator at the bottom of the tank. Old samples that have serviceable parts are also suitable for use.
You should know: actively develop the topic of "homemade" in the press began in the early 90s. One of the first to propose the idea of installing and launching the device was engineer Kotenev and inventor Maslov (Model Designer magazine).
To facilitate your work, first of all, you need to draw detailed drawings: draw up a detailed layout of the future juicer. Then you should prepare all the tools.
In the process of work, we will need the following elements:
- centrifuge;
- proper cover;
- brackets for fastenings;
- bearings of various sizes.
Selected elements should be cleaned from regular exposure to powder - rust and scale. To do this, with fine sandpaper, it is necessary to polish all surfaces to a shine.
Note: the design should have only two holes: for laying raw materials and draining juice. Other voids and holes must be sealed with rubber pads.
The next steps are the manufacture of a grater and a gasket. To do this, we need a cutting tool, for example, a grinder. It is better to cut the gasket from stainless steel to increase the durability of the entire device.
To make a grater, you will need to work out technical drawings and perform a number of simple steps:
- Drill small holes.
- Divide the resulting circles into sectors.
- Attach the workpiece to the screws.
- Stuff the cutting teeth.
What should not be forgotten

From any wooden handle, you can make a pusher for tomatoes and other fruits. Do not forget to put a limiter so that the device does not sag and does not fall to the grater.
To make a high-capacity squeezer, you will definitely need a powerful engine. It is important to secure all parts well and insulate electrical parts.
Remember: be sure to wash all parts with detergent before starting. Components must be made of proven materials and prevent oxidation, corrosion and the ingress of harmful substances into the juice.
Trial run

 Before starting the active use of the juicer in the country or city kitchen, it is necessary to make a trial run. When rotating the drum, pay attention to extraneous noises, knocks and beats. Any extra sound indicates the imperfection of the design.
First run benefits:
- the ability to test in practice all the capabilities of the device;
- prevention of negative moments in the future during operation;
- technical condition control.
For the first productive launch, you need to carefully prepare and sort out the raw materials. Dense and strong parts, for example, the core of apples or pear pits, do not need to be removed, as this is not a hindrance to work.
We substitute a container under the tube, put the fruits in the bunker, press them against the wall with a pusher. It is necessary to squeeze the juice before the vibration sensations begin. If there is a slight vibration - stop casting and let the spinning device work. After completing the session, it is imperative to immediately disassemble the device and rinse all parts.
Other ideas for squeezing fruits and vegetables

The main advantages of this type:
- affordable price;
- reliability;
- long-term operation.
To improve the design, you can use plastic bottles. We take a container and cut off its bottom at a distance of 10-15 cm from the bottom edge. Then we insert a small bottle into the resulting hole, having previously made small holes in it. We unscrew the cork and you can get to work. This option is only suitable for occasional juicing for one person Leave a message and your contacts in the comments - we will contact you and together we will make the publication better!