In modern private construction, the roof truss system makes it possible to increase the living space and create an additional half-floor. This design is distinguished by a variety of design options, their reliability and versatility. It is convenient for installation of dormers and skylights and access to a small balcony on the roof. Such a constructive completion of the building makes it possible to organize additional living space instead of the usual attic. The attic level is formed thanks to a specific rafter system and a large angle of inclination.
What type of attic space should you choose?
For the first time, attics began to settle in Europe after the Second World War, when there was not enough full-fledged housing for everyone. However, in our time, the attic, as an elite housing under the roof, has become very fashionable. The construction of mansard roofs was taken up in the dacha sector, and in country cottages, and in already new houses, in order to add usable space.
Today, the installation of the roof truss system has become much easier and more affordable, thanks to the offer of the latest developments and the availability of building materials. High-quality insulation and new methods of sealing the attic roof have turned an ordinary attic into a cozy room. This made it possible to protect the living space under the cold roof from the cold and negative weather factors. And the rafter system of the attic roof allows you to vary the configuration, size and shape of the under-roof space. Attic construction options:
- cold summer - summer cottage;
- insulated - for full-fledged year-round living.
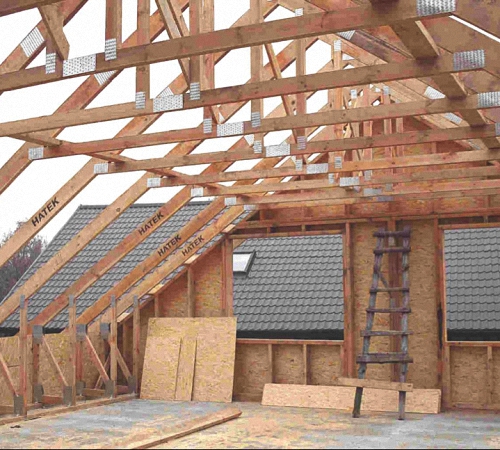
Mansard roof rafter system - photo:

The side walls of the attic inside have different wall shapes:
- symmetrical and asymmetrical;
- single-level and two-level;
- vertical (with additional pantries on the sides);
- partially vertical (the bevel for the ridge begins approximately from the middle of the wall);
- inclined;
- beveled triangular (in the shape of the slopes of the attic roof);
- broken lines (attic of a complex shape).
The total volume of the attic space, which is provided by a four-sided (hip) or gable roof, depends on the angle of the bevel. With competent interior cladding and thoughtful design, a room can be aesthetic and full-fledged for living, even with strongly sloping walls.
When the under-roof space must be designed for housing, it is important:
- bring all communications;
- determine the layout and functionality of 1 or more compartments;
- provide ventilation, heat and waterproofing;
- take care of additional insulation for the winter;
- bring all the amenities if it is an isolated room for one person.

Architect's advice: The living space inside the attic is planned to be easy to move and comfortable for life support. Therefore, the dimensions of the room should be at least 3 m wide, and there should be enough space above the head to move freely with raised arms.
The preliminary calculation of the roof truss system is very important. All points should be thought out in advance, entering the preliminary attic project. Sometimes it is necessary to replace the roof, and the decision to complete the attic comes in the process of choosing a roof configuration.
Attention: The construction of the roof roof structure of the truss system should be carried out taking into account the fact that it will create an additional load on the foundation and walls, which is harmful for a not new house. And although this will not destroy the main structure, it can give additional shrinkage.
It is not too late to abandon the idea of arranging an additional residential floor if the building is dilapidated and the soil is not suitable for multi-storey buildings. Only specialists of a construction organization or an architect can correctly calculate the total load, he will also prompt the optimal configuration (geometry) of the attic, so as not to spoil the appearance of the house. The angle of inclination of a new building is determined at the design stage. It depends on such factors:
- climatic conditions of the region;
- roofing materials;
- functionality of the interior.

Mansard roof rafter system - drawings
An attic space cannot be planned without special windows. It is important to think over their location even at the design stage, that is, before installing the rafter system. In the end, not only the appearance of the house, but also the reliability of the entire structure will depend on the competent laying of window openings, which affect the step between the supports. It is also necessary to think over the method of fastening the frame of the skylights, and their height is dictated by the ease of maintenance inside the attic room.
Where to start the construction of the attic rafter system:
The rafter frame is the base or skeleton of the attic. And if you are interested in how to make a roof truss system, you should start by studying the existing experience, so as not to invent anything and not allow any annoying mistakes. If the rafter "cap" is installed and mounted correctly, then sheathe it from the outside and from the inside is no longer difficult.
The do-it-yourself roof rafter system is assembled in order:
- mauerlat;
- base from beams;
- frame racks;
- runs;
- hanging rafters of the upper slopes.
Tip: When erecting an attic, all wood must be dry and seasoned, treated with a special antiseptic or antifungal aerosol. Logs and dry timber should have a moisture content of about 18-20%, no more.
Consider the next stage of work - a diagram of the roof truss system. Basis of construction:
- main racks,
- floor beam,
- side rafter,
- ridge rafter,
- top harness,
- fastening brackets.
How to make a mansard roof for a small summer cottage?
All work on the construction of the gable roof truss system can be done with a small team of henchmen.
If you want to build a cold summer attic over a small summer cottage, it is important to think about how you can get to the upper room:
- on external attached steps;
- from the inside, like an attic staircase.
Light boards, beams and small diameter logs are suitable for the prepared perimeter of the country house. However, the integrity and reliability of the lightweight construction of the attic room will depend on the reliability of the joints of the rafter system with the floor beams. You can use strapping, screws, nails, bolts, etc.
The racks are stacked in order with support on the beams of the base and floors, then the rafter legs of the first level of the slopes are attached to them. The main nodes of the attic rafter system are fastened either with construction staples or with hardened wire strapping. Sometimes an additional connection with reinforcement with staples or wire is required.

The upper beam of the attic floor is attached to these supports - this is a ridge post that "collects" the rafters under the upper slope. Next, the rafter legs are fixed for the upper level of the slopes, after which the rafter legs are connected to the main floor beams.
When the base is ready, all supports are fastened with straps and lathing, for additional reliability, so that the rafter system is strong and convenient for laying insulation, waterproofing and roofing material. The simplest construction of a country attic is covered with waterproofing and covered with slate. And don't forget the rainfall drainage system.
An attic made of layered rafters is made in about the same way, but the tops are reinforced with a thicker bar - for sufficient structural strength. Such a system will functionally replace the support beam of the upper slopes. They will become the supporting frame of the attic roof and the basis for wall and ceiling cladding indoors - photo:

The lower level has options for fastening the support along the upper points of the rafters - on the side girder of the racks, on the gables, or only on the racks, that is, without mounting the side girders. And the lower points of the rafters of both lower slopes should rest on the floor beams, and preferably without a tie-in.
Under a roof made of heavy piece materials, it will be necessary to reduce the interval between the rafters, and also add the lathing of their cross beams. These schemes are often used for the construction of complex configuration mansard roofs.
It is important to build a roof attic, knowing some of the design features. Therefore, experts recommend that you learn a few lessons - how to properly make a roof truss system. We start with the Mauerlat.
1. Mauerlat - that warp around the perimeter of the house, on which the entire rafter system is attached. Therefore, the reliability of the fastening of the lower beams to this perimeter will literally depend on whether the roof will rip off due to unfavorable weather and climatic events. A high-quality Mauerlat will not allow the roof of the attic to come off in a tornado or topple over during powerful hurricane winds. Reliable fastening of the truss structure to the perimeter of the building evenly distributes the load of the roof onto the walls and foundation of the house.

2. Boards and beams are better to choose strong, not knotty, with a thickness of 40mm. Under the Mauerlat, it is better to use dry processed wood, optimally - a bar with a section of 150x100mm. After preparing the perimeter of the walls for laying the rafters, the timber or board must be laid horizontally, adjusting the level along the entire perimeter of the walls.
3. On the crowns of walls or columns of a frame-type structure or brickwork, a layer of waterproofing recommended for the type of building materials must be laid. This is necessary so that the moisture content of the walls and the base of the rafter system does not transfer to them. For waterproofing, bitumen, roofing felt or roofing felt, and other modern waterproofing materials are suitable.
4. The beam at the base is fastened to the walls with bolts or brackets; additionally, the fastening can be reinforced with a wire strapping. Mauerlat studs are mounted into the wall even during masonry. The Mauerlat beam is treated with an antifungal agent so that it is not subject to destruction.

5. When everything is ready for the installation of rafter legs, it is important to mark the base where they will be attached. Ready-made rafter legs can be ordered in the workshop and then assembled on their own, than spending a lot of time on their manufacture. For convenience, they can be expanded from those sides of the house, where they will fit along the perimeter of the attic.
6. Check the struts for looseness and vertical movement. If it is, then do not think that the problem will go away with the installation of roofing materials. The added weight of the structure will only make it more wobbly. Therefore, all flaws should be eliminated even at this stage - reinforce the fastening with braces and ties.
7. Experts recommend observing an equal interval (step) between the rafters - about 80-120 cm. The easiest way is to pull the twine between the extreme rafters to use it as a markup and level of the remaining rafter beams. Racks are made not only in one horizontal plane, but also set exactly vertically - check the plumb line.

8. The uprights are a good foundation for the future walls of the attic living space, so they should be perfectly flat. Inside there will be cladding made of wood or plywood boards, drywall, fiberboard or chipboard. Do not forget to put the appropriate insulation between them, which is intended for the roof and attic.
9. To fix the racks to the drains of the upper bar, use metal staples or nails. With the completion of this stage of work, the installation of the rafter frame is completed. At the last stage, the rafters are connected in pairs, attached to the ridge beam.
10. Remember to leave openings for skylights or doorways for stairs. Installation of roof windows is carried out after the walls of the inner lining are equipped.

11. It is possible to do without a ridge beam, but it is necessary when the length of the attic roof is more than 7m. But it increases the total weight of the rafter system. It is enough to fasten the tops of the rafters with ties. The final stage is the lathing for heat and waterproofing and roofing materials. When the roof is almost ready, they proceed to the installation of roof windows and interior decoration of the room.
12. It is better to calculate the amount of consumables and wooden beams in advance using tables and drawings, but it is better to take into account the minimum and maximum consumption - with different steps between the racks. Ideally, the design is expected to be lightweight and reliable at a low cost. We suggest studying the important points of arranging the roof truss system in the video at the end of the article.
A structurally complex attic under aesthetic roofing materials looks much more interesting than an ordinary hip roof, but only specialists can make it. When the decision is made to replace the old roof with a more modern roof, take the opportunity to build an attic. Although the more complex structure of the roof truss system is a bit onerous in terms of the amount of work, the additional living space and the unique look of the house will delight your children and grandchildren for many years.
The attic is called the roof, under which the living rooms are equipped. The shape of the attic roof can be different, but most often the attic is equipped under a gable roof. The most rational solution that allows you to get the maximum usable area of a residential attic is a mansard roof with a broken slope line.
The stages of building a mansard roof with your own hands are in many ways similar to the construction of an ordinary one, as are the names of the elements that make up its frame. These include:
- Mauerlat - a support beam that transfers the load from the rafters to the walls of the building;
- Floor beams - boards that form the attic floor and the ceiling of the lower floor;
- Racks - vertical supports supporting the rafter system;
- Girders - horizontal supports for rafters;
- Crossbars - horizontal transverse elements that pull the roof slopes together, otherwise they are called puffs;
- Rafters - boards that form the main contour of the roof;
- Suspension - a suspended post that supports the tightening and redistributes the load between the rafters;
- Sheathing - boards or plywood sheets intended for laying a roof covering on top of them and transmitting the load to the rafter system;
- Fillets are boards fixed along the axis at the bottom of the rafters and designed to form the overhang of the roof.

The cross-section of the roofing elements is determined by calculation; the article lists the materials most often used in private construction.
The device of a sloping attic roof and its differences
As already mentioned, a roof with broken slopes is somewhat different from a simple gable roof. The difference lies in the shape of the opposite slopes: they are not a straight line, but consist of two slopes connected at an obtuse angle. The roof can be either symmetrical or have a different shape of opposite slopes - it depends on the project.
Due to the broken shape, the useful usable volume of the attic space significantly increases. The lower part of the rafters is usually set at an angle of about 60 degrees to the horizontal, and the support legs that support these rafters act as a frame for the internal walls. The upper part of the rafters is most often installed at a slight angle, from 15 to 45 degrees - this saves materials, but maintains the functionality of the roof and its resistance to snow loads.


Vertical uprights resting on floor beams, purlins and connecting braces form a parallelepiped that limits the internal dimensions of the attic. To give the structure additional rigidity, struts are installed between the floor beams and the lower rafters. After installing the upper rafters, to strengthen the truss and eliminate the sagging of the crossbars, suspended supports - headstock are installed. For additional strengthening of the lower rafters, they are pulled together with the racks with the help of contractions. The elements are fastened with nails and bolts or studs.
Calculation of the dimensions of the attic roof
The main condition for a comfortable attic device is the ceiling height - it should not be lower than 2.5 meters. To ensure such a height of the room, the fracture line of the attic roof must be at a height of at least 2.8 meters, taking into account the thickness of the insulation layer and the inner lining of the attic, as well as the thickness of the finished floors.
Before proceeding with the purchase of materials and the construction of the roof, it is necessary to draw a detailed drawing, which will indicate the overall dimensions of the house, the line of the slopes and the height of the attic.

Drawing - dimensions of the attic roof
Sloped mansard roof construction technology
- Install the Mauerlat around the perimeter of the house. In wooden buildings, the upper beam or log serves as a mauerlat. In stone - brick or block - buildings, the Mauerlat timber is attached to studs or anchors fixed in the walls during masonry at a distance of no more than 2 meters. The Mauerlat is leveled along the inner plane of the wall, the wall remaining outside is later laid with decorative masonry. Mauerlat beams made of dry coniferous wood usually have a cross section of 100 or 150 mm. Saw off the timber of the required length, straighten the anchor pins, if necessary, and put the timber on top of them. Lightly tapping with a hammer. Dents from the studs remain on the bar, a hole of the required diameter is drilled through them. You can also mark the timber using a tape measure, but the probability of an error in this case is higher. Roll waterproofing is laid on the wall, you can use ordinary roofing material in two layers. Mauerlat is put on studs and nuts are tightened.

- For floor beams, coniferous beams with a section of 100x200 mm are usually used. The floor beams are placed either on top of the Mauerlat with an extension of 0.3-0.5 meters beyond the plane of the walls, or in specially designed pockets in the masonry. In the first case, the beams are fixed with corners and self-tapping screws. To make the floors even, the beams are laid in a strict sequence: first the extreme ones in level, then, pulling the lace, the intermediate ones are aligned along them. The spacing of the floor beams is usually from 50 to 100 cm, but the most convenient is a step of 60 cm, which allows you to lay insulation slabs without cutting. To equalize the height of the beams, they are suspended or lining from the board is used. If the beams are placed in special pockets in the masonry, their ends must be treated with coating waterproofing and wrapped with roofing material. Align them in the same way.
- Racks are installed on the extreme floor beams. The extreme racks are made of 100x150 mm timber, the height and line of installation of the racks are determined according to a previously prepared drawing. The racks are leveled using a level and a plumb line and temporarily fixed with jibs in perpendicular directions - along and across the roof axis. This will allow the racks to be installed without deviations to either side. Jibs are made from any board and nailed. Between the extreme drains, pull the lace and put the rest of the racks along it with a step equal to the step of the floor beams, that is, on each beam. All racks are fixed in the same way as the extreme ones. You should have two rows of uprights of equal height, running parallel to each other.
- Runs from a 50x150 mm board are laid and fixed on the racks, the runs are fixed on 150 mm nails and on the corners with self-tapping screws. A crossbar from a 50x200 mm board is placed on the girders with the narrow side down - this will increase their rigidity. Since there will be no load on the crossbars during operation, such a section of the board is quite enough, however, in order to exclude their deflection and increase reliability during the installation process, when installing the crossbars, temporary supports from a board no thinner than 25 mm are placed under them. On top of the crossbar, they are fastened with one or two boards - also temporarily, until the rafters are installed. In this case, the boards must be placed not in the middle of the tightening - there they will interfere with further installation, and after retreating about 30 cm After installing the racks, girders and crossbars, you get a rigid structure that limits the interior of the attic. To increase its strength, it is subsequently fixed with struts and contractions.
- Installed from a board 50x150 mm. First, a template is made from a 25x150 mm board - it is easier and faster to process. A board of the required length is applied to the upper girder, the shape of the cut is drawn directly on the board and cut out. A template is applied to the girder at the places where the rafters are installed, and if it coincides everywhere, then the upper part of all rafters can be made according to the template. The lower part, resting on the Mauerlat next to the floor beams, is cut out each time in place. The rafters are fastened with corners and screws and on nails.

- To complete the upper rafters, it is necessary to mark the center of the roof. This can be done using a temporary stand nailed to the Mauerlat and extreme tightening from the end of the roof so that one edge of the board runs along the center line of the roof. The rafters are aligned along this edge. Next, a template is prepared from a 25x150 mm board, applying it to the edge of the installed board at the desired level and to the girder on which the lower rafters rest. Mark the upper and lower cuts and cut out the template. Apply it alternately to both sides of the roof, checking how accurately its center is marked. If the rows of racks are made in parallel, then there should be no problems with the installation of the upper rafters - they will all have the same size.
- The required number of rafter legs is performed according to the template. The rafters are installed on the girders and connected at the top using overhead metal plates or board scraps for self-tapping screws. In the girder, the rafters are resting on the cuts and fixed to the corners. To keep the rafters straight, they are secured using struts installed with the lower end on the puffs. So they put all the rafters. Hanging racks are fixed - pieces of board 25x150 mm. The upper edge of the board is fixed at the junction of the rafters, the lower edge is tightened.
- They put struts under the lower rafters from a board of 50x150 mm, abutting them with the lower oblique cut against the floor beam and fixing them on the corners, and the upper edge is attached to the side of the rafter leg, nailed onto one or two nails, after which they drill a through hole and fix it on a bolt or hairpin ... After installing the lower struts, remove all temporary supports and racks.
- The gables are sewn up, leaving door and window openings. If the floor beams are laid in the wall pockets, fillets are attached to the lower rafters - boards that continue the rafter line and form the overhang of the roof. When laying floors on top of the Mauerlat, the beams already protrude to the required distance, and there is no need for filly.
- corresponding to the type of roofing - solid or sparse. Waterproofing is placed on the lathing and the installation of the roofing begins, for example,.

A broken mansard roof usually does not need insulation - only the walls and ceiling of the attic are insulated. The air space formed under the rafters ensures good ventilation of the attic, reduces heating of the attic in summer and provides additional thermal insulation in winter. Therefore, when sewing the gables, it is important to leave ventilation windows in the upper part of the roof, above the attic floor ceilings.
Video - instructions for building a mansard roof
When people start building a house, they rarely think about the fact that the composition of the family may soon change. What to do if additional living space is needed, and it is impossible to expand the dwelling due to outbuildings due to the small area of the land plot? The construction of the mansard roof solves the problem of the lack of space, it can be installed on only a rebuilt house or make the reconstruction of an existing roof.

Gable attic

Broken roof with attic
Varieties of attic roofs
The group of attic roofs includes all types of roofs, under the slopes of which you can equip a living space. According to building codes, the attic is distinguished from the attic by the ceiling height suitable for human habitation and the presence of natural light. The following are suitable for the installation of the attic:


Houses with a roof of any type can be equipped with an attic, however, working with a hipped roof, one-pitched and asymmetric is more difficult and more expensive, it is better to abandon these options in favor of more rational ones - a gable or a broken roof.
Types of attic spaces
A heated attic room is a real alternative to the second residential floor of a wooden or brick house. The fact is that an increase in the number of storeys of a structure is associated with significant costs for the capital foundation and the construction of the stairs. Different attic configurations are used depending on the available area and the needs of the homeowner:

- One-level. Only one living space is located under the broken or straight slopes of the gable roof. The construction of an attic of this type does not involve an increase in the weight of the roof, therefore it is suitable for buildings under construction and reconstruction. Even a master without experience can perform a calculation and build a drawing of a single-level attic. According to building codes, the ceiling height in a residential area should be 2.5 m or more.
- One-level with a portable console. A cantilever-type mansard roof device is placed under an asymmetric roof. To increase the area of a dwelling, part of it is taken out to the perimeter of the structure. The protruding part of the attic, resting on the pillars, is adapted for a shed or garage. The roof of the house with consoles is asymmetrical, the main part of the house is covered by a gable roof, and the console is covered by a gable patch. A cantilever attic view is erected to install vertical windows for natural light. However, professional architects can create a project and drawings of such complexity, and the complex scheme of the rafter system is not suitable for self-assembly.
- Two-level. If the roof height exceeds 5 m, then in the attic room you can equip two rooms located at different levels and connected by a staircase. This type of attic is not built on existing houses. Two-level rooms are planned at the design stage, taken into account when creating foundation drawings. The mutual arrangement of the rafter system is specially designed for complex, asymmetric geometry of the roof slopes. The second level of the attic is based on columns, therefore, the reliability of the structure directly depends on the correct calculations and the professionalism of the architect.

Designers can create real masterpieces from console and two-level attics, using the advantages of panoramic lighting, equip a greenhouse, a nursery or a bedroom filled with fresh air and light, however, a simple single-level design is more suitable for self-assembly.
Attic benefits
Homeowners try to use every opportunity to rationalize their construction costs, so they don't miss the opportunity to use the space under the roof of the house. This option for increasing the usable area of the house has the following advantages:

- The minimum price for 1 sq. m of living space. Due to the fact that the equipment of the attic is not connected with the increase in the cost of building the foundation, the cost of each meter in the house is cheaper than in the construction of two-story structures.
- Rationalization of heating costs. An air pocket between the floor and ceiling of the attic prevents the heat generated by the heating devices from escaping through the roof. The air does not transfer heat well, so the ground floor of the building will be warmer, which leads to energy savings.
- The finished look. The equipment of the attic makes the appearance of the house complete and harmonious, allows you to equip a balcony, shed or garage.
- The speed of construction. During the construction of an attic in a residential building, well, be sure to stop using the first floor. The speed of installation allows the completion of the attic equipment within a week.
- Minimum costs. Experienced builders argue that there is no cheaper way to get a few square meters.
To equip an attic room, the length of the end wall of the building must exceed 4.5 m, and the area of the house must be more than 7 sq. m, the recommended proportion of height to area is ½.
Natural lighting in the attic
The presence of natural light is a prerequisite that must be met in order for the attic room to be considered residential according to building codes. There are two ways to organize it.

When choosing windows for the attic, keep in mind that it should be in harmony with the roofing material, the total area of the windows cannot exceed a third of the surface of the slopes, and the size of the translucent structure directly depends on the angle of inclination.
Ventilation equipment
If you are going to insulate and heat the attic, it must be equipped with a forced ventilation system. The cold under-roof space is ventilated independently with the help of dormer windows. In a high-quality insulated attic, natural air circulation is hampered, which makes it stuffy, damp and uncomfortable. To avoid such problems, installation is necessary:


Arrangement of elements of a forced ventilation system on a soft roof
A working forced ventilation system makes the air circulate using convection - the property of warm air to rise upward, making room for cool air taken from the street. This will increase the service life of the rafter system, roofing material, protect against mold and dampness, and also create a pleasant microclimate in the attic.

There are ready-made drawings of standard-size attic roofs available for do-it-yourself installation, if you are an inexperienced builder, then it will be most reliable to stop at just such options.
Video instruction
For reading 10 min. Views 1.3k.
Let's figure out what exactly we call an attic today. According to the building regulations in force today, we are talking about a room in an attic, part of the facade of which is formed by the roof surface.
Moreover, if we consider the line of intersection of the walls of the facade of the building and the surface of the roof, then its height above the floor level should not exceed one and a half meters.

There is a wide range of possible solutions for their design. It should be remembered that one of the main features of the attic is that there are two sections of the roof slope. One of them is flatter, the other with a stronger slope.
In addition, it is desirable that the height of the vertical part of the wall be more than one meter. This will make it possible to feel much more comfortable in such a room than in the opposite case.
Design
Consider the types of truss systems for attic rooms. Here we will tell you about the main types of such premises, depending on their structure.

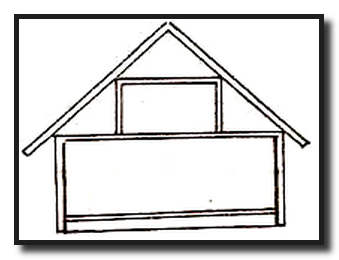
Here we are talking about a flat inclined surface. However, the slope in this case is usually relatively small. It is much easier to design such an attic than for other types, but there will be relatively little usable space in such a room.

There are many such solutions. Let's talk about some of them. This is also one of the easiest options. It looks like this.
As we can see here, when designing the attic, the integrity of the roof is not compromised in any way. This allows you to reduce the cost of arranging such a room.

But the downside of this option is that the size of the attic itself in this case is minimal in comparison with other architectural and design solutions.

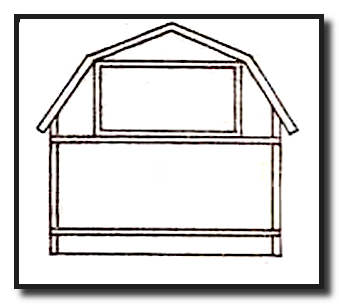
Let's consider a similar option. However, we note that it allows you to increase the size of the attic. It is designed for a different type of roof structure.

Its main drawback is the same as in the previous case. Here, very little space is allocated for the room. Which, however, pays off in the simplicity of designing this kind of attics.

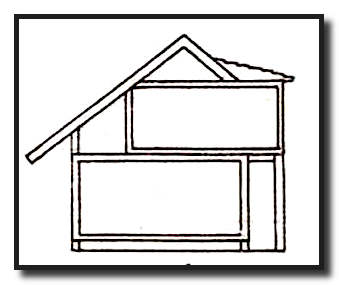
Here we will look at more complex geometry.
We see that the design of this type of attic presents certain difficulties. Moreover, the room has a much larger volume than in previous cases. There is a vertical outer wall, which makes it possible to make high-quality windows in the attic.
An important aspect of such a solution is that it is possible to push the vertical wall of the attic outside the facade of the house. This provides a good opportunity to increase the area of the room. Note that here we are talking about a single-level attic.

Here we are talking about a much more complex option. A two-level room with several rooms can also be one of the options for an attic.
However, designing such an attic is not an easy task, although it can provide additional flexibility and efficiency in using the available space.
Roof shapes
In this section, we will go over the basic types. The simplest types include single-slope or dual-slope.
A more complicated option is to use a polyline type. When using such a variety of it, the internal space that can be used for an attic room is significantly increased. This option is a kind of gable roof.
More complex options are those that are made in the form of a dome, pyramid or cone.
There is also a four-slope, which is also called hip. In fact, here we are talking about a gable roof, complemented by two more slopes, which are located in the front and rear.
Also, one cannot fail to mention the multi-gable roofs. Here we mean a combination of two or more gable, which are located perpendicular to each other.
The following figure illustrates some of their types.

Sloping mansard roof
There are not so few varieties of attics. However, some options are quite rare. One of the most common is this. What exactly do we mean when we talk about this?
In fact, we are talking about an ordinary gable roof. Its only difference is that in the variant under consideration, each slope is divided into two sections (this is the most common option, but there may be more than two such sections), which have a different slope. The part that is in the center is less inclined, and more along the edges. Let us explain what has been said with a drawing.

Now let's move on to how it works. Consider another drawing.

This diagram shows the location of the rafters that make up the frame. Let's briefly talk about them. This is the part on which the entire roof structure is mounted. On the one hand, this is part of the ceiling of the upper floor of the building.
On the other hand, the rest of the structural elements are mounted on these beams:
- Racks are vertically arranged elements that serve as a support.
- The purlins are located along the attic.
- Reclining rafters are an inclined base for flooring.
- Crossbeams are used for roof slabs.
The main structural elements have been listed here. Let's show one more scheme.

Several more important elements of the rafter system are shown here:
- Mauerlat. These are longitudinally located beams that serve as the main support for layered rafters.
- Hanging rafters. They are located in the upper section of the roof.
- The tightening serves to increase the strength of the entire structure.
- The braces are additional support for the layered rafters.
The rafter system is the foundation, but that's not all. The roof itself has a rather complex structure. After all, she must protect the house from rain, cold and heat. In addition, water condensation forms inside the house, which can not only create significant discomfort for residents, but also damage the thermal insulation layer. Therefore, it has a rather complex structure.

Let us explain this scheme. Usually the insulation layer is placed between the layered rafters. A vapor barrier is directly placed under it. Waterproofing is placed above the insulation layer. A thin layer of air is left under it, which serves for ventilation.
On the layered rafters, a counter-lattice is nailed from above (slats that are located along the rafters). And on them - a crate (slats located perpendicular to the rafters). A roof covering is installed on top.This is an example of such a roof, in which ventilation is provided.
The majority belongs to this type. In areas where a warm and dry climate prevails, a roof can be installed in which this kind of ventilation is not provided.

We will tell you how mansard roofs can look like in the most common cases.
Here is the construction for a gable roof attic. Here is another diagram that corresponds to a gable polyline.
If it is four-pitched, then this allows you to allocate more free space for the attic. Here is a schematic diagram of the rafter system for them.

The diagram below shows a rafter system that can be used in design. Next, we will show another example of a hipped roof.

Diy mansard roof construction technology
If we have plans to build an attic, then, in principle, two main ways are possible:
- Do it yourself.
- Contact a specialist.
Each of the options mentioned has its own advantages and disadvantages. If you do all the necessary work with your own hands, then it will cost much less. But for this you have to work hard and you will need to do the work at a high-quality, fairly professional level.
If you turn to specialists, then the work, although it will be done with high quality, will also cost much more.
If you nevertheless decide to take on this business on your own, then first you need to prepare the necessary materials and tools.
Creation will take place in two main stages:
- creating a skeleton,
- arrangement of the roof.
Various materials will be required to carry out the work:
- Wooden beams of various sections.
- Boards 3-4 cm thick and 15 cm wide.
- Roofing material (slate).
- Insulation.
- Vapor barrier.
- Waterproofing.
- 80mm nails.

You will also need tools to work:
- Sharp knife.
- A hammer.
- Axe.
- Construction stapler with staples.
- Plumb line.
- Roulette.
- Hacksaw.
Since it is a rather complex structure, you must first draw up its diagram and calculate the parts.
Consider the situation for a gable sloping mansard roof. Let's talk about what calculations and how to do it.
First of all, it is important to decide on the roofing material. It must be chosen based on the specific features of the situation. In particular, let's pay attention to two different sides of the issue. The level of thermal insulation and waterproofing in the attic is significantly lower than in the house.
This necessitates a very careful attitude in the selection of materials for the construction of the roof. Another feature is that it is important to use lighter materials both for the roof and for the interior decoration of the attic being created.
Since each slope is divided into two sections, it is important to determine the angle of inclination of the steeper section. It should be remembered that if it is less than 15 degrees, then this imposes special requirements on the roofing material. If we are talking about a slope greater than 45 degrees, then almost any material can be used for the roof.
In order to determine the weight, you must first of all determine its area. To do this, its surface is divided into simpler geometric shapes and their area is added up.
When determining the weight, the following are taken into account:
- weight of rafters and beams,
- insulation weight,
- waterproofing weight,
- roof weight.
First, the weight per unit area is determined, and then multiplied by its value.
When calculating the weight, do not forget about the possible weight of the applied snow and take into account its value. You also need to take into account the additional impact of the wind.
The total load is found by dividing the total load by the roof area. On the basis of the obtained number and rather complex calculations according to special tables, the necessary parameters of the rafter system are determined and, in particular, the size of the rafter step and the recommended roof slope.
Carrying out works
Installing the rafter system
Before carrying out such work, it is necessary to prepare the wood. It needs to be dried well, and also treated with a special antiseptic and fire retardant compound.
The first step is to install the Mauerlat.
It is laid on a waterproofing layer. The next step is to attach the ridge bar.

After that, layered rafters are installed. For convenience, their attachment points can be marked on the Mauerlat. Usually, the pitch of the rafters is 70 cm. It is customary to cut the rafters in order to strengthen the connection with the Mauerlat.

The top edges of the rafters are also cut at an angle. Puffs are installed there.
Then a crate is placed on the rafters and a vapor barrier film is installed.

The rafter system is the basis for the roof, but you need to install insulation and waterproofing.
First of all, you need to decide on the choice of material for insulation. Several options are common:
- Glass wool. It is a cheap and effective material, but when it is installed, harmful dust is generated. When used, this material is safe, durable and effective.
- Fiberboard plate. It has good thermal insulation and sound insulation. Usually not applicable for residential buildings.
- Polyfoam is an effective material, it weighs a little. However, it is toxic and fire hazardous.
- Expanded polystyrene in its characteristics is similar to polystyrene, but does not have its disadvantages.
- Mineral wool. In recent years, it is the most common material used for insulation. It is effective in use, has almost no drawbacks.
On top of the rafters we lay a waterproofing film, which must be carefully secured. We insert blocks of mineral wool from below and fix them with a vapor barrier membrane, attaching it to the rafters from below.
In this case, the sheets of mineral wool must be cut several centimeters wider than the gaps between the rafters. This is necessary in order to exclude the formation of cracks in the thermal insulation.
Features of roof truss systems
The frame is built to ensure that it can support the entire weight of the attic roof along with the so-called "roof cake". On the other hand, it should be as light as possible in order to reduce the load.
Usually, coniferous wood is used for such work. This is due to the fact that such wood is more easily capable of being processed.
Before use, wooden parts must be antiseptic and fireproof.
Modern technologies and high-quality building materials allow you to independently build a high-quality mansard roof. However, in this case, it is necessary to carry out competent design and calculation of the necessary parameters.
Particular attention should be paid to the quality and reliability of the rafter system being built.
In an effort to effectively use the entire available area of a country house, many owners equip an attic. In doing this, you must be prepared for the arrangement of the roof in a certain way. At its core, the attic is a converted attic and requires certain design solutions and some alterations in thermal insulation and roofing. In general, the construction of a mansard roof of a country house is not much different from the construction of other types of roofs. But due to the operational characteristics of the attic roof and the requirements imposed on it, it is necessary to have knowledge and understanding of the specifics of arranging this type of roof.
Types of mansard roofs
Like any construction work, the construction of an attic roof begins with the design stage and the selection of the most suitable attic roof for the structure, its type and type. For the attic, single-pitched or ordinary and broken gable roofs are used. In addition, the materials used and the design features of the roof itself affect the appearance of the roof.
Depending on the structural features of the building itself, several standard roof solutions are used in the construction of the attic. Mansard roofs: photo and description
- Gable roof for a single-level attic. This option is a conventional gable roof, under which the attic is arranged. During the design and construction, there are no big difficulties due to the simplicity of calculations and the ease of work on the construction of the truss structure. The main disadvantage of this roof structure is the small attic interior with rather low ceilings.
- Sloped gable roof for a single-level attic. Unlike the usual gable roof for the attic, the broken structure uses 4 pitched planes located at different angles. This type of roof structure is somewhat more difficult to design and build, but its undeniable advantage is its full-size interior.
- Single level mansard roof with outboard consoles. The construction of this type of roof is more complex in comparison with the previous ones. But a spacious room and full-fledged vertical windows compensate for the disadvantages in the complexity of design and construction. The design feature of an attic with such a roof is its displacement and extension beyond one of the sides of the house, and the roof looks more like a pitched roof.

- Two-level mansard roof with a mixed type of support. Roofs of this type are the most difficult to design and build. Such roofs are designed in conjunction with the house, as a whole, due to the multi-level placement of rooms.
Various skylight roof projects are not much different in design from conventional pitched roofs. Of course, there are certain design features, but in general they are the same as gable or single-pitched, and consist of the following main elements:

. Roof... The outer part of the roof, which serves as a protection against various weather conditions.
. Lathing... Most often, wooden boards to which the roof is attached, as well as insulation materials.
. Ridge run... The top of the entire rafter structure.
. Rafters... These are stiffeners of the entire roof structure, they can be layered and hanging. For the roof of the attic, layered rafters are used.
. Mauerlat... This structural element consists of beams laid along the perimeter of the outer walls and connected to the walls using special fasteners. The entire rafter structure is attached to the Mauerlat.
.Diagonal ties... To ensure the reliability and strength of the entire rafter structure, the rafters are connected to the longitudinal beams and vertical posts using diagonal ties or bevels.
. Internal supports... To give the roof stability, the rafters and / or the ridge girder are supported with vertical beams.
. Insulating layer... Due to the fact that the roof of the attic and the internal premises are practically one whole, a multilayer insulating cake is laid between the roof and the walls of the room to maintain the temperature and humidity conditions. Insulation consists of waterproofing and vapor barrier, sound and noise insulation, as well as a thick layer of thermal insulation. In addition, proper insulation of the attic roof is also important for the preservation of the roof itself.
Mansard roof construction technology
When designing and erecting a mansard roof, many builders and designers, either unknowingly, or doing their job somehow, make serious mistakes in insulation, ventilation and rafter structures. The result is a mansard roof, which literally after a couple of seasons becomes unusable, fungus, mold appears, and the roof begins to leak or completely collapses. This happens due to a violation of the technology for the construction of a mansard roof.
Due to the fact that the roof of the attic is maximally attracted to the walls of the interior, and it is quite difficult to obtain excellent heat transfer rates in this case, the entire structure of the attic roof must have excellent thermal insulation, ventilation and a properly erected rafter structure using wood treated with fire protection agents.

In order for the roof of the attic to be reliable and durable, you need to know the following:
- the thickness of the rafters must be more than 250 mm. For such rafters, you can use glued beams;
- use materials as thermal insulation that will not lose their properties in the event of an increase in humidity. For example, extruded expanded polystyrene or expanded glass;
- between the roof and the layer of thermal insulation, we make full-fledged ventilation with air vents and hoods, through which air will circulate under the entire roof surface;
- on the inside, along the entire surface of the thermal insulation, it is necessary to equip a layer of vapor barrier;
- on the outside of the rafters, a layer of waterproofing and, if necessary, a layer of sound insulation is laid under the roof.
Such requirements are due to certain natural and physical phenomena. But first things first:
A large thickness of the rafters is required for the possibility of laying a layer of thermal insulation with a thickness of 20 cm between them, and this in turn entails an increase in the mass of the entire roof structure, which the rafters hold on to themselves.
The wood for the entire structure is treated with special means to protect it from fire and microorganisms, which is a strict requirement of SNiP. This will keep it from damage by fungi and increase its service life.
If you use such popular materials as mineral and glass wool for thermal insulation, you can only win in the convenience of installation and the lightening of the entire structure as a whole. But cotton wool, whatever it is, is cotton wool that, like a sponge, absorbs water, cakes and loses its insulating qualities. If you choose any other material, besides polystyrene and foamed glass, you should focus on complete resistance to moisture, low heat transfer coefficient and relatively low weight.
The thickness of the insulation of 20 cm is necessary because in our latitudes it is very cold in winter and very hot in summer. And a feature of the attic design is large heat loss in winter and rapid warming up of the room in summer. A large layer of thermal insulation will prevent heat loss and penetration into the interior. But this is only one of the reasons, the second is the safety of the roof. The fact is that the heat that leaves their premises in winter heats up the roof, on which a layer of snow lies and partially forces it to melt, and snow is a natural insulation. Melted snow at sub-zero temperatures turns into ice, which does not have any thermal insulation properties, it makes the roof heavier and finally destroys the roof itself. And since up to 100 thawing and freezing cycles can pass in one day, the roofing material will fail in just one season. In summer, the room becomes incredibly hot and stuffy, and an air conditioner, or even two, is required. But these inconveniences can be avoided by equipping a thick layer of the correct thermal insulation.

Full roof ventilation is no less important. It will help cool the roof, both in summer and winter, as well as remove excess moisture from under the roof. All this will provide comfortable living in the attic room, protect against mold, fungi and rot, and in addition, will keep the roof from destruction in winter.
Regarding steam, hydro and sound insulation, everything is simple. Vapor barrier allows excess moisture to pass through itself from the side of the premises and prevents its penetration from the outside, waterproofing protects the thermal insulation materials and the room from accidental ingress of moisture. And sound insulation reduces the noise level from rain, hail and wind blows on the roof surface.
Phased construction of a mansard roof
Performing all the work on creating a roof for the attic requires some experience from the builders in this area. Unlike conventional pitched roofs, erecting a mansard roof with your own hands is somewhat more difficult due to the arrangement of angled windows in the roof itself and the broken structure of the slopes. To carry out the construction of a mansard roof with your own hands, you must adhere to the following stages of work:
Design

The first thing to do is develop a roof project. To do this, you can turn to specialists or, if you have a good command of a computer, do everything yourself in an architectural program. Also at this stage, all the necessary calculations of loads, the angle of inclination of the roof slopes, etc. are carried out. To do everything correctly, you should refer to such a document as SNiP "Loads and Impacts" for the necessary information.
Erection of a rafter frame
This stage of work is the most laborious, and in order for the mansard roof to be made with high quality with your own hands, the combined efforts of 3-4 people will be required. We begin the construction of the attic roof with laying and fixing the Mauerlats around the entire perimeter of the house, using a beam with a section of 100x100 mm.
Mansard roof construction photo:

After that, we install a frame for the attic room, the racks of which will also act as supports for the rafter structure. To do this, we use a bar with a section not less than the section of the longitudinal beams on which the racks will rest. First of all, we install vertical posts at the beginning and at the end of the building. We fix them to the longitudinal beams using special stamped metal corners and self-tapping screws. To facilitate all fastening work, we use a screwdriver. Now we put a jumper on top of the racks and fix it.

We pull the cord between the two resulting arches, and if everything was done correctly, it will be strictly along the horizon, if not, we will have to disassemble one of the arches, cut a little and reinstall it. Now, along the stretched cord, we install similar arches with a step that is provided for the rafters. We connect the resulting arches with jumpers, which we fix with stamped corners or nail plates.

Having assembled the frame of the future interior, we proceed to the installation of the rafters. We start with those that have the greatest angle of inclination and are on the same level with the frame of the attic room. There are no particular difficulties here. The rafter beam is cut to the desired calculated length, a groove is cut out at the base of the beam for installation on the Mauerlat, and the top is cut at a certain angle. After that, each rafter is installed in place and fixed to the main structure.

The next step is a little more difficult, as you will have to install the upper rafters. The difficulty lies in observing a certain angle and centering of the entire structure. To facilitate the task, you can first make a template from two long boards that will exactly repeat the future connected rafters. Using this template, cut the rafters on the ground and then set them in place. The installation algorithm of the rafters is the same as for the arches of the interior frame.

At the end of the installation of the truss structure, we nail the crate. For the lathing, both ordinary boards and sheets of plywood or chipboard can be used. This will already depend on the type of roofing materials.
Making an insulating cake
Having installed the rafters and lathing, we proceed to create an insulating layer. To do this, first of all, we lay a vapor barrier on the inside of the rafters and fix it to the rafters with staples. Next, we lay the heat-insulating material and carefully make sure that it lies close to the rafters and does not leave gaps. On top of the thermal insulation, in 50 cm increments, we fill the crate, which will hold all the thermal insulation on itself.

On the outside of the rafters, we lay a layer of waterproofing, which will protect against accidental penetration of moisture. Finally, we lay the roof over the waterproofing.
Mansard roof construction: video tutorial
The variety of ready-made attic roof projects is very extensive. They can be with or without windows, rounded or strictly straight, with one slope or several. But no matter what the roof of the attic is, its construction will require the knowledge and skills of a master of construction.