One of the fastest, easiest and most budgetary ways to carry out finishing work indoors is to install drywall on the walls. This building material allows in the shortest possible time to install a solid and rather versatile wall, due to which an absolutely flat surface of the main load-bearing partitions is formed, as well as to organize additional heat and noise insulation. And in order for you to succeed and the finished result exceeded all your expectations, we will tell you how to install drywall on the wall with your own hands.
Drywall for wall cladding - general information about the material
Drywall is a versatile material for wall decoration due to the following qualities:
- Availability;
- The ability to get an absolutely flat surface;
- Environmental friendliness;
- High resistance to external environmental factors;
- Ease of operation;
- Ease of installation;
- Possibility of spot repairs with the least cost of time and money.
In addition, drywall allows you to put noise insulation and all the communications you need in the empty space between the sheets and the rough coating. As for the decorative finish, you can cover such a wall with absolutely any material.
Important! Plasterboard allows you to design a variety of niches, shelving and arches right on the wall surface. This is a huge advantage of this material over others, which allows you to equip small rooms with minimal loss of free space.
Tools and materials that you need to work
To install drywall on a wall, you will need special tools and materials that will greatly facilitate the work process.
Tools:
- Screwdriver for attaching drywall to the grille and mounting the frame;
- Medium spatula;
- Notched trowel for spreading the adhesive over the surface of the sheets;
- Construction or office knife;
- Electric drill with perforator;
- Drills for concrete;
- Mixer attachment for mixing glue;
- Capacity for adhesive, about 8 liters in volume;
- Paint roller;
- Scissors for cutting metal;
- Plane;
- Grout for processing joints;
- Grinder;
- Cutter.
Drywall
In building materials stores, you can find different colors of drywall sheets. This is due to the fact that this material is produced taking into account the conditions of the room in which it will be used.
For example:
- Gray. It is used mainly in residential areas with normal humidity. It is designated by GCR.
- Light purple or pink. It is a heat-resistant material used for cladding stoves and fireplaces. GKLO designation.
- Green shades. Such drywall is used for wall cladding in rooms with high humidity, for example, a bathroom. Defined by the abbreviation GKLV.
- Blue or dark gray. This material immediately combines the properties of moisture resistance and heat resistance. It is used most often for finishing baths and boiler rooms, denoted by GKLVO.
Important! Drywall is best to take 10-15% over the amount you need.

Metallic profile
You will need the following types:
- Guide.
- Rack.
- Ceiling.
- Protective corner.
Additional consumables and accessories:
- Direct suspensions.
- Sealing tape.
- Dry mortar (in the case of frameless installation of drywall sheets).
- Primer for pre-treatment of walls and preparation for subsequent puttying.
- Plaster based putty for filling joints.
- Reinforcing mesh or tape.
- Self-tapping screws for working with drywall.
- Dowels for securing the racks.
- Thermal insulating material.
Installation of drywall on a wall in a frame way
This type of installation is considered the most common, since such a structure is more reliable, especially if you want to make decorative wall cladding with tiles.
Important! The only drawback of installing drywall on the frame is the complexity of the installation itself and the need to purchase additional materials.
In order to make it clearer for you, we have divided the further process of actions into three stages.
Stage 1. Building the circuit and markup
Before starting all work, it is very important to draw the future layout of the drywall sheets on the wall. Thanks to this action, you will be able to use the material more rationally and economically.
Important! Pay your attention to the fact that the wall is sheathed exclusively in a checkerboard pattern, and the sheets of drywall are laid strictly vertically. These details should also be indicated in the schematic drawing.
After you have drawn the location of the drywall on the wall, you should determine the future location of the metal profiles. The markup should be done as follows:
- Step back from the working surface so that you can easily lay insulation materials and communications. Drill screws in the corners.
- Attach a plumb line to one of the screws. Fix the same screw at the point of contact with the floor. Do the same with the opposite angle.
- Pull similar cords between the upper and lower screws and mark the base lines along which the supporting profiles of the frame will be laid in the future.
- Further, using the same principle, transfer the entire layout to the wall surface.
- Remove the screws after finishing work.

Stage 2. Installation of a frame from profiles
After you have transferred the markings to the walls, adhering to it, you can mount the drywall profile on the wall. The sequence of actions is as follows:
- Measure and, if necessary, cut the profiles to the desired length.
- Take the guide profile that you will mount to the floor and glue it with sealing tape. Secure it to the floor along the marked lines. The fastening step must be at least 1 unit per 60 centimeters.
Important! Please note that if the base of the floor is concrete, the holes for fastening should be prepared in advance, and for stronger fixation, use plastic dowels.
- Fix the ceiling guide profile in the same way.
- Now you can start installing vertical profiles. To do this, determine the center at the place where the profile will be fixed, install a suspension in it. Moving up and down from the center point, install the frame elements every 60 centimeters.
Important! Installation of vertical metal profiles should be started from the corner of the room.
- Insert the metal vertical profile simultaneously into the upper and lower profiles, placing it between the suspension petals. Check the level of its positioning accuracy, and then fix it to the suspension.
- Install the rest of the vertical profiles in the same way.
Important! If you plan to make decorative wall cladding with tiles, it is better to reduce the spacing of the racks to 40 centimeters.
- If the room has a window opening, install the lintel so that it is between the window sill and the vertical profiles. It will be the main bearing profile of the window opening. Install the frame in the same way near the doorway.
Important! In addition to the window and door opening, such a frame element should be installed at all joints. They should be fastened with rack profiles using “crabs”.

Stage 3. Wall cladding
Before fixing the drywall sheets to the wall, an insulating material should be installed.
Important! It is best to use foam, cork or mineral wool for these purposes. It should be laid in empty strips of a metal frame, while threading over the profiles and fixing with curved suspension legs.
Now you can proceed to the installation of drywall on the wall with your own hands. The sequence of actions is as follows:
- Install the bottom sheets on the wall with a gap of about 10-15 millimeters from the floor.
- Fix the drywall with a special screw.
- Sew the rest of the wall in the same way.
- At the end of work, putty all joints and clean the surface with an emery mesh.
That's it, the walls are ready for subsequent decorative coating!
Important! Pay attention to these tips:
- Fastening with self-tapping screws should be done in all racks and jumpers;
- The self-tapping screw should be at least 10 millimeters from the edge of the sheet;
- The step between the screws should be about 25-35 centimeters;
- If the self-tapping screw did not work out to fix, then you better remove the old one immediately, and screw the new one into the hole located in 5 centimeters increments.
Frameless installation method
This type of cladding is suitable for small rooms, since the fastening of drywall sheets to the wall is close. If you decide to use this technology, consider the fact that the method you have chosen has its own nuances:
- The height of the room should not exceed the length of the sheets. This is due to the fact that horizontal fastening in this installation option is unacceptable.
- If the curvature of the walls exceeds 5 centimeters, it will need to be pre-leveled before sheathing. Therefore, in this case, it will be more expedient to clad the walls with a frame method.
For wall cladding with drywall in a frameless way, you should adhere to the following scheme of actions:
- Prepare the base base. To do this, remove old wallpaper, paint and other debris from the wall surface.
- Prime the cleaned surface.
- Using a plumb line, measure the depth of the irregularities.
- Make a preliminary layout of the walls.
- Cut open sheets of drywall, cut holes for sockets and switches.
Now make the wall cladding directly. It can be done in three ways:
- If the unevenness of the wall is approximately 4 millimeters, drywall fixation can be done with plaster putty. To do this, using a notched trowel, apply adhesive mixture in the center and around the perimeter of the sheet. Next, the sheet should be lifted and pressed against the wall. Check the correct position with a spirit level and, using a rubber mallet, level the sheet vertically with light blows. Subsequent sheets of drywall are stacked closely without joints.
Important! If you plan to hang something on this wall in the future, then the sheet should be completely putty.
- This cladding option is used in cases where the curvature of the walls reaches 2 centimeters. Therefore, it is advisable to use a stronger adhesive for such surfaces. As for the plating process, in this case, glue is applied every 25-35 centimeters in the form of piles with a diameter of 10-15 centimeters and a height of 2-2.5 centimeters. The wall sticker process is the same as in the previous method.
Drywall in modern life is one of the most common finishing materials. It is gaining popularity due to the mass of positive qualities, with a small list of negative ones, and in the price category it does not hit the budget.
This material was chosen for the decoration of the premises, and the question of its installation arises. Mounting drywall on walls is not too difficult, but you can't call it simple either. There are two ways to fix drywall:
- Frameless way. The simplest, since it should not provide for the construction of a frame structure. Mostly, special glue is used for fastening.
- Frame method... Quite laborious, since it requires the construction of a frame base, on which drywall will be directly fixed.
Let's take a look at each method, its pros and cons, the installation process. And yet, let's decide how to fix drywall to the wall, and which method is better and more reliable.
What is this article about
Frameless way
The first method, and the easiest to execute, is frameless. To carry out cladding in this way, there are a number of necessary conditions, namely:
- The base for the attachment must be fairly strong. Any damage, fungal infection, etc. should be absent;
- The surface must be waterproofed and protected from freezing and moisture;
- The wall must be free of all kinds of debris, dust, layers of paint, wallpaper, etc.
- And, of course, no curvature, or have a slight curvature.
Here is a small number of features and factors that are directly important when using this mounting method.
Now let's look at what we need to fix drywall. Of course, after the question of how to attach drywall to the wall becomes a question, the question arises, what tool is needed and what materials, here is the main list:
- These are wall plasterboard sheets. This is our main material to work with;
- Plaster mix. Useful for sealing joints, roughness and unevenness of the wall;
- Of course, you need a container to prepare the solution;
- A jigsaw, or ordinary, is better, of course, electric;
- A knife is a blade, in the common people a painting knife;
- A rubber hammer is useful for leveling the sheets;
- A natural attribute for all work is the building level, fishing line and tape measure;
- Rule;
- And the last tool on our list is the spatula.
The list of instruments is complete. Now, having prepared them, you need to proceed directly to the installation of drywall on the walls. And consider the order of work.
The procedure for performing work to sew up the wall with drywall in a frameless way.
Step-by-step instruction
On this, the installation of a drywall structure in a frameless way can be considered complete. We are waiting for everything to dry, putty the seams, install the skirting boards, and you're done.
Frame installation method
It's time to consider the second method of plasterboard wall cladding. Wireframe method. It is, of course, more time consuming, complex and costly, but it has a number of advantages over the previous method, let's see how this design is better:
- When installed in this way, the heat and sound insulation of the room increases;
- Unlike the frameless method, it does not require much attention to surface preparation;
- Allows you to eliminate the global curvature of the walls;
- It is used without problems in damp and freezing areas, for their protection and insulation.
Let's see what a wireframe connection looks like:

As it has already become clear, for the installation of such a structure, it is necessary to provide for the installation of the frame, to which the plasterboard sheets are subsequently fixed. There are only a few material options for creating a frame base:
- Wooden frame. Quite cheap, but short-lived when mounted on a freezing or damp wall, as it quickly corrodes.
- Galvanized profile frame. More expensive, but at the same time durable, easy to operate, working with it is many times easier than with a wooden frame.
We will stop considering this type of fastening on the use of a galvanized profile. Here you can read about fastening a plasterboard to a wooden crate.
Materials and tools
Of course, there are a number of tools and materials that will be needed during installation, and let's get to know them:
- The main material, as was, and remains the wall drywall.
- The next thing we need is either wooden profiles or galvanized metal profiles (we opted for galvanized ones).
- To secure the frame, you will need metal suspensions
- The hangers themselves must, of course, be fixed to the wall, and screws and dowels will help with this.
- Of course, you cannot do without a drill and a hammer drill for preparing the holes for fasteners.
- A putty is useful for sealing joints, and of course a spatula.
- The profile will need to be adjusted to the desired size; either a grinder or metal scissors will help with this.
- To check the evenness of the surface, you need a level and a plumb line.
- During work, everything needs to be measured and, of course, you should use a tape measure.
- And the last on our list is a screwdriver and self-tapping screws, where can we do without them if you need to attach something.
Step-by-step instruction
We figured out the tool, and now it's time to move on to performing the work on fixing drywall directly. When installing drywall sheets in this way, there are a number of features, so you need to strictly know the algorithm of work, and follow it.
And here is the algorithm itself, step-by-step instructions for performing the work:
- The first step is to take measurements of the room, measure the required amount of material, and calculations associated with this data;
- Further, the marking of the location of profiles and suspensions is carried out;
- Then we fix the profile, horizontally guides (to the floor and ceiling), vertically side, and then also vertically with a step of 50 centimeters bearing;
- The suspensions, in turn, are placed at a distance of 70–80 centimeters;
- Thus, the frame is almost complete. It remains to securely fasten everything and check the fasteners. After that, you can proceed directly to the installation of drywall sheets;
- First of all, we provide for a heat-insulating layer, which is made of glass wool, arranging it between the profiles;
- Now we can proceed directly to fastening the sheets. We arrange a drywall sheet, check the evenness of the surface, and then screw the sheet to the profiles with self-tapping screws, while screwing it in so that the screw head is hidden in the sheet 2-3 millimeters deep;
- The first sheet is ready, in the same way we mount the following sheets, do not forget that it is necessary to mount drywall so that the seams go with an offset, and there are no cross joints;
- After installing the drywall directly, you should deal with the seams, they need to be putty. Holes from screws are also subject to putty, since they also need to be hidden.
So the second method of securing has come to an end. In fact, it is used in most cases to quickly level the wall surface, since installation is not very expensive, and generally levels the surface, which gives the wall a new life.
Thus, there are two types of the main methods of plasterboard cladding, and you now know about them, and then, which one is more suitable for your room, the choice is strictly yours. I would only like to note that with the usual preparation of the wall for decoration, you can use the first method, but with large irregularities, dampness, and freezing, the second is more suitable.
Sheathing the surface with gypsum plasterboards is the installation of plasterboard. This is perhaps the fastest way to level the surface, and certainly the most inexpensive. This process goes before finishing - that is, plastering, painting, wallpapering will be after the walls are sheathed with plasterboard.
To mount the sheets correctly, you need certain tools and equipment. If something is not there, you will have to buy it, borrow it from friends or rent it. But do not try to save money and do without something: the installation process will not be so comfortable and the work may be delayed.
What you need to install drywall:
- Laser level;
- Level;
- Plumb line;
- Pencil;
- Roulette;
- Dyeing lace.

These tools are needed for marking.
To make the frame, you will need a puncher, a hammer, a grinder, pliers, metal scissors, and a screwdriver. Well, to work with drywall sheets, you need a hacksaw, a rail, a plane and a sharp knife.
You also need to worry about high-quality sealing of holes from screws, corners and joints of plasterboard boards. To do this, you will need spatulas, containers for creating mixtures, and also a grater with sandpaper. Rollers and brushes will also come in handy.
What options are there: drywall installation technology
In modern technology for the installation of gypsum plasterboard sheets, two main methods are distinguished - this is a frameless (adhesive) option and a frame method.
This is not to say that some method is many times better, if you do not break the rules and choose the method that is optimal in this particular situation, then the result will be equally good.

Frameless way of laying gypsum boards:
- For this method, the wall covering should not exfoliate, it can be dry and dust-free, as well as unpainted with oil paint or enamel;
- Thermal insulation and the adhesive method do not exist together, therefore insulation is possible only with foam;
- And the advantage of the frameless method is that it provides excellent sound insulation from structure-borne noise, you do not need a lot of tools, and there is not so much distance from the front surface to the base.
The frame method, as you might guess, involves cladding over the frame, most often metal. This method is suitable for more complex work if you are creating a multi-level ceiling or, for example, an arch. Despite the laboriousness of the process, the instruction for implementation itself will not be overwhelming.
Layout for drywall: installation of gypsum board
Surface marking is a mandatory step. Do not make a fatal mistake by jumping over this repair point. There is a certain sequence of markup, which, as they say, has its own secrets.
The layout of the walls is carried out as follows:
- Measure a distance of 5 cm from the corner, draw a vertical line on the adjacent wall;
- Draw a line on the opposite wall in the same way, and using an ordinary long rail connect these lines on the floor and on the ceiling;
- Then, from the corner of the wall, mark vertical lines at a distance of about 60 cm, and then in a checkerboard pattern make marks every half a meter - this will become a place for mounting the mounting suspension;
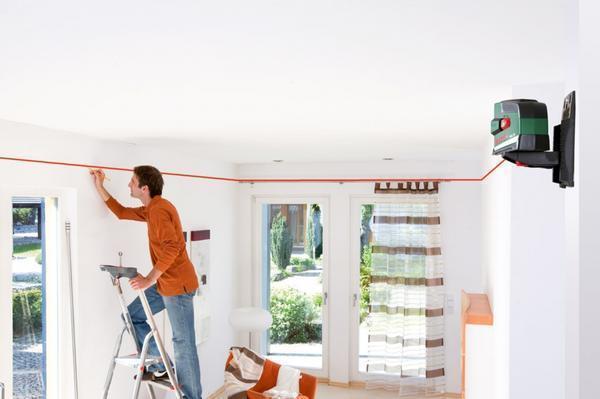
- Mark the horizontal level of the room with a hydro level, or better with a laser level; put small marks in the inner and outer corners, in each corner measure the distance from these marks to the ceiling, and make a mark with the value of this distance.
The last step is necessary in order to find the lowest point of the ceiling. And this is important, because with frame installation, the ceiling will drop at least 4 cm from its lowest point. The found height should be noted in each corner, and all the resulting marks are connected, getting the horizontal level of the room.
How to cut correctly: how to install drywall

You need to first mark the plasterboard sheet, then cut one layer of paper with a well-sharpened knife along the marked line. Then break the sheet so that the gypsum base breaks along the cut. Hold the two halves of the sheet at a right angle, cut the paper layer on the back.
You will probably have bumps in the ends, paper will stick out - this is corrected with a drywall plane or a sandpaper float. As a result, you will get a piece of drywall sheet of the desired size with smooth, neat edges.
Frame method: drywall, DIY installation
After installing the metal frame, you can proceed to. For both the walls and the ceiling, one mounting method will be valid. It is necessary to put the sheet close to the finished frame so that one edge of the plate is located close to the wall. Plasterboard sheets are attached to the profile with self-tapping screws.

Very important:
- When carrying out work, deepen the self-tapping screw so that the top does not protrude, but at the same time there was no very deep fit of the fastener either;
- If the cardboard top layer breaks, the fastener will relax;
- The interval between screws is approximately 25 cm;
- If the height of your ceilings is greater than the dimensions of the GKL canvas, you will have to fix the intermediate profile.
All parts of the sheet must be fixed, otherwise the joint will certainly crack. In this case, start up the subsequent panels in a checkerboard pattern with a breakdown according to the scheme: a whole plate from below - a cut from above - vice versa. So you can achieve the reliability of the entire structure.
Seam treatment: drywall, work on the nuances
When the installation is complete, process the joints of the sheets and putty the grooves from the fasteners. For the processing of joints, a gypsum mixture is usually used - when it dries, it forms a durable material. Bevelled edges must be primed.

Next - glue a reinforcing mesh on all joints with the factory edge. If one or both of the edges of the sheet are chamfered, the mesh must be cut along the chamfer, not allowing it to go out of the plane. The reinforcement mesh should always be in the middle of the filler.
Approximately 60% of the total volume of the groove is filled with the first layer of putty, then the mesh is immersed in the putty and smoothed out. And then the remaining volume of the depression is filled. Do not forget to putty on the groove from the self-tapping screws. Don't worry if you see the putty pull in a little after it dries - this is normal. Well, with the finishing putty, you will finally process the grooves.
Drywall installation process (video)
Standard installation of drywall can be done according to video tutorials, which show all the details of the process - from the "acclimatization" of drywall to the installation of a junction box. The glue method is used less often, but the frame method allows you to fix the problem of any curvature of surfaces, and the field of application of this method is much wider.
Happy repair!
At the moment, installing drywall is one of the most economical solutions for repairing an apartment or a private house. With the help of this building material, you can easily get rid of defects in walls or ceilings, achieving a perfectly flat surface. It is also effective as a building material from which arches, boxes for masking communications and other decorative elements can be made. In this article, we will consider the technology of its attachment to walls and ceilings.
Features of the material and its application
To begin with, let's figure out what this building material is and what characteristics it has. Drywall consists of three layers: two outer (made of special cardboard), and inner (made of gypsum with additives). Product weight in standard sizes can be up to 30 kg. Depending on what additives are used in production (hereinafter - gypsum plasterboard, gypsum plasterboards), there are:
- Plain gypsum board,
- fire-resistant - GKLO,
- moisture resistant - GKLV.
The most widespread are ordinary sheets, which are used when working on the walls and ceiling of the room being repaired. Moreover, for different elements, the material is suitable for its thickness. For example, fixing drywall to the ceiling implies the use of building materials with a thickness of 9-9.5 mm, for walls - 12.5 mm, for decorative elements (arches, etc.) - 6 mm. The easiest way is to install drywall walls - fastening can even be done by one person. Read about how to do this in this article.
Any installation technology implies the use of special fastening profiles. There are several separate types of profiles:
- ceiling
- wall
- rackmount
- guides.
As a rule, the maximum length of such profiles does not exceed 4 m.
Preparatory work
Preparation for the installation of sheets is a crucial stage of work, on which the future of the planned repair depends. Preparatory work includes the selection of the tools necessary for carrying out the installation procedures, as well as an assessment of the working surface on which the sheets will be mounted.
Installation tool
Since the installation of drywall sheets requires extreme precision, such items as a level, tracer, square, tape measure, pencil are necessary among the tools. Such a set will allow you to accurately determine the places for the profile attachments. We also need a perforator, metal scissors, a special plane and a drywall knife, a screwdriver (how to fix drywall without such a convenient tool? Read about it) - they will allow you to securely fix and refine the finish surface.

Assessment of the condition of the working surface
Before starting the cladding, regardless of which surface it is mounted on, a thorough inspection of the plane is carried out. Of great importance is the composition of the building material from which the walls or ceiling are made, as well as the humidity of the air, which will subsequently be established in the room. After assessing the situation, a specific type of finish and suitable fasteners are selected. For living quarters, standard materials are best suited; for bathrooms or basements, characterized by high air humidity, they are moisture resistant. For the arch, you need to choose a special - arch material!
Selection of fasteners
When installing on a stone surface (concrete, brick, etc.), fasteners such as dowels are used (usually for such types of work, their length reaches 40 mm, and their diameter is 6 mm). For fasteners on surfaces made of less dense materials (for example, silicate blocks, etc.), drywall installation is carried out using dowels with a large diameter and length (8 x 80 mm). Self-tapping screws are used for wood surfaces.
Preparing a work surface for mounting drywall
At this stage, the main work is to measure the parameters of the base surface for installing the structure, on which the sheets will subsequently be attached, as well as marking it for the fastening suspension.
Ceiling markings
Regardless of whether we are going to make a plasterboard ceiling or a wall, before fastening it is necessary to carefully mark the surface, prepare it for the installation of the profile. Considering that ceilings are far from always perfectly horizontal (moreover, builders often lay slabs with a slope), it is necessary first of all to find the lowest ceiling angle. To do this, using a tape measure, the distance from each corner of the ceiling to the floor is measured (you can simply by level). Having decided on the lowest point of the ceiling, you can proceed to further work. By the way, it is the lower part of the ceiling that will serve as the starting point when lowering the plasterboard ceiling. When you have decided on the height of the ceiling, it's time to mount the profile around the perimeter (as a rule, UD 27 is preferred, but for different rooms it is advisable to use a profile type of different size) at a distance of at least 4 cm from the base ceiling. After that, you can start marking for the fastening suspension.

Wall markings
The wall is marked in the same way as the ceiling. There are only a few nuances: the perimeter profile is set at a distance of at least 5 centimeters from the wall, and the distance between the marking lines is not 40 (as for the ceiling), but 60 centimeters. As for the placement of marks for mounting the mounting suspension - the same as for the ceiling. If you plan to make a niche in the wall, then this must be taken into account when marking the wall.

Fastening hangers and profiles
Drywall mounting technology involves the use of mounting hangers (ES or others), as well as spokes with a swivel hanger and eyelet. We will consider exactly ES suspensions. We will assume that we have already installed all the suspensions on the ceiling (wall) at strictly marked points. Using scissors for metal, we shorten the CD profile along the length of the lines drawn on the ceiling, but shorter by about 10 mm. These profiles are inserted into the previously installed UD profile around the perimeter and oriented inside the ES fixing hangers. Here it is important to achieve the exact horizontal position of the CD profiles. Use the level to adjust. We fix the CD profile using small metal screws, bend the extra edge of the ES suspension. To reinforce the base, you can additionally connect our parallel CD profiles with crab fixings using specially cut pieces of the CD profile (40 and 60 centimeters long - for the ceiling and wall, respectively).
If the parameters of the room are such that the standard dimensions of the sheet do not fit, you need to cut it to give it the necessary parameters. For this, a knife is used, the edges of the cut are additionally processed with a special plane. It should be understood that the location of the CD profile on the surface should be such that all the edges of the drywall sheets fall on the profile. This is one of the most important mounts, so this recommendation should not be neglected. So, we can say that the frame is ready.
Installation of gypsum board
Once again, we check the parameters of the frame for the installation of drywall sheets. After that, we fasten them with self-tapping screws for metal with a length of 25 mm. In this case, you need to adhere to a simple rule: the distance between the fasteners is no more than 25 centimeters, and the self-tapping screw must be screwed in perfectly (the cap does not protrude and is not deeply embedded in the finishing material). Next, putty is carried out to give the seams and screw-in places of self-tapping screws a perfectly even look. For the putty, special compounds are used, as well as a serpentine film, which improves the adhesion properties of the putty and facing. Only then can we say that the sheets are finally installed and ready for subsequent decoration. Also for wet rooms, laying tiles on drywall is relevant, which we talked about in detail.
| Name of works | Cost of work per 1 m2, rub. | Cost of materials for 1 m2, rub. | Total, rub. |
|---|---|---|---|
| Plasterboard partitions | |||
| with lining in 1 layer on each side | 420 | 400 | 820 |
| with cladding in 2 layers on each side | 520 | 530 | 1050 |
| Wall cladding with plasterboard | |||
| in 1 layer on a metal frame | 300 | 300 | 600 |
| in 2 layers on a metal frame | 350 | 380 | 730 |
| Plasterboard ceilings | |||
| in 1 layer, on a metal frame | 420 | 300 | 720 |
| in 2 layers, on a metal frame | 500 | 370 | 870 |
Often there is a need to align the walls in the apartment. One of the simplest and most affordable means is to install drywall, and by doing it yourself, you can significantly save your family budget.
Material selection
Types and purpose of drywall
Before starting directly to work, you need to decide on the required material.
In any good hardware store you will be offered a choice of 4 types of drywall, this
- GKL - normal gypsum plasterboard gray with black or blue marking lines, which is suitable for normal dry heated rooms. It is used for both walls and ceilings. The thickness is 6 mm, 9 mm, 12.5 mm. For walls, ceilings and partitions, it is recommended to use sheets with a thickness of 12.5 mm. Other sizes are for arched, curved structures and radius surfaces.
- GKLV - moisture resistant gypsum plasterboard green with black or blue marking lines. The manufacturer adds antifungal impurities to the gypsum itself, and the cardboard coating is made moisture resistant. This type of drywall is used to decorate rooms with high humidity ( ex .: bathroom).
- GKLO - fire-resistant gypsum plasterboardred with black or blue marking lines. It contains reinforcing components in gypsum that increase resistance to open flame. It is used for finishing industrial premises, ventilation, attics, electrical panels.
- GKLVO - moisture-resistant and fire-resistant gypsum plasterboardgreen with red markings. It combines the properties of GKLV and GKLO. It is used for finishing industrial premises with high humidity and with increased requirements for compliance with fire safety standards.
Drywall edge types:
- PK, SK - transverse cut edge of gypsum board, not pasted over with cardboard;
- PK, VK - rectangular longitudinal edge for dry installation without filler joints;
- ЗК - rounded edge. It is used when using dry plaster without serpyanka;
- FK - transverse cut edge, intended for filling joints without reinforcing tapes with an open gypsum core;
- UK, AK - beveled (crimped), thinned edge, intended for pasting with serpyanka and putty of seams;
- PLUK, HRAK - semicircular, beveled in length (thinned) edge, for pasting with serpyanka and putty of seams;
- PLC, HRK - semicircular longitudinal edge, designed for filling seams without serpyanka.
Advice: choose drywall with UK and PLUK markings in order to avoid the formation of protrusions due to which the layer of putty increases during finishing!
What to look for when buying drywall:
- drywall is supplied to the store in packs, the bottom sheets in which are packing and have, most often, a thickness of 12 mm. They are necessary to prevent damage to the main sales sheets. Negligent sellers, trying to make money, sell them, although they are defective and must be recycled;
- all corners must be intact, without traces of crumbling, cardboard must not be damaged;
- sheets should be stored in dry warehouses in a horizontal position;
The choice of profiles for the frame
For the installation of walls or the construction of drywall partitions, the following types of profiles are used:
- PS (CD) - rack profile... They are used as vertical frame racks. The size range of such a profile:
- 50/50-a * b \u003d 48.8mm * 48.5mm;
- 65/50-a * b \u003d 63.8mm * 48.5mm;
- 75/50-a * b \u003d 73.8mm * 48.5mm;
- 100/50-a * b \u003d 98.8mm * 48.5mm.
Installation of the rack-mount profile is carried out in a guide profile of the appropriate size;
- MON (UD) - guide profile... It is used mainly around the perimeter of the wall. The size range of such a profile:
- 50 / 40-48.8 * 38.5mm;
- 65 / 40-63.8 * 38.5mm;
- 75 / 40-73.8 * 38.5mm;
- 100 / 40-98.8 * 38.5mm;
- 28 / 27-28 * 27mm;
- 28 / 18-28 * 18 mm.
- As a rack profile, they are very often used ceiling profile PP, it is produced in only one size - 60x27 mm, therefore PN 28/27 is used with it. The PS profile is used mainly for the construction of partitions.
Advice: When buying a profile, you should pay attention to its quality. The profile should be chosen rigid, this will increase the quality of the work performed 
U-shaped hangers are used to fasten the rack profiles to the wall.


Calculation of the required material
Before going to a hardware store, you need to decide on the amount of material that you need.
Calculation of drywall
To buy drywall, you need to calculate how many sheets we need, for this we do the following:
- we calculate the area of \u200b\u200bthe wall or walls that you are going to sew up by multiplying the height and width of the walls;
- if there are door or window openings, we calculate their area and subtract from the total area of \u200b\u200bthe walls;
- Since during work there are always unsuitable pieces from trimming, it is necessary to add another 10-15% to the resulting final area;
- when sheathing a wall in two layers, multiply the resulting number by two.
Calculation of profiles
To calculate the number of profiles, you can use the following sequence:
- Measure the height and length of the wall on which we will mount the frame.
- The number of guides (UD) is calculated by the formula: (wall height * 2 + length * 2) * 1.2 (correction factor) / 3 (length of one UD) \u003d the sum of the profiles, which is rounded up.
- We calculate the number of rack (CD) profiles using the formula: (length of the room in centimeters / 60 centimeters) * 1.2 (correction factor) -1 \u003d the number of CD, which is also rounded up.
- The sum of U-shaped suspensions is calculated by the formula: number of CD * 5.
Fastener calculation
 The calculation of the number of self-tapping screws for drywall is performed as follows:
- if the wall is sewn up in one layer, then the sheets are screwed in with a step of no more than 25 cm with self-tapping screws 28 mm long;
- if the wall is sewn up in two layers, then the first layer rotates in 60 cm increments with 28 mm self-tapping screws, and the second layer in 25 cm increments with 35 mm self-tapping screws so that they reach the profiles;
- based on the size of a standard drywall sheet (1200mm by 2500mm), we get an approximate number of self-tapping screws (do not forget to add 10-15%) - 1st layer - 16 pcs. per sheet, 2nd layer - 35 pcs. per sheet.
 The calculation of the number of dowels for attaching the guide profile and U-shaped hangers is carried out as follows:
- the length of one guide profile in centimeters (300cm) is divided by the recommended mounting step of 40cm, not forgetting to add 10-15% to the resulting number for the stock and the final number is multiplied by the number of the PN profile being purchased;
- for each U-shaped suspension there are 2 dowels.
Standard dowels are used with a size of 6x40 mm, with a mushroom head.
Quantity calculation  self-tapping screws (press washers) for fastening the rack profile is carried out as follows:
- if the rack profiles are not spliced \u200b\u200b(wall height<3 метров), то количество прессшайб около 4 шт. на профиль, без учета крепления к П-образному подвесу на который приходится ещё по 2 прессшайбы на 1 подвес;
- if the rack profiles are spliced \u200b\u200b(wall height\u003e 3 meters), then the number of press washers increases to 8 pcs.
Required tools

You can read more about all the tools in the article
Layout and installation of the frame
Before marking and installing the frame, you need to prepare the workplace. If there were wallpapers on the walls before, then it is advisable to peel them off, and soak the wall with an antifungal primer, but if the room is dry and without variable humidity, this stage can be skipped.
Sequence of work:
- find the most protruding part of the wall and project it onto the floor, retreat the width of the guide profile from this point and use a laser or lace to mark along the entire wall.
Advice:Perfectly right angles between walls in rooms are rare. Especially in old buildings. The distance between them at different ends may differ by several centimeters. When marking the future frame, you should take this into account and bind not to one wall, but to two parallel ones. The distances are then averaged. This will avoid the visual curvature of the resulting room.
Having made the first line on the floor, you can transfer it to the ceiling and walls. For this, you can use a plumb bob or a laser level, this will greatly simplify the task.
If there is an assistant, then by inserting a rack profile, cut to the height of the wall, into the guide, using the building level, you can transfer the point from the floor to the ceiling.
When all the lines are drawn, you can proceed with the installation of the guide profile. All profiles that are attached to existing structures are mounted using a sealing tape between it and the supporting surface. The first are the profile guides to the floor and ceiling. They are fixed with dowel-nails every 40-50 cm and along the edges. 
After installing the guide profile, the rack-mount ones are set, at a distance of 60 cm from each other, measured from the centers of the profiles. The length of the rack profile should be 1-1.5 cm shorter than the height of the wall, otherwise it will be energized and give an uneven wall surface.
Advice: masters do not recommend leaving drywall strips less than 10 cm, so if the length of the wall is not a multiple of the number of drywall sheets and just a strip of 10 centimeters or less remains, then the first and subsequent profiles should be shifted so that sheets in width lie down from the edges of the wall more than 10 cm (preferably 30-40 cm).
When all the rack profiles are exposed, it is necessary to strengthen the structure with U-shaped suspensions, making sure that all the profiles remain in the same plane.

After fixing the suspensions, we set the jumpers between the rack profiles in 60 cm increments.

In order to save material, sometimes not all jumpers are installed, but only at the level of possible future loads according to the knee-belt-shoulder rule.
The lintels are made from the same profile as the frame posts. I use crabs to attach them to the racks, but most often they use self-tapping screws. To do this, the rack profile is cut into 60 cm and on each edge the side walls are cut off with 4-5 cm scissors to form an ear which is attached to the rack profile with press washers.

If you plan to insulate or soundproof the wall, as well as the wiring of all the wiring is done before fixing the drywall sheets to the frame.
After installing all the jumpers and all additional operations, you can proceed to fixing the drywall to the frame.
Installation of drywall on the frame
The fixing of drywall should be staggered so that there is no joining line along the entire wall, along which a crack can go during the operation of the room. If the wall is sheathed in two layers, then the seams of the first layer should also not coincide with the seams of the second layer. 
You should start attaching the sheet to the profile from the middle, gradually going to the edges or from one corner to another, in order to avoid loose adhesion of the sheets to the frame. The recommended step of fastening with self-tapping screws is not more than 25 cm.
The gap between the sheets and the floor should be within 10 mm, to avoid warping of the sheets by the floor covering during its free movement when walking.
The sheets should not fit snugly against each other, there should be a gap of 5 mm between them. 
At first, you can wind only whole sheets, and leave the trimming for later, so you will save yourself time without constantly switching to different operations.
Self-tapping screws must be screwed into the drywall at right angles. The caps of the self-tapping screws must be completely recessed into the sheet, this is necessary for the smooth further puttying of the walls.

After the entire wall is sheathed with drywall sheets, at all non-factory joints we cut off the chamfer at an angle of approximately 45 ′ (on each side of the joint we cut off the gypsum at an angle of 20-22 ′). This is necessary so that after the wall putty, the joints are not noticeable.

You can watch the approximate work on the installation of plasterboard walls in the following video:
Finishing the wall
After finishing the installation of drywall on the frame, you can proceed to finishing the wall, which consists in filling the surface of the entire wall.
Before puttingtying, it is necessary to prime the entire wall, special attention should be paid to the joints of the plasterboard sheets.
First of all, all the seams of the head of the screws on the wall are filled with putty, after it dries a little, we close the seams with a serpyanka or fiberglass. After that, we putty the seams over the serpyanka, and then go to the entire plane of the wall. After the putty has completely dried, it must be primed again to perform the following work, whether it be painting or wallpapering. You can see how to perform wall puttying work in this video:
You can learn more about plastering drywall walls from our articles on the site.
If you still have questions about working with drywall, you can ask them in the comments.