If earlier you or your acquaintances used the services of firms for the installation of double-glazed windows, then you know that the installation can be normal and in accordance with GOST. The second option is more expensive, but if all the requirements are met, then the quality will be much higher than in the first (for more details about the norms, see GOST 30971-02).
Consists of several stages.
Note! The manufacturers do not give a guarantee if the measurements were not carried out by their employees. If installed incorrectly, the windows will soon begin to freeze, and if even the slightest mistake was made in the calculations, then the structure simply will not enter the opening.
Nevertheless, if you study all the subtleties of the process, then there will be no difficulties during installation. Moreover, you can save a decent amount of money this way.
Video - Installation of PVC windows in accordance with GOST
Stage 1. Measurements
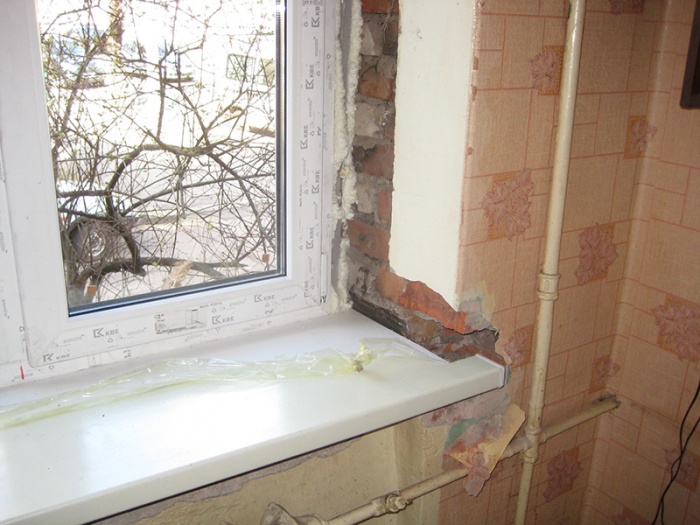
In most apartments, there are openings without a quarter.
Note! The quarter is a 6 cm wide inner frame (or ¼ brick, hence the name), which prevents the window from falling out and strengthens the structure as a whole.
If there is no quarter, then the frame will be installed on the anchors, and the foam will be closed with special cover strips. Determining the presence of a quarter is quite simple: if the inner and outer widths of the frame are different, then there is still a quarter.

- First, the width of the opening is determined (the distance between the slopes). It is recommended to remove the plaster to make the result more accurate.
- Next, the height is measured (the distance between the slope above and the window sill).
Note! Measurements need to be repeated several times and take the smallest result.
To determine the width of the window, two mounting gaps are subtracted from the width of the opening. To determine the height, the same two gaps plus the height of the profile for the stand are subtracted from the height of the opening.

The symmetry and straightness of the opening is checked, for which a mounting level and a plumb line are used. All defects and irregularities must be indicated in the drawing.
To determine the width of the drainage, add 5 cm for the bend to the already existing drainage. Also, the width of the insulation and cladding is taken into account (subject to the subsequent finishing of the facade).

The dimensions of the window sill are determined as follows: the size of the departure is added to the width of the opening, the width of the frame is subtracted from the obtained figure. With regards to the departure, then it should overlap the heating radiator by a third.
Note! are measured at the end of the installation.
Stage 2. Order
After measurements, the finished drawing should be referred to the window manufacturer, where all the necessary fittings will be selected. It is worth remembering that installation can be performed in one of two existing ways:

In the first option, you will have to pull the bag out of the frame, insert it into the opening and install the glass back. In the second case, the entire structure is attached as a whole. Each option has its disadvantages - if you pull out the package, then it can; and vice versa, if the window is put assembled, then it can be damaged due to its heavy weight.
Prices for the popular line of windows
Stage 3. Preparation
This stage of installation begins only after the delivery of the ordered windows. First, the workplace is vacated, all furniture is covered with plastic wrap (there will be a lot of dust).


Step 1. If required, a double-glazed window is removed from the window. For this, the glazing bead is slightly pry off with a staple and pulled out. First of all, vertical glazing beads are removed, then horizontal ones. They must be numbered, otherwise gaps will form after installation.


Step 3. The bolts are unscrewed after the plugs are removed from the awnings. The handle is turned to "ventilation mode" (in the center), the window is opened slightly and removed. Only the frame with imposts remains.
Note! Mullions are special jumpers intended for dividing the sashes.
Then you need to make a markup for the anchors and make holes along it - two from the bottom / top and three on each side. This requires anchors ø1 cm and a drill of the required diameter.
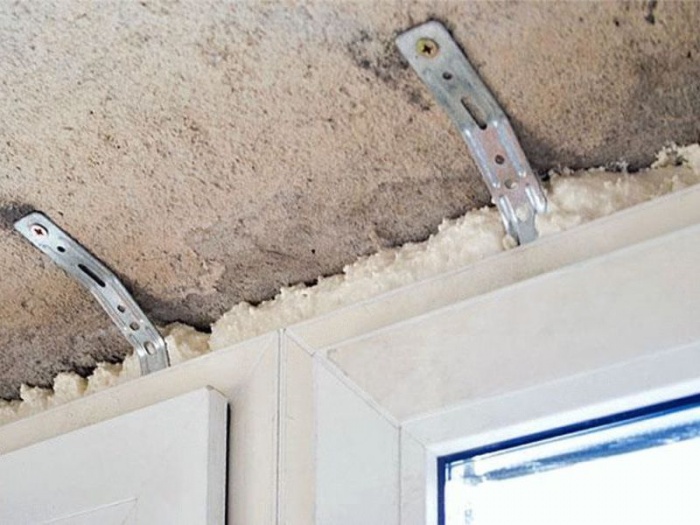
If the material from which the walls are made is loose (for example, cellular concrete), then the fastening is performed using anchor suspensions. The latter should be fixed to the wall and frame with hardened self-tapping screws (eight pieces each).
Note! To avoid the formation of a thermal bridge in the window sill profile, it should be filled in the day before installation. So the element will not freeze.
Stage 4. Dismantling work
This procedure is recommended to be carried out immediately before the installation of a new window. In most cases, the old ones are thrown away, so the structure can be torn out together with the mount, and, if necessary, the frame can be sawed.


Step 1. First, the sealant and thermal insulation are removed.
Step 3. The window sill is removed, the cement layer under it is peeled off.
Step 4. The adjacent surfaces are treated with a primer (by the way, many installers forget about this). In the case of a wooden opening, a layer of waterproofing material is laid around the perimeter.


Note! Installation can be carried out at a temperature not lower than -15ᵒС. The polyurethane foam must be frost-resistant.
Stage 5. Installation of a plastic window

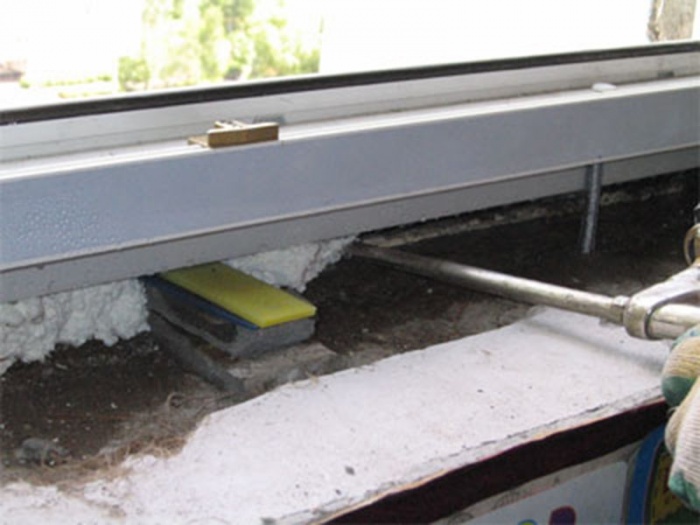
Step 1. First, wooden wedges are placed around the entire perimeter, a window is installed on them (this will make it easier to align the structure), only after that it is attached to the wall. The underlays can be left as additional fasteners.


Step 2. The absence of a support profile can be considered a gross violation of GOST standards, since it is not only needed for stability, but also makes it possible to install an ebb with a window sill. In the absence of a profile, they are attached directly to the frame, which violates its tightness.
The correct position of the stand profile is shown in the diagram.

Step 3. Next, the evenness of the window is checked in three planes, for which a mounting level and a plumb line are used. Typically, traditional bubble levels are not suitable for this due to insufficient measurement accuracy, so it is better to use.


Step 4. If the window has risen evenly, then it is fixed with anchors. To do this, a wall is drilled with a perforator through pre-prepared holes in the structure (about 6-10 cm). The lower anchors are fixed (not completely), the evenness of the package is checked again, after which the remaining points are attached.
Note! The final screed is made only after the final check. Do not tighten too much, otherwise the structure will "skew".
Prices for polyurethane foams and nail gun cleaners
Polyurethane foam and nail gun cleaners
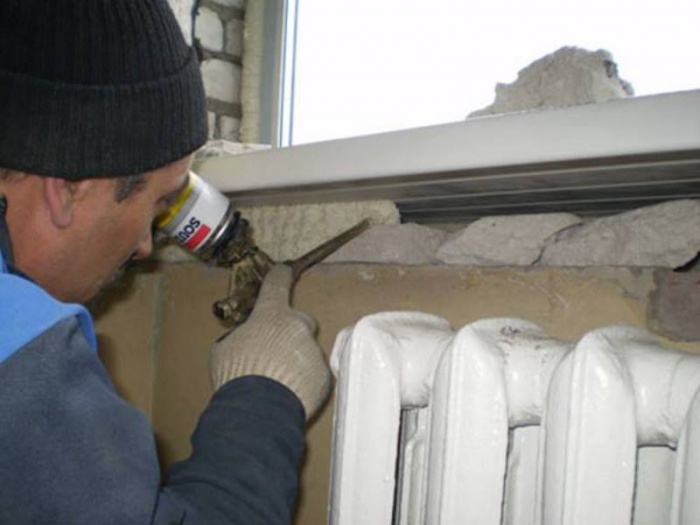
Stage 6. Drainage

Outside, an outflow is attached to the support profile with self-tapping screws. The joints are carefully sealed with sealant to prevent moisture penetration into the structure.

The edges of the low tide are recessed into the walls by several centimeters, having previously made recesses using a perforator.
Note! The bottom slot is also sealed before installation.
Step 7. Assembling the window


After fixing the anchors, the glass unit is inserted back.
Step 1. The glass is inserted and fixed with glazing beads (the latter should snap into place, for which you can lightly tap them with a rubber mallet).
Step 2. The leaves are opened, their tightness is checked. In the open position, arbitrary opening / closing of the sash cannot occur if the window is installed level.
Step 3. The assembly seam is closed on the sides. Polyurethane foam will provide high-quality waterproofing and prevent glass fogging. Before and after sealing, the joints are sprayed with water to improve polymerization.
Note! The seams are filled no more than 90%, otherwise the structure will "lead". If done correctly, the foam will come out a few centimeters after drying.
Step 4. The perimeter of the window is glued with a special vapor barrier tape, and a material with a foil surface is used from below.
Stage 8. Installation of the window sill

Step 1. The sill is trimmed so that it fits into the opening and at the same time rests on the lining profile. There remains a small gap (about 1 cm) for thermal expansion. In the future, the gap is hidden by plastic
Step 2. Wooden wedges are placed under the windowsill. It must be laid with a slight slope towards the room, and then applied with something heavy for a while, until the foam dries. Additionally, the window sill can be fixed with anchor plates.

Video - Installation instructions for plastic windows
conclusions
Now you know how plastic windows are installed, so you can safely get down to work. The final check of all elements can be carried out only 24 hours after the end of installation (then the foam will already "set").
The described technology is quite applicable to, although there are also some nuances - such, for example, as installing a parapet to create a partition.


Find out how to do it right in our new article.
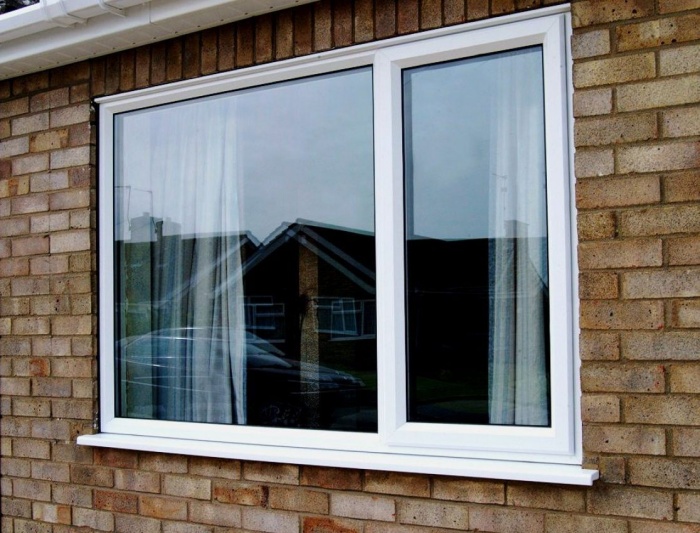
Relatively recently, all residential buildings had ordinary wooden windows, which had to be glued over for the winter. Today it is almost a relic of the past. And most people tend to replace such windows with modern plastic window structures, and they are especially interested in installing plastic windows with their own hands.
Such a desire of the consumer is quite understandable - plastic windows have not only an aesthetic appearance, but also serve as an interior decoration. They are also much easier to operate, serve an order of magnitude longer, and are significantly cheaper than their wooden counterparts.
If you have a desire to change old windows in your apartment for modern double-glazed windows, then you will certainly ask yourself whether it is possible to install a plastic window yourself. How difficult is the installation of plastic windows, and is it possible to do it yourself without resorting to the help of specialists?
Yes, it’s quite possible. In order to install a plastic window with your own hands, it is not necessary to have a construction specialty. With certain skills and good tools, anyone can install a plastic window with their own hands.
Let's figure out how to do it right.
What does a plastic window consist of?
First, consider the design of a plastic window. Without this, you will not understand the installation process itself.
Plastic windows are made from a special material called PolyVinyl Chloride. Therefore, plastic windows are abbreviated as PVC windows. As with any window, the main element of a PVC window is a frame made of a profile consisting of cells. The more such cells in the frame (also called cameras), the warmer the window will be.
Typically, the frame color is white. Although plastic can be black, brown, and even colored. The most common and cheapest option is white plastic windows.
In addition, the window consists of an opening part (sash) and a fixed part, which is called "wood grouse". A glass unit is inserted directly into these parts of the window, which is pressed against the frame with a special plastic strip. For tightness, a black rubber seal is placed.
Special mechanisms are installed on the window sashes, with the help of which the window opens and closes.
In addition, on the outside, the window has a so-called ebb - a small board with the help of which precipitation is removed, and slopes - plates with which the side and upper parts from the side of the street are sealed.

Stages of installing plastic windows with your own hands
All stages of installing plastic windows with your own hands are reduced to the following:
- careful measurements;
- dismantling of old window structures;
- preparation of window openings;
- DIY installation of PVC windows.
Making measurements
Before ordering, and, accordingly, installing a plastic window, you need to make several measurements. Moreover, how carefully they will be done depends on how your structure will fit into the window opening. Remember that accurate measurements are almost half the battle. If you make the measurements incorrectly, when installing plastic windows with your own hands, the structure simply will not enter the opening. In addition, the windows can begin to freeze.
First you need to carefully examine the opening. If the part of the window that is smaller on the outside, then measurements are taken at the narrowest place. Moreover, it is highly desirable to make several of them, because window openings are rarely perfectly flat. Find the smallest measurement value, and add to it 3. Measure the height, leave its value as it is.
If the window is the same size both inside and outside, measurements are taken slightly differently. You need to measure the width and height. Then you need to subtract 5 cm from the height, and 3 from the width. This will be the full size of your window, with width and height. We subtract the values in order to leave gaps for the installation of the window sill and special polyurethane foam.

Each owner chooses a window sill according to the size he wants. Someone likes wide window sills, someone narrow, and someone makes them at wall level. This is individual, and there are no rules here. This is about the width.
In length, both the window sill and the ebb tides must be taken with a margin - about 10 cm wider than the window opening.
Preparing for installation
Do-it-yourself installation of plastic windows always begins with dismantling the old window. As a rule, dismantling is especially easy even for novice builders.
After you have broken down the old window, you need to carefully examine the opening and remove everything that may later fall off. If any parts of the opening protrude from the walls after dismantling, they must also be removed and the surfaces smoothed. Potholes, if any. It should be repaired with cement mortar.
When installing PVC windows with your own hands, the following circumstances must be taken into account:
- the plastic window structure should be carefully secured;
- the window structure must be aligned both horizontally and vertically, otherwise in the future it may simply be skewed;
- it is imperative to plaster the foam on all sides, with which the structure is attached, also in order to avoid further problems such as deformation.

Installation technology of plastic windows
Do-it-yourself plastic window is mounted as follows:
- on four sides, the structure should be fixed with wedges, and it is determined how accurately the frame is in relation to the opening;
- fix the frame with special bolts;
- attach the structure with screws to the wooden part;
- seal the plastic structure with polyurethane foam, spreading it over a surface slightly moistened with water.
You need to start with the fact that there are two different ways to install plastic windows with your own hands.
The first method is that holes are drilled in the window frame for special anchors, which are driven into the wall. This is a rather difficult method, but a more reliable mount.

The second method is that metal plates are first attached to the frame from the outside, and only then these plates are attached to the walls. This is a much simpler and faster method, but such a fastening is not reliable. The frame can simply be skewed even in strong winds. Therefore, if you nevertheless decided to make your life easier and install a plastic window with your own hands in the second way, use thick and wide metal plates. In this case, you can give your plastic construction more reliability. However, if it is very windy in your city, this method will definitely not work for you.
Direct mounting
Do-it-yourself installation of a plastic window in the first way with reliable fastening is carried out as follows.
First you need to check whether the structure and the window opening are aligned. If everything is in order, proceed directly to the installation.
First you need to remove the window sash. For this:
- turn the window handle down, putting the window in the "closed" position, and remove the cover from the hinges with a screwdriver;
- pull out the pin that is on the upper hinge;
- open the shutter by turning the window handle to a horizontal position, after which, by lifting the window sash, you can easily remove it from the lower pin.
After you have removed the sash, you need to remove the glass unit on the "capercaillie". For this:
- insert a small spatula or something similar, strong enough, thin and not wide, into the gap between the frame and the glazing bead;
- Move the glazing bead with a spatula, going along its entire length, and remove it from the frame.
After that, it is already quite easy to remove the glass unit itself. The main thing is that it does not fall out of the frame after the glazing beads you removed have ceased to hold it. To avoid this, the window must be tilted.
The frame is freed from the glass unit, and now it should be pasted over with a special tape around the perimeter. This tape is needed to keep the window warm.

As a rule, white self-adhesive protective tapes are glued to the frames. It is also advisable to remove them, because later, when they heat up in the sun and stick to the frame, melting with it, it will be difficult to do. In the meantime, the tapes are removed very easily.
Now the frame needs to be inserted into the window opening. To do this, you will need mounting wedges, which are placed in the corners (this is a mandatory requirement), as well as in other places where you deem it necessary.
With the help of a drill and a drill, special holes are made into which fasteners are inserted. The first hole is drilled at a distance of 1.5 - 2 cm from the top edge. The bottom hole should be approximately the same distance from the bottom corner. The gap between two fasteners should not be more than 5-7 cm.
The hole is driven into the hole, and then the anchor is tightened. In this case, the anchor must be tightened carefully, trying not to overtighten, otherwise the profile will bend, and this cannot be allowed. This operation - tightening the anchors - is continued as many times as necessary.
After that, ebb tides should be installed outside. Before installation, stick on the outside of the frame with self-adhesive waterproofing. On the side, grooves are made in the openings (then it will be necessary to bring the edges of these ebb tides there).
A special profile is installed on the part of the opening where the ebb tide rests on the wall, to which the ebb is then attached. If the height difference is small, the profile can not be installed, but simply apply a layer of polyurethane foam. Then the ebb should be brought under the ledge of the frame, and attached to it with self-tapping screws. Along the lower border, the ebb also needs to be filled with polyurethane foam.
Now let's take a closer look at the second method of installing plastic windows with our own hands - using plates.
This method is much simpler, although, as we said, less reliable. Installation using this method involves the installation of thick metal plates.
They should be installed at the same distance as the anchor for the first installation method - about 2 cm from the edge, and no more than 7 cm between those in the middle. Metal plates are simply screwed to the profile using self-tapping screws.

In all other respects, the installation of plastic windows with your own hands completely coincides with the first installation method. In the same way, a window is set in terms of level in three planes, after which all actions are identical. Simply, unlike the first method, not the frame itself is attached, but metal plates, and they are attached to the so-called dowel-nails. The peculiarity of the fastening is that first a hole is drilled, then the metal plate is folded back, a dowel is inserted into the hole, the plate is put in place and the dowel is tightened.
The main mistakes when installing plastic windows with your own hands
If you install plastic windows incorrectly, this can lead to the fact that it will be cold in the house, water will flow into the room through improperly mounted ebb tides. And the expensive structures themselves will quickly become unusable. And if professional installers sometimes make mistakes when installing PVC windows, then an amateur who installs plastic windows with his own hands is certainly not immune from them.
Let's take a look at the 10 most common mistakes that are made when installing plastic windows.
Window size is incorrect
Usually this is a consequence of incorrect, careless measurement of the window opening, and, accordingly, the manufacture of an unsuitable window structure. And in case the window is too large in size. And if the size is very small, it is simply impossible to install such structures.

Poor preparation of the window opening
If the surfaces are poorly cleaned, debris, dust, potholes remain on them, or, on the contrary, parts of the wall protrude on the surface of the opening, the polyurethane foam will not stand as tightly and evenly as is necessary for a high-quality installation of plastic windows with your own hands. In addition, this kind of pollution is very good at absorbing moisture, and it will soon be inside your apartment.
Ignoring the thermal insulation of the wall
If the plastic window is installed without taking into account the thermal insulation of the wall, then cold air will penetrate into the apartment at the joints. Therefore, it is imperative to take into account the layers of the walls when installing plastic windows. If the wall is single layer, the window must be positioned exactly in the middle of the wall. If the wall is double skinned, the window should be installed at the very edge, as close to the insulation as possible. And if the wall is three-layer, then it is necessary to install the PVC window directly in the plane of the wall insulation, in order to avoid heat loss.
Incorrect distance between window frame and slope
If the window frame is located too close to the slope, then the seal in this place will be of poor quality, and moisture will begin to appear and accumulate in these places. If, on the contrary, the frame is located too far from the slope, then there is a risk of deformation, since the load on the anchors or metal plates is too great.
Wrong size of the window sill
The sill strip should be somewhat narrower than the window frame itself. If it is of a different size, or it was decided not to put it at all, then water will penetrate under the window frame due to the lack of a normal seal in this place, and as a result, the wall will be constantly wet. Metal parts can simply corrode over time.

Poor fastening of the PVC window to the wall
If you regret the dowels or anchors, and there are too few of them to properly attach the window structure to the wall, the position of the window will change over time, the frame will deform, and it will be difficult for you to tear off and close the window.
Not enough polyurethane foam
Polyurethane foam is practically the only material for insulating the window structure and the wall itself, to which it is attached. If there is not enough foam, then the heat will go away. Therefore, the gap between the slope and the window frame must be filled properly, not sparing the foam.
Lack of insulating tape
If you decide not to use the insulating tape laid down in accordance with GOST on the inside and outside of the window structure, be prepared for the fact that the thermal insulation will gradually get worse and worse. Accordingly, the windows will become unusable much faster than you would like.
Therefore, if you decide to install a plastic window with your own hands, try to go through all the necessary steps and carry out all the necessary actions efficiently, carefully and slowly. Then your beautiful self-installed plastic windows will delight you and your household for many years.
Advantages of installing windows in the Moscow Windows company
Established erection crews (not hired). Employees are citizens of the Russian Federation.
All assembly crews are trained in their own service center, they undergo training and certification annually.
All assembly and fastening materials are purchased centrally from trusted suppliers.
Automated calculation of installation materials allows you to ensure compliance with GOST standards. Elimination of errors in the calculation of materials.
Installation quality control. Every day, an independent quality control service selectively visits the sites to check the work performed.
Getting feedback. 2 days after installation, the quality control dispatcher will contact you, and you will appreciate our work.
The service life of plastic windows is 40 years or more, but only competent installation provides them with high operational properties. Installation of PVC windows in accordance with GOST is one of the Moscow Windows Standards.
The company offers two installation options using unique technologies: basic SetEco ™ and installation in accordance with GOST SetFull ™.
Installation of windows using the SetFull ™ system
Installation of plastic windows using SetFull technology is carried out in accordance with GOST, while taking into account the features and disadvantages of buildings.
A special compound protects the assembly seam both from the street side and from the room side.
The SetFull ™ system is guaranteed for 5 years.
System components:
- Polyurethane foam.
- Pre-compressed sealing tape.
- Waterproofing tape (membrane type)
- Vapor barrier layer.

Installation of windows according to the SetEco ™ system
This is the basic installation type. The materials used are easy to use, while providing a basic seal for the assembly seam. For additional protection, "Outside seam insulation" is carried out. The service includes the installation of two special insulating tapes. Recommended by Moskovskie Okna, for orders with plastic slopes, providing reliable vapor barrier from the side of the room.
Installation warranty for SetEco ™ system is 2 years
System components:
- Polyurethane foam.
- Pre-compressed sealing tape. *
Installation according to GOST
Modern plastic windows require competent installation. When installing plastic windows, all future loads on the window must be taken into account: mechanical, temperature and chemical. The functional durability of the window primarily depends on the correct installation of the window.

Stage 1. Protection of living quarters from construction debris
Before installation, it is imperative to prepare the room. Cover the floor, furniture, expensive items, dishes, etc. with plastic wrap to protect it from construction dust.

Stage 2. Checking for compliance with the size of the windows and the complete set of the order
Before starting dismantling work, be sure to check the dimensions of the openings and frames delivered to the object, taking into account the standards for the dimensions of the assembly seam. Checking the contents of the order.
Plastic windows are increasingly being installed by owners of country houses, as they have many advantages over wooden products. They also differ in acceptable cost. But before installing, you need to carefully prepare for such work. To do everything yourself, you need to know the specifics of performing all operations.
All plastic products are completed with parts for installation, so with proper preparation, you can install the window without outside help. It is worth performing all actions very carefully so as not to damage the structure. In order to secure the windows in the opening more accurately, it is worthwhile to carry out work with an assistant. In some cases, before carrying out work, it is necessary to reinforce the opening.
Materials required for work
Before starting the installation, you need to prepare the following materials:
- wedges inserted for correct positioning of windows;
- polyurethane foam;
- sealant;
- hydro-vapor barrier material required to protect joints from moisture;
- anchor bolts.
Wedges are used during the installation process to more accurately position the plastic profile. It is much more difficult to follow without these materials. Construction foam is an insulating material that fills the space between the wall and the frame. When choosing a foam, it must be borne in mind that it must correspond to the temperature at which the work will be performed. If you purchase a material intended for use in the summer, its use in the winter can lead to the creation of a poor-quality insulation layer.
Also, during work, a self-expanding sealing tape will be required. This material is glued along the perimeter of the window from the outside, after which it expands. Sealant is used to fill the space between the slopes and the window sill.
How to determine the correct position of a plastic window
Before carrying out installation work, it is important to correctly determine the position of the frame relative to the wall thickness. The plastic window should go inside from the street side by about a third. This rule is optional, but when shifting the window in any direction relative to the specified distance, it should be borne in mind that the length of the ebb and sills must correspond to the project.
It is important to consider the size of the radiator and its position. The window sill should not overlap it by more than ½ the width. If the radiator is completely shut off, this can negatively affect the temperature in the room in winter, as well as the condition of the window. If installed incorrectly, plastic windows tend to fog up.
The length of the window sill should be about 15 cm larger than the window opening. Thanks to this, the edges of the window sill can be processed when finishing the slopes. The window sill comes with side caps, which should also be fixed after installing the window.
Methods for fixing plastic windows
The choice of a particular fastening method depends on parameters such as the size of the window opening and the material of the walls. This should be taken into account when choosing fasteners for plastic structures.

Fixation of plastic windows can be done in several ways:
- With dowels or anchor bolts. They are fixed in the holes pre-created in the wall.
- Serrated plates that are located outside the window profile. They are installed on a spacer and secured with self-tapping screws.
The first described method is considered more reliable. That is why, with the help of dowels, plastic structures are fixed, which are large. The fastener passing through the window unit is more reliable and able to withstand impacts.
If you decide to install a small plastic window, you can secure them using anchor plates. These fasteners can be hidden by slopes and finishing materials. But before carrying out the work, you should prepare small indentations for them. This will avoid problems with plane alignment.
It is worth noting that when installing plastic windows, professionals combine the above methods. In this case, anchor bolts are used to secure the base of the profile and its vertical parts. The upper part is fixed with plates.
Basic rules for installing plastic windows
To properly install windows, you should follow a few basic rules:
- Installation of plastic double-glazed windows should be carried out using polyurethane foam. This material allows you to give the structure additional rigidity. It also acts as a retainer and heat insulator.
- To protect the space between the window and the wall, it is necessary to fix a waterproofing material on the outside, and a vapor barrier on the inside.
- You can install windows at any time of the year. Many professionals recommend carrying out work in the winter, as this will allow you to immediately see if mistakes have been made.
- Before purchasing foam, you must carefully study the features of the composition. Such materials differ in several ways. One of them is the solidification temperature. The instructions on the cylinder indicate the most favorable conditions for using the foam. If you ignore them, the material can begin to deteriorate during the operation of the structure.
- When foaming the gaps between plastic windows and walls, it is necessary to fill in small portions. This allows less foam to be consumed.
- If the opening is crumbling, it is necessary to clean the surface of old materials and reinforce it.
Observing the described rules, you can install windows with your own hands without making mistakes that people who have no experience of such work make. The technology for installing plastic windows in a brick house is quite simple, but it is important to carefully follow each action so as not to make a mistake.
How is the preparation of the opening
Before carrying out work on the installation of windows, it is necessary to thoroughly clean the opening from dirt and dust. It is important to remove all residues of paint and building materials. It is also important to compare the dimensions of the opening and the plastic frame before installation. If the gap is more than 4 cm, it is necessary to use more than just foam. This is due to the fact that when using it, it will not be possible to create an even and high-quality seam. In addition, a lot of foam will go away.

Before installation, it is necessary to remove the sashes from the frame. To do this, simply pull the pin out of the hinges. If it is necessary to get the glass unit out of the frame, the glazing beads holding the glass are removed. Perform these steps very carefully so as not to scratch the glass.
After removing the sash and glass units, place them on a soft mat and lean against the wall so that they are in a stable position. Double-glazed windows do not fit flat, as this can lead to scratches on the glass surface.
After that, the protective film is removed and markings are applied to the places where the fasteners will be located. The distance between them should be about 40 cm.It is important to take into account that the indents from the corners should be more than 15 cm.
Installation process
After carrying out the described actions, spacers should be inserted into the window opening in the brick wall in order to create the necessary gap. Frame alignment should be done using a building level. It is also important to control the side clearances.

In the openings of brick houses, it is necessary to mark the installation locations of the anchors. After that, holes are created in the walls. If fastening is done with anchor plates, it is necessary to bend them so that they fit well on the wall.
The next step is to install the frame. It is important to check the horizontal and vertical structure of the structure before proceeding. How it will be finally fixed. After that, the bolts are finally tightened until the head protrudes above the surface by no more than 1 mm.
After all the described work, the doors and double-glazed windows are installed, as well as the functionality of the entire structure is checked. If you installed the products with your own hands for the first time, you should carefully inspect the opening and make sure that no mistakes were made during the work.
Installation of slopes
Before installing the outer slopes, measure the width and length of the opening. Cutting plastic slopes is done with a circular saw.
Important! It is necessary to fix the slopes only on clean and leveled surfaces.
At the first stage, the upper horizontal part is fixed. It needs to be drowned as deep as possible, and the space should be filled with polyurethane foam. It's worth remembering. That it should not be produced too much, since when the material hardens, it can change the shape of the plastic products.
After that, the installation of vertical slopes takes place. During these works, it is important to check the verticality of the elements. The installation of the lower slope takes place in the same way. It is important to ensure that all elements are correctly docked, and there are no gaps between them. The corners between the plastic slopes are closed with a special piece.

Installation of internal slopes should be done only after careful preparation of the surface. If the opening is crumbling, it is better to clean it up to the main wall and only then carry out further work. After that, the opening is leveled and filled with insulation. If necessary, the window opening is reinforced.
Installation of plastic windows assumes adherence to GOST standards. Home owners do not always prefer to install windows according to all the necessary rules and regulations.
Installation diagram of a plastic window.
Experts strongly recommend that all residents adhere to these rules, especially those who have office space, shops, and various public institutions at their disposal. Most buyers are sure that the quality and reliability of the entire structure depends on the profile. But apart from this, assembly and, accordingly, installation plays a key role. Sometimes the owners who hire specialists do not think about whether the installation will be done in accordance with GOST. The manufacturer of the profiles always indicates that the assembly should be done in this way, but the installer may not follow these rules.

Installation diagram of a plastic window.
Installation in accordance with GOST is optional. This is more of a recommendation. If the homeowners decide to install windows in accordance with the requirements of the standard, it is necessary to invite qualified employees, preferably from a large construction company. A contract is concluded with this company, which includes a certain point, which indicates that the installation will be carried out exactly in accordance with GOST.
When buying, the seller must select the appropriate profile that will meet the specific conditions. The structure should be checked for optimal air exchange and heat transfer, for the level of sound insulation, dust penetration, etc. As a rule, well-known supplier companies have certificates that the window structures have passed the necessary checks. Accordingly, it is better to purchase goods from them.
Basic requirements during installation
It is important to take into account the fact that most problems with plastic windows arise if the installation is done incorrectly. Therefore, if you decide to install plastic windows, you should not save on the installation process. Today in Russia there is GOST 30971-2002. The following rules are indicated for correct installation. First of all, the GOST indicates the types of profiles, as well as examples and various mounting options. During the installation process, it is important to follow certain rules: there should be no cracks, openings. This is necessary for isolation from the cold. In the places where the window is fastened vertically and horizontally, three seams are made: internal, external and middle. Moreover, in order to properly mount the window, it is necessary to take into account the expansion of the plastic when heated.
Related article: French vegetable garden on the site

Window installation scheme in the opening.
It must also be remembered that when choosing, one should be guided by sanitary standards and tightness standards. The optimal temperature and humidity level will directly depend on this. In order to find out such standards, it is necessary to consider the requirements of SanPin 21.2.1002-00, where the norms of ventilation and heating in a dwelling are prescribed. If you do not follow these rules, there may be a risk of infection with fungus or mold, this can occur due to excessive moisture levels.
It should be noted that the installation in accordance with GOST is a guarantee of your safety and the favorable functioning of the window structure. In addition, installation according to the required standards ensures a favorable microclimate in the house.
When installing, the joints must be positioned in 3 levels. The first is able to protect the room from the penetration of precipitation and water. The second (inner) level must protect against the penetration of vapors. The third level is done using construction foam. The types of walls are also spelled out in the standards, which must also be taken into account. You need to know all the installation rules. They are convenient for guiding both during the purchase and during the installation process. It is worth repeating once again that you should buy only high-quality, certified products. The seller must provide you with documents that spell out all the technical features of the product.
Installation Requirements
The quality certificate must be awarded not only to the company that sells the windows, but also to the one responsible for the installation. It is important that qualified specialists undertake the installation of the structure. The emergence and implementation of the certification system will bring the business to a high level. Today, the buyer makes high demands on the quality of structures and service in general.
Before installation, it is necessary to make all the necessary measurements by comparing them. It is important to know what loads the structure can withstand, the wind load is determined. From this it is concluded whether additional installation of the frame with metal plates is necessary. Some windows may leak air. In this case, the frames are installed to normalize the thermal insulation.