The user dug up the foundation a little so as not to cut the extruded polystyrene foam, and the insulation board stood up completely. Then he cleaned the foundation of dirt, drilled holes with a perforator, glued the thermal insulation on the cement-foam and fixed the plates with mushroom dowels.

To reinforce the blind area along the thermal insulation layer, a masonry mesh made of wire with a diameter of 3 mm and a mesh size of 10x10 cm was laid out. The reinforcing mesh was passed through thermally compensating liners - an ordinary board.

This article talks about .


Installation of metal siding and installation of a ventilated facade
The key feature of the hinged ventilation facade is the presence of a ventilation gap between the insulation (protected by a moisture-proof membrane) and the external finish, for example, siding panels.
The gap (approximately 4-5 cm) allows steam and moisture to be freely removed (weathered) through the ventilation duct.

ZlojGenij
For the installation of a hinged ventilation facade, I chose metal siding, profileL-beam. It has its own editing subsystem. To save money, I decided to use the ceiling profile used for interior gypsum board installation as guides. Profile thickness 2 mm.

The profile is attached to hangers mounted on the plinth. To evenly distribute the load along the hangers vertically, the user spliced the profiles together.

All work on the installation of guides for the ventilation facade is divided into a number of successive steps:
- We mount the extreme profiles.
- We stretch the lace between them.
- We set the rest of the profiles according to the markup.


After that, the user carefully measured all the dimensions of the house, including the "dressing room", and ordered "at the company" the calculation of the required amount of siding.
Metal siding is custom-made to fit your home, minimizing the amount of trimming.


After buying siding ZlojGenij proceeded with the installation of window slats, tk. this is a complex element and, according to technology, they must be installed before installing the siding.

First, the lower ebb is installed, then the upper one, then the sides are mounted. The whole process is also divided into sequential operations:
1. We measure the distance between the profiles and transfer them to the ebb blank.

2. Leave 2-3 cm for the hem of the metal.

3. Then we cut and bend.


For bending and cutting metal, the user used pliers and metal shears. On the outside, the ebb is not immediately trimmed, because. this is done with the sidewalls installed.
The upper part of the tide is made similarly to the lower one.

The following photos clearly demonstrate the manufacturing process of the side parts.

The end result should be something like this.


Each person dreams of a warm house, so that even in the most severe frosts it would be comfortable to be indoors. Therefore, the first question that confronts the owners of their home is how to insulate the walls from the outside on their own. This is especially true for wooden buildings. In this article, we will give instructions according to which the walls of frame and timber houses are thermally insulated from the outside. And for a more visual example, you can watch the video.
Types of insulation
There is a huge variety of thermal insulation materials. Let us dwell on the choice of insulation for wooden houses, which are massively used by consumers.
Stone wool in slabs. Such material is easy to cut even with a conventional knife. Due to the light weight of the plates, it is easy to transport even in a passenger car, especially if you need to insulate a small area. During installation, stone wool is placed in the gap between the racks of the frame, and then insulated with vapor barrier material from the inside and waterproofing from the outside.
Attention! During transport or installation, never compress or tamp the mats.
Ecowool. This is an environmentally friendly material for insulation, based on cellulose fibers. Produced in a package, in a slightly compressed form. There are two ways to insulate this material:
- dry. To do this, the packaging with glass wool is opened, the material is kneaded and rammed into the walls. The disadvantage of this method is that over time the fibers can shrink, and this will lead to heat loss. However, some manufacturers give a guarantee that this material will not settle for 10-20 years.
- wet. Ecowool is sprayed onto the walls and clings to the building frame, so that the material does not settle.
Styrofoam. One of the most budgetary types of insulation. This material does not absorb moisture, so it is not necessary to cover it with a moisture-proof membrane. However, when working with foam, you need to show maximum accuracy, because it can crumble and break.
Attention! As a heater, you need to purchase non-pressed foam sheets.
polyurethane foam. It is sold in the form of two-component substances that begin to foam when applied to walls when exposed to air. In operation, such material is similar to mounting foam. They fill the voids in the wall, and cut off the excess. The result is a monolithic layer of insulation, which completely eliminates heat loss. Polyurethane foam has water-repellent properties.
Natural heaters. These include slabs of sawdust or a mixture of clay and straw. Such materials are environmentally friendly, inexpensive, but their main disadvantage is the complexity of manufacturing. Linen fiber is also a natural insulation. It has antiseptic properties, preventing the formation of fungus and mold. It is easy to cut, mount, it does not cause allergies and is moisture resistant.
What is the best way to insulate walls?
The key to a quality repair is a well-thought-out work plan. Therefore, it is worth considering in advance how you will insulate the walls: from the inside or outside. Internal insulation is rarely used, because. because of it, the size of the rooms is significantly reduced. In addition, experts do not recommend insulating wooden houses in this way, because. moisture will penetrate into the wood, from the side of the street. Because of this, mold and fungus may appear inside the structure, and the tree itself will begin to rot. In addition, it is necessary to buy material that, in its properties, will match the tree. Linen fiber, soft fiberboard, basalt and fiberglass materials are suitable for this.
With the external method of thermal insulation, a uniform layer of insulator is formed for the free release of vapors. The insulation is less dense than wood, because of this, steam escapes through the ventilation gap. The external method of thermal insulation is an ideal option for those who want to insulate old houses made of timber, which have lost their “presentation” over time, after sheathing they will look like new. However, if the walls are not properly insulated, the wood will begin to deteriorate, and under a layer of exterior finish, you will not be able to control the condition of the wood.
Insulation of the walls of a frame house with mineral wool
Thermal insulation of a frame house begins with waterproofing. To do this, you can use glassine - a cheap but effective material. It is cut into strips and fastened with a stapler to the frame of the house, in increments of no more than 12 cm. Sheets of glassine are glued with an overlap of up to 10 cm to protect the insulation from condensation.
Advice! If the frame of the house will be sheathed with siding, then a distance of 30-50 mm should remain between it and the insulated facade so that moisture does not linger in the frame.
Then we lay a layer of insulation. Mineral wool is an excellent option for wall insulation. It does not cause allergic reactions, has low flammability and high thermal conductivity, such plates are easily cut with a construction knife. The laying process is simple, first we measure the distances between the racks and add 5 cm on each side for allowances. We cut the sheets of the desired size and lay them on the waterproofing. We close the joints between the frame and the insulation with a strip of mineral wool 3-4 cm wide.
We lay a layer of vapor barrier on top, for this we use foam phenol. It must be shot to the frame of the building using a construction stapler. Penophenol is laid in a horizontal direction, leaving 5 cm joints with the foil part outward. After that, we sheathe the walls of the house with edged boards or siding.
Insulation of the walls of the frame house with foam plastic
In order to fix the foam on the wall, first we install vertical canopies from the cord. Then glue is applied to the foam sheets, along the edges and at five points inside, and fixed on the wall. Thus, the entire insulation is laid. Next, you need to seal the gaps with mounting foam. For additional strength, we fix the sheets with plastic dowels.
Attention! Styrofoam does not absorb moisture, so additional insulation is not needed in this case.
Outside, the walls must be plastered, and before that, a reinforced mesh must be mounted. Putty will help protect the structure from the influence of external factors, but it should be applied in two layers. After the surface has dried, a finishing layer can be applied with decorative plaster.
Insulation of the walls of the house from a bar
External insulation of houses made of timber should be made with slab materials, they are more rigid and do not shrink over time. If you prefer basalt or fiberglass insulation, then you need to choose the right thickness. If the house is made of 15 cm timber, then the thickness of the heat insulator is 10 cm, and if the timber is 20 cm, then you can take a thinner material - 5 cm.
To begin with, the surface of the house is coated with waterproof mastic. Then a vertical wooden frame is installed, which must be smeared with an antiseptic to prevent decay. Then basalt wool is attached to it with the help of self-tapping screws or dowels-umbrellas, for 1 sq.m of insulation - 4-6 fasteners. A diffusion membrane is laid on top as a waterproofing agent. We nail slats on top of the wooden frame, 5 cm thick, which will create a ventilation gap to remove moisture. Then we nail the profiles to the rails and install the siding, starting from the bottom, checking the horizontal laying with a level.
Thus, the choice of insulation depends on your personal preferences. And to decide whether to do internal or external thermal insulation depends on how the finishing of the external walls will be done. Well, if you want even the most severe frosts not to bring you inconvenience, you can insulate the walls both inside and outside.
Warming the house with mineral wool: video
Warming of a wooden house: photo


It would seem that the question is quite simple - and the methods have long been worked out, and the choice of thermal insulation products is significant. But this is not about any building, but about a wooden house. Regarding its insulation, there are a number of nuances that cannot be neglected.
It's all about some features of such a building material as wood. First of all, it is its susceptibility to decay, the ability to "breathe" and retain heat well. The last two properties allow you to maintain comfortable conditions in the premises, as a rule, without significant additional costs. For example, for the purchase (and professional installation) of climatic equipment, due to the increased consumption of en / resources (including fuel for the boiler). At least, the indicated devices are not used as intensively in wooden houses as in brick or cellular concrete buildings. So, let's consider in detail how and what is the best way to insulate a wooden house.
To make the technology of work clearer, it should be explained why insulation from the outside for a wooden house is the only right solution. This method of reducing heat loss is the main one for any buildings, as it has a number of advantages. For example, does not reduce the usable area. This is one of the disadvantages of arranging this protective layer from the inside. But for a log house, something else is more relevant.
It's all about the so-called "dew point". The external installation of the insulation takes it outside the perimeter of the house, and condensate forms in the ventilated space. Consequently, in cold weather, the tree does not freeze, and in warm weather, the process of decay does not begin. If the insulation is laid on the walls of the premises, then the “point” shifts inward. As a result, the logs (beams) remain unprotected, and the condensate settles in the thermal insulation material, which initiates the development of mold and fungus not only in it, but also in the rooms.

How to insulate a wooden house
If you delve into the details, then the choice of materials is not so big.
Styrofoam boards
They differ not only in the correct geometry, but also in "rigidity". Therefore, to fix them, it is necessary to carefully align the base. It is still acceptable for a beam, especially if the walls were erected by professionals. And what about logs? In addition, foam plastics do not let in not only moisture, but also air. Therefore, the main attraction of a wooden house - climate control - will be completely leveled.

Spray formulations
Usually polyurethane. There are even more disadvantages, besides, special equipment will be needed. But the companies providing this service (for PU insulation) are silent about another rather significant disadvantage - the low maintainability of the layer. After all, it sticks to the surface on which it is applied. If, in the literal sense, it can still be “picked out” from a brick or concrete goods, then what about the tree? After all, it is quite malleable to mechanical stress, and damage to logs or timber in this case cannot be avoided.

There are other types of insulation for wooden buildings, which are advised to use the authors of some articles. But all the listed materials (chipboard, flax fiber, etc.), taking into account the specifics of the log house and in terms of durability, hardly deserve attention.

To insulate buildings made of wood, only mineral wool should be used. Excellent vapor permeability, elasticity, low weight - in fact, such thermal insulation fully complies with all the main criteria for a wooden house.
Warming the house from the outside - how to do it
Surface cleaning
This is where any repair or finishing work begins. For a wooden house, the initial inspection is especially important. It is necessary to identify all foci of damage to wood, determine their nature, methods and means to eliminate defects. This is a separate topic, and.
Processing with special / preparations
For a wooden house, both are equally relevant - flame retardants and antiseptics. Features of their use and formulation are indicated on the packaging. It is clear that it is desirable to do this in positive weather and clear skies.

All types of wood differ in porosity. Although more often they talk about the hardness or density of lumber. Based on this, the appropriate compositions should be selected. Their list is quite large, and the specifics of the application can vary greatly. The best ones are those that penetrate deep enough into the structure of the material and do not "close" the pores. Otherwise, the tree will not be able to "breathe".
Installation of a vapor barrier layer
Its main purpose is to ensure the ability of wood to self-regulate the microclimate and at the same time protect the material from direct contact with moisture. There are many varieties of films and membranes on sale. If the first option is chosen, then it must be taken into account that all samples differ in their execution, and therefore, in the specifics of use. The film is cheaper, but the usual modification of polyethylene cannot be used for vapor barrier. It is hermetic, and together with water does not let air through. It is worth considering when choosing products.
Mounting on the outside of a wooden house is quite simple - using a construction stapler (staples). It is only necessary to take into account that the strips must be mounted with a slight "overlap", and the joints must be closed with adhesive tape (adhesive tape).

The construction of the supporting frame
It is also called a crate. What is its peculiarity in relation to a wooden house? The coefficients of thermal expansion of the materials to be bonded should be taken into account. Metal slats are much more convenient for installation, but since the house is made of wood, it is not advisable to use them. Only wooden bars of the appropriate length and section.
The dimensions of the seats (cells of the crate), as well as its design, are selected based on the geometry and design of the insulation. Mineral wool is sold in slabs or rolls, so it is not difficult to draw up a sample laying pattern.
Another nuance concerns fasteners. Self-tapping screws or screws should not be used for fixing elements of the crate. They "tightly" grab the supporting structure, and this should not be. A wooden house “plays” somewhat under the influence of external factors (a feature of the material), therefore, fastening the crate to it is only with nails.

What to consider
The reliable position of the insulation is ensured by the fact that during the laying in place, the samples are slightly compressed. Then, due to their elasticity, they straighten out somewhat, which determines their reliable "hitch" with the slats of the supporting frame. When calculating its parameters, it is necessary to choose the cell sizes so that they are slightly smaller than thermal insulation products. Then you do not need any of their additional fastening on the outside of the house.

Laying insulation material
There is nothing complicated about this, especially if the scheme is drawn up correctly. Mineral wool is well cut with an ordinary knife, they bend, so there will be no problems.
Peculiarities:
- On problem areas of the walls (complex configuration, slope, etc.), it is worth additionally fixing the thermal insulation with special nails - anchors.
- The gaps at the junction of the insulation to the frame rails are sealed with the same construction tape.
- Installation of thermal insulation is carried out in the direction from the bottom up, in rows.
- In regions with frosty winters, insulation (depending on the thickness of the samples) can also be laid in 2 layers. In this case, the plates for the second are cut so that after installation their joints in the rows do not match. That is, a mount with a slight offset.
Calculator for calculating the amount of insulation
It happens that the walls of a wooden house do not do well with one of their tasks of retaining heat.
The solution to this problem lies in the insulation of the walls.
The insulation layer will act as a barrier between the street and the interior of the house.
When the question arises about the insulation of the walls of the log house, it is necessary to decide on the choice of thermal insulation method, which can be carried out both outside and inside.
Many homeowners lean towards the first option. This is obvious, because this method is much more efficient.
- External walls are additionally protected from moisture and solar activity, which increases their service life;
- Removing the dew point to the outside without the likelihood of condensation;
- Ensuring highly efficient thermal insulation;
- Preservation of the volume of the premises;
- Possibility of sealing external holes and cracks;
Flaws:
- Changing the appearance of the facade of the building;
- high cost of work;
- dependence of work on the season and on weather conditions;

External insulation under siding
- low cost;
- the possibility of leveling the walls;
- independence of work from the season and weather conditions;
Flaws:
- The shift of the dew point inside the room and the likelihood of condensation and mold;
- Reducing the volume of the room;
- Possible interior change for the worse;

Internal insulation
Types of external insulation:
- Strengthening heat insulators on the wall surface with adhesive mortars and finishing with plaster;
- Non-ventilated walls in three layers. The insulating material is fixed with a mortar and a single-brick external wall is installed in compliance with the air gap;
- Ventilated facade. The walls are protected with a waterproofing material, on top of which an insulating material is mounted. Then a windscreen is installed, and the frame is sheathed with clapboard or any other siding. This method allows installation even in winter due to the absence of the need to use adhesive solutions.
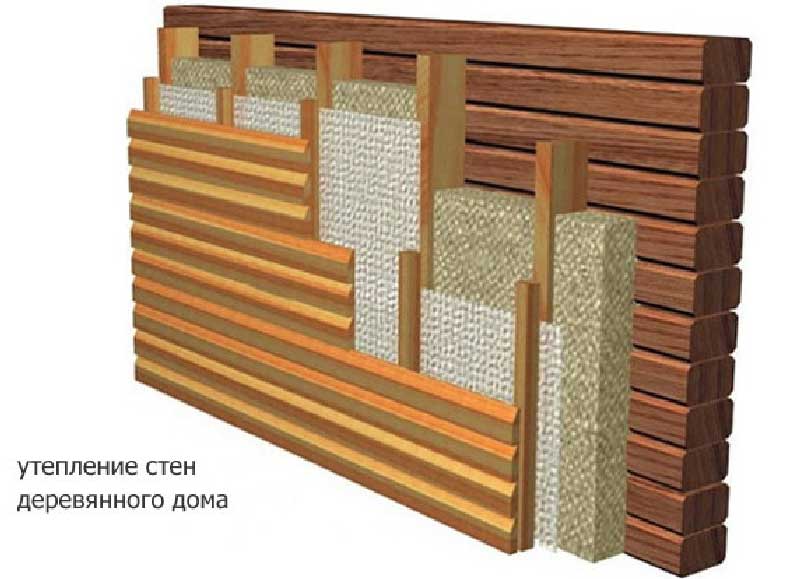
The main secret of the right house lies in the arrangement of its walls. The so-called wall "pie" causes a healthy microclimate and longevity of the structure.
wall pie
The “pie” of the wall consists of the following elements:
- Exterior finish protects all subsequent layers from aggressive external influences, moisture and temperature fluctuations. It can be made with various materials. Siding, facade plaster, decorative stones, facing bricks - the choice depends only on your imagination;
- waterproofing membrane located under exterior trim or wall cladding. It creates conditions for a favorable microclimate of the room and ensures the safety of wooden frame elements from moisture. Waterproofing releases water vapor to the outside, but does not let moisture in;
- insulation is one of the most important components. It is laid between I-beams - in cells formed with the help of horizontally located connecting links;
- Vapor barrier membrane prevents the penetration of vapors into the interior of the walls. Its installation is carried out on a wooden frame from the inside of the walls. Its installation is necessary in places with high humidity (kitchen, bathroom, toilet). Waxed paper often acts as a vapor barrier.
- Interior decoration- the closing layer of the "pie". The inner surface of the wall, if desired, can be sheathed with drywall, clapboard, etc.

The choice of insulation for a wooden house
Thermal insulation of walls made of timber can be carried out using facing bricks, stones made of concrete or ceramics, small blocks. The only thing between the cladding and the surface of the wooden wall should be the designed air gap, which is provided in order to remove excess moisture from their wood.
As heat-insulating materials can also be used:
- stone wool is a heat and sound insulating material that made mainly from molten rock. Is a variety. Gabbro-basalt rock is the raw material for the manufacture of material fibers;
- is an inexpensive, hygienically and sanitary safe, light but rigid material. Its insulating properties fully satisfy common requirements, but the possibility of cracking from thermal expansion to which walls are exposed does not allow us to call it the best solution for insulation;
- Ecowool is an absolutely natural, environmentally friendly, perfectly soundproofing material., which is made up of cellulose and antiseptics, which are based on borax and boric acid. The material is moisture resistant, hypoallergenic, its laying is carried out without forming seams and voids. Does not require the use of a vapor barrier layer when insulating timber walls;
- Basalt wool is characterized by excellent vapor permeability. Basalt is a non-combustible material, which provides fire protection for a wooden log house. The material has good soundproofing characteristics;
- Foam glass is foamed glass, which is made up of thousands of glass cells.. The material is elastic, moisture resistant, environmentally friendly, fireproof, very durable and able to withstand any temperature fluctuations. It does not attract insects and does not allow mold and mildew to form. Among the shortcomings, one can note the lack of vapor conductivity, high fragility and high cost of the material;
- In the case of wooden walls, mineral wool is ideal as a heat insulator. It meets almost all the requirements for a heater, namely, it has a high coefficient of thermal insulation, a minimum coefficient of thermal conductivity and low hygroscopicity. She is not afraid of high temperatures, fungus, mold, insects and rodents. It perfectly copes with the removal of vapors to the outside, non-toxic, non-flammable, breathable and, importantly, durable and can last from 30 to 60 years, based on the declared characteristics of the material.
Materials such as:

Types of heaters
The range of modern heaters is very rich and varied, so the question of choosing a heat-insulating material according to the technical features of the room, the requirements and budget of the buyer will not be difficult.
Preparatory work
NOTE!
First of all, the walls are treated with antiseptic preparations., which protect wood from fungus, rot, mold, woodworms, and fire-fighting substances that improve the protective characteristics of the building.
Before installation, carry out the following steps:
- It's time to seal the cracks and gaps. They are sealed with sealants or jute fibers;
- Next, proceed to the installation of the crate. To do this, they are attached to the surface of the walls with self-tapping screws. bars 50×50 mm or 50×100 mm- they are selected according to the number of layers of insulation.
- The crate is installed in the form of horizontally and vertically arranged guides with a distance between them almost equal to the width of the insulation- less than one cm, in order to more tightly join the material.

Seal cracks with tow

Sealing cracks with sealant
Insulation of the walls of a wooden house outside with mineral wool
Warming the outer walls of a wooden house with your own hands is not such a complicated process as it seems at first glance, and mineral wool is well suited for these purposes.
CAREFULLY!
Before installing the insulation on the crate, it is necessary to attach a vapor barrier membrane. It will let the water vapor of the premises go outside, and it will hold back the moisture rushing into the room from the outside, preventing it from being absorbed into the insulation layer and protecting its thermal insulation characteristics.
- Having fixed the vapor barrier, begin to lay the slabs of insulating material using a construction stapler. In addition, the space between the rails is fixed to the wall. using umbrella dowels.
- A waterproofing membrane is mounted on top of the laid insulation, which will not let moisture in from the outside, but will remove a small amount of condensate that has penetrated the insulation layer;
- Further, installation of rails under facing materials, which perform not only the role of the frame and decoration of the facade, but also form ventilation gaps necessary for ventilation of the heat-insulating layer;
- As facing materials for wooden houses often used siding, lining, blockhouse.

Installation of the crate on the beam

Ways of timber insulation

Mineral wool insulation scheme
Installation of insulation from the outside using expanded polystyrene as an example
Expanded polystyrene sheets begin to be fixed in the frame from the bottom up using glue specially designed for this purpose. If some sheets do not hold well in place, you can use foam wedges to secure them or ordinary nails.
Further, the foam is covered with a diffusion membrane. It must be laid in horizontally running strips from the bottom of the wall to the top, while the resulting polystyrene foam joints should be overlapped by 10 - 15 cm.
The membrane is fastened with a stapler, and the joints are glued with adhesive tape.
After fixing the membrane, the structure is clad. For these purposes, lining, thin-layer plaster or siding is used.
NOTE!
No gaps should be left between the sheets to avoid the formation of “bridges” of cold.

Insulation with expanded polystyrene

Styrofoam laying
vapor barrier
The vapor barrier serves to protect the insulation from the penetration of steam from the side of the wooden wall. It is only necessary to install a vapor barrier membrane on the wall if mineral thermal insulation materials are used and / or their external surfaces face the street.
The film is installed between the heat-insulating material and the load-bearing walls of the house. The function of the vapor barrier is to protect the heat-insulating layer from getting wet.
It is necessary to accurately determine the side of the film fastening, since its incorrect installation in the future will lead to uncontrolled access of moisture.
For example:
- The foam propylene membrane is fixed with the rough side to the under-roof space.. If the membrane is polyethylene, the question of which side to attach will not matter
- The two-layer membrane is laid with a smooth surface to the heat-insulating layer.
- One-sided laminated polypropylene film is also directed with its smooth side to the insulating layer;
- The foil surface of the special film turns towards the heat-insulating layer;

vapor barrier
Installation of vapor barrier:
- Turn the film to the appropriate side and carefully, avoiding damage, fasten it to the crate;
- Carefully glue punctures, overlaps, likely gaps and cracks;
- Mount the crate using bars with a section of 3 × 5 cm in order to ensure ventilation;
- Cover the structure with finishing materials;
Waterproofing
- Waterproofing protects the walls of the house from the damaging effects of moisture, fungus, mold.
- It is reinforced between the thermal insulation material and the siding.
- Installation of a waterproofing membrane is carried out with an overlap of 10-15 cm.
- The canvases are attached with a stapler to the surface of the crate, while the joints are sealed with special tapes.
- Ventilation gaps are formed using a crate with a bar 25 × 50;
- From below, a protective metal mesh is installed

waterproofing membrane
In conclusion, it is worth saying that it is quite possible to perform the insulation of the walls of a house from a bar on your own. All you need is your patience and some expenses, which will more than pay off in the future.
Useful video
Insulation of a wooden house outside under siding in the video below:
In contact with
Internal insulation has a lot of disadvantages, among which costs First of all, isolate the formation of condensate. Therefore, your house, especially a wooden one, should be insulated from the outside - in this case, the internal temperature of the walls will drop very slowly. The location of the cold zone in this case will fall on the inside of the insulation, so it will not touch the wooden walls.
It is better to combine home insulation with vapor barrier material installed from the inside - this will not only prevent the penetration of cold from the outside, but also prevent condensate from accumulating in the structure and destroying it. As a result, the house will be warm, and the humidity level will always be normal.
Note! Between the wooden wall and the insulation, you should always leave a small air gap, otherwise mold will appear there and the structure will collapse sooner or later.
The modern building materials market offers a wide range of insulation, among which everyone can choose the appropriate option both in terms of quality and cost. The most popular of them today is mineral wool, so let's start with it.

The main advantage of this material is fire safety, which, in fact, makes it so popular. Moreover, mineral wool provides good ventilation, prevents the formation of rot and fungus, and also conducts heat well.
Minuses:
- the material easily loses its original shape;
- it is short-lived - after a year of operation, almost half of the properties are lost.
The average cost of a cubic meter of mineral wool is approximately 1,500 rubles. This figure varies in one direction or another depending on the manufacturer and the technical characteristics of the material.

Another option that you can resort to when insulating a house made of wood. Styrofoam consists of many granules filled with air, which provides lightness and good thermal insulation.
Pros:
- excellent soundproofing properties;
- long service life;
- ease of installation;
- resistance to deformation and decay;
- high density;
- resistance to temperature changes.
Minuses:
- environmental insecurity;
- prone to rapid fire.
But the main disadvantage of the material can be considered that it cannot be used for insulating wooden houses due to poor vapor permeability and.
A square meter of foam plastic costs from 50 to 300 rubles, depending on the thickness and the manufacturer of the spruce.

Penoplex is also widely used in the insulation of buildings. It is produced by extrusion, as a result of which a material of a homogeneous consistency is formed. The advantages of the material include:
- environmental friendliness;
- incombustibility;
- safety;
- ease of use;
- water-repellent characteristics (due to the fact that there are no micropores in the cells);
- the ability to withstand heavy physical exertion;
- durability, resistance to decay;
- low thermal conductivity.
Minuses:
- upon contact with solvents of organic origin, the material is destroyed;
- there are difficulties in trimming and fitting;
- Vapor resistance can sometimes be more of a minus than a plus.
A cubic meter of foam plastic costs about 4,000 rubles. Warming a wooden house with such material is effective, but very expensive.
Note! If you want to insulate your home and protect it without spending a lot of money on it, then it is recommended to pay attention to mineral wool. It is on the use of this material that the technology below is based.
Isoplat is made from coniferous trees, and no chemical binders are added. Due to this, the plate does not dry out and does not deform over time. In addition, Isoplat is environmentally friendly and as effective as the tree itself.

Pros:
- thermal insulation: 12 mm board = 44 mm solid wood
- sound insulation from -23 dB
- elasticity: the plate fits snugly to the frame, breaking cold bridges at the joints
- vapor permeability: the plates remove excess moisture from the wall, preventing the formation of fungus and mold in the house
- ease of installation: Isoplat is pressed against the wall and nailed, a ventilated facade is installed on top and that's it. No more materials and work will be required.
- paraffin impregnation: protects walls from atmospheric moisture
- 100% eco-friendly
Minuses:
- - a higher price compared to other materials, but it will pay off, since Isoplat is guaranteed to "work" for more than 70 years and no alterations will be needed.

The first stage of work is to prepare the necessary tools and building materials.
What will be required in the work
When warming a house you will need:
- mineral wool;
- scotch;
- wooden slats (250 mm thick);
- nails;
- polyethylene film;
- staples;
- boards, approximately 10x5mm;
- slats, 5x3 cm;
- waterproofing.
And now - directly to work.
First stage. Surface preparation
At the end of the installation, the outer walls of the house will remain closed, so for a start they should be protected from harmful microorganisms and decay. For this purpose, special compounds are applied to the surface, which must be allowed to dry completely. Usually it takes a little time and after a few days you can start installation.

Second phase. vapor barrier
Wooden houses are good because they do not need a layer of air between the vapor barrier and the outer surface of the walls. For this reason, you can immediately attach the plastic film. Wooden slats are nailed to a flat surface (about every meter), to which a layer of vapor barrier is attached with staples. This distance is necessary to ensure proper ventilation. Holes are made at the bottom and top between the slats to eliminate the possibility of moisture accumulation and increase the intensity of air circulation.
The points of attachment of the film to the rails must be sealed with adhesive tape, which will protect the insulation from moisture penetration.
Third stage. Frame construction

Next, you need to create a framework. The boards should be nailed, being installed "on edge", with a step of 1.5-2 cm less than the width of the insulation board. By the way, mineral wool has sufficient rigidity to be placed in a frame without additional fasteners. In any case, the sheets of material will not slip.
Note! Professionals advise installing two layers of insulation in our climate zone at once. It is characteristic that the joints between the plates of the first and second layers should not coincide.
Fourth stage. Waterproofing
The final stage of work is the installation of waterproofing, designed to protect the insulation from moisture penetration. The membrane is ideal for this - its special structure allows air to enter, thereby creating additional ventilation, and at the same time does not allow moisture to pass to the mineral wool.

The waterproofing must be attached to the frame in the same way as the vapor barrier. At the joints, this creates a 2-centimeter overlap. The joints themselves are glued with adhesive tape to ensure tightness.
Fifth stage. Ventilated facade
If you do all these procedures, then a ventilated facade is created in parallel. It is designed to circulate air between the waterproofing and the outer layer of the surface finish. For this reason, it is necessary to create an additional frame layer. A similar crate is being constructed, but this time the slats are used in a different size - 3x5 cm. A fine-mesh iron mesh is installed at the bottom of the frame, which will prevent the penetration of insects and small rodents.
Sixth stage. Facade finishing

What material will be used in the decoration of the facade depends entirely on the design features, financial capabilities and personal wishes of the owner. For example, to give the house an attractive appearance, you can:
- sheathe with clapboard;
- finish it with facade tiles;
- sheathe with boards;
- build vinyl siding.
Siding is considered the most suitable option, but when installing it, you need to follow some rules.
- First of all, when finishing with siding, you should move from the bottom up.
- Be sure to leave a gap of 1 cm between the panels of the material.
- To fix the siding, you must use nails or self-tapping screws.
Possible mounting options
Before you start warming a wooden house, you need to find out what its load-bearing capacity is. In the construction of simple frame buildings, a strip foundation is mainly used. Therefore, in this case, it will be necessary to install an additional plinth, made in the form of a strip under the lining. It is desirable that the base is directly connected to the foundation.
The insulating layer is attached to the frame, we have already talked about this.
Sometimes, when insulating, a hinged frame is used, for the manufacture of which perforated aluminum profiles were used. Also, external walls can be insulated with light materials, for example, pressed flax or wood chips. Of course, the effectiveness of these materials cannot be compared with mineral wool or foam.

As a conclusion
High-quality heaters are available today to every owner of a wooden house. If all the work is carried out correctly, the result will be not only a cozy atmosphere, but also significant budget savings. Moreover, such a house will look beautiful and presentable - in any case, the owner will have something to be proud of.
Video - Insulation of the walls of a wooden house