Most experienced motorists prefer the old hinged or casement gate options, considering them the most secure and reliable due to the heavy weight and thickness of the metal. But, as practice shows, casement systems have a worthy competitor, namely, folding garage doors. Such is the popularity of the hinged design that today it accounts for approximately three-quarters of garage doors sold. It's worth looking into the reasons.
Advantages and disadvantages of garage doors
To understand the difference in using lifting and folding systems and the old swing structure, you need to try them at least a couple of times in practice, for a knowledgeable person the difference is visible to the naked eye:
- The folding gate system allows you to avoid the formation of a "blind" zone when leaving the garage. There are no shutters in lifting systems that block the view, which is why dozens of cars beat in garage cooperatives every year;
- The absence of hinged doors when opening the doors increases the room for maneuver in front of the gate, there is no need to park the car a couple of meters from the doorway in order to be able to open and close the garage.
For your information! Often, drivers decide to change ordinary gates to folding ones for only one reason: in strong winds, there is a chance to get hit by a sash on the car body at the time of departure.
Folding gates are cheaper to manufacture, they are more convenient to use, a simple device allows you to build on your own. But it is not possible to install such a system in every garage, at least you need free space in the ceiling above the entrance to the garage.
We build folding gates for the garage with our own hands
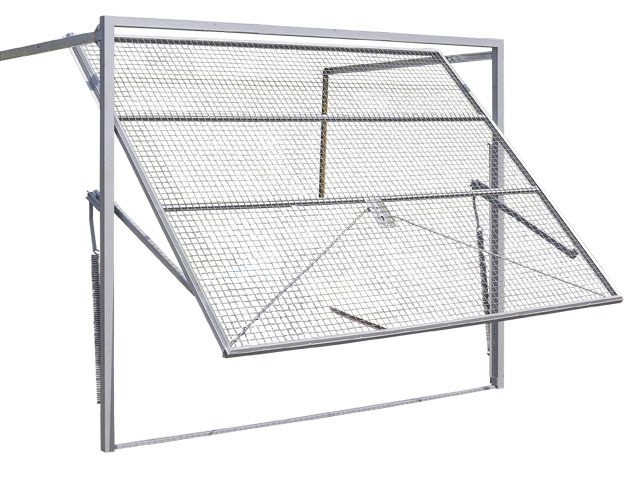
The device and the principle of operation of the gate are clear from the above diagram and drawing:
- Structurally, the gate consists of two frames - the shield itself, or a panel that closes the doorway, and a supporting support frame with guide elements;
- When opening, the upper part of the folding gate deviates and moves on rollers or bearings along two guides until the panel is completely on two horizontal beams;
- The lower edge of the panel rises and is fixed in this position.
The plane of the folding gate makes a movement resembling the rolling of a conditional cylindrical surface of a large radius. To facilitate the lifting of a steel or wooden panel of a folding gate, compensating springs or counterweights in the form of a load suspended on cables are used in the design.
Important! Unlike hinged systems, there are no external hinges in folding gates, which are easy to cut with a grinder. At the same time, the panel covering the doorway is adjacent to the carrier frame from the inside, respectively, it is much more difficult for intruders to pull out the garage door with a cable hooked to the towbar of a pickup truck or tractor.
Manufacturing of hinged gates
The easiest way is to make a folding gate design from a steel corner and a channel. Initially, you will need to measure the dimensions of the doorway, cut it out of the channel and weld the frame of the garage doorway.
In the upper part of the frame, two horizontal corners are welded with a shelf width of at least 40-50 mm. The length of each corner is more than two meters, so it is necessary to carry out welding work and assemble the entire structure "on the ground", before installing the folding gate system in the doorway.
The angle of attachment of the corner to the frame must be adjusted according to the building level. After welding with the frame, each corner is reinforced with a temporary brace made of a board or a wooden batten to avoid deformation of the structure at the time of its installation in the garage doorway.
If a lift in the form of weights suspended on cables is used in the folding gate system, one stud with a grooved roller with a diameter of 30-50 mm must be welded to the upper part of the frame.
Particular attention should be paid to the manufacture of the main panel of the folding gate. Structurally, the folding panel is a frame made of a pipe or a metal tubular profile with outriggers welded in the lower and upper parts - brackets.
The tubular frame of the panel must be marked and welded exactly to the dimensions of the stationary frame. The main condition is to perform welding in three steps so that the frame of the folding panel does not turn out with a “propeller” due to overheating.
First, the cut pieces of the profile are laid out on a flat area and fixed together by spot welding. At the second stage, the joints are welded on one side of the folding frame, after 30 minutes they are turned over and welded on the reverse side. If the frame of the panel turned out to be strictly in one plane, sheet metal can be fixed, otherwise neat straightening with a blowtorch and a sledgehammer will be required.
Assembly and installation of folding gates
Before installing the swing gate system, you will need to pre-assemble the structure. To do this, a stationary frame with welded corner guides is laid out on a flat horizontal platform. A freshly welded movable panel is laid on top of the frame, its position is aligned as it will stand in the closed position in the garage doorway.
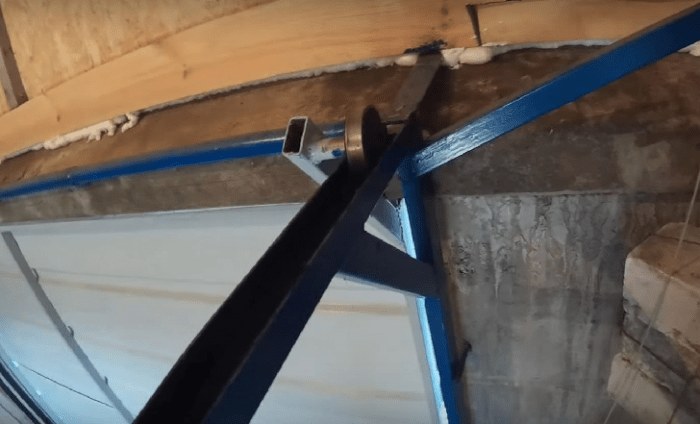
To connect the two parts of the gate, it will be necessary to weld oblique brackets with roller or bearing rollers to the upper profile of the panel.
The reliability and smooth operation of the lifting mechanism depends on how accurately the supports are installed. Groove rollers are put on the studs welded to the stationary frame. Additional L-shaped brackets are welded to the bottom beam of the panel, to which the lift-lift cable of the supporting gate will be attached.
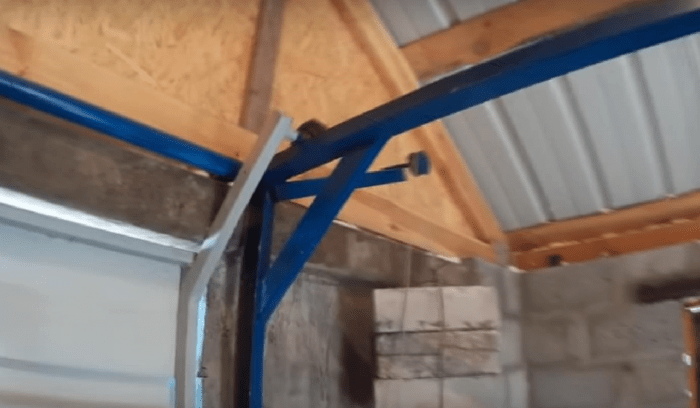
It remains to install the stationary frame in the garage doorway and fix it with anchor bolts to the side walls of the garage. Subsequently, the attachment points will need to be carefully poured with concrete mortar and plastered. Before the stationary frame is finally fixed, it will be necessary to align its position with the building level. Next, you need to make a U-shaped fixture, with which the ends of the corner guides are fixed to the ceiling.
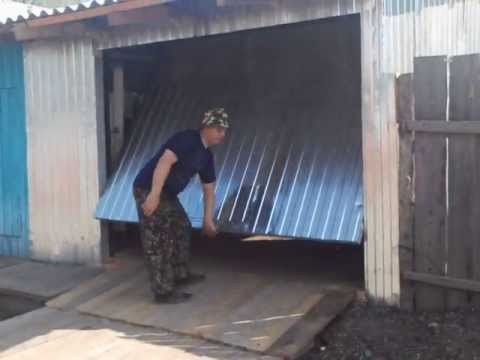
Gates that do not open with wings, but slowly disappear from our eyes, “leaving” along the walls of the garage, are convenient, because they do not interfere and are not bulky, do not take up space. The owner of such a device does not need to think about where it will be placed when it is opened, when a garage is being built, there is no “difficulties in winter due to snow” option. When opening such an entrance, only the lower part of the gate door near the garage ceiling is visible. Lifting gates are very safe, because they are, in fact, a single piece of wood or metal and are very difficult to crack. If galvanized, they will also be very resistant to corrosion. The door will reliably protect against thieves, keep heat inside the building and will become very convenient and easy to use, but buying it is very expensive. Much cheaper and more fun to do do-it-yourself garage door.
Important! Before making such gates, you need to understand that they also have disadvantages:
You only need a rectangular opening for the entrance to the garage, the arch will not work, except perhaps decorative.
You must first open the gate, and then drive close to the garage (you need a space of about one and a half meters). When the gate is open, the height of the garage decreases by 15-20 cm.
Lifting gates are very safe, because they are, in fact, a single piece of wood or metal and are very difficult to crack.
A model with sections is a canvas, which is made up of blocks of wood, plastic, or steel, about 1.5 m in size. During the lifting of this door, the blocks are "pulled" up and then returned back in the same way. Inside, the wooden sheet will be filled with polyurethane foam, which will not let the cold into the garage in winter. The panels are connected with articulated hinges, the moving parts are made of steel or plastic (steel is better, they will last longer), and the guide skids are resistant to destruction and rust due to their composition.
Unfortunately, such a door is almost impossible to make on your own, and cracking it is quite simple. You can buy a ready-made prefabricated kit and put the door in order to get its main plus - simplicity and ease for the owner.
Lift-and-turn doors - sashes “drive” under the roof during movement using the action of hinges and levers. Such a door is very reliable and it is very difficult for an attacker to crack it in order to rob a garage. They are also quiet during the ascent, because they do not use "driving" elements: guides and rollers, while using them, it is quite difficult to pinch your finger. This is an expensive choice, about 60 thousand rubles. for the object and 15 thousand - for installation.
Important! Gates can also be without automation, with manual control or automatic on the electric drive. Naturally, the former are cheaper. The cost will be from 14 to 75 thousand rubles. From 7 to 15 thousand pay for the installation. You can buy parts separately, but is it worth the trouble? It is easier to purchase an installation kit so that you can assemble and mount it later. A detailed description of the phased assembly is attached to each type of door.
 Lift-and-turn doors - in the process of movement, the sash “drives” under the roof using the action of hinges and levers
 This type of door includes a frame, a lifting sash and a mechanism that opens the door. A steel or wooden frame is mounted in the opening; profiles directly for the canvas must be placed in the box. It is made of wooden boards, sandwich panels, it should be covered with metal. A door made from a single piece of wood is a very expensive pleasure, the choice is simpler - boards impregnated with a chemical composition that will shelter from the weather and covered with metal painted in any color. You can glue the tree with pieces of pressed foam or other insulating material.
Before you start directly making the gate, you need to study the available methods of lifting.
- Method when using hinges and levers. A simple design promises reliability, but you need to mount the guide profiles very well and smoothly adjust the spring tension. Profiles should be placed parallel and even.
- Counterweight method. The cable is fastened down at the corners of the frame, passed through the block, led to the winch pulley, and at its end there is a counterweight. Its mass will be commensurate with the weight of the gate. The option means that the frame and frame will be subject to considerable load, it is advised to choose such a mechanism exclusively for huge gates. Next step: designing the gate. We measure the opening and draw a sketch (we search the Internet for drawings).
Important You will need the following details: a metal rod for a voltage regulator with a diameter of 8 mm; corner for the rail section - 40 x 40 x 4 mm, on the frame - 3.5x3.5x0.4 cm; wooden blocks with a section of 12 by 8 and ceiling 10 by 10; channel bracket 8 x 4.3 x 0.5 cm; metal pins; spring diameter 3 cm.
The box is assembled from wooden bars, their ends are connected with steel plates or corners, and the bottom deepens 2 cm deep into the floor, then we fix it in the opening with steel pins.
 This type of door includes a frame, a lifting sash and a mechanism that opens the door.
 The frame is made like this: they take a thick corner, its parameters are in direct proportion to the sheet of the shield, at 25 they take the 75th, at 50 the 100th corner. Next, we measure the garage and prepare the opening for attaching the frame, you need to make sure that its surfaces are smooth and even, if this is not the case, we take the grinder in our hands and work. Next, we are looking for a workspace for the welding process. We will have 2 channels lying on the welding site, their parameters are 20 cm smaller than the frame. We cut off the corners along the length from both ends, making sure that they fit snugly. We weld them together, make notches and use the four (five) of the electrode, create a frame, but do not weld very tightly. We apply it to the opening and control the density, if it is not there, then we adjust what happened and weld it again, then we clean the seams. We do the same with the second part of the frame, then the same - on the second wall, the frame should be made double - internal and external, install it.
A support for the channel bracket is made from the corner, in one shelf we make a hole to fix it to the racks, in the other - 3 holes to fix the spring bracket. We fix the bracket by drilling 3 holes in one of the shelves. Next, we make an adjusting plate from an iron strip, we combine the spring and the bracket with it. We bend the last coils of the spring with hooks, attaching a voltage regulator from the bar to the bottom. We create a hinged corner for the lower part from the corner, drill a hole of 8.5 mm and weld it to the frame, retreating from the lower edge to the central part of the hole. Thus, we make preparations for the manufacture of a lever for lifting on a 12 cm hinge. Further, we weld a plate for the voltage regulator to its end.
We need two corners for the gate to move. We take two corners, dock and connect along the edge so that the distance between the tops is at least 5 cm. We weld the rail to the plate with holes, leave 8 cm between the lower edge of the cross member and the axis of the guide. We weld a piece of channel with an indent of 12-15 to the second end of the rail see Next, we attach it to the ceiling bar. You can install additional protection devices at will, as well as rubber edging and lining, they will make the structure more stable and will give stability to the structure.
 Garage Doors
 It is advised to shed a trench with concrete along the length of the stroke between the side racks, press the channel parallel to the ground, when it hardens, we weld both frames.
Canvas installation
We measure the diagonal, taking into account the dimensions, bait it by welding, all kinds of gaps are excluded, we clean the seams and put the canvas. We attach the brackets and guides, their horizontal must be made perfect, then: we insulate the canvas, fasten the metal sheet, clean the seams, degrease. We adjust the springs, fix the internal fittings. The whole celebration of work and design will take two or three days.
The option is complicated, but they are airtight and better protect the room. They can be electric or manual. The first option is convenient, just press a button or remote control - you're done. But the manual drive breaks less often, and it’s easier to make a shield for it. The necessary parts cannot be made at home. Parts cannot be bought on the market, it is better to buy a factory kit.
The garage doorway should be measured and estimated whether a standard canvas will fit, also check that the side parts and the top from the bottom of the opening are in the same plane. We add 50 cm to the height of the doorway (if the gate is driven - 100 cm), this is the length of the garage necessary for the gate to lie on its ceiling.
 The option is complicated, but they are airtight and better protect the room
 Sectional doors consist of a leaf, locks, movement mechanism, spring balancing mechanism and guide modules. Tires are attached along the edges of the opening, which run under the ceiling, and the gate moves along them. It is better to buy polymer sections, they practically do not corrode, do not create noise, withstanding temperatures of -50 - +60.
Installation scheme
Create markup to secure the frame and component elements. Assemble the frame structure (not much different from the similar algorithm for up-and-over doors). Everything is standard: we put the frame, fasten the rails to the ceiling with bolts, but there is no need to drill holes and make other structures to keep it on the weight. We collect the canvas, starting from the bottom, we equip the panel elements with rollers. We protect the structure with casings. We check - if everything is done correctly, the canvas will not move by itself, hanging at the level at which it was installed.
It is worth saying in conclusion - home-made sectional doors must be safe. The bet is your own car, or even your life. You should be extremely careful about the installation rules, adhere to safety precautions and pay a small amount to a specialist who will check the quality of the door installation after the owner's efforts.
Do-it-yourself lifting gates
Today, lifting gates to the garage for many are no longer an innovation, but a first necessity. Due to their convenience and simplicity, they are increasingly replacing conventional swing gates. This type of garage door is especially appreciated in winter, when its owners do not need to clear the snow for a long time and tediously to open the doors. Moreover, many craftsmen have learned how to make lifting gates for the garage with their own hands.
There are two types of overhead garage doors:
- Lifting sectional;
- Lifting and turning.
Overhead sectional doors are a mechanism consisting of individual panels half a meter high, which, when opened, are pulled up to the ceiling.
Sectional sash panels can be made of steel, wood or plastic. They are fastened together with hinged loops, and move along the guides with the help of metal or plastic rollers. The guides, in turn, are made of stainless steel. Panels from the inside must be insulated with polyurethane.
Overhead sectional doors have a number of advantages:
- Ease of use;
- Safety of use;
- No noise when lifting the gate;
- Possibility of installing an automatic opening and closing system.
The disadvantages of such gates are:
- High price;
- The impossibility of self-production;
- Difficulties with;
- The complexity of installation;
- Poor strength (high probability of mechanical damage and breaking).
Note! Even if you want to save on sectional doors, you can do it only on their installation. However, you need to be prepared for the fact that such an installation in the garage with your own hands is quite difficult to perform. The second savings option is to abandon the mechanical drive and install a manual drive, which will lead to inconvenience when using. And the third opportunity to save the budget is based on reducing the parameters of the opening - in this way it will be possible to save on the size of the leaf of sectional folding doors.
Up-and-over or vertical garage doors are a single leaf that rises to the ceiling using a special device consisting of a hinged-lever mechanism.

The main advantages of lifting gates are:
- Reliability and durability;
- Saving space in front of the garage (compared to swing);
- The possibility of manufacturing lifting garage doors with your own hands;
- Variety of sheathing of the outer part of the valves;
- Possibility of installing an automatic lifting system;
- If desired, the presence of a gate.
However, lifting garage doors also have a number of disadvantages:
- When pulled up to the ceiling, they steal about 20 cm of space (this must be taken into account if there is a high car);
- The impossibility of partial repair if the rising canvas is damaged (the entire structure will have to be changed);
- Large canvas weight;
- Inconvenience at the entrance to the garage - between the gate and the car from the street there must be a distance of at least 1.5-2 m in order for them to open;
- Impossibility of installation in openings of non-rectangular shape.
Despite all the disadvantages of folding swing gates, their main advantage is still the ability to build them yourself. Homemade garage doors will be in no way inferior to their industrial counterparts. In addition, in order to make a lifting gate on your own, you will only need to spend time on carefully developing a diagram of their folding mechanism and purchasing all the necessary materials.
Homemade lifting garage doors can be the pride of any man. But in their production, you need to know how to make the gate serve for a long time and reliably.
Lifting gates consist of four parts:
- frame;
- opening;
- Canvas;
- lifting mechanism.
In the manufacture of fabric for do-it-yourself lifting gates, it is advisable to use either sandwich panels or a plank shield covered with a sheet of metal. A shield made of wood will have a very large weight and poor resistance to climatic conditions. It is best to insulate the canvas with basalt wool or polystyrene foam. For aesthetic reasons, the outside of the door shield can be sheathed with corrugated board or plastic panels.
The frame of the structure is made in accordance with the dimensions of the opening. For the manufacture of the frame, you can use both wooden and metal beams.

As for the lifting mechanism, it can be made either automatic or mechanical.
Important! When using an automatic mechanism to raise the shutters to the garage, it is necessary to minimize the weight of the canvas. At the same time, the automatic opening system is not as reliable and wear-resistant as the mechanical one.
The door opening mechanism can be made according to one of two existing schemes:
- Articulated-lever;
- Using counterweights.
The hinged-lever mechanism is based on the movement of two levers in special guides on hinges. Such a mechanism is considered very reliable. The main condition for its reliability is the accuracy when installing the guides (vertically and parallel to each other) and adjusting the springs.
The mechanism on the counterweights is designed in such a way that the counterweights are suspended on cables passed through a system of blocks and regulate the process of raising and lowering the door shield. The counterweight mechanism is used less often, since when it is used, there is a very large load on the frame and the gate frame.
If it is planned to cut a gate in the canvas, then it must necessarily swing open outward to avoid its involuntary opening during the lifting process.
Materials and tools necessary for construction
During the production of lifting garage doors, the following tools may come in handy:
- Roulette;
- Building level;
- Corner;
- Welding machine;
- Bulgarian;
- Screwdrivers and wrenches of different sizes;
- Drill;
- Screwdriver;
- Electric jigsaw.
From the materials you may need the following:
- Wooden beam section 12x8 and 10x10 (the possibility of using a durable steel profile);
- Corners 40x40x4;
- Channel 40x80;
- Steel bar 8mm;
- Two springs with a diameter of 30mm;
- self-tapping screws;
- Anchor bolts.
In the manufacture of shutters with a lifting mechanism, it will be necessary to draw up drawings or borrow them from other sources.

Action algorithm
- We collect the box. We connect two vertical beams and one transverse using plates or a square.
- We deepen the bottom of the box to a depth of 20mm.
- We assemble the canvas frame and sheathe it with the necessary material. We place rollers in the upper part of the canvas, we place a seal around the entire perimeter of the canvas.
- We collect the frame for the guides. At a distance of the length of the canvas from the horizontal bar of the box, we install a beam strictly parallel to it, to which we attach guide rails on both sides. We attach the second ends of the rails to the top of the vertical bars of the box. We mount the guide rails from two metal corners.
- On both vertical bars of the box, with the help of corners and fasteners, we make movable brackets, to which we attach the levers of their channels.
- In the lower part of the vertical bars of the box we fix the springs. We attach the upper parts of the springs to the bracket and channel. The fixation of the spring with the channel and the bracket can be reinforced with a tension regulator.
- We install the rollers on the canvas in the guides.
- We fix the canvas in the box.
- Cut out the wicket.
- Installing a lock.
Summing up, we can say that making a lifting garage door with your own hands is not so difficult. The easiest way to insulate garage doors will be.
The garage becomes an integral part of any home or cottage, since almost every family has a car and very often there is more than one. As you understand, a garage cannot exist without high-quality, reliable and convenient gates, so it is necessary to approach the choice of the design of future gates very carefully.
Types of lifting gates
Today, lifting gates have become commonplace and are very common. Their main advantage is the incredible functionality and comfort of use.
Due to their compactness, they are great for all types of garages and yards, can work in tight spaces and save you time and effort when opening. Today there are such types of lifting gates:
Lifting sectional
The main canvas consists of panels that are assembled into a single non-rigid structure and are able to bend as they rise and align into a rigid canvas when closed.
Sectional lifting gates
lifting and turning
The front panel is solid and absolutely not deformable. The rise of such a structure occurs along a curved path, the upper part goes a little deeper into the garage, about thirty percent of the total height, and the lower part goes out, the remaining segment.
One or another variety should be selected taking into account your preferences and the characteristics of the garage itself, as well as the amount of free space near the entrance. Also consider the cost, as well as the complexity of self-assembly, since both of these parameters will differ for each type.

The most common type of garage door at the moment is the garage door lift-and-turn.
Further, in the article you will learn how to make a lifting gate with your own hands, but first you need to know the design of the overhead gate. They consist of a frame that is securely fixed in the garage opening, the door leaf itself and a mechanism that carries out movement.
The upper edge is fixed on two slats along which it moves on rollers approximately at a height of two-thirds from the lower edge, side rollers are fixed, which move along the side rivers. The entire system is set in motion by one or two drives, or in extreme cases this is a manual opening of the gate.
We collect the necessary materials and tools
Depending on the features and type, the amount and type of material will vary, but for the simplest gates that you can easily make with your own hands, you will need the following materials:
- Wooden bars with a section of 120x80 and 100x100, for the box and ceiling, respectively.
- Metal pins for fastening.
- Corners for the frame and rail, 35x35x4 and 40x40x4.
- Channel bracket 80x45.
- Spring, with an inside diameter of 30 millimeters.
- Metal rod with a diameter of 8 millimeters.
- Actually, the canvas itself.
- If required then buy an actuator for automation.

Of the tools, you will need the simplest things that you can easily find in your garage, namely: a hammer, tape measure, pencil, a set of wrenches, a drill, a level, screwdrivers, metal and wood drills, a grinder and a welding machine.
Step by step instructions
The whole installation process is quite simple and will take place according to the following plan:
- Frame manufacturing.
- Installation of rollers.
- Create a shield.
- Installation of additional elements.
So, we begin the process with the design of the future structure. It is best to do this in advance so that in the process of work you do not have any hitches and difficulties with calculations, since your head will be busy with many different things to do, and the work will move very slowly, and the result may turn out to be of less quality.
Step 1: Measuring the opening
First of all, measure the garage opening, and then transfer it to paper. Based on the resulting values, you make a small sketch of the future design, if you don’t know this, it’s better to use any of the ready-made drawings that you like.

Measurements must be taken carefully during installation, because this kind of design should not have even the slightest skew.
Step 2: Main frame fixing
Once you know what gate you want to make, you can get to work. Homemade lifting gates are made on the basis of a wooden box, which is assembled into a single frame. Individual bars are twisted with metal corners or plastics using self-tapping screws, nails or bolts.

The resulting frame is fixed in the opening, the lower part should go deep into the floor to a depth of three to five centimeters. It is necessary to fix the frame with metal pins to each wall and to the floor. For reliability, for each linear meter it is necessary to use one pin with a length of thirty centimeters.
Watch video: We make the frame of the canvas
Step 3: Assembling the Canvas
The canvas is assembled very simply: a metal frame is made for it from the corners, and sewn up with a sheet of metal on top. To decorate the gate, it is fashionable to trim the sheet with various decorative panels. For insulation and soundproofing, foam, mineral wool and so on are used.
Step 4: We fix springs and mechanisms

It is best to choose springs from steel 65G.
We take the corners and make a support for the guide mechanism. We drill two holes on one of the shelves, through which the structure will be fixed to the supports.
On the other hand, we drill three holes with a diameter of one centimeter to secure the spring bracket. The bracket and spring are connected with an adjustment plate.
Thus, a ring is obtained on the top of the spring, and a thread on the bottom. From below, using the corners, we make a knot of hinges, with a hole of about one centimeter.
It is welded to the frame near the bottom rib and the middle of the hole designed for the lift system lever, at a distance of about twelve centimeters.

Step 5: We make guides, rails
The plate for adjusting the tension is welded onto the end of the lever. We make guides from the corners. They are welded in such a way that the internal size is five centimeters.

The frame is formed using a thick corner. With a canvas of 25-ke, it is best to use the 75th corner, and for the 50th canvas - a corner of a weave.
At the edges of the rails, clamps are attached that will hold the sash in the open and closed position and prevent the rollers from sliding into the rails.
We fix the rail with bolts to the wall, accurately measuring the level, it is best to do this by opening the gate halfway so that the rollers are in the middle of both guides.
Step 6: Final stage
After all installation work is completed, the entire system must be painted so that the metal does not succumb to corrosion and does not deteriorate too quickly. Hard-to-reach places, and places adjacent to walls and other surfaces should be painted even before installation. After that, after letting the structure dry, you can begin to use it.
We make automation
Having made lifting gates with your own hands, you should think about automating them, since it is not always convenient to constantly run and open them. For example, in winter or when it's pouring rain, you don't really want to go out and fiddle with locks and stuff. It is best to do this while sitting in the car or only when leaving the house.
It is very simple to automate swing or folding gates, you only need to purchase a suitable drive and install it according to the instructions that come with the kit.
All drawings must be present there and the drawings will show you clearly how to install. The mechanism for swing gates depends on the method of installation and can be of the following varieties:
- Installation is carried out on the door leaf.
- Mounted on rails.
- The drive is installed on the side racks.
Which one is more suitable for you, you need to decide on your own, as it will depend on the design features, the weight of the gate, your preferences and other factors.
When purchasing a car, the owners first of all think about a cozy, warm, comfortable and spacious home for their steel friend. Such an individual space is called a garage. It can be attached to the house, or it can be a separate small building.
In any case, the garage simply must be equipped with a personal car entrance. Garage doors are the very first option in search queries for those who want to create this miracle of mechanics and technology with their own hands.

Types of structures
It would seem that it is easier: to choose a standard gate for your opening - and not have an additional headache. But craftsmen, proving to themselves and the world that they are not born with a bastard, continue to look for new ways to save money and use their own creative forces and technical skills.

Among the wide variety of garage doors, there are basic designs that daily delight even the most demanding car owners with their functionality.
The simplest of them are classic swing models.. They usually consist of two wings, one of which has an entrance door. As a rule, swing gates are very massive and take up a lot of space. Since their plowing requires a rather large amplitude. They are installed on a metal frame, to which they are attached with durable canopies. Such gates require increased attention: control of lubrication of hinged mechanisms. Due to insufficient care of swing gates, sagging can sometimes be detected.


Sectional doors for the garage are several metal movable canvases interconnected by loops. The edges of each part are equipped with special rollers that move along special guides installed in the gate opening. They go under the ceiling, thanks to which the sectional doors smoothly go up, while saving space in the room.
There is a convenient variation of this view, when the gate drives off to the side.

Folding garage structures also consist of vertical sections. But more often they are swing gates, folding on the sides like an accordion. They can be installed in an opening of any width (the number of sections - canvases will depend on this).
They can be installed in such a way that they will fold both inward and outward - depending on the size of the room and the need to save it. The main load falls on the walls and ceiling, so the space remains free and unused.


One of the most common and easy to install types of garage doors are lifting structures. Like the others, they can be automatic, but also have their own unique lever mechanism.
The mechanical model of the lifting gate opens and closes with a slight movement of the hand, and by installing an additional bar with a motor, you can get excellent automatic gates on the remote control.

materials
Any garage door is made from the following basic materials:
- metal (profiling);
- tree;
- steel.

Structures made of corrugated board have a fairly long service life and have high strength. Treated with special anti-corrosion agents, such gates will be resistant to moisture and temperature changes. In addition, care for metal structures is much easier than for any other materials.
The corrugated board is very easy to cut and divide into the necessary sections / sections, removing the additional weight load on the guides. However, when working on garage doors on your own, it should be borne in mind that it is very easy to cut yourself deeply on the cut edges of the metal. Elementary safety rules will save you from getting an unpleasant injury.

Wooden garage doors are less in demand in the market but also have their own functional value. Along with metal, they have a low price. Wood is always beautiful and natural. Perhaps this is where all the advantages of the material end.
Wooden gates are fire hazardous, less durable and have very low strength. They are prone to rotting even after being treated with antiseptic and other impregnations.

Steel structures are somewhat more expensive than wooden and metal structures, but are just as durable and strong as the latter.
The main horse that most modern motorists and professionals rely on is sandwich panels. Practical and economical, these doors are good heat and sound insulators. They are very easy to install, insulate and wash.. Excellent fire-fighting property will ensure the safe stay of your car in the garage with such gates.
Profiled sheets are also an excellent material for making garage doors.. With such an entrance design, you are not afraid of weather conditions and mechanical damage. This is a very durable, beautiful and economical material.

Dimensions
Modern manufacturers of garage doors offer a huge number of dimensional varieties of their designs. Some even have them made to order. It will not be difficult for you to make the necessary measurements in your garage.
There is also the opportunity to make an independent calculation using preliminary drawings and diagrams. Be sure to take into account the specifics of the premises, the material from which your gates will be made, the weather conditions that await them at different times of the year.

Professionals insist that lifting gates can only be installed in rectangular openings. The lifting mechanism also cannot be done differently than it is in the classic models.
A good option is to take ready-made standard drawings for lifting garage doors and substitute your own values \u200b\u200bin there so as not to be mistaken. In this case, the scheme must take into account not only the size, but also the location of the entire structure as a whole. Particular attention should be paid to both the door leaf itself and the lifting mechanism.


The drawing shows in detail what measurements and where to make.
The decryption is pretty simple:
- H- the height of the opening in which the gate frame and the structure itself will be installed. It is very important to understand that the total height of the opening and the maximum height of the car that can enter the garage after installing the gate are two completely different things. This distance is measured in order to understand what gap remains to lift the gate to the ceiling.
- L- the lintel or the depth of the garage and b1, b2 - the shoulders are necessarily located in the same plane, but they necessarily have different sizes. Moreover, L is always greater.
- B– the width of the opening should be measured with gaps of approximately 2 cm on each side.
- L- the depth of the garage is necessarily greater than the height of the entire gate structure, otherwise the canvas will simply have nowhere to “go away”.

How to do?
It takes from two to five days to independently manufacture lifting gates. Depending on the desired result.
For example, there are two types of lifting mechanisms:
- Levers + springs. Not the easiest, but the most common and safest way to raise and lower a garage door of a small mass. Particular attention during installation will have to be paid to the fixation and adjustment of the springs and the high quality of the guides for the rollers.
- Counterweights. As a rule, it is used in the manufacture of homemade folding gates of great weight. The cable is pulled from the bottom corners of the canvas, passes through a special block and is attached to counterweights located at the other end of the winch.

The definition of lifting mechanisms gives a clear picture of what tools and materials you may need during the manufacturing and installation process.
Consider the main stages in the manufacture of garage doors of a lifting type:
First stage– creation of a layout and drawing of future gates. A little has already been said about this. But when describing the stages of production directly, you should start with this.

The second stage involves the acquisition of the necessary tools and materials for the manufacture of gates:
- Rectangular pipes-profiles 40*20 mm and 20*20 mm. It is very important that they have sufficiently dense walls: at least two millimeters. The former are well suited for the manufacture of a canvas frame, and the latter for longitudinal and transverse jumpers and guides.
- Gate cloth. Here, the owner needs to decide for himself how he wants to see the entrance to his garage: profile sheet, sandwich panel, wood, metal.
- Wooden beam or metal corner. If you decide to use a lever-spring mechanism, such tools are ideal for you to secure it.
- Retractable rollers and directly the gate lifting mechanism.
- Insulation, if you decide to make your garage warm even in the cold season.
- A set of complex tools: grinder, welding machine, screwdriver.
- Among the simple - only what can be found in the arsenal of any master owner: level, screwdriver, tape measure, pencil, hammer, wrenches.


When preparing the opening it should be borne in mind that it should be in the same plane with the walls of the garage itself. This will improve the functionality and simplify the operation of the structure.
We proceed to the alignment of the walls, which will be adequately assessed by the construction water or infrared level. But also a prerequisite is the strength and horizontal flooring.

So, all the preparatory measures have been completed, we proceed directly to the manufacture and assembly of lifting garage doors with our own hands. And this will be the third stage of work.
We make a frame. This is the main element that bears the biggest responsibility and the biggest load. First, we assemble the box, which will be made of wooden beams or a metal corner, as indicated in the required materials. The main feature of the manufacture and installation of the frame box is that its lower part should go under the floor level by 2 cm. This is an additional means of fixing the structure.
It is important to remember that it cannot be adjusted using wooden wedges and mounting foam. In order to "fit" the frame under the opening, it is necessary to use special metal liners.

The next step is to install roller bearings.. The guides must be installed first. They are sometimes also called roller rails. This point is important because the entire installation process must be accompanied by a careful measurement of the level Otherwise, the design simply will not be able to function.
In the picture, the rails are highlighted in green and their correct installation so that everything works.


It's time to proceed directly to the door leaf. Manufacturing options are simple and not very diverse.
There are three main types of installation of the gate shield itself:
- wooden frame made of beams, sheathed with sheets of metal;
- one-piece metal shield;
- metal profile base, on which a solid sheet is also attached.


This is the reverse side of the coin, that is, what will be inside the garage. It's over, I want to add insulation to our incredibly cold winters. As for outdoor processing, everything here already depends on your financial capabilities and aesthetic preferences.


The fourth stage in the manufacture of lifting gates is to install the gate. If there is an urgent need for it, the production of the front door and its installation is made with greater ease. For this, simple doors cut out of the gate and mounted on hinges are suitable.. After the readiness of all the main structural elements, a complete check of the mechanisms, tightness, level and functionality is carried out.


Many craftsmen in their video blogs talk about the possibility of automating lifting gates. It is also within the power to do it yourself to the owner of the garage. Three main components cannot be dispensed with here: an electronic drive unit (the brain of automatic opening and closing of the gate), a radio signal receiver and a remote control.
For the installation of the first, professionals advise using practically improvised means, such as a reverse winch or a power window mechanism.

Another important point is the installation of a lock on the gate. Since such a structure can often be opened with one slight movement of the hand, it will not be difficult for attackers to deal with both the gate and the contents of your garage.

Among the additional accessories that can be installed in the process of making a do-it-yourself garage door are more decorative tips: installing windows that increase the amount of sunlight and save electricity.

As can be seen from the step-by-step instructions for self-manufacturing of lifting gates, this process is quite laborious and sometimes even complicated. But thanks to the garage owner's own participation, it becomes noticeably more economical. For example, the average price of a domestic manufacturer's lifting gates can reach up to 70,000 rubles. When doing all the work with your own hands, you save about 60,000 rubles, taking into account the installation of options.
By following all the rules and steps in the manufacture of a garage door with a lifting mechanism, you will receive a versatile and unique design that will protect your car at any time of the year.

The main tips and recommendations for the operation of lifting-type garage doors come down to the care, adjustment and repair of all components in particular, and the system as a whole. For example, all rubber seals require additional periodic lubrication with silicone. This will help to avoid cracking or freezing during the frosty season.

The lever system requires constant lubrication so that it does not rust, does not creak and works as long as possible. Rollers, by the way, have the same undisguised need. The tension of the springs needs to be constantly adjusted so that the operation of the lifting-type garage door is as comfortable and durable as possible.
If the tension weakens, then the gate can simply not be opened. And if, on the contrary, the spring is overtightened, then the sash can be knocked over and damage the canvas.

In case of mechanical damage to the door leaf, it is no longer possible to fix it. Since it is installed with one whole sheet, it will be necessary to replace the entire main door covering.
After all the basic manufacturing and installation work has been completed, you should worry about security systems. So, it is best to install stops on the rails so that the canvas does not come off the rails during operation.

One of the main tips of professionals and amateurs in their field is the timely diagnosis of the state of the entire structure as a whole. As well as constant monitoring of the state of its components.
Hand-made manufacture of lifting gates for a garage is a very complicated process. It requires constant monitoring, increased accuracy and responsibility. Getting started, you need to weigh the pros and cons of this process, and already with confidence to take on it. Taking into account all the nuances, tips and recommendations, any car owner will be able to make exactly what they really wanted, but it was scary to imagine. All people are the smiths of their own happiness and their surroundings.