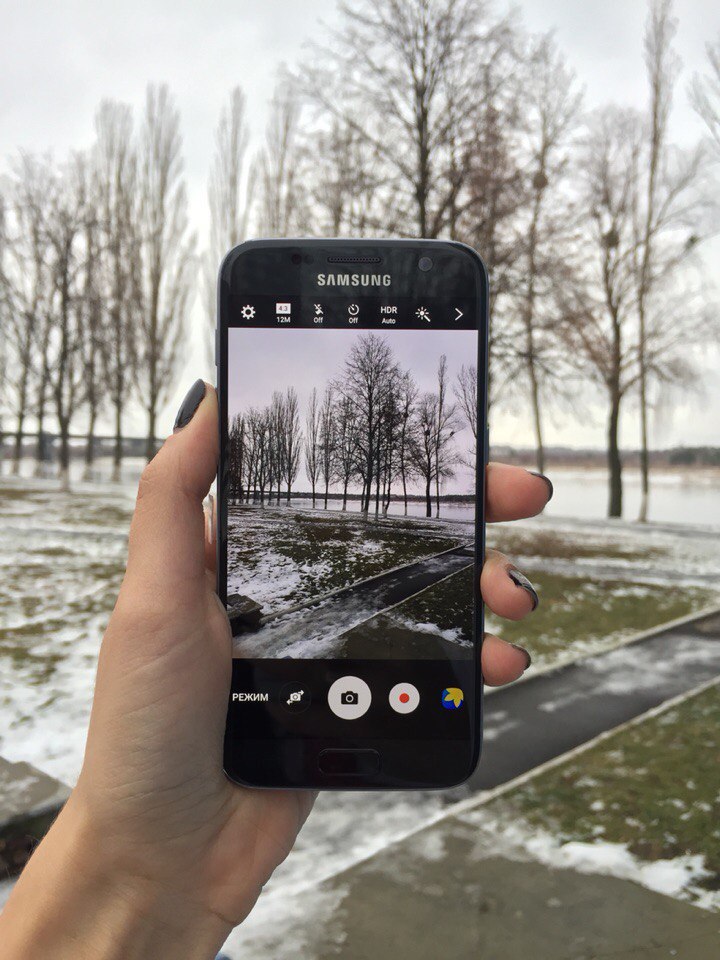
At the time of buying smartphone one of the most important selection criteria are camera specifications devices. Progress modern technologies got to the point that the camera mobile phone can compete with the camera. And given the fact that the phone modern man uses more often than any other device, a great responsibility is assigned to the phone camera.
Sometimes in the hands different people the same smartphone takes pictures in different ways, the objects in the photographs are different from each other. Most are confident that the more megapixels a camera has, the better quality photo, in fact it does not quite correspond to reality. As a rule, the point is camera settings. Megapixels indicates what size photos can be printed without compromising quality.
To get a high-quality picture, you need set up the camera correctly... These settings include white balance, exposure, focus, and ISO. Also, in order to improve the quality of photography, it is necessary follow a few simple rules.

Keep your lens clean
The first thing to do before creating another photo masterpiece is to wipe the camera lens with a cloth, often there are fingerprints or some kind of debris from your pocket on it. A clean lens will definitely make your photo sharper, sharper and more vibrant.

Pay attention to the light
Good photos can only be taken under normal lighting conditions. Even as a beginner photographer knows that light should not hit the camera directly, but should illuminate the subject well. From this it follows that it is better to arrange photo sessions in daylight days. But don't take pictures in the open sun.
Focus objects
In order for this or that object to be in the center of attention, it is enough to designate it by touching the phone screen, wait until the camera selects the object and take a photo. Thus, you can place accents on the photo, highlight the main thing and blur the secondary.
Don't use ZOOM
Using the smallest zoom possible (bringing the subject closer) will significantly degrade the image quality. Objects in the photo lose sharpness and clarity, the picture becomes blurry, and sometimes you can even see large pixels. To get closer to an object, it's best to just walk up to it. If this is not possible, then take a picture without zoom, and then cut out the desired area.
Use flash on rare occasions
Majority professional photographers don't use flash at all. The flash spoils the color reproduction, distorts colors, highlights unnecessary details. Moreover, it should be avoided when shooting portraits. All skin imperfections using flash will be in the spotlight.
Experiment with the settings

It is impossible to unequivocally answer the question in which position it is necessary to bring the settings of the smartphone in order to get perfect photo... Most correct advice in this case - experiment with ISO, change white balance, try macro photography, and generally speaking enjoy all those settings that your smartphone allows you to change.
Don't be afraid to change the settings from minimum to maximum and vice versa. For example, in shots that include very light and very dark parts at the same time, try using the built-in HDR mode.
If the lighting is insufficient, the objects in the photo cannot be seen, increase ISO.

By changing, you can get colder or warmer tones.


Change clarity, sharpness and saturation, so you can make the photo more realistic or vice versa.
Check the resolution, most smartphones allow you to choose photo resolution... The higher the resolution, the better the quality of the photos.

Do not forget about automatic photography... It is not for nothing that smartphones are called smart phones; they may well independently select the necessary settings to improve the image quality.
Enjoy multi-burst shooting
Multi-burst shooting will allow you to capture the right moment. When you hold down the shutter button, the camera will start shooting a series of frames until you release your finger. Then you can choose the best frame and delete the rest.
Photo editors will fix bugs
A huge variety of specialized applications that will help correct the shortcomings of an already finished photograph can be downloaded from PlayMarket. There are all the same settings as the phone camera, only you can apply them already on the finished photo... Not a single hour can be spent processing a photo and experimenting with filters. The most popular applications are Snapseed, VSCOCam, Pixlr Express, Adobe Photoshop Express, free and easy to use.
Try to photograph the same object from different angles, experiment with phone camera settings, use editors, and soon you will be able to amaze your friends and loved ones with miracles a photo taken with a smartphone.
The quality of the video captured by the webcam can be influenced by both program settings and external factors. environment... Use the tips below to help you properly assess environmental conditions, access settings in the YouCam program, and complete required settings... Other programs may have similar controls.
Update Windows and install new webcam drivers
If you are concerned about image quality, use Windows Update to install the most recent service packs that fix known hardware issues.
To run Windows Update Troubleshooter:
Tuning for environmental factors
The video signal quality of a webcam is affected by many external factors... Consider all of the following and make the necessary adjustments.
Place your laptop in an easy-to-view location... Since the HP Webcam is located in the lid of the laptop, you can adjust the angle of its position and, accordingly, the shooting. In addition, the laptop can be moved closer or further away from the subject to obtain the desired image.
Clean the webcam lens. To clean the lens, use a soft, lint-free cloth (not a tissue or paper towel) and a soft detergent for example for cleaning glasses. The webcam lens is built into the laptop lid.
Adjust lighting. You may need to increase or decrease the lighting in the room, move the light source closer to or further from your subject. If the light source is too close or the light is too strong, unnatural highlights or shadows may appear in the image. Avoid using light sources that shine directly into the webcam lens or strong lighting behind the subject. In addition, fluorescent lamps should be avoided whenever possible, as they increase the graininess of the image and may cause some colors to change.
Move slowly when filming with a webcam. Webcams are not designed to record fast motion video. Fast movements will result in blurry areas in the footage.
Minimize external noise. Whenever possible, shoot video in a quiet room with closed door and minimal background noise from computers and other equipment. HP notebook PCs with webcams have built-in microphones, which, however, do not have the ability to cancel out background noise. If the built-in microphone does not suit your project, use an external microphone that plugs into the microphone-in jack on your computer.
For both indoor and outdoor use. The webcam is designed for indoor use where the light parameters are more constant or can be adjusted. When using the webcam outdoors, the light may be too bright and there may be strong contrast between bright and dark areas. In this case, the exposure time for an individual image is significantly reduced, which results in blurry images with low resolution. This is more noticeable on select laptop models, where the webcam is configured to automatically adjust settings for low light conditions.
YouCam video settings
You can adjust the video quality of your webcam using the YouCam settings. If YouCam is not installed, see Installing the YouCam app See the document Testing Your Webcam with YouCam for information on obtaining this program.
In today's article I will show you how set up video surveillance in one of the stores at the request of a friend. To be honest, I have never had to deal with the installation and configuration of video surveillance before, and just the other day such an opportunity presented itself. I must say right away that I did not come up with anything complicated and expensive: the observation was carried out using a regular webcam.
I have a friend who rents a small department in one of the city's supermarkets. And recently, he suspected that the sales girls were not performing their duties very well. He wanted to be able to sometimes "spy" on their work and control the quality of customer service. It also became necessary to record a video archive, so that in the event of any excesses, you can watch the video for the right day at the right time. And the very presence of a video camera in the department would discipline the workers.
The requirements of the customer (my friend) to the organization of video surveillance were as follows:
1. Minimum costs for video surveillance.
For this reason, I immediately had to abandon the use of an IP camera, and take a regular webcam. An IP camera, of course, allows you to get a better image, but it also costs much more (the price for a more or less decent IP camera starts from 5000 rubles and more). Accordingly, they also refused to buy a static IP address from the provider, which is necessary for the operation of the IP camera.
2. It is desirable that the software for organizing video surveillance is also free. In addition, it should not be too difficult to configure: the customer would like to be able to independently change some options (for example, change the video recording quality or its format) if necessary.
3. So that the video can be easily accessed at any time. But at the same time, it should be available only to the customer.
4. So that the video from the camera is written to the archive and you can view the recording for a certain period of time.
Based on all the requirements listed above, I found it seems to be the best option... This is using the service.  It is suitable not only for controlling your business, but also for many other purposes:
You can install a camera in the apartment and watch what your child is doing in the absence of adults. Or look after the nanny hired to look after him.
You can look at your apartment while at work.
You can put cameras in the office and keep an eye on employees during a business trip or vacation. In general, the list of applications can be limited only by your imagination.
Note that this is not only an Internet service, but also a program Ivideon Server, which allows you to record video from web or IP cameras, and transmit it over the Internet. I'll go into more detail on this later.
So, I will describe in order all my actions:
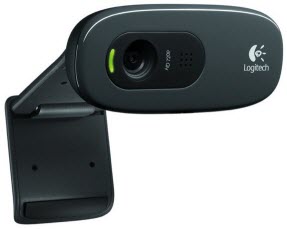
I first went to the computer store to choose webcam... It was necessary to purchase not the most expensive, but also not the cheapest, decent quality camera. As a result, I stopped my choice on Logitech HD Webcam C270... Reasonable price (around 1500 r), good resolution (1280 × 720 pixels) - in general, this is what you need!
 Also I immediately bought USB extension cable 5 meters long. Please note that according to the USB standard, it can be extended by no more than 5 meters. And even then it is desirable that the cable is of high quality. If there is a need to lengthen it to a greater distance, then it is already necessary to use an extension cord with an amplifier, but there is no guarantee that everything will work correctly.
  Then I decided on which way I would pin webcam... Previously, I looked on the Internet different variants mounting webcams to the wall. In one of them, it was suggested to glue the camera using double-sided adhesive tape, but experimentally I was convinced that this is not reliable.
From everything I saw, I liked two options: 
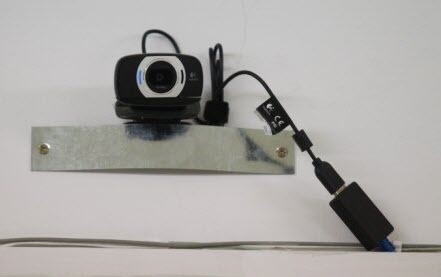 As a result, I fixed it in about the same way as you see in the first picture.
So, once on the spot, we proceed as follows:
1. We connect our webcam to the computer. If it is necessary to lengthen it, then we connect it via an extension cable. We fix the camera in the place we need on the wall (ceiling, cabinet, etc.).
After that we install the original driver for the webcam. It is advisable to do this because drivers provided by the operating system do not always work correctly.
For my webcam, I downloaded the driver from the manufacturer's official website.
2. The computer to which the camera is connected must naturally have an Internet connection. We launch a browser on it and go to the site .
First, we need to register here. To do this, click on the "Registration" button at the top right. Then enter your email address and password - click "Register":  Everything! We created our own account in the Ivideon system... By the way, we will automatically receive a confirmation of this by email.
3. Now we return to home page site and scroll down to the bottom. At the bottom left, click the "Downloads" button:  On the page that opens, download the program Ivideon Server:
Then install the Ivideon Server program on the computer... It is possible to set it as service... If you install the program in this way, then it will not even be displayed in the processes in the "Task Manager". Consequently, the person being monitored will not even know with the help of what software this is carried out and, accordingly, will not be able to turn it off.
If you wish, you can generally disguise the camera in some way and not inform the person that he is being watched. It all depends on you and on what goals you pursue by organizing video surveillance.
To install Ivideon Server as a service, check the corresponding box in one of the dialog boxes. Click "Next" - "Install":  In the last window, without removing the checkboxes, click the "Finish" button. After that, the following window will automatically start, in which we click "Next":
  Then we indicate our mailing address. In the line "Location" you can write something of your own or select from the list. Click "Next":
  Personally, after that I got a window with the following error: “Error while trying to attach the server to the account: problem with the network connection”:
  If you suddenly get such a window, then try to temporarily disable programs blocking the connection to the Internet: antiviruses, firewalls, firewalls. In my case, it was the third-party firewall installed on the computer that was to blame. After turning it off, everything worked.
If this does not help, then the developer advises the following solution: register 8.8.8.8 as the second DNS in the computer's network settings.
In the next window, you are prompted to make sure that your camera is already connected. Click here "Next": 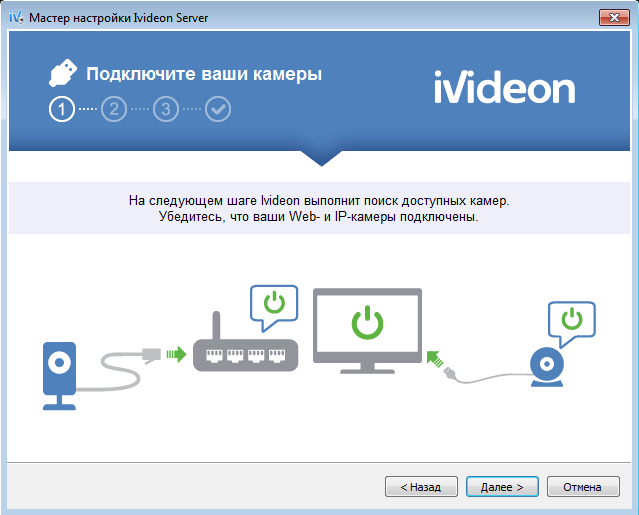 Then a window will appear in which you need to select a camera, which will be used for video surveillance.
If you have an IP camera, then most likely you will have to add it manually using the “Add” button. My regular webcam immediately appeared in the list:  Click "Next". In the next window, you need to set the parameters if we want. If we do not need this, then simply uncheck the "Include recording to archive" checkbox.
  Here you need to decide how many gigabytes hard disk we are ready to give it away for recording a video archive. In my case, the client wanted the video to be saved for at least two weeks. Because overall size allowed, then I set the archive to 200 GB.
Click "Next". In the next window, I left all the checkboxes by default and clicked "Finish":  A browser window will automatically open with a proposal to log into your account on the site. Enter the email address and password - click "Login":

Will open, so to speak, Personal Area
, in which we already see our camera at work. Click on the image - a separate window with an online broadcast will open. I was already writing the article at home, so I photographed the first thing that was nearby. Well, of course they were computers 🙂 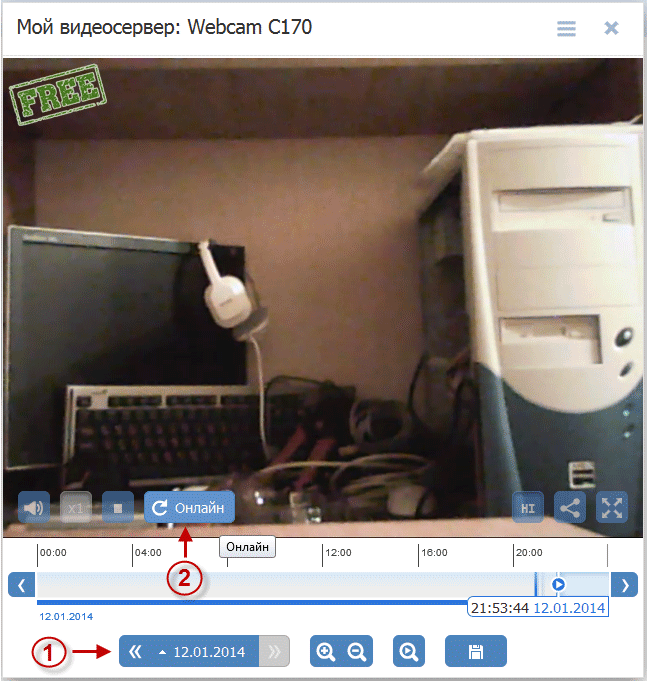 In order to watch videos for other days in the future, you will need to click the "Calendar" button ( 1
) - select the day - select the desired hour on the time scale. And in order to return to online shooting when viewing the archive, you need to press the "Online" button ( 2
).
In order to watch videos for other days in the future, you will need to click the "Calendar" button ( 1
) - select the day - select the desired hour on the time scale. And in order to return to online shooting when viewing the archive, you need to press the "Online" button ( 2
).
So, we were convinced of the performance of our system, we leave our personal account.
Now there is something left to tweak in the program Ivideon Server... We have it up and running now. To get into the settings, first stop it:  Now we press the button with the “Settings” key. If you go to the "Advanced" tab, then here you can configure the recording settings for the webcam. By the way, they affect the amount of data written to the archive (more details).
If your computer connects to the Internet through a proxy server, then on the same tab at the top you can write proxy settings. 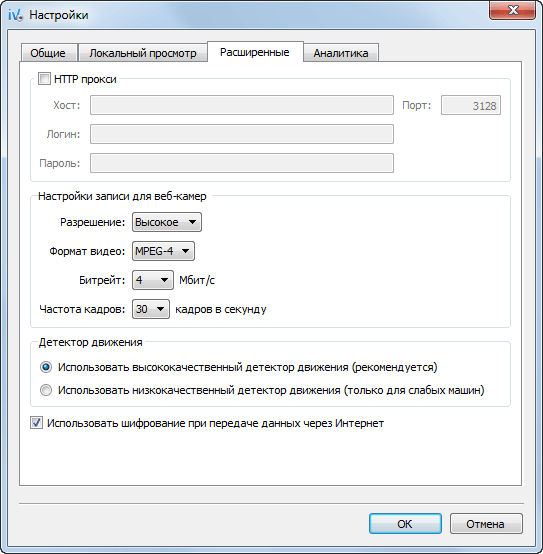 Now go to the webcam settings. In the main window of the program, right-click on the name of the camera - select "Settings":
  On the "General" tab, select the sound source so that you can not only see the image, but also hear the voice:
  On the “Record” tab, you can set exactly when to record: only when there is some movement in the frame, or continuously. My client wanted the video to be recorded continuously. Therefore, I put the switch on the appropriate line and press "OK".
This concludes the configuration of the program and press the "Run" button: 
To prevent the computer user from catching the eye of a freshly installed program, I suggest removing the Ivideon Server shortcut from the desktop, and in the “Start” delete the Ivideon folder.
You also need to do the following: disable hibernation of the computer... In Windows 7, for this you need to go to “Start” - “Control Panel” - “Power Supply”. On the left, select "Setting the transition to sleep mode". In the line "Put the computer into sleep mode" select "Never". In the line "Turn off display" you can choose anything:  This is basically all: now you can restart your computer.
In order to make sure that everything is configured the way we need it, we open it on any another computer site ivideom.com- there we press the "Login" button on top. Logging into your account, we watch the video broadcast.
By the way, Ivideon has its own application for iOS and Android, so if you have a tablet or smartphone based on one of these operating systems, you can access your cameras from them.
Yes, my article turned out to be great! But there is no other way: this is step-by-step instruction on setting up video surveillance.
What else would I like to say on the topic of the article?
As you understand, in order for such a video surveillance system using a webcam to work, the computer to which the camera is connected must also be turned on. In this case, Ivideon Server must also be running.
If the browser is not very suitable for you to track your cameras, then you can install the Ivideon Client application. It provides video viewing through both local area network and via the Internet.
The Ivideon service allows you to connect and use up to two cameras... If you need to connect and see more of them in your account, you will have to pay 60 rubles. per month per camera. If you feel sorry for money, you can register several accounts for different mailboxes :-).
Also, for an additional fee, the service provides various useful services:
- Cloud video archive - you can store a video archive not on your computer's hard drive, but in the Ivideon cloud, and you can access it at any time through a browser.
- Exporting the archive to an AVI file - you can save the desired fragment of the archive recording to your computer as a file in the .avi format. This cannot be done on the free plan.
- Event notifications - you will be notified by e-mail if there is movement in the frame or the camera suddenly turns off.
I understand that you cannot describe all the nuances in one article, so if you have any questions, ask them in the comments. If you want to learn more about the service, then go to their website in the section
Your bluish face in the monitor of your video chat interlocutor is unlikely to please her eyes. However, according to Hol Wilder, video conferencing specialist and organizer of www.videoconference.com, with the right approach, even the cheapest webcam can show you in all its glory.
That color
Problem. The light emanating from the computer monitor you are sitting at, for all its weakness, is sufficient to distort the broadcast picture. Whichever color prevails on your desktop, your face will be painted exactly the same. However, if you are a Chinese person sitting in front of a yellow desktop, then everything is in order.
Solution. “Turn on the table lamp. Its more powerful light will overwhelm the monitor lighting, ”suggests Hall.
That's how absent-minded
Problem. Yours table lamp turned out to be so strong that its light literally whitened your face. The black eye is no longer visible, but you look like a kabuki actor.
Solution. If your lamp does not have a function to reduce the power of light, you can diffuse it in another way. Stick a piece of tracing paper with tape on the lamp. This will soften the relentless rays of the electric light. If your table is located next to light wall Hall has an even easier way to reduce the intensity of the light bulb. Turn it away from your face and point it at the wall. The reflected light will still be strong enough to eliminate the monitor effect.
How is the glass?
Problem. Its roots lie in the distant childhood, when you ate a little mark and read lying down. As a result, you ruined your eyes and now you wear glasses. And all would be fine, but now the monitor is reflected in their glasses. Because of what your interlocutor cannot see what color your eyes are (the horoscope promised her a meeting with a man with eyes the color of wet asphalt.)
Solution. In the monitor settings, reduce its brightness. “Typically, reflections disappear after a 25-30 percent decrease in brightness. In five minutes, you’ll get used to a slightly darkened desktop, ”Hall promises.
All in white
Problem. You did everything right, but for some reason the complexion became crimson.
Solution. " Automatic tuning The camera selects the brightest spot, which is defined as “white”, and adjusts all other colors based on this, ”explains Hall. If the present white in front of the camera, then other colors will be distorted. To prevent this from happening, just put on a white T-shirt, giving the camera a sample of snowy white. But you may not wear pants at all. All the same, your lower limbs are hidden by the table.
Modern people have long been accustomed to the fact that a smartphone is a multifunctional device that can be used to solve the widest range of tasks. But the user may not even guess about some of the capabilities of his mobile gadget. For example, in a situation where a webcam is required for video calling, it can be replaced with an Android phone camera.
Turning your phone into a webcam comes in handy if you need to:
- Make an urgent video call via Skype, but you don't have a standard camera at hand, or it's broken;
- Install an additional webcam for webcasting;
- Create remote surveillance using your phone.
Even a phone with a broken screen can be used as a webcam. The main thing is that the front or main camera module is in working order. For different ways you will need to connect your phone:
- USB cable;
- Wi-Fi hotspot;
- Programs for pairing a phone and a computer or laptop.
Method 1: How to use your phone as a webcam via USB
You can connect your smartphone as a webcam to a PC or laptop via a regular USB cable. You will need some software to set up video communication. The most popular and convenient is the Android application DroidCam Wireless Webcam, which can be downloaded for free in the digital store. Google play... You also need to install the DroidCam program on your PC.
This software will work in conjunction: the Android application will configure the phone as a webcam, and the PC program will receive and process the signal from the mobile device.

Consider step by step setup phone:
- Install the DroidCam Wireless Webcam application on your smartphone;
- Open the page http://www.dev47apps.com/ in your browser, download the distribution kit and install it on your computer or laptop;
- Turn on developer mode on your phone. You can read about how to do this in our article "10 most useful hidden functions of Android";
- Run the USB Debugging function. To do this, select the "For Developers" menu item in the phone settings and press the button in the corresponding item.


- Launch DroidCam Wireless Webcam App;
- Connect your smartphone to your computer via a USB cable;
- Launch the DroidCam client on your computer;
- Click on the USB connection button;
- Click on the Start button.


An image from the phone camera will appear on the client's screen. In the settings of the DroidCam Wireless Webcam application, you can select the front camera as the main one for connection, as well as assign the phone's microphone to capture audio.


Method 2. How to use your phone as a webcam over Wi-Fi
DroidCam Wireless Webcam software allows you to set up your phone as a webcam via Wi-Fi connection... To do this, follow points 1 and 2 of the above instructions. Then go through the following steps:
- Start Wi-Fi on your phone;
- Open the DroidCam Wireless Webcam App;
- Open the DroidCam program on your PC;
- Click on the Wi-Fi connection button;
- In the Device IP line, type in the number that will be displayed on the main screen of the Android application in the WiFi IP item;
- Check the checkboxes Audio and Video;
- Click Srart.


After that, the application will capture the video signal from the phone camera and transmit it through the client to the computer. The free version of the application only connects the phone and the PC, and also contains ads. The paid application DroidCam does not display advertising banners and allows you to customize the video: set the contrast and brightness, change the resolution, and so on.
Please note: There are many recommendations on the Internet for applications that allow you to use your phone as a webcam. The second most popular program is the USB Webcam Android application. It should work similarly to the DroidCam utility, that is, you need to download the application to your smartphone and the PC program from the official website. The problem is that, although the application is still available on Google Play, the client's developer's offsite has ceased to exist, and downloading the distribution kit from a third-party source is fraught with the introduction of a dangerous virus on your computer.
Method 3. Turning a smartphone into an IP camera for remote video surveillance
This method is suitable for those who do not want to limit themselves to length USB cable or the reception area of your home Wi-Fi signal. You can make a smartphone a webcam, while at the same time, at the other end of the city, you can using Android- IP Webcam application, which is free to download from the Google Play store. To output the video signal from the phone to a PC or Skype, a special adapter is required, which is downloaded from the official website.

To set up your phone as a webcam, you need:
- Install the application on your smartphone;
- Install the adapter on the computer;
- Set up a camera for video capture in the application;
- Set video resolution and quality;
- Change advanced settings: video orientation, focus and flash mode, white balance, color effect, and so on;
- Select the "Start broadcast" item in the application.


- Through a browser;
- Via VLC player;
- Via Skype.
To view the video in a browser, enter the IP address and port of the device into the search bar. This information you can find out by clicking the "How do I connect" button in the application. Indicate that you are connecting directly and choose a connection method: via a mobile network or Wi-Fi. In a pop-up window, the application will inform you desired number e.g. 192.168.0.39:8080. Next, on the video broadcast page, select the viewing and listening mode.

- Install the distribution kit;
- Open the player;
- In the top menu, select the item "Media";
- Click "Open URL";
- Type in a line with the address indicated in the application and add the word videofeed, for example, like this: http://192.168.0.39:8080/videofeed;
- Click Play.


To connect a broadcast in Skype:
- Open the adapter program;
- Type in an address similar to the one used for the VLC player;
- Specify the resolution of 320x240 (if the signal does not connect, increase the resolution to the next level, for example 640x480);
- Click "Apply";
- In Skype, open Video Settings;
- In the "Select Webcam" select MJPEG Camera.


The IP Webcam application differs from DroidCam Wireless Webcam in extended functionality and simpler connection, which does not require the installation of additional drivers for your phone.
While exploring the ways in which a phone can be made a webcam, we used a model of a gadget from the Fly company.
Why Fly
Since 2003, the British company Fly has been a stable manufacturer of high-quality smartphones, in which engineers try to take into account all the requirements of modern users. The company focuses on creating budget smartphones that are not inferior in quality to mid-range models. Even in a gadget for 7-8 thousand rubles, the user will find a powerful 4-core processor, a capacious battery, an excellent camera, a high-quality IPS-screen, and all that is framed by a stylish design.

We turned our smartphone into a webcam for a while. Since the testing took quite a long time, we needed a gadget with a capacious battery, a large screen, a high-speed Internet module and a smart processor. And the Cirrus 9 smartphone came up on every point. On the large 5.5-inch IPS screen, it was very convenient to manage application settings and learn instructions for managing programs. A powerful 1.25GHz 4-core processor ensured stable system performance when downloading and running multiple applets at the same time. The 4G LTE module made it possible to instantly download the most voluminous application, and a capacious 2800 mAh battery kept the smartphone on full alert all this time.