Magnets are divided into several types: permanent, electrical and temporary. They differ in characteristics, durability and operation features.
Permanent magnets
The most popular were permanent magnets- that is what we mean when we talk about magnets in general. Their main feature is that they retain their magnetic charge for a long time. How long and with what strength this element will last depends on what the magnet is made of.The most powerful magnets are neodymium
They are made from different metal alloys:
- Neodymium, boron and iron. Such elements are called supermagnets, because they last a long time. performance characteristics and demagnetized at a rate of 1-2% over 100 years. It is almost impossible to demagnetize neodymium.
- Samarium and cobalt - due to their resistance to aggressive environments and high temperatures, are actively used in the military industry. In terms of its operational features, it is similar to its neodymium counterparts.
- Alnico is an alloy of aluminum, cobalt and nickel. Lightweight and heat-resistant material, but quickly demagnetized under the influence of another magnetic field.
- Magnetoplastics - consist of polymers, magnetic powder and all kinds of additives. Unlike all other types, these magnets are easy to process, plastic and elastic. Thanks to this, they create products complex shape and experimenting with the position of the poles. The power of such elements depends on the amount of magnetic powder in the composition of the magnetic mixture, which can reach 94% of the mass of the finished product.
- Ferrites are an alloy of iron with other metals. The most common type, since it is inexpensive to manufacture and has a wide scope of operation, however, when exposed to high temperatures, it quickly loses its properties.

Temporary magnets
Another interesting question is what the temporary magnet is made of. For this, any metal object is used. For example, a paper clip, scissors, a screwdriver, etc. If you briefly bring it to a source of a powerful magnetic field or another strong magnet, then this metal part temporarily take over its magnetic properties. But getting out of the action of this field, the properties are instantly lost. Such elements are actively used in electromechanics and automotive industry.Electromagnets
Unlike constant ones, they have a magnetic field only when electricity passes through them. These magnets are made from a metal blank. Any sample of iron or its alloys that magnetise well will do - it acts as a core. Check the iron piece for the possibility of acting as a source electromagnetic field simple - use a standard fridge magnet. If it is attracted to the piece of iron, then it is suitable for the role of the core. This block is wrapped with copper wire, having previously isolated one metal from another, and then the current source is connected. Electromagnets are easy to make on your own by following simple instructions.
The simplest electromagnet is made in 5 minutes from a nail, wire and battery
Unlike all other types, electromagnets change their characteristics under the influence electric current- the power of the device, the direction of the poles are regulated. It is used in electrical devices, in motors and generators, in industry when transporting metal goods. And craftsmen create many options for homemade designs.
Man first met a magnet in antiquity. However, very quickly, this natural stone ceased to meet the needs of people. It was then that the technology for making magnets was developed. Of course, a lot of time has passed since then. The technology has changed significantly, and now it is possible to make a magnet at home. You do not need to have special skills and knowledge for this. It's enough to have everything close at hand necessary materials and tools. So, the manufacture of a magnet is as follows.
Soft magnetic materials
All materials capable of magnetization can be divided into soft magnetic and hard magnetic. There is a significant difference between the two. So, magnetically soft materials retain their magnetic properties for a short time.
An experiment can be carried out: run iron bars over a strong magnet several times. As a result, the material will acquire the properties of attracting other metal objects. However, the manufacture of those possessing these abilities is impossible in this case.
Hard magnetic materials
Such materials are obtained by magnetizing an ordinary piece of iron. In this case, the properties are retained much longer. However, they completely disappear when the object hits a sufficiently hard surface. They also collapse if the material is heated to 60 degrees.
What is needed

Finally
Making permanent magnets at home is a fairly simple process. However, when using certain schemes, care must be taken.
The most powerful of the permanent magnets is neodymium. It is possible to make it at home, but this requires a blank made of a rare earth metal - neodymium. In addition, an alloy of boron and iron is used. Such a workpiece is magnetized in a magnetic field. It is worth noting that such a product has tremendous strength and loses only 1 percent of its properties over a hundred years.
Want to create magnets from scrap materials but don't know where to start? In this article, you will find many ideas and ideas that you can implement.
This article is for people over 18 years of age.
Have you already turned 18?
How to make a magnet?
As you know, a magnet can be made with your own hands, and even at home. This skill will definitely not be superfluous, because in this way you can make souvenirs for the New Year. It is important to remember that making a magnet yourself at home, you get an absolutely unique thing and precious experience! In this article, you will also learn if you can make a magnet out of wood and how to color a magnet out of plywood.
In fact, making such a magnet is very simple. It is enough just to make a little effort and show your imagination properly. Having engaged in the manufacture of magnets yourself, you will have a good time and get a wonderful souvenir, as well as the skill that will allow you to create things that have magnetic properties literally from improvised means.
How to make DIY fridge magnets: ideas
Refrigerator door magnets are a great design solution if you want to give your kitchen a homely atmosphere.
IN this list contains the most interesting solutions that can be implemented:
- a magnet with a photo - will bring a feeling of coziness, because you can put photos of loved ones, children or even pets in the slot under the photo (besides, all the above categories will be very nice);
- topiary - a cute craft in the shape of a tree or bush will perfectly fit into the overall canvas of the refrigerator;
- notepad - will help you take various notes or leave messages to your family, and you can also write down the names of products that you need to buy in it;
- herringbone is a design element inherent in the New Year's holiday, which can hang on the refrigerator at any other time.
For many centuries, the dog has been a faithful friend and companion of man on his life path... Therefore, a magnet with the image of a dog placed on the surface of the refrigerator (or any other) will become a wonderful aesthetic decoration. You can find templates for making a dog below.
With regard to materials: the dog's fur can be made from felt, and the ears can be made from nylon tights. In addition, the puppy can be made from papier-mâché. Such a product can be decorated and diversified with various design solutions, which will make the decoration realistic.
Coffee beans have always been excellent material for use in fine arts... They have attractive appearance and a pleasant smell. Coffee beans can also be used in the creation of magnets, because they can be used to create completely unusual sculptures. From them, you can glue the topiary, which will complement the interior favorably. You can also use them to create a sculpture of a dog. Alternatively, you can create coffee heart that will look perfect as design solution for kitchen.
We will show you how to make a cat-shaped magnet with your own hands.
For crafts you will need:
- coffee beans;
- thick cardboard;
- brush:
- scissors;
- PVA glue;
- jute twine;
- glue gun.
Manufacturing
1. Take the cat template you like and cut it out of paper.
2. Transfer the image to cardboard, cut it out.
3. We glue the top with burlap (on the seamy side of our craft!) And leave it under a press for several hours so that the glue is thoroughly dry. Burlap will make our magnet more dense.
4. Cut off the excess fabric along the contour.

5. Cover the front side of the cat magnet brown paint so that there are no white spaces in the future.
6. We are waiting for the paint to dry. Then we glue the blank from the end part with twine using hot glue from a glue gun.
7. We glue the cat with coffee beans, also using a glue gun.
8.Fix the magnetic tape on the back side.
9. We make antennae from the twine. The eyes can be taken from an old toy or small buttons can be used. You can tie a bow on the cat's neck.

How to make a DIY search magnet?
It is fairly easy to create a search magnet that will always point northward, which coincides with the earth's magnetic field. To do this, you will need a needle, stopper, and a bowl of water. Through all the simple manipulations, you will get a device that will involuntarily move parallel to the magnetic field.
You can also create it yourself:
- electric magnet. It is created by passing current through a piece of metal. This is done in order to create a magnetic field. To do this, you will need a nail, wire, duct tape, and a battery;
- Neodymium magnet. It is problematic to create it at home, because many complex units will be required, but it is worth trying in any case;
- a levitating magnet - a spectacular design that can decorate any interior with its mystery;
- a needle magnet on a canvas is an extremely convenient thing that will save you the trouble of looking for needles, since they will all be collected in one prominent place;
- a magnet for non-ferrous metals is a thing that will greatly help in the search for non-ferrous metals, regardless of the search location.
How to make a magnet for welding with your own hands?
The magnetic corner is one of the the most important conditions high-quality welding, because it allows you to welding works as accurate and quality as possible. This complex process itself with such a part is simplified, because the welding magnet allows you to fix the parts to be welded in the right way. Creating such a welding device on your own, it is necessary that it does not have to be literally torn away from the object. It is desirable that it be "disconnectable", that is, it should come off without external influence. For greater clarity, when creating such a device, drawings should be prepared in advance, in which all proportions will be taken into account.
How to make curtain magnets with your own hands?
Magnetic curtain holders are a device that can make your life much easier. The use of magnetic surfaces in everyday life simplifies a lot of things that you never thought could become even easier. For example, a magnetic surface for knives on the wall will save you from the need to constantly climb into the drawer of the table, it will be enough just to remove the right knife from a magnetic board. The main thing is to properly calibrate the magnetic field of this device so that it holds the knives vertically, but not strong enough to tear them off.
Do-it-yourself Christmas magnets
Decorating an apartment on New Year(on NG), you can also use magnets. The symbol of 2018 is a yellow dog, which, as we know from one of the previous paragraphs, can be made of papier-mâché, as well as felt and nylon. Thus, you will have interesting craft for a decor that can hang all year round as a sign of obvious symbolism. In addition, magnets can be used to make new Year decoration from satin ribbons, which do not need to be additionally fastened, because the magnetic field will itself hold them in the place you need. Such a designer find will look extremely impressive and will be appreciated by your guests and household.
Do-it-yourself salt dough magnets
Salted dough is an extremely cheap, readily available and extremely plastic material.
To prepare the test, you will need:
- 2 tbsp. l. flour;
- 1 tbsp. l. salt;
- some water and PVA glue.
1. Knead all the ingredients, knead it thoroughly with your hands until it stops sticking to your hands.
2. Cover the baking sheet with foil or parchment, sculpt directly on it. With the help of a stack, we sculpt the necessary figure (we will have it as a heart).
3. Smooth out irregularities with a wet brush. We put in a cold oven, gradually bringing the temperature to 130 degrees. The product should dry completely.
4. Turn off the oven, let the product cool down. We paint in any color. You can use watercolor or gouache. Back side paint in black and glue the magnetic tape. The magnet is ready!

BUT here from what other materials can magnets make:
- from polymer clay. An extremely effective material for sculpting, which is ideal for the embodiment of your wildest creative fantasies;
- from plaster - perfect for creating objects of small size;
- from felt - patterns can be found in the public domain;
- from beads. This material has enough options to realize the creative potential;
- from foamiran. Plastic suede is gaining popularity in craft circles, and this material is also extremely easy to use;
- from a battery - discharged batteries can be given a second life in such an interesting way;
- from clay - classic material for needlework. Perfect for making magnets.
How to make a strong magnet at home?
Similar to other types of magnets, it takes a little more effort to create a powerful magnet at home. As you know, objects are magnetized by friction against other magnets to obtain a magnetic field, therefore, in order to create something more powerful, you just need to produce friction large quantity once.
RadioMir 2006 №9
It is known that a noticeable effect of the magnetic field is observed only in iron-containing materials. But these materials also differ and are divided into soft magnetic and hard magnetic. Their main difference is the ability to retain magnetization after the end of the magnetic field. In addition to iron and its alloys, magnetic properties have ferrites made from iron dioxide powder with various additives (barium, cobalt, strontium, etc.) by hot pressing under high pressure.
Cores of transformers and chokes are made from soft magnetic ferrites, hard magnetic ferrites are used to make permanent anisotropic magnets.
IN living conditions good permanent magnets can be made from alloy steels. Without going into the intricacies of the range of steel grades, we can say that hardenable steels are suitable for manufacturing. There are always old files at hand, files, hacksaw blades etc. The selected material must first be "released", heated to red heat, and then slowly cooled. After making the blank of the magnet, it is quenched - heated to a light red heat and sharply cooled in cold water... The stronger the hardening, the better the magnet will be.
The magnetization process can be carried out on a simple installation consisting of an inductor and a fuse. The coil is wound on a frame of such a diameter that a magnet blank is placed inside. For example, for the manufacture of the coil, I used a frame from imported solder (h = 40 mm, D = 50 mm, d = 22 mm).
The coil is wound with a PEV-2 wire with a diameter of 2 mm and contains about 500 turns. It is fixed on the base and connected to the mains through a fuse and a switch. The workpiece is placed inside the coil, the fuse is installed and the switch is closed. The fuse immediately burns out, but during this time the workpiece has time to magnetize.
For the fuse, you can use a thin copper wire... For safety, it must be placed in a glass tube from a blown fuse and covered with clean quartz sand(for reliable extinguishing of the discharge).
The burnout current of a wire fuse I pp can be approximately calculated using the empirical formula:
I pp = (d-0.005) / K where d is the wire diameter, mm (up to 0.2 mm);
K - constant coefficient (for copper K = 0.034). From this formula it follows that the diameter of the wire for the fuse
d = K * I pp +0.005.
The installation in the proposed version allows obtaining permanent magnets with a force of up to 200 mT, which is quite sufficient for use in structures containing magnetic field transducer (PMF) microcircuits.
The same installation can be used to demagnetize a radio installation tool by turning on the coil through a step-down transformer with an output voltage of no more than 6 V. remove, describing expanding circles.
When working with an induction coil when connected to the mains (220 V), follow the safety instructions.
I. SEMYONOV, Dubna, Moscow region
In this article, I want to tell you how you can make a cute fridge magnet with a photo. And not only to manufacture, but also to sell profitably.
My site was originally dedicated to sublimation printing. But this does not mean at all that you can earn money only by selling mugs, plates, puzzles and other sublimation products. There are a lot of ideas! This is thermal transfer and the manufacture of watches with a photographic portrait and the printing of various calendars and much, much more.
The first article is about magnets.
Most of all, in the manufacture of vinyl magnets, I am attracted by the simplicity (no equipment is needed) and the chic price wrap. Judge for yourself - a magnet measuring 65 x 90 mm costs me less than 5 rubles. I sell it in kindergartens for 120 rubles!
There are different magnets - plastic, metal, sunset. We will be making a magnet based on magnetic vinyl. It looks like this:

In a nutshell, this is the most common photograph pasted on magnetic vinyl.
Choose any photo frame and insert a child's photo. You can draw a photo frame yourself or download it on the Internet. Don't forget about copyright only. Not all authors are allowed to make money on their frameworks and templates.
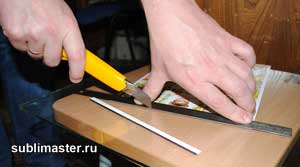
To make a magnet, we need the simplest tools:

This is a small piece of glass, a stationery knife and a metal ruler. And it's all? - you ask! Yes, that's enough to make good money. You don't even need to have your own printer. You can always order photo printing on the side. And your magnets from this will not become much more expensive. We'll count everything later.
A few words about magnetic vinyl. It is sold in rolls, usually 30 meters long. Such a roll is not only quite expensive, but also very heavy. This increases shipping costs for those who order vinyl by mail or via transport company... Those who have a Zenon company nearby are more fortunate - they will sell at least half a meter of magnetic vinyl there. Agree, this is very convenient.
Magnetic vinyl is available in a variety of thicknesses. I recommend purchasing vinyl no thinner than 0.7 mm for making magnets. Thinner vinyl magnets look cheap and not solid.
Also, magnetic vinyl comes with an adhesive layer and without an adhesive layer. With an adhesive layer has protective film and with the same thickness it is slightly more expensive.

You just have to choose a bundle:
Adhesive Magnetic Vinyl + Plain Photo on Paper
Magnetic vinyl without glue + photo on self-adhesive photo paper.
I will use the second option. I have at hand a 0.75 mm thick vinyl without glue and for inkjet by Privision.
So, let's start making our magnets.
I think finding a cute photo frame for you will not be difficult. Let's assume that you already have it. Adjust the photo frame to the size you want - I have 65 x 90 mm. With this size, 9 magnets are placed on an A4 sheet. Of course, you can choose absolutely any size.
You also photographed the children. It remains to insert the photos into the frame. This can be easily done with or.
By the way, a large section will soon appear on the site about how to photograph children in kindergartens and schools and process photographs. Don't forget not to miss the announcement.
Photos are inserted, now they need to be placed on the sheet and printed. You can use Photoshop for this, but I like CorelDraw. I import one photo frame at a time and place it on A4 sheet. If you order more than one magnet, I duplicate the required number of times.
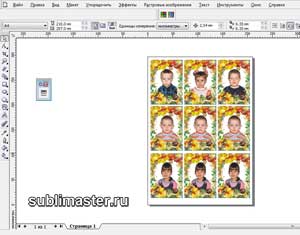
All photo frames are in place, self-adhesive photo paper is inserted into the printer. We are sending the sheet for printing! We print with ordinary water-based ink.

Now we will glue the photographic paper onto the magnetic vinyl. I preliminarily cut it into A4 sheets. More precisely, they turn out a little less - 20.5 x 29 cm. The width of a roll of magnetic vinyl is 61.5 cm. I cut it equally into three parts. And I deliberately reduce the length a little, with my size of the magnets, this is quite enough. You, too, try to calculate everything so that there is less waste.
To make the photo paper lay flat on the vinyl without bubbles or wrinkles, just watch me do it and repeat.
First, turn the sheet face down and fold the backing paper about 15 mm along the short edge of the self-adhesive.
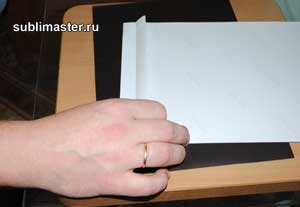
Now we turn the sheet over and, holding the edge with the folded paper (preventing it from sticking), place the sheet evenly on the magnetic vinyl.

With the sheet in position, gently glue the edge of the sheet to the vinyl and iron it well with a dry soft cloth.
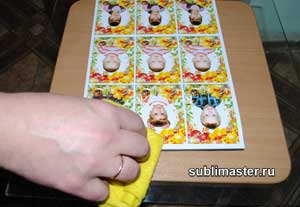
Now our sheet is securely attached to the magnetic vinyl and won't move anywhere. Left hand we place it under the sheet, grab the edge of the protective paper and begin to smoothly pull to the side, exposing the adhesive layer, and right hand using a rag, smooth the sheet to the vinyl with up and down movements.

So we smooth it to the end.
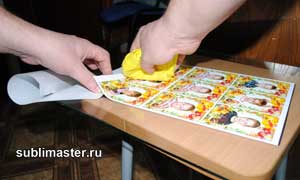
Set aside the resulting sandwich for 15 to 20 minutes so that the glue layer sets well. The magnets can now be cut. A reciprocating cutter is ideal for this purpose, but it can be perfectly done without it.
A metal ruler and a stationery knife are what you need. To help the knife cut rather than rip the paper on the vinyl, keep the angle of the knife as close to the surface as possible.
Refresh the knife blade by breaking off the blunt part. I usually do this after cutting the next A4 sheet.
Here are the first nine magnets ready.

I put each magnet in a separate bag. I have them 75 x 120 mm. This bag costs a penny, and parents really like the individual packaging.

That's the whole process. As you can see, nothing complicated. Now let's do some math.
I bought 0.75 mm thick magnetic vinyl without glue at 310 rubles for running meter(width 0.61 cm), which is 504 rubles per square meter or 30.3 rubles per A4 sheet (round up to 31 rubles).
I bought the self-adhesive for 100 rubles for 20 A4 sheets. So one sheet costs 5 rubles.
31 + 5 = 36 rubles.
36 rubles: 9 magnets = 4 rubles apiece!
Let me remind you that I sell them for 120 rubles. I know that some people sell similar magnets for 150 rubles.
Now a few words about quality. Water-based ink has a serious drawback - it fade rather quickly. Especially compatible ink. If your customers' refrigerator is by the window, then the magnet on its door can fade in a year. In this case, I would suggest that you print your photos in a darkroom and glue them onto vinyl with an adhesive backing. In this situation, the cost of your magnet will grow by 2 - 3 rubles, but it will not fade over the years.
Alternatively, the magnet can be covered with a thin cold laminate (laminate). This complicates the process a little, but the magnet looks great!
You can also get an inexpensive corner cutter and trim the corners of your magnets nicely.
In short, I gave you an idea. How you put it into practice is entirely up to you. Now you know how to make a magnet with a photograph. Take my word for it, such magnets are in constant demand in kindergartens and schools!