The decoration of any dish and, in particular, a confectionery product is of no small importance and even makes it tastier. Various technological techniques and methods are used to decorate baked goods. The simplest and most popular are patterns, ornaments, cream inscriptions. For this you will need cream injector.
What is a pastry syringe
In appearance, the confectionery syringe made at the factory resembles an ordinary medical one. But it has a capacity bigger size, and instead of needles, he has nozzles of a conical or flattened shape at the end with figured or slot-like holes. The cream is applied to this container and is squeezed out of the nozzle using a press, like Toothpaste from a tube. Its surface can have a rather intricate shape due to the figured slots.
Sometimes a cooking bag is used instead of a syringe - tight plastic bag with a nozzle soldered into the corner, the cream from which is squeezed out when the bag is squeezed by hand. But what if there is no such syringe or bag at hand? You can make them yourself at home using available tools.
How to make your own pastry syringe or bag
If you dye your hair yourself, you can use a long-tipped bottle containing an oxidizing agent for the dye instead of a pastry syringe. If the bottle is rinsed well with water, it can be used as a syringe small size... Its tip can be cut obliquely closer to the lid so that the hole is wider.
Homemade pastry syringes with small holes can be filled with hot black and white chocolate and draw lace patterns with them, make inscriptions
If you take a thick plastic bag and cut off one corner of it, you have a tool that can easily replace a cooking bag.
In this capacity, you can use:
- milk carton
- plastic file for storing sheets of paper and documents
- plastic bag
- bag rolled up of baking paper
You can use several of these bags if you cut the corners of them differently. By simply cutting off triangles with different heights, from 3 to 7 mm, you get a device with which you can write or squeeze out a cream in the form of a sausage. If you cut a hole in the bag with cloves, such a sausage will turn out to be ribbed.
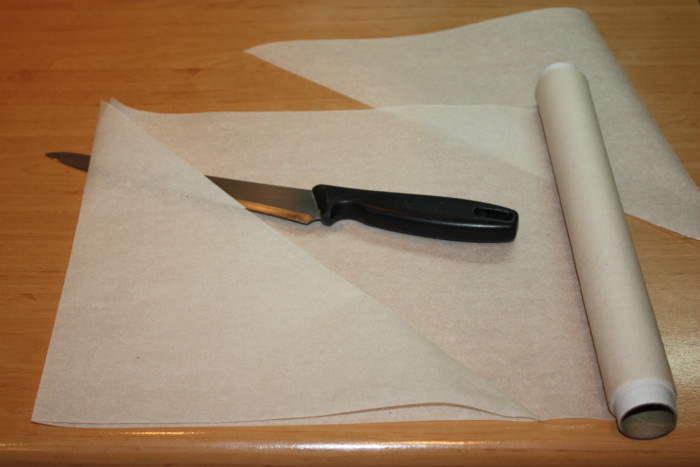
It is very convenient to be able to correctly make a cornet with your own hands, especially if there is no ready-made pastry bag at hand. I described this process in great detail and showed in the photo how you can spend less than a minute to get two ready-made cornet. Therefore, if you need to decorate a dessert or cake and do not know what to replace pastry bag, then, using my step-by-step photo-material, you can make a cornet with your own hands easily and simply.
For work we need:
- food paper in a roll;
- sharp knife with a long blade.
How to make a piping bag at home
Take the paper by the top left corner and fold it at a 90 ° angle. Cut off the folded triangle along the fold.

We also fold the remaining half and cut it along the fold.
These are the two triangles we got.
In order for the cornet to turn out to be larger or smaller, you must select the paper size accordingly. The wider the paper, the more cornet you get. I have paper 28 cm wide.For convenience of further explanation, I marked the corners with numbers: 1, 2, 3.
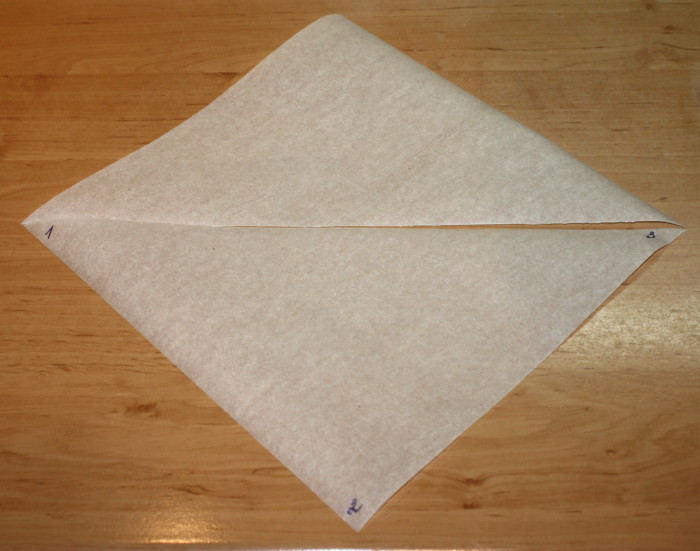
I turned the paper triangle over so that the numbers were outward, but the paper is transparent and you can clearly see them. Hold the paper at corner 2, with corner 1 to your left. Take corner 3 and connect it with corner 2, as shown in the photo and do not release it, fix it with your left hand. Pay attention to the tip of the future cornet. It should be sharp if folded correctly.

Now we take corner 1, wrap the cornet in it and connect corner 1 with corner 2, but not from the inside, like corner 3, but outside.

I get such an assembled cornet: all the corners are connected and a sharp tip.

And this is how a do-it-yourself pastry bag looks like on the other side.

Now, fix all three corners connected at the top. You should not rush here, carefully fold the top of the corners twice and fix the folds.

That's all. The cornets are ready. We just need to fill them with the desired content and cut the tip to the required size.
And here is a video instruction on how to make a piping bag at home with your own hands from paper.
This is how quickly, easily and simply you can make a piping bag at home.
Culinary bag - irreplaceable thing in the arsenal of the hostess.Using it, you can give delicacies a more presentable look. There are cases that the previous bag has become unusable or it simply does not exist, and there is no time or money, then it becomes necessary to make a pastry bag with your own hands. For example, bags made of various auxiliary materials.
How to make a polyethylene piping bag at home
You can make a pastry bag from a polyethylene material, namely a bag, bag, file, freezer bag, etc. It will not take much time and effort to create such a homemade bag. To make it you need:
- prepare a plastic bag;
- fill it with the necessary cream;
- squeeze air out of the bag;
- fasten the package with a knot or pull it off with a thread, fastener;
- cut off the corner of the required diameter.
In this way, you can quickly create a disposable piping bag. Depending on what diameter you cut the corner of the bag, you will receive different attachments for decorating all kinds of sweets. It is easy to operate, does not require washing.
How to make a piping bag at home from paper
A piping bag can be made from paper. Waxed paper or baking paper is best for this. Also, by adjusting the tip, you can achieve different tip configurations by cutting out different shapes. To create this paper bag you need:
- cut a triangle out of paper;
- roll the paper to make a cone;
- bend the edges of the paper cone inward;
- fill the cone with cream;
- cut off the tip of the cone of the desired diameter.
It is very easy to make a piping bag made of paper. Throw it away after use.

How to make a pastry bag at home from textiles
The previous methods describe the creation of disposable piping bags. From fabric, you can create a pastry bag that can be reused. When choosing a fabric, pay attention to the material. The most suitable fabric is teak. Since this material does not fade and has a dense structure. To create a pastry bag made of fabric, you must:
- cut the fabric in a triangular shape;
- roll a cone out of it;
- sew one side tightly with thread;
- cut off the tip of the cone with scissors;
- sew a nozzle into the cone.
The seams on the pastry bag should be left outside to prevent the cream from getting into them. This bag must be washed without detergents... To disinfect it, you need to iron it with an iron, setting a high temperature.


How to make a piping bag at home - tips and tricks
- From plastic bottle caps, you can make various attachments for pastry bags from different materials.
- Practice a little before decorating your baked goods.
- For novice pastry chefs, it's best to start decorating baked goods with simple patterns, namely stars and dots.
- Choose a fabric that is not dyed so that it does not fade.


It is really possible to make a pastry bag on your own from improvised means, plastic bags, paper or cloth will come to the rescue. With this culinary attribute, you can amazingly decorate confectionery!
Making a cake is not easy, painstaking, requiring certain skills and experience. It is important that the cake is not only tasty, but also beautiful. If appearance the cake is boring, nondescript and unappetizing, it may happen that no one wants to appreciate its taste. That is why openwork ornate patterns made of cream, bows and curls, flowers and figures are so necessary for cakes.
A beautiful cake can be made at home.
If you decide to cook something yourself, then this article is for you. But sometimes it's easier to order food at home. You just need to go to the site. to choose pizza, sushi, kebab or other dish. Delivery will take place in a short time.
To beautifully decorate the cake at home, the hostess just needs to have it on hand kitchen knife and scissors, a pastry bag with nozzles, wooden sticks. The type of cream must be selected so that it keeps its shape and does not spread. An excellent cream-protein, it does not lose its shape with temperature changes. Oil cream is also often used, but you need to work with it carefully, as it is sensitive to temperature changes. Using food coloring, you can give the cream any color. Fill the pastry bag with cream or frosting, select the desired nozzle and, using gentle pressure, decorate the cake. With the help of wooden sticks, cream or chocolate flowers on a culinary masterpiece.
Instead of pastry bags, chefs often use pastry syringes to decorate cakes. It looks like an ordinary syringe, only very large and instead of a needle it has various nozzles. A cream is put in a syringe and with the help of a press it is squeezed onto a confection. Experienced housewives with experience, who for all holidays try to bake a new cake according to a recipe taken from a culinary site on the Internet or suggested by a colleague at work, must have both a pastry bag and a pastry syringe with various attachments.
Well, what if the aromas of pastries are just beginning to hover in the kitchen of a young pastry chef? What if the hostess nevertheless decided to bake the cake herself, and not buy in the store, and then suddenly realized that she did not have special devices? It's OK. You can quickly make a piping bag yourself at home. There are several ideas; it all depends on how much free time is left in stock.
A plastic bag is always at hand
The quickest option is to use a plastic bag. A tight, transparent bag with a zip fastener works best. You need to open the fastener, fill the bag with cream with a spoon, close the fastener (if the bag is the most common, then instead of a fastener it is fixed with a knot or an elastic band). Next, cut off a small corner of the bag with scissors and, pressing on the bag with cream, through this cut, start decorating your cake. If it suddenly turns out that there is no tight plastic bag at hand, then as a last resort, you can use a milk bag or a file for storing papers. Let's make a reservation right away that culinary miracles will not work with such a bag, the thickness of the squeezed out cream will not always be the same and curly decorations cannot be made here. But ... Better at least something than nothing at all.
Paper will come to the rescue
More possibilities are given by a handmade paper pastry bag. To do this, you need to cut off the triangle and wrap it in a conical shape. It is very important that there are no gaps, otherwise the cream will seep through them when pressed. If the paper is thick, then the corner can be cut figuratively (straight, obliquely, serrated or wedge-shaped), this will create at least some semblance of a nozzle. And to get a beautiful curly ornament, you can use a plastic bottle. The neck is cut off, and in the lid, a pattern is first drawn with a marker (a snowflake or crown, a diamond or an asterisk), now a figured hole is cut out according to the pattern and the lid is screwed to a paper bag. For this case, confectionery parchment is well suited. But with such a paper bag you need to work very quickly, since the paper gets wet from the cream and can break.
We sew a pastry bag
If there is enough time, then the pastry bag can be sewn. Fabrics like teak, linen or waterproof cotton are great. These fabrics are quite dense, do not fade and wash well. You need to cut a triangle out of the fabric, sew it into a cone, cut off the bottom corner, try on and sew a nozzle into it. To prevent the seams from clogging up with cream, they should be left outside. Such a pastry bag can last a very long time if it is washed immediately after each use without detergents and dryers and dried well.
On - how to choose and use a piping bag with attachments:
Some useful tips
Homemade plastic and paper pastry bags are very convenient when you need to use cream in decorating the cake different colors... Each bag is filled with cream a certain color and they are used for drawings at the same time.
Housewives with a particularly violent imagination came up with the idea of using empty and cleanly washed bags of mayonnaise or ketchup for pastry purposes. Very comfortable and original.
You shouldn't completely fill your homemade pastry bag, it is best to fill it two-thirds of the way so that the cream does not drip from the back side when squeezing out.
The pastry syringe can also be replaced if necessary. For liquid cream, hot black or white chocolate, a regular medical large syringe without a needle is perfect. They can make openwork inscriptions and patterns on cakes. After all, how nice it is to receive as a gift is not easy beautiful cake, but with a signature, name and wishes.
How to make roses from oil ...
Flowers from butter cream: master ...
Flower shaped cake is great
How to choose the right cake
How to choose a cake to order for the day
Latest recipes with photos
How to make a piping bag at home How to make a piping bag at home? Making a cake is not easy, painstaking, requiring certain skills and experience.
Source: legkoe-delo.ru
How to make a piping bag at home
Navigating the article
How can store-bought gingerbread, cookies, muffins, pastries and cakes compare to homemade baked goods? And besides, if such a comparison is made, it will turn out to be in favor of homemade desserts. In fact, homemade confectionery products are tastier and somehow “soulful”. And the process of making them is comparable to some kind of ritual action, especially in its final stage, at a time when unpresentable semi-finished products turn into wonderful and mouth-watering desserts.
But not everyone knows how to decorate homemade cakes, or not everyone knows how to do it. But to decorate a cake at home it is not at all necessary to own the skills of an experienced pastry chef. And, by the way, a cake decorated with his own hand in its beauty can at times surpass store masterpieces. The main thing is not to strive to reproduce what you see on purchased cakes... Since homemade cakes are unique just for their originality and uniqueness. And how can this be achieved? What to use for registration? What specific products to use as a ready-made decor, and what to do specifically for decorating a cake at home? Let's define.
Cream jewelry
Cream roses, leaves and borders on cakes are classic confectionery. And the classics, as we know, never go out of fashion under any circumstances. Based on this, cream decorations remain popular in home cooking today. Indeed, not every cream is suitable for decorating a cake. It is possible to decorate the cake only with such a cream that does not flow and does not settle. The most suitable material for cream jewelry is considered butter cream and meringue. Cakes decorated with such cream look especially solemn, indeed, they are stored only in the refrigerator and only for a very short time: butter and eggs are perishable foods.
For such decorations, it is possible to use confectionery syringes or bags with special attachments. By means of these attachments it is possible to draw curly borders and trellises, roses and chrysanthemums, leaves and stems. But if there are no such tools in your kitchen arsenal, then it is possible to decorate the cake with cream by means of an ordinary paper cornet. To make a cornet, you only need a sheet of thick, clean paper (A4), which must be rolled into a small bag (hollow cone). The tip of the cone must be cut in a straight line or along an oblique line, or make a triangular cut on it (with a downward angle).
Cornetic (it is necessary to hold it with your hand all the time, fixing the shape of the bag and not allowing it to unfold), fill it with cream, wrap it upper part, so that the cream does not fall out, and begin, squeezing the bag, squeeze the cream onto the cake.
Depending on the cut, it is possible to lay straight stripes on the cake, draw peas, or make leaves and flowers (a cornet with a triangular cut). If, along with this, it is easy to move your hand with a cornet back and forth, then the strips of cream squeezed out of it will turn out to be wavy and similar to ruffles. It is possible to make a multi-colored cream for decorating a cake using special food colors, or use freshly squeezed beetroot (cherry) or carrot juice, spinach juice, cocoa powder or instant coffee.
Mastic jewelry
Confectionery mastic is a good alternative to creamy decorations. By its consistency, it resembles plasticine, and it is possible to mold every figurine, leaves, flowers and other decorations from it. The main thing is to be able to sculpt. Confectionery mastic can be purchased in a specialized store, but it is better to prepare it yourself. For mastic, powdered and condensed milk and powdered sugar in equal proportions are useful to us. All these ingredients must be combined and kneaded mastic (like dough), and then sculpt whatever your heart desires from it.
Just remember that this sculptural material dries and hardens quickly. Based on this, firstly, during work, cover the mastic with cling film, and secondly, do not cover the whole cake with it - it will be too hard. In addition, too voluminous jewelry can crack. It is possible to paint the mastic as well as the butter cream, and it is necessary to roll it out on cling film, sprinkling the mastic itself with powdered sugar. What can be made from mastic? Flowers (roses, lilies, daisies, chrysanthemums) and leaves, frills and ruffles, figurines of animals and men, every other object that you are able to sculpt.
Icing jewelry
Openwork icing can be a decoration of a cake at home. If you still do not understand what it is, then do not be intimidated by the tricky name. Icing is a drawing mass made from egg whites and powdered sugar. It is very easy to prepare it: rub one raw egg white with powdered sugar (200 g) and add a teaspoon lemon juice... Just do not forget that the protein must be cold, and the icing sugar must be sifted without fail. The density of the mass is adjusted by eye, adding powdered sugar into it. The fact is that the icing should turn out to be dense enough so that the drawing does not spread, but not too thick, so that the drawing mass is easily squeezed out of the cornet.
After that, fold the paper cornet, fill it with drawing mass and draw your laces. Future patterns are first drawn on paper (ready-made contour drawings are printed) or, in addition, children's coloring is used for this. After that, the paper with the pattern is covered with transparent cellophane (cling film) and smeared with a thin, thin layer of olive oil (it does not dry). Icing is applied in thin solid lines along the contour of the drawing and left to dry. When the "lace" hardens, and it can take a couple of days, they are removed from the film and used to decorate the cake.
Such decorations turn out to be very fragile, therefore they are advised to be made with a margin and put on the cake before serving it. It is possible to assemble three-dimensional decorations from individual elements by gluing the parts with liquid icing. For the manufacture of convex and concave laces, a film with an icing pattern is placed on convex surfaces (cans, bottles, etc.). And one more fundamental point: such decorations dissolve from liquid: keep this in mind when decorating cakes covered with cream or icing with icing.
It is possible to decorate the cake beautifully with chocolate. Such jewelry is made according to the same principle as icing. Chocolate (without additives and filling) is simply melted in a water bath, and then different patterns are drawn for it. By using white and dark chocolate it is possible to make unique two-tone decorations. By the way, it is possible to apply patterns directly to the surface of the cake with liquid chocolate.
Decorations for a baby cake
Children's cake requires special imagination from the craftswoman. Since it should turn out to be not just beautiful, in particular for children. Based on this for decoration baby cake today they are trying to use "sculptural" materials, from which it is easy to mold various funny figures. Sugar or milk mastic, painted in bright colours... Multicolored fruits, sweets, jelly, marmalade and multicolored confectionery sprinkles will look good on a children's cake.
A unique method of decorating a children's cake is the use of Barbie dolls. In order for the cake to bake cakes, which are then collected and cut in the form of a fluffy skirt. The doll itself is wrapped up to the waist with cling film and placed in this skirt, having previously cut a hole in the cakes for the doll. After that, they decorate the skirt with colored mastic or bright cream, make a bodice for a Barbie dress and receive a children's cake-doll.
Other decoration methods
It is possible to decorate a homemade cake with simpler ones, but no less effective methods... So, for example, it is possible to simply pour over a cake with chocolate, sugar or colored icing and spread ready-made chocolate figures or whole walnut kernels on it. Peeled almonds can turn into chamomile or chrysanthemum petals, and become a unique border for the cake.
Fresh fruits look no less impressive on the cake: oranges, tangerines, kiwi, strawberries, cherries, pineapples. And suddenly the fruit is pre-dipped in transparent jelly, then they will not dry out or wrinkle and become brighter. Fruit can be combined with decorations made from butter or protein cream, with chocolate and whipped cream.
Stencil decoration is also a beautiful decoration method. homemade cake... To do this, cut out an ornament in paper (larger than the surface of the cake) and, holding the stencil in weight over the cake, sprinkle the paper with powdered sugar or cocoa powder: the ornament is magically transferred from the stencil to the cake. Cocoa is used to decorate cakes covered with white cream, and powdered sugar is used to decorate cakes with chocolate icing.
Cake side decoration
So far, we've talked about how to decorate the surface of a cake. But what to do with his sides? At home, the sides of the cake can be covered, for example, with curly cream stripes or overlaid with fragments of thin chocolate (melted and frozen in advance in the form of a thin page). In addition, on the sides of the cake, it is possible to lay out a "palisade" made of wafer rolls or long shaped cookies. But much more often, the previously greased sides of the cake are simply sprinkled with crumbs from cookies, nuts, crackers or remnants of cakes. And for these purposes, oatmeal fried in a dry pan is suitable!
In a word, there would be a desire, but there will be opportunities. And believe me, decorating cakes at home, you can find a lot of such opportunities. Creativity has a place everywhere, and even more so in the kitchen!
Burning records
I, as a friend, have a lot of fun watching you, and
At the bagatokh booths on the pidvikonnі growth aloe, in the same
How to make a piping bag at home
How to make a pastry bag at home Navigation through the article How can store-bought gingerbread cookies, cookies, muffins, pastries and cakes be compared to homemade baked goods? And besides, if u
Source: tpk-eti.ru
Many people love sweets, be it pastries, cakes or cake. We are used to buying most of these products in stores, and this has its advantages. We do not waste our time in the kitchen, all sprinkled with flour, trying to create yummy. It so happens that we still want to tinker in the kitchen and please our loved ones with something delicious, for example, cakes with custard above. But there is no pastry bag and there is no time to run to the store in search of it either. The presented three master classes will tell you how quickly and easily you can build a pastry bag from available tools.
First mater class. Pastry bag from the package
Plastic bag;
Scissors;
Every home has a simple plastic bag and scissors. And if there is a need for a pastry bag, then it can be easily built quickly.
1. We take the package, if it has a zip fastener, then this is only a plus. Gently fill the bag with cream.
2. Next, close the bag with a fastener or tie its end into a knot.
3.Using scissors, cut off the corner of the bag. The pastry bag is ready, now you can squeeze out the cream.
The disadvantages of such a bag are that the cream is not squeezed out of it evenly and it will not work to make any curly decorations.
The plus is that such a bag is disposable and can then be easily thrown away.
Second master class. Parchment Parchment Bag
Necessary materials:
Baking parchment or waxed paper
Scissors;
Stages of execution:
1. First of all, cut out a triangle from kitchen parchment and fold it into a cone.
2. Using scissors, cut a corner at the end of the cone.
3. Then we fill our bag with cream, while making sure that the cream does not come out of the cracks.
4. Then we fix the edges of the bag by bending its edges at the top.
5. If you are not satisfied that the cream will come out monotonously. Then you can perform an additional attachment.

Materials for additional attachment:
Plastic bottle;
Marker;
Construction knife;
1. Take a plastic bottle and cut off the neck with a knife.
2. Then we take the bottle cap, and with a marker draw the pattern we need and cut it out.
3. Then we screw the lid to the neck and attach the resulting nozzle to the pastry bag.

The advantages of such a bag are that many different attachments can be made to it.
Third master class. Pastry bag made of fabric
Any thick fabric e.g. tick;
Nozzles;
1. First of all, we cut out the shape of a triangle from the fabric, and then sew them.
2. Cut off the corner of the resulting cone.
3. Next, we sew the necessary nozzle into the bag and bend the seams outward.

The advantages of such a pastry bag are that such a bag will last a very long time.
When making such a bag made of fabric, it should be remembered that the fabric must be chosen dense, and so that it does not fade. Such a bag should be washed without detergents.
Such pastry bags are easy to use and do not take much time to make. And perfect for those who don't cook often.
Enjoy your meal!
DIY piping bag
The presented three master classes will tell you how quickly and easily you can build a pastry bag from improvised means. Many people love sweets, be it pastries, cakes or cake. Big cha
Source: www.sdelalsam.su
You can make a do-it-yourself pastry bag if such a culinary store assistant is not around when you really need it. This is an indispensable item for housewives who love to cook meringues, pastries, cakes, pies and other confectionery masterpieces that require decoration to complete the desired look. Such dishes without decorations will not look so beautiful.
Consider several simple ways how to make a pastry bag with your own hand from scrap materials. The choice of this or that option will depend only on the availability of free time.
From plastic bag or paper
It is quite simple and quick to make a pastry bag from a plastic bag, since all you need is the bag itself and scissors. You can also use a file for documents or special bags with a fastener, the latter option to prevent further leakage of the cream.
The bag needs to be filled with a little cream, and then zipped. Now the tip of the bag should be fixed with a regular elastic band, then cut off the corner with scissors. Remember that the larger the corner piece, the thicker the cream strip will subsequently be. You can clearly see the scheme for creating this type of pastry bag in the figure.
You can experiment with the shapes of the cuts to create a variety of decorations as a result.
To make a paper bag, you need to take or cut out a triangle, and the dimensions can be independently adjusted. Put its base towards you, after which one end must be wrapped inward so that it is connected to the upper corner. Then, grabbing the other end of the paper, wrap the resulting cone. Now make sure that all the ends of the triangle meet at one point.
After that, the ends are wrapped several times inside the cone to secure the shape. The result should be a cone-shaped pouch. It remains to place the desired nozzle inside the made product and cut the end by 2 cm. The pastry bag is ready, fill it with cream and start decorating. It should be borne in mind that when squeezing out the cream, you should move it to the nozzle by wrapping the edges of the bag.
Reusable homemade bag
If you need a reusable piping bag for home use, it is better to use good fabric... A fabric that will wash well and not fade, for example, teak, is perfect. In addition to fabric, you will need the following items:
- plastic bottle cap;
- cut neck from a plastic bottle;
First of all, you should start sewing the bag. To do this, you need to cut a triangle of the desired size from the fabric, and then sew it into a cone. Then you should cut off a small corner. And turn out cloth bag not necessary, since cream can subsequently be clogged into the seams.
Separately on the lid, we draw the desired pattern of the pattern, with which you will decorate the dishes later, and cut it out carefully with scissors. The cap must be screwed to the cut-off neck of the bottle, which must be threaded into the previously sewn bag. You can start creating culinary masterpieces.
There are many ways to create a piping bag with your own hands, and this requires a simple list of materials and tools.
Master class on making a pastry bag
Any housewife can make a do-it-yourself pastry bag. It will come in handy if you do not have it at hand desired subject, or you just want to save money.
Housewives often bake cakes and pastries at home. The main tool for decorating baked creations is a pastry bag. But what if it's not there? In this case, you need to make a pastry bag with your own hands, photo and step by step instructions will help. Exist different ways for the manufacture of such an element.
Homemade polyethylene pastry bag
The most common method of making a baking bag is using a plastic bag. For these purposes, it is recommended to take a material with a high density. The package may have a zip fastener. Regular polyethylene material can be simply tied with a knot.
Step-by-step instructions for making a bag:
- A pre-prepared cream or pastry mousse is poured into a plastic bag.
- The bag is fixed with a fastener, or tied with a knot (with an elastic band).
- A small piece is cut from one corner of the material with scissors.
The result is a practical cellophane pastry bag. The more the corner is cut off, the thicker the cream is squeezed out. Therefore, if you need to make a beautiful thin inscription on the cake, then you should cut off a small corner. In any case, experts recommend experimenting with the result in advance.  With a homemade pastry bag, you can easily decorate ready-made cookies or baked cakes. Thanks to this device, housewives make symbolic inscriptions or beautiful images on baked goods. In addition to a plastic bag, some craftswomen use a sheet of parchment or cloth. It is enough to sew a bag of the required size and make a hole in it.
How to make a piping bag from a bottle
To make a functional device you will need plastic bottle small volume. You can make a bag for curly drawings from it. Such a product will serve for a long time. 
For cooking, you will need the following elements:
- bottle cap;
- cut off the neck of the bottle;
- plastic or cloth bag;
- knife.
- On the lid, you need to draw the desired pattern and carefully cut it out.
- The lid is screwed to the cut neck.
- A hole is made in a pastry bag made of fabric or a bag in order to stick a neck with a lid there.
- All elements are interconnected.
- Cream is poured into the resulting bag and the desired pattern is made.
 Thanks to this method, you can make different patterns of flowers, snowflakes or geometric shapes... It is enough to use different caps with holes. Thus, the decoration of a cake or other dish will amaze guests with its originality.
Exist different variants preparation of a confectionery device. It can be used to decorate not only sweet dishes. It is used to decorate salads and soups. In the photo there is a do-it-yourself pastry bag, which every housewife can make easily and quickly. Such methods are especially relevant for women who rarely use such devices. Therefore, there is no need to buy them.