Before buying and installing a two-gang switch, you first need to decide what it is for at all? And it is intended to control two lighting circuits from one point.
Do not confuse it with pass-through switches, which play other roles. They differ from each other in the number of contacts. Therefore, when choosing, look first of all not at the front panel, but at reverse side switch.

two-gang light switch

two-gang simple switch
Let's say if you have 2 or more bulbs in the chandelier, using a two-gang switch, you can make it so that when you press one key, only half of the lamps turn on, and when you press the second, all the rest at once. 
It can also be controlled by two different lamps located at separate points from each other - for example, lighting sconces at different ends of the room or even in another room. 
A two-key switch differs from its one-key counterpart not only in the number of switches, but most importantly, in the number of contacts. There are only 3 of them here. One common and two outgoing. Through them, the phase is separated and then returned to the junction box by separate wires or goes directly to the fixtures.

Note that you will need at least a three-wire wire to install a double switch, even if you do not have a PE protective earth conductor in your apartment wiring. 
Installation of a two-gang light switch and wire connection
There is nothing complicated in the connection diagram and in the process of installation, installation and connection of wires to the switch contacts. First of all, the switch must be disassembled. To do this, dismantle the keys themselves. If you can’t do it manually, simply by pulling them towards you, use an ordinary screwdriver, prying the keys from the side. 
As a result, you have the body itself with fasteners on the sides and the inner contact part in your hands. The main task is to supply voltage from the phase conductor to the common contact. Further, when two keys are closed, this phase will diverge to one or the other lighting circuit. 
To find the central contact, look at the marking, since it may not always be located exactly alone and in the center. 
But what if you do not understand the inscriptions or they are erased and painted over? Then you need to use a contact screwdriver with a tester with a battery-powered dialing function.
Insert any metal object (stud, screw) into the intended common contact. You wrap your fingers around it, and touch the other two contacts with a screwdriver.
When you alternately press the keys, that is, turn on one - check, then turn off the first and turn on the second - check that the screwdriver LED should light up every time. If this does not happen, then this is not a general contact. 
To connect a common contact, use the conductor phase coming from the junction box gray color. You clean the end of the core, put it between the contact plates and tighten the screw with a screwdriver. 
Next, connect the other two wires in the cable to the outgoing pin connectors. 
The connection of the conductors directly to the two-gang switch itself is now complete. Insert the case into the mounting box and tighten the fixing screws. 
Then you tighten the two spacer screws, which help the fastening fork with teeth to rest against the walls of the box as much as possible and firmly hold the switch body inside it. 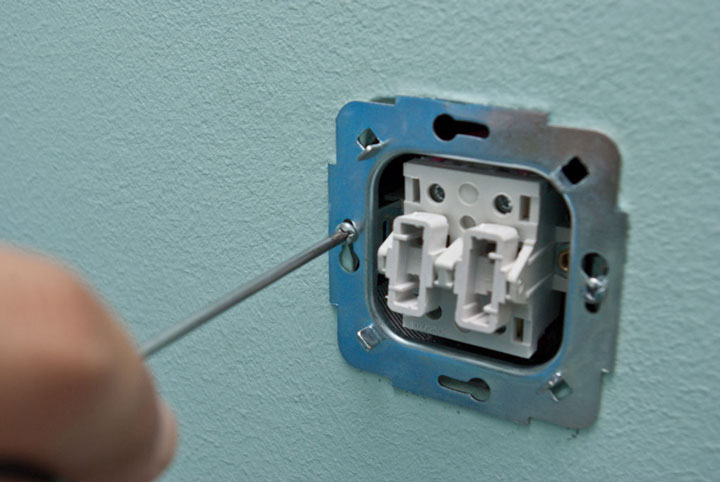 After that, you can return to place all the decorative frames and the keys themselves.
Installation of connections of a two-gang switch in a junction box
The following cables can enter the junction box or junction box:
- power cable from the machine in the shield
- cable going down to the switch
- one (if you have a chandelier with two lighting circuits) or two cables (if the light points are in different places) to outgoing fixtures

In order not to get confused, follow the following order:
Connect all neutral conductors first. They are usually of blue color. Zero does not pass through the two-gang switch and comes directly from the shield to the lamp, through the connections in the junction box.
All stripped cores can be connected using Wago quick-clamp terminals.  Although everyone has them different attitude, but it is for lighting circuits with minimal loads that they are ideal.
Next in order is protective earth. This is a green/yellow wire. If you don’t have a grounding conductor in your apartment or the lamp body is insulated and the cable is two-core, then, accordingly, this connection will not be in the junction box. 
It remains to connect the phase conductors. Here you need to be extremely careful. First, clamp the phase in the Vago terminal block, which comes from the power supply. Then, in the same terminal, insert the core that comes from the common phase contact of the two-gang switch.
You should have 4 free unconnected wires left. Two of them are the wiring that goes to the chandelier or sconce, and the other two cores are phases connected to the lower outgoing contacts of the two-keyboard.  Take two more clamps and SEPARATELY connect these conductors through them. Thus, you will connect two lighting circuits to the fixtures independently of each other.
Connection on a chandelier or lamp
In a lamp or chandelier, terminal blocks are usually used for connection. Run on them the cores of the cable coming out of the junction box according to the color marking. 
The factory lamp must have wires of exactly the color that are prescribed in the rules. Phase - a gray or dark-colored conductor should go to the central contact of the lamp, and zero - blue to the bulb base itself.
Grounding yellow-green colors can be attached both to the terminal and directly under the screw on the housing. 
Errors when connecting a two-gang switch
The first mistake that an illiterate specialist can make is to put on the switch not a phase, but zero.
Remember: the switch must always break the phase conductor, and in no case zero.
Otherwise, the phase will always be on duty on the base of the chandelier. And an elementary replacement of a light bulb can end very tragically. 
By the way, there is one more nuance due to which even experienced electricians can break their heads. For example, you wanted to check directly on the contacts of the chandelier - the phase comes there through a switch or zero. Turn off the two-keyboard, touch the contact on the chandelier with a Chinese sensitive indicator - and it glows! Although you have assembled the circuit correctly.
What can be wrong? And the reason lies in the backlight, which are increasingly equipped with switches. 
A small current, even in the off state, still flows through the LED, applying potential to the lamp contacts. 
By the way, this is one of the reasons for the blinking LED lamps off. How to deal with this can be found in the article "". To avoid such an error, you need to use not a Chinese indicator, but a multimeter in voltage measurement mode.
The second error is when the phase supply conductor is connected not to the common contact of the switch, but to one of the outgoing ones. In this case, the circuit will not work as it should. All lights will only light up if you press two keys at the same time. But if you press only the key to which the phase does not come initially, then the chandelier will not light up at all. 
If you entered new apartment, where it was not you who connected the chandelier, and it behaves in such a strange way, that is, it does not react as it should to the two-key switches, then the point is most likely precisely in such an erroneous installation of the supply wires. Feel free to disassemble the switch and check the common contact.

If you have a backlit switch, an indirect sign of such an incorrect connection may be the failure of the neon light bulb. Why indirect? Since here everything depends on which key you will start the phase on.
The third common mistake is connecting neutral wire on the chandelier, not to a common zero in the switch box, but to one of the phase wires.  To avoid this, use and observe the color coding of the wires, and even better, if you do not trust the colors, check the voltage supply using a high-quality indicator or multimeter before turning on the lamp.
The failure of the circuit breaker can occur for various reasons: from a short circuit to the banal wear of the box. In order to replace it, you can call an electrician, but if you wish, this work can be done independently. There is nothing difficult in this operation, and any adult, even without special knowledge, will cope with it in no more than half an hour. However, it should be remembered that since this work involves electricity, you need to take care of safety measures. In this article you will find a detailed answer to the question of how to change the switch with your own hands.
Preparation for work
Before proceeding with the replacement of the switch, you need to make sure that the reason is in it. Often the “culprit” is the cartridge, so you should first check it with a probe or multimeter, after unscrewing the lamp.
Also make sure that other rooms have light.
After making sure that it is the switch that is faulty, it must be dismantled. It should be remembered that the light switch is replaced in a de-energized apartment, so it is necessary to turn off the voltage that is supplied to the room with a knife switch. Warn all households that you are working with electricity and at this time they should not turn on any electrical appliances, and even more so, touch the switch.

Let's figure out first how to change the switch with one button.
Removing the switch
To dismantle a faulty device, you must first remove its protective cover, made of plastic or carbolite. To do this, you need to unscrew the 2 fastening screws.
The switch mechanism with one key is fixed inside the socket box with spacer tabs. It has a pair of screw terminals with cable cores connected to it. The position of the legs, if necessary, can be adjusted located on the left and right side screws.
Before removing the mechanism, it is necessary to determine which core the phase is suitable for. To do this, we need a screwdriver-probe. Touching her contacts one by one, we check the presence of voltage. Then the device key should be switched to another position, and then re-check.
The supply phase cable is the one on the contact of which the probe indicates the presence of voltage; at the same time, it is absent on the second contact. The zero core should go to the lighting device.
Phase detection is performed on a circuit breaker that is energized, so you must be extremely careful when performing this procedure. Only after its completion, the room must be de-energized by turning off the breaker or removing the plugs.

Having de-energized the apartment, you need to make sure that there is no voltage on the switch, and then continue to dismantle it. In this case, you need to act as follows:
- Remove the mechanism from the socket, after unscrewing the screws of the spacer legs.
- After that, you need to separate the wires, starting with the phase. Loosen the contact screw, pull out the cable and mark it with electrical tape.
- Disconnect the second cable from the mechanism.
- Straighten the wires.
This completes the dismantling.
Preparing to connect
Before you connect a new device, you need to prepare it for installation. The procedure for this is as follows:
- Remove the key using a flathead screwdriver.
- Unscrew the screws to gain access to the mechanism. The execution of these devices is different, but they are connected according to the same principle and fixed to the socket by means of spacer legs. The movement of the latter is provided by screws.
To fix the wires, a pair of screw clamps and a pressure plate are provided. With their help, you can loosen the fastening, or, on the contrary, press the cores more strongly. One to two wires can be connected to each contact.

Installing a new switch
Having prepared the mechanism for installation, we proceed directly to its connection. In this case, you need to act in the following order:
- Strip the ends of the wires from insulation by 1-1.5 cm with a knife.
- Insert the cleaned core into the contact hole, making sure that there is no insulation in the clamp. It should be remembered that the phase conductor (red) must be mounted in the socket of the contact marked with the L1 symbol, and the neutral conductor (black or blue) - in the socket L2.
- If the end of the core sticks out more than 2 mm, trim the excess.
- Tighten the contact screw.
- Pull on the cable to make sure the contact is secure. The wire must remain motionless. If this is not the case, tighten the contact more tightly. But it is important not to overdo it - you can break the thread.
- Strip and insert the next wire into the hole.
- Pin the same way, make sure the quality of fixation.
After that, the switch must be inserted inside the socket and secured with sliding strips. Then supply electricity to the room and check the operation of the device under voltage.

If the light turns off when the key is pressed up, you should swap the cables or simply turn the mechanism case over.
After making sure that everything is in order, replace the switch key and screw the cover. When installing the key, you need to make sure that the pins on it fit into the button grooves. This completes the switch replacement.
Let's move on to the question of how to properly change a switch with two or three buttons. The procedure for performing the procedure is almost identical to that observed when working with a one-button device, with the exception of a couple of nuances. When installing a switch with two buttons, the phase is connected to terminal L3, and the other two cables go to terminals L1 and L2. Switches for three keys are connected with four wires, one of which is phase, and each of the other three corresponds to its connection group.
Visually the whole process of replacing a two-gang switch on the video:
Conclusion
In the material presented, we tried to analyze in as much detail as possible how to replace the light switch. As you can see, this procedure does not present any particular difficulties, and our readers, after reading the article, will easily cope with such work on their own, without the help of a professional electrician.
Is your old wall switch broken? Or does it not suit you for aesthetic or other reasons? After reading this article, you will be able to easily replace the circuit breaker yourself without waiting for a master electrician to visit you.
The whole process will not take you much time and effort. You just need to be careful if you are going to change a two- or three-gang switch. The fact is that you will need to pre-mark the wires connected to the old switch in order to screw them to the new one in the same sequence. This will allow you later, when you press the keys of the new switch, to turn on the light in the sequence that you were used to before. When replacing a one-button switch, these manipulations will be redundant.
First of all, you need. Turn off the breaker (or unscrew the plugs) on the switchboard. Value your life and health.
Switch replacement
1. Remove the switch key(s) by prying it(them) off the edges one by one with a flat screwdriver or spatula.After that remove decorative frame- overlay. Depending on the circuit breaker design, it can be attached directly to the circuit breaker body, or through an additional pressure plate.
Pry off the frame or the plate fixing it with a flat screwdriver, and pull it towards you.

It should snap off and be removed from the switch housing. After you have removed the keys and the frame, you will have access to either the screws that secure electric wires to the switch terminals, or the wires themselves.
With the switch in the off position, touch all the screws one by one with an indicator screwdriver, or to the bare sections of the wires to make sure that there is no phase voltage in the wires and the switch can be replaced safely. The control lamp of the indicator should not light up at the same time. If the indicator light is on somewhere, try turning off another switch on the shield, or turn off the power to the entire apartment.
After you have made sure that there is no phase voltage in the wires, you can safely continue.
2. Using a screwdriver, unscrew the screws securing the switch housing to the socket by turning them counterclockwise. If these are the screws of the spacer "legs", then it is enough to unscrew them by 3-5 turns (loosen the mount).

If the switch is screwed to the socket box with screws (screws), then to remove the switch it is necessary to unscrew them completely.

Remove the switch from the socket, as far as the wires allow, gently straightening them.
If you have a one-button switch installed, then unscrew the screws with which the wires are screwed to the switch terminals by 2-3 turns and disconnect the wires from the switch.
Some types of switches can be equipped with self-clamping terminals (no screws required). In such terminals, the wires are inserted with some force into the holes intended for this, without subsequently being fixed with screws. If you don't see any sign of screws where the wires enter the switch, try pulling hard on the wire and it should pop out of the terminal clamp. Or find and press the release button, which will release the wire.

If there are more than one buttons on your switch, then mark all the wires in the order in which they are screwed to the switch. Hang tags, mark with a marker, stick different pieces of electrical tape, or in some other way mark the wires, so that you can connect them to the new switch in the same sequence. One wire (phase, if the electricians did everything right) should be connected on one side of the switch, the other 2 or 3 on the other.

3. Inspect the wires for damage. If the end of the wire is damaged, oxidized or broken, and the length of the wires allows them to be shortened a little, then cut the broken section with side cutters and strip 5-7 mm of insulation.
Also check the socket in which the switch was fixed. If it hangs in the wall or has begun to fall apart for some reason, it will be better to replace it.
If everything is in order with the socket, then you can connect a new switch.
4. Remove the new switch from the packaging. Remove the switch key(s) by carefully prying them off the edge. Try to do this carefully, without damaging the plastic surface of the keys and the frame. Carefully remove the frame. Some bezel retainers have rather delicate plastic latches. If they are broken due to careless handling, then subsequently the frame on the switch will hang out rather unaesthetically, so do not rush. Do everything carefully.
5. Connect the wires, connecting them according to the markings you made earlier. On some switches, the designation of the contacts may be indicated on the back cover: L and 1 , 2 , 3 . Here "L" is a contact for connecting a phase wire; 1, 2, 3 - outgoing contacts, which can also be marked with arrows.

Insert the wires one by one into the corresponding sockets on the switch, and fix the wires by tightening the terminal screws with force. After you screw the wires, try to lightly pull on the wire, thus checking the security of the fixation. If the wire pops out of the terminal, tighten the screw harder next time.
If your new switch has self-locking wire terminals, which can be identified by the absence of screws to fix the wires, then all you need to do is insert the stripped end of the conductor into a special socket, and the wires will automatically lock into such a terminal.
6. Install the switch in place, along the way helping the wires to fit freely in the socket. Align the switch and fix it with the help of sliding tabs (alternately tightening the fastening screws of the tabs clockwise), or screw it to the box with screws (if holes for screws are provided in the box).
When installing, keep in mind that according to the rules of ergonomics, turning on the light with switches located at head level is done by pressing upper part switch keys (up - turn on the light).
Well, those switches that are installed at waist level, on the contrary, turn on the light by pressing the bottom of the key (down - turn on the light).
After securely fixing the switch in the socket, you will only have to install and fix the decorative frame, then put the switch key (s) inside the frame and put it (them) in place by gently pressing.
7. Turn on the breaker on the switchboard and enjoy the work you have done!
I must say that if you still mixed up or did not mark the wires (if there are more than two), then you will need to find the phase wire. To do this, spread bare ends wires so that they do not touch each other and the wall so that they can be safely touched with an indicator screwdriver. Turn on the electricity with the switch you turned off earlier.
Touch each wire in turn with the tip of the indicator screwdriver (do not forget to keep one finger on the contact pad of the indicator screwdriver) and find the phase wire. When you touch this wire, the indicator light should light up. Label this wire. Then turn off the electricity again.
The marked wire will subsequently need to be connected to the part of the switch where there is an input for only one wire (sometimes this input is indicated by the letter L on the back cover).
If none of the wires turned out to be phase, or more than one wire causes the indicator to glow, then in this case, to determine correct option connection, it would still be better for you to use the help of an electrician.
It will not be superfluous in this article to also say a few words about installing dimmers.

A dimmer (dimmer) is an electronic device designed to adjust the power electric current. Typically a dimmer is used to adjust the brightness of incandescent lamps.
The dimmer is installed in the socket in the same way as a conventional light switch. A conventional monoblock dimmer is connected in the same way as a conventional light switch: with two wires.
Depending on the design, dimmers are:
- rotary-push, which turn on when you press the knob, and the adjustment is made by turning it.
- rotary, all controlled by turning the knob. Turning on the light with such dimmers always starts with a minimum brightness.
- keyboards that look like normal switches. When the key is pressed, the on / off is performed, and when the key is held for more than 3 seconds, smooth adjustment occurs.
- sensory, operated by touching the touch panel.
The first and obvious one is the price. A good dimmer costs several times more than a good switch.
Dimmers should absolutely not be used to control the brightness of fluorescent (energy-saving) or LED lamps - their electronics will interfere with the operation of the dimmer electronics, and vice versa. As a result, both devices will fail.
In conclusion, watch a short video that will help you visually understand the procedure for replacing the switch. The video will open in a separate window.
Click on the button ↓↓↓ and share with your friends if you find this article helpful!
In the process of life, one has to face the need to replace the switch. It might be at work office space or apartment, most often due to a repair or malfunction of the switch. In any case, if you want to learn how to replace switches with your own hands, so as not to resort to the services of an electrician, it will be useful for you to read this article.
Installation of sockets in drywall
Work principles
In order to make the replacement of switches and avoid mistakes that can lead to undesirable consequences:
- short circuit;
- failure lighting fixtures;
- burnout of wiring in walls and junction boxes;
- worst case scenario - electric shock
it is necessary to familiarize yourself with the principle of operation of switches, safety precautions, remember the schemes for their inclusion in the circuit electrical wiring, study the rules for dismantling, installation and connection, take into account design features when installing new switches various kinds.
Kinds
Switches are divided according to the method of mounting on the wall:
- Switches for concealed wiring are inserted into a recess made in advance in the wall with a cylindrical plastic or metal socket.

Switches for concealed wiring
- Overhead switches for open wiring are used in wooden switchboard structures. In these cases, the wires are often attached to the wall surface or placed in special plastic cable channels.

Open Wiring Switch Installation Diagram
Products are divided according to the design of the terminals for fastening the ends of the wiring:
- Screw terminals clamp the stripped end of the wire between two plates. As a disadvantage of this design, one can note a slight heating of the contacts when clamped with brass plates. aluminum wire. The difference in the metals in the contact creates resistance; when current passes, the terminals heat up. For this reason, the screws must be periodically tightened to ensure a more reliable contact. If the wiring in the room is done copper wires, there will be no such problem.
- Clamping spring terminals do not require maintenance screwing. A powerful spring constantly presses on the brass plate pressing the stripped end of the wire. In this way, quality contact is constantly maintained.
- Switches are divided by the number of buttons: one-button, two-button and even three-button. One button turns on a light source with a single or group of lamps that turn on simultaneously, for example, in a toilet or bathroom.
Two-button and three-button can be used to turn on the light in different rooms or one large chandelier in the living room.
Almost always in the hall, lighting structures have several groups of lamps that can be turned on separately or all together using different buttons on the same switch. Listed here are the simplest, most commonly used in living conditions apartments and private houses light switches.

There are switches of more complex and expensive designs:
- Touch (capacitive) are triggered by a light touch with a finger;
- With a dimmer - by changing the resistance, you can achieve a smooth increase or decrease in brightness;
- Acoustic switches are triggered by a clap or voice command;
- WITH remote control have several functions: switching on by groups, changing brightness and others.
The principles of their work and the features of connecting with their own hands deserve consideration in a separate topic.
Dismantling
Doing repairs in the apartment with your own hands, at the stage of replacing switches, pay attention to safety rules. First of all on switchboard turn off the circuit breaker from which the lighting group is powered with the switch to be dismantled. By de-energizing the circuit, you eliminate the possibility of electric shock.
On older flush-mounted switches, the fixing bolts are located on the front panel and are easily accessible. In new models, they are located under the keys of the shift buttons, which are simply pry off with a screwdriver and removed. Having unscrewed the fastening screws and removed the top cover, you will see the design of the switch, fixed in a cylindrical frame.
Make sure that there is no voltage on the contacts, use an indicator screwdriver (now there are many different types with attached instructions). Modern screwdrivers with power sources, when in contact with the phase, give out a light indication and an acoustic signal.
In the classic version, when in contact with the terminal thumb should be held on top of the handle where a contact is provided to provide a control circuit. If the indicator lamp of the screwdriver on one of the contacts lights up, the circuit breaker on the switchboard is not turned off.
Turn off the switch of the desired group, if there is no voltage at the terminals of the switch to be removed, proceed to the next steps.
Remove the two screws on the sliding bars that secure the switch frame to the wall socket. Unscrew the screws on the terminals, releasing the wires; if the ends have burnt insulation, bite off this area with wire cutters. Mark the phase wire by bending it, or glue electrical tape for ease of further connection.
Switches for open wiring are dismantled according to the same method, the difference is that they do not have a locking mechanism with sliding bars. Then the screws are unscrewed, pressing the switch design to the wall.
One button connection
Strip the insulation at the ends of the wires, connect 5 mm sections to the switch terminals, phase (red wire) - to the contact with the designation L1. Blue or black wire - to the contact with the designation L2. Insert the switch into the socket, fix the case with sliding bars, screwing in the screws.
Turn on the network at the switchboard and check the operation. It happens that switching off is carried out by pressing the key up, turn the switch body over or swap the wires. If everything is fine, screw on the decorative cover, fix the switch key.
Two button installation
The difference in connection with single-gang switch in that three phase wires are connected to terminal L3 and two wires to L1 and L2. The three-gang switch has four wires: one phase and three contacts for different connection groups. The rest of the method of removal, installation and connection for flush and external wiring switches remains the same.
Installing a concealed wiring switch
Replacement. Video
The video will tell you how to change the switch in a house or apartment and what rules should be followed. This is something every owner can do.
Based on the above information, observing the safety rules, you can change ordinary switches of any type with your own hands without resorting to the services of an electrician. As practice shows, there is nothing difficult in replacing the switch, most people can do it at home.
Switches are as short-lived as most household appliances. Often the cause of the breakdown is the failure of the switch. How to change the switch at home, at work or in the office, this article will tell you. This will significantly reduce the electrician's waiting time or save the budget. Acquiring new knowledge and skills, especially in terms of everyday life, is always useful.
The principle of operation of the switch
Before changing the switch in the apartment, do not forget about safety precautions and remember such unpleasant situations as:
- the possibility of a short circuit;
- burnout of the filaments of lighting fixtures;
- the likelihood of wiring burnout;
- and the most dangerous of them is the probability of electric shock.
In order to avoid such situations, you need to know the principle of operation and design of such devices, safety precautions, study the electrical wiring diagrams and familiarize yourself with the rules for dismantling and installing switches. It is worth considering that different types such products are connected in different ways.

Main types
Switches are divided depending on the method of mounting on the wall:
- Devices for hidden wiring are installed in a pre-made hole in the wall with a socket made of plastic or metal in the form of a cylinder.
- In wooden structures, open wiring and overhead switches are usually installed. They are simply fixed to the wall or fit into special plastic cable channels.
Depending on the design of the terminals, the switches have different features devices and installations. The answer to the question largely depends on this: how to change the switch?
- Screw terminals clamp the end of the stripped wire between two plates. The main disadvantage of this design is that the contacts heat up as a result of clamping the wire between the plates. Plate material - brass, wires - aluminum. Since different metals are used, a difference in contact is created, and as a result, resistance, and the terminals heat up. Therefore, from time to time you need to check how tight the screws are, and periodically tighten them. This problem itself is eliminated if the wiring is made of copper.
- Terminals in which a clamping spring is installed. It is not necessary to tighten the screws prophylactically. The brass plate under which the end of the wire is located is securely fixed with a spring.
- Switches can also be divided by the number of buttons: with three, two, or the simplest - one-button. A single button fixture is used to turn on one lamp or a group of lamps, such as some chandeliers. Such switches are used in bathrooms.
Variants with three or two keys are used to illuminate large rooms where different areas of the room are illuminated separately. Also, the installation of such switches is relevant in the living room, where large chandeliers are used.
Variety of switches
The offer on the market is very diverse. There are conventional push-button switches. They are the most common and commonly used. There are also more expensive devices. Here are some of them:
- Touch - turn on at the touch of your fingers.
- Acoustic, which respond to a clap or a loud voice.
- With a dimmer, thanks to which you can change the brightness of the light in the room.
- Remote control.

Dismantling
Starting repairs in the apartment on your own, you need to familiarize yourself with the safety rules. First of all, be sure to de-energize the wiring by turning off the circuit breakers on the distribution panel. When the network is de-energized, you can proceed to dismantle. This will help instructions on how to change the light switch. It can be found in this article.
The dismantling of switches and wiring that are listed as old is much easier, because the bolts that attach the switch to the wall are easily accessible. New models of such devices provide for hiding bolts under the keys. First you need to remove the buttons from the switch, and then unscrew the bolts and the product.
After unscrewing the bolts and accessing the switch circuit, you first need to check for voltage. For this, indicator screwdrivers are used. Today their range is very wide. The indicator screwdriver, when it comes into contact with the powered parts of the switch, it glows at the end. If there is no voltage, then the tip of the screwdriver will not glow. You can also choose screwdrivers that will not only glow, but also emit a sound signal.
According to the rules for dismantling and installing switches, the thumb is held on top of the indicator handle, it is here that the contact providing the control circuit is located. This is the safest.
By turning off the switch of the group in which the switch is to be replaced, you can proceed to the next stage of work. Unscrew the screws of the sliding bars that hold the switch in a special hole in the wall. Release the wires by unscrewing the screws on the terminals. If the ends have burnt marks, then they just need to be bitten off with the help of wire cutters. The wire on which the phase is located should be marked by bending it or wrapping it with electrical tape, this will come in handy when connecting.

How to change a switch with one key?
You should initially strip the insulation, freeing the wires, stripping pieces of about 5 mm, connect them to the terminals. The phase (red wire) is connected to contact L1. Blue or black is designated L2. The next step is to install the switch in a special place and fix it with strips using screws. Check the operation of the switch by turning on the network. If the layout of the switch buttons is more familiar in such a way that turning off occurs by pressing up, then the switch just needs to be turned over or the wires changed. If after connecting the device works, then you can install a decorative cover. This is the easiest way to change a light switch with one key.

Replacing switches with two keys
When installing a two-button device, you should follow the same sequence as when replacing a device with one button. How to change a switch with two buttons? The difference is that three phase wires are connected to terminal L3, and two wires to L1 and L2. Three-key switches are connected using three contacts and one phase.

When figuring out how to change a switch with two buttons, it is worth remembering the probability of wire mismatch in color, like red is phase, and black (blue) is neutral. You can find the same wires separately standing houses, their purpose will be directly reversed. You should always check the presence of a phase with an indicator screwdriver.
Conclusion
So, we looked at how to change the switch. If you follow the safety rules, you can change ordinary appliances of any type with your own hands, without the help of an electrician. In principle, there is nothing complicated about this, and most people cope with this work on their own.